
CA60Q - Empfänger HARMAN KARDON - Kostenlose Bedienungsanleitung
Finden Sie kostenlos die Bedienungsanleitung des Geräts CA60Q HARMAN KARDON als PDF.


| Produkttyp | Empfänger |
| Marke | Harman Kardon |
| Modell | CA60Q |
| Abmessungen (B x H x T) | 440 x 150 x 400 mm |
| Gewicht | ca. 10 kg |
| Stromversorgung | 230 V ~ 50 Hz |
| Leistungsaufnahme | 400 W (Betrieb), < 1 W (Standby) |
| Ausgangsleistung | 2 x 100 W an 8 Ohm |
| Eingänge | 4x Audio-Eingang (Cinch), 1x Phono (MM), 2x optisch, 1x koaxial, 1x USB |
| Ausgänge | 2x Lautsprecher, 2x Recorder, 1x Kopfhörer (6,3 mm) |
| Radiofrequenzbereich | FM 87,5 – 108 MHz, AM 530 – 1710 kHz |
| Klangregelung | Bass, Höhen, Balance, Loudness |
| Fernbedienung | Ja, im Lieferumfang enthalten |
| Gehäusematerial | Metall, Frontplatte gebürstet |
| Display | LED-Display mit Lautstärke- und Frequenzanzeige |
| Kühlung | Passive Kühlung (Kühlrippen) |
| Schutzschaltungen | Kurzschluss-, Überlast- und Übertemperaturschutz |
| Reinigung | Staubfreies, trockenes Tuch; keine aggressiven Reinigungsmittel |
| Sicherheitshinweise | Gerät nicht öffnen; nur vom Fachmann reparieren lassen |
| Zubehör | Netzkabel, Fernbedienung, Bedienungsanleitung |
Häufig gestellte Fragen - CA60Q HARMAN KARDON
Benutzerfragen zu CA60Q HARMAN KARDON
0 Frage zu diesem Gerät. Beantworten Sie die, die Sie kennen, oder stellen Sie Ihre eigene.
Eine neue Frage zu diesem Gerät stellen
Laden Sie die Anleitung für Ihr Empfänger kostenlos im PDF-Format! Finden Sie Ihr Handbuch CA60Q - HARMAN KARDON und nehmen Sie Ihr elektronisches Gerät wieder in die Hand. Auf dieser Seite sind alle Dokumente veröffentlicht, die für die Verwendung Ihres Geräts notwendig sind. CA60Q von der Marke HARMAN KARDON.
BEDIENUNGSANLEITUNG CA60Q HARMAN KARDON
harman/kardon
HIGH FIDELITY CAR AMPLIFIER
CA60Q/CA30
OWNER'S MANUAL
MODE D'EMPLOI
BEDIENUNGSANLEITUNG
MANUALE D'ISTRUZIONI
BRUKSANVISNING
GEBRUIKSAANWIJZING
MANUAL DE INSTRUCCIONES
owner's manual
Congratulations on your purchase of a Harman Kardon CA60Q/CA30 High Fidelity Car Amplifier.
To fully understand the CA60Q/CA30 capabilities, please read this manual carefully and follow all of the instructions regarding its use and installation.
FEATURES
■ 10 Amperes of HCC (High instantaneous Current Capability) maintain a wide dynamic range and low distortion when driving low impedance or reactive loads.
■ Ultrawide Bandwidth is achieved by the use of inherently fast open-loop circuitry. This improves transient accuracy and phase linearity.
■ Low Negative Feedback
Highly linear circuitry produces low distortion with only 25dB of negative feedback. This further improves dynamic accuracy.
■ Discrete Component Audio Circuitry is used because it was found to be the only way to provide HCC, Ultrawide Bandwidth and Low Negative Feedback.
■ A unique noise filter is provided that can remove engine noise from many inherently noisy car audio systems.
GENERAL INSTRUCTIONS
● This unit is for use in cars with 12 volt negative ground systems.
● To prevent discharge of the car battery, do not use this unit for long periods of time when the engine is not running.
● Should the fuse blow, first check that the connections are correct and then be sure to replace the fuse with a fuse of the same type as the one supplied with the unit.
- Do not use speakers with a nominal impedance less than 4 Ohms.
● This unit is of the bridged-mono connection type. Never let the speaker output wires touch the car chassis. Do not use a common ground for the left and right channels.
- Do not operate the unit at high power levels inside a very hot car such as would occur if the car was left in direct sunlight with the windows shut. Wait until the temperature in the car returns to normal.
- If your unit behaves abnormally, turn it off immediately and consult an authorized Harman Kardon Service Station.
ACCESSORIES
- Ground Cord (Black) (1 pc.)
- Power Supply (with Fuse) Cord (Red) (1 pc.)
- Connector with Tube (5 pcs.)
- Mounting Screws (1 set)
CONNECTIONS
Before beginning to make connections, make certain that the ignition key switch is OFF. Be careful to install the amplifier so that it cannot become caught in the sliding seat, or contact the car chassis with its terminals or wiring.
REMOTE terminal
This terminal enables the power switch of the tuner/deck to also turn on the amplifier. Connect it to the appropriate wire (power amplifier remote) on the tuner/deck.
If a specific wire for this purpose is not provided on the tuner/deck, use the wire for controlling the power antenna. If that wire is already connected to the power antenna, the amplifier can be connected in addition.
Should no power antenna wire be provided, connect the wires from the REMOTE terminal to the ACC circuit of the car, so that the car ignition switch will turn the amplifier ON and OFF.
+B terminal (+12V)
The +B terminal is the positive power input terminal. It should be connected directly to the car battery. Use the accessory battery cable with its fuse located near the battery.
GND terminal (±)
This is the negative power input terminal. It should be connected directly to the car chassis using the accessory black cord. It is not necessary to connect this terminal to the negative battery terminal.
SPEAKER SYSTEM terminals
Connect the speaker systems to these terminals. Be careful to connect the positive speaker terminals to the positive terminals of the amplifier. Do not connect the negative speaker terminals to the car chassis.
NOTE: Some cars are provided with speaker wires which often include a negative wire common to both left and right channels. This wire should not be used. Be sure to connect the negative speaker wires from left and right speakers to their respective terminals on the amplifier.
INPUT jacks
These input jacks are for connection to the line (preamplifier) output jacks on the tuner/deck. It is recommended that high quality shielded coaxial cables with tight-fitting RCA plugs be used for this connection.
INPUT LEVEL control
This control matches the input sensitivity of the amplifier to the output level of the head unit. In its "Max" (Full clockwise) position, the amplifier requires 250mV input voltage in order to provide its rated output power. If the head unit output level is much greater than 250mV, turn this control to a lower setting.
Noise filter
This is a unique feature that can eliminate engine noise due to grounding and wiring problems. It isolates the input signal from the amplifier chassis ground. We recommend listening to the total car audio system, while the engine is running, and switching the noise filter on and off to determine which setting results in the best overall sound quality.
NOTE: This filter does not replace the need for a power line filter! This is an input signal isolator!
CA60Q only
The CA60Q is a 4 channel amplifier that is divided into 2 stereo amplifiers. Input 1 and input 2 each have their own left and right input jacks, input level controls, noise filters, and speaker terminals.
Also, CA60Q has two additional fuses mounted in the chassis. These fuses offer additional protection over the battery cable fuse. Be sure that all 3 fuses are used, and that their values are correct. Fuse 1 and fuse 2 are each rated 5 amperes, while the battery cable fuse is rated 10 amperes.
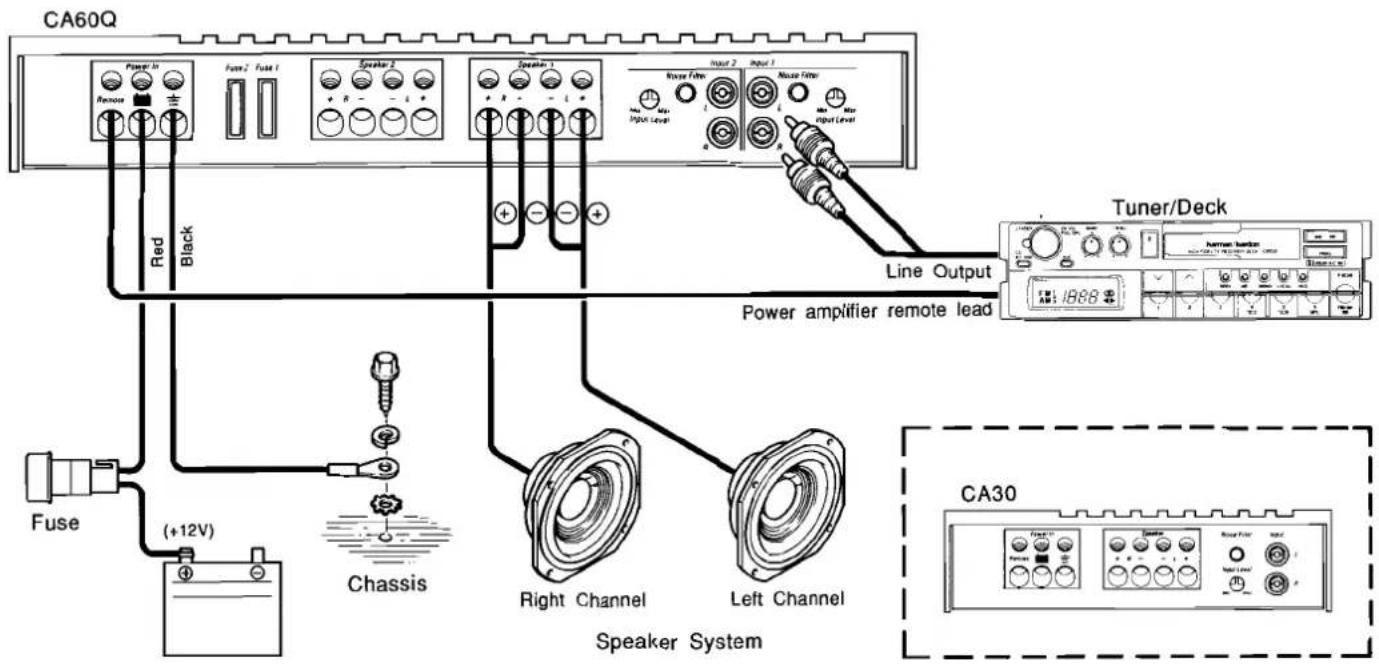
Connection Diagram
INSTALLATION
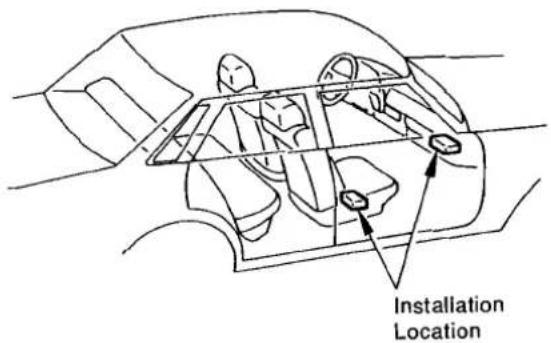
The locations shown in the above illustration are recommended for the amplifier installation. If you prefer another location, consult an authorized Harman Kardon Dealer or Service Station before making the installation.
Drill undersized holes in the car chassis corresponding to the four holes in the amplifier chassis so that the 5mm tapping screws fit tightly. We recommend 3.5mm or 1/8 inch diameter holes.
Securely mount the amplifier to the surface with the four 5mm tapping screws.
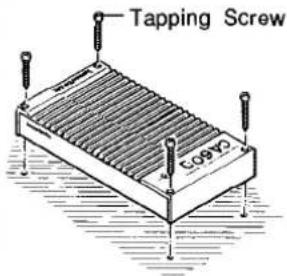
WARNING: After connecting the power supply cord and speaker wires to the amplifier, install the unit so that the amplifier terminals will not touch the car chassis.
SPECIFICATIONS
Power Output, RMS : CA60Q: 15 watts x 4 (20 - 20,000Hz, 4 Ohms) CA30 : 15 watts x 2
HCC (High instantaneous : ±10A Current Capability)
THD : No more than 0.2% (4 Ohms)
Negative Feedback : 25dB
Power Bandwidth : 10Hz to 100,000Hz
Frequency Response : 10Hz to 100,000Hz (+0, -3dB)
Signal-to-Noise Ratio : 100dB
Input Sensitivity/Impedance : 250mV/22k Ohms (variable)
Power Supply : DC +14.4V (11 - 16V usable), negative ground
Typical Input Current Requirements
At Idle : CA60Q: 0.6A CA30 : 0.3A
Full Power Music : CA60Q: 2.4A Signal (4 Ohms/ch.) CA30 : 1.2A
Full Power Sine Wave : CA60Q: 7.2A (4 Ohms/ch.) CA30 : 3.6A
Dimensions (W x H x D) : CA60Q: 12-3/5" x 1-9/10" x 6-9/13" (320 x 48.5 x 170 mm) CA30 : 7-4/14" x 1-9/10" x 6-9/13" (185 x 48.5 x 170 mm)
Weight : CA60Q: 5 lbs. 8 oz (2.5 kg) CA30 : 3 lbs. 1 oz (1.4 kg)
All specifications and features subject to change without notice.
Marke : HARMAN KARDON
Modell : CA60Q
Kategorie : Empfänger