
Omada ES210GP - Schalter TP-LINK - Kostenlose Bedienungsanleitung
Finden Sie kostenlos die Bedienungsanleitung des Geräts Omada ES210GP TP-LINK als PDF.


| Produkttyp | Managed Gigabit PoE+ Switch |
| Modell | Omada ES210GP |
| Marke | TP-Link |
| Abmessungen (B x T x H) | 294 x 180 x 44 mm |
| Gewicht | 1,7 kg |
| Stromversorgung | Netzteil (intern), 53,5 V DC, 2,5 A |
| PoE-Budget | 120 W |
| PoE-Standard | 802.3af/at (PoE+) |
| Anschlüsse | 8x 10/100/1000 Mbps RJ45 (PoE+), 2x SFP Slots |
| Lüfter | Lüfterlos (geräuschlos) |
| Montage | Tisch- oder Wandmontage, Rackmontage mit Kit |
| Verwaltung | Web-Interface, Omada SDN Controller, CLI, SNMP |
| VLAN | 802.1Q VLAN, VLAN-Überbrückung |
| Sicherheit | ACL, MAC-Filter, Storm Control, DoS-Schutz |
| Energieverbrauch | Max. 135 W (mit PoE) |
| Betriebstemperatur | 0 °C bis 40 °C |
| Lagertemperatur | -40 °C bis 70 °C |
| Luftfeuchtigkeit | 10% bis 90% (nicht kondensierend) |
| Reinigung | Mit trockenem Tuch abwischen; kein Wasser oder Reinigungsmittel |
| Ersatzteile und Reparatur | Nur durch autorisiertes Fachpersonal; keine vom Benutzer austauschbaren Teile |
Häufig gestellte Fragen - Omada ES210GP TP-LINK
Benutzerfragen zu Omada ES210GP TP-LINK
0 Frage zu diesem Gerät. Beantworten Sie die, die Sie kennen, oder stellen Sie Ihre eigene.
Eine neue Frage zu diesem Gerät stellen
Laden Sie die Anleitung für Ihr Schalter kostenlos im PDF-Format! Finden Sie Ihr Handbuch Omada ES210GP - TP-LINK und nehmen Sie Ihr elektronisches Gerät wieder in die Hand. Auf dieser Seite sind alle Dokumente veröffentlicht, die für die Verwendung Ihres Geräts notwendig sind. Omada ES210GP von der Marke TP-LINK.
BEDIENUNGSANLEITUNG Omada ES210GP TP-LINK
Installation Guide
Omada Easy Managed Switch
LED Explanation
| LEDExplanation | |
| Power On/Off: Power on/off | |
| Link/Act; Uplink1, Uplink2 (For ES210GP) | On (Green): Running at 1000 MbpsOn (Yellow): Running at 10/100 MbpsBlinking: Transmitting/receiving dataOff: No connected device |
| PoE Status (For Port 1-4 of ES205GP /Port 1-8 of ES210GP) | On: Providing PoE powerBlinking: Current-overload/Short-circuitOff: Not providing PoE Power |
| PoE Max (For ES205GP/ES210GP) | For ES205GP:On: 58 W ≤ Total power supply < 65 WBlinking: Total power supply keeps ≥ 58 W for more than 2 minutesOff: Total power supply < 58 WFor ES210GP:On: 116 W ≤ Total power supply < 123 WBlinking: Total power supply keeps ≥ 116 W for more than 2 minutesOff: Total power supply < 116 W |
Connection for PoE Switch
For simplicity, we will take ES210GP for example throughout the Guide.

flowchart
graph TD
    A["Powered Device (PD)"] --> B["PoE+ Ports (1-8)"]
    B --> C["AC Power Cord"]
    C --> D["DC Power Adapter"]
    D --> E["Network Gateway"]
    E --> F["Router"]
    F --> G["LAN Port"]
    F --> H["WAN Port"]
    G --> I["Internet"]
    H --> I
    J["PC"] --> B
    K["IP Camera AP IP Phone"] --> B
    L["User Interface"] --> A
    M["User Interface"] --> A
Note:
- The PoE ports can also connect to non-PoE devices, but only transmit data.
- The PoE ports shall not be used to charge lithium batteries or devices supplied by lithium batteries.
- Maximum PoE power is 30 W for each PoE port, and total PoE budget is 65 W (for ES205GP)/
123 W (for ES210GP) respectively. - PoE budget calculations are based on laboratory testing. Actual PoE power budget is not guaranteed and will vary as a result of client limitations and environmental factors.
Connection for Non-PoE Switch
For simplicity, we will take ES205G for example throughout the Guide.
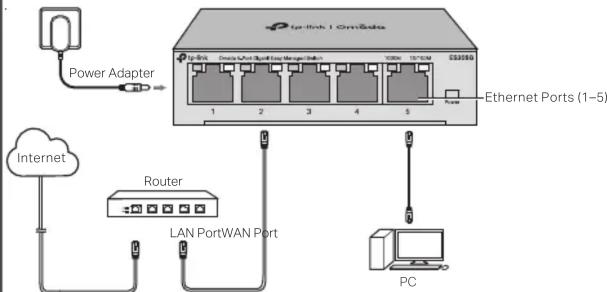
flowchart
graph TD
    A["Power Adapter"] --> B["Router"]
    B --> C["LAN PortWAN Port"]
    C --> D["PC"]
    D --> E["Ethernet Ports (1-5)"]
    style A fill:#f9f,stroke:#333
    style B fill:#ccf,stroke:#333
    style C fill:#cfc,stroke:#333
    style D fill:#fcc,stroke:#333
    style E fill:#cff,stroke:#333
Configuration
The switch supports two configuration methods:
- Standalone Mode: Configure and manage the switch singly.
- Controller Mode: Configure and manage the network devices centrally. It is recommended in the large-scale network, which consists of mass devices such as access points, switches, and gateways.
Note: When the switch is changed from Standalone Mode to Controller Mode, configurations of the switch will be lost. For details, refer to the related documents on the download center of our official website: https://www.tp-link.com/support/download/.
Method 1: Standalone Mode
In Standalone Mode, use a computer to configure and manage the switch.
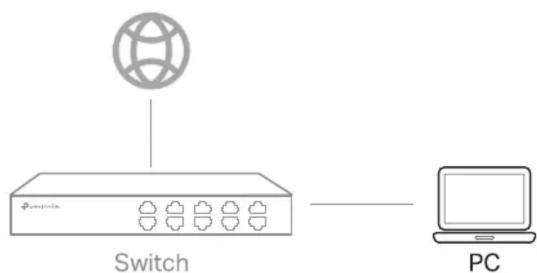
flowchart
graph LR
    A["Switch"] --> B["Laptop"]
    style A fill:#f9f,stroke:#333
    style B fill:#ccf,stroke:#333
-
To access the management page of the switch, open a browser and type the switch's IP address in the address field. Then press the Enter key.
-
If the switch obtains IP address from the DHCP server (typically a router), find the switch's IP address on the DHCP server.
- If not, use the default IP address 192.168.0.1 to launch the switch's management page.
Note: Make sure the switch and computer are in the same subnet.
- Enter admin for both the username and password in the lower case letters to log in. The first time you log in, change the password to better protect your network and devices.
- After a successful login, the main page will appear. You can click the menus on the top side and left side to configure the corresponding functions.
For detailed configurations, refer to the User Guide. The guides can be found on the download center of our official website:
https://www.tp-link.com/support/download.
Method 2: Controller Mode
Choose from the following two types of Omada Controller:
• Type 1: Omada Hardware Controller
Omada Hardware Controller is a good alternative if you have no spare PC to keep running Omada Software Controller in the network. It needs to be purchased additionally. For more details, refer to the Installation Guide of Omada Hardware Controller.

flowchart
graph TD
    A["Client Server"] --> B[" Omada Hardware Controller "]
    A --> C[" CAP "]
    A --> D[" EAP "]
    A --> E[" EAP "]
    B --> F[" Switch "]
    C --> F
    D --> F
    E --> F
    F --> G[" Client"]
    F --> H[" Cloud"]
Note:
- Before you start, be sure to power up and connect your devices according to the topology figure.
- A DHCP server (typically a router with DHCP function enabled) is required to assign IP addresses to the EAPs and clients in your local network.
- Omada Controller must have network access to your Omada devices (the router, switch, and EAPs) in order to find, adopt, and manage them.
• Type 2: Omada Software Controller
On a PC with Windows OS or Linux OS, download the Omada Software Controller from
https://www.tp-link.com/support/download/omada-software-controller/ Then run the file and follow the wizard to install and launch the Omada Software Controller. To manage your devices, Omada Software Controller needs to keep running on your computer.

flowchart
graph TD
    A["Omada Software Controller running on the Host PC"] --> B["Switch"]
    C["EAP"] --> B
    D["EAP"] --> B
    E["EAP"] --> B
    F["Mobile Device"] --> B
    G["Computer"] --> B
    H["Router"] --> B
    I["Server"] --> B
    J["Server"] --> B
    K["Server"] --> B
    L["Server"] --> B
    M["Server"] --> B
    N["Server"] --> B
    O["Server"] --> B
    P["Server"] --> B
    Q["Server"] --> B
    R["Server"] --> B
    S["Server"] --> B
    T["Server"] --> B
    U["Server"] --> B
    V["Server"] --> B
    W["Server"] --> B
    X["Server"] --> B
    Y["Server"] --> B
    Z["Server"] --> B
Choose from the following two types of Management Interface:
• Type 1: Via Web Browser
- Open the Omada Controller's web page.
* For Omada Software Controller
Launch the Omada Software Controller on your PC. After the initiation process, the controller automatically opens its web page. If not, click Launch a Browser to Manage the Network.
* For Omada Hardware Controller
As Omada Hardware Controller gets its IP address from the DHCP server of the router, we don't know its IP address explicitly. However, we can find it out on the router's DHCP client list.
a. You need first find the IP address of the router. Open the command line on your PC and enter ipconfig. In the result list, find the Default Gateway, which is also the IP address of the router.
b. Launch a web browser and enter the IP address of the router. Log into the router's web page, and both the username and password are admin by default. Then go to Network > LAN > DHCP Client List to find the IP address of your controller according to its MAC address.
c. Enter the IP address of your controller in address bar to open its web page.
- On the Omada Controller's page, follow the wizard to complete the quick setup.
- After quick setup, login page appears. Enter the username and password you have created and click Log in. Then you can further configure the controller.
- (For Remote Management) You can remotely access and manage your controller via Omada Cloud Service.
Note: Before you start, make sure that both your controller and your PC can access the internet.
* For Omada Software Controller, refer to its User Guide
* For Omada Hardware Controller
a. Make sure Cloud Access is enabled on your controller. By default, Cloud Access is enabled. Make sure that the Cloud LED is flashing slowly.
b. Launch a web browser and enter https://omada.tplinkcloud.com in the address bar. Enter your TP-Link ID and password to log in. Click + Add Controller and choose Hardware Controller to add your controller.
- Type 2: Via Omada App
- Download the TP-Link Omada App on your mobile device. It can be downloaded from App Store or Google Play:

- Launch your Omada App and configure the controller at a local site or remote site.
- Local Management
a. Connect your mobile device to the EAP by using the default SSID (format: TP-Link_2.4GHz/5GHz_XXXXXX) printed on the label at the bottom of the product.
b. Launch Omada App and go to Local Access, tap the + button on the upper-right corner to add the controller. Then you can further configure the controller.
- Remote Management
Note: Before you start, make sure that both your controller and mobile device can access the internet.
* For Omada Software Controller
a. Make sure that Cloud Access is enabled on your controller and your controller has been bound with your TP-Link ID.
b. Launch Omada App and log in with your TP-Link ID. Then go to Cloud Access. A list of controllers that have been bound with your TP-Link ID will appear. Then you can further configure the controller.
* For Omada Hardware Controller
a. Make sure that Cloud Access is enabled on your controller. By default, Cloud Access is enabled. Make sure that the Cloud LED is flashing slowly.
b. Launch Omada App and log in with your TP-Link ID. Then go to Cloud Access. Tap the + button on the upper-right to add your controller. Then you can further configure the controller.
Environmental and Physical Specifications
| Operating Temperature | 0 °C to 40 °C (32 °F to 104 °F) |
| Storage Temperature | -40 °C to 70 °C (-40 °F to 158 °F) |
| Operating Humidity | 10% RH to 90% RH non-condensing |
| Storage Humidity | 5% RH to 90% RH non-condensing |
EU declaration of conformity
For ES205G:
TP-Link hereby declares that the device is in compliance with the essential requirements and other relevant provisions of directives 2014/30/EU, 2014/35/EU, 2009/125/EC, 2011/65/EU and (EU)2015/863.
The original EU declaration of conformity may be found at https://www.tp-link.com/en/support/ce/ For ES205GP/ES210GP:
TP-Link hereby declares that the device is in compliance with the essential requirements and other relevant provisions of directives 2014/30/EU, 2014/35/EU, 2011/65/EU and (EU)2015/863.
The original EU declaration of conformity may be found at https://www.tp-link.com/en/support/ce/
UK declaration of conformity
TP-Link hereby declares that the device is in compliance with the essential requirements and other relevant provisions of the Electromagnetic Compatibility Regulations 2016 and Electrical Equipment (Safety) Regulations 2016.
The original UK declaration of conformity may be found at https://www.tp-link.com/support/ukca/
Some models featured in this guide may be unavailable in your country or region. For local sales information, visit https://www.tp-link.com.

To ask questions, find answers, and communicate with TP-Link users or engineers, please visit https://community.tp-link.com to join TP-Link Community.

For technical support and other information, please visit https://www.tp-link.com/support, or simply scan the QR code.

Safety Information
- Keep the device away from water, fire, humidity or hot environments.
- Do not attempt to disassemble, repair, or modify the device. If you need service, please contact us.
- Do not use damaged charger or USB cable to charge the device.
- Do not use any other chargers than those recommended.
- Adapter shall be installed near the equipment and shall be easily accessible.
- Use only power supplies which are provided by manufacturer and in the origin
packing of this product. If you have any questions, please don't hesitate to contact us. - Place the device with its bottom surface downward.
- The socket-outlet shall be installed near the equipment and shall be easily accessible. (For ES205GP/ES210GP)
- The plug on the power supply cord is used as the disconnect device, the socket-outlet shall be easily accessible. (For ES205GP/ES210GP)
- Plug the product into the wall outlets with earthing connection through the power supply cord. (For ES205GP/ES210GP)
- The PoE ports shall not be used to charge lithium batteries or devices supplied by lithium batteries. (For ES205GP/ES210GP)


- Installation Guide
- Connection for PoE Switch
- Note:
- Connection for Non-PoE Switch
- Configuration
- Method 1: Standalone Mode
- Method 2: Controller Mode
- Choose from the following two types of Omada Controller:
- • Type 1: Omada Hardware Controller
- • Type 2: Omada Software Controller
- Choose from the following two types of Management Interface:
- • Type 1: Via Web Browser
- - Type 2: Via Omada App
- EU declaration of conformity
- UK declaration of conformity
- Safety Information
Marke : TP-LINK
Modell : Omada ES210GP
Kategorie : Schalter