
MIN74387NP - Herd BLOMBERG - Kostenlose Bedienungsanleitung
Finden Sie kostenlos die Bedienungsanleitung des Geräts MIN74387NP BLOMBERG als PDF.


| Produkttyp | Einbau-Induktionskochfeld |
| Marke | Blomberg |
| Modell | MIN74387NP |
| Abmessungen (Höhe x Breite x Tiefe) | 48,2 x 590 x 520 mm |
| Einbaumaße (Breite x Tiefe) | 560 (+2) x 490 (+2) mm |
| Spannung | 220-240 V ~ 50 Hz |
| Gesamtleistungsaufnahme | max. 3,0 kW |
| Anzahl Kochzonen | 4 Induktionszonen |
| Kochzonen (Position / Durchmesser / Leistung / Booster) | Hinten links: 180 mm, 1500 W / 2000 W Vorne links: 180 mm, 1500 W / 2000 W Vorne rechts: 145 mm, 1200 W / 1800 W Hinten rechts: 210 mm, 2400 W / 3600 W |
| Booster-Funktion | Ja (je Zone) |
| Flexi-Kochzone (Breitfläche) | Ja, linke Seite kombinierbar |
| Steuerung | Touch-Steuerung mit akustischem Signal |
| Timer | Ja, mit automatischer Abschaltung |
| Kindersicherung (Tastensperre) | Ja |
| Reinigungssperre | Ja |
| Ãœberhitzungsschutz | Ja |
| Ãœberlaufschutz | Ja |
| Automatische Topferkennung | Ja |
| Restwärmeanzeige | Ja |
| Kochflächenmaterial | Glaskeramik |
Häufig gestellte Fragen - MIN74387NP BLOMBERG
Benutzerfragen zu MIN74387NP BLOMBERG
0 Frage zu diesem Gerät. Beantworten Sie die, die Sie kennen, oder stellen Sie Ihre eigene.
Eine neue Frage zu diesem Gerät stellen
Laden Sie die Anleitung für Ihr Herd kostenlos im PDF-Format! Finden Sie Ihr Handbuch MIN74387NP - BLOMBERG und nehmen Sie Ihr elektronisches Gerät wieder in die Hand. Auf dieser Seite sind alle Dokumente veröffentlicht, die für die Verwendung Ihres Geräts notwendig sind. MIN74387NP von der Marke BLOMBERG.
BEDIENUNGSANLEITUNG MIN74387NP BLOMBERG
Blomberg
Built-in Hob
User Manual

natural_image
Simple line drawing of a steaming hot water in a beaker with bubbles (no text or symbols)MIN74387NP
EN
185.9239.29/R.AA/17.04.2024
7757188757
Dear Customer,
Please read this manual before using the product.
Blomberg thank you for choosing the product. We want your product, manufactured with high quality and technology, to offer you the best efficiency. To do this, carefully read this manual and any other documentation provided before using the product and keep it as a reference. If you give the product to someone else, give the manual with it. Follow the instructions, taking into account all the information and warnings stated in the user manual.
Heed all information and warnings in the user manual. This way, you will protect yourself and your product against the dangers that may occur.
Keep the user manual. If you give the product to someone else, give the manual with it.
The user manual contains the following symbols:

Hazard that may result in death or injury.
NOTICE Hazard that may result in material damage to the product or its environment.

Hazard that may result in burns due to contact with hot surfaces.

Important information or useful usage tips.

Read the user manual.
TABLE OF CONTENTS
1 Safety instructions 4
Purpose of usage 4
Child, vulnerable person and pet safety..... 4
Electrical safety 5
Transportation safety 6
Installation safety 7
Safety of use....7
Temperature warnings....8
Accessory use 8
Cooking safety 8
Induction 8
Maintenance and cleaning safety 9
2 Environmental Instructions 10
Waste regulation....10
Compliance with the WEEE Directive and Disposing of the Waste Product...... 10
Package information....10
Recommendations for energy saving ..... 10
3 Your product 11
Product introduction....11
Product control panel introduction and usage....12
Hob control 12
General information on hob....12
Technical specifications....14
4 First use 15
First cleaning 15
5 How to use the hob 16
General information on hob usage.....16
Control panel 19
6 General information about cooking 27
General warnings about cooking with hob27
7 Maintenance and care 28
General cleaning information....28
Cleaning the hob....29
Cleaning the control panel 29
8 Troubleshooting 30
1 Safety instructions
• This section contains safety instructions that will help prevent any risks of personal injuries or material damage.
- If the product is transferred to another person or used second hand, the operating manual, product labels, other relevant documents and accessories should be delivered with the product.
- Our company shall not be held responsible for any damage that may occur as a result of failure to comply with these instructions.
- Failure to comply with these instructions shall render any warranty void.
• Always have the installation and repair work performed by the manufacturer, the authorized service or a person specified by the importer.
- Use genuine spare parts and accessories only.
- Do not attempt to repair or replace any part of the product unless it is clearly specified in the operating manual.
- Do not perform technical modifications on the product.
Purpose of usage
- This product is designed for home use. It is not suitable for commercial use.
- Do not use the product in gardens, balconies or other outdoor environments. The appliance is intended to be used in household and staff kitchen areas in shops, offices and other working environments.
- WARNING: This product should be used for cooking purposes only. It should not be used for different purposes, such as heating the room.
Child, vulnerable person and pet safety
- This product can be used by children 8 years of age and older, and people who are underdeveloped in physical, sensory or mental skills, or lack of experience and knowledge, as long as they are supervised or trained
about the safe use and hazards of the product.
• Children should not play with the product. Cleaning and user maintenance should not be performed by children unless there is someone overseeing them.
- This product should not be used by people with limited physical, sensory or mental capacity (including children), unless they are kept under supervision or receive the necessary instructions.
• Children should be supervised to ensure that they do not play with the product.
• Electrical products are dangerous for children and pets. Children and pets must not play with, climb on, or enter the product.
- Do not put objects that children may reach on the product.
- Turn the handle of the pots and pans to the side of the workbench so that children can not grab and burn.
- WARNING: During use, the accessible surfaces of the product are hot. Keep
children away from the product.
- Keep the packaging materials out of the reach of children. There is a hazard of injury and suffocation.
- (Not all products are supplied with a plug, so if your product DOES have a plug) For the safety of children, disconnect the power plug and make the product inoperable before disposing of the product.
Electrical safety
- Connect the product into a grounded outlet protected by a fuse that matches the current ratings indicated on the type label. Have the grounding installation made by a qualified electrician. Do not use the product without grounding in accordance with local / national regulations.
- The plug or the electrical connection of the product should be in an easily accessible place (where it will not be affected by the flame of the stove). If this is not possible, there should be
a mechanism (fuse, switch, switch, etc.) on the electrical installation to which the product is connected, in compliance with the electrical regulations and separating all poles from the network.
• The product must not be connected into the outlet during installation, repair, and transportation.
- Connect the product into an outlet that meets the voltage and frequency values specified on the type label.
- (Not all products are supplied with a supply cord, so if your product DOES NOT have a supply cord)
Use only the connecting cable specified in the "Technical specifications" section.
- Do not jam the power cord under and behind the product. Do not put a heavy object on the power cord. The power cord should not be bent, crushed, and come into contact with any heat source.
- Use original cable only. Do not use cut or damaged cables or extension leads. - If the power cord is damaged, it must be replaced by a manufacturer, an authorized service or a person to be specified by the importer company in order to prevent possible dangers.
(Not all products are supplied with a plug, so if your product DOES have a plug)
- Do not plug the product into an outlet that is loose, has come out of its socket, is broken, dirty, oily, with risk of water contact (for example, water that may leak from the counter).
- Never touch the plug with wet hands! To unplug, do not hold the cord, always hold the plug.
• Make sure that the product plug is securely plugged into the outlet to avoid arcing.
! Transportation safety
- Disconnect the product from the mains before transporting the product.
- When you need to transport the product, wrap it with
bubble wrap packaging material or thick cardboard and tape it tightly. Secure the product tightly with tape to prevent the removable or moving parts of the product and the product from damage.
- Check the overall appearance of the product for any damage that may have occurred during transportation.

Installation safety
- Before the product is installed, check the product for any damage. If the product is damaged, do not install it.
- Do not install the product near heat sources (radiators, stoves, etc.).
- Keep all ventilation ducts open around the product.

Safety of use
• Make sure that the product is turned off after each use.
- If you do not use the product for a long time, disconnect it or turn off the fuse from the fuse box.
- Do not operate defective or damaged product. If any, disconnect the electricity / gas connections of the product and call the authorized service.
- WARNING: If the surface is cracked, switch off the appliance to avoid the possibility of electric shock.
- Do not climb on the product to reach anything or for any other reason.
- Do not use the product in situations that may affect your judgment, such as drug intake and / or alcohol use.
- Flammable objects kept in the cooking area may catch fire. Never store flammable objects in the cooking area.
- Cast iron, aluminum or cookware with damaged / rough bottom parts may lead to scratching the glass surface. When replacing cookware, always raise the containers, do not slide on the surface.
• Vapour pressure that build up due to the moisture on the hob surface or at the bottom of the pot can cause the pot to move. Therefore,
make sure that the hob surface and bottom of the pots are always dry.
- This product is not suitable for use with a remote control or an external clock.

Temperature warnings
- WARNING: While the product is operating, exposed parts will be hot. Do not touch the product and heating elements. Children under the age of 8 should not be brought close to the product without an adult.
- Do not place flammable / explosive materials near the product, as the edges will be hot while it is operating.
- WARNING: Danger of fire: Do not store items on the cooking surfaces.

Accessory use
- WARNING: Use only hob guards designed by the manufacturer of the cooking appliance or indicated by the manufacturer of the appliance in the instructions for use as suitable or hob guards incorporated in the appliance. The use of
inappropriate guards can cause accidents.

Cooking safety
- WARNING: The cooking process must be observed. Short-term cooking processes must be constantly observed.
- WARNING: Unattended cooking on a hob with fat or oil can be dangerous and may result in fire. NEVER try to extinguish a fire with water, but switch off the appliance and then cover flame e.g. with a lid or a fire blanket.
- Be careful when using alcohol in your food. Alcohol evaporates at high temperatures and may catch fire when exposed to hot surfaces, causing a fire.

Induction
- Hotplates are equipped with "Induction" technology. Your induction hob that provides both time and money savings must be used with pots suitable for induction cooking; otherwise hotplates will not operate. For detailed
information, see the section "Pot selection".
- As induction hobs create a magnetic field, they may cause harmful impacts for people who use devices such as insulin pump or pacemaker.
- Close the hotplate from its control panel after use, do not rely on the pot sensor.
• Metal objects such as knives, forks, spoons and lids should not be placed in the hotplate as they will get hot.
• Metal items stored in drawers under the hob may become very hot during long and intensive use. Do not store metal objects in drawers under the hob.
- Do not put electronic products such as mobile phones, tablets, computers
on the induction hob. Your product may be damaged.
⚠ Maintenance and cleaning safety
- Wait for the product to cool before cleaning the product. Hot surfaces may cause burns!
- Never wash the product by spraying or pouring water on it! There is an electric shock hazard!
- Do not clean the product with steam cleaners as this may cause electric shock.
- Salt, sugar residues on the bottom of the cookware or such particles on the glass surface can cause the glass to scratch and crack. Make sure that the bottom is clean before placing the cookware. Keep the glass ceramic surface clean.
2 Environmental Instructions
Waste regulation Compliance with the WEEE Directive and Disposing of the Waste Product

This product complies with EU WEEE Directive (2012/19/EU). This product bears a classification symbol for waste electrical and electronic equipment (WEEE).
This product has been manufactured with high quality parts and materials which can be reused and are suitable for recycling. Do not dispose of the waste product with normal domestic and other wastes at the end of its service life. Take it to the collection center for the recycling of electrical and electronic equipment. Please consult your local authorities to learn about these collection centers.
Appropriate disposal of used appliance helps prevent potential negative consequences for the environment and human health.
Compliance with RoHS Directive:
The product you have purchased complies with EU RoHS Directive (2011/65/EU). It does not contain harmful and prohibited materials specified in the Directive.
Package information
- Packaging materials of the product are manufactured from recyclable materials in accordance with our National Environment Regulations. Do not dispose of the packaging materials together with the domestic or other wastes. Take them to the packaging material collection points designated by the local authorities.
Recommendations for energy saving
Information on energy efficiency according to EU 66/2014 can be found on the product fiche given with the product. The following suggestions will help you use your product in an ecological and energy-efficient way:
• Defrost frozen food before cooking.
- Turn off the product 5 to 10 minutes before the end time of cooking for prolonged cooking. Now you can save up to 20% electricity by using heat.
- Use pots / pans with a size and lid suitable for the hotplate. Always choose the right size pot for your meals. More than necessary energy is needed for containers of the wrong size.
- Keep hob cooking surfaces and pot bases clean. Dirt reduces the heat transfer between the cooking area and the pot base.
3 Your product
Product introduction
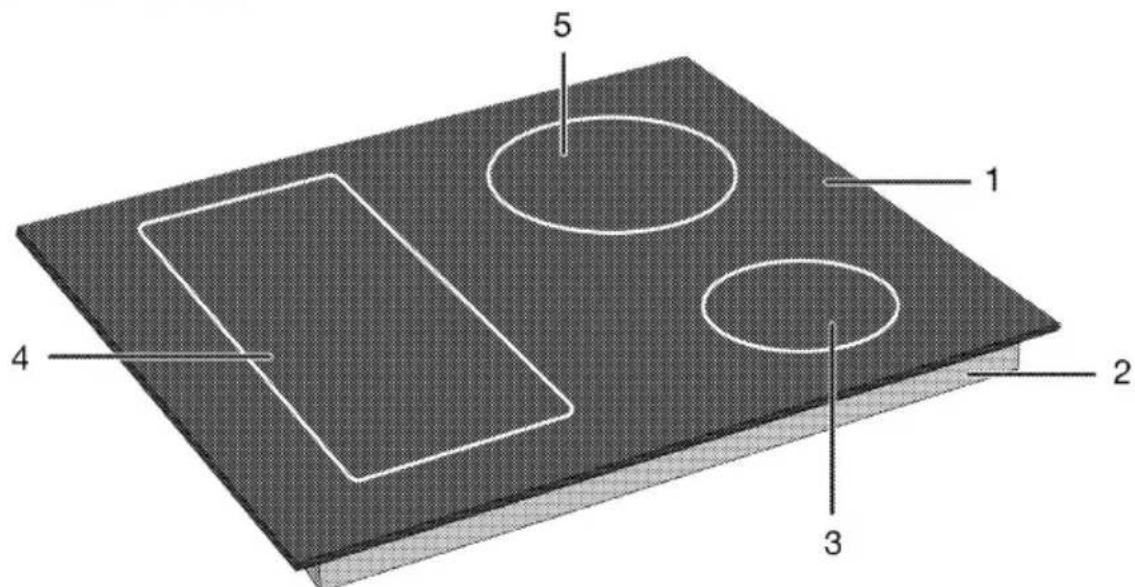
1 Glass cooking surface
2 Lower housing
3 Induction cooking zone
4 Induction cooking zone
5 Induction cooking zone
Product control panel introduction and usage
In this section, you can find the overview and basic uses of the product's control panel. There may be differences in images and some features depending on the type of product.
Hob control

Keys and symbols
— : The light indicating that the relevant key is operated
① : On/Off key
: Key lock key
: Wide surface cooking zone combination key
: Quick Heating key/High power setting (booster) key
: Cleaning lock key
: Timer key
+ : Timer increase key
— : Timer decrease key
: Hob-Hood connection key *
* It varies depending on the product model. It may not be available on your product.

Cooking zone display
1 Temperature indicator of the relevant cooking zone
2 Setting area for temperature level
3 Quick Heating key/High power setting (booster) key

Timer display
1 Timer indicator
2 Timer decrease key
3 Timer key
4 Timer increase key
5 Timer symbol
6 Timer activity LED of the relevant cooking zone
General information on hob

1 Rear left - Induction cooking zone
2 Rear right - Induction cooking zone
3 Front right - Induction cooking zone
4 Front left - Induction cooking zone Your hob is equipped with hob cooking surfaces with wide surfaces (Flexi surfaces). You may operate this cooking surface as individual hobs independent from each other. You may
activate the combination function for these cooking zones and transform them to a single cooking surface for cooking operations with your large cooking pots. Using proper pots for these cooking zones and the combination function are described in the "How to use the hob" section.
Technical specifications
| General specifications | |
| Product external dimensions (height/width/depth) | 48,2 mm*/590 mm/520 mm |
| Hob installation dimensions (width/depth) | 560 (+2)mm /490 (+2)mm |
| Voltage / frequency | 1N ~ 220-240 V ~ 50 Hz |
| Cable type and cross section used / suitable for use in the product | min. H05V2V2-F 3 x 1,5 mm^2 |
| Total power consumption | max. 3.0 kW |
| Burners | |
| Rear left | Induction cooking zone |
| Dimension | 180 mm |
| Power | 1500 W / Booster: 2000 W |
| Front left | Induction cooking zone |
| Dimension | 180 mm |
| Power | 1500 W / Booster: 2000 W |
| Front right | Induction cooking zone |
| Dimension | 145 mm |
| Power | 1200 W / Booster: 1800 W |
| Rear right | Induction cooking zone |
| Dimension | 210 mm |
| Power | 2400 W / Booster: 3600 W |
| * The height of the hob specified in the technical table is the base cover height of the product. | |

Technical specifications may be changed without prior notice to improve the quality of the product.

Figures in this manual are schematic and may not exactly match your product.

Values stated on the product labels or in the documentation accompanying it are obtained in laboratory conditions in accordance with relevant standards. Depending on operational and environmental conditions of the product, these values may vary.
4 First use
Before you start using your product, it is recommended to do the following in the following sections.
First cleaning
- Remove all packaging materials.
- Wipe the surfaces of the product with a wet cloth or sponge and dry with a cloth.
NOTICE
The surface might get damaged by some detergents or cleaning materials. Do not use aggressive detergents, cleaning powders/creams or any sharp objects during cleaning.
NOTICE
Smoke and smell may emit for a couple of hours during the initial operation. This is quite normal. Ensure that the room is well ventilated to remove the smoke and smell. Avoid directly inhaling the smoke and the smell that emits.
5 How to use the hob
General information on hob usage
General warnings
- Do not let any objects to fall on the hob. Even small objects such as saltshakers may damage the hob. Do not use cracked hobs. Water may seep through these cracks and cause a short circuit. If the surface is damaged in any way (e.g. visible cracks), turn off the fuse first, then call the authorized service to unplug the product to reduce the risk of electric shock.
- Do not use unbalanced and easily tilting pots/pans on the hob.
- Do not heat the pots/pans and pots empty. The pots and the appliance may be damaged.
• Always turn off the hob's burners after each use. - You shall damage the appliance if you operate the hobs without any pot or pots/pans. Always turn off the hobs after each operation.
• After each use the cooking surface will be hot, so do not put the plastic pots/pans on the cooking surface. Clean such material on the surface immediately. - Sudden temperature changes on the glass cooking surface may cause damage, be careful not to spill cold liquids during cooking.
- Put a sufficient amount of food in pots and pans. Thus, you can prevent food from pouring forth out of the pots/pans and will not need to clean unnecessarily.
- Do not place the covers of pots and pans on burners/zones.
- Place the pots by centering them on the burners/zones. If you wish to place a pot on a different burner/zone, do not slide it towards the desired burner; rather, lift it first and then put it on the other burner.
Operating principle of the induction hob
Induction hob is like an open circuit. The circuit completes when a cooking pots/pans suitable for induction cooking is placed on it and an electronic system below the glass surface generates a magnetic field. The metal base of the pots/pans is heated by taking energy from this magnetic field. Thus, the heat is not generated on the surface of the hob, but directly on the pots/pans above it. Glass surface is heated with the heat of the cooking pots/pans.
Advantages of cooking with induction Induction hobs offer some advantages as the heat is transferred directly to the cooking pots/pans.
- Foods that overflow during cooking do not burn rapidly as the glass cooking surface is not heated directly. It is cleaned more easily.
- Cooking shall be faster as the heat is generated directly on the cooking pots/pans. Thus, it saves time and energy with respect to other hob types.
- As the heat is given directly to the cooking pots/pans, there is no heat loss, and it provides a more efficient cooking.
- The fact that the heat transfer stops and the cooking surface is not heated directly when the cooking pots/pans is removed from the cooking surface
provides a safer use against possible accidents while cooking.
For a safe operation:
- Do not select high heating levels when using non-sticking cooking pots/pans coated with little amount of oil or used without oil (teflon type).
- Do not use glass cooking surface as a surface where you can place something on it or as a cutting surface.
- Do not place metal objects such as cutlery or pot lids on your hob as they may get hot.
- Never use aluminium foil for cooking. Never place food wrapped in aluminium foil on the induction zone.
- Keep magnetic objects such as credit cards or tapes away from the hob while it is operating.
- If there is an oven under your hob and it is being operated, the sensors on the hob may reduce the cooking level or turn off the hob.
- Your hob has an automatic shut-off system. Detailed information about this system is provided in the following sections. However, if you use thin based pots for your cooking, these pots shall heat up very quickly and the bottom of the pan may melt and damage the cooking surface and the appliance before the automatic shut-off system is activated.
Cooking pots/pans
You shall use ferromagnetic, quality cooking pots/pans which bear a label or warning that it is compatible for induction cooking only with your induction hob. Generally, the higher the iron content, the better the cooking pots/pans shall perform. The base diameter of the cooking pots/pans shall match the induction zone. Suggested dimensions are listed below.
Suitable pots/pans:
- Cast iron pots/pans
- Enamelled steel pots/pans
• Steel and stainless steel pots/pans (with label or warning indicating that it is induction compatible)
Unsuitable pots/pans:
- Aluminium pots/pans
• Copper pots/pans - Brass pots/pans
- Glass pots/pans
- Pottery
• Ceramic and porcelain
Recommendations:
- Use flat bottomed cooking pots/pans only. Do not use pots/pans with convex or concave bases.

- Use cooking pots/pans with thick, processed bases only. If you use thin based pots, these pots shall heat up very quickly and the bottom of the pan may melt and damage the cooking surface and the appliance before the automatic shut-off system is activated. Sharp edges may cause scratches on the surface.
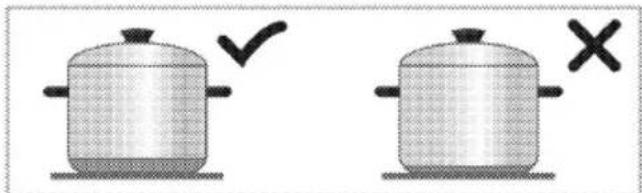
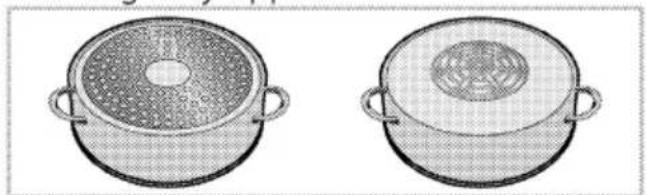
- The bases of some cooking pots/pans have a smaller ferromagnetic field than its true diameter. Only this area is heated by the hob. Therefore, the heat is not evenly distributed and the cooking
performance is decreased. Moreover, such cooking pots/pans may not be detected by large induction hobs. Thus, the cooking hob shall be selected according to the size of the ferromagnetic field.

natural_image
Two identical illustrations of cooking panes with handles, one showing a side view and the other showing a side view (no text or symbols)- Some cooking pots/pans have a base that contains non-ferromagnetic materials such as aluminium. These types of cooking pots/pans may not heat adequately or may not be detected by the induction hob at all. In some cases, a bad pots/pans warning may appear.
natural_image
Two identical cooking pot illustrations with handles and lid, shown from different angles (no text or symbols)Cooking pots/pans test
Test whether your pot is compatible with cooking with an induction hob using the methods below.
- It is compatible if the base of your pot holds a magnet.
- It is compatible if "☐" and "☐" or "☐" does not flash when you place your pot on the induction hob and turn on the hob.
Recommended cooking pots/pans sizes
| Diameter of cooking zone - mm | Pot diameter - mm |
| 145 | min. 100 - max 145 |
| 180 | min. 100 - max 180 |
| 210 | min. 140 - max 210 |
| 240 | min. 140 - max 240 |
| 280 | min. 125 - max 280 |
| 320 | min. 125 - max 320 |
| Cooking zone with wide (flexi) surface | width 230 - length 390 |
The detection of cooking pots/pans by the induction hobs depend on the diameter and material of the ferromagnetic in the base of the pots/pans. To ensure detection of the cooking pots/pans and achieve an efficient cooking, the cooking pots/pans shall be selected as per the size of your hob. The cooking pots/pans sizes recommended for hob sizes are given above.
Boiling behavior may vary depending on the pot types, size of the pot and size of the cooking zone. For a more homogenous boiling behavior, a one step larger cooking zone might be used. To use a larger cooking zone does not cause wasting of energy at induction hobs, because the heat is only created in the relevant pot area.
Automatic detection of the cooking pots/pans
When you place any cooking pots/pans compatible with induction on your hob, your hob automatically detects which hob the cooking pots/pans is placed on and provides directions on the control panel.
Cooking zone with wide surface (flexi)
Your hob is equipped with hob cooking surfaces with wide surfaces (Flexi surfaces). You may operate this cooking surface as individual hobs independent from each other for your smaller cooking pots/pans. You may activate the combination function for these cooking zones and transform them to a single cooking surface for cooking operations with your large cooking pots.
As two independent cooking zones

natural_image
Simple diagram with two circles and a checkmark, no text or symbols presentCooking zones with wide surface have two cooking zones, as front and rear. You may use these zones as two independent cooking zones for different temperature levels with two different cooking pots/pans. Place the cooking pots/pans by centering the separate cooking zones.
As two independent cooking zones

natural_image
Simple diagram of a device with a central circular element and two side handles, no text or symbols present.For cooking operation with a single cooking pot/pan, place it in the centre of the front or rear cooking zone. Do not place the cooking pot/pan at the centre of the cooking zone.
As a single cooking zone
natural_image
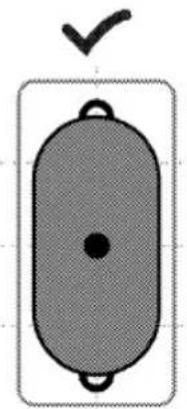
Simple diagram of a gray oval shape with a central dot and two side handles, enclosed in a dashed rectangle (no text or symbols)For cooking operations on large cooking pots/pans, place the pots/pans so that it covers the centres of both cooking zones and that it is centred on the cooking zone.
Control panel

Keys and symbols
: The light indicating that the relevant key is operated
① : On/Off key
: Key lock key
: Wide surface cooking zone
combination key
: Quick Heating key/High power setting (booster) key
: Cleaning lock key
:Timer key
+ : Timer increase key
: Timer decrease key
: Hob-Hood connection key *
* It varies depending on the product model. It may not be available on your product.
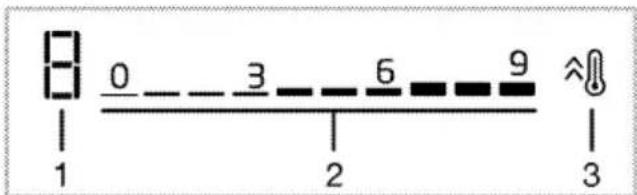
Cooking zone display
1 Temperature indicator of the relevant cooking zone
2 Setting area for temperature level
3 Quick Heating key/High power setting (booster) key

Timer display
1 Timer indicator
2 Timer decrease key
3 Timer key
4 Timer increase key
5 Timer symbol
6 Timer activity LED of the relevant cooking zone
General warnings for the control panel
This appliance is controlled with a touch control panel. Each operation performed in the touch control panel is confirmed with an audible signal.
Always keep the control panel clean and dry. A damp and dirty surface may cause problems in operating the functions.
The hob automatically returns to stand-by mode if no operation is performed within 20 seconds.
The appliance will display "FF" alert due to safety reasons if any key (☐ key) is touched for a long period.
The — light on the activated or selected keys are illuminated.
Turning the hob on
- Touch the ① key on the control panel.
- The hob is ready to use.
Turning the hob off
- Touch the ① key on the control panel.
- The hob turns off and returns to stand-by mode.
Remaining heat indicator
There is a heat indicator for each hob zone on the control panel. This indicator indicates that the hob is still hot when it is turned off. Do not touch the relevant hob(s) until the remaining heat indicator disappears.
| Symbol | Description |
| H | High temperature |
| h | Low temperature |
In case of a power failure, the remaining heat indicator does not illuminate and warn the user against hot hobs.
Turning the hobs on (cooking zone) and setting the temperature level

- Turn the hob on by touching the ① key.
- The "0" symbol appears on the hob zone displays.
- Depending on the are you want to turn on, by touching on the setting area or by sliding your finger on the area, set the temperature level between "0" and "9".
While the temperature level is increased as 1,2,3...19 on some models, it may be increased as 1,1.,2,2. ... 9. on some other models. This varies as per product model.
Turning off the hobs:
A selected hob zone may be turned off in 2 different ways:
- By setting the temperature as "0" You may turn off the hob by reducing the temperature setting to "0".
- Using the timer off function for the desired hob zone
When the time is off, the timer turns off the hob connected to it. All displays indicate "0" or "00". The ⏻ symbol on the hob display disappears. The setting of the timer for the hob zone is described in the following chapters.
Combination of the hob zones with wide surface (flexi) (if hob zones with wide surfaces are available on your hob)
- Turn the hob on by touching the ① key.
- Touch the ⚠ key.
- The display of the left hob zone displays 0 and — light of the [●] key will be illuminated.

- By touching on the setting area or by sliding your finger on the area, set the temperature level between 0 and 9. While the temperature level is increased as 1,2,3...19 on some models, it may be increased as 1,1.,2,2. ... 9. on some other models. This varies as per product model.
- The hob starts to operate. If another hob is selected or if you wait for 10 seconds without any operation, the — light of the [●] key will fade.
The hobs with wide surface on the left are described as an example. If the hobs on the right have wide surfaces on your appliance, the same apply for the hobs on the right.
Combination of the hobs with wide surface (flexi) while one or both of the hobs on the left are operating (if hobs with wide surfaces are available on your hob)
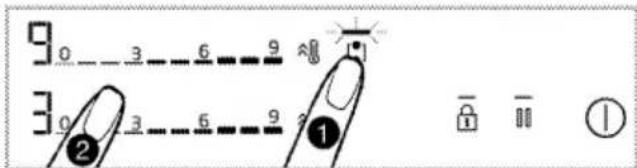
While one or both of the hobs on the left are operating separately, you may combine both hobs by activating the hob with wide surface. In this way, you may operate a wider hob surface with the same values.
-
While one or both of the hob zones on the left are operating, touch the [●] key.
-
On both of the hob zone displays, the hob zone with the lower degree will be displayed and — light of the [●] key will illuminate.
- Combined hobs resume to operate with the temperature of the hob zone which have a lower degree and, if applicable, with the timer setting value. Temperature and timer values of the hob zone that had a higher temperature value before combining will be cancelled.
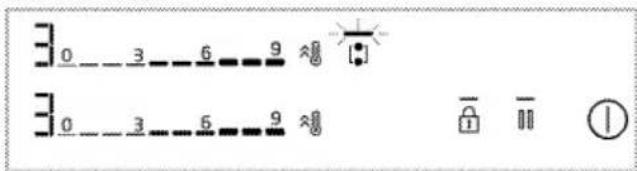
To change the temperature value afterwards, set the desired temperature level from the setting area.
Turning the cooking zones with wide surface off (if hobs with wide surfaces are available on your hob)
You may separate and turn off the cooking zones by touching the ⚙️ key
High power setting (BOOSTER)
You may use the booster to heat with maximum power. However, we do not recommend cooking for a long period at this position. High power setting may not be available on all hobs. When the period for High power setting (See Operating period limits table) has expired, the hob zone is turned off.
Selecting high power setting (BOOSTER) directly:
- Turn the hob on by touching the ① key.
- Touch the ⚠ key of the hob you want. The selected hob zone operates with maximum power and 3 lights flash on the hob zone display respectively.
When the period for High power setting (See Operating period limits table) has expired, hob will continue operating on the highest temperature level.
Selecting high power setting (BOOSTER) while the hob zone is active:
- Touch the ⚠️ key when the hob is on and the relevant hob zone is operating at a specific level.
- The selected hob zone operates with maximum power and 3 lights flash on the hob zone display respectively. When the period for High power setting has expired, hob will continue operating on the highest temperature level.
Turning the high power setting (BOOSTER) off before its expiration:
You may turn the high power setting off whenever you desire by touching the ^§ key. The hob zone continues to operate at the highest temperature value. Bring to 0 by touching active hob zone setting area or sliding your finger on the area to turn off.
Cleaning lock
Cleaning lock allows the user to clean for a short period of time by preventing the operation of all keys on the control panel while the hob is on. The appliance does not draw power during this period.
Activating the cleaning lock

- Touch and hold on the ☐ key when the hob is on.
- Light will illuminate. The "☐" symbol will be displayed on the displays of the hob zones. No key other than the ① key may be operated during this period.
Deactivating the cleaning lock
Touch and hold on the ☐ key to disable cleaning lock. ☐ light will fade and cleaning lock will be disabled.
Key Lock
While the hob is on or off, you may activate the key lock to prevent changing of functions inadvertently.
Activating the key lock
- To activate the key lock, touch the 🔒 key until one signal is heard.
The — light of the 🔒 key shall flash and all cooking zones shall be locked.

Only the Ⓐ key operates while the key lock is active. When you touch any other key, the — light of the 🔊 key flashes to indicate that the key lock is active. If you turn off the hob while the keys are locked, the key lock shall be deactivated to turn the hob on again.
Deactivating the key lock
- Touch and hold the 🔒 key until one signal is heard. The operation shall be confirmed with an audible signal. The — light of 🔒 key will fade and the key lock will be deactivated.
Timer function
This function facilitates cooking for you. You do not need to attend the hob throughout the cooking period. The hob zone turns off automatically after the period you have selected.
Activating the timer

-
Turn the hob on by touching the ① key.
-
Depending on the are you want to turn on, by touching on the setting area or by sliding your finger on the area, set the temperature level you want.
-
Activate the timer by touching the Ⓧ key.
The "00" will illuminate and ⚙ symbol starts to blink.
-
There are 4 activity LEDs around the "00" displayed on the timer display. For the hob zone to be set a timer, touch the ⏻ key to select the relevant hob zone side.
-
Set the desired period by touching the +/− keys. + You may also advance the timer faster by touching the + or − key for a long period of time.
The Ⓧ symbol illuminates solidly after flashing on the hob zone display for a specific period of time. When the Ⓧ symbol illuminates solidly, this shows that the function is activated.
The timer may only be used for hobs that are being operated.
i Repeat the procedure above for other hobs that you want to set a timer for.
Timer cannot be set without selecting the hob zone and the temperature level of the hob zone.
While the timer is active, the time set for the selected hob zone is displayed on the timer display.
Turning off the timers
The hob turns off automatically and an audible warning is given when the set time has expired.
Touch any key to turn off the audible warning.
Turning off the timers prematurely
If the timer is turned off prematurely, the hob continues to operate with the set temperature until it is turned off.
Turning off by reducing the timer setting to "00" level:
-
Select the timer of the relevant hob by touching the ⏻ key.
-
Wait until the "00" symbol is displayed on the timer display by touching the — key to reduce the value. You may also advance the timer faster by touching the — key for a long period of time.
The Ⓧ symbol flashes for a specific period of time on the hob zone display, then it turns off completely and the timer is cancelled.
Stop function
With this function, you may stop all functions operating at the hob (excluding the timer) to the 1st level for a while.
If the timer is set for any hob zone, the timer resumes to operate during the stop function.
- Touch the ☐ key while your hob is on. All hobs that are being operated continue to operate at 1st level.
- Touch the ☐ key again to operate all stopped hob cooking zones with their previous settings.
Settings
Using this function, you may change power management, cooking-end audible signal time, and hob- hood connection settings.
cFl: Power management setting
cF2: Cooking-end audible signal time
cF3: Hob-Hood connection setting
1- Power management setting (CFI)
You may set the total power of the hob as you desire with this function.
-
Turn on the hob by touching the ① key, and turn it off by touching ① key again.
-
Within 10 seconds after turning off the product, touch ⏻/‖‖/¶/‖‖ keys respectively.
- On the timer display FI, on left rear hob display "9" will be displayed.
-
By touching on the setting area of the left rear hob setting area or by sliding your finger on the area, set the power level between (see Table - Power management level) "1" and "9".
-
Confirm the selected level setting by touching the ① key.
- Your hob will turn off and will start to operate with the total power setting at the selected level.
"Power management" includes 9 different power levels (see Table - Power management level).
Table - Power management level
| Power management level | Total power |
| 1 | 1,2 kW |
| 2 | 2,4 kW |
| Power management level | Total power |
| 3 | 3 kW |
| 4 | 3,6 kW |
| 5 | 4,4 kW |
| 6 | 5,4 kW |
| 7 | 5,7 kW |
| 8 | 6,7 kW |
| 9 | 7,4 kW* |
Total power value for the power management level of 5, 6, 7, 8, 9 is 3.6 kW in products that with the maximum total power consumption of 3.6 kW.
2- Cooking-end audible signal time setting (cF2)
Using this function, you may set the cooking-end signal time of the hob as you want.
- Turn on the hob by touching the ① key, and turn it off by touching ① key again.
- Within 10 seconds after turning off the product, touch ⏻/¶¶/¶/¶ keys respectively.
- Default setting cF1 will be displayed on the timer display.
- For cooking-send audible signal setting, touch ☐ key once.
" Oon the timer display ⒽF2, on the left rear hob display "2" will be displayed. - By touching on the setting area of the left rear hob setting area or by sliding your finger on the area, set the signal time setting (see Table - Cooking-end audible signal time) between "0" and "3".
- By touching the ① key, confirm the cooking-end audible signal time setting.
- Your hob will turn off and will start to operate with the signal time setting at the selected level.

Factory default value for the cooking-end audible signal time setting is standard 2nd level.
Table - Cooking-end audible signal time setting
| Cooking-end audible signal level | Cooking-end audible signal period |
| 0 | 15 seconds |
| 1 | 30 seconds |
| 2 | 1 minute |
| 3 | 2 minutes |
3- Hob-Hood connection setting (cF3)
Using this function, you may connect hob and hood to allow them to operate together automatically.
-
Turn on the hob by touching the ① key, and turn it off by touching ① key again.
-
Within 10 seconds after turning off the product, touch ⏻/‖‖/¶/‖ keys respectively.
- Default setting cFl will be displayed on the timer display.
- Touch twice on ☐ key for the Hob-Hood connection setting.
- Oon the timer display ⌊F∃, on the left rear hob display "4" will be displayed.
-
By touching on the setting area of the left rear hob setting area or by sliding your finger on the area, set the hood operation level (see Table - Hood operation level) between "0" and "7".
-
By touching the ① key, confirm the hob-hood connection setting.
- Your hob will turn off and will start to operate with the selected hob operation level.
Table - Hood operation level
| Hood operation level | Lamp | Hood (Boiling on one hob) | Hood (Boiling on any 2 or more hobs) | Frying |
| 0 | off | off | off | off |
| 1 | light | off | off | off |
| 2 | light | off | L1 | L1 |
| 3 | light | L1 | L1 | L1 |
| 4 | light | L1 | L1 | L2 |
| 5 | light | L1 | L2 | L2 |
| 6 | light | L1 | L2 | L3 |
| 7 | light | L2 | L2 | L3 |
Setting hood operation level over the hob
With this setting, you may set hood operation level over the hob.
-
Turn the hob on by touching the ① key.
-
Touch the ⚙ key for 3 seconds.
- The - light of the ♂ key will go off.
- Touch the ⚙ key until the desired operation level for the hood is reached.
Using induction hobs safely and effectively
Operating principle: Induction heater heats the cooking pot directly due to its operating principle. Thus, it has many advantages over other hob types. It
operates more efficiently and the hob surface is cooler.
Your induction hob is equipped with superior safety system that shall ensure operation with maximum safety.

Your hob may be equipped with hobs with a diameter of 145, 180, 210 and 280 mm with induction feature depending on the model. Thanks to the induction feature, each hob zone automatically detects the pot placed on it. Energy occurs on the contact area of the pot only, and thus minimum level of power is consumed.
Automatic turning off system
The hob control has an automatic turn off system. If one or more hob zone(s) are left on, the hob zone turns off automatically after a while (See Table-1). In case of a timer assigned to the hob zone, the timer display is turned off then, too.
The time limit for automatic turn off depends on the selected temperature level. Maximum operating period is applied for this temperature level.
The hob zone may be operated by the user again after it is turned off automatically as described above.
Table-1: Automatic turning off periods
| Temperature level | Automatic turning off periods - hours |
| 0 | 0 |
| 1 | 6 |
| 2 | 6 |
| 3 | 5 |
| 4 | 5 |
| 5 | 4 |
| Temperature level | Automatic turning off periods - hours |
| 6 | 4 |
| 7 | 2 |
| 8 | 2 |
| 9 | 1 |
| Quick Heating | 10 minutes |
While the temperature level is increased as 1,2,3...19 on some models, it may be increased as 1,1.,2,2. ... 9. on some other models. This varies as per product model.
Overheating protection
Your hob is equipped with some sensors that ensure protection against overheating. You may observe the following in case of overheating:
- The hob zone that is operating may be turned off.
- The selected level may be reduced. However, this is not reflected on the display.
Overflow protection system
Your hob is equipped with an overflow protection system. In case of any overflow on the control panel for any reason, the system cuts off the power connection automatically to turn off your hob. At this time, "F" symbol appears on the display.
Precise power setting
Induction hob responds to the commands issued immediately as per its operating principle. Its power settings are changed very rapidly. Thus, you may prevent overflowing of a meal (water, milk) that is about to overflow by turning the appliance off immediately.
6 General information about cooking
This section describes tips on preparing and cooking your food.
General warnings about cooking with hob
-
Never fill the pan with oil more than one third of it. Do not leave the hob unattended when heating oil. Overheated oils bring risk of fire.
Never attempt to extinguish a possible fire with water! When oil catches fire, cover it with a fire blanket or damp cloth. Turn off the hob if it is safe to do so and call the fire department. -
Before frying foods, always remove their excess water and put them inside the heated oil slowly. Make sure that frozen foods are defrosted before frying.
- When heating oil, make sure that the pot you use is dry and keep its lid open.
- For recommendations on cooking with power saving, refer to the "Environmental Instructions" section.
- The cooking temperature and time values given for foods may vary depending on the recipe and amount. For this reason, these values are given as ranges.
7 Maintenance and care
General cleaning information
▲ General warnings
- Wait for the product to cool before cleaning the product. Hot surfaces may cause burns!
- Do not apply the detergents directly on the hot surfaces. This may cause a permanent stains.
- The appliance shall be thoroughly cleaned and dried after each operation. Thus, food residues shall be easily cleaned and these residues shall be prevented from burning when the appliance is used again later. Thus, the service life of the appliance extends and frequently faced problems are decreased.
- Do not use steam cleaning products for cleaning.
- Some detergents or cleaning agents may damage the surface. Do not use abrasive detergents, cleaning powders, cleaning creams, descalers or sharp objects during cleaning.
- There is no need for a special cleaning agent for cleaning after each use. Clean the appliance using dish soap, warm water and a soft cloth or sponge and dry with a dry microfiber cloth.
- Be sure to completely wipe off any remaining liquid after cleaning and immediately clean any food splashing around during cooking.
- Do not wash any component of your appliance in a dishwasher.
For the hob:
- Acidic dirt such as milk, tomato paste and oil may cause permanent stains on the hobs and components of the burners/hotplates, clean any
overflown fluids immediately after cooling down the hob by turning it off.
Inox and stainless surfaces
- Do not use acid or chlorine-containing cleaning agents to clean stainless or inox surfaces and handles.
- Stainless or inox surface may change colour in time. This is normal. After each operation, clean with a detergent suitable for the stainless or inox surface.
- Clean with a soft soapy cloth and liquid (non-scratching) detergent suitable for inox surfaces, taking care to wipe in one direction.
- Remove lime, oil, starch, milk and protein stains on the inox-stainless and glass surfaces immediately without waiting. Stains may rust under long periods of time.
Glass surfaces
- When cleaning glass surfaces, do not use hard metal scrapers and abrasive cleaning materials. They can damage the glass surface.
- Clean the appliance using dishwashing detergent, warm water and a microfiber cloth specific for glass surfaces and dry it with a dry microfiber cloth.
- If there is residual detergent after cleaning, wipe it with cold water and dry with a clean and dry microfiber cloth. Residual detergent residue may damage the glass surface next time.
• Under no circumstances should the dried-up residue on the glass surface be cleaned off with serrated knives, wire wool or similar scratching tools. - You can remove the calcium stains (yellow stains) on the glass surface
with the commercially available descaling agent, with a descaling agent such as vinegar or lemon juice.
- If the surface is heavily soiled, apply the cleaning agent on the stain with a sponge and wait a long time for it to work properly. Then clean the glass surface with a wet cloth.
• Discolorations and stains on the glass surface are normal and not defects.
Plastic parts and painted surfaces
- Clean plastic parts and painted surfaces using dishwashing detergent, warm water and a soft cloth or sponge and dry them with a dry cloth.
- Do not use hard metal scrapers and abrasive cleaners. It may damage the surfaces.
- Ensure that the joints of the components of the appliance are not left as damp and with detergent. Otherwise, corrosion may occur on these joints.
Cleaning the hob
Glass cooking surface
Follow the cleaning steps described for the glass surfaces in the "General cleaning information" section for the cleaning of glass cooking surface. You may complete your cleaning as per the information below for special cases.
- Sugar-based foods such as dark cream, starch and syrup should be cleaned immediately, without waiting for the surface to cool. Otherwise, the glass cooking surface may be permanently damaged.
- Do not use cleaning agents for cleaning operations you perform while the hob is hot, otherwise permanent stains may occur.
Cleaning the control panel
- When cleaning the panels with knob control, wipe the panel and knobss with a damp soft cloth and dry with a dry cloth. Do not remove the knobs and gaskets underneath to clean the control panel. The control panel and knobs may be damaged.
- While cleaning the inox panels with knob control, do not use inox cleaning agents around the knobs. The indicators around the knobs may be deleted.
- Clean the touch control panels with a damp soft cloth and dry with a dry cloth. If your product has a key lock feature, set the key lock before performing control panel cleaning. Otherwise, incorrect detection may occur on the keys.
8 Troubleshooting
Consult the Authorised Service Agent or technician with license or the dealer where you have purchased the product if you cannot remedy the trouble although you have implemented the instructions in this section. Never attempt to repair a defective product yourself.
Product does not operate.
- The mains fuse is defective or has tripped. >>> Check fuses in the fuse box. If necessary, replace or reset them.
- Product is not plugged into the (grounded) socket. >>> Check the plug connection.
- Buttons/knobs/keys on the control panel do not function. >>> If your product equipped with key lock function,keylock may be enabled. Please disable it.
- If the display does not light up when you switch the hob on again. >>> Disconnect the appliance at the circuit breaker. Wait minimum 20 seconds and then reconnect it.
• Overheat protection is active. >>> Allow your hob to cool down.
• The cooking pot is not suitable. >>> Check your pot.
"☐" and "☐" or "☐" symbol appears on the cooking zone display.
- You have not placed the pot on the active cooking zone. >>> Check if there is a pot on the cooking zone.
- Your pot is not compatible with induction cooking. >>> Check if your cooking pot is compatible with induction hob.
- The cooking pot is not centered properly or the bottom surface of the pot is not wide enough for the cooking zone. >>> Choose a pot wide enough and center the pot on the cooking zone properly.
- Cooking pot or cooking zone is overheated. >>> Allow them to cool down.
Selected cooking zone suddenly turns off during operation.
- Cooking time for the selected cooking zone may be over. >>> You may set a new cooking time or finish cooking.
• Overheat protection is active. >>> Allow your hob to cool down. - An object may be covering the touch control panel. >>> Remove the object on the panel.
The pot does not get warm even if the cooking zone is on.
- Your pot is not compatible with induction cooking. >>> Check if your cooking pot is compatible with induction hob.
- The cooking pot is not centered properly or the bottom surface of the pot is not wide enough for the cooking zone. >>> Choose a pot wide enough and center the pot on the cooking zone properly.
Cooling fan continues operating although the hob is turned off.
- This is not a fault. Cooling fan will continue operating until the electronics in the hob cools down to a suitable temperature.
Noise from the cooker during cooking
Some sounds may be heard from the cooker while cooking. These sounds are due to the composition of the cooking vessel. These sounds are normal, they are not a malfunction and they are a part of induction technology.
Possible noises and reasons
- Fan noise: The cooker is equipped with a fan that activates automatically according to the temperature of the appliance. The fan has various operating levels and operates at different levels as per the temperature.
- Lower buzz like the operating noise of a transformer: This is due to the nature of the induction technology. As the heat is transmitted directly to the base of the cooking vessel, such buzz sounds may be heard as per the material of the cooking vessel. Thus, different noises may be heard with different cookware.
- Cracking noise: The reason of this is the structure and material of the base of the cooking vessel. A cracking sound may be heard if the cooking vessel is made of various layers with different materials.
- Whining noise: A whining sound may be heard when two cooking zones on the same side of the cooker are used to cook with different cooking levels.
Error codes/reasons and possible solutions
| Error codes | Error reasons | Possible solutions |
| E 22E 26 | Induction hob is overheated. | Turn the induction cooker off and wait until it is cooled down. The error shall be resolved when temperature of the hob comes down below the limits. |
| E 46 | One or more keys are kept pressed for more than 10 seconds.An object is left on the control panel or the control is exposed to vapour. | The problem shall be resolved when you remove your hand from the hob.The problem shall be resolved when the control panel is cleaned. |
| E 47 | A pot suitable for induction heating is not used. | The error shall be resolved when a pot suitable for induction heating is used. |
| E 1 - E 15 | Communication error on induction hob. | Turn the induction hob off and operate again after 30 seconds.Contact the authorized dealership if the issue is resumed. |
| E 16 - E 21 | Temperature sensor error on induction hob. | Turn the induction hob off and operate again after 30 seconds.Contact the authorized dealership if the issue is resumed. |
| E 23 | Software error on induction hob. | Turn the induction hob off and operate again after 30 seconds. Contact the authorized dealership if the issue is resumed. |
| E 24 | ||
| E 25 | Fan operation error on induction hob. | Turn the induction hob off and operate again after 30 seconds. Contact the authorized dealership if the issue is resumed. |
| E 31 - E 45 | Electronic board hardware error on induction hob. | Turn the induction hob off and operate again after 30 seconds. Contact the authorized dealership if the issue is resumed. |
| E 48 | Sensor error on induction hob. | Sensor equipment shall be rendered compatible for the operating conditions. Contact the authorized dealership if the issue is resumed. |
| E 49 | ||
| E 51 | ||
| E 52 - E 57 | High temperature error on induction hob. | Turn the induction hob off and wait until it is cooled down. The error shall be resolved when temperature of the sensor comes down below the limits. Contact the authorized dealership if the issue is resumed. |
| FF | Any one of the keys may have been touched long. | When long touching on one of the keys was stopped, |
| A cooking pot may have come over the control unit. | When the cooking pot over the control unit is lifted, | |
| There may be food/liquid poured over the control unit. | Error will disappear when the food/liquid residues are cleaned. |
BLOMBERG UK AND IRELAND STANDARD MANUFACTURER GUARANTEE TERMS AND CONDITIONS
Your new Blomberg product is guaranteed against faulty materials, defective components or manufacturing defects.
The standard guarantee starts from the date of original purchase of the product, and lasts for a period of thirty six (36) months unless Beko plc (the "Manufacturer") agrees to extend the guarantee for the product in writing.
If you have any questions about the guarantee on your product (including how long it is valid), please contact your retailer or our contact centre on 0333 207 9870 (UK and Northern Ireland) or 01 691 0160 (Republic of Ireland)
This guarantee does not in any way diminish or affect your statutory rights in connection with the product. This guarantee is in addition to your statutory rights as a consumer. If you have any questions about these rights, please contact the retailer from which you purchased the product. In certain circumstances, it is possible that your statutory rights may offer additional or higher levels of protection than those offered under the terms of this guarantee.
What is covered by this guarantee?
- Repairs to the product required as a result of faulty materials, defective components or manufacturing defects.
• Functional replacement parts to repair a product.
• The costs of a Blomberg Approved Engineer to carry out the repair.
What is not covered?
• Transit and delivery damage.
- Cabinet or appearance parts, including but not limited to control knobs, flaps and handles.
- Accessories and/or consumable items including but not limited to ice trays, scrapers, cutlery baskets, filters and light bulbs.
• Repairs necessary as a direct or indirect result of:
- Accidental damage, misuse or abuse of a product.
- An attempted repair of a product by anyone other than a Blomberg Approved Engineer (the "Engineer").
- Installation or use of a product where such installation or use fails to meet the requirements contained in this guarantee or the User Instructions Booklet.
- Repairs to a product operated at any time on commercial or non-residential hold premises (unless we have previously agreed to the installation environment).
This guarantee is limited to the cost of repairing the product. To the extent permitted by law, the Manufacturer does not accept and will not be held liable for any financial loss incurred in connection with the failure of any product to operate in accordance with the expected standards. Such financial loss includes but is not limited to loss arising from:
• Time taken off work.
• Damaged food, clothing or other items.
• Meals taken at restaurants or from takeaways.
• General compensation for inconvenience.
Important Notes
- Your product is designed and built for domestic household use only.
- The guarantee will automatically be void if the product is installed or is used in commercial or non-residential domestic household premises, unless we have previously agreed to the installation environment.
- The product must be correctly installed, located and operated in accordance with the instructions contained in the User Instructions Booklet provided with your product.
- Professional installation by a qualified Electrical Domestic Appliance Installer is recommended for all Washing Machines, Dishwashers and Electric Cookers (as incorrect installation may result in you having to pay for the cost of repairing the product).
- Gas Cookers must be professionally installed by a Gas Safe (or Gas Networks Ireland for Republic of Ireland) registered gas installer.
- This guarantee is given in respect of products purchased and used within the United Kingdom and the Republic of Ireland.
- This guarantee is effective from the initial date of purchase of a new product from an authorised retailer and will be void if the product is resold.
- This guarantee does not apply to graded sales (where the product is purchased as a "second").
- Possession of a copy of these terms and conditions does not necessarily mean that a product has the benefit of this guarantee. If you have any questions, please call our Call Centre on the number set out above.
- The Manufacturer reserves the right to terminate the guarantee if its staff or representatives are subjected to physical or verbal abuse in the course of carrying out their duties.
- Optional extras, where available (i.e. extendable feet) are supplied on a chargeable basis only.
Does Blomberg offer replacements?
This is a repair-only guarantee. On occasion, the Manufacturer may at its sole discretion, replace your product with a new product instead of carrying out a repair. Where a replacement is offered, this would normally be an identical model but when this is not possible, a model of similar specification will be provided. The
Manufacturer will cover the costs and arrange for the delivery of the new product and for the return of the old product. Any costs related to disconnecting the faulty product and installing the replacement product will not be borne by the Manufacturer unless previously agreed to in writing. The original guarantee will continue to apply to the replacement product; the new product will not come with a new guarantee.
When will the repair take place?
Our Engineers work Monday to Friday 9.00am to 5.00pm. Appointments outside these hours may be possible at the sole discretion of the Manufacturer but cannot be guaranteed. Whilst our Engineers will endeavour to minimize inconvenience and to meet requests for specific timed appointments, this cannot be guaranteed. We will not be liable for delays or if it is unable to carry out a repair because a convenient appointment cannot be arranged.
Will there be any charge for the repairs?
It is your responsibility to provide evidence to the Engineer that your product is covered by this guarantee with a proof of purchase. The Manufacturer reserves the right to charge for the reasonable cost of any service call if:
• You cannot provide evidence that your product is covered by this guarantee.
- Where a service call has been made and the engineer finds that there is no fault with your product.
- That your product has not been installed or operated in accordance with the User Instructions Booklet.
- That the fault was caused by something other than faulty materials, defective components or manufacturing defects.
• For missed appointments.
Payment of these costs are due immediately upon the Engineer providing you with an invoice. The Manufacturer reserves the right to terminate the guarantee if you fail to pay the costs for the service call in a timely manner.
If you are a resident of the United Kingdom, this guarantee will be governed by English law and subject to the English Courts, save where you live in another part of the United Kingdom, in which case the law and courts of that location will apply.
If you are resident in the Republic of Ireland, this guarantee will be governed by Irish law and the Irish courts will have jurisdiction.
This guarantee is provided by Beko plc. Beko House, 1 Greenhill Crescent, Watford, Hertfordshire. WD18 8QU.
Beko plc is registered in England and Wales with company registration number 02415578.
BLOMBERG UK AND IRELAND OPTIMA INVERTER MOTOR GUARANTEE TERMS AND CONDITIONS
This 10 year guarantee relates to Blomberg products that feature the Optima Inverter Motor.
The Optima Motor guarantee terms and conditions are in addition to our Standard guarantee terms and conditions detailed in the previous section.
In order to activate the 10 year guarantee you MUST register the appliance within 90 days of the original purchase date. You can register by first visiting blomberguk.com/register and by following the online instructions.
All Blomberg appliances come with a 3 year parts and labour guarantee as standard. When you register your appliance for the Optima Inverter Motor 10 year guarantee, you are also registering your appliance for the standard 3 year parts and labour guarantee.
Blomberg built-in or integrated products purchased from Euronics agents come with a 3 year parts and labour guarantee which is extended to 5 years, free of charge, upon registration of the appliance. When you register your appliance for this additional 2 years, you will automatically activate the Optima Inverter Motor 10 year guarantee. You do not need to register twice. To make a claim against your Blomberg Optima Inverter Motor Guarantee (the "Guarantee"), all customer and product details must be registered with Beko plc using the procedure outlined below.
- This extra 7 years or 5 years (for built-in appliances from Euronics agents) Guarantee is only effective after the expiration of the standard manufacturer's guarantee.
- It is only valid for the Optima Inverter motors of selected washing machines, washer-dryers, tumble dryers and dishwashers. It does not cover any labour charge or any other components of the product. In addition, it is only valid for one replacement of the Optima motor during the extra 9-year (for free standing appliances) or 8 year (for built-in appliances) guarantee period.
- To activate your guarantee, you MUST register your appliance within 90 days of the original purchase date, by visiting blomberguk.com/register.
- Customers will receive a unique reference code as proof of guarantee validation by email or post, which must be quoted at the time of a claim being made.
-
Any repair/replacement of the Optima Inverter motor must only be carried out by an authorised Blomberg Service Agent (the "Service Agent").
-
Labour for the repair/replacement of the Optima Inverter motor is not included in this guarantee and is chargeable directly by the Service Agent.
-
Any additional components fitted to the product at any time will not be covered by this guarantee and will be chargeable directly by the Service Agent.
-
The guarantee is not transferable and cannot be exchanged for cash.
-
There are no alternative or additional offers to this Guarantee.
-
The guarantee is exclusive of the manufacturer's standard guarantee
-
The Terms and Conditions shown above are in addition to the standard terms and conditions of your product guarantee. Please read and refer to such Terms and Conditions when making any claim.
-
We may use the information you provide for marketing purposes and to analyse your purchasing preferences. We may keep your information for a reasonable period for these purposes in accordance with the applicable Data Protection Laws and General Data Protection Regulations (GDPR). You can opt into this service during the registration process. Further details are available at http://www.blomberguk.com/cookie-and-privacy.
-
These Terms and Conditions are governed by the laws of England and Wales; manufacturer: Beko plc, Beko House, 1 Greenhill Crescent, Watford WD18 8QU. Company Registration Number: 02415578.
HOW TO OBTAIN SERVICE FOR YOUR APPLIANCE
Please keep your purchase receipt or other proof of purchase details in a safe place; you will need to have this documentation available should the product require attention under guarantee.
Please take a few moments to complete the details below, as you will need this information when you call us, or to use our online services. When you call us you may be required to input your serial number into your telephone keypad. For help please visit Blomberguk.com/support/model-finder
- The product model number is printed on the Operating Instruction Booklet / User guide
- The product model and serial number is printed on the Rating Label affixed to the appliance.
- The Retailer (Purchased from) and Date of purchase will be printed on your purchase receipt or other proof of purchase paperwork
Recording of these details alone will not count as proof of purchase. A valid proof of purchase is required for requesting service under guarantee.
| Model number | Serial number | Purchased from | Date of purchase |
For service under guarantee or for product advice please call our Contact centre
Before requesting service please check the troubleshooting guide in the Operating Instructions booklet, as a charge may be levied where no fault is found, and even though your product may still be under guarantee.
After arranging service the area around the product must be easily accessible to the Engineer, without the need for cabinets or furniture to be removed or moved.
It is your responsibility to ensure our Engineers have a clean and safe environment to carry out any repairs.
Please have your Model number and Serial number available when you call us, as you may be required to input your serial number into your telephone keypad during your call.
UK Mainland & Northern Ireland:
0333 207 9870
Landline or mobile calls to 0333 numbers cost no more than calls to geographic numbers 01 or 02, and are charged at the basic rate. Calls from landlines and mobiles are included in free call packages but please check with your telephone service provider for exact call charges.
Republic of Ireland:
01 691 0160
Service once the manufacturers guarantee has expired
If you have purchased an extended guarantee please refer to the instructions contained within the extended guarantee agreement document, otherwise please call us using the appropriate number above, where service can be obtained at a charge.
Should you experience any difficulty in obtaining service please call us on 0333207 9870 or 01 691 0160
Contact us though our website
Send us a secure message through our online contact us form. Please visit our website, click Contact Us and choose a product support topic from the list of options. Complete the required details and click send message.
Product registrations
For UK and Republic of Ireland product registrations please visit blomberguk.com/register


- Blomberg
- Built-in Hob
- User Manual
- Dear Customer,
- Please read this manual before using the product.
- TABLE OF CONTENTS
- Safety instructions 4
- Environmental Instructions 10
- Your product 11
- First use 15
- How to use the hob 16
- General information about cooking 27
- Maintenance and care 28
- Troubleshooting 30
- Safety instructions
- Purpose of usage
- Child, vulnerable person and pet safety
- Electrical safety
- (Not all products are supplied with a plug, so if your product DOES have a plug)
- ! Transportation safety
- Temperature warnings
- Accessory use
- Cooking safety
- Induction
- Environmental Instructions
- Waste regulation Compliance with the WEEE Directive and Disposing of the Waste Product
- Compliance with RoHS Directive:
- Package information
- Recommendations for energy saving
- Your product
- Product introduction
- Product control panel introduction and usage
- Hob control
- Keys and symbols
- Cooking zone display
- Timer display
- General information on hob
- Rear left - Induction cooking zone
- First use
- First cleaning
- NOTICE
- How to use the hob
- General information on hob usage
- General warnings
- Operating principle of the induction hob
- Advantages of cooking with induction Induction hobs offer some advantages as the heat is transferred directly to the cooking pots/pans.
- For a safe operation:
- Cooking pots/pans
- Suitable pots/pans:
- Unsuitable pots/pans:
- Recommendations:
- Cooking pots/pans test
- Automatic detection of the cooking pots/pans
- Cooking zone with wide surface (flexi)
- As two independent cooking zones
- As a single cooking zone
- Control panel
- General warnings for the control panel
- Turning the hob on
- Turning the hob off
- Remaining heat indicator
- Turning the hobs on (cooking zone) and setting the temperature level
- Turning off the hobs:
- Combination of the hob zones with wide surface (flexi) (if hob zones with wide surfaces are available on your hob)
- Combination of the hobs with wide surface (flexi) while one or both of the hobs on the left are operating (if hobs with wide surfaces are available on your hob)
- Turning the cooking zones with wide surface off (if hobs with wide surfaces are available on your hob)
- High power setting (BOOSTER)
- Selecting high power setting (BOOSTER) directly:
- Selecting high power setting (BOOSTER) while the hob zone is active:
- Turning the high power setting (BOOSTER) off before its expiration:
- Cleaning lock
- Activating the cleaning lock
- Deactivating the cleaning lock
- Key Lock
- Activating the key lock
- Deactivating the key lock
- Timer function
- Turning off the timers
- Turning off the timers prematurely
- Turning off by reducing the timer setting to "00" level:
- Stop function
- Settings
- 1- Power management setting (CFI)
- 2- Cooking-end audible signal time setting (cF2)
- 3- Hob-Hood connection setting (cF3)
- Setting hood operation level over the hob
- Using induction hobs safely and effectively
- Automatic turning off system
- Overheating protection
- Overflow protection system
- Precise power setting
- General information about cooking
- General warnings about cooking with hob
- Maintenance and care
- General cleaning information
- ▲ General warnings
- For the hob:
- Inox and stainless surfaces
- Glass surfaces
- Plastic parts and painted surfaces
- Cleaning the hob
- Glass cooking surface
- Cleaning the control panel
- Troubleshooting
- Product does not operate.
- "☐" and "☐" or "☐" symbol appears on the cooking zone display.
- Selected cooking zone suddenly turns off during operation.
- The pot does not get warm even if the cooking zone is on.
- Cooling fan continues operating although the hob is turned off.
- Noise from the cooker during cooking
- Possible noises and reasons
- BLOMBERG UK AND IRELAND STANDARD MANUFACTURER GUARANTEE TERMS AND CONDITIONS
- What is covered by this guarantee?
- What is not covered?
- Important Notes
- Does Blomberg offer replacements?
- When will the repair take place?
- Will there be any charge for the repairs?
- BLOMBERG UK AND IRELAND OPTIMA INVERTER MOTOR GUARANTEE TERMS AND CONDITIONS
- HOW TO OBTAIN SERVICE FOR YOUR APPLIANCE
- For service under guarantee or for product advice please call our Contact centre
- 207 9870
- 691 0160
- Service once the manufacturers guarantee has expired
- Contact us though our website
- Product registrations
Marke : BLOMBERG
Modell : MIN74387NP
Kategorie : Herd