
LM100G - Fernbedienung Uni-T - Kostenlose Bedienungsanleitung
Finden Sie kostenlos die Bedienungsanleitung des Geräts LM100G Uni-T als PDF.


| Produkttyp | Laser-Distanzmessgerät (Fernbedienung) |
| Marke | Uni-T |
| Modell | LM100G |
| Messbereich | 100 m |
| Genauigkeit | ± (2,0 mm + 5×10⁻⁵ × D) |
| Messreferenz | Vorne / Mitte / Hinten |
| Display | 2,4-Zoll-EBTN-Bildschirm |
| Lasertyp | Klasse 2, 505–515 nm, <1 mW |
| Stromversorgung | 3 × AAA NiMH-Akkus (1,2 V), aufladbar über Micro-USB |
| Abmessungen | 59 × 28 × 137 mm |
| Gewicht (mit Akkus) | 170 g |
| Betriebstemperatur | 0 °C bis 40 °C |
| Messfunktionen | Einzelmessung, Dauermessung (Min/Max), Fläche, Volumen, direkte/indirekte Pythagoras-Messung, Auto-Horizontal, Auto-Vertikal, Addition/Subtraktion |
| Datenprotokoll | 20 Gruppen |
| Auto-Ausschaltung | Nach 3 Minuten Inaktivität |
| Zubehör | 3 × AAA NiMH-Akkus, Micro-USB-Kabel, Tragetasche, Bedienungsanleitung |
| Reinigung und Pflege | Das Gerät mit einem weichen, trockenen Tuch reinigen. Keine aggressiven Reinigungsmittel verwenden. |
| Sicherheitshinweise | Nicht in die Laserstrahlung blicken. Laserschutzklasse 2 beachten. Gerät vor Feuchtigkeit und extremer Hitze schützen. |
| Garantie | 1 Jahr ab Kaufdatum |
Häufig gestellte Fragen - LM100G Uni-T
Benutzerfragen zu LM100G Uni-T
0 Frage zu diesem Gerät. Beantworten Sie die, die Sie kennen, oder stellen Sie Ihre eigene.
Eine neue Frage zu diesem Gerät stellen
Laden Sie die Anleitung für Ihr Fernbedienung kostenlos im PDF-Format! Finden Sie Ihr Handbuch LM100G - Uni-T und nehmen Sie Ihr elektronisches Gerät wieder in die Hand. Auf dieser Seite sind alle Dokumente veröffentlicht, die für die Verwendung Ihres Geräts notwendig sind. LM100G von der Marke Uni-T.
BEDIENUNGSANLEITUNG LM100G Uni-T
LM50G/LM70G/LM100G Laser Distance Meter – Green Edition User Manual
Preface
Thank you for purchasing this brand new product. In order to use this product safely and correctly, please read this manual thoroughly, especially the safety notes.
After reading this manual, it is recommended to keep the manual at an easily accessibleplace, preferably close to the device, for future reference.
Limited Warranty and Liability
Uni-Trend guarantees that the product is free from any defect in material and workmanship within one year from the purchase date. This warranty does not apply to damages caused by accident, negligence, misuse, modification, contamination or improper handling. The dealer shall not be entitled to give any other warranty on behalf of Uni-Trend. If you need warranty service within the warranty period, please contact your seller directly.
Uni-Trend will not be responsible for any special, indirect, incidental or subsequent damage or loss caused by using this device.
I. Appearance
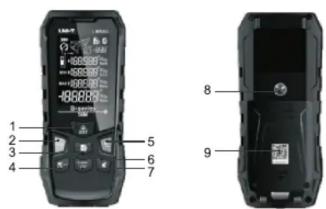
| No. | Description | Short press | Long press |
| 1 | Distance button | Enter single measurement mode | Power on meter (in the off state)/Enter continuous measurement mode |
| 2 | Function button | Switch measurement function | N/A |
| 3 | Log button | Scroll up log | Save log |
| 4 | Unit/Reference button | Switch reference | Switch unit |
| 5 | Add/Subtract button | Add | Subtract |
| 6 | Sound button | Turn on/off buzzer | N/A |
| 7 | Clear/Off button | Delete log/Return after clearance | Power off meter |
| 8 | Tripod mounting hole (size: 1⁄4 inch) | N/A | N/A |
| 9 | Battery compartment | N/A | N/A |
II. Measurement Function Icons
| Single/Continuous measurement | |
| Area measurement | |
| Triangular area measurement | |
| Volume measurement | |
| Direct Pythagoras measurement | |
| Indirect Pythagoras measurement 1 | |
| Indirect Pythagoras measurement 2 | |
| Auto horizontal measurement | |
| Auto vertical measurement |
III. Operating Instructions
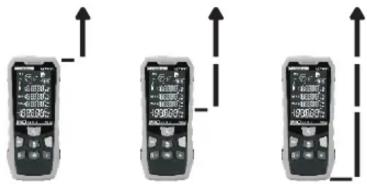
Turn on the meter and it will enter the single measurement mode by default. Press the button and the flashing edge is the edge to be measured.
- Please pay attention to the measurement reference. The starting point will be different when different reference points are selected.
The measurement reference in this manual refers to the rear reference.
1. Single Measurement
Turn on the meter and it will enter the single measurement mode by default. Point the laser at the measurement target, then press the 📄 button and the measurement result will be displayed at the bottom of the screen.
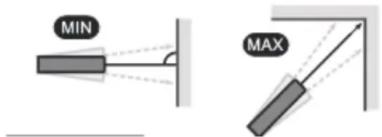
2. Continuous Measurement (Max/Min Measurement)
This function can be used to measure the diagonal of a house, look for levels, stake out, etc.
Long press the 📁 button to enter the continuous measurement mode. Point the laser at the measurement target, and then press the 📁 button to stop measuring. The MIN/MAX/current measured value will be displayed on the screen successively.
- This function will stop automatically after 5 minutes of continuous measurement.
3. Area Measurement
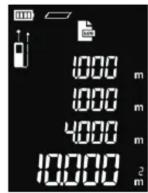
1) Press the ➤ button to switch to the area measurement □.
2) According to the flashing edge, point the laser at the first point of the target, and press the 📄 button to measure the first edge (length).
3) Point the laser at the second point of the target, and press the 📄 button again to measure the second edge (width).
4) The calculation results of the length, width, circumference and area will be displayed on the screen successively.
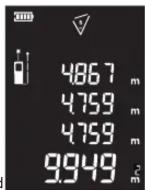
4. Triangular Area Measurement
1) Press the ▷ button to switch to the triangular area measurement √.
2) According to the flashing edge, point the laser at the first point of the target, and press the 🔊 button to measure first edge. the
3) Point the laser at the second point of the target, and press the 📄 button again to measure the second edge.
4) Point the laser at the third point of the target, and press the 📄 button again to measure the third edge.
5) The calculation result of the triangular area will be displayed at the bottom of the screen.
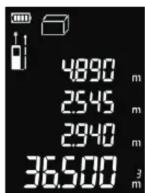
5. Volume Measurement
1) Press the button to switch to the volume measurement.
2) According to the flashing edge, point the laser at the first point of the target, and press the button to measure the first edge (length).
3) Point the laser at the second point of the target, and press the button to measure the second edge (width).
4) Point the laser at the third point of the target, and press the 📄 button again to measure the third edge (height).
5) The volume calculation result will be displayed at the bottom of the screen.
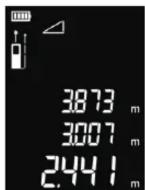
6. Pythagoras Measurement
All the Pythagoras measurement can be applied to different plane measurement, as long as the right-angle side is perpendicular to the object being measured.
Note: In Pythagorean Theorem, the right-angle side cannot be longer than the hypotenuse; otherwise a calculation error will occur.
1) Press the ▷ button to switch to the direct Pythagoras measurement ∠.
2) According to the flashing edge, point the laser at the first point of the target, and press the button to measure the hypotenuse.
3) Rotate to the direction perpendicular to the target with the set reference as center, and press the button to measure one right-angle side.
4) The calculation result of the other right-angle side is displayed at the bottom of the screen.
7. Indirect Pythagoras Measurement ①
1) Press the button to switch to the indirect Pythagoras measurement ①.
2) According to the flashing edge, point the laser at the first point of the target, and press the kbutton to measure the first hypotenuse.
3) Rotate to the direction perpendicular to the target with the set reference as center, and press the button to measure one right-angle side.
4) Rotate to the third point of the target with the same reference as center, and press the button to measure the second hypotenuse.
5) The calculation result of the length between the first point and the third point is displayed at the bottom of the screen.
8. Indirect Pythagoras Measurement ②
1) Press the button to switch to the indirect Pythagoras measurement ②.
2) Point the laser at the first point of the target, and press the button to measure the first hypotenuse.
3) Rotate to the second point of the target with the set reference as center, and press the button to measure the second hypotenuse.
4) Rotate to the direction perpendicular to the target with the same reference as center, and press the button to measure the third right-angle side.
5) The calculation result of the length between the first point and the second point is displayed at the bottom of the screen.
9. Auto Horizontal Measurement
1) Press the button to switch to the auto horizontal measurement.
2) According to the flashing edge, point the laser at the first point of the target, and press the button.
3) The angle degree between the hypotenuse and the horizontal edge, the length of the hypotenuse edge, the length of the horizontal edge, and the length of the vertical edge will be displayed on the screen from top to bottom.
10. Auto Vertical Measurement
1) Press the button to switch to the auto vertical measurement.
2) According to the flashing edge, point the laser at the first point of the target, and press the button to measure the first hypotenuse.
3) Rotate to the second point of the target with the set reference as center, and press the button to measure the second hypotenuse.
4) The calculation result of the length between the first point and the second point is displayed at the bottom of the screen.
IV. Standard Accessories
| Accessories | Quantity | Accessories | Quantity |
| 1.2V (AAA) NiMH batteries | 3 | User manual | 1 |
| Micro USB cable | 1 | Pouch | 1 |
Technical Parameters
| Model | LM50G LM70G LM100G |
| Range (m) | 50m 70m 100m |
| Accuracy (mm) | ± (2.0mm+5×10^-5D) |
| Single measurement | √ |
| Continuous measurement | √ |
| Area measurement | √ |
| Volume measurement | √ |
| Direct Pythagoras | √ |
| Indirect Pythagoras 1 | √ |
| Indirect Pythagoras 2 | √ |
| Addition/Subtraction | √ |
| Auto horizontal measurement | √ |
| Auto vertical measurement | √ |
| Display type | 2.4-inch EBTN screen |
| Measurement reference | Front/Middle/Rear reference |
| Measurement unit | m/ft/in/ft+in |
| Data logging | 20 groups |
Auto power off 3 minutes without operation
Laser class Class 2
Laser type 505-515nm, <1mW
Battery type 3 AAA rechargeable batteries (1.2V, NiMH)
Operating temperature 0^ C \~ 40^ C ( 32^ F \~ 104^ F)
Interface type Micro USB interface (for charging)
Size (mm) 59 x 28 x 137
Weight (including batteries) 170g
1. Range
The range data is based on the rear reference (default); the maximum range may vary depending on the model version, and the actual range is shown on the product packaging.
2. Accuracy ("D" represents the measured length)
Under good measurement conditions (good measurement surface/room temperature/indoor lighting, etc.): up to the rated range.
Under poor measurement conditions (too much light, weak reflection on the surface of the measured object or large temperature difference, etc.): the error may increase. Tip: Use a reflector or a good reflective surface in the case of poor daylight or target reflection.
3. In the ideal state, the short distance accuracy can be up to 1mm
(Ideal state refers to constant speed (speed < 1m/s) and flat contact surface; short distance means <1.5m)
4. Angle Error
0.1° is the error caused by the temperature, D is +/-0\~45°.
For example, the 0 degree error is +/-0.3^ at room temperature, the 45 degrees error is +/-0.85^ at non-room temperature.
VI. Fault Code – Problems and Solutions
All information is displayed in code or "Error". The following shows the codes and their explanations and the corresponding solutions:
| Code | Problems | Solutions |
| 204 | Calculation error | Follow the instructions and operate again |
| 220 | Low battery | Please replace the batteries or charge them |
| 255 | The reflected light received is weak, or the measurement time is too long | Please improve the reflective surface(use a reflector, white paper, etc.) |
| 256 | The received signal is too strong | Please improve the reflective surface(use a reflector, or do not aim at strong light) |
| 261 | Over range | Please measure within the range |
| 500 | Hardware malfunction | If it still appears after the meter has been turned on/off multiple times, please contact |
- LM50G/LM70G/LM100G Laser Distance Meter – Green Edition User Manual
- Preface
- Limited Warranty and Liability
- Appearance
- Measurement Function Icons
- Operating Instructions
- Single Measurement
- Continuous Measurement (Max/Min Measurement)
- Area Measurement
- Triangular Area Measurement
- Volume Measurement
- Pythagoras Measurement
- Indirect Pythagoras Measurement ①
- Indirect Pythagoras Measurement ②
- Auto Horizontal Measurement
- Auto Vertical Measurement
- Range
- Accuracy ("D" represents the measured length)
- In the ideal state, the short distance accuracy can be up to 1mm
- Angle Error
- Fault Code – Problems and Solutions
Marke : Uni-T
Modell : LM100G
Kategorie : Fernbedienung