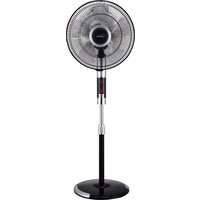
FS40-7ARB - Ventilator MIDEA - Kostenlose Bedienungsanleitung
Finden Sie kostenlos die Bedienungsanleitung des Geräts FS40-7ARB MIDEA als PDF.


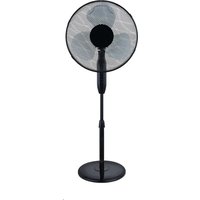
| Typ | Standventilator |
| Modell | FS40-7ARB |
| Marke | MIDEA |
| Durchmesser des Lüfterblatts | 40 cm |
| Fernbedienung | Ja (im Lieferumfang enthalten) |
| Oszillation | Ja (4 Modi: schwingend, fluktuierend, Acht-Schwung, fest) |
| Timer | Ja, bis zu 8 Stunden (Ein- und Ausschalttimer) |
| Geschwindigkeitsstufen | 4 |
| Betriebsmodi | Normal, Natur, Schlaf |
| Höhenverstellung | Ja, durch Verstellring |
| Neigungsverstellung | Ja, manuell |
| Sicherheitsfunktionen | Überhitzungsschutz (Thermosicherung) |
| Reinigung | Außenteile mit leicht feuchtem Tuch abwischen; kein Wasser ins Motorgehäuse |
| Montage | Basis, Verlängerungsstange, Schutzgitter und Lüfterblatt müssen montiert werden |
| Stromversorgung | 220–240 V ~ 50 Hz (Standard Haushaltsstrom) |
Häufig gestellte Fragen - FS40-7ARB MIDEA
Benutzerfragen zu FS40-7ARB MIDEA
0 Frage zu diesem Gerät. Beantworten Sie die, die Sie kennen, oder stellen Sie Ihre eigene.
Eine neue Frage zu diesem Gerät stellen
Laden Sie die Anleitung für Ihr Ventilator kostenlos im PDF-Format! Finden Sie Ihr Handbuch FS40-7ARB - MIDEA und nehmen Sie Ihr elektronisches Gerät wieder in die Hand. Auf dieser Seite sind alle Dokumente veröffentlicht, die für die Verwendung Ihres Geräts notwendig sind. FS40-7ARB von der Marke MIDEA.
BEDIENUNGSANLEITUNG FS40-7ARB MIDEA

natural_image
Line drawing of a standard 16-inch outdoor fan with a mounted stand and control panel (no text or symbols)OWNER'S MANUAL
STAND FAN
MODEL:FS40-7ARB
Please read the instruction manual carefully before use and safekeeping.
CAUTION
Read Rules for Safe Operation and Instructions Carefully.
WARNING
-
If the supply cord is damaged, it must be replaced by manufacturer or its service agent or a similarly qualified person in order to avoid a hazard.
-
To protect against the risk of electrical shock, do not immerse the unit, cord or plug in water or other liquid.
-
This appliance is not intended for use by persons (including children) with reduced physical, sensory or mental capabilities, or lack of experience and knowledge, unless they have been given supervision or instruction concerning use of the appliance by a person responsible for their safety. Young children should be supervised to ensure that they do not play with the appliance.
-
When the appliance is not in use and before cleaning, unplug the appliance from the outlet.
-
Keep electrical appliances out of reach from Children or infirm persons. Do not let them use the appliances without supervision.
-
When the fan was assembled, the rotor blade guard shall not be taken off anymore
-
Prior cleaning unplug the fan
- The rotor guard shall not be dissembled/opened to clean the rotor blades.
- Wipe the fan enclosure and rotor blade guard with a slightly damp cloth.
RULES FOR SAFE OPERATION
- Never insert fingers, pencils, or any other object through the grille when fan is running.
- Disconnect fan when moving from one location to another.
- Be sure fan is on a stable surface when operating to avoid overturning.
- DO NOT use fan in window, rain may create electrical hazard.
- Indoor use only.

ASSEMBLY OF BASE & COLUMN UNIT
- Unscrew the "7" finger screw from the Extension Pole. (Fig.1)
- Insert the extension pole in the base and tighten the "7" Finger screw. (Fig.2)
- From the extension pole loosen the height adjustment ring and adjust the internal pipe to the desired height. (Note: If you can't find the internal pole, it slides inside the extension pole. You can pull it out from the extension pole.) (Fig.3)
- To attach the head unit to the extension pole, loosen the thumb screw on the bottom of the head unit. Place the head unit on the extension pole and tighten the thumb screw in alignment with the groove on the internal pole. (Fig.4)
CAUTION: Height adjustment ring must be fully fastened before the assembly of the motor section to the extension pole.

GUARD & FAN BLADE ASSEMBLY
- Unscrew the spinner clockwise (or take the spinner out from the bag) and the plastic nut counter clockwise to remove both of them. Fix the rear guard to the motor then tighten the plastic nut again. (Fig.5)
- Insert the blade into shaft, and make sure the rotor shaft pin is fitted into groove of the blade. Turn the spinner counter clockwise to tighten the blade. (Fig.6)
- Fix the front guard and the rear guard with circlip and then use the fasten clip to tighten the fan guard. (Fig.7)


natural_image
Illustration of two fans with a handle, one showing internal blades and the other showing a curved arm (no text or symbols)OPERATING INSTRUCTION
I. Remote Controller (Fig.8)
a. KEY INSTRUCTION
1. “ ⏻ ” ON key and “ ⏻ ” OFF key
The ON key is for switching on the fan. The fan will be started at breeze step. Press the OFF key if the fan needs to switch off.
2. “✿” SPEED key
After the fan has started, press this key to select the fan speed. The sequence is 1.2.3.4 when the key is touched repeatedly. The lights on the display can indicate fan speed state.
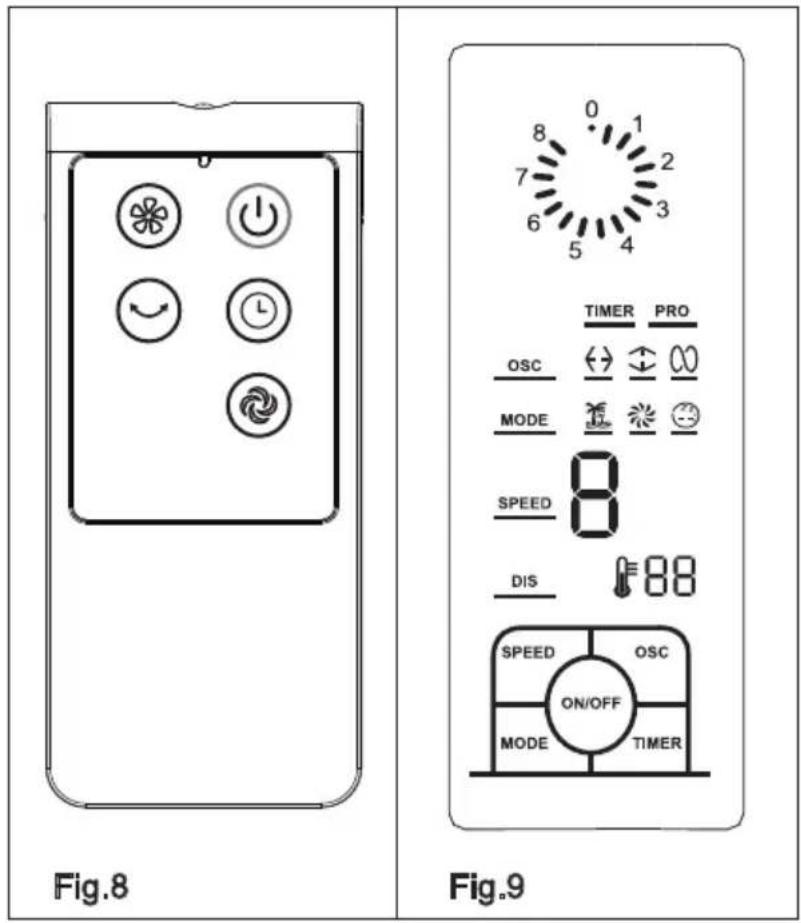
3. “ ” MODE key
Press this key to select mode. The sequence is normal, natural and sleep when this key being touched repeatedly or continuously. The light can indicate mode state.
Normal wind
Press the “ ” key to select the normal wind, then press the “speed” repeatedly to choose 4 speed.
Natural wind
Press the “ ” key to select the natural wind, then press the “speed” repeatedly to choose 4 speed.
Sleep wind
Press the “ 🔒 ” key to select the sleep wind, then press the “speed” repeatedly to choose 4 speed.
- “ Ⓛ ” TIMER key
Press the “ Ⓛ ”key. The “ timer ” light is flashing the timer dial and the first finger light are on. Each finger light represent half an hour in the time dial.
The fan is delivering air/stop when the finger light is on/off. This key is touched repeatedly for selecting the timer.
The timer will be increased by half an hour timely and sum to the 8 hours finally. The press of time slot must be in 5 seconds, otherwise the timer setting is finished automatic.
The “ Ⓛ ” LED stop flashing after finishing the setting. When all finger lights are off, the fan will stop.
Timer for ON, Must press the timer when the fan is off
Timer for OFF, Must press the timer after the fan is on.
- “ ∽ ” OSC key
After the fan has started, press this key to select oscillation mode. The sequence is wiggly, fluctuating, eight-rock and fixedly. The lights on the display can indicate fan oscillation mode.
b. BATTERIES (not included)
(1) Slide the battery compartment Cover.
(2) Insert the batteries, and make sure that the batteries are placed as shown in the Fig.10.
(3) Slide back the battery cover.
NOTES: Use size "AAA" manganese or alkaline batteries. Do not use rechargeable batteries.

c. BATTERY WARNING AS BELOW
- "Do not dispose of batteries in fire, batteries may explode or leak."
- -Do not mix old and new batteries.
- -Do not mix alkaline, standard (carbon-zinc) or rechargeable (nickel-cadmium) batteries.

natural_image
Illustration showing two hand tools: a manual tool and a handheld device, both with no visible text or symbols.d. REMOTE CONTROLLER OPERATION
Point the remote controller at the receptor on body of the fan and press the desired button. The remote controller will work at distances of up to roughly five meters and the angle of 30 degree included between right and left from the receptor. The batteries must be removed from the remote controller before it is scrapped and that they are disposed of safely.
e. OVERHEAT PROTECTION OF THE MOTOR
The windings of the motor have a thermal-fuse that burns out and the fan switches off and temperature of the motor is no longer going up so that plastic parts of the fan don't subject to deformation so far so to be burned by the overheat if the motor is overheat for any unexpected reason.
II. Control Panel (Fig.9)
These keys of the control panel may be used as same as of the remote controller.
III. Tilt Adjustment
To adjust the air flow upward or downward, push the guards lightly to the desired direction.
IV. Height Adjustment
The height of the fan can be adjusted by loosening the locknut carefully raising or lowering the fan and firmly re-tightening the locknut.
MAINTENANCE INSTRUCTION
The fan requires little maintenance. Do not try to fix it by yourself. Refer it to qualified service personnel if service is needed.
- Before cleaning and assembling, fan must be unplugged.
- To ensure adequate air circulation to the motor, keep vents at the rear of the motor free of dust. Do not disassemble the fan to remove dust.
- Please wipe the exterior parts with a soft cloth soaking a mild detergent.
- Do not use any abrasive detergent or solvents to avoid scratching the surface. Do not use any of the following as a cleaner: gasoline, thinner, bending.
- Do not allow water or any other liquid into the motor housing or interior parts.
CLEANING
- Be sure to unplug from the electrical supply source before cleaning.
- Plastic parts should be cleaned with a soft cloth moisten with mild soap. Thoroughly remove soap film with dry cloth.
GD Midea Environment Appliances Manufacturing CO.,LTD.
Midea Industrial Park, Dongfu Road, Dongfeng Town, Zhongshan, Guangdong, China
- OWNER'S MANUAL
- STAND FAN
- MODEL:FS40-7ARB
- CAUTION
- WARNING
- RULES FOR SAFE OPERATION
- ASSEMBLY OF BASE & COLUMN UNIT
- GUARD & FAN BLADE ASSEMBLY
- OPERATING INSTRUCTION
- Remote Controller (Fig.8)
- a. KEY INSTRUCTION
- “ ⏻ ” ON key and “ ⏻ ” OFF key
- “✿” SPEED key
- “ ” MODE key
- Normal wind
- Natural wind
- Sleep wind
- b. BATTERIES (not included)
- c. BATTERY WARNING AS BELOW
- d. REMOTE CONTROLLER OPERATION
- e. OVERHEAT PROTECTION OF THE MOTOR
- Control Panel (Fig.9)
- Tilt Adjustment
- Height Adjustment
- MAINTENANCE INSTRUCTION
- CLEANING
Marke : MIDEA
Modell : FS40-7ARB
Kategorie : Ventilator