
HES-35VD - Chauffe-eau instantané et cumulus HITACHI - Kostenlose Bedienungsanleitung
Finden Sie kostenlos die Bedienungsanleitung des Geräts HES-35VD HITACHI als PDF.

| Produkttyp | Durchlauferhitzer und Warmwasserspeicher (Kombigerät) |
| Marke | Hitachi |
| Modell | HES-35VD |
| Fassungsvermögen | 35 Liter |
| Heizleistung | 2,0 kW (elektrisch) |
| Spannung | 230 V / 50 Hz |
| Schutzart | IP24 (Spritzwasserschutz) |
| Abmessungen (H × B × T) | ca. 600 × 400 × 400 mm |
| Gewicht | ca. 20 kg |
| Betriebsdruck max. | 6 bar |
| Temperaturbereich | 30 °C – 75 °C (einstellbar) |
| Sicherheitsventil | integriertes Überdruckventil |
| Innenbehälter | emaillierter Stahl |
| Energieeffizienzklasse | C (gemäß EU-Verordnung) |
| Installation | Wandmontage, senkrecht |
| Wartungshinweis | Jährliche Entkalkung empfohlen |
| Lieferumfang | Gerät, Montageset, Sicherheitsventil, Bedienungsanleitung |
Häufig gestellte Fragen - HES-35VD HITACHI
Benutzerfragen zu HES-35VD HITACHI
0 Frage zu diesem Gerät. Beantworten Sie die, die Sie kennen, oder stellen Sie Ihre eigene.
Eine neue Frage zu diesem Gerät stellen
Laden Sie die Anleitung für Ihr Chauffe-eau instantané et cumulus kostenlos im PDF-Format! Finden Sie Ihr Handbuch HES-35VD - HITACHI und nehmen Sie Ihr elektronisches Gerät wieder in die Hand. Auf dieser Seite sind alle Dokumente veröffentlicht, die für die Verwendung Ihres Geräts notwendig sind. HES-35VD von der Marke HITACHI.
BEDIENUNGSANLEITUNG HES-35VD HITACHI
HITACHI Inspire the Next
Instruction and installation manual ELECTRIC SHOWER HEATER
รัฐน/Model HES-35VD/HES-35VDS HES-45VD/HES-45VDS/HES-48VD
สารบัญ/CONTENTS
ข้อควรระวังเพื่อการใช้งานอย่างปลอดภัย/THE PRECAUTIONS CAREFULLY FOR PROPER OPERATION
คำเตือนและข้อควรระวัง/WARNING AND CAUTION 1
คำแนะนำในการใช้งาน/USE INSTRUCTION
- ชื่อชิ้นส่วนต่างๆ/NAME OF PARTS 3
2.วิธีการใช้งาน/HOW TO USE 4 - คําอธิบายการใช้แผงควบคุมและจอแสดงผล/DESCRIPTION OF CONTROL PANEL AND LCD DISPLAY 5
- การตั้งอุณหภมิ/TEMPERATURE SETTING 7
- การตั้งเวลานาพิกาก/CLOCK SETTING 8
- การบันทึกอุณหภมิ/TEMPERATURE MEMORY 9
- ข้อสำคัญ/IMPORTANT ISSUE 9
- ข้อควรระวัง/CAUTIONS 10
- การตุแลรักษา/MAINTENANCE 11
- การแก้ไขปัญหาเบื้องต้น/TROUBLE SHOOTING 12
11.ข้อมูลจำเพาะ/SPECIFICATIONS 13
คำแนะนำในการติดตั้งเครื่องทำน้ำอุ่น/INSTALLATION INSTRUCTION
- ก่อนเริ่มการติดตั้ง/BEFORE STARTING INSTALLATION 14
- การติดตั้ง/INSTALLATION 15
- ท่อนำ/WATER HOSE 16
- การต่อสายไฟฟ้า/CONNECTION OF THE WIRES 16
- วิธีติดตั้งแห่งหลักดิน/HOW TO INSTALL THE GROUND ROD 17
- ข้อควรปฏิบัติหลังการติดตั้งเครื่องทำน้ำอุ่น/ AFTER INSTALLATION 18
-
การทดสอบการทำงาน/OPERATION TEST 18
-
โปรดอ่านคู่มือการใช้งานนี้ก่อนใช้งาน เพื่อการใช้งานผลิตภัณฑ์อย่างถูกต้อง เมื่ออ่านแล้ว โปรดเก็บไว้ในที่ที่สะดวกต่อการนำกลับมาอ่านซ้ําในอนาคต
- Please read the instruction manual before use for the proper usage of this product. After reading this, keep it for future reference.
ข้อควรระวังเพื่อการใช้งานอย่างปลอดภัย
THE PRECAUTIONS CAREFULLY FOR PROPER OPERATION
การใช้งานผลิตภัณฑ์นี้ : ใช้สำหรับปรับอุณหภูมิน้ำ
How to use Product : To adjust water temperature.
 | คําเตือนWarning | ความหมายในช่องนี้คือ “อาจจะก่อให้เกิดอาการบาดเจ็บหรือเสียชีวิตได้”This means there is a risk of injury or death. |
 | ระวังCaution | ความหมายในช่องนี้คือ “อาจจะก่อให้เกิดการบาดเจ็บหรือเสียหายต่อทรัพย์สินได้”This means there is a risk of injury or damage. |
ตัวอย่างภาพที่ใช้ในการแสดง Examples of pictures


หมายถึง “การเตือนหรือข้อควรระวัง” This means warning or precaution.
หมายถึง “สิ่งที่ไม่ควรกระทำหรือห้ามทำ” This means something that cannot or must not be done.
หมายถึง “สิ่งที่ควรปฏิบัติตาม” This means something that must be done.
 คําเดือนWarning คําเดือนWarning | ||
| เครื่องทําน้ําอุ่นไฟฟ้าจะต้องติดตั้งสายดินเสมอการติดตั้งสายดินอย่างไม่ถูกต้องสามารถทําให้เกิดไฟฟ้าชื่อตไดThe Electric Shower Heater unit must be earthed.Improper grounding could cause electric shock. |  | อย่าติดตั้งหรือเคลื่อนย้ายเพื่อดิตตั้งใหม่ด้วยตนเองการติดตั้งไม่ถูกต้องจะก่อให้เกิดการร่ว่ซึมไฟชื่อตรือไฟไหมได้ กรุณาติดต่อผู้เชี่ยวชาญที่ได้รับอนุญาตให้ทําการติดตั้งเครื่องDo not install, remove and reinstall the unit by yourself. Improper installation will cause leakage, electric shock or fire. Please engage an authorized dealer or specialist for the installation work.  |
| หลังจากติดตั้งเครื่องทําน้ําอุ่น ให้อุตพลาสติกเหนียวเพื่อบ้องกันน้ําจากภายนอกเข้าสู่ตัวเครื่องกรณีที่ไม่อุดพลาสติกเหนียวอาจทําให้น้ําเข้าสู่ภายในตัวเครื่อง ซึ่งเป็นสาเหตุให้ไฟฟ้าลัดวงจรหรือเกิดไฟไหมได้After setting the Electric Shower Heater unit, it must be seal by Plaseal to protect water from outside into the unit. In case unseal by Plaseal, water may be into the unit. It may cause electric shock, short circuit or fire hazards. |  | อย่าใช้ท่อน้ําเข้าของเครื่องทําน้ําอุ่นร่วมกับท่อน้ําออกอื่นๆ แรงต้นน้ําอาจลดลงเนื่องจากมีน้ําไหลออกจากจุดอื่น อุณหภูมิของน้ําฝักบัวอาร้อนมากDo not share the inlet pipe of Electric Shower Heater unit with other outlets. The pressure may drop due to water being drawn off at other point. The shower water temperature may become to hot.  |
| อย่าติดตั้งวาล์วเปิด-ปิดน้ําบริเวณทางน้ําออกDo not install any stop valve in the outlet pipe line. |  | อย่าเปลี่ยนหัวฝักบัว สายยางฝักบัว หรือชั้นส่วนอื่นๆ ของเครื่องที่ไม่ใชอะไหล่แท้จากอิตาซิDo not replace the Shower Head, Shower Hose or any other parts of the unit with the spare parts other than HITACHI genuine parts.  |
HITACHI
 Caution Caution | |
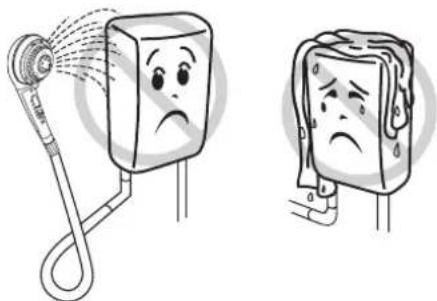
• อย่าใช้ทางน้ําออกหลายจุดร่วมกันDo not share outlet.  | • อย่าดีตน้ําใส่ตัวเครื่องท่าน้ําอุ่นหรือวางผ้าเปียกบนตัวเครื่องDo not spray water to the body or put wet towels on it.  |
• อย่าสอดนี้วมือหรือสิ่งของอื่นเข้าใบในตัวเครื่องท่าน้ําอุ่นDo not insert finger or other something into the Electric Shower Heater units.  | • อย่าเอามือหรือผ้าเช็ดตัวไปปิดหัวผักบัวDo not block the Shower Head with hand or towel.  |
• อย่าใช้ผ้าเทปติดบังคับแกน RESET ELCBถึงแม้ว่าแกน RESET ELCB ไม่สามารถต้นขึ้นได้Do not fix the lever forcibly with tape, etc.If the Reset ELCB lever cannot be set even if you push it up.  | • อย่าพับหรือบิดสายฝักบัวDo not bend the Shower Hose.  |
• ปิดสวิทช์เบรคเกอร์ก่อนทำการตรวจเช็คภายในตัวเครื่องSwitch off the Power Supply before check unit.  | |
• เด็ก คนซรา คนป่วยและบุคคลร่างกายไม่สมประกอบใช้เครื่องท่าน้ําอุ่นควรเอาใจใส่เป็นพิเศษ และตรวจสอบอุณหภูมิน้ําก่อนที่จะใช้When the shower is used by someone such as child, old person, sick person and physically handicapped person, the concern person is kindly requested to pay attention and check the shower temperature by using hand from time to time.  | |
• ระวังอุณหภูมิของน้ําจากหัวฝักบัวขณะลดปริมาณน้ําลง อุณหภูมิของน้ําจะร้อนมากถ้าอัตราการไหลของน้ําน้อยBe careful to shower temperaturewhen reducing the water volume. The water temperature to become very hot if the water flow rate is too low.  | |
HITACHI
คำแนะนำในการใช้งาน USE INSTRUCTION
โปรดอ่านคู่มือการใช้งานเนื้ก่อนใช้งาน เพื่อการใช้งานผลิตภัณฑ์ห้องอย่างลูกต้อง เมื่อย่านแล้ว โปรดเก็บไว้ในที่ตํะตวกต่อการ^nากลับมาอ่านซ้ําในอนาคต
Please read the instruction manual before use for the proper usage of this product.
After reading, please keep it for future reference.
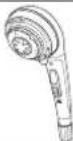
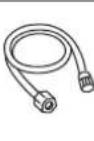
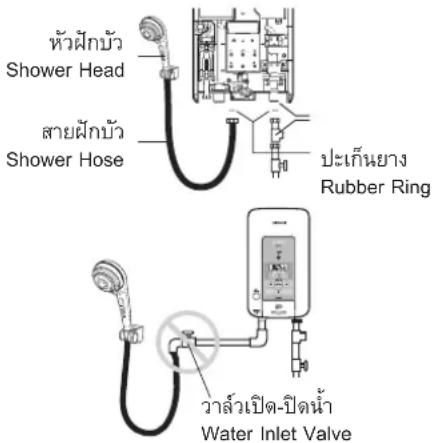
1. ชื่อชิ้นส่วนต่าง ๆ NAME OF PARTS
อุปกรณ์ที่อยู่ในกรอบเส้นประ ต้องถูกจัดเตรียมไว้ต่างหาก Equipment in the frame has to be prepared separately.
ชื่อส่วนประกอบ PART LIST
| ตัวเครื่อง Unit | หัวฝักบัว Shower head | สายฝักบัว Shower hose | คู่มือการใช้งาน Instruction manual | แผ่นคู่มือการติดตั้ง Installation guide sheet | ที่แขวนหัวฝักบัว Shower head hanger |
 |  |  |  |  |  |
| อุปกรณ์ยื้อกันแรงดั้นน้ํากิวชสกรองน้ํ Safety valve/Water filter | ประเภทนยาง (6 ตัว) Rubber packing (6 pcs) | สกรุ (8 ตัว) Screw (8 pcs) | พุกษีตสกรุ (8 ตัว) Wall plug (8 pcs) | พลาสติกเหนียว 1 ชุด Plaseal (1 set) | |
 |  X 6(อะไหล่สํารอง 2 ตัว)(Spare part 2 pcs) X 6(อะไหล่สํารอง 2 ตัว)(Spare part 2 pcs) |  8(อะไหล่สํารอง 2 ตัว)(Spare part 2 pcs) 8(อะไหล่สํารอง 2 ตัว)(Spare part 2 pcs) |  X 8(อะไหล่สํารอง 2 ตัว)(Spare part 2 pcs) X 8(อะไหล่สํารอง 2 ตัว)(Spare part 2 pcs) |  |
HITACHI
2. วิธีการใช้งาน HOW TO USE
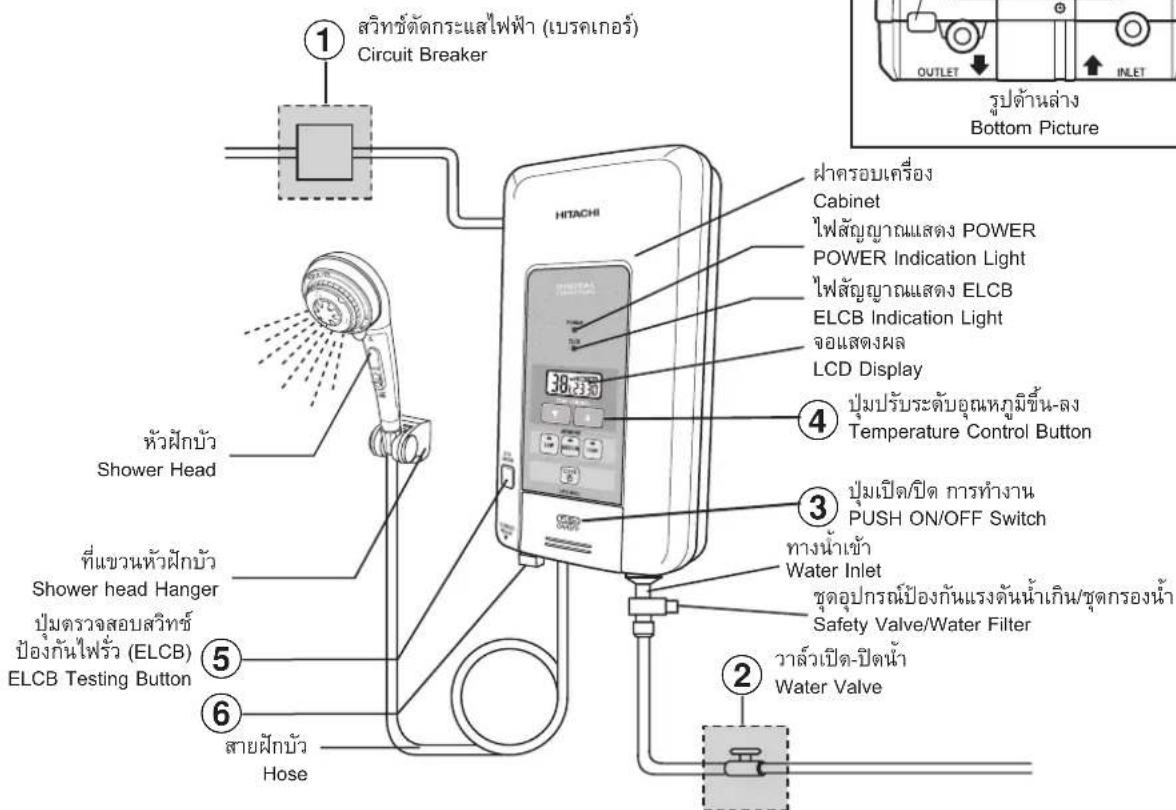
1) เปิดสวิทย์เบรคเกอร์ (No.1)
Switch "ON" the circuit breaker (No.1)
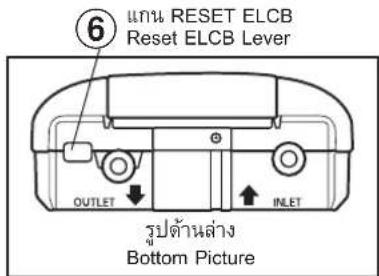
2) ต้นแกน RESET ELCB (No.6) ขึ้นด้านบนในกรณีที่แกนเช็ค ELCB (No.6) ตกลงมา
Push up the reset ELCB lever (No.6) if it is down.
หมายเหตุ บางครั้งหลังจากต้นแกน RESET ELCB (No.6) ขึ้น อาจจะต้องทำการตั้งเวลาปัจจุบัน วิธีการตั้งนาพิกา กรุณาทําตามขั้นตอนของการตั้งเวลานาพิกา CLOCK SETTING (หน้า 8)
Remark Sometimes you have to set the current time after resetting the ELCB lever (No.6). Instruction on how to set the clock, please refer to CLOCK SETTING (page 8)
3) เปิดวาล้วน้ำ (No.2) (น้ำจะไหลออกทางฝักบัว)
Turn on the main water valve (No.2) (water will flow out of the shower head)
4) กดปุ่มเปิด/ปิดการทำงาน (PUSH ON/OFF) (No.3) สัญญาณไฟ ELCB จะสว่างขึ้น จอแสดงผลจะแสดงการทำงาน While pressing the PUSH ON/OFF Switch (No.3), the ELCB indicator will light up and the display will show the operation.
5) เลือกรูปแบบสายน้ำตามต้องการ โดยการผลักแกนปรับสายน้ำเพื่อหมุนหัวฝักบัวให้ได้สายน้ำที่ต้องการ
Select the shower flow by revolving the shower flow lever.
รูปแบบสายน้ำ 5 รูปแบบ คือ
- = สายนำแบบนวด/Massage Rain
- สายนำแบบผ่อนคลาย/Outer Rain and Massage Rain
- สายนำแบบฝอยเบาสบาย/Outer Rain
- สายน้ำแบบสดชื่น/Outer Rain and Inner Rain
- สายนำแบบสบาย/Inner Rain
หมายเหตุ รูปแบบสายน้ำที่หมนมาอยู่ตรงกับเครื่องหมาย △ เป็นรูปแบบสายน้ำที่คุณเลือก
Remark The shower flow image indicated above “△” is the selected shower flow.
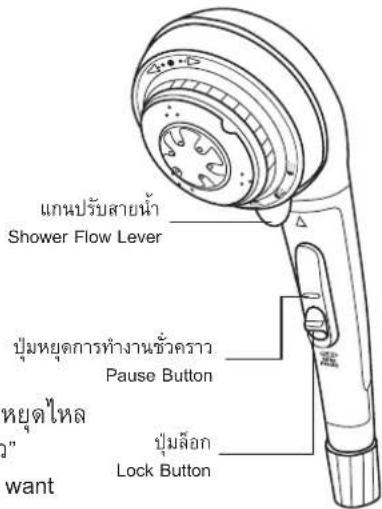
6) เมื่อกด “ปุ่มหยุดการทำงานชั่วคราว” น้ำจะหยุดไหลชั่วขณะและหากต้องการให้น้ำหยุดไหล เป็นระยะเวลานานให้เลื่อน “ปุ่มล็อก” หลังจากที่ได้กด “ปุ่มหยุดการทำงานชั่วคราว”
When "Pause" button is pressed, water flow is impeded for a moment. If you want to stop water for long time, slide "Lock" button after pressing "Pause" button.
□ ขณะที่ใช้งาน “ปุ่มหยุดการทำงานชั่วคราว” และ “ปุ่มล็อก” นั้น อาจมีน้ำไหลออกจากหัวฝึกบัวเล็กน้อย แต่ไม่ได้หมายความว่า
เครื่องเกิดการขัดข้องแต่อย่างใด
หลังการใช้งาน ควรตรวจสอบให้นแน่ใจว่าหัวผักบัวอยู่ในสภาวะที่ไม่ได้ใช้งาน “ปุ่มหยุดการทำงานชั่วคราว” แล้วจึงปิดเครื่อง
☐ When using "Pause" button and "Lock" button, there will be some water flowing out from the shower head. However, this is not a sign of any trouble.
☐ After using, be sure that the shower head is not being used in the "Pause Lock" mode before turn off the unit.
หมายเหตุ
ที่ระดับแรงดันน้ำต่ํา รปแบบสายน้ำบางรูปแบบอาจจะใช้ม่ได้
หากน้ำไหลออกจากหัวฝักบัวไม่ตี โปรดตก “ปุ่มหยุดการทำงานชั่วคราว” ครั้งเตียวเพื่อปิดและเปิดทางน้ำไหล
Remark
☐ At low water pressure, some shower flow cannot be used.
☐ If spray is not good, please press "Pause" button once to close and open the water inlet.
HITACHI
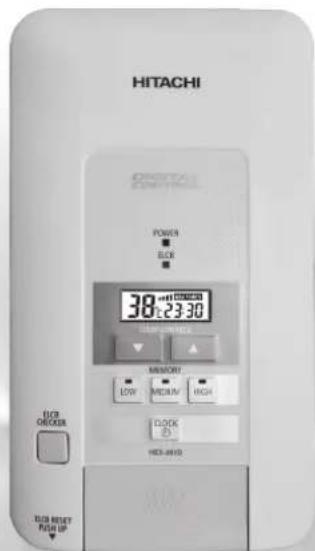
3. คําอธิบายการใช้แผงควบคุมและจอแสดงผล DESCRIPTION OF CONTROL PANEL AND LCD DISPLAY
3.1 คําอธิบายการใช้แผงควบคุม DESCRIPTION OF CONTROL PANEL
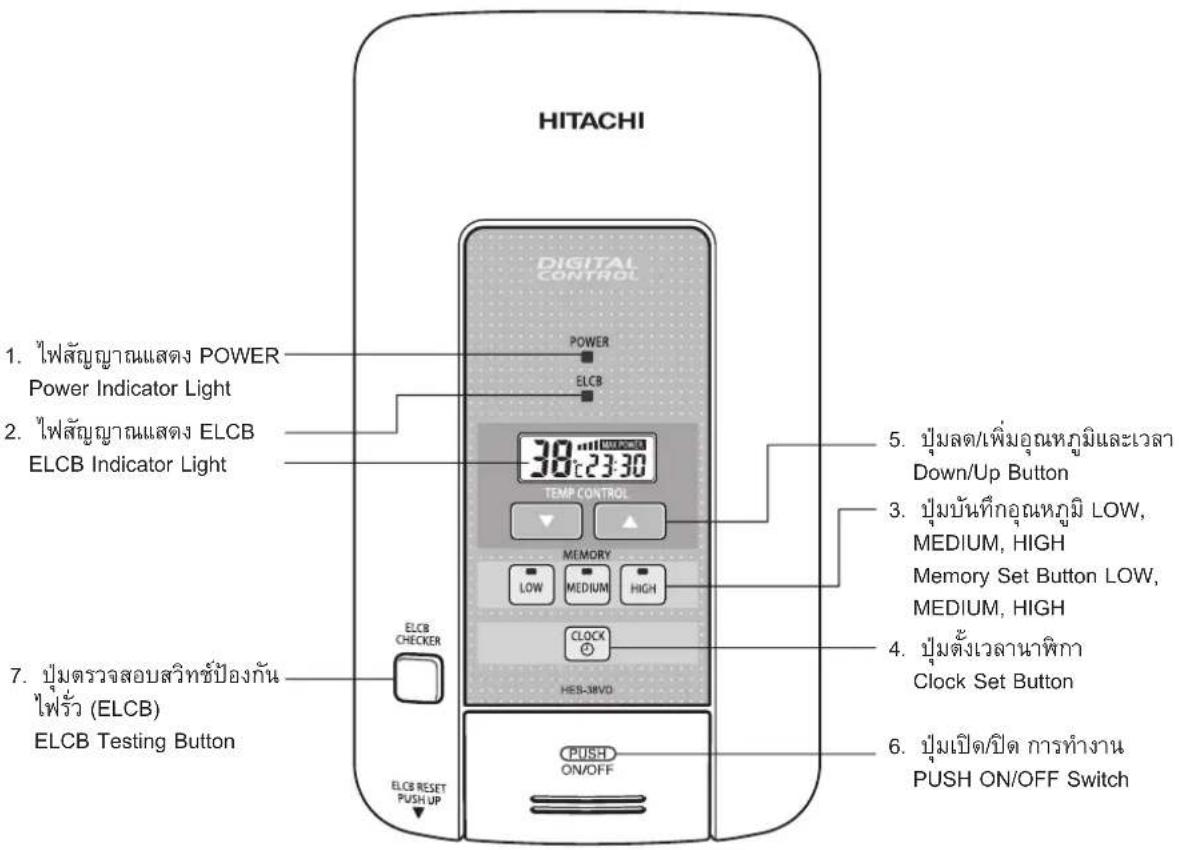
| รายละเอียด/Description การใช้งาน/Function | |
| 1. ไฟสัญญาณแสดง POWER/Power Indicator Light แสดงสถานะการทํางาน/Power Status | |
| 2. ไฟสัญญาณแสดง ELCB/ELCB Indicator Light แสดงสถานะการทํางานของ ELCB/ELCB Status | |
| 3. ปุ่มบันที่กอุณหภูมิ LOW, MEDIUM, HIGH/Memory Set Button LOW, MEDIUM, HIGH | บันที่กอุณหภูมิของน้ํา LOW, MEDIUM, HIGH/MemoryLOW, MEDIUM, HIGH |
| 4. ปุ่มตั้งเวลานาพิกา/Clock Set Button ตั้งเวลานาพิกา/Clock Setting | |
| 5. ปุ่มลด/เพิ่มอุณหภูมิและเวลา/Down/Up Button ลด/เพิ่มอุณหภูมิและเวลา/Reduce/Reverse and Increase/Forward | |
| 6. ปุ่มเปิด/ปิดการทํางาน/PUSH ON/OFF Switch เปิด/ปิดการทํางาน/Switch the unit ON/OFF | |
| 7. ปุ่มตรวจสอบสวิทช์ป้องกันไพรั่ว/ELCB Testing Button คตปุ่มเพื่อตรวจสอบการทํางานของระบบป้องกันไพรั่ว/Press this button to test the ELCB operation |
HITACHI
3.2 คําอธิบายการใช้จอแสดงผล DESCRIPTION OF LCD DISPLAY
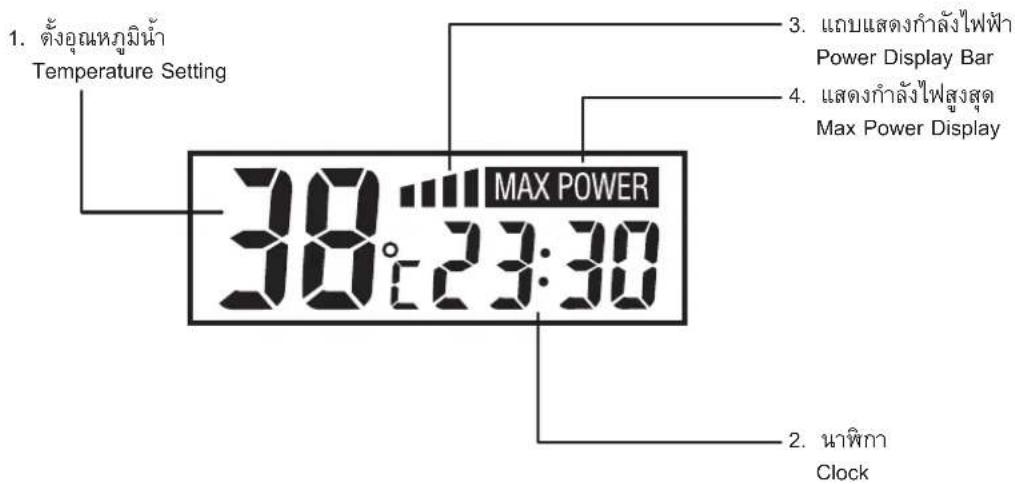
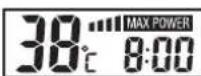
| รายละเอียด/Description การใช้งาน/Function | |
| 1. อุณหภูมิ/Temperature | อุณหภูมิของน้ำที่ตั้งไว้/Shower Temperature Setting |
| 2. นาพิกา/Clock | เวลาปัจจุบัน/Current time |
| 3. กําลังไฟ/Power | กําลังไฟที่ Heater ใช้/Heater Power |
| 4. กําลังไฟสูงสุด/Max Power Display | แสดงสถานะการใช้กําลังไฟฟ้าสูงสุด/Maximum Power Operating Status |
HITACHI
4. การตั้งอุณหภูมิ TEMPERATURE SETTING
เมื่อมีสัญญาณไฟ LCD ติดสว่างขึ้น จะแสดงอุณหภูมิที่ 38°C (ตั้งมาตรฐานมาจากโรงงาน) Once the LCD is activated, 38°C will be displayed (factory setting)
ปุ่มควบคุมอุณหภูมิ
TEMP CONTROL BUTTON
สามารถตั้งอุณหภูมิได้ตามต้องการ โดยกดที่ปุ่ม “ลด” หรือ “เพิ่ม”
Set to the desired temperature by pressing either the "DOWN" or "Up" button.
TEMP CONTROL
ปุ่มลดอุณหภูมิ
Down Button


ปุ่มเพิ่มอุณหภูมิ
Up Button
1) การกดปุ่มแต่ละครั้งจะเป็นการลดหรือเพิ่มครั้งละ 1°C (จะมีเสียงสัญญาณ “ปีบ” สั้นๆ)
Each press of the button will either reduce or increase the temperature by 1°C. (buzzer sound: "shot beep").
2) อุณหภูมิต่ำสุดอยู่ที่ 32°C
Lowest adjustable temperature is 32^ C.
3) อุณหภูมิส่งสด รุ่น HES-35VD/35VDS อยู่ที่ 45°C, รุ่น HES-45VD/45VDS/48VD อยู่ที่ 48°C
Highest adjustable temperature for HES-35VD/35VDS is 45°C, HES-45VD/45VDS/48VD is 48°C
โดยอุณหภูมิน้ำออกจะมีค่าอยู่ระหว่าง ±°2 การกดปุ่ม ลด /*พิ่ม อุณหภูมินแต่ละครั้ง
°C บนจอแสดงผลจะ
กระทรวง เมื่อน้ำอุ่นอุณหภูมิได้ตามที่ปรับตั้งไว้ °C จะหยุดกระทรวง
Actual shower temperature varies in the range of ±2^ of displayed temperature. Every time you press
"DOWN" ▼ or "Up" button, °C on the LCD display will blink and when the water temperature reaches the set temperature, °C will stop blinking.
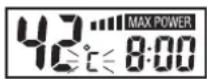
ตัวอย่าง : ถ้าตั้งอุณหภูมิที่ 42°C และมีข้อความ “MAX” ปรากฏขึ้นบนจอแสดงผล กรุณา ลดความแรงของสายน้ําลงจนกระทั่ง °C หยุดกระทรวง
e.g. : If the temperature is set to 42^ C and the word “MAX” appears on the display, please reduce the flow of water until ^ C stops blinking.
คำเตือน WARNING
ระวังอุณหภูมิของน้ำจากหัวฝักปัวขณะลดปริมาณน้ำลง อุณหภูมิของน้ำจะร้อนมากหากน้ำไหลน้อย Be careful with the water temperature when reducing the water flow.
The water temperature will become very hot if the water flow rate is too low.
HITACHI
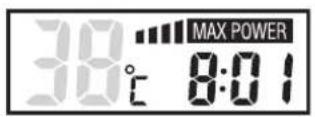
5. การตั้งเวลนาฬิกา CLOCK SETTING
1) กด ศิ้นสัญญาณ "ปีบ" สั่นๆ จะตังขึ้น และนาพิกาจะกระทรวง Press [Emit "short beep" sound and clock will blink.
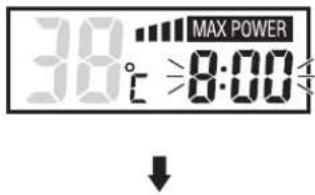
2) กดเพิ่ม /ʌd แต่ละครั้งจะเป็นการเพิ่มหรือลดเวลาครั้งละ 1 นาที Each press of the up /down button will either increase or reduce the time by 1 minute. □ การทดสอบเพิ่ม ▲/ลด ค้างไว้จะเป็นการเพิ่มหรือลดเวลาครั้งละ 10 นาที Each press and hold of the up ▲ /down button will increase or reduce the time by 10 minutes.
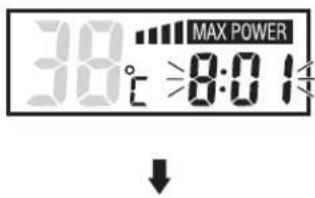
3) กต CLOCK ④ เสียงสัญญาณ "ปีบ" จะตังขึ้นและนาพิกาจะไม่กระทรวง Press CLOCK ② Emit "beep" sound and clock will stop blinking.
6. การบันทึกอุณหภูมิ TEMPERATURE MEMORY
อุณหภูมิที่ถูกบันทึกมาจากโรงงาน
The default temperature memory setting(factory setting) is

วิธีการใช้งาน/How to use
1) กดปุ่ม LOW จะมีเสียงตั้ง “ปีบ” สั้นๆ จอแสดงผลที่ 36°C
Press "short beep" will sound and display will show 36°C.
2) กดปุ่มเพิ่ม ▲ /ลด เพื่อเลือกอุณหภูมิที่ต้องการ
Press Up /Down Button to set the temperature you want.
วิธีการใช้งานของบันที่คิดและ High หมือนวิธีข้างต้น
For the Temperature Memory of 📄 and , please perform the same step.
วิธีการเปลี่ยน/How to change
ตัวอย่าง การเปลี่ยนบันทึก Low ที่ 42°C
Example Memory Changing at 42°C.
1) กดปุ่ม LOW จะมีเสียงตั้ง “ปีบ” สั้นๆ จอแสดงผลที่ 36°C
Press "short beep" will sound and display will show 36°C.
2) กดปุ่มเพิ่ม ▲ อุณหภูมิไปที่ 42°C
Press Up, temperature will be changed to 42^ C.
3) กดปุ่ม LOW จะมีเสียงดัง “ปีบ” 2 ครั้ง เป็นการแสดงว่าเครื่องได้ทำการบันทึกแล้ว
Press "beep" will sound twice to let you know that the unit has already recorded.
วิธีการเปลี่ยนบันที่คิดต้น และ เหมือนวิธีข้างต้น
For the Memory Changing of MID and , please perform the same step.
7. ข้อสำคัญ IMPORTANT ISSUE
ถ้าท่านใช้น้ําก็อกอื่นๆ พร้อมกันกับเครื่องท่าน้ําอย่น แรงดันน้ําจะตกและทำให้น้ําไหลออกน้อย หรือทำให้อุณหภูมิน้ําเพิ่มสูงซั้น นี่ไม่ใช่อาการเสียของเครื่อง กรุณาปรับอุณหภูมิน้ําร้อนให้เหมาะสมโดยวาล์วน้ํา (ก็อกน้ํา)
□ ในกรณีเกิดฟ้าร้อง ฟ้าผ่า ขอให้ปิดสวิทธ์ตัดกระแสไฟฟ้าเข้าเครื่อง เพื่อป้องกันเครื่องเสียหาย
ถ้าแกน RESET ELCB ไม่สามารถดันกลับชั้นที่เติม ถึงแม่จะต้นชั้นบนแล้ว หรือแกน ELCB เลื่อนลงมา ขณะเครื่อง
ทำงาน (อย่าใช้เทปในการยิดแกนให้เข้าที่ด้วยตนเอง) ขอให้ติดต่อตัวแทนจำหน่ายที่ท่านซื้อเครื่องมา
ถ้าเต็ก คนป่วย บุคคลร่างกายไม่สมประกอบใช้เครื่องทำน้ำอุ่น หรือเครื่องทำความร้อน ควรเอาใจใส่เป็นพิเศษ และตรวจสอบอุณหภูมิน้ำก่อนที่จะใช้
☐ If you use the other valve together with the shower heater. The water pressure will fall. Only little water is out will make the hot water temperature increase but it is not the damaged symptom of the shower heater. Please adjust temperature by water valve.
☐ In case of lightning thunder, please close the circuit breaker to protect from the damage.
☐ If the reset ELCB lever can not return. Although press up already or move down during operation. Please inform the dealer. [Do not stick the lever (Up-Down) with the tape by yourself]
☐ Please take special care for children, old people, patient, and physically handicapped person. If they use it, the close person should check the water temperature.
HITACHI
8. ข้อควรระวัง CAUTIONS
ห้ามต่อท่อน้ำเย็นเข้าทางต้านที่น้ำร้อนไหลออก
Do not connect the cold water tube to the outlet hot water.
กรุณาอย่าติดตั้งวาร์วะเปิด-ปิดน้ำบริเวณต้านทางน้ำออก เนื่องจากอาจเป็น สาเหตุทําให้อุปกรณ์ทําความร้อนหรือท่อนำเกิดความเสียหายได้
Do not install any stop valve in the outlet pipe line. It will cause heating tank or pipe to damage.
ห้ามใช้สายฝักบัวยี่ห้ออื่นและสายฝักบัวที่เป็นโลหะต่อเข้ากับเครื่องโดย เต็ดขาด การใช้งานสายฝักบัวที่เป็นโลหะอาจเป็นสาเหตุให้เกิดอันตราย จากไฟฟ้าดูดได้ ดังนั้นกรุณาใช้เฉพาะสายฝักบัวและหัวฝักบัวที่บรรจุมา พร้อมกับตัวเครื่องในกล่องเท่านั้น
Do not use other maker's shower hose and metal made shower hose. Using of metal shower hose will accidentally cause of electrical shock. Use only the shower hose and head packed in Hitachi Shower Heater.
อย่าฉีดน้ำใส่ตัวเครื่องทำน้ำอุ่นหรือวางผ้าเปียกบนตัวเครื่อง
Do not spray to shower heater or put the wet cloth on the shower heater.
อย่าเอามือหรือผ้าเช็ดตัวไปปิดหัวฝักบัวหรือพับสายฝักบัว
Do not cover the shower head with your hand or bath towel or fold the water hose.
ห้ามทำการปรับหรือแก้ไขชุดอุปกรณ์ป้องกันแรงดันน้ำเกินโดยเด็ดขาด
Do not adjust or repair the accessories for prevention of over pressure water.
กรณีที่ตั้งอุณหภูมไว้ที่ค่าสูงแล้วลดปริมาณน้ำอย่างรวดเร็วจะมีน้ำร้อน ที่มื่อุณหกุมิสูงไหลออกมาขอให้ระมัดระวัง
In case of setting high temperature and quickly reduce the water pressure, will cause hot water spills out of the outlet. So, please be careful.

natural_image
Illustration of a sad book character spraying water from a hose, and a distressed book character holding a pipe (no text or symbols)
natural_image
Illustration of a hand holding a showerhead with motion lines, next to a stylized showerhead emitting smoke (no text or symbols)
คำเตือน WARNING
ทุกครั้งหลังการใช้งาน ควรปิดเครื่องที่ปุ่มเปิด/ปิด (PUSH ON/OFF)
Turn off PUSH ON/OFF switch the unit every time after using.
หมายเหตุไฟฟ้าดับ
เมื่อเกิดไฟฟ้าตับเกิน 1 นาที หน้าจอแสดงผลกระทบกลับไปสถานะเริ่มต้น ต้องทำการกดปุ่มเปิด/ปิด (PUSH ON/OFF) อีกครั้ง เพื่อเริ่มการทำงานใหม่อีกครั้ง
Remark POWER FAILURE
If the power fails more than 1 minute, the display will back to the default setting. Press PUSH ON/OFF switch again to start the new operation again.
HITACHI
9. การดูแลรักษา MAINTENANCE
- ตรวจสอบการทำงานของสวิทย์ป้องกันไฟร่วม (ELCB) เดือนละครั้ง Check the operation of earth leakage circuit breaker (ELCB) once a month.
□ กดปุ่มตรวจสอบ ELCB (ELCB Testing Button) ถ้าสวิทช์ป้องกันไพร่ว ELCB
ปกติแกนของ ELCB (Reset ELCB Lever) จะเลื่อนลงมา ถ้าแกนไม่ตกลง
ด้านล่างให้แจ้งผันแทนเจ้าหน่ายให้มาตรวจสอบ
ตันแกน RESET ELCB ให้ขึ้นด้านบนตามปกติ เพื่อตั้งการทำงานของ ELCB อีกครั้ง ในกรณีนี้ แนใจว่าไตตัดไฟจากสวิทย์ป้องกันไพร่วแล้ว
☐ Press the ELCB testing button if it's usual. Reset ELCB lever will be fallen down. If not please inform to the dealer for checking.
☐ Push up the reset ELCB lever usually to set ELCB operation again. To make sure that you had cut out circuit breaker in this case.
- การทำความสะอาดชดกรองนำ Filter Cleaning
□ทำความสะอาดใส่กรองชุดกรองน้ำโดยใช้น้ำล้างทุกเดือน
□ทำความสะอาดชุดกรองน้ำเมื่อท่านรู้สักว่าน้ำอุ่นไหลไม่ปกติ
□ ไส้กรองสามารถต่อตอกมาล้างได้ โดยหมุนไส้กรองทิศทางทวนเข็มนาพิกา
หลังจากปิดวาล์วันแล้ว
☐ Clean the filter by water every month.
□ When the hot water doesn't flow as usual.
☐ Filter set can be taken out easily by turning the reverse button after the inlet is closed.
- การทำความสะอาดหัวฝึกบัว Shower Head Cleaning
□ ให้ใช้แปรงสีฟันขนอ่อนทำความสะอาดบริเวณด้านนอกฝ่าฝักบัว ห้ามลอดล้าง
ทำความสะอาดชิ้นส่วนภายใน เพาะอาจทำให้ชิ้นส่วนภายในชํารุดเสียหายได้
□ ควรถอดทำความสะอาดหัวฝักบัวเป็นประจำทุกๆ 1 เดือน
☐ Use the soft brush to clean around the outside of shower head lid. Do not take off any parts of shower head to clean. It may cause damaged parts.
☐ Clean the shower head once a month.
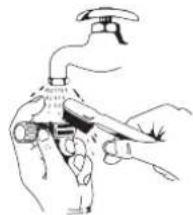
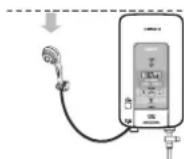
- ทำความสะอาดตัวเครื่องทำน้ำอุ่น Body Cleaning
ต้องมั่นใจว่าได้ทำการปิดสวิทซ์ป้องกันไพรั่ว ELCB แล้ว ก่อนทำความสะอาด
□ทำความสะอาดด้วยผ้าชุบนำสมู่อ่อน บิดให้แห้ง เซ็ดให้สะอาด
อย่าใช้นำมันเบนซิน ทินเนอร์ เซ็ดทำความสะอาดเป็นอันขาด
To ensure that reset ELCB lever is fallen down before cleaning.
☐ To clean the body of the shower heater by using cloth to dipping water, twist dryly.
☐ Do not use benzene and thinner so on for cleaning.
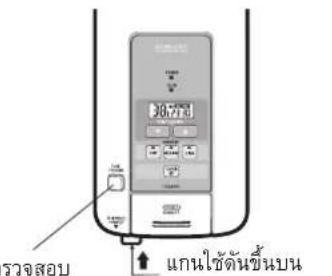
Reset ELCB Lever
ป้องกันไพร่ว
ELCB Testing Button
natural_image
Illustration of a hand using a tool to clean or adjust a surface with a faucet (no text or symbols)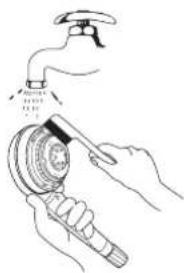
natural_image
Illustration of hands using a tool to clean or wash a water tap (no text or symbols present)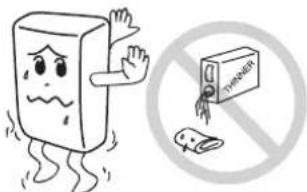
10. การแก้ไขปัญหาเบื้องต้น TROUBLE SHOOTING
1. โปรดตรวจสอบตามจุดต่อไปนี้ก่อน
Please check the following point as below
| อาการ SYMPTOMS จุดตรวจสอบ CHECKING POINTS | |
| น้ําไหลออกน้อยTHE WATER IS SO DIFFICULTTO BE OUT | 1. ตรวจสอบชุดกรองน้ําหรือไส้กรองอุดตันด้วยผ่าน, ผงหรือไม่Check if filter is obstructed by dust, clean if it's dirty.2. ตรวจสอบหัวฝกบัวอุดตันด้วยผ่านผงหรือไม่ ทำความสะอาดหัวฝกบัวถ้าอุดตันCheck if shower head is obstructed by dust, clean if it's dirty. |
| น้ําที่ออกมาเย็นYOU GET ONLYCOLD WATER | 1. ตรวจสอบแกน ELCB ถ้าแกนตกลงมาอาจเนื่องมาจาก ELCB ทำงาน ให้ดันแกน ELCB ชั้นCheck if the reset ELCB lever is down (because ELCB is working). Please push up if it's down.2. มีการแสดงผลที่ผิดปกติ ให้กดปุ่มเปิด/ปิด (PUSH ON/OFF) เพื่อบิดและเปิดการทำงานของเครื่องใหม่อีกครั้งWhen the error code displays, press PUSH ON/OFF button to restart the unit. |
| ไม่มีน้ําไหลเลยNO WATER IS OUT | ตรวจสอบว่าล้วน้ําว่าเปิดหรือไม่Check the inlet. Open it if it's closed. |
2. ถ้าพบสิ่งผิดปกติต่อไปนี้ในช่วงใช้งาน โปรดติดต่อตัวแทนจำหน่ายทันที่
If you find the following errors during operation, please contact the dealer immediately.
□ น้ำรัว
□ น้ำไหลไม่สะดวก
ควบคุมอุณหภูมิน้ำร้อนไม่ได้
ไฟสัญญาณแสดง POWER ไม่ติดหรือกระพริบ
Water is leaking.
☐ The water doesn't flow well.
□ Can't control hot water temperature.
☐ When power indicator light do not go up.
3. สำหรับการช่อมต้องใช้ช่างชํานาญพิเศษ
Repairing must be done by the specialized technician.
ห้ามเปิดฝากรอบและทดลองช่อมเครื่องต้วยตัวท่านเอง
☐ Do not open the cover and try repairing by yourself.
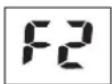
- ในการมีที่จ่อแสดงผลแสดงสัญลักษณ์นี้ กรุณาติดต่อตัวแทนจำหน่ายผลิตภัณฑ์ HITACHI โดยทันที่ If the error codes below appear on the display, please contact the HITACHI dealer immediately.
หรือ/or
หมายเหตุ : แบตเตอร์ลิเรียม นาฬิกาจะยังคงทำงานตามปกติด้วยแบตเตอร์ลิเรยม แม้ว่าจะปิดสวิทช์การทำงานเครื่องแล้วก็ตาม หากต้องการเปลี่ยนแบตเตอร์ใหม่ กรุณาติดต่อตัวแทนจำหน่ายผลิตภัณฑ์ HITACHI โดยทันที่ Remark : Lithium battery Clock works as usual by Lithium battery even if the power is off. If you want to change battery, please contact the HITACHI dealer immediately.
HITACHI
- ข้อมูลจำเพาะ SPECIFICATIONS
| รุ่นMODEL | HES-35VDHES-35VDS | HES-45VDHES-45VDS | HES-48VD |
| แรงดันไฟฟ้าVoltage | 220 V 50 Hz | ||
| กําลังไฟฟ้าสูงสุดMaximum watt | 3,500 W 4,500 W | 4,800 W | |
| ระบบจ่ายน้ําWater distribution | ไม่เกิน 1 จุดNot exceeding 1 point | ||
| การควบคุมอุณหภูมิน้ําWater temperature control | ควบคุมด้วยระบบติจิตอลปรับอุณหภูมิคงที่อัตโนมัติElectric control automatically adjusts temperature constant in the span of | ||
| 32°C - 45°C 32°C - 48°C | |||
| แรงดันน้ําต่ําสุดMinimum water pressure | 15.6906 กิโลปาสคาล (0.16 กก./ตร.ซม.)15.6906 kPa (0.16 Kgf/cm2) | ||
| แรงดันน้ําสูงสุดMaximum water pressure | 343.233 กิโลปาสคาล (3.5 กก./ตร.ซม.)343.233 kPa (3.5 Kgf/cm2) | ||
| อุปกรณ์เพื่อความปลอดภัยSafety accessories | ฟิวส์, สวิทช์เปิด-ปิด, เทอร์โมสตัส, ベรกเกอร์สวิทช์, ชุดอุปกรณ์ป้องกันแรงดันน้ําเกินFuse, On-Off Switch, Thermostat, Circuit breaker and Safety valve | ||
| ขนาดเครื่องDimensions | 215 (กว้าง) x 377 (สูง) x 92 (ลึก) มม.215 (W) x 377 (H) x 92 (D) mm. | ||
| น้ําหนักWeight | 2.8 กก.2.8 Kg. | 2.9 กก.2.9 Kg. | |
| อุปกรณ์พร้อมเครื่องAccessories | ฝักบัวพร้อมสายยาง, ที่แขวนฝักบัว, ชุดกรองน้ําShower head, Shower hose, Shower hanger, Water filter | ||
คำแนะนำในการติดตั้งเครื่องทำน้ำอุ่น INSTALLATION INSTRUCTION
ควรให้ช่างที่มีความชํานาญในการติดตั้งเครื่องนี้ โปรดสอบถามจากร้านค้า ตัวแทนจำหน่ายผลิตภัณฑ์
It should be installed by the expert, please inquire the dealer of "HITACHI"
คำเตือน WARNING
กรณาตั้งเวลานาพิภาปัจจุบันหลังการติดตั้งเครื่องทำน้ำอุ่น ถ้าไม่ทำการตั้งเวลานาพิภาเครื่องจะไม่ทำงาน
ต้องติดตั้งสายดินพร้อมติดตั้งเครื่องทำน้ำอุ่นไฟฟ้า หรือเครื่องทำน้ำร้อนไฟฟ้า
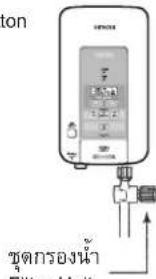
□ ควรติดตั้งเครื่องกรองน้ำทางด้านน้ำเข้า
ห้ามติดตั้งประตุน้ำหรือวาล์วใด ๆ ทางด้านน้ำอุ่นออกเด็ดขาด
ต้องติดตั้งชุดอุปกรณ์ป้องกันแรงดันน้ำเกินเข้ากับตัวเครื่องทุกครั้ง
☐ Please set the present time after installing the unit. If you do not set time, the unit will not work.
☐ The unit must always be grounded.
☐ The water filter unit should be installed before water flow into the shower unit.
☐ Do not install a water gate or any valve at the outlet water hose.
☐ You must always install a safety valve on the unit.
1. ก่อนเริ่มการติดตั้ง BEFORE STARTING INSTALLATION
1) โปรดตรวจสอบให้นแน่ใจก่อนว่ามีแรงดันน้ำเพียงพอ แรงดันน้ำต่ำสุด รุ่น HES-35VD/35VDS,
HES-45VD/45VDS และ HES-48VD คือ 15.6906 กิโลปาสคาล (0.16 กก./ตร.ชม.) และแรงดันน้ำไม่สูงกว่า 343.233 กิโลปาสคาล (3.5 กก./ตร.ชม.)
Please check to make sure that there is sufficient water pressure with the minimum water pressure of the model HES-35VD/35VDS, HES-45VD/45VDS and HES-48VD are 15.6906 kPa (0.16 Kgf/cm ^2 ) and the maximum pressure must be less than 343.233 kPa (3.5 Kgf/cm ^2 )
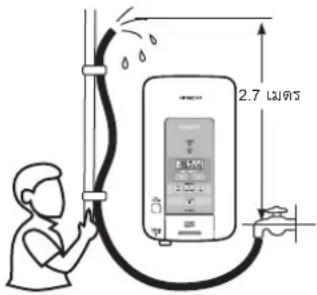
วิธีวัดแรงต้นน้ำ ให้ทำตามรูปภาพประกอบคือ น้ำจะต้องลันออกจากปลายสายยางสูงกว่าตัวเครื่องอย่างน้อย 2.7 เมตร
☐ How to measure the water pressure is shown in the picture at right that is, water must be able to flow out of the unit at least 2.7 meters high.
2) ความต้องการต้านไฟฟ้า จะต้องต่อเครื่องอย่างถาวรกับสายไฟฟ้าหลักแบบสลับตามขนาดตัวเลขในตาราง
Electric wire has to join permanently together with the main line according the table below.
| รุ่นMODEL | สวิทช์ตัดกระแสไฟฟ้า (เบรคเกอร์)CIRCUIT BREAKER | ขนาดสายไฟและสายดินที่ใช้ต่อเข้าเครื่องSIZE WIRE AND GROUND WIRE CONNECTED TOTHE SHOWER HEATER |
| HES-35VDHES-35VDS | 20 แอมแปร์ 220 โวลต์ ไฟสลับ20 Amp 220 Volt, a.c. | 4 ตารางมิลลิเมตร4 sq. mm. |
| HES-45VD/HES-45VDSHES-48VD | 30 แอมแปร์ 220 โวลต์ ไฟสลับ30 Amp 220 Volt, a.c. | 4 ตารางมิลลิเมตร4 sq. mm. |
HITACHI
2. การติดตั้ง INSTALLATION
1) จะติดตั้งเครื่องที่ไหน
Where to install
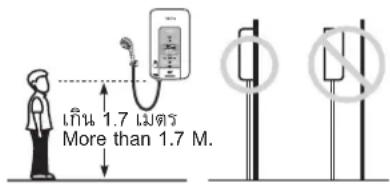
จะต้องติดตั้งเครื่องเข้ากับผนังตามรูป
□ ควรติดตั้งเครื่องสูงกว่าระดับอย่างน้อย 1.70 เมตร
☐ Must be installed at the wall, as the picture.
☐ It should be installed above the floor at least 1.70 M.
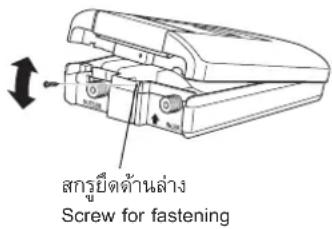
2) การเปิดฝากอบรมเครื่องออกจากฐานเครื่อง
Opening of the cover out of the unit base.
ถอดสกรุส่วนล่างของตัวเครื่องออก
ดึงฝากอบต้านบนออก
☐ Remove the screw at the bottom of the unit.
☐ Pull off upper cover.
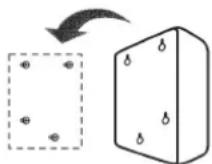
3) ติดตั้งตัวเครื่องบนผนังคอนกรีต อิฐ หรือผนังกระเบื้องดินเผา
Install on concrete, brick or ceramic wall
ใช้สว่านเจาะรับนผนัง
□ สอดปลักเข้าไปในรู
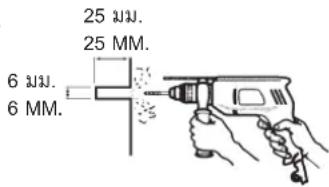
ขันสกรูแต่ละตัวเข้าไปในปลักตอนบนสองตัว โดยด้างให้เหลือความยาวสกรูเอาไว้ 3 ถึง 4 มิลลิเมตร ต่อไปแขวนชุดเครื่องบนสกรู แล้วค่อยขันสกรูยืด ทั้ง 4 ตัว ให้ยืดแน่นและอุดรูยืดสกรูด้วยพลาสติกเห็นยว (plaseal)
การติดตั้งที่แขวนหัวผักบัวติดตั้งที่แขวนหัวผักบัว ให้อยู่ในระดับที่ เมื่อแขวนหัวผักบัวแล้ว ส่วนสูงสุดของหัวผักบัวต้องไม่สูงกว่าส่วนบนสุดของตัวเครื่อง
หลังจากติดตั้งเครื่องเสร็จเรียบร้อย ต้องติดตั้งชุดอุปกรณ์ป้องกันแรงดันน้ำ เกินเข้ากับตัวเครื่องทางด้านทางน้ำเข้าทุกครั้ง
Drill holes on the wall.
☐ Insert the plug to the holes.
☐ Tighten two screws in the top plug leaving about 3 to 4 mm. space. Next hang the heater unit on the screws and move to tighten the 4 screws and seal the holes with plaseal.
☐ Installation the hanger on level properly. If shower head is hung the highest shower head not over the top of water heater.
☐ After installation of the heater unit, proceed to install the safety valve to the until at the water inlet tube.
ชุดอุปกรุณ์ป้องกัน
แรงดันน้ำเกิน
Safety valve
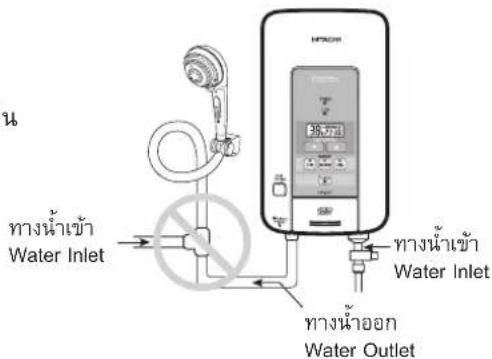
3. ท่อน้ำ WATER HOSE
1) ใช้เครื่องมือที่ถูกต้องในการติดตั้ง
Use proper tools for the installation
อย่าขันให้น็อตพลาสติกแตก
ขันนี้อตพลาสติกให้ตึงเพื่อมิให้น้ำไหลซืมออกมาได้
☐ Never tighten the plastic nuts until they break.
☐ Tighten the plastic nuts to prevent water leakage.
คำเตือน Warning
อย่าลีมใส่ปะเก็นยาง ทางท่อน้ำเข้าน้ำออก
ไม่ควรใช้ผ้าเทปพันเกลียวบริเวณทางน้ำเข้า และทางน้ำออก
□ ห้ามทำการปรับหรือแก้ไขชุดอุปกรณ์ป้องกันแรงดันนำเกินโดยเต็ดขาด
☐ Do not forget to put in the rubber rings on water inlet and the water outlet hose.
☐ Do not use any tape at the inlet and outlet water tubes.
☐ Never adjust or modify the safety valve by yourself.
| ### | ### |
 |  |
4. การต่อสายไฟฟ้า CONNECTION OF THE WIRES
1) ก่อนที่จะทำงานไฟฟ้าใด ๆ ต้องสับสวิทย์ตัดไฟออกเสียก่อน
Before working on any electrical part, turn off the circuit breaker
first.
□ ใช้สายไฟแบบคุ่ขนาด 4 ตร.มม. (ดูตารางหน้า 14)
ต่อสายไฟโดยตรงจากแพงสวิทช์ภายในบ้าน และติดตั้งสวิทช์ตัดไฟไว้นอกห้องอาบน้ำ
เครื่องทำน้ำอุ่นจะต้องติดตั้งอย่างถาวรักับสายไฟต่อเข้าเครื่องทาง
สวิทช์สองขัว ซึ่งมีจุดสมผัสหน้าทองขาวของสวิทช์ห่างกันอย่างน้อย
3 มม. สวิทช์นี้ต้องอยู่ในที่เห็นได้ง่ายภายนอกห้องอาบน้ำ
☐ Use 4 sq. mm. Wire for wiring. (See the table on page 14)
☐ Connect the wire directly from the switch-board of the house and install a circuit breaker outside the bathroom.
☐ The shower heater must be installed permanently together with the electric line join with 2 electrodes of circuit breaker, far from at least 3 mm. The breaker must be seen easily outside of bathroom.
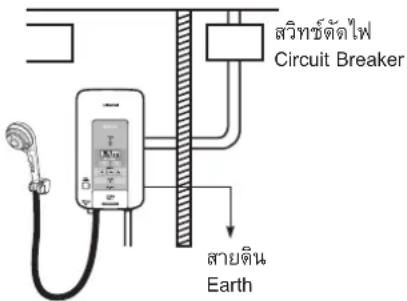
ห้องอาบน้ำ Bathroom
HITACHI
2) ต่อสายไฟเข้าที่เครื่องดังต่อไปนี้
Connect the wiring following picture
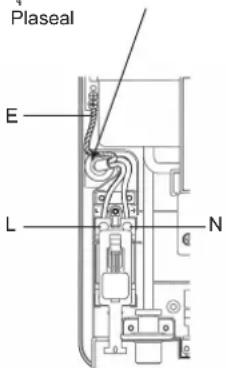
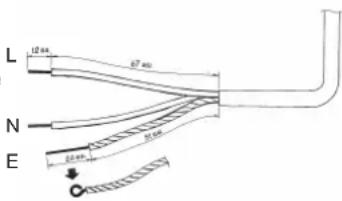
เจาะรุที่ปะเกินยางซึ่งอยู่ที่ฐานเครื่อง แล้วร้อยสายไฟเข้าจากต้านหลัง
□ บอกสายไฟ แล้วต่อเข้ากับสวิทช์ป้องกันไฟร่วง (ELCB) โดยต่อสายด้านที่มีกระแสไฟไหลผ่านเข้าทางขั่ว L และต่อสายด้านที่ไม่มีกระแสไฟไหลผ่านเข้าทางขั่ว N แล้วใช้ไขดวงขันให้แน่น
□ นำสายดินที่ปากสายเรียบร้อยแล้วต่อเข้ากับจุดต่อสายดินที่ตัวฐานรองอีตเตอร์
ตามรูป
☐ Punch a hole at the rubber ring on the unit base. Then insert the electric cable from the back.
☐ Strip the cable and connect to the earth leakage circuit breaker (ELCB). Connect the line to the terminal L and the NEUTRAL to the N and secure it tightly with screws.
☐ Connect the stripped ground wire to the ground terminal of the heater base following the picture.
อุดต้านในด้วยพลาสติกเหนียว
3) ต้องต่อสายไฟให้ตรงขั๋ว (L กับ N) หรือบวกกับลบ
Connect the wires to the correct terminals (L and N)
ถ้าต่อสายผิดขั้ว (L, N) จะทำให้เกิดการผิดปกติในวงจร ซึ่งในกรณีนี้อาจทำให้ระบบการทำงานของเครื่องเสียหาย หรือเกิดไฟฟ้าล้วงจรได้
☐ Wrong connection of the terminals (L, N) can cause abnormality in the circuit. In this case, it may damage the working of the unit or cause a short circuit.
4) จะต้องต่อสายดินเข้ากับตัวเครื่องเสมอ
The shower heater must be always grounded.
□ขนาดของสายดินที่ใช้ในการติดตั้งดูรายละเอียดในตารางหน้า 14
☐ The size of the ground wire used in the installation, refer to the details on page 14.
วิธีติดตั้งแท่งหลักดิน HOW TO INSTALL THE GROUND ROD
□ เลือกแหล่งชุมชั้นที่จะฝังเหล็กทองแดง ความยาวของแห่งทองแดง ต้องไม่น้อยกว่า 90 ซม.
□ แห่งสำหรับต่อสายดินจะต้องฝังลงในพื้นดินไม่น้อยกว่า 70 ชม. จากผิวพื้น
จะต้องแน่ใจว่า ความต้านทานของดินจะต้องน้อยกว่า 5 โอห์ม
ถ้าความต้านทานเกิน 5 โอห์มให้ฝังแท่งเหล็กลีกลางไป โดยอาจต้องใช้ 2 ถึง 3 แท่ง
☐ Choose a humid area to put the copper electrode. The minimum length of the copper electrode is 90 cm.
☐ The ground rod must be put under the ground at the minimum of 70 cm. away from the ground surface.
☐ Make sure that the resistance of the ground must not exceed 5 ohms.
☐ If the resistance exceeds 5 ohms, it may be necessary to put two or three electrodes for grounding.
อย่างน้อย 70 ซม.
At least 70 cm.

HITACHI
ข้อควรปฏิบัติหลังการติดตั้งเครื่องทำน้ำอุ่น AFTER INSTALLATION
กรุณาตรวจสอบเช็คการติดตั้งของสายดินโดยดูจากช่องการเซ็นต์ซื้อรับรองและวันที่ติดตั้งของช่างที่มาทำการติดตั้ง ซึ่งอยู่บริเวณเต้านข้างของเครื่อง
☐ Check for installation of ground wire by date and sign of installed person at the right side of body case.
5. การทดสอบการทำงาน OPERATION TEST
โปรดอธิบายการทำงานของเครื่องตามคำแนะนำในการใช้งานให้กับลูกค้าหรือผู้ใช้เครื่อง การทดสอบการทำงาน
1) □ เปิดวาล์วน้ำเข้าจากท่อน้ำหลัก (No.2) น้ำจะไหลออกจากฝักบัว
□ ตรวจสอบว่าน้ำรั่วจากท่อหรือไม่
2) ถ่อนเปิดสวิทย์ตัดกระแสไฟฟ้า (No.1) โปรดตรวจสอบการต่อสายไฟ
□ ผลักสวิทย์ตัดกระแสไฟฟ้า (No.1) เข้าตําแหน่ง “ON”
ตันแกน ELCB (No.6) ขึ้นต้านบนเพื่อตั้งการทำงานของ ELCB (No.6)
□ กดปุ่มตรวจสอบ ELCB (No.5)
ถ้าแกนตรวจสอบ ELCB (No.6) ตกลงมา แสดงว่าเครื่องทำงานปกติ
ตันแกนตรวจสอบ ELCB (No.6) ขึ้นด้านบน (เครื่องพร้อมที่จะทำงาน)
3) ต่อ กลุ่มเปิดปิด การทำงาน (PUSH ON/OFF) (No.3) ไฟสัญญาณแสดง ELCB สีเขียวและ POWER สีแดงจะสว่าง และน้ำไหลออกจากหัวฝักบัวตาม อุณหภูมิที่ตั้งไว้ ตัวเลขดิจิตอลจะแสดงที่ 38°C (ตั้งมาตรฐานมาจากโรงงาน)
□ กดปุ่มควบคุมอุณหภูมิขึ้น ▲/ลง สัญลักษณ์ °C บนจอแสดงผลกระทบะ Agrิบ เมื่อน้ําอุ่นมีอุณหภูมิได้ตามที่ปรับตั้งไว้ สัญลักษณ์ °C จะหยุด Agrิบ
Please describe the operation instruction of this heater unit to your customers or users.
Operation test
1) ☐ Open the water valve from the main valve (No.2) water will flow out of the shower head.
☐ Check to see if water leaks from the tubes or not.
2) ☐ Before opening the circuit breaker (No.1) please check the wire connections.
☐ Push the circuit breaker (No.1) to "ON" position.
☐ Push to ELCB (No.6) lever to the upper side to set the ELCB (No.6) to work.
☐ Press the button of the ELCB checker (No.5).
☐ If the lever of the ELCB checker (No.6) comes down, it shows that the shower heater works normally.
☐ Push the lever of the ELCB checker (No.6) to the upper side (The machine is ready to work.)
3) ☐ Press the PUSH ON/OFF (No.3) switch red (POWER) indicator light and water flow out of shower head according to the set temperature.
☐ Press UP ▲ /DOWN ▼ temperature control button. Indicator °C will blink. When water reaches to the set temperature, °C will stop blinking.
HITACHI
จัดจำหน่ายโดย บริษัท อิตาซิเชลล์ (ประเทศไทย) จำกัด
เลขที่ 333, 331/1 - 8 หมู่ที่ 13 ถนนบางนาตราด ก.ม. 7
ตำบลบางแก้ว อำเภอทางพลี จังหวัดสมุทรปราการ 10540
โทรศัพท์ : 0-2335-5455 โทรสาร 0-2316-1126, 0-2316-1127
Web site : http://www.hitachi.co.th E-mail : hitachi@hitachi.co.th
ราคาแนะนําขายปลีกรรมภาษีมูลค่าเพิ่ม : รุ่น HES-35VD 5,890 บาท / รุ่น HES-45VD 6,390 บาท
รุ่น HES-35VDS 6,190 บาท / รุ่น HES-45VDS 6,790 บาท
รุ่น HES-48VD 6,490 บาท
3RPL093721 2014-06 (YT-HCPT)R0