
AT440MLb - Plattenspieler Audio-Technica - Kostenlose Bedienungsanleitung
Finden Sie kostenlos die Bedienungsanleitung des Geräts AT440MLb Audio-Technica als PDF.


| Produkttyp | Plattenspieler |
| Modell | AT440MLb |
| Marke | Audio-Technica |
| Antrieb | Riemenantrieb |
| Geschwindigkeiten | 33 1/3 U/min, 45 U/min |
| Tonabnehmer | Moving Magnet (MM) – Audio-Technica AT440MLb |
| Nadelnachführung | Mikroline (MicroLine) |
| Auflagekraft | Einstellbar, 1,0–2,0 g |
| Anti-Skating | Einstellbar |
| Ausgang | Cinch (RCA), unsymmetrisch |
| Phono-Vorverstärker | Integriert (umschaltbar) |
| Abmessungen (B x T x H) | ca. 420 x 340 x 120 mm |
| Gewicht | ca. 5,2 kg |
| Stromversorgung | 100–240 V, 50/60 Hz |
| Staubschutz | Transparenter Staubdeckel |
| Reinigung | Nadelreinigung mit Bürste; Gehäuse mit weichem Tuch |
| Sicherheitshinweise | Vor Nässe schützen; Netzstecker ziehen bei Nichtgebrauch |
| Ersatzteile | Ersatznadel ATN440MLb, Tonabnehmer AT440MLb |
| Reparatur | Nur durch autorisierten Fachhändler |
| Garantie | 2 Jahre (je nach Land) |
Häufig gestellte Fragen - AT440MLb Audio-Technica
Benutzerfragen zu AT440MLb Audio-Technica
0 Frage zu diesem Gerät. Beantworten Sie die, die Sie kennen, oder stellen Sie Ihre eigene.
Eine neue Frage zu diesem Gerät stellen
Laden Sie die Anleitung für Ihr Plattenspieler kostenlos im PDF-Format! Finden Sie Ihr Handbuch AT440MLb - Audio-Technica und nehmen Sie Ihr elektronisches Gerät wieder in die Hand. Auf dieser Seite sind alle Dokumente veröffentlicht, die für die Verwendung Ihres Geräts notwendig sind. AT440MLb von der Marke Audio-Technica.
BEDIENUNGSANLEITUNG AT440MLb Audio-Technica
取扱説明書
VM型(デュアルマグネット)ステレオカートリッジ
AT440MLb
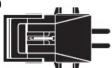
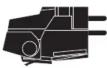
お買い上げありがとうございます
ご使用の前にこの取扱説明書を必ずお読みのうえ、正しくご使用ください。また保証書と一緒にいつでもすぐ読める場所に保管しておいてください。
安全上の注意
本製品は安全性に充分な配慮をして設計をしていますが、使いかたを誤ると事故が起こることがあります。事故を未然に防くために下記の内容を必ずお守りください。
警告 この表示は「取り扱いを誤った場合、使用者が死亡または重傷を負う可能性があります」を意味しています。
●同梱のボリ袋は幼児の手の居く所や火のそばに置かない。●幼児の手の居く所に置かない
事故や火災の原因になります。事故や故障の原因になります。
[EMPTY]
注意 この表示は「取り扱いを誤った場合、使用者が傷害を負う、または物的損害が発生する可能性があります」を図味しています。
● 實封日光の当たる場所、風雪器号の派く、高温多温は、● 分解を改進はし、刻し。
- 直射日光の当たる場所、暖房器具の近く、高温多湿や ほこりの多い場所に置かない - 分解や故障はしない 故障の原因になります
故障や不具合の原因になります。
●振動系は指で触れない 故障の原因になります
故障の原因になります。
特長
●VM型デュアルマグネットシステムと高性能バラトロイダル発電系
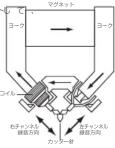
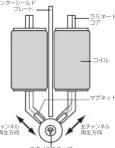
オーディオテクニカのVM型ステレオカートリッジは、ほかに頼を見ない構造です。2本のマグネット振動子をV字状に配置して振動系の性能を高め、レコードに音溝を刻み込んだカッターヘッドと相似で理想的な動作を実現しました。これに加えてAT100/400シリーズでは、コアの継ぎ目がなく磁気損失が極めて少ないパラトロイダル発電系を本体に採用し、高い発電効率を得ています。また、2枚のコアを積層することで高域特性もいっそう改善されています。左右の発電系をセンターシールドプ
レートでセバレ電気的なクロストークを減らしたこともAT100/400シリーズの特長です。このように振動系と発電系両面からカートリッジの伝送性能を高めたVM型AT100/400シリーズは、世界中で絶賛されて記録的なロングセラー商品となっていいます。
●コイルにPCOCC材を採用
をお楽しみいただけます。
PCOCC
[EMPTY]
PCOCC= Pure Copper by Ohno Continuous Casting process(单结晶状高純度無酸素銅)
テクニカルデータ
型式:VM型 スタチックコンプライアンス:40×10^{-6}cm/dyne
再生周波数範囲 : 20 \~ 25,000 Hz
出力電圧 : 4.0mV (1kHz, 5cm/sec)
チャンネルセバレーション:28dB(1kHz)出力ランプ…)0dB(1kHz)
針圧 : 1.0 \~1.8 g (1.4g標準)
コイルインピーダンス : 3.2kΩ (1kHz)
鱼荷抵抗 : 47kΩ
負荷容量 : 100 \~ 200pF
アイルインダクタン3 : 490mH (1kHz)
スタチックコンプライアンス : 40×10 ^-6 cm/dyne
ダイナミックコンプライアンス : 10×10 ^-6 cm/dyne (100Hz)
針先形状:マイクロリニア
カンチレバー : アルミニウムテーバーバイブ
蓋直トラックキブシ角 .20
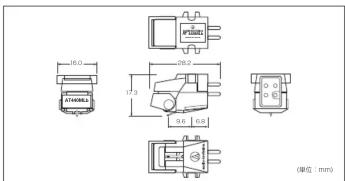
外形寸法 H17.3×W16.0×D
質量 : 6.5g
●付属品:非磁性体ドライバー×1、
カートリッジ取り付けビス 5mm×2、10mm×2、
ロッシャー×4、オット×3、六角オット×2、ブラシ×1
PCOOCリード線セット×1
(改良のため予色なく変更することがあります。
audio-technica
使いかた
*針部分は大変デリケートです。取り扱いには充分ご注意ください。 *本製品をヘッドシェルに取り付けるなどの取り扱いの際は、 針を取り外してから行ってください。
◆ 針交換のしかた
本製品の 計交 換はスタイラスノブを抜 き差しするだけで
簡単に行えます。
- 振動系に手を触れたりしないようにプロテクターを起
こしてください。
- 取ら付けは交換針の内側の突起をカートリッジの溝に合わせます。
針の寿命は使用条件によって大幅に変化しますが、およそ
1000時間です。
①ヘッド シェルに 取り付け ます。
振動系を痛めないように、交換針を取り外しておきます。ビスは、必ずカートリッジ側からシェルに向
かって差し込み、仮締めをします。
※ シェルの天面側から長いビスを入れると、交換針が入らなくなることがあります。
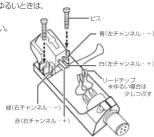
②出力端子の極性に注意してリードチップを接続します。
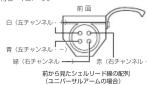
ユニバーサルアームのシェルリード線は、下図のように配列されています。カートリッジの出力端子
へ、同じ色のリード線を接続し
少しぶふしてから行ってください。※出方剛子にはリン(ゼナムの歯を締剤に加えるない至くがずい)
※ 出力端子にはバスタなどの熱を絶対に加えない还可ください。 ※ 付属のリード線をご使用になると最高のマッチングが
得られます。
③カートリッジの取り付け位置を正確に決めます。
(オーバーハングの調整)
アームまたはブレーヤーシステムの説明書に従ってオーバーハ
ングの調整をします。不明な場合は、ブレーヤーに最初から付
ていたガードリッジの鋒売位置に合わせてください。(若図)※院英が大きいと音願が劣化しますので、できる�数は1 mm以内に
本誠達が入せぬに言葉が劣化しますので、を念めるガスー・INM取扱に描えてください。
*調整後、ビスを左右均等になるように本締めします。
④針圧を調整します。
本製品の適正針圧は1.0~1.8gで、標準値は1.4gです。使用条件
やお好みによって、適正值の範囲内で針圧を調整してご使用ください。
⑤アームの高さを調整します。
ヘッドシェルの底面とレコード面が横から見て平行になるように、高さを調整してください。アームの
高さが適切でないと、カートリッジのボディがレコードに当たり、音質が劣化することがあります。※接続する機関によっては、又一人の高さを調整できない機関を含めます。
※技続する機器によっては、アームの間とを資金とさない機器もあります。
⑥アンプとの接続を行います。
本製品は、損失の少ない高性能な"パラトロイダル発電系"によってコイルインピーダンスを低くし
ながら、4.0mV(1kHz、5cm/sec.)の高出力を維持しています。このため一般的なMM型と同様な図や扱い者より、イズの少ないタリアな音楽再生を示す。これだけは表す。アンゴのPHONO
な取り扱いて、よりオイスの少ないクリアな音楽再生をお業じあいに行います。アンプのPHONO(MM)端子ヘダイレクトに接続して使用してください。アンプにPHONO端子がない場合は、別売の
フォノイコライザーを使用してください。推奨負荷抵抗/容量は47kΩ/100~200pFです。
⑦針先をいつもきれいにしておいてください。
針先にごみや汚れが付着した場合は、付属のブラシできれいに
しておいてください。汚れがひどい場合は、スタイラスクリー
ナー(別売)をおすすめします。
税元から針先へ同がってブラジを動かしてグリーニ
シグしてください。ガードリッシをアームから外した
ときは恐れずにプロナウターを起こし、アップなどの軽源から離して保管してください。
の熟齢:から繰ひて保むてくれ この。
⑧交換針は純正品をご使用ください。
AT440MLbの交換針は右記のとおりです。交換針 ATN440MLb(ノブカラーパープル)
必ず オー ディオテ クニカの 純 正 品 をご 使 用ください。
アフクーサービスについて 本製品をご家庭用として、取扱説明や接続注意書きに従ったご使用において故障した場合、保証書記載の期間規定により無料修理をさせていただきます。修理ができない製品の場合は、交換させていただきます。お買い上げの際の領収書またはレシートなどは、保証開始日の確認のために保証書と共に大切に保管し、修理などの際は提示をお願いします。
お問い合わせ先(電話受付/平日9:00\~17:30)
製品の仕様・使いかたや修理部品のご相談は、お買い上げのお店または当社窓口およびホームページの
リ ホ ード ま ご お願
お客様相談窓口(製品の仕様・使いかた)0120-773-417(携帯電話:PHSなどのご利用は03-8746-0211FAX:043-739-8120、EXE-LL:support@audio-technica.co.in
●サービスセンター(修理部品)120-887-416(携帯電話
FAX:042-739-9120 Eメール:servicecenter@audio-technica.co.jp
●ホームページ(サポート)www.audio-technica.co.jp/atj/support
株式会社オーディオテクニカ
〒194-8666 東京都 町田市西成瀬2-46-
http://www.audio-technica.co.jp 112300700
INSTRUCTIONS
VM Type (Dual Magnet) Stereo Cartridge
AT440MLb
Caution
This stereo cartridge was designed with painstaking attention given to safety, but trouble may occur if it is used incorrectly. Be sure to read these precautions before using product.
- Keep the cartridge out of the reach of small children.
Failure to heed this precaution may result in accidents or malfunctioning.
- Keep the plastic bag provided with the cartridge out of the reach of small children and away
from flames.
Failure to heed this precaution may result in accidents or a fire.
- Do not put this cartridge in a location where it will be exposed to direct sunlight, near heating
devices or in places with a high temperature, high humidity or with high concentrations of dust.
Failure to need this precaution may result in malfunctioning or trouble. Do not touch the paradox's antilever fulvum
- Do not touch the cartridge's cantilever fluid. Failure to heed this precaution may result
- Do not attempt to disassemble or modify the cartridge.
Failure to heed this precaution may result in malt
- Do not subject the cartridge to strong impact.
Failure to heed this precaution may result in malfunctioning.
Features
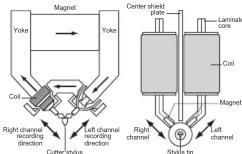
- VM type dual magnet system & high-performance Paratoroidal generator coil system
Audio-Technical's VM stereo cartridges have a unique structure. The structure improves
performance of the vibration system, allowing the stylus perfect contact to the record surface.
Additionally, the AT100/400 series adopts a lossless Paratoroidal generator coil system to their
cartridge bodies that results in peak generating efficiency. Stacking two cores makes further instruments to high frequency characteristics by separating the debt and left channels from
Improvements to high frequency characteristics by separating the right-and-left channels from the center shield plate.
the center shield plate, resulting in reduced
resulting in reduced electrical cross talk. The
VM type AT100/400 series'
dual magnet vibration
and generation systems
have been highly praised
all over the world and
have became a
long-selling series.
• PCOCC coil
The PCOCC coil enables purer transmission because it is not subject to grain boundaries in the
direction of transmission.
PCOCC
PCOCC = Pure Copper by Ohno Continuous Casting process
Specifications
| Type | : VM | Static compliance | : 40 × 10^4 cm/dyne |
| Frequency response | : 20 ~ 25,000 Hz | Dynamic compliance | : 10 × 10^4 cm/dyne( 100Hz) |
| Output voltage | : 4.0 mV (1kHz, 5 cm/sec.) | Stylus | : Micro Linear |
| Channel separation | : 28 dB (1kHz) | Cantilever | : Aluminum taper pipe |
| Output balance | : 1.0 dB (1kHz) | Vertical tracking angle | : 20° |
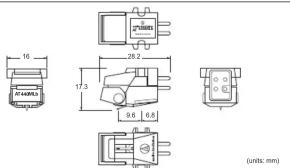
| Tracking force | : 1.0 ~ 1.8 g (1.4 g standard) | Dimensions | : 17.3(H) × 16(W) × 28.2(D) mm |
| Coil impedance | : 3.2 kΩ (1kHz) | Weight | : 6.9 g |
| DC resistance | : 800 Ω | *Accessories : Non-magnetic driver = 1 | |
| Recommended load impedance | : 47 kΩ | cartridge installation screws 5 mm + 2 mm over 2, | |
| Load capacitance | : 100 ~ 200 pF | washer 4, nut 2, hexagon nut 2, brush 1, | |
| Coil inductance | : 490 mH (1kHz) | PCOCC lead wire × 1 | |
(Specifications are subject to change without notice due to improvements.)
audio-technica
Operation
*The stylus section is extremely fragile. Exercise
care in handling it.
Remove the stylus assembly before mounting the cartridge
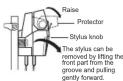
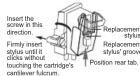
◆ Replacing the stylus
You can easily replace the cartridge's stylus by removing
and inserting the stylus knob.
- Raise the protector without touching the cartridge's
cantilever fulcrum
- When installing, position the rear tab of the
replacement stylus to the groove of the cartridge
Product lifetime of the stylus is around 1000 hours,
though it varies depending on the conditions of use.
[Non-Text]
(1) Mount the cartridge onto the headshell.
Remove the stylus assembly before mounting the cartridge. Insert the two mounting screws from
the cartridge side, securing them to the headshell.
*Inserting them from the headshell will make it difficult or impossible to replace the stylus.)
(2) Connect the lead tip, noting output polarity.
The layout of the universal arm's shell leads is as shown below. Connect leads to cartridge output
terminals of the matching color. If the lead clip is loose.
flatten it out slightly to insert it.
*Never apply heat (from solder, etc.) to the output terminal.
*The supplied lead wire is the best choice for use.
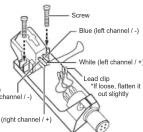
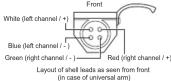
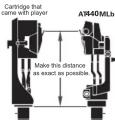
(3) Determine the correct position for installing the cartridge (adjust overhang). Adjust overhang, following the instructions in the arm or the phonograph's user's manual. If you are unsure, align stylus tip to cartridge that originally came with the player (as shown in the figure).
*An overly large gap will impair audio quality, so align within
1 mm if possible
*After adjusting, finish tightening screws making sure there
is a balance between left and right
(4) Adjust tracking force.
The appropriate tracking force of this cartridge is in the range of 1.0 to 1.8g (standard level: 1.4g ). Depending on conditions of use or individual preference, adjust the tracking force within the range of suitable values.
(5) Adjust arm height
Adjust the height so that the bottom face of the headshell and the record surface are
parallel, as seen from the side. An improper arm height may cause the body of the
cartridge to make contact with the record and could impair audio quality.
*Depending on equipment being connected, you may not be able to adjust arm height
(6) Connect to the amplifier
The cartridge uses a low-loss Paratoroidal generator coil system with low coil impedance to achieve its high output value of 4.0 mV (1 kHz, 5 cm/sec.). The cartridge can be considered essentially as a moving-magnet cartridge, but its low noise characteristics give it extremely clear tone quality. Connected directly to the PHONO (MM) terminal of the amplifier. When your amplifier does not have the PHONO terminal, use the phono equalizer sold separately. Recommended load impedance/capacitance are 47 kΩ/100\~200 pF.
(7) Keep the stylus tip clean at all times.
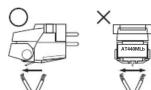
Use the brush provided to remove the dirt and dust on the stylus tip. A stylus cleaner (sold separately) is recommended to remove stubborn dirt. Clean the stylus tip by moving the brush from the base toward the stylus tip. When the cantilever has been removed from the arm, do not forget to raise the protector, and store the cartridge away from the amplifier and other heat
How to clean the stylus tip Always move the brush in the direction in which the record rotates.
audio-technica
Audio-Technica Corp
2-46-1 Nishi-naruse, Machida, Tokyo 194-8666, Japan
©2014 Audio-Technica Corp.


Marke : Audio-Technica
Modell : AT440MLb
Kategorie : Plattenspieler