
CA-115 - Hi-Fi-System TOA - Kostenlose Bedienungsanleitung
Finden Sie kostenlos die Bedienungsanleitung des Geräts CA-115 TOA als PDF.


| Marke | TOA |
| Modell | CA-115 |
| Produktkategorie | Hi-Fi-System |
| Typ | Auto-Verstärker |
| Abmessungen (B x H x T) | 178 mm x 50 mm x 132 mm |
| Gewicht (nur Verstärker) | 0,9 kg |
| Stromversorgung | 12 V Gleichstrom (Batterie), Betriebsbereich 10 – 16 V |
| Stromaufnahme (Nennausgang) | Unter 3 A |
| Nennausgangsleistung | 15 W |
| Klirrfaktor | Unter 5 % (1 kHz, Nennausgang) |
| Frequenzgang | 100 Hz – 10 kHz (±3 dB) |
| Mikrofoneingänge | 2 x 600 Ω, 4 mV (Klinke 6,3 mm) |
| Hilfseingang (AUX) | 10 kΩ, 500 mV (Klinke 6,3 mm) |
| Sicherung | 4 A (CA-115) |
| Lautsprecherimpedanz | 4 Ω oder 8 Ω (Gesamt) |
| Mitgeliefertes Mikrofon | Dynamisches Mikrofon mit Sprechschalter, 600 Ω, -53 dB |
| Montage | Im Armaturenbrett oder unter dem Armaturenbrett (mit Montagesatz) |
| Betriebstemperaturbereich | Nicht spezifiziert (für Auto-Umgebung ausgelegt) |
| Reinigung | Mit einem weichen, trockenen Tuch abwischen; keine aggressiven Reinigungsmittel |
| Reparierbarkeit | Sicherung austauschbar; andere Reparaturen nur durch Fachpersonal |
| Zubehör | Mikrofon, Mikrofonhalter, Montagesatz, Netzkabel, Lautsprecherkabel, Sicherung |
Häufig gestellte Fragen - CA-115 TOA
Benutzerfragen zu CA-115 TOA
0 Frage zu diesem Gerät. Beantworten Sie die, die Sie kennen, oder stellen Sie Ihre eigene.
Eine neue Frage zu diesem Gerät stellen
Laden Sie die Anleitung für Ihr Hi-Fi-System kostenlos im PDF-Format! Finden Sie Ihr Handbuch CA-115 - TOA und nehmen Sie Ihr elektronisches Gerät wieder in die Hand. Auf dieser Seite sind alle Dokumente veröffentlicht, die für die Verwendung Ihres Geräts notwendig sind. CA-115 von der Marke TOA.
BEDIENUNGSANLEITUNG CA-115 TOA
CAR AMPLIFIER CA-115
CA-130
CA-160
Thank you very much for purchasing TOA's Car Amplifier. To prolong the life of your amplifier by operating and using it correctly, please read this instruction manual carefully. The Car Amplifier with a rated output of 15 W (CA-115), 30 W (CA-130), and 60 W (CA-160) is suited to general public address applications made from cars.

natural_image
Isometric line drawing of a rectangular electronic device with three ports and ventilation slots (no text or symbols)■ SAFETY PRECAUTIONS
- Be sure to read the instructions in this section carefully before use.
- Make sure to observe the instructions in this manual as the conventions of safety symbols and messages regarded as very important precautions are included.
- We also recommend you keep this instruction manual handy for future reference.

WARNING
Indicates a potentially hazardous situation which, if mishandled, could result in death or serious personal injury.
Do not install the unit in the following locations to avoid a traffic accident and personal injury:
- Locations which block the driving of a car.
- Locations where the unit contacts the user's body or cloth when getting on or down the car.

CAUTION
Indicates a potentially hazardous situation which, if mishandled, could result in moderate or minor personal injury, and/or property damage.
Connect the power cord as instructed below. Failure to do so could result in electric shock or a failure of the amplifier or car.
- Connect the red cord directly to the positive ⊕ terminal of the battery, and the blue cord to the negative ⊖ terminal.
- Insulate joints between the power cord and battery terminal with the vinyl tape.
TOA Corporation
■ NOMENCLATURE AND FUNCTION
[Side view]
[Front view]

① Power switch [POWER] Power is switched on and off with each depression of this switch.
② Power indicator Lights when the power is switched on.
③ Mic 1 input jack [MIC1] Connects to either the supplied or other microphone.
④ Mic 2 input jack [MIC2] Connects to either the supplied or other microphone.
⑤ Mic 1 volume control [MIC1] Adjusts the volume of the microphone connected to Mic 1 jack.
⑥ Mic 2 volume control [MIC2] Adjusts the volume of the microphone connected to Mic 2 jack.
⑦ Auxiliary input jack [AUX] Connects to a tape recorder, radio, etc.
⑧ Power cord Connects to the power supply.
⑨ Speaker cable Connects to the speaker.
⑩ Fuse holder Be sure to use the fuse of specified rating. (CA-115: 4 A, CA-130: 8 A, CA-160: 12 A)
INSTALLATION
The car amplifier can be mounted in the dashboard or center console of the car. (The mounting method differs depending on the type of the car.) It can also be mounted under the dashboard using the supplied mounting kit.
When using the supplied mounting kit, attach the mounting bracket to the dashboard first, and then the amplifier to the bracket.
Note: To avoid the amplifier's failure, do not use devices other than the supplied mounting kit when installing.

■ CONNECTIONS
Connect the power supply and speaker as follows:
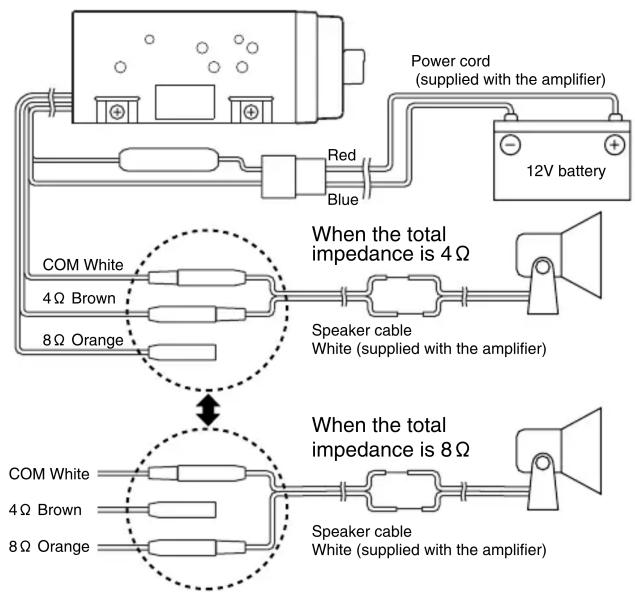
Notes
- The amplifier cannot be installed in the car using a 24 V battery.
- The amplifier cannot be installed in the car of the negative grounding type.
- See to it that the amplifier's output does not exceed the speaker's (total) permissible input.
- Ensure that the amplifier's output impedance matches the speaker's total impedance. The amplifier may fail if they are not matched.
OPERATION
- Press the power switch ① and ensure that the power indicator lights. (If the power indicator does not light, check the power cord for correct connection.)
- Insert the microphone plug into Mic 1 input jack ③.
- Turn on the microphone switch and adjust the volume using Mic 1 volume control ⑤. When using Mic 2, connect the microphone to Mic 2 input jack ④ and adjust the volume with Mic 2 volume control ⑥. Up to two microphones can be used per amplifier.
- When using a tape recorder or radio, connect the earphone terminal or LINE OUT terminal of the tape recorder, etc. to the auxiliary input jack ⑦ by means of a shielded wire. Use the volume control of the tape recorder, etc. to adjust the volume.
To connect the amplifier to the tape recorder, use either a commercial "phone plug-to-miniature plug" cord or such a connection cord as is shown below.

Solder Hot and Cold in the shielded cable correctly so that they do not contact each other.
- Accessories
Dynamic microphone (with talk switch) .... 1
Microphone holder 1
Mounting screw (4 x 16) ...... 2
Mounting bracket 1
Mounting screws
Hexagon bolt (M5x15) 2
Screw (M4x8) 4
Nut (M5) 2
Spring washer (M5) 2
Spring washer (M4) 4
Plain washer (M5) 4
Plain washer (M4) 4
Power cord (1.5 m) 1
Speaker cable (0.3 m) 1
Fuse (CA-115: 4 A / CA-130: 8 A / CA-160: 12 A) ..... 1
SPECIFICATIONS
| Model No. | CA-115 CA-130 | CA-160 | |
| Power Source | Standard voltage: 14 VDCOperating range: 10 – 16 VDC (12 V battery) | ||
| Current Consumption Under 3 A(rated output) | Under 5 A(rated output) | Under 9 A(rated output) | |
| Rated Output | 15 W | 30 W | 60 W |
| Distortion | Under 5% (1 kHz, rated output) | ||
| Frequency Response | 100 Hz – 10 kHz within ±3 dB | ||
| Input | Mic 1: 600 Ω, 4 mV(Usable plug: ø6.3 mm phone plug)Mic 2: 600 Ω, 4 mV(Usable plug: ø6.3 mm phone plug)Aux: 10 kΩ, 500 mV(Usable plug: ø6.3 mm phone plug) | ||
| Dimensions (mm) | 178 (w) x 50 (h) x132 (d) | 178 (w) x 50 (h) x144 (d) | 178 (w) x 50 (h) x170 (d) |
| Weight 0.9 kg | (amplifier only) | 1.1 kg(amplifier only) | 1.2 kg(amplifier only) |
| Supplied Microphone | Uni-directional dynamic microphone(with talk switch)Impedance: 600 ΩSensitivity: -53 dB (1 kHz, 0 dB =1 V/Pa) | ||
Note: The design and specifications are subject to change without notice for improvement.


Marke : TOA
Modell : CA-115
Kategorie : Hi-Fi-System