
VeX M-LCA-C-W - Nicht kategorisiert JL Audio - Kostenlose Bedienungsanleitung
Finden Sie kostenlos die Bedienungsanleitung des Geräts VeX M-LCA-C-W JL Audio als PDF.


| Produkttyp | LED-Lichtkappe |
| Kompatible Lautsprechersysteme | ETXv3 und VeX™ geschlossene Lautsprechersysteme |
| Spannungsversorgung | +12V DC |
| Stromaufnahme | 150 mA pro LED-Kappe (durch Sicherung geschützt) |
| Schutzart | O-Ring-Dichtung für Wasserdichtigkeit |
| Montageort | Hinten am Lautsprechergehäuse, durch gebohrtes Loch |
| Verdrahtung LED | Rot (+12V), Schwarz (Masse) |
| Verdrahtung Lautsprecher (optional) | Rot/Streifen (+), Schwarz/Streifen (-), Grün (LED-Masse), Blau (Speaker LED +), Gelb (Speaker/LCD -) |
| Lieferumfang | 2 LED-Lichtkappen, 2 M10 x 1,5 Nylon-Einsatz-Flansch-Sicherungsmuttern, 2 O-Ringe, 2 150mA Sicherungen, 2 Sicherungshalter, 2 Buchsenkonverter (weiblich), 1 M10 Sicherungsmutterwerkzeug |
| Werkzeug | M10 Sicherungsmutterwerkzeug (inklusive) |
| Garantie | 2 Jahre (USA) |
| Hersteller | JL Audio, Inc. |
| Reinigung | Mit einem feuchten Tuch reinigen; keine aggressiven Chemikalien verwenden |
| Sicherheitshinweise | Nicht an Navigationslichter anschließen; Sicherung einbauen; Kurzschlussschutz beachten |
| Reparatur | Defekte Sicherung ersetzen; bei anderen Schäden autorisierten Service kontaktieren |
Häufig gestellte Fragen - VeX M-LCA-C-W JL Audio
Benutzerfragen zu VeX M-LCA-C-W JL Audio
0 Frage zu diesem Gerät. Beantworten Sie die, die Sie kennen, oder stellen Sie Ihre eigene.
Eine neue Frage zu diesem Gerät stellen
Laden Sie die Anleitung für Ihr Nicht kategorisiert kostenlos im PDF-Format! Finden Sie Ihr Handbuch VeX M-LCA-C-W - JL Audio und nehmen Sie Ihr elektronisches Gerät wieder in die Hand. Auf dieser Seite sind alle Dokumente veröffentlicht, die für die Verwendung Ihres Geräts notwendig sind. VeX M-LCA-C-W von der Marke JL Audio.
BEDIENUNGSANLEITUNG VeX M-LCA-C-W JL Audio
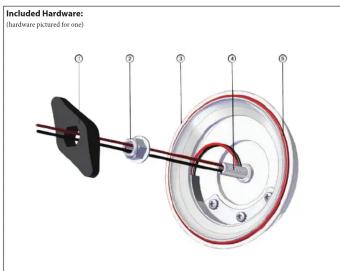
NOTE: The M-LCA-C-W Light Cap and M880-ETXv3-SG-WH Enclosed Speaker System are used in this manual for illustrative purposes only. The installation steps are the same for all ETXv3 and VeX™ Enclosed Speaker Systems and all LED Light Caps.
| BOM ID Quantity Description | ||
| 1 M10 Locknut Tool | ||
| 2 | 2 | M10 x 1.5 Nylon Insert Flange Locknut |
| 3 2 LED Light Cap | ||
| 4" 2 Threaded Stud | ||
| 5" 2 O-Rang | ||
| - 2 150mA Fuse (not shown) | ||
| - 2 Fuse Holder (not shown) | ||
| - 2 Female Converter (not shown) | ||
* Pre-installed on LED Cap
| LED Light Cap Wiring: | ||
| Wire Size | Wire Color | Use |
| 18 AWG | Red | LED Positive (+) |
| Black | LED Negative (-) | |
| Enclosed Speaker System Wiring: | ||
| Wire Size | Wire Color | Use |
| 16 AWG | Red/Stripe | Speaker Positive (+) |
| Black/stripe | Speaker Negative (-) | |
| 20 AWG | Red | LED Light Cap Positive (+) |
| Green | LED Light Cap Negative (-) | |
| Blue | Speaker LED Positive (+) | |
| Yellow Speaker/LCD Negative (-) | ||
Note: Not all wires may be used in normal applications.
LIMITED WARRANTY - MARINE PRODUCTS (USA)
JL AUDIO warrants this product to be free of defects in materials and workmanship for a period of two (2) years from the
original date of purchase. This warranty is not transferable and applies only to the original purchaser from an authorized [L AUDIO dealer. Should service be necessary under this warranty for any reason due to manufacturing defect or malfunction, (L AUDIO will sit at its discretion), repair or replace the defective product with new or remanufactured product at no charge. Damage caused by the following is not covered under warranty: accident, misuse, abuse, product modification or neglect, failure to follow installation instructions, unauthorized repair attempts, mispresentations by the seller. This warranty does not cover incidental or consequential damages and does not cover the cost of removing or reinstalling the unitful cosmetic damage due to accident or normal wear and tear is not covered under warranty.
Any applicable implied warranties are limited in duration to the period of the express warranty as provided herein begin
with the date of the original purchase at retail, and no warranties, whether express or implied, shall apply to this product thereafter. Some states do not allow limitations on implied securities. Therefore these acquisitions may not apply to trust. This
warranty gives you specific legal rights, and you may also have other rights which vary from state to state.
For Service Information in the U.S.A. please call
. Audio Customer Service: (95 4) 4 43-110
AM - 5:30 PM (Eastern Time Zone)
JL Audio, Inc
10369 North Commerce Pkwy
Miramar, FL 33025, USA
International Warranties:
Products purchased outside the United States of America are covered only by that country's distribution and activity.
by that country's distributor and not by JL Audio, Inc.
JL AUDIO. | How we play.™
www.jlaudio.com
3.2 通过以下途径进行项目管理:项目管理人须根据项目进度计划进行项目管理,项目管理人应根据项目进度计划进行项目管理。





Installation Instructions for
M-LCA-C-W
&
M-LCB-C-W
LED LIGHT CAP
FOR ETXv3 & VeX™ ENCLOSED SPEAKER SYSTEMS
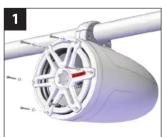
Remove the six #8 x 1-L/4" Pan Head Screws and six #8 Flat Washers that secure the speaker to the enclosure.
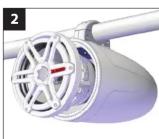
Disconnect the speaker wiring and speaker LED wiring (if equipped), and remove the speaker from the
Using the exterior angles of the JL Audio logo as a guide, mark the center of the rear aluminum logo cap, as shown. Using a punch tool, make an indent in the aluminum logo cap on the center mark.
Using a 7/16" drill bit, carefully drill through the center of the rear aluminum logo cap, into the enclosure. File any sharp edges.
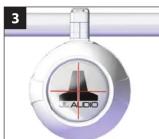
Pass the LED wires and Threaded Stud on the back of the LED Light Cap through the drilled hole, and position the cap flush against the back of the enclosure.
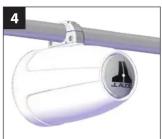
Slide an M10 x 1.5 Nylon Insert Flange Locknut over the LED wiring, and hand-tighten onto the Threaded Stud.
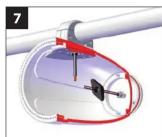
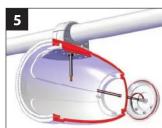
Slide the M10 Locknut Tool over the LED wires and onto the M10 x 1.5 Nylon Insert Flange Locknut.
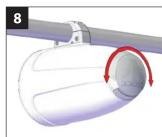
Rotate the LED Light Cap to the desired angle. Using the M10 Locknut Tool, fully tighten the M10 x 1.5 Nylon Insert Flange Locknut until the O-ring is fully compressed and not visible to ensure the unit is properly sealed. Remove the M10 Locknut Tool from the enclosure.
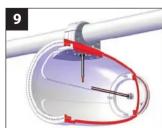
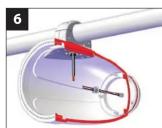
Connect the LED wires from the LED Light Cap to the LED wires entering the enclosure. Refer to the wiring charts on the opposite page for details. DO NOT install the fuse holders inside the enclosure.
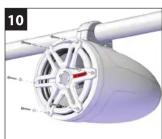
Reconnect the speaker wiring, and reinstall the speaker using the six #8 x 1-1/4" Pan Head Screws and six #8 Flat Washers.
- For marine installations, do not connect the LED lights to the vessel's navigational lighting circuits.
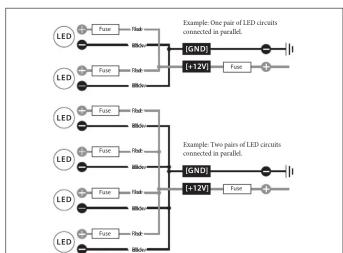
- For short-circuit protection, install a supplied fuseholder onto EACH LED Light Cap's RED (+12V) LED power connection lead.
- Connect all RED (+12V) leads together (parallel) and connect to a switched +12V supply. Connect all GREEN (GND) leads together and connect to a negative ground or to the NEGATIVE battery post.
- We recommend activating the LEDs thru a lighting circuit that supplies +12V via an existing switch. If an existing switched circuit is not available, you may install a dedicated toggle/rocker style switch that will supply positive (+12V) power. Fuse this connection according to how many LED circuits you have (LED circuits x 150~mA ).

Marke : JL Audio
Modell : VeX M-LCA-C-W
Kategorie : Nicht kategorisiert