Seamless ASM60200 - Subwoofer SpeakerCraft - Kostenlose Bedienungsanleitung
Finden Sie kostenlos die Bedienungsanleitung des Geräts Seamless ASM60200 SpeakerCraft als PDF.


Benutzerfragen zu Seamless ASM60200 SpeakerCraft
0 Frage zu diesem Gerät. Beantworten Sie die, die Sie kennen, oder stellen Sie Ihre eigene.
Eine neue Frage zu diesem Gerät stellen
Laden Sie die Anleitung für Ihr Subwoofer kostenlos im PDF-Format! Finden Sie Ihr Handbuch Seamless ASM60200 - SpeakerCraft und nehmen Sie Ihr elektronisches Gerät wieder in die Hand. Auf dieser Seite sind alle Dokumente veröffentlicht, die für die Verwendung Ihres Geräts notwendig sind. Seamless ASM60200 von der Marke SpeakerCraft.
BEDIENUNGSANLEITUNG Seamless ASM60200 SpeakerCraft
OWNER'S MANUAL
Seamless
In-Wall Subwoofer
natural_image
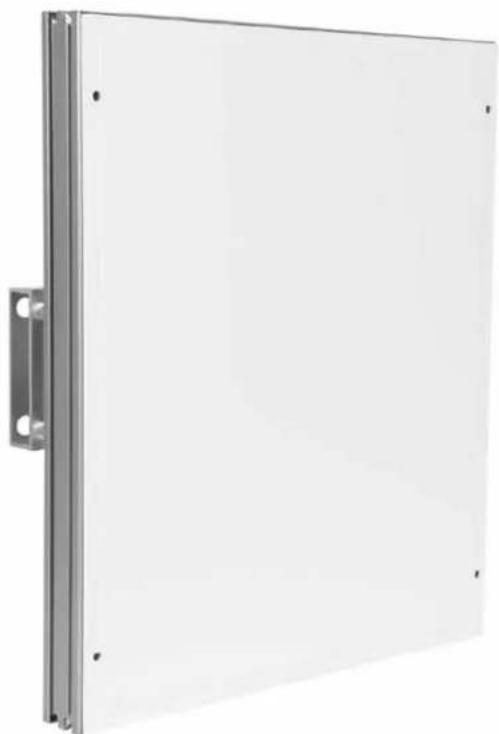
Exterior view of a white rectangular panel with metal framing and mounting holes (no text or symbols)WHAT'S INCLUDED
1 - Seamless Subwoofer
4 - Installation Screws
1 - Appropriate Square-Drive
1 - Polyswitch Protection Circuit
1 - Installation Instructions
INSTALLATION INSTRUCTIONS (NEW CONSTRUCTION)
Note: You must first install the Seamless Enclosure (Sold Separately). If you have not done this, please install it following the instructions included with the enclosure.
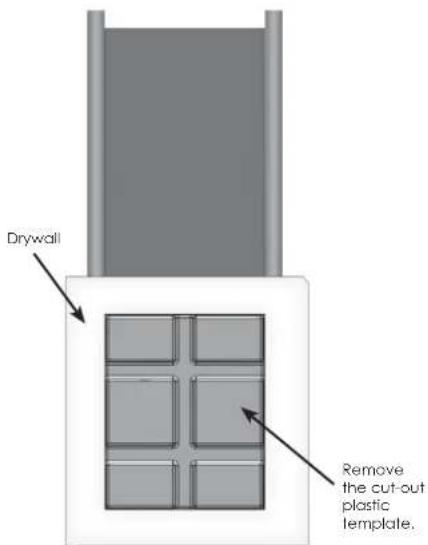
- Remove the cut-out plastic template from the subwoofer enclosure. This step assumes that drywall has been installed. Figure 1.
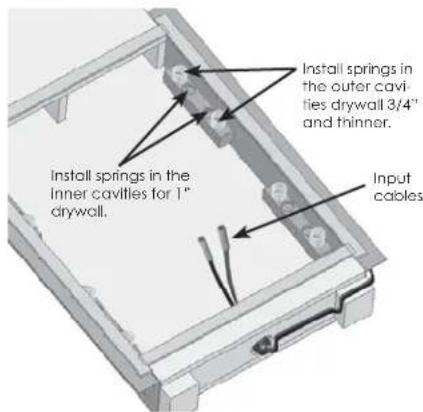
- Stapled to the box is a bag containing eight springs. Install all eight springs into the cavities of the plywood blocks. The cavities can accommodate 1/2" and up to 1" drywall installations. Figure 2.
text_image
Drywall Remove the cut-out plastic template.Figure 1
text_image
Install springs in the outer cavities drywall 3/4" and thinner. Install springs in the inner cavities for 1" drywall. Input cablesFigure 2
text_image
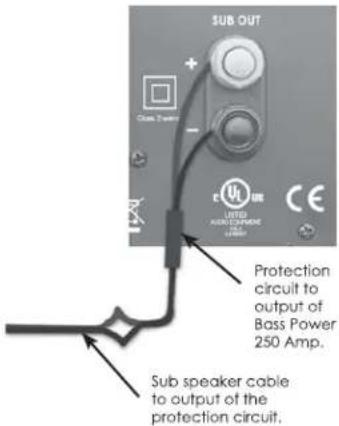
SUB OUT Protection circuit to output of Bass Power 250 Amp. Sub speaker cable to output of the protection circuit.Figure 3
- Observing the proper polarity (Red for positive and black for negative), securely connect the subwoofer to the input cable on the enclosure. Make sure the cable does not interfere with the diaphragm. The other side of the input cable should already be connected to the wire leads coming from your SpeakerCraft Bass Power 250 amplifier. Note: The amplifiers power must be unplugged when connecting any wires or cables to it. IMPORTANT: A protection circuit most commonly known as a Polyswitch is included in the packaging. To protect your Seamless Sub from excessive current from your amplifier, please install this protection circuit before operating your sub. In the event that the protection circuit is triggered, it will reset itself only when it cools. It requires no manual setting or replacement. Figure 3.
INSTALLATION INSTRUCTIONS (NEW CONSTRUCTION) CONTINUED
-
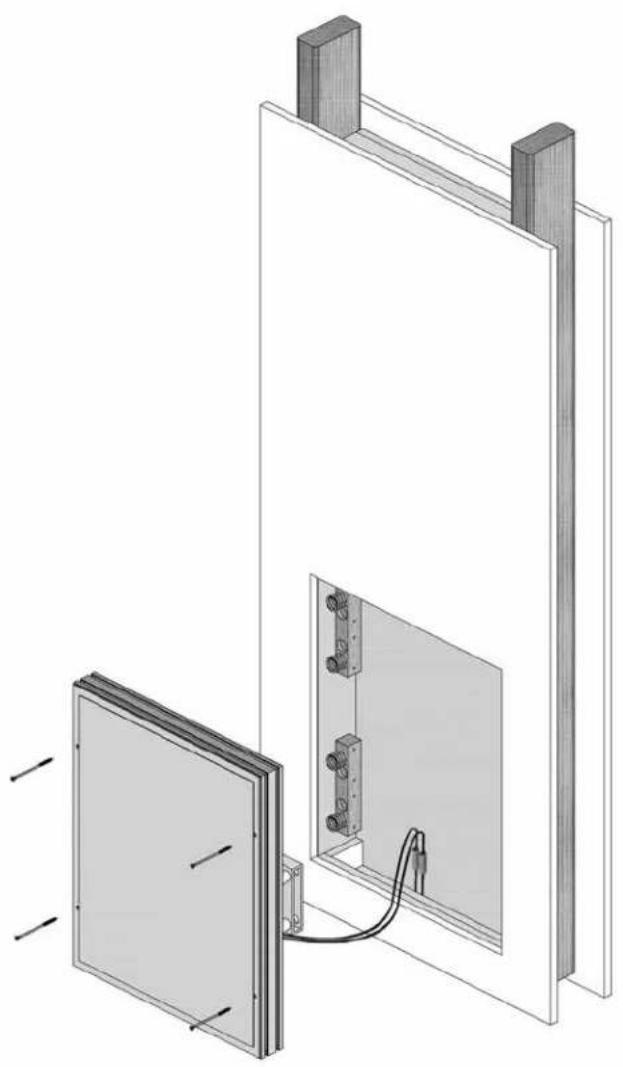
Install the Subwoofer using the supplied #7 x 3", screws. The appropriate square-drive bit is also supplied for your convenience. Figure 4.
-
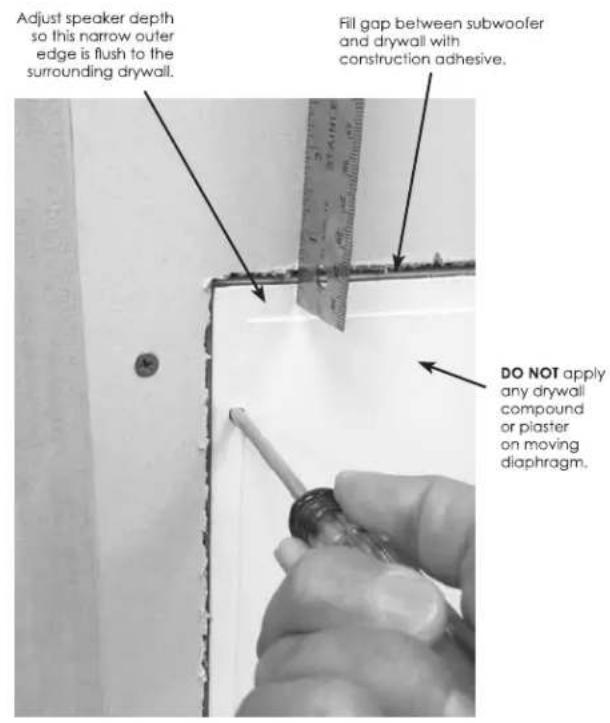
Use a screwdriver and the supplied square-drive to manually adjust the speaker so the outer edge of the diaphragm is perfectly flush to the surrounding wall. See Figure 5. Note: It is not the moving area of the diaphragm, but the lower edge that must be flush to the drywall.
natural_image
Technical line drawing of a wall-mounted panel assembly with a cable and connector, showing structural components without any text or symbols.Figure 4
text_image
Adjust speaker depth so this narrow outer edge is flush to the surrounding drywall. Fill gap between subwoofer and drywall with construction adhesive. DO NOT apply any drywall compound or plaster on moving diaphragm.Figure 5
-
Once the Subwoofer is correctly positioned, seal and further secure the diver using a strong construction adhesive, like Loctite Power Grab or Liquid Nails. Use plenty of adhesive in the gap around the whole perimeter of the Subwoofer in order to prevent air leaks, and to ensure a strong bond. Let the adhesive cure for at least 24 hours. For shorter installation times, the ideal choice is a two-part epoxy adhesive, applied with a mixing nozzle.
-
Thoroughly test the Subwoofer with a variety of program sources, making sure there are no unwanted vibrations.
-
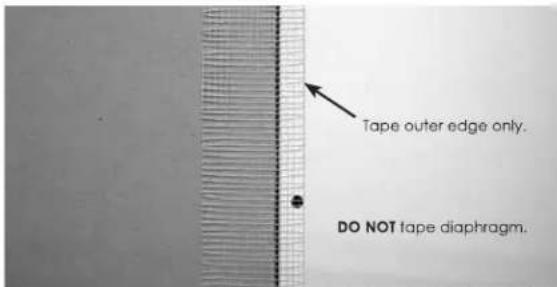
Tape the edge of the Subwoofer and the drywall around it with fiberglass mesh tape. Avoid tape overlap at the corners. Do not tape the moving part of the diaphragm, but only the 3/8"-wide edge around it. Figure 6.
text_image
Tape outer edge only. DO NOT tape diaphragm.Figure 6
-
Mud over the outer edge of the Subwoofer, fully covering the fiberglass tape. Important: Use 50% water with 50% Acrylic Admix (by volume) when mixing the drywall compound – this will improve the bonding of the drywall compound to the edge of the diaphragm. Note: Do not apply any mud or plaster on the moving part of the diaphragm. Let dry thoroughly, and lightly sand the mud around the perimeter of the Subwoofer, if required. Do not sand the moving part of the diaphragm.
-
If a textured finish is desired, first prime the whole diaphragm and mud around it with a very fine mist of 3M Type 61 "Drywall Corner Bead" adhesive, used as a primer. Let dry for 30 minutes, texture lightly, and let dry.
-
Prime the whole face of the Subwoofer and mud around it before painting.
-
Paint, let it dry, enjoy.
Note: Standard 5 drywall finish is required to ensure a high quality finish. Below are the requirements set forth by the four major trade associations, the Association of Wall and Ceiling Industries International (AWCI), the Ceilings and Interior Systems Construction Association (CISCA), the Gypsum Association (GA), and the Painting and Decorating Contractors of America (PDCA).
Level 5 Finish - All joints and interior angles shall have tape embedded in joint compound and two separate coats of joint compound applied over all flat joints and one separate coat of joint compound applied over interior angles. Fastener heads and accessories shall be covered with three separate coats of joint compound. A thin skim coat of joint compound, or a material manufactured especially for this purpose, shall be applied to the entire surface. The surface shall be smooth and free of tool marks and ridges. It is recommended that the prepared surface be coated with a drywall primer prior to the application of finish paint. The skim coat is a final leveling agent suitable to smooth out a surface to be used under the harshest lighting conditions that may otherwise highlight any imperfections under the finished surface.
Usage: Gloss and entirely non-textured surfaces.
SPECIFICATIONS
Seamless Subwoofer
Frequency Response: 45Hz to 250Hz (-6dB points) (before amp filtering); approximately 25 Hz to 100 Hz including amp filtering.
Nominal impedance: 8 ohm Compatible
Sensitivity: 86dB/2.83V/1m
Power Handling: 100 to 250W RMS/8 ohm
Maximum SPL: 105 dB SPL/1m
Dimensions: H x W x D: 17.25" x 14" x 3.25" 438mm x 356mm x 82mm
Weight: 13 lbs 6 kg
Declaration of Conformity

We. Speakercraft Inc.
940 Columbia Ave.
River USA
declare under our sole responsibility that the products described in this owners manual are in compliance with technical standards
EN 61000-6-1:2007 Electromagnetic Compatibility (EMC)
- Part 6-1: Generic standards - Immunity for residential, commercial and light-industrial environments
EN 61000-6-2:2005 Electromagnetic Compatibility (LMC)
- Part 6-2: Generic standards Immodity for industrial environments

SpeakerCraft Inc.
940 Columbia Ave, Riverside CA 92507
(800) 448-0976 Fax [951] /67-8/47
LIMITED 3-YEAR WARRANTY
SpeakerCraft Inc. warrants to the original retail purchaser only that the Seamless FR1 will be free from defects in materials and workmanship, provided the speaker was purchased from a SpeakerCraft Authorized Dealer.
Defective products must be shipped, together with proof of purchase, prepaid insured to the SpeakerCraft Authorized Dealer from whom they were purchased, or to the SpeakerCraft factory at the address listed on this installation instruction manual. Freight collect shipments will be refused. It is preferable to ship this product in the original shipping container to lessen the chance of transit damage. In any case, the risk or loss or damage in transit is to be borne by the purchaser. If, upon examination at the Factory or SpeakerCraft Authorized Dealer, it is determined that the unit was defective in materials or workmanship at any time during this warranty period, SpeakerCraft or the SpeakerCraft Authorized Dealer will, at its option, repair or replace this product at no additional charge, except as set forth below. If this model is no longer available and can not be repaired effectively, SpeakerCraft, at its sole option, may replace the unit with a current model of equal or greater value. In some cases where a new model is substituted, a modification to the mounting surface may be required. If mounting surface modification is required, SpeakerCraft assumes no responsibility or liability for such modification. All replaced parts and product become the property of SpeakerCraft Inc. Products replaced or repaired under this warranty will be returned to the original retail purchaser, within a reasonable time, freight prepaid.
This warranty does not include service or parts to repair damage caused by accident, disaster, misuse, abuse, negligence, inadequate packing or shipping procedures, commercial use, voltage inputs in excess of the rated maximum of the unit, or service, repair or modification of the product which has not been authorized or approved by SpeakerCraft. This warranty also excludes normal cosmetic deterioration caused by environmental conditions. This warranty will be void if the serial number on the product has been removed, tampered with or defaced.
This warranty is in lieu of all other expressed warranties. If the product is defective in materials or workmanship as warranted above, the purchaser's sole remedy shall be repair or replacement as provided above. In no event will SpeakerCraft be liable for any incidental or consequential damages arising out of the use or inability to use the product, even if SpeakerCraft Inc. or a SpeakerCraft Inc. Authorized Dealer has been advised of the possibility of such damages, or for any claim by any other party. Some states do not allow the exclusion or limitation of consequential damages, so the above limitation and exclusion may not apply.
All implied warranties on the product are limited to the duration of this expressed warranty. Some states do not allow limitation on the length of an implied Warranty. If the original retail purchaser resides in such a state, this limitation does not apply. Please contact SpeakerCraft for additional warranty information.

SpeakerCraft offers a variety of accessories to make your installation of this and other SpeakerCraft products easy, economical, and professional. Contact your authorized SpeakerCraft Dealer for more information. For technical inquires, please call 1-800-448-0976 or e-mail us at techsupport@speakercraft.com. We are available to assist you every weekday, except holidays, between the hours of 7:00 a.m. and 5:00 p.m. PST.