MT6 Three - Lautsprecher SpeakerCraft - Kostenlose Bedienungsanleitung
Finden Sie kostenlos die Bedienungsanleitung des Geräts MT6 Three SpeakerCraft als PDF.


Benutzerfragen zu MT6 Three SpeakerCraft
0 Frage zu diesem Gerät. Beantworten Sie die, die Sie kennen, oder stellen Sie Ihre eigene.
Eine neue Frage zu diesem Gerät stellen
Laden Sie die Anleitung für Ihr Lautsprecher kostenlos im PDF-Format! Finden Sie Ihr Handbuch MT6 Three - SpeakerCraft und nehmen Sie Ihr elektronisches Gerät wieder in die Hand. Auf dieser Seite sind alle Dokumente veröffentlicht, die für die Verwendung Ihres Geräts notwendig sind. MT6 Three von der Marke SpeakerCraft.
BEDIENUNGSANLEITUNG MT6 Three SpeakerCraft
MT6 Series Owner's Manual
SPEAKER SPECIFICATIONS
| MT6 ONE | MT6 TWO | |
| Speaker Type: | 2 Way In Wall | 2 Way In Wall |
| Tweeter: | Pivoting 1" Silk Dome | Pivoting 1" Silk Dome |
| Woofer: | 612 " Polypropylene Cone with Filleted Rubber Surround | 812 " Glass Composite Cone with Filleted Rubber Surround |
| Impedance: | Rohm | Rohm |
| Sensitivity: | 92dB 1W/1 m | 92dB 1W/1 m |
| Frequency Adjustments: | None | Front-Mounted 3 Position ± 3 dB Treble Adjustment Switch |
| Frequency Response: | 50 dB - 200 dB ± 2dB | 45 dB - 200 dB ± 2dB |
| Power Recommendations: | 100 watts (undistorted) | 120 watts (undistorted) |
| Dimensions [H x W x D]: | 1212 " x 812 " x 312 " | 1212 " x 812 " x 312 " |
| MT6 THREE | MT6 FOUR | |
| Speaker Type: | 2 Way In Wall | 2 Way In Wall |
| Tweeter: | Pivoting 1" Aluminum Dome | Pivoting 1" Aluminum/Magnesium Dome |
| Woofer: | 612 " Aluminum Cone with Dual Voice Coil and Filleted Rubber Surround | 612 " Aluminum/Magnesium Cone with Dual Voice Coil and Filleted Rubber Surround |
| Impedance: | 8/6"Dohm, depending on switch settings | 8/6"Dohm, depending on switch settings |
| Sensitivity: | 90dB 1W/1 m | 90dB 1W/1 m |
| Frequency Adjustments: | Front-Mounted 3 Position ± 3 dB Treble Adjustment Switch& ± 3 dB Bass Adjustment Switch | Front-Mounted 3 Position ± 3 dB Treble Adjustment Switch& ± 3 dB Bass Adjustment Switch |
| Frequency Response: | 40 dB - 200 dB ± 2dB | 3/1 dB - 200 dB ± 2dB |
| Power Recommendations: | 125 watts (undistorted) | 150 watts (undistorted) |
| Dimensions [H x W x D]: | 1212 " x 812 " x 312 " | 1212 " x 812 " x 312 " |
In our attempt to constantly improve our products, features and specifications are subject to change without notice.
SpeakerCraft offers a variety of accessories to make your installation of these speakers and other SpeakerCraft products easy, economical, and professional. Contact your authorized SpeakerCraft Dealer for more information.
Should you have any questions regarding this, or any other SpeakerCraft product, please call our toll-free service hot line at 1-800-448-0976. We are available to assist you every weekday, except holidays, between the hours of 7:00 a.m. and 5:00 p.m. PST.
940 Columbia Ave., Riverside CA 92507
18001 448-0976 Fax (051) 787-8747
www.speakercraft.com
SpeakerCraft
OWNER'S MANUAL
MT6 SERIES
ONE/TWO/THREE/FOUR
Mirror Image Technology In-Wall Loudspeakers
Congratulations on your purchase of SpeakerCraft "Mirror Image Technology" In-Wall Speakers. Your speakers are equipped with pivoting dome tweeters, which allow you to direct the sound toward or away from a listening area, and "Mirror Image Technology" in which the tweeters are mounted in an asymmetrical offset position to their baffles. This design minimizes diffraction and reflection effects for better stereo imaging than speakers with conventional center positioned tweeters. SpeakerCraft has a wide variety of accessories to compliment your Mirror Image Technology In-Wall Speakers. Contact your dealer or SpeakerCraft direct for more details.
SPEAKER PLACEMENT
Before installing your speakers, you should consider the placement carefully, being into account the location of electrical plumbing and other fixtures. Contact your dealer for assistance if you are not sure of the best location in your particular room environment.
Placement In Wall: When installing your speakers into the wall, ideal sound will be achieved when the tweeters are placed at seat level or slightly higher and the usual slaring area is no closer to the wall than the distance between the speakers themselves. (See Diagram 1) The Mix series is designed with the tweeter below the woven to ferrium optimum imaging if the speakers are positioned far away from the primary listening area, adjust the planting swirons so they are pointed toward the primary listening area. Note: To avoid possible damage to the picking sweeters, read the section entitled "SPEAKER/ADJUSTMENTS" in this manual prior to performing the tweeter adjustment.
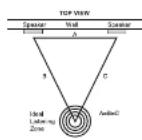
Diagram 1: deal Placement
SpeskerChart
MOUNTING SURFACE PREPARATION
New Construction - Unfinished Walls
A New Construction Bracket, SpeakerCraft P/N BKT90401. Available from your dealer, may be installed prior to drywall application across stores up to 24" on-center where a speaker will be located. Insulation material should be in place prior to installing drywall. After the hole is cut and the drywall is installed, the speakers are then easily installed following the instructions for mounting in "Finished Walls". Note: if the speakers are to be mounted more than 24" on-center, a special "Extra Long Wing", SpeakerCraft P/N WING90226, is available from your dealer.
Finished Walls
Prior to the actual installation of the speakers, it will be necessary to run cables to the speaker locations. See your dealer for more information about cable installation. After the cable has been properly installed, you are ready to mount the speakers. Following the simple steps listed below will result in a professional loading installation:
- Determine the best area to mount your speakers. This area of the wall should be free of obstructions such as electrical conduit, HVAC ducts, or water lines. This can best be determined by noting the placement of fixtures and gaining access to an attic or crawl space for further analysis of the location of such obstacles.
- Find the studs nearest the desired speaker mounting location. We highly recommend using a good stud finder tool for this procedure. If you are lining up the speakers to some other object or molding in the room, make sure you consider the size of the baffle flange which extends beyond the mounting hole on all four sides.
- Mark the hole. A template for setting the hole is provided in the box along with two parts mask inserts for use when painting. Position the template in the desired position and penal an outline on the wall.
Page 2
MT6 Series Owner's Manual
- Cutting the hole. CAUTION: This is the most important part of the entire installation. If you are not certain whether any obstructions exist behind the desired mounting area, you should start by cutting a small hole in the center of your enclosed mounting hole with a drywall saw. Cut at a 45° angle towards the inside of the hole (See Diagram 21). Cutting the small hole at this angle will make drywall replace much easier as the piece cut out can be installed readily back into the hole. Once you have determined there aren't any obstructions in your desired mounting location, then cutting the inside hole at a 45° angle to the wall surface.
- Add insulation. If the area in the wall is not already insulated, add an adequate amount of insulation material to fill the wall cavity. If the insulation material used is faced with foil or paper, position the foil or paper away from the speaker.
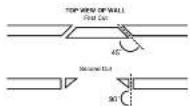
Diagram 2: Wall Cut Out
SPEAKER ADJUSTMENTS
The Minor Image Technology Series speakers come from the factory with the tweeter facing straight out from the textile. This will result in the overall smooth response, however, depending on your particular primary areas, room encounters, ceiling heights, or personal preferences, you may find the sound more pleasing by pointing the tweeters in a particular direction. Additional freight is desired in the primary listening area, point the tweeter towards that area, and it less difficult is required, point the breveer away. When used in a home theater surround sound environment as size or rear channel speakers, the best result will be obtained by pointing the tweeters away an adjunct wall. Push gently at the end of the tweeter to point it in the desired direction. (See Diagram 3)
CAUTION: Avoid touching tweeter dome as damage WILL occur on metal dome tweeters !MT6 THREE & FOURL
Tweeter Adjustment (MT6 TWO, THREE & FOUR):
The 3 vertical buttons with the center button labeled "T" allow for 6x80 of TRDLC adjustment. Your speakers were shipped with the triple set to neutral. This setting provides the most linear frequency response. If you desire more triple, push the button with the up arrow and the roller will play 3x80 higher. If you want less triple, push the button with the down arrow and the twelter will play 1x80 lower. In return to the neutral setting, push the "T" button. [See Diagram 4]
Woofer Adjustment (MT6 THREE & FOUR):
The 3 vertical buttons with the center button labeled 'B' allow for 6x5 of BASS adjustment. Your speakers were shopped with the base set to neutral, resulting in even of importance. This setting provides the fastest bass frequency response. If you desire more bass, push the button with the up arrow and the bass will play 3x5 higher and lower the importance to turn. If you want less bass, push the button with the down arrow and the bass will play 3x5 lower and increase the importance to turn. In setting provides a more linear low frequency response. To return to the neutral setting, push the B' button (See Diagram 4) which allows the power to alter the amplitude of the speaker's position. The speaker's position is a wide spread, but it may be a more uniform or more variable number of speakers who are able to clean their speaker's profile suggests using the lowest pump press that the down arrow until it is determined there. The amplifier will operate properly with the speakers switched to a higher output mode. If you want to safely operate multiple pairs of speakers, consider purchasing Speaker Craft 54 or 58 Speaker Selectors
Push Tweeter Here
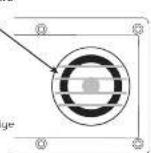
Diagram 3 Tweeter
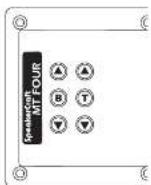
Diagram 4:
Bass & Treble Adjustment Switches
SPEAKER INSTALLATION
Note: Your M&G sensors speakers may have come with the optional Java speaker wire connector. Before using Java, please follow the instructions included with the connector.
The unique integral mounting bar system incorporated into your MTO Series speaker allows for a quick installation by following the easy steps below:
- Remove the grille by pushing the two mounting bars, located at the rear of the speaker. Towards the front of the speaker. The long screws attached to the mounting bars will serve the grille of the ballie
- Attach the speaker cable, observing the proper polarity with your amplifier I + to + and - to -1. Make sure the left channel of the amplifier is connected to the left speaker, and the right channel is connected to the right speaker.
MT6 Series Owner's Manual
Page 3
- Slide the ends of the two mounting bars at the tweeter end of the speaker behind the drywall so the drywall is now between the mounting bars and the back of the speaker grille. This should be enough room for the other ends of the mounting bars to bear the other end of the drywall hole and stair behind the drywall as well (See Diagram 5).
- Position the speaker into the note and start tightening the six screws evenly. This will cause the mounting ears to properly sandwich the drywall between the self adjusting mounting bar feet and the speaker flange. Make sure the speaker is positioned correctly before turn tightening of the six mounting screws. Note: The flange of the speaker is designed to fix and conform to any small imperfections in the walls' surface. The tension on the screws should not be tightened so that the flange bows out. If this occurs, back of the tension on the screws until the bowing is eliminated.
- Adjust the pooling vector to the desired position.
- Adjust the BASS (MT6 THREE & FOUR) and TRESLE (MT6 TWO, THREE & FOUR) switches to the desired position
- Push the grille firmly into the six in the speaker before.
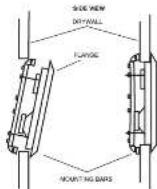
Diagram 5: Mounting Bars
PAINTING THE SPEAKERS
If you plan to paint your speakers, we recommend that it is done prior to installation. If you decide to paint your speakers someone in the future, it is cost to remove them by simply evening the steps for Speaker Installation listen above. When painting the speakers, the paint masks crowded in the carton must be installed in place of the grille. The grilles can also be painted, however, great care should be taken not to plug the odes as this will greatly reduce the sound quality of the speakers. Speaker/corn recommends only light spray painting using 5 parts thinning agent to 1 part paint. Do not paint the grilles while they are attached to the speaker. It is necessary to paint the material under grille, follow the same procedure used to paint the grilles.
SPECIAL FIRE WALL INSTALLATION
If you plan to ensure your speakers in a I'm rated well, you should purchase SpeakerCam & Rectangle Sound Enclosures, model #1-1612. How metal enclosure mounts easily between roads, and returns a standard electron connector or connecting your speaker tube directly to the speakers.
LIMITED LIFETIME WARRANTY
SpeakerCraft Inc. warrants to the original retail purchaser only from the SpeakerCraft product will be free from defects in materials and partnerships, provided the speaker was purchased from a SpeakerCraft Authorized Cover.
Defective products must be shipped, together with proof of purchase, prepaid insured to the SpeakerCraft Authorized Dealer from whom they were purchased, or to the SpeelerCraft barley at the address based on this modulation and manual warranty. Hought enter shipments will be relaxed. In a prevalence to tap the product in the original shipping moxtane to lower the chance of formal damage. In any case, the risk or loss or damage is limited to be borne by the purchaser, it upon remuneration of the variety of SpeelerCraft Authorized Dealer to determine that the unit was defective in materials or workmanship at any time during this warranty period. SpeakerCraft or the SpeelerCraft Authorized Dealer will, at the option, repair or replace this product at no additional charge, except as set forth below. The price of sale is \100 per share. The price of sale is \50 per share. The price of sale is \25 per share. The price of sale is \100 per share. The price of sale is \50 per share. The price of sale is \25 per share. The price of sale is \$100 per share.
This Warranty does not include service or parts to repair damage caused by accident, discrete misuse, abuse, negligence, intracourse packing or shipping procedures, commercial use, voltage input in excess of the other maximum at the unit, or severe, repair or modification of the product which has not been authorized or approved by Speaker Craft. The Warranty also excludes normal cosmetic deterioration caused by environmental conditions. This Warranty will be void. The Serial Number on the product has been removed, sampled with or defected.
In this Warranty is in lieu of all other expressed warranties. If the product is defective in materials or workmanship as warranted above, the purchasers sole remedy shall be repair or replacement as provided above. In no event will SpeakerCraft be liable for any incidental or consequential damages arising out of the use or inability to use the product, even if SpeakerCraft inc. or a SpeakerCraft inc. Authorized Order has been advised of the possibility of such damages, or let any claim by any other party. Some states do not allow the exclusion or limitation of consequential damages, so the above limitation and exclusion may not apply.
All implied warranties on the product are limited to the duration of this expressed Warranty. Some states do not allow limitation on the length of an implied warranty. If the original retail purchaser resides in such a state, the limitation does not apply.