
CV502-MB - Sicherheitskamera MARSHALL - Kostenlose Bedienungsanleitung
Finden Sie kostenlos die Bedienungsanleitung des Geräts CV502-MB MARSHALL als PDF.


| Produkttyp | Sicherheitskamera |
| Modell | CV502-MB |
| Marke | Marshall |
| Videoauflösung | Full-HD (1080p) |
| Videoausgang | 3G-SDI, HDMI |
| Objektivsteuerung | ESC (manuell) oder DC-IRIS (automatisch) |
| Weißabgleich | AUTO, ATW, PUSH, MANUELL (mit Farbtemperatur, Rot-/Blauverstärkung) |
| Belichtungssteuerung | Helligkeit, AGC-Grenze, Verschluss (AUTO/MANUELL/FLIMMERFREI), DSS (bis 64x) |
| Gegenlichtkorrektur | WDR, BLC, SPOT, ACE, ECLIPSE |
| Tag-/Nachtmodus | AUTO, FARBE, NIGHT (mit Anti-Sättigung, AGC-Pegel, Verweilzeit) |
| Bildstabilisator | ON/OFF, Bereich (10-30%), Filter (NIEDRIG/MITTEL/HOCH), Auto-Zentrierung (AUS/HALB/VOLL) |
| Audio | Eingebautes Mikrofon, Audio-Pegel, AGC, Abtastbits (16/20/24/32 Bit) |
| Bildsteuerung | Farbsättigung (0-20), Schärfe (0-20), Spiegel, Flip, Digitalzoom (1-16x), Entnebelung (AUTO/MANUELL), DNR (AUS/NIEDRIG/MITTEL/HOCH), Bewegungserkennung, Schattenkompensation, Gamma (STANDARD/GERADE/NIEDRIG/MITTEL/HOCH), Bildrate (1080p60 usw.) |
| Anzeigesteuerung | Kameraversion, Kameratitel, Privatsphärenzonen (bis zu 8 Masken mit Farbe und Transparenz), Kamera-ID (0-255), Baudrate (2400-115200), Sprache (ENGLISCH, CHINESISCH, JAPANISCH) |
| Reset | Werkseinstellungen wiederherstellbar |
| Betriebsspannung | 12V DC (typisch) |
| Anschlüsse | BNC (SDI), HDMI, Strom, Audio (Mikrofon) |
| Abmessungen (ca.) | Mini-Broadcast-Format (ca. 50 x 50 x 80 mm) |
| Gewicht (ca.) | ~200 g |
| Besonderheiten | OSD-Joystick-Steuerung, RS-485-Schnittstelle, erweiterte Menüstruktur |
| Lieferumfang | Kamera, Bedienungsanleitung (PDF) |
Häufig gestellte Fragen - CV502-MB MARSHALL
Benutzerfragen zu CV502-MB MARSHALL
0 Frage zu diesem Gerät. Beantworten Sie die, die Sie kennen, oder stellen Sie Ihre eigene.
Eine neue Frage zu diesem Gerät stellen
Laden Sie die Anleitung für Ihr Sicherheitskamera kostenlos im PDF-Format! Finden Sie Ihr Handbuch CV502-MB - MARSHALL und nehmen Sie Ihr elektronisches Gerät wieder in die Hand. Auf dieser Seite sind alle Dokumente veröffentlicht, die für die Verwendung Ihres Geräts notwendig sind. CV502-MB von der Marke MARSHALL.
BEDIENUNGSANLEITUNG CV502-MB MARSHALL
Marshall Electronics
Full-HD (3G/HD-SDI) Mini-Broadcast POV Cameras
CV343, CV502, CV345, CV505 models
Operation Manual
MENU STRUCTURE
| SETUP SUB MENU | ||
| LENS | ESC | |
| DC IRIS | ||
| WBCONTROL | AUTO | |
| ATW | ||
| PUSH | ||
| MANUAL | COLOR TEMPERATURE | |
| RED GAIN | ||
| BLUE GAIN | ||
| AE CONTROL(EXPOSURE) | BRIGHTNESS 0~20 | |
| AGC LIMIT 0~20 | ||
| SHUTTER | AUTO | |
| MANUAL | ||
| FLICKERLESS | ||
| DSS (SENS-UP) OFF, x2~64 | ||
| BACK LIGHT | BACK LIGHT | WDR |
| BLC | ||
| SPOT | ||
| ACE LOW, MIDDLE | HIGH | |
| ECLIPSE | LEVEL | |
| COLOR | ||
| DAY/NIGHT | AUTO | ANTI-SAT. |
| AGC LEVEL | ||
| AGC MARGIN | ||
| DWELL TIME | ||
| COLOR | ||
| NIGHT | ||
MENU STRUCTURE
| SETUP SUB MENU | ||
| IMAGE STABILIZER | RANGE 10%, 20%, 30% | |
| FILTER LOW, MIDDLE, HIGH | ||
| AUTO C OFF, HALF, FULL | ||
| AUDIO | AUDIO LEVEL 0~143 | |
| AUDIO AGC OFF, ON | ||
| AGC MAX 0~119 | ||
| SAMPLE BITS 16, 20, 24, 32 BITS | ||
| IMAGE CONTROL | COLOR LEVEL 0~20 | |
| SHARPNESS 0~20 | ||
| MIRROR | ||
| FLIP | ||
| D-ZOOM 1.0X ~ 16.0X | ||
| DEFOG | AUTO | |
| MANUAL | ||
| DNR OFF, LOW, MIDDLE, HIGH | ||
| MOTION | ||
| SHADING | ||
| GAMMA | ||
| FRAME RATE | ||
| DISPLAY CONTROL | CAM VERSION | |
| CAM TITLE | ||
| PRIVACY | ||
| CAM ID 0~255 | ||
| BAUDRATE | ||
| LANGUAGE | ||
| RESET | ||
| EXIT | ||
OSD Joystick and Button
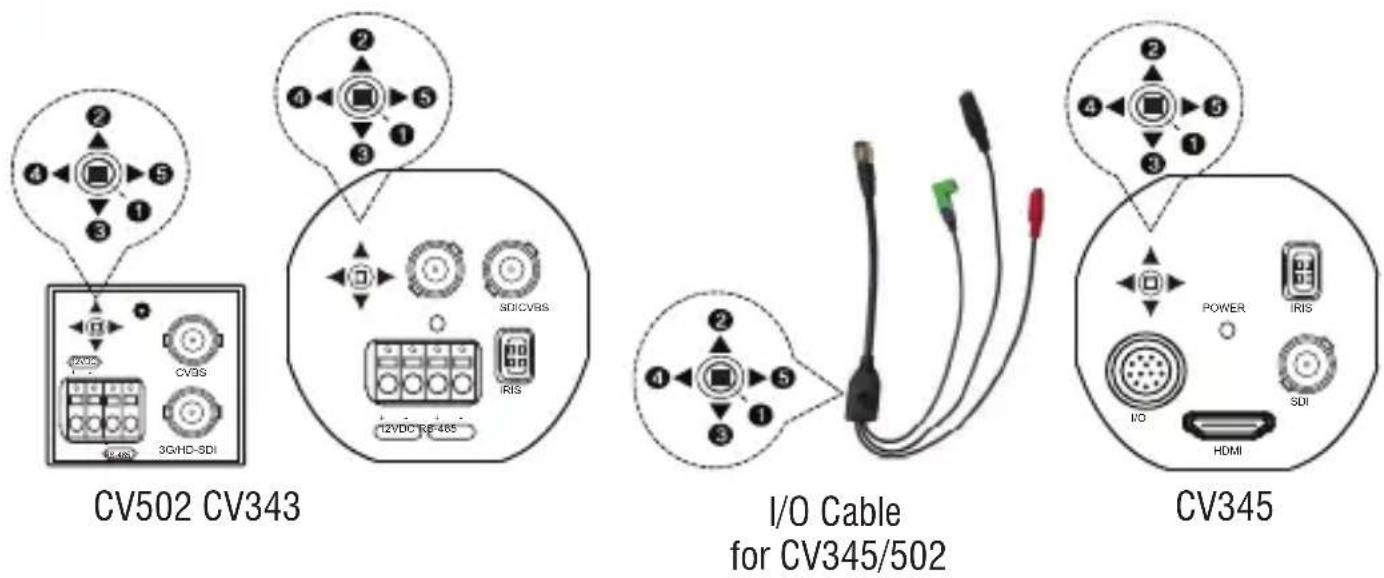
① SET Used to access the menu and confirm selection.
② UP Used to move the cursor up.
③ DOWN Used to move the cursor down
④ LEFT Used to move the cursor to left and change the value.
⑤ RIGHT Used to move the cursor to right and change the value.
Press SET button to access the MAIN MENU.
Use the UP & DOWN buttons to select the desired item.
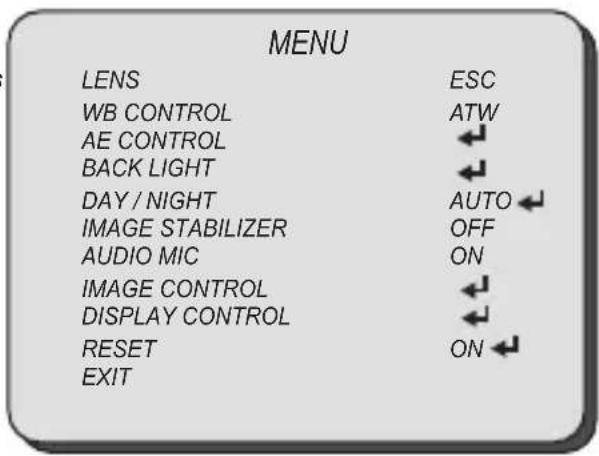
Use the LEFT & RIGHT buttons to change the sub-item.

Icon indicates "Press OSD Button" or "Enter Sub Menu".
Select LENS using the UP or DOWN button.
You can change between ESC and DC IRIS using the LEFT or RIGHT button.
■ ESC: Manual IRIS Lens (Fixed IRIS lens)
Shutter will automatically control exposure if SHUTTER is set as AUTO.
■ DC IRIS: DC Auto IRIS Lens.
IRIS will automatically control exposure.
| MENU | |
| LENS | ESC |
| WB CONTROL | ATW |
| AE CONTROL | |
| BACK LIGHT | |
| DAY / NIGHT | AUTO |
| IMAGE STABILIZER | OFF |
| AUDIO MIC | ON |
| IMAGE CONTROL | |
| DISPLAY CONTROL | |
| RESET | ON |
| EXIT | |
| MENU | |
| LENS | DC IRIS |
| WB CONTROL | ATW |
| AE CONTROL | |
| BACK LIGHT | |
| DAY / NIGHT | AUTO |
| IMAGE STABILIZER | OFF |
| AUDIO MIC | ON |
| IMAGE CONTROL | |
| DISPLAY CONTROL | |
| RESET | ON |
| EXIT | |
Select WB CONTROL using the UP or DOWN button.
You can change between AUTO, ATW, PUSH, and MANUAL using the LEFT or RIGHT button.
■ AUTO: Controls the automatic adjustment of the light source's color temperature to 3,000^ K \~ 8,000°K.
■ ATW: Continuously adjusts camera color balance in accordance with any change in color temperature. Compensates for color temperature changes within the range of 1,900°K to 11,000°K.
■ PUSH: Color temperature will be manually adjusted by pushing the OSD button. Place the white paper in front of the camera when OSD button is pressed to obtain the optimum result.
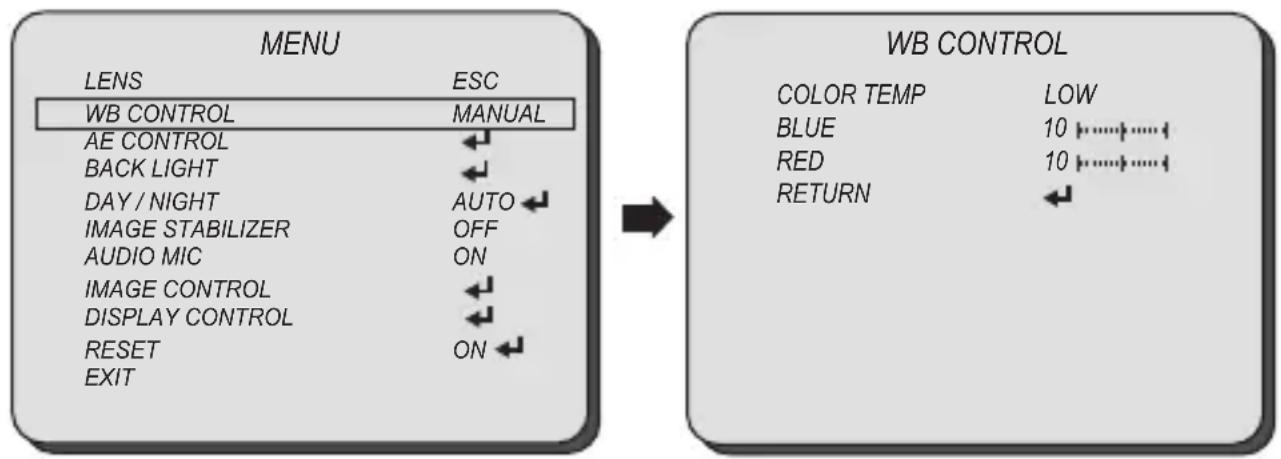
■ MANUAL: Select this to fine-tune White Balance manually.
You can adjust the blue and red tone level manually.
■ COLOR TEMP: Select color temperature from LOW, MIDDLE, or HIGH.
■ BLUE: Adjust the Blue tone of the image. (0\~20)
—RED: Adjust the Red tone of the image. (0\~20)
flowchart
graph LR
    A["MENU"] --> B["WB CONTROL"]
    A --> C["WB CONTROL"]
    A --> D["WB CONTROL"]
    style A fill:#f9f,stroke:#333
    style B fill:#ccf,stroke:#333
    style C fill:#cfc,stroke:#333
    style D fill:#fcc,stroke:#333
■ Adjust White Balance first by using the AUTO or ATW mode before switching to MANUAL mode.
■ White Balance may not work properly under the following conditions. In this case, select the ATW mode.
- When the ambient illumination of the subject is dim.
- If the camera is directed towards a fluorescent light or is installed in place where illumination changes dramatically, the White Balance operation may become unstable.
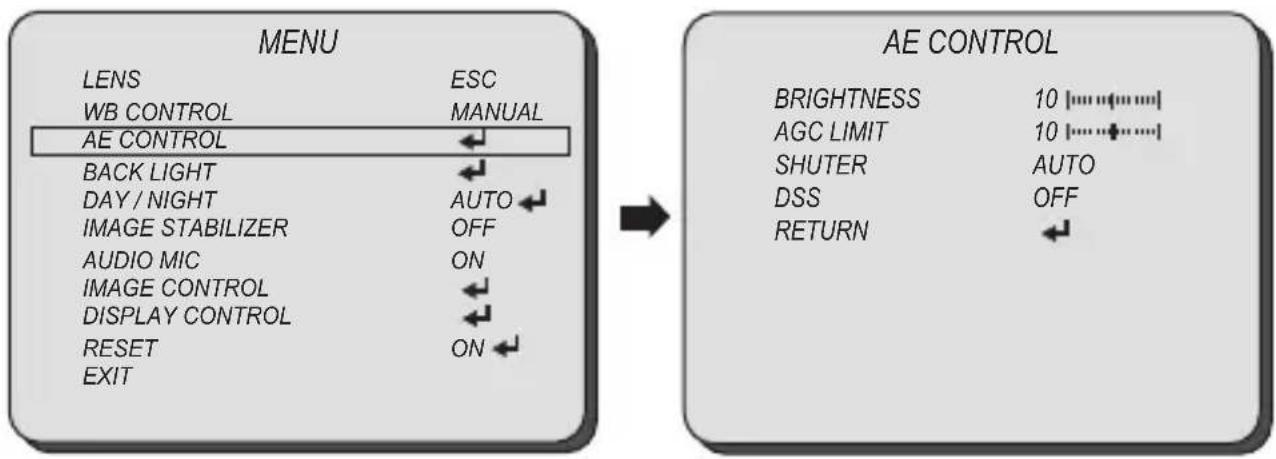
Select AE CONTROL using the UP or DOWN button.
You can select one sub-mode from BRIGHTNESS, AGC LIMIT, SHUTTER, and DSS using the UP or DOWN button.
flowchart
graph LR
    A["MENU"] --> B["AE CONTROL"]
    subgraph A
        LENS --> ESC
        WB CONTROL --> MANUAL
        AE CONTROL --> ←
        BACK LIGHT --> ←
        DAY / NIGHT --> AUTO
        IMAGE STABILIZER --> OFF
        AUDIO MIC --> ON
        IMAGE CONTROL --> ←
        DISPLAY CONTROL --> ←
        RESET --> ON
        EXIT --> ←
    end
    subgraph AE_CONTROL
        BRIGHTNESS --> 10
        AGC LIMIT --> 10
        SHUTER --> AUTO
        DSS --> OFF
        RETURN --> ←
    end
■ BRIGHTNESS: The brightness control function adjusts gain and iris to keep a brightness level.
■ AGC LIMIT: This function controls the amplification/gain process automatically if the illumination falls under the usable level.
Camera will raise up gain to the selected gain limit under dark conditions.
■ SHUTTER: This function control shutter speed.
■ MANUAL: Shutter speed will be fixed at the selected speed. (1/60\~40,000)
■ AUTO: Shutter controls exposure automatically when IRIS is manual. (NORMAL/DEBLUR)
FLICKERLESS: This function will help to decrease video flickers due to a conflict with the installed lighting frequency.
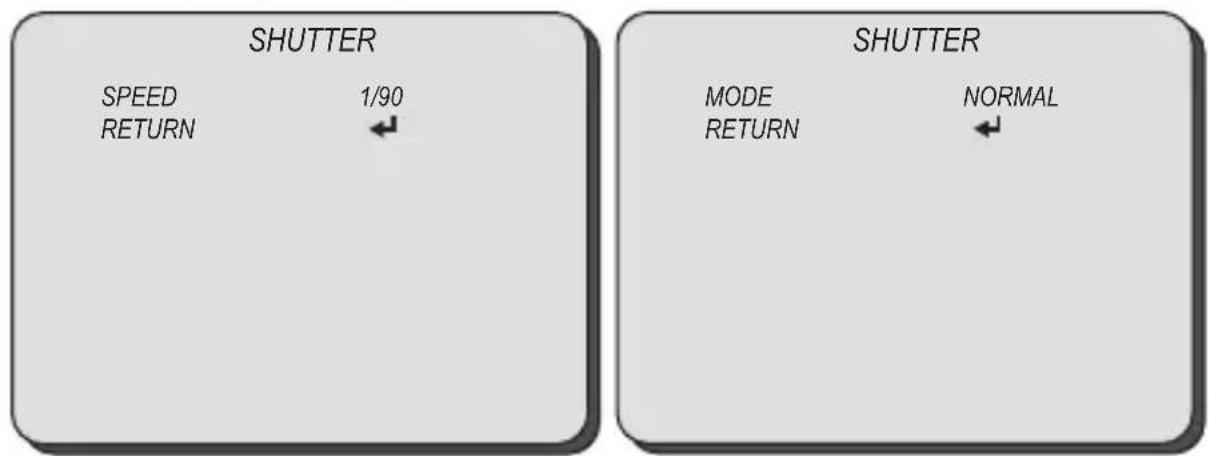
■ DSS (Digital Shutter Speed): When luminance condition is low, DSS can adjust the picture quality by maintaining the light level. Slow shutter speed limits to x64.
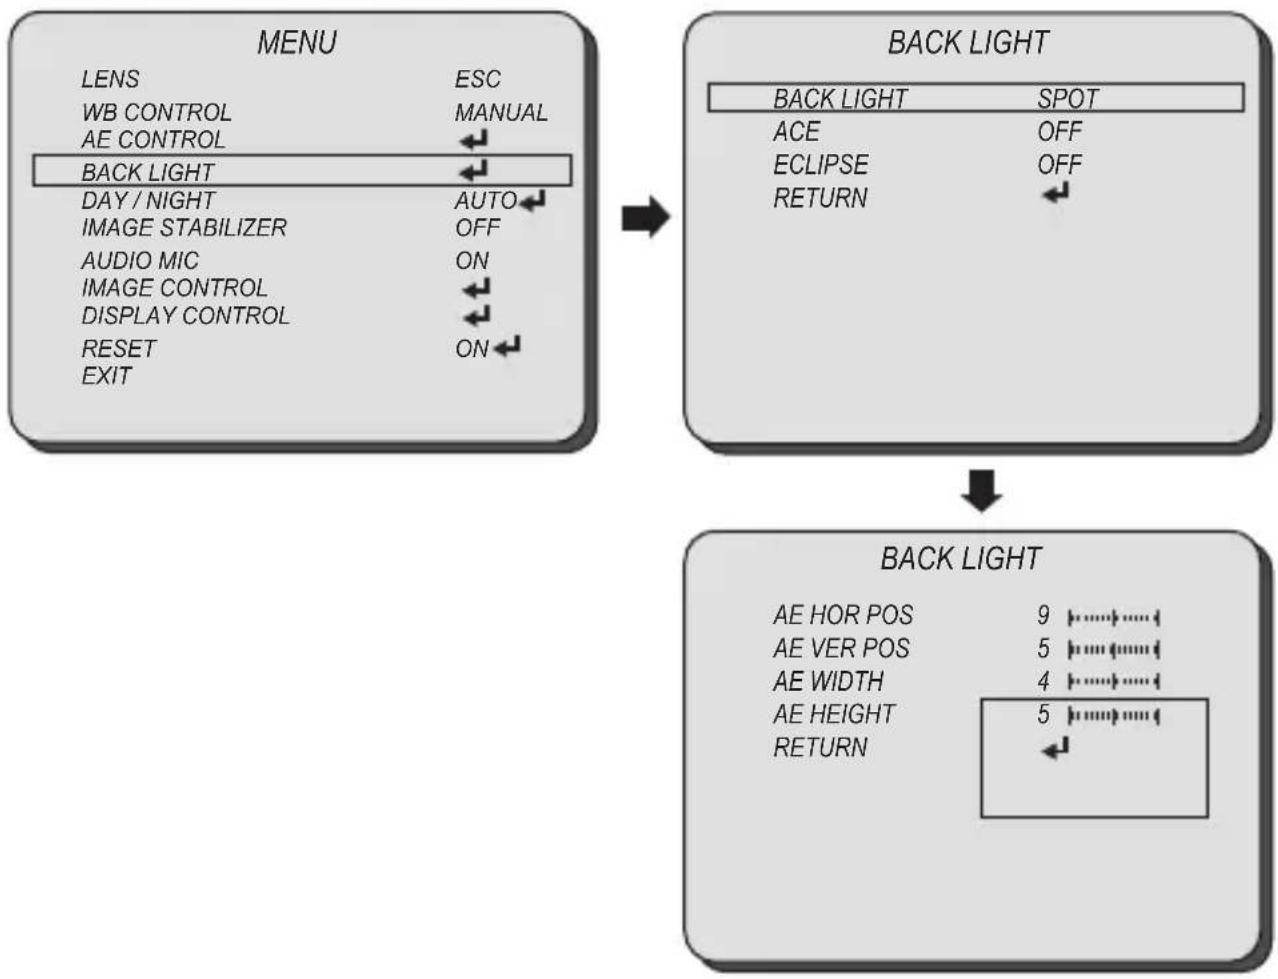
Select BACK LIGHT using the UP or DOWN button and enter using SEL button.
You can select one sub-mode from BACK LIGHT, ACE, and ECLIPSE using the UP or DOWN button.
■ BACK LIGHT
■WDR: Enable user to view both object and background more clearly when background is too bright.
●WDR-LEVEL: Select the WDR level from LOW, MIDDLE, and HIGH using the LEFT or RIGHT button.
■BLC: Enable a back light compensation feature.
■SPOT: Enable a user to select a desired area on a picture and view that area more clearly when background is too bright.
● AE HOR POS: Move the SPOT area horizontally using the LEFT or RIGHT button.
● AE VER POS: Move the SPOT area vertically using the UP or DOWN button.
●AE WIDTH: Change the width of SPOT area using the LEFT or RIGHT button.
●AE HEIGHT: Change the height of SPOT area using the UP or DOWN button.
flowchart
graph TD
    A["MENU"] --> B["BACK LIGHT"]
    B --> C["BACK LIGHT"]
    C --> D["BACK LIGHT"]
    D --> E[AE HOR POS 9 ▼⋯⋯⋯⋯⋯⋯⋯⋯⋯⋯⋯⋯⋯⋯⋯⋯⋯⋯⋯⋯⋯⋯⋯⋯⋯⋯⋯⋯⋯⋯⋯⋯⋯⋯⋯⋯⋯⋯⋯⋯⋯⋯⋯⋯⋯⋯⋯⋯⋯⋯⋯⋯⋯⋯⋯⋯⋯⋯⋯⋯⋯⋯⋯⋯⋯⋯⋯⋯⋯⋯⋯⋯⋯⋯⋯⋯⋯⋯⋯⋯⋯⋯⋯⋯⋯⋯⋯⋯⋯⋯⋯⋯⋯⋯⋯⋯⋯⋯⋯⋯\( _{AE\space\nearrow\space} \) AE VER POS 5 ▼⋯⋯⋯⋯⋯⋯⋯⋯⋯⋯⋯⋯⋯⋯⋯⋯⋯⋯⋯⋯⋯⋯⋯⋯⋯⋯⋯⋯⋯⋯⋯⋯⋯⋯⋯⋯⋯⋯⋯⋯⋯⋯⋯⋯⋯⋯⋯⋯⋯⋯⋯\( _{AE\space\nearrow\space} \) AE WIDTH 4 ▼⋯⋯⋯⋯⋯⋯⋯⋯⋯⋯⋯⋯⋯⋯⋯⋯⋯⋯⋯⋯⋯⋯\( _{AE\space\nearrow\space} \) AE HEIGHT 5 ▼\( _{AE\space\nearrow\space} \) RETURN ←
    A -->|LENS ESC WB CONTROL MANUAL AE CONTROL| A
    A -->|BACK LIGHT| A
    A -->|DAY / NIGHT AUTO| A
    A -->|IMAGE STABILIZER OFF| A
    A -->|AUDIO MIC ON| A
    A -->|IMAGE CONTROL ←| A
    A -->|DISPLAY CONTROL ←| A
    A -->|RESET ON| A
    A -->|EXIT| A
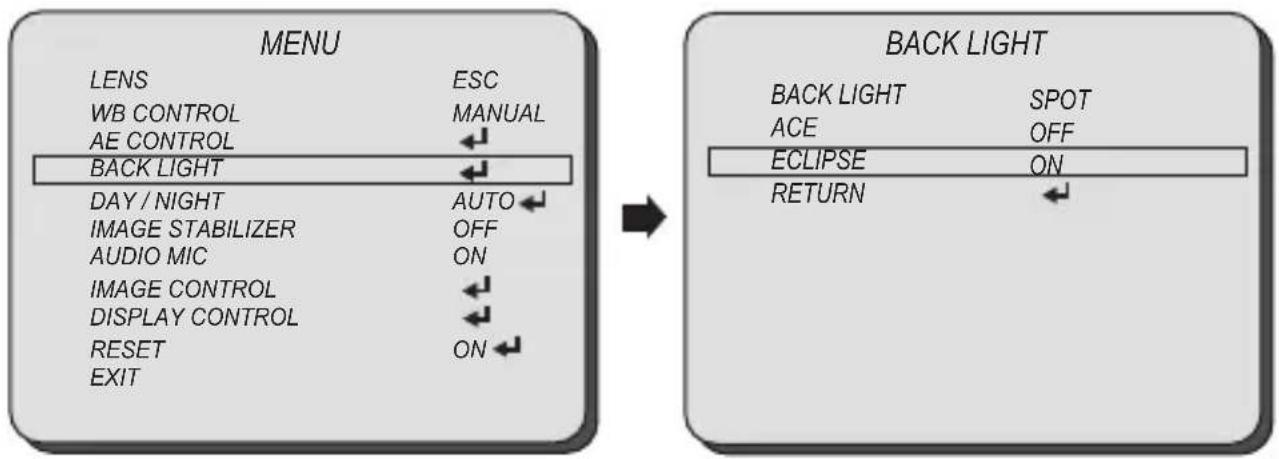
Select BACK LIGHT using the UP or DOWN button and enter using SEL button.
You can select one sub-mode from BACK LIGHT, ACE, and ECLIPSE using the UP or DOWN button.
■ ACE: Brightness correction of the dark image area.
Select the GAIN level from OFF, LOW, MIDDLE, and HIGH using the LEFT or RIGHT button.
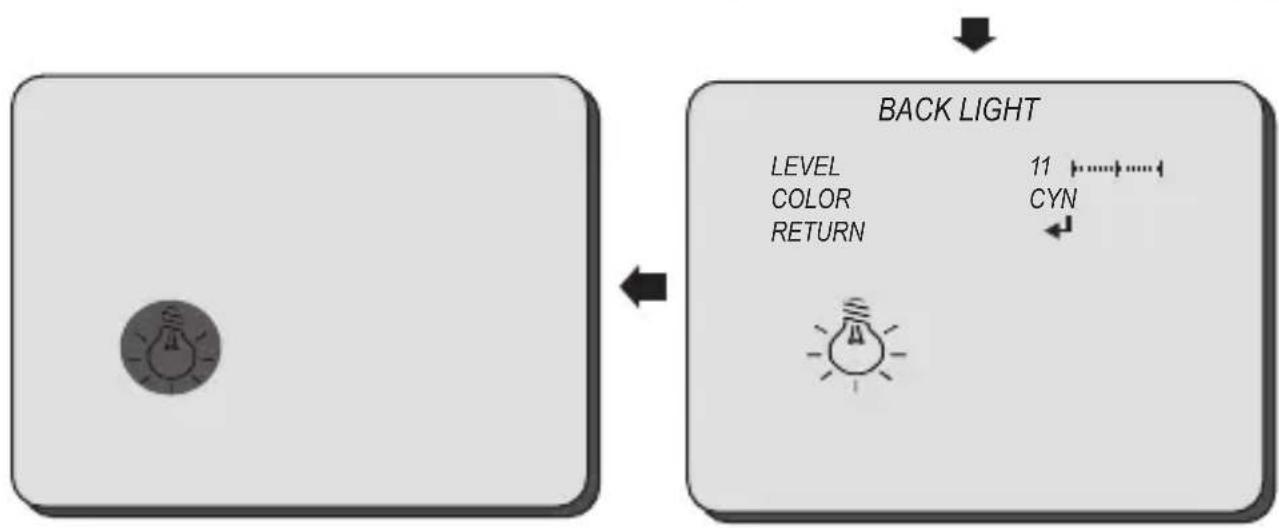
■ ECLIPSE: Highlight the bright area with a masking box with a selected color.
Enable/Disable ECLIPSE, selecting from OFF or ON using the LEFT or RIGHT button.
■ LEVEL: Select the masking level from 0\~20 using the LEFT or RIGHT button.
- COLOR: Select the color of masking from GRN, MAG, RED, BLUE, BLK, WHT, YEL, and CYN using the LEFT or RIGHT button.
flowchart
graph LR
    A["MENU"] --> B["BACK LIGHT"]
    subgraph Left
        C["LENS"] --> D["ESC"]
        E["WB CONTROL"] --> F["MANUAL"]
        G["AE CONTROL"] --> H["←"]
        I["BACK LIGHT"] --> J["←"]
        K["DAY / NIGHT"] --> L["AUTO"]
        M["IMAGE STABILIZER"] --> N["OFF"]
        O["AUDIO MIC"] --> P["ON"]
        Q["IMAGE CONTROL"] --> R["←"]
        S["DISPLAY CONTROL"] --> T["←"]
        U["RESET"] --> V["ON"]
        W["EXIT"] --> X["←"]
    end
    subgraph Right
        Y["BACK LIGHT"] --> Z["SPOT"]
        AA["ACE"] --> AB["OFF"]
        AC["ECLIPSE"] --> AD["ON"]
        AE["RETURN"] --> AF["←"]
    end
flowchart
graph LR
    A["Light Bulb Icon"] --> B["Back Light"]
    B --> C["LEVEL 11 COLOR CYN RETURN"]
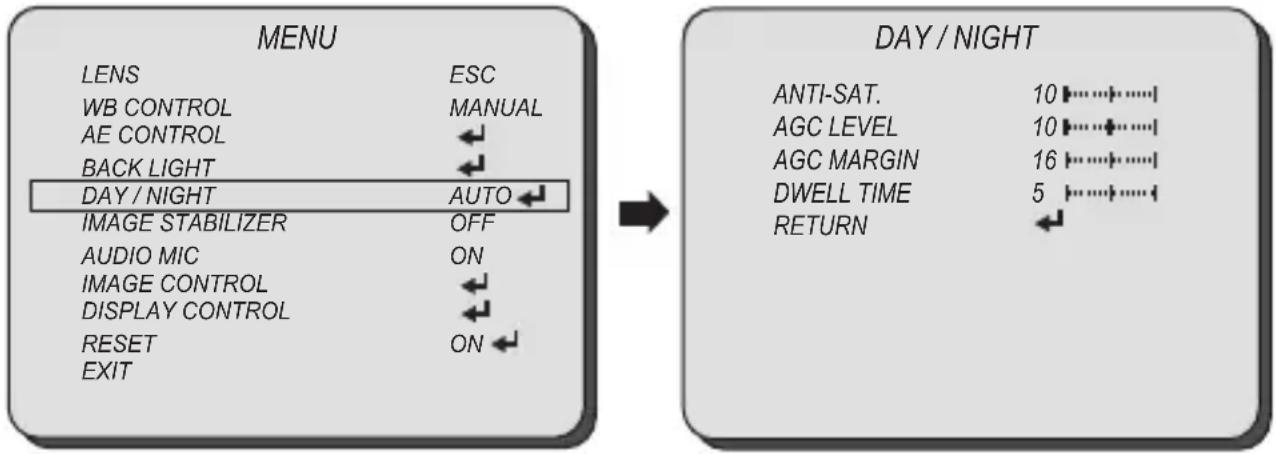
Select DAY / NIGHT using the UP or DOWN button.
You can select one sub-mode from AUTO, COLOR, and NIGHT using the UP or DOWN button.
■AUTO: The camera will stay in DAY in a normal environment, but will switch to NIGHT mode when ambient illumination falls below this pre-set level. ICR(IR Cut) filter is removed when it switches to Black/White.
Select the AUTO mode using the LEFT or RIGHT button and enter into sub-menu using SEL button.
—ANTI-SAT.: Adjust the anti-saturation level manually.
This feature will reduce the saturation in which part of the camera receiving the light affected by the IR or light in Night mode. If the saturation is reduced the surroundings will be darker.
■AGC LEVEL: Set the level of threshold for switching day to night. This level is same as the exposure gain level.
■AGC MARGIN: Set the margin between Day →Night switching level and Night →Day switching level.
■DWELL TIME: Select the dwell time between Day →Night and Night →Day change.
flowchart
graph LR
    A["MENU"] --> B["日至"]
    B --> C["DAY / NIGHT"]
    C --> D["ANTI-SAT. 10 ⋯⋯⋯⋯"]
    C --> E["AGC LEVEL 10 ⋯⋯⋯⋯"]
    C --> F["AGC MARGIN 16 ⋯⋯⋯⋯"]
    C --> G["DWELL TIME 5 ⋯⋯⋯⋯"]
    C --> H["RETURN ⋯"]
    A --> I["LENS ESC"]
    A --> J["WB CONTROL MANUAL"]
    A --> K["AE CONTROL ←"]
    A --> L["BACK LIGHT ←"]
    A --> M["DAY / NIGHT AUTO ←"]
    A --> N["IMAGE STABILIZER OFF"]
    A --> O["AUDIO MIC ON"]
    A --> P["IMAGE CONTROL ←"]
    A --> Q["DISPLAY CONTROL ←"]
    A --> R["RESET ON ←"]
    A --> S["EXIT"]
■ COLOR: The camera keeps color mode constantly.
■ NIGHT: The camera keeps Black/White mode constantly.
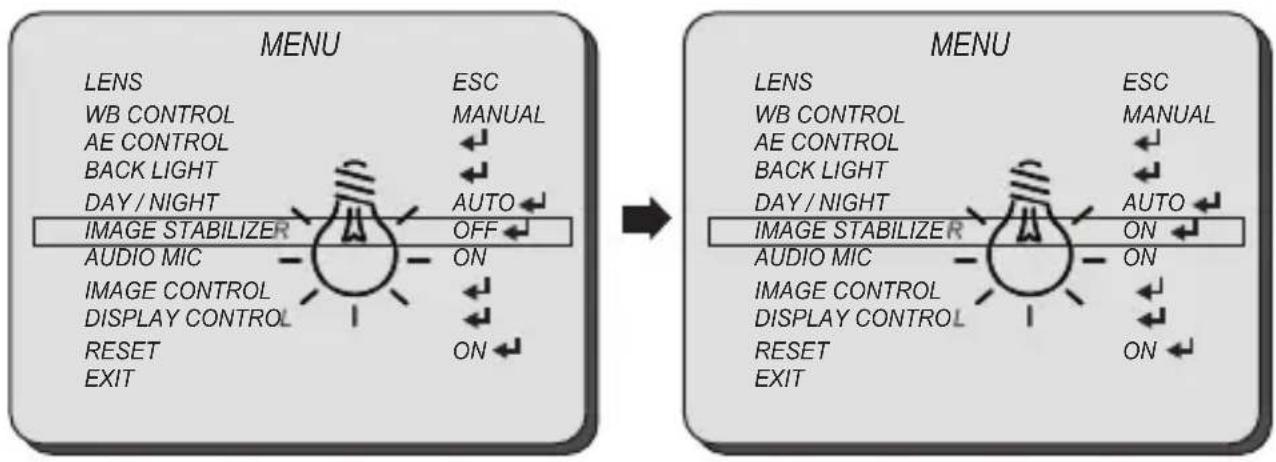
Select IMAGE STABILIZER using the UP or DOWN button and enter ON using SEL button.
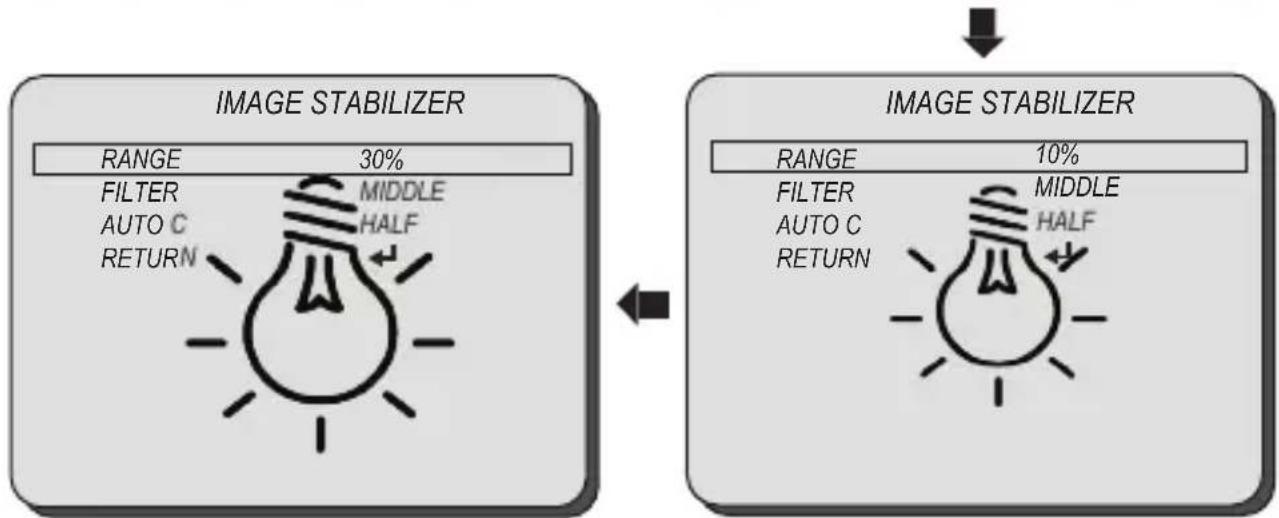
You can select one sub-mode from RANGE, FILTER, and AUTO C using the UP or DOWN button.
■ IMAGE STABILIZER: This function will reduce image blurriness due to vibrations caused by hand shake or Pan/Tilt operation. The image will be digitally zoomed in to compensate the shifted pixels.
■RANGE: Set the digital zoom level for image stabilizing. (Max. 30%: x1.4 Digital Zoom)
- FILTER: Select the level of correction hold filter for the worst case of image.
●HIGH: Less image correction. ●Low: More image correction.
■ AUTO C: Select the image auto centering level according to a vibration type.
●FULL: The camera will correct the blurriness due to vibrations caused by both hand shake or Pan/Tilt operation.
●HALF: The camera will correct the blurriness due to vibrations caused by hand shake.
- OFF: Disable the auto centering function.
flowchart
graph LR
    A["MENU"] --> B["LENS"]
    A --> C["WB CONTROL"]
    A --> D["AE CONTROL"]
    A --> E["BACK LIGHT"]
    A --> F["DAY / NIGHT"]
    A --> G["IMAGE STABILIZER"]
    A --> H["AUDIO MIC"]
    A --> I["IMAGE CONTROL"]
    A --> J["DISPLAY CONTROL"]
    A --> K["RESET"]
    A --> L["EXIT"]

    M["MENU"] --> N["LENS"]
    M --> O["WB CONTROL"]
    M --> P["AE CONTROL"]
    M --> Q["BACK LIGHT"]
    M --> R["DAY / NIGHT"]
    M --> S["IMAGE STABILIZER"]
    M --> T["AUDIO MIC"]
    M --> U["IMAGE CONTROL"]
    M --> V["DISPLAY CONTROL"]
    M --> W["RESET"]
    M --> X["EXIT"]

    style A fill:#f9f,stroke:#333
    style M fill:#bbf,stroke:#333
flowchart
graph LR
    A["IMAGE STABILIZER"] --> B["IMAGE STABILIZER"]
    A --> C["RANGE 30% FILTER AUTO C RETURN MIDDLE HALF"]
    B --> D["RANGE 10% FILTER AUTO C RETURN MIDDLE HALF"]
AUDIO MIC
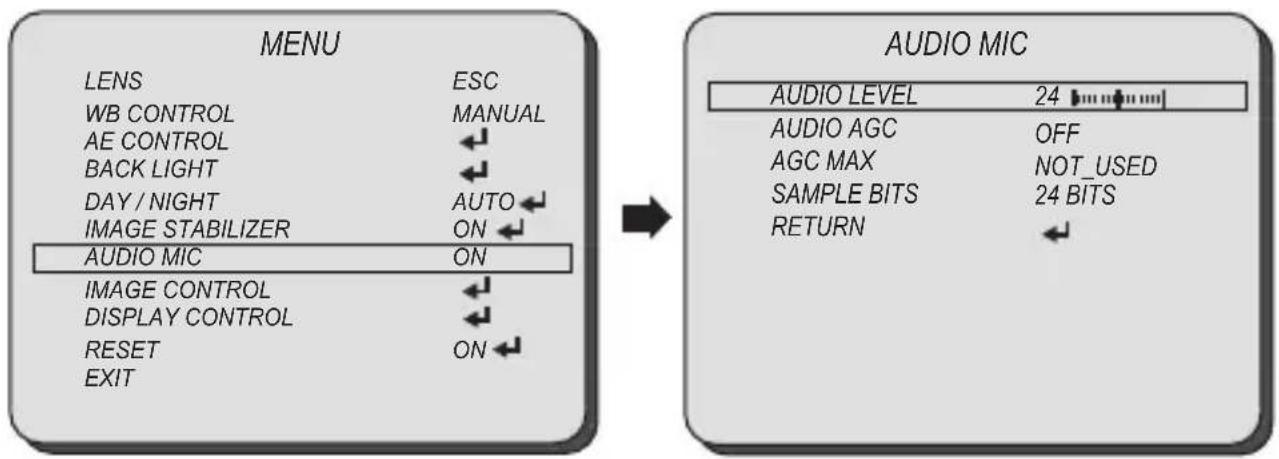
Select AUDIO MIC using the UP or DOWN button and enter ON using SEL button.
You can select one sub-mode from AUDIO LEVEL, AUDIO AGC, AGC MAX, and SAMPLE BITS using the UP or DOWN button.
■ AUDIO MIC: The audio input will be embedded on SDI and HDMI output.
■AUDIO LEVEL: Enabled when AUDIO AGC is set OFF. Adjust the audio level manually.
—AUDIO AGC: Automatically adjusts the MIC gain as the input signal becomes too loud or too low.
■ AGC MAX: Enabled when AUDIO AGC is set ON. Set the maximum level of AUDIO AGC.
- SAMPLE BITS: Select the bit depth of audio.
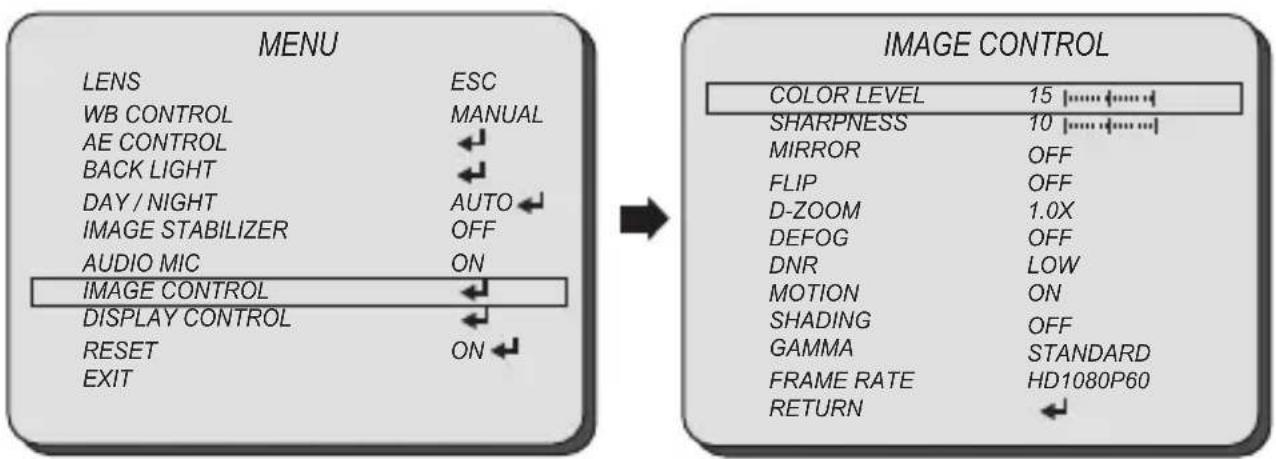
Select IMAGE CONTROL using the UP or DOWN button.
You can select COLOR LEVEL, SHARPNESS, MIRROR, AND FLIP using the UP or DOWN button.
flowchart
graph LR
    A["MENU"] --> B["LENS ESC"]
    A --> C["WB CONTROL MANUAL"]
    A --> D["AE CONTROL"]
    A --> E["BACK LIGHT"]
    A --> F["DAY / NIGHT AUTO"]
    A --> G["IMAGE STABILIZER OFF"]
    A --> H["AUDIO MIC ON"]
    A --> I["IMAGE CONTROL"]
    A --> J["DISPLAY CONTROL"]
    A --> K["RESET ON"]
    A --> L["EXIT"]

    M["IMAGE CONTROL"] --> N["COLOR LEVEL 15 ⋯⋯⋯⋯⋯⋯⋯⋯⋯⋯⋯⋯⋯⋯⋯⋯⋯⋯⋯⋯⋯⋯⋯⋯⋯⋯⋯⋯⋯⋯⋯⋯⋯⋯⋯⋯⋯⋯⋯⋯⋯⋯⋯⋯⋯⋯⋯⋯⋯⋯⋯⋯⋯⋯⋯⋯⋯⋯⋯⋯⋯⋯⋯⋯⋯⋯⋯⋯⋯⋯⋯⋯⋯⋯⋯⋯⋯⋯⋯⋯⋯⋯⋯⋯⋯⋯⋯⋯⋯⋯⋯⋯⋯⋯⋯⋯⋯⋯⋯⋯⋯⋮<br>    N --> O[SHARPNESS 10 ⋯⋯⋯⋯⋯⋯⋯⋯⋯⋯⋯⋯⋯⋯⋯⋯⋯⋯⋯⋯⋯⋯⋯⋯⋯⋯⋯⋯⋯⋯⋯⋯⋯⋯⋯⋯⋯⋯⋯⋯⋯⋯⋯⋯⋯⋯⋯⋯⋯⋯⋯⋯⋯⋯⋯⋯⋯⋯⋯⋯⋯⋯⋯⋯⋯⋯⋯⋯⋯⋯⋯⋯⋯⋯⋯⋯⋯⋯⋯⋯⋯⋯⋯⋯⋯⋯⋯⋯⋯⋯⋯⋯⋯⋯⋯⋯⋯⋮<br>    O --> P[MIRROR OFF"]
    O --> Q["FLIP OFF"]
    O --> R["D-ZOOM 1.0X"]
    O --> S["DEFOG OFF"]
    O --> T["DNR LOW"]
    O --> U["MOTION ON"]
    O --> V["SHADING OFF"]
    O --> W["GAMMA STANDARD"]
    O --> X["FRAME RATE HD1080P60"]
    O --> Y["RETURN ←"]
■ COLOR LEVEL: Adjust the color level value for a fine color tune.
Adjust the color level from 00\~20 using the LEFT or RIGHT button.
■ SHARPNESS: Increasing this value, the picture outline becomes stronger and clearer.
Adjust the sharpness level from 00\~20 using the LEFT or RIGHT button.
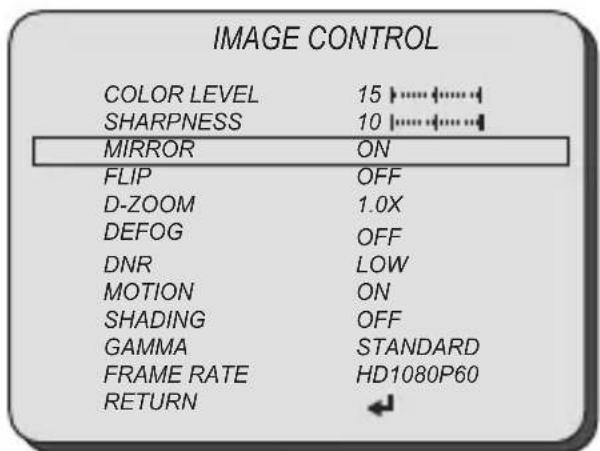
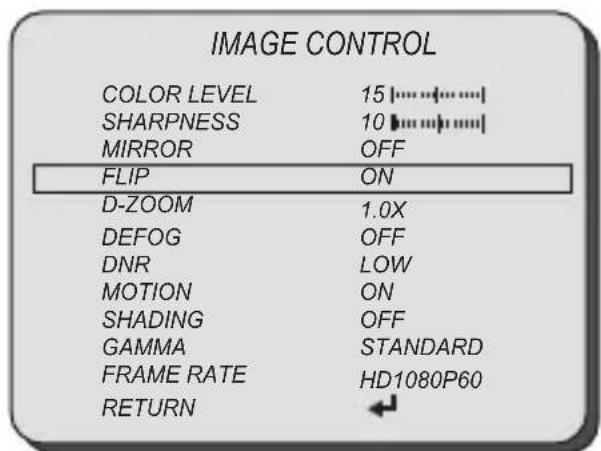
■ MIRROR: Video output is rotated horizontally.
■ FLIP: Video output is rotated vertically.


Select IMAGE CONTROL using the UP or DOWN button.
You can select D-ZOOM, DEFOG, and DNR using the UP or DOWN button.
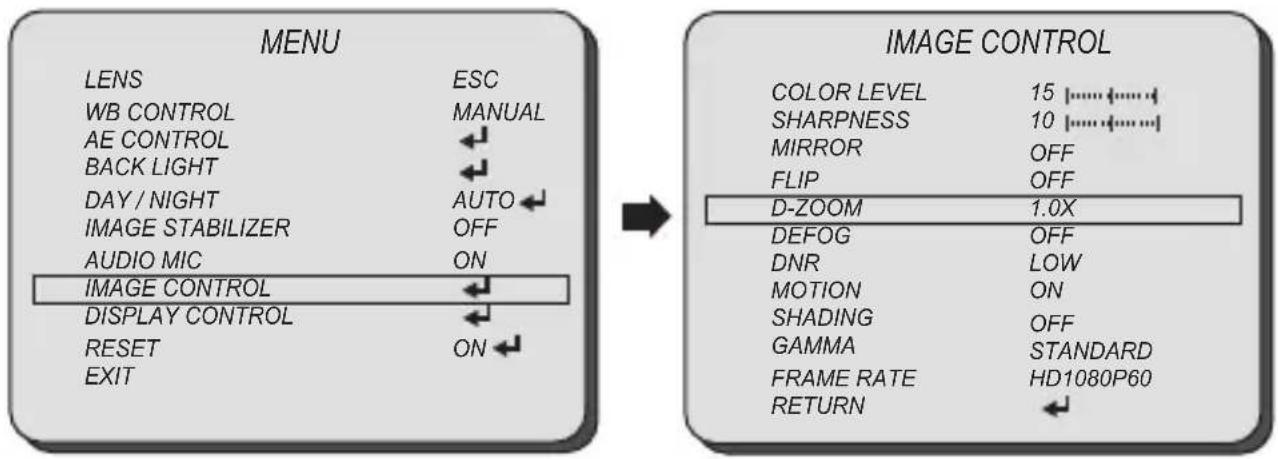
■ D-ZOOM: Digitally zoom the video output up to 16X.
Adjust the digital zoom level from 1.0\~16.0X using the LEFT or RIGHT button.
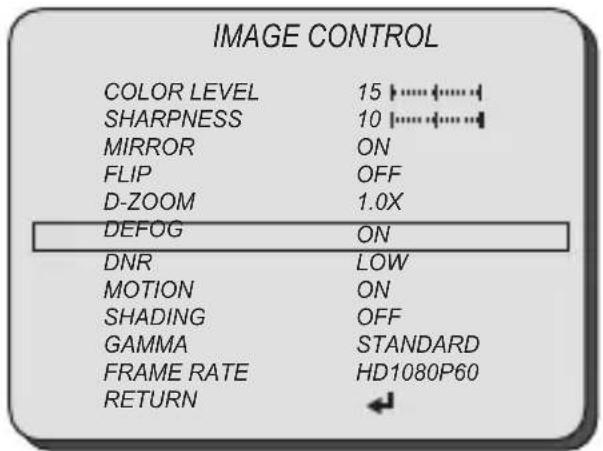
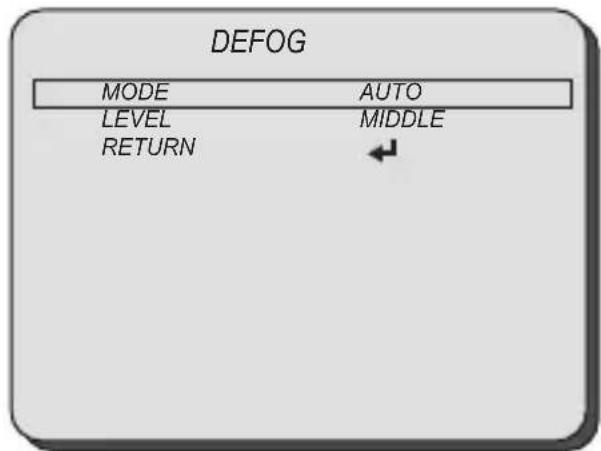
■ DEFOG: This feature will help increase visibility in extreme weather conditions, such as fog, rain or in a very strong luminous intensity.
■ MANUAL: Set the level of defoging function (LOW, MIDDLE, HIGH).
— AUTO: This feature will help increase visibility in extreme weather conditions, such as fog, rain or in a very strong luminous intensity.
■ DNR: This feature will reduce the video noise at low ambient light.
Select the DNR level from OFF, LOW, MIDDLE, and HIGH using the LEFT or RIGHT button.
Select IMAGE CONTROL using the UP or DOWN button.
You can select MOTION, SHADING, and GAMMA using the UP or DOWN button.
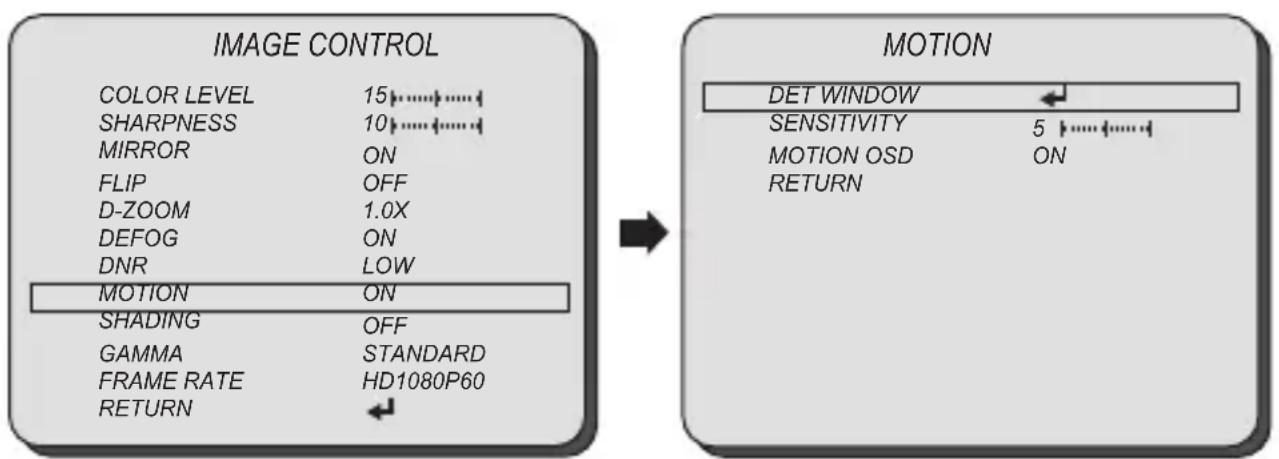
■ MOTION: This feature will observe the object movement by motion zone and sensitivity that are pre-set with sub menu. The motion detection icon can be displayed out.
- DET WINDOW: Set the motion detection window.
- WINDOW ZONE: Select the motion detection window.
- WIDOW USE: Enable/disable the motion detection window selected from WINDOW ZONE.
- DET H-POS: Move the motion detection mask area horizontally.
- DET V-POS: Move the motion detection mask area vertically.
- DET H-SIZE: Change the width of motion detection window.
- DET V-SIZE: Change the height of motion detection window.
■ SENSITIVITY: Set the motion detection sensitivity.
■ MOTION OSD: Enable/disable the motion detection OSD.
flowchart
graph LR
    A["IMAGE CONTROL"] --> B["MOTION"]
    A --> C["COLOR LEVEL 15 ⋯⋯⋯⋯"]
    A --> D["SHARPNESS 10 ⋯⋯⋯⋯"]
    A --> E["MIRROR ON"]
    A --> F["FLIP OFF"]
    A --> G["D-ZOOM 1.0X"]
    A --> H["DEFOG ON"]
    A --> I["DNR LOW"]
    A --> J["MOTION ON"]
    A --> K["SHADING OFF"]
    A --> L["GAMMA STANDARD"]
    A --> M["FRAME RATE HD1080P60"]
    A --> N["RETURN ←"]
    B --> O["DET WINDOW ←"]
    B --> P["SENSITIVITY 5 ⋯⋯⋯⋯"]
    B --> Q["MOTION OSD ON"]
    B --> R["RETURN"]
■ SHADING: This feature will correct the inconsistent brightness level in the image.
■ GAMMA: This feature will adjust video output brightness.
Select the GAMMA level from STANDARD, STRAIGHT, LOW, MIDDLE, and HIGH using the LEFT or RIGHT button.
Select IMAGE CONTROL using the UP or DOWN button. You can select RESOLUTION using the UP or DOWN button.
■ RESOLUTION: Change video output specification.
Select the RESOLUTION using the LEFT or RIGHT button.
■ CV343-CS, CV502-M, CV345-CS, CV505-M Model
Select the RESOLUTION from 720p25/30, 720p50/60, 1080p25/30, 1080i50/60, and 1080p50/60 using the LEFT or RIGHT button.
■ CV343-CSB, CV502-MB, CV345-CSB, CV505-MB Model
Select the RESOLUTION from 720p59.94, 1080p29.97, 1080i59.94, and 1080p59.94 using the LEFT or RIGHT button.
| IMAGE CONTROL | |
| COLOR LEVEL | 15 |
| SHARPNESS | 10 |
| MIRROR | ON |
| FLIP | OFF |
| D-ZOOM | 1.0X |
| DEFOG | ON |
| DNR | LOW |
| MOTION | ON |
| SHADING | OFF |
| GAMMA | STANDARD |
| FRAME RATE | HD1080P60 |
| RETURN | |
Select DISPLAY CONTROL using the UP or DOWN button.
You can select CAM VERSION, CAM TITLE, PRIVACY, CAMERA ID, BAUD RATE, and LANGUAGE using the UP or DOWN button.
■ CAM VERSION: Display the firmware version of the camera.
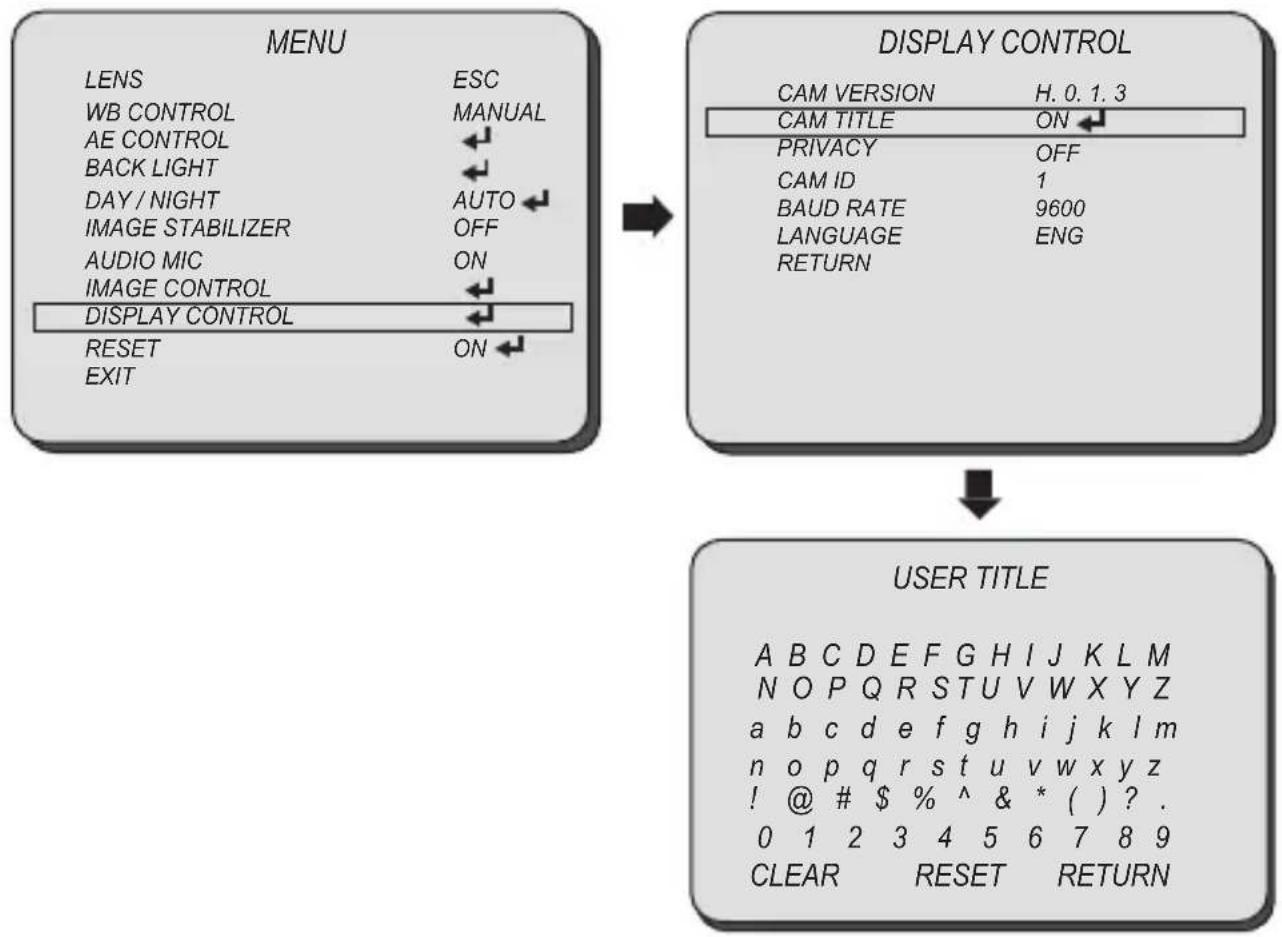
■ CAMERA TITLE: The camera title can be entered and it will appear over the video output.
You can input the camera title from the virtual keyboard using the LEFT, RIGHT, UP, DOWN, and SET button.
flowchart
graph TD
    A["MENU"] --> B["DISPLAY CONTROL"]
    B --> C["USER TITLE"]

    subgraph A
        A1["LENS"] --> A2["ESC"]
        A3["WB CONTROL"] --> A4["MANUAL"]
        A5["AE CONTROL"] --> A6["←"]
        A7["BACK LIGHT"] --> A8["←"]
        A9["DAY / NIGHT"] --> A10["AUTO"]
        A11["IMAGE STABILIZER"] --> A12["OFF"]
        A13["AUDIO MIC"] --> A14["ON"]
        A15["IMAGE CONTROL"] --> A16["←"]
        A17["DISPLAY CONTROL"] --> A18["←"]
        A19["RESET"] --> A20["ON"]
        A21["EXIT"]
    end

    subgraph B
        B1["CAM VERSION"] --> B2["H. 0. 1. 3"]
        B3["CAM TITLE"] --> B4["ON ←"]
        B5["PRIVACY"] --> B6["OFF"]
        B7["CAM ID"] --> B8["1"]
        B9["BAUD RATE"] --> B10["9600"]
        B11["LANGUAGE"] --> B12["ENG"]
        B13["RETURN"]
    end

    subgraph C
        C1["A B C D E F G H I J K L M"]
        C2["N O P Q R S T U V W X Y Z"]
        C3["a b c d e f g h i j k l m"]
        C4["n o p q r s t u v w x y z"]
        C5! @ # $ ^ & * ( ) ? .
        C6["0 1 2 3 4 5 6 7 8 9"]
        C7["CLEAR"] --> C8["RESET"] --> C9["RETURN"]
    end
DISPLAY CONTROL PRIVACY
Select DISPLAY CONTROL using the UP or DOWN button.
You can select PRIVACY using the UP or DOWN button.
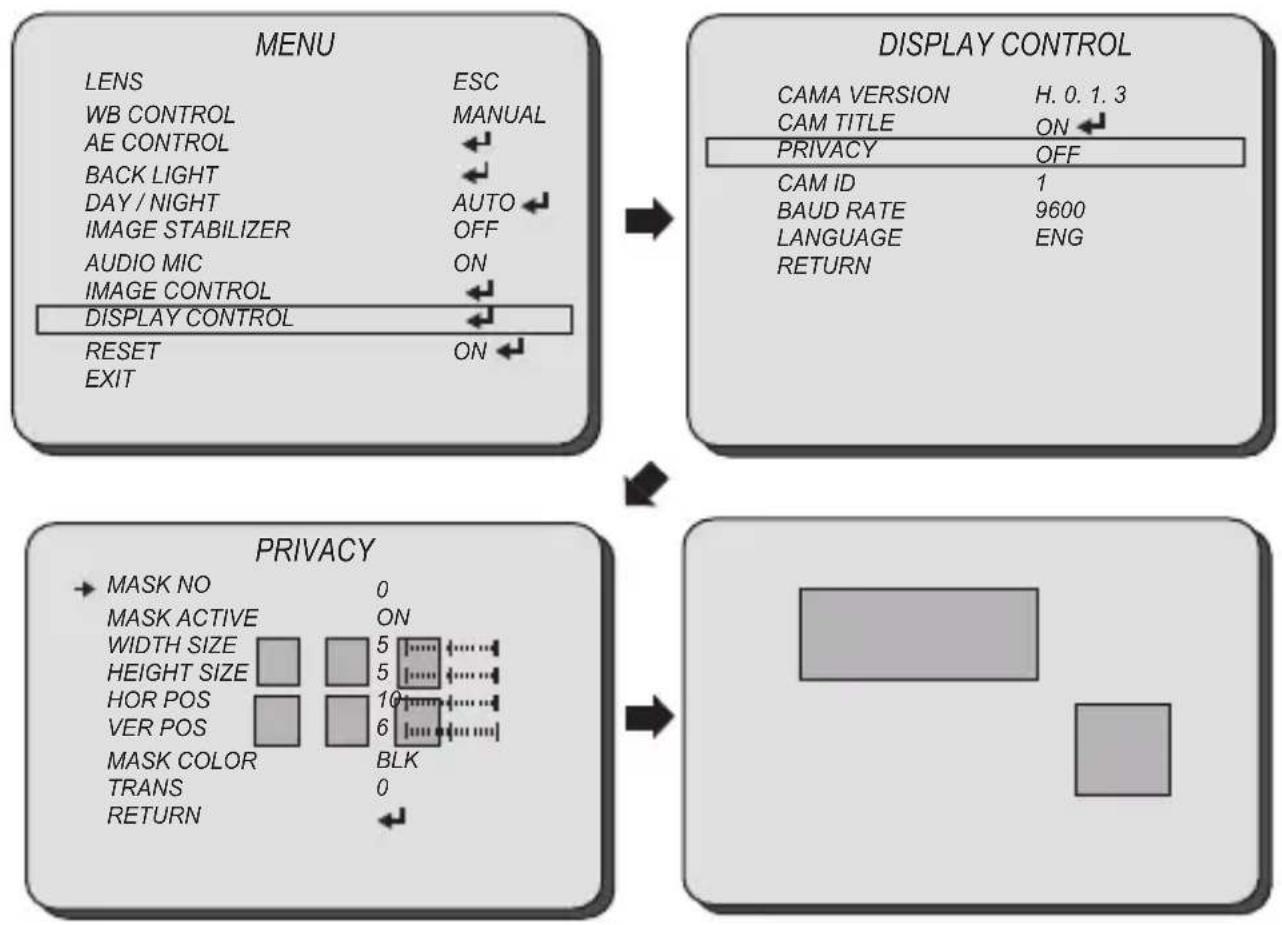
■ PRIVACY: Mask an area you want to hide on the screen.
- MASK NO: Select the mask number to modify using the LEFT or RIGHT button.
- MASK ACTIVE: Enable/Disable the mask display using the LEFT or RIGHT button.
- WIDTH SIZE: Change the width of SPOT area using the LEFT or RIGHT button.
- HEIGHTSIZE: Change the height of SPOT area using the UP or DOWN button.
- HOR POS: Move the SPOT area horizontally using the LEFT or RIGHT button.
- VER POS: Move the SPOT area vertically using the UP or DOWN button.
- MASK COLOR: Select the mask color using the LEFT or RIGHT button.
- TRANS: Select the mask transparency using the LEFT or RIGHT button.
flowchart
graph TD
    A["MENU"] --> B["DISPLAY CONTROL"]
    B --> C["PRIVACY"]
    C --> D["Output"]
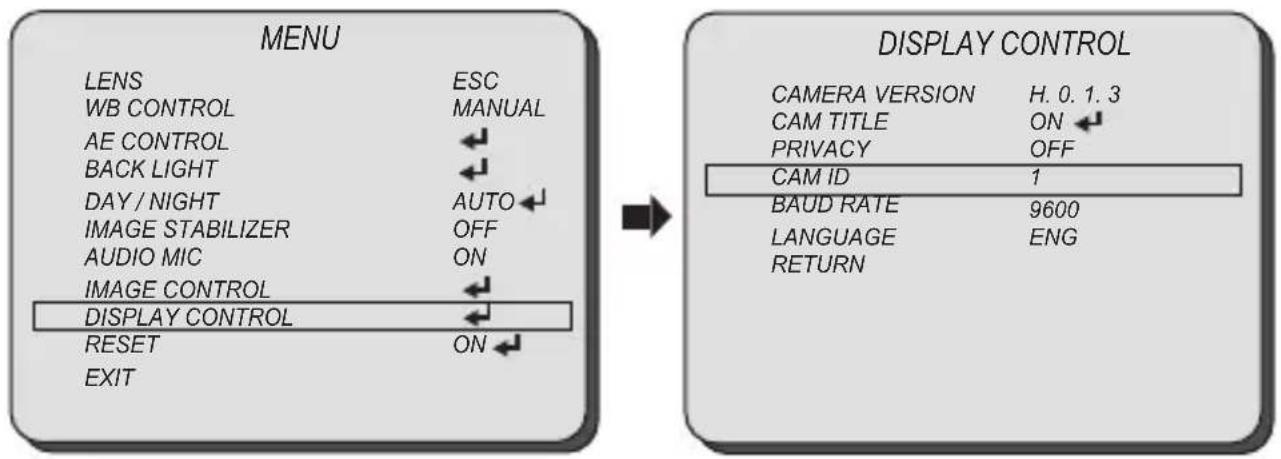
Select DISPLAY CONTROL using the UP or DOWN button.
You can select CAMERA ID, BAUDRATE, and LANGUAGE using the UP or DOWN button.
■ CAMERA ID: Select the camera ID number from 0\~255.
■ BAUDRATE: Set the baudrate of RS-485 communication (2400, 4800, 9600, 19200, 38400, 57600, 115200).
■ LANGUAGE: You can select the menu language according to your requirements.
Select the OSD language from ENGLISH, CHN, CHN(S), and JPN using the LEFT or RIGHT button.
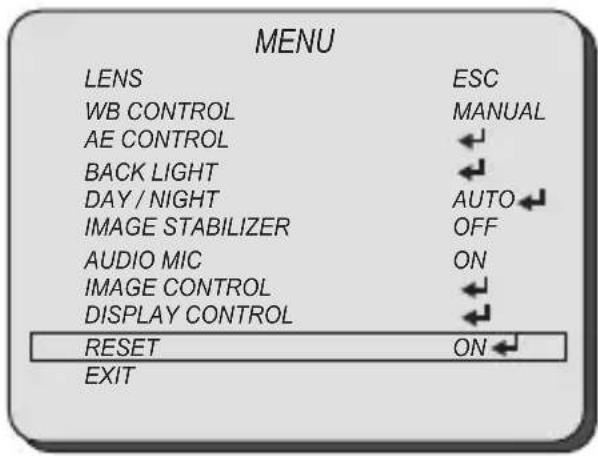
Select RESET using the UP or DOWN button.
■ RESET: Reset the camera settings to the factory defaults.
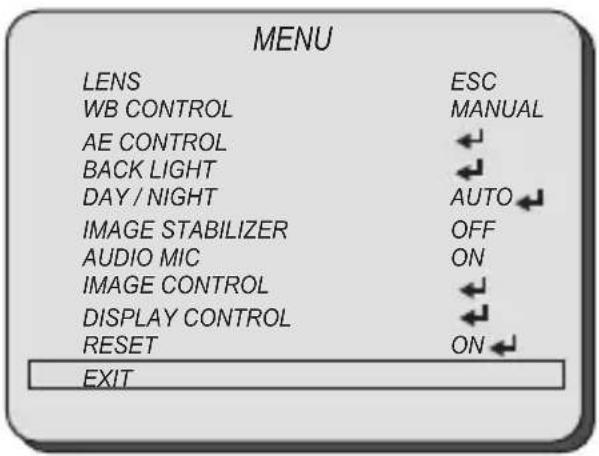
Select EXIT using the UP or DOWN button.
■ SAVE: Exit the setup after saving the setting value changes.
TROUBLESHOOTING
Before sending the camera for repair, please check below to make sure that the camera is installed correctly. If it still does not perform adequately, please consult with your supplier.
| Problem Solutions | |
| Nothing appears on the screen. | a. Check that all connected devices are powered on.b. Confirm that the voltage is correct.c. Confirm that the power supply provides enough current to power the camera.d. Check that all video cables are correctly connected. |
| The picture is not clear. | a. Check that your monitor is correctly adjusted.b. Confirm that the glass in front of the lens is clean. If there is dust, dirt or fingerprints on the glass, the image quality will be affected.To clean the glass use a soft, dry and non-abrasive cloth or a commercially available lens cleaning set.c. Correctly adjust the focus. |
| The picture has interference. | a. The camera may be close to a high voltage source, such as a power generator.b. The BNC cable is not terminated properly.c. The video cables are not connected properly. |
| The picture is flickering continually. | a. Check the termination and set the impedance at 75Ω properly.b. Ensure that the camera is not pointing towards the Sun or any light source.c. Check if there is any intermediate device.d. Check if the distance of the video cable exceeds the maximum transferable limitation. |
Marshall Electronics, Inc.
1910 East Maple Ave. El Segundo, CA 90245
Tel: (800) 800-6608 / (310) 333-0606 • Fax: 310-333-0688
www.LCDracks.com
support@marshall-usa.com


- Marshall Electronics
- Full-HD (3G/HD-SDI) Mini-Broadcast POV Cameras
- MENU STRUCTURE
- OSD Joystick and Button
- Press SET button to access the MAIN MENU.
- ■ BACK LIGHT
- AUDIO MIC
- ■ RESOLUTION: Change video output specification.
- ■ CV343-CS, CV502-M, CV345-CS, CV505-M Model
- ■ CV343-CSB, CV502-MB, CV345-CSB, CV505-MB Model
- DISPLAY CONTROL PRIVACY
- TROUBLESHOOTING
- Marshall Electronics, Inc.
Marke : MARSHALL
Modell : CV502-MB
Kategorie : Sicherheitskamera