
CV500-M2 - Sicherheitskamera MARSHALL - Kostenlose Bedienungsanleitung
Finden Sie kostenlos die Bedienungsanleitung des Geräts CV500-M2 MARSHALL als PDF.


| Produkttyp | Sicherheitskamera |
| Marke | Marshall |
| Modell | CV500-M2 |
| Auflösung | Full HD (1080p) |
| Videoausgang | HDMI |
| Stromversorgung | 12 V DC |
| Abmessungen (B x H x T) | 120 x 70 x 70 mm |
| Gewicht | ca. 300 g |
| Gehäusematerial | Kunststoff |
| Befestigungsmöglichkeit | Stativgewinde (1/4 Zoll) |
| Objektivtyp | Festbrennweite |
| Sichtwinkel | ca. 90° |
| Minimale Beleuchtung | 0,1 Lux |
| Bildwiederholrate | 60 fps |
| Farbe | Schwarz |
| Lieferumfang | Kamera, Netzteil, HDMI-Kabel, Bedienungsanleitung |
| Reinigung | Mit trockenem, fusselfreiem Tuch |
| Sicherheitshinweise | Vor Feuchtigkeit und Staub schützen |
| Reparatur | Nur durch autorisiertes Fachpersonal |
Häufig gestellte Fragen - CV500-M2 MARSHALL
Benutzerfragen zu CV500-M2 MARSHALL
0 Frage zu diesem Gerät. Beantworten Sie die, die Sie kennen, oder stellen Sie Ihre eigene.
Eine neue Frage zu diesem Gerät stellen
Laden Sie die Anleitung für Ihr Sicherheitskamera kostenlos im PDF-Format! Finden Sie Ihr Handbuch CV500-M2 - MARSHALL und nehmen Sie Ihr elektronisches Gerät wieder in die Hand. Auf dieser Seite sind alle Dokumente veröffentlicht, die für die Verwendung Ihres Geräts notwendig sind. CV500-M2 von der Marke MARSHALL.
BEDIENUNGSANLEITUNG CV500-M2 MARSHALL
Marshall
1080 HD-SDI
OPERATION GUIDE
Models:
CV340 Series
CV500 Series
Please read this guide carefully before installing and using the camera. Please retain this guide for reference.
MENU STRUCTURE
| LENS | DC | MODE: OUTDOOR, INDOOR, LENS: ADJUST |
| VIDEO | ||
| MANUAL | ||
| P-IRIS | MODE: AUTO, MANUAL | |
| LEVEL | ||
| LIMIT | ||
| EXPOSURE | SHUTTER | 1/30~60, FLK, 1/240, 480, 1000, 2000, 5000, 10000, 50000, X2~30, AUTO |
| 1~15AGC | ||
| SENSE-UP | AUTO (x2~x30), OFF | |
| BRIGHTNESS | 1~100 | |
| D-WDR | OFF, ON | |
| DEFOG | OFF, ON | |
| POSITION/SIZE, GRADATION, DEFAULT | ||
| BACKLIGHT | WDR GAIN, PRIORITY | |
| BLC | GAIN, AREA, DEFAULT | |
| HSBLC | AREA, DISPLAY, LEVEL, MODE, BLACK MASK, DEFAULT | |
| WHITE BALANCE | ATW | |
| AWB | ||
| AWC-SET | ||
| INDOOR | ||
| OUTDOOR | ||
| MANUAL | BLUE: 1~100, RED: 1~100 | |
| DAY & NIGHT | AUTO | DELAY |
| N→D (AGC) | ||
| N→D (AGC) | ||
| COLOR | ||
| B/W | BURST: ON, OFF | |
| IR SMART: ON, OFF | ||
| IR LED: ON, OFF | ||
| IR PWM: 0~100 | ||
| EXT | ||
| 2DNR | ON, OFF | |
| NR | 3DNR | ON, OFF |
| LEVEL: 0~100 | ||
| START. AGC: 0~100 | ||
| END. AGC: 0~100 | ||
MENU STRUCTURE
| SPECIAL | CAM TITLE | |
| D-EFFECT | FREEZE | |
| MIRROR: MIRROR, V-FLIP, ROTATE | ||
| D-ZOOM | ||
| SMART D-ZOOM (Function disabled.) | ||
| NEG.IMAGE | ||
| DIS (Function disabled.) | ||
| MOTION | SELECT: AREA | |
| DISPLAY: ON, OFF | ||
| SENSIVITY: 0~100 | ||
| MOTION VIEW: ON, OFF | ||
| DEFAULT | ||
| PRIVACY | SELECT: AREA | |
| DISPLAY: COLOR | ||
| COLOR | ||
| TRANS. | ||
| DEFAULT | ||
| LANGUAGE | ||
| DEFECT | LIVE DPC: OFF, AUTO, ON | |
| STATIC DPC: OFF, ON | ||
| RS-485 | CAM ID: 0~255 | |
| ID DISPLAY: OFF, ON | ||
| BAUD RATE: 2400~38400 | ||
| VERSION | ||
| ADJUST | SHARPNESS | 0~15 |
| MONITOR | LCD: GAMMA, ADAPT, LEVEL, BLUE/RED GAIN | |
| CRT: BLACK LEVEL, BLUE/RED GAIN | ||
| LSC | OFF, ON | |
| VIDEO. OUT | NTSC, PAL | |
| RESOLUTION 1080P, 720P | ||
| PRAME RATE | 1080P: B-30/25P, A-30/25P, A-60/50P, 59.94I | |
| 720P: B-30/25P, 59.94P | ||
| RESET | ||
| EXIT | ||
OSD Joystick and Button
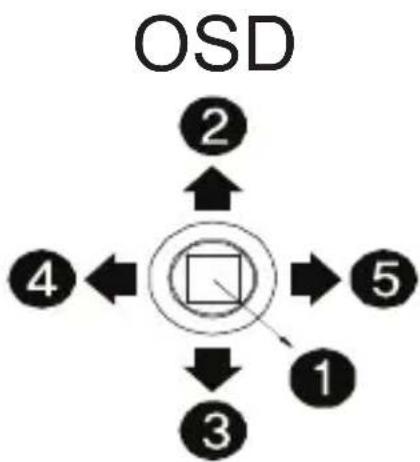
flowchart
graph TD
    A["OSD"] --> B["2"]
    B --> C["4"]
    C --> D["5"]
    D --> E["1"]
    E --> F["3"]
    F --> G[" "]
    G --> H[" "]
    H --> I[" "]
    I --> J[" "]
    J --> K[" "]
    K --> L[" "]
    L --> M[" "]
    M --> N[" "]
    N --> O[" "]
    O --> P[" "]
    P --> Q[" "]
    Q --> R[" "]
    R --> S[" "]
    S --> T[" "]
    T --> U[" "]
    U --> V[" "]
    V --> W[" "]
    W --> X[" "]
    X --> Y[" "]
    Y --> Z[" "]
① SET Used to access the menu and confirm selection.
② UP Used to move the cursor up.
③ DOWN Used to move the cursor down
④ LEFT Used to move the cursor to left and change the value.
⑤ RIGHT Used to move the cursor to right and change the value.
Press SET button to access the MAIN MENU.
Select each sub-menu by using the UP, DOWN, LEFT, and RIGHT buttons. Press the SET button to select.
Use the UP & DOWN buttons to select the desired item.
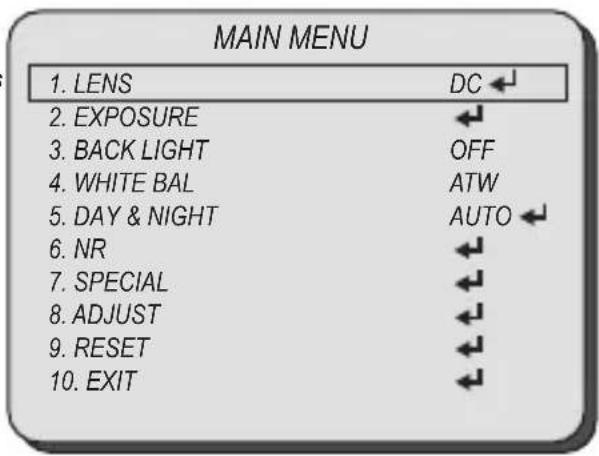
Use the LEFT & RIGHT buttons to change the sub-item.
Icon indicates "Press OSD Button" or "Enter Sub Menu". --- Icon indicates "Not Available".
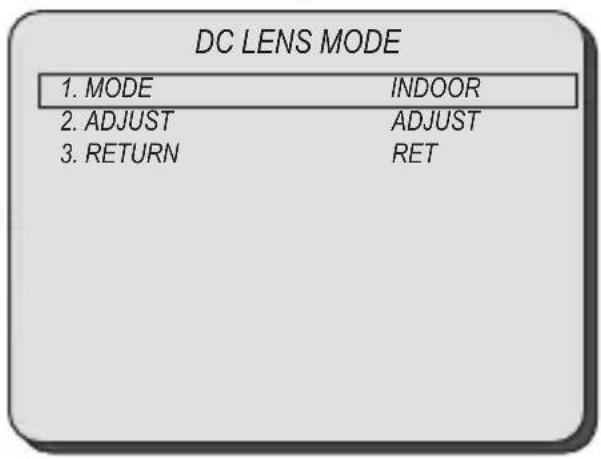
Select LENS using the UP or DOWN button.
You can change between MANUAL, DC, VIDEO, and P-IRIS using the LEFT or RIGHT button.
■ MANUAL: Manual Lens (Fixed focal or fixed IRIS lens)
■ DC: DC Auto Iris Varifocal Lens.
You can change the DC mode between INDOOR and OUTDOOR mode using the LEFT or RIGHT button.
●MODE: INDOOR, OUTDOOR
- ADJUST: Activates the automatic lens adjustment function.
■ VIDEO: Auto Iris Varifocal Lens.
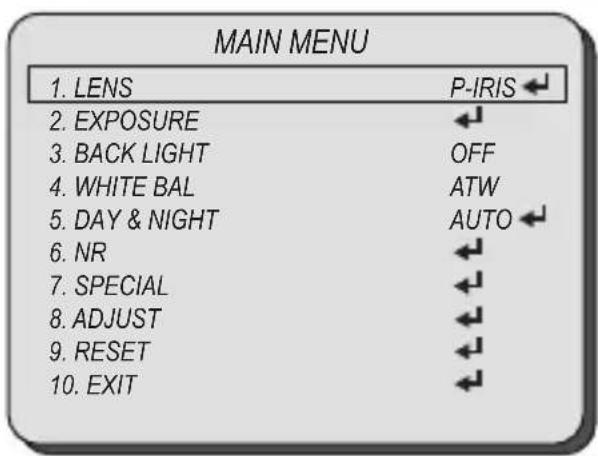
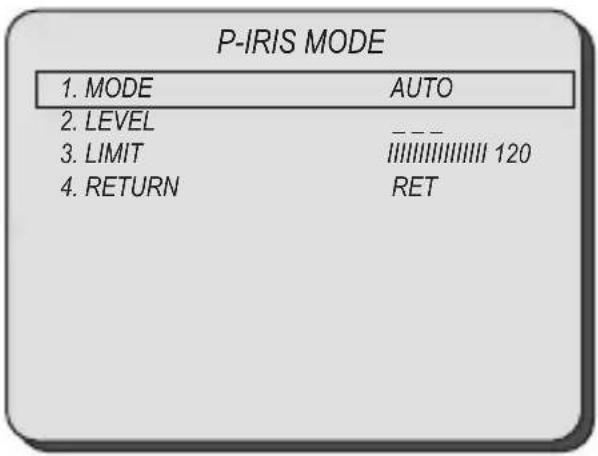
■ P-IRIS: P-IRIS Lens (helps to improve the image quality with regards to iris contrast, resolution and depth of field and keeps the best image quality at different environment of light source.
You can change the mode between AUTO and MANUAL mode using the LEFT or RIGHT button.
● MODE: MANUAL, AUTO
- LEVEL, LIMIT: Set the level and limi of P-IRIS lens adjustment function.
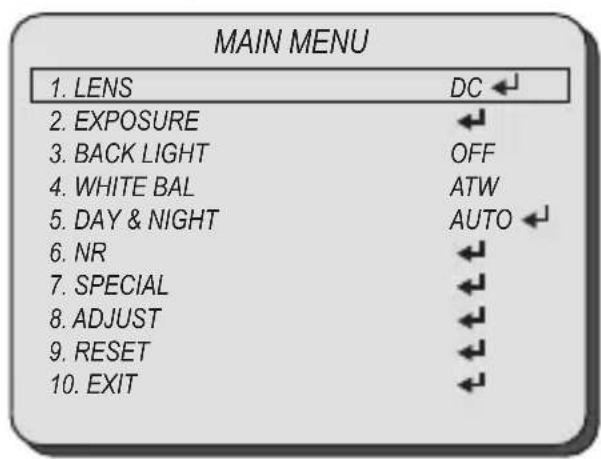


Select EXPOSEURE using the UP or DOWN button.
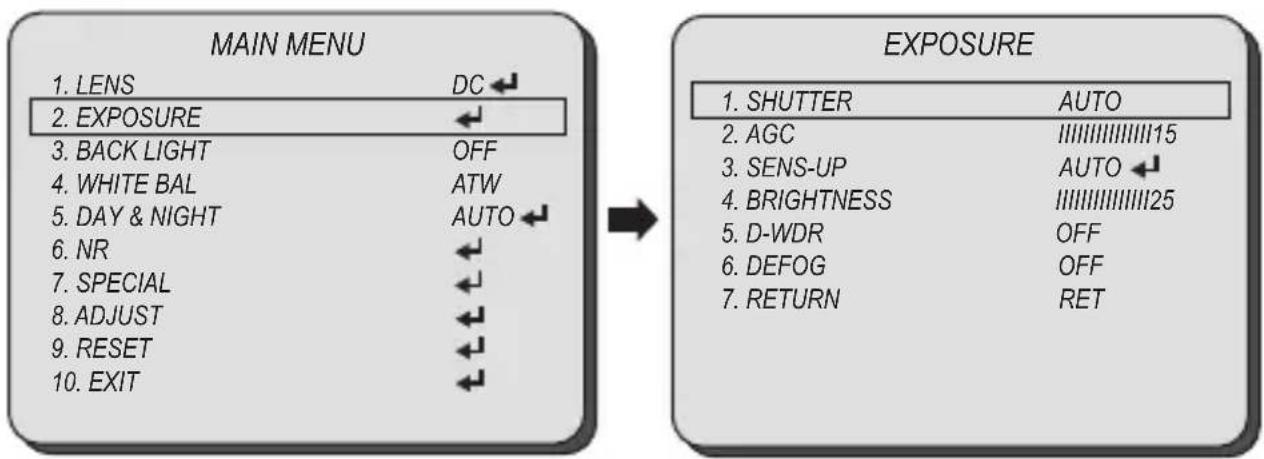
You can select SHUTTER, AGC, SENS-UP, BRIGHTNESS, D-WDR, and DEFOG menu using the UP or DOWN button.
■ SHUTTER: You can adjust the shutter speed of the lens.
You can adjust the shutter speed manually or select shutter speed mode from FLK or AUTO mode using the LEFT or RIGHT button.
- FLK: Select this when you experience picture flicker, this happen when there is a clash with the installed lighting frequency.
- AUTO: Enable AUTO to control the shutter speed automatically. If AUTO is selected, the shutter speed is automatically controlled depending on the ambient illumination of the subject.
- 1/60sec \~ 1/50,000sec, x2\~x30: You can control shutter speed manually using the LEFT or RIGHT button.
flowchart
graph LR
    A["MAIN MENU"] --> B["EXPOSURE"]
    A --> C["1. LENS DC ←"]
    A --> D["2. EXPOSURE ←"]
    A --> E["3. BACK LIGHT OFF"]
    A --> F["4. WHITE BAL ATW"]
    A --> G["5. DAY & NIGHT AUTO ←"]
    A --> H["6. NR ←"]
    A --> I["7. SPECIAL ←"]
    A --> J["8. ADJUST ←"]
    A --> K["9. RESET ←"]
    A --> L["10. EXIT ←"]
    M["EXPOSURE"] --> N["1. SHUTTER AUTO"]
    M --> O["2. AGC IIIIIIIIIIIIIIII15"]
    M --> P["3. SENS-UP AUTO ←"]
    M --> Q["4. BRIGHTNESS IIIIIIIIIIIIIIII25"]
    M --> R["5. D-WDR OFF"]
    M --> S["6. DEFOG OFF"]
    M --> T["7. RETURN RET"]
■ If the shutter mode is set to AUTO, carefully position the camera during installation since the produced image might be poorly framed due to a bright light source.
■ When the SHUTTER is set to FLK mode, 1/240 \~ 50,000, or x2\~x30, SENS-UP will be disabled.
EXPOSURE AGC
Select EXPOSEURE using the UP or DOWN button.
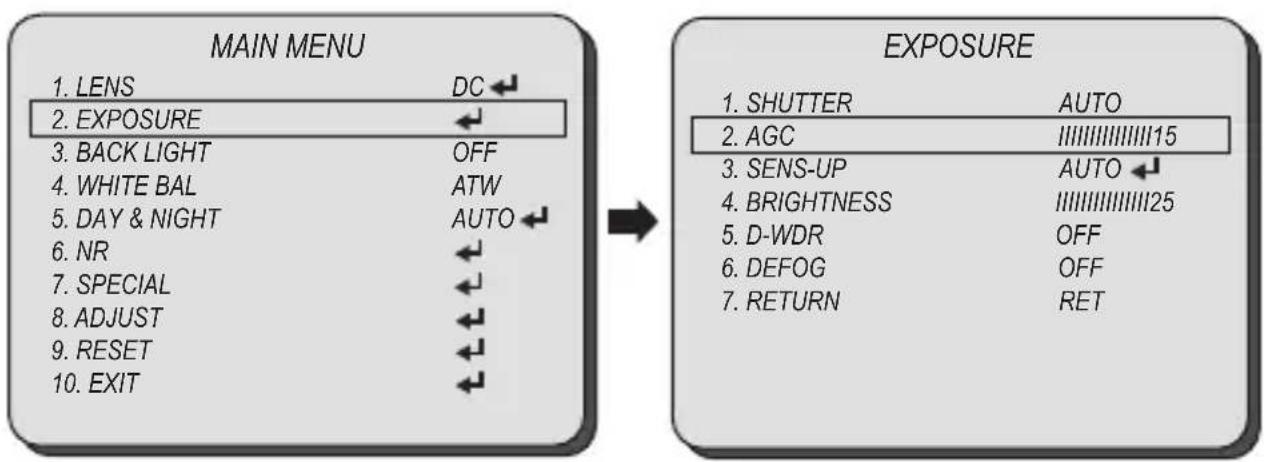
You can select SHUTTER, AGC, SENS-UP, BRIGHTNESS, D-WDR, and DEFOG menu using the UP or DOWN button.
■ AGC(AUTO GAIN CONTROL): A function which controls the amplification/gain process automatically if the illumination falls under the usable level.
flowchart
graph LR
    A["MAIN MENU"] --> B["EXPOSURE"]
    A --> C["1. LENS DC ←"]
    A --> D["2. EXPOSURE ←"]
    A --> E["3. BACK LIGHT OFF"]
    A --> F["4. WHITE BAL ATW"]
    A --> G["5. DAY & NIGHT AUTO ←"]
    A --> H["6. NR ←"]
    A --> I["7. SPECIAL ←"]
    A --> J["8. ADJUST ←"]
    A --> K["9. RESET ←"]
    A --> L["10. EXIT ←"]
    B --> M["1. SHUTTER AUTO"]
    B --> N["2. AGC IIIIIIIIIIIIIIII15"]
    B --> O["3. SENS-UP AUTO ←"]
    B --> P["4. BRIGHTNESS IIIIIIIIIIIIIIII25"]
    B --> Q["5. D-WDR OFF"]
    B --> R["6. DEFOG OFF"]
    B --> S["7. RETURN RET"]
EXPOSURE SENS-UP
Select EXPOSEURE using the UP or DOWN button.
You can select SHUTTER, AGC, SENS-UP, BRIGHTNESS, D-WDR, and DEFOG menu using the UP or DOWN button.
■ SENS-UP: When it is in low luminance condition, the camera automatically detects the light level and maintains a clear picture quality if this mode is activated. You can select the sense-up mode from OFF or AUTO mode using the LEFT or RIGHT button.
- OFF: Deactivates the SENS-UP function.
●AUTO: Activates the SENS-UP function.
x2\~x30: You can select SENS-UP level using the LEFT or RIGHT button.
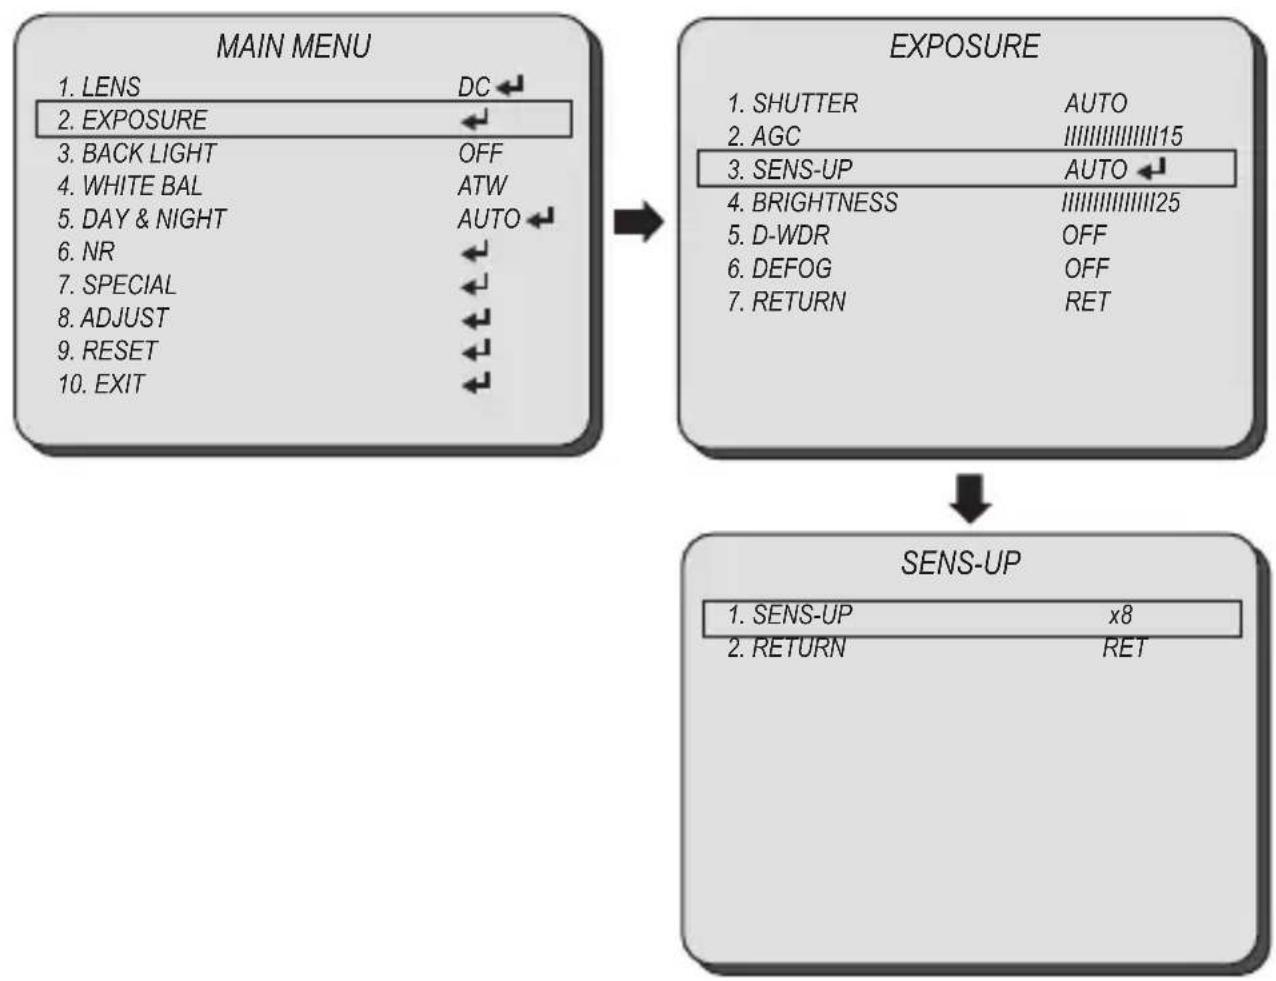
flowchart
graph TD
    A["MAIN MENU"] --> B["EXPOSURE"]
    B --> C["SENS-UP"]
    A --> D["MAIN MENU"]
    D --> E["EXPOSURE"]
    E --> F["SENS-UP"]
    F --> G["EXPOSURE"]
■ Ghosting in object movements may occur if the sens-up is set to higher level.
Select EXPOSEURE using the UP or DOWN button.
You can select SHUTTER, AGC, SENS-UP, BRIGHTNESS, D-WDR, and DEFOG menu using the UP or DOWN button.
■ BRIGHTNESS: Adjust the screen brightness.
You can adjust the brightness level from 1 \~ 100 using the LEFT or RIGHT button.
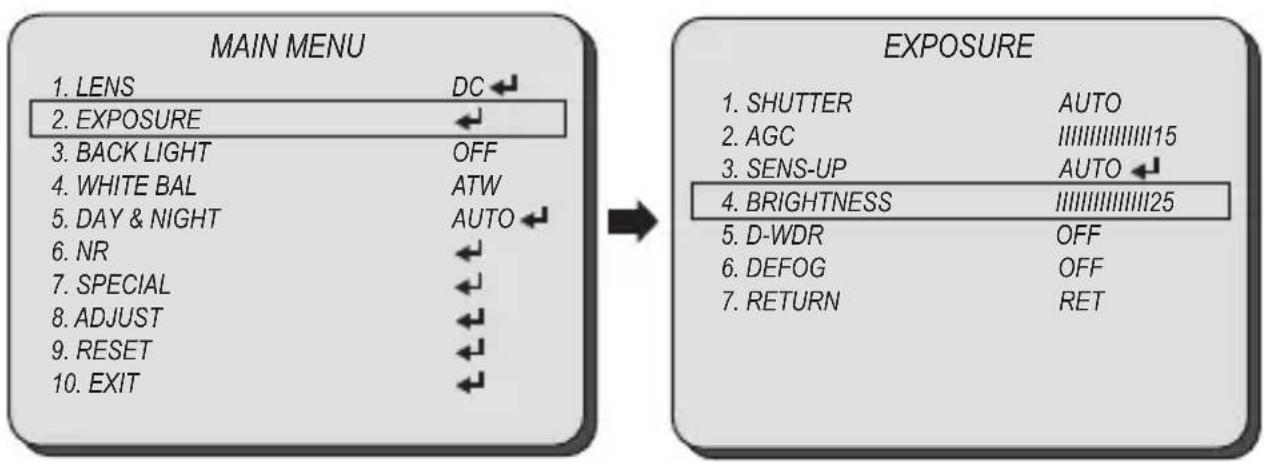
flowchart
graph LR
    A["MAIN MENU"] --> B["EXPOSURE"]
    A --> C["1. LENS DC ←"]
    A --> D["2. EXPOSURE ←"]
    A --> E["3. BACK LIGHT OFF"]
    A --> F["4. WHITE BAL ATW"]
    A --> G["5. DAY & NIGHT AUTO ←"]
    A --> H["6. NR ←"]
    A --> I["7. SPECIAL ←"]
    A --> J["8. ADJUST ←"]
    A --> K["9. RESET ←"]
    A --> L["10. EXIT ←"]

    B --> M["1. SHUTTER AUTO"]
    B --> N["2. AGC IIIIIIIIIIIIIIII15"]
    B --> O["3. SENS-UP AUTO ←"]
    B --> P["4. BRIGHTNESS IIIIIIIIIIIIIIII25"]
    B --> Q["5. D-WDR OFF"]
    B --> R["6. DEFOG OFF"]
    B --> S["7. RETURN RET"]
■ Higher BRIGHTNESS setting may cause noise, spots, or white image.
■ D-WDR : DWDR(ACCE) illuminates darker areas of an image while retaining the same light level for brighter areas to even out the overall brightness of images with high contrast between bright and dark areas.
You can select the DWDR level from OFF and ON using the LEFT or RIGHT button.
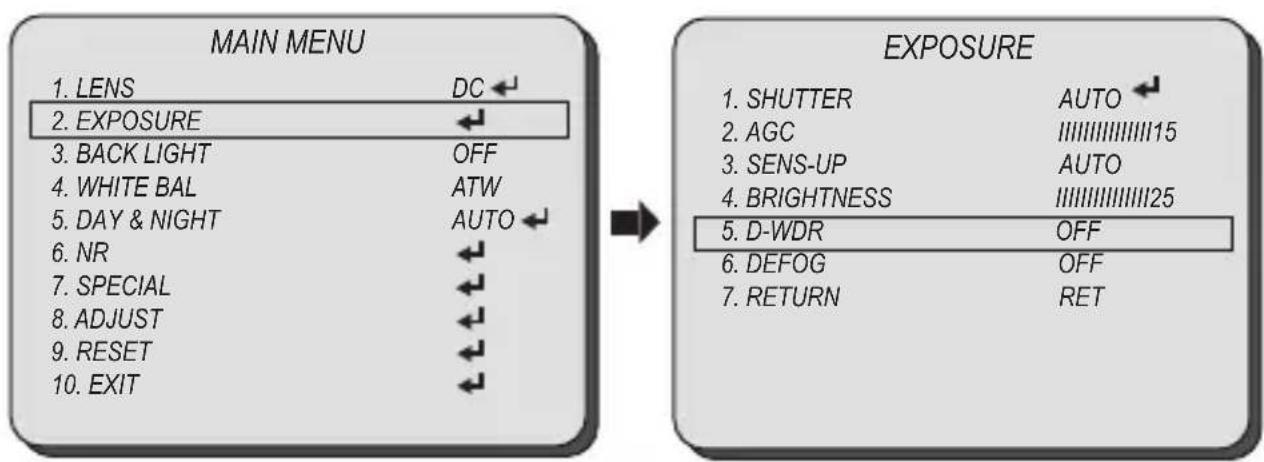
flowchart
graph LR
    A["MAIN MENU"] --> B["EXPOSURE"]
    A --> C["1. LENS DC ←"]
    A --> D["2. EXPOSURE ←"]
    A --> E["3. BACK LIGHT OFF"]
    A --> F["4. WHITE BAL ATW"]
    A --> G["5. DAY & NIGHT AUTO ←"]
    A --> H["6. NR ←"]
    A --> I["7. SPECIAL ←"]
    A --> J["8. ADJUST ←"]
    A --> K["9. RESET ←"]
    A --> L["10. EXIT ←"]

    B --> M["1. SHUTTER AUTO ←"]
    B --> N["2. AGC IIIIIIIIIIIIIIII15"]
    B --> O["3. SENS-UP AUTO"]
    B --> P["4. BRIGHTNESS IIIIIIIIIIIIIIII25"]
    B --> Q["5. D-WDR OFF"]
    B --> R["6. DEFOG OFF"]
    B --> S["7. RETURN RET"]
Select EXPOSEURE using the UP or DOWN button.
You can select SHUTTER, AGC, SENS-UP, BRIGHTNESS, D-WDR, and DEFOG menu using the UP or DOWN button.
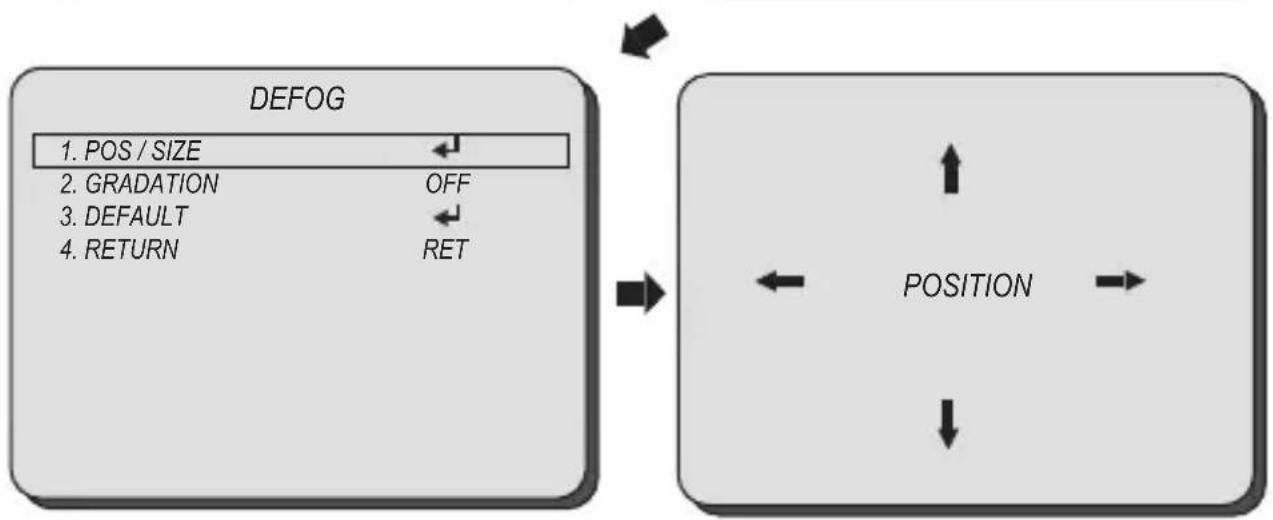
■ DEFOG: DEFOG feature will help increase visibility in extreme weather conditions, such as fog, rain or in a very strong luminous intensity.
You can select the DEFOG level from OFF and ON using the LEFT or RIGHT button.
- POS / SIZE: Adjust the position and size of the DEFOG function.
- GRADATION: Adjust the gradation level of the DEFOG function.
- DEFAULT: Reset the DEFOG function.
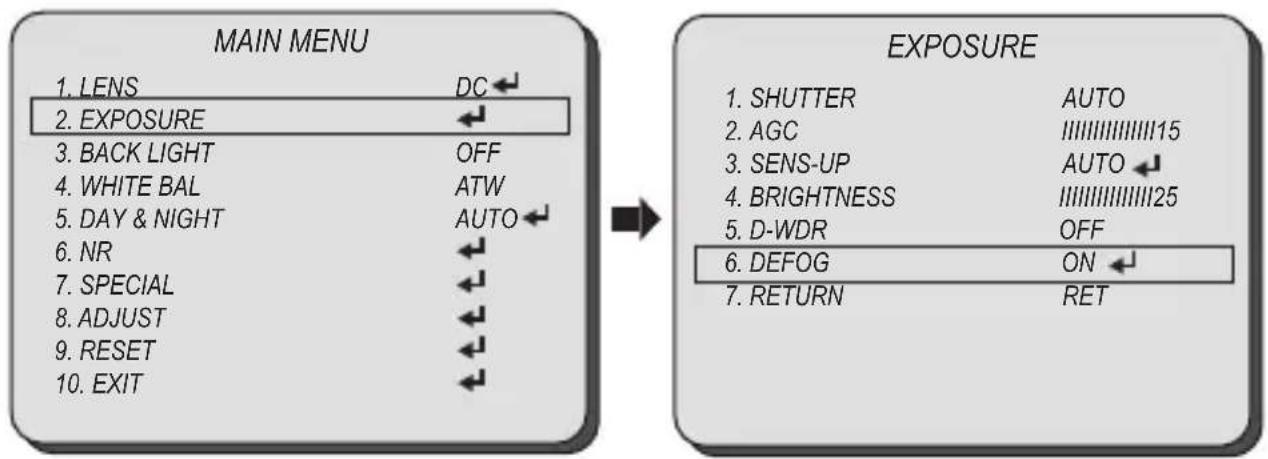
flowchart
graph LR
    A["MAIN MENU"] --> B["EXPOSURE"]
    A --> C["1. LENS DC ←"]
    A --> D["2. EXPOSURE ←"]
    A --> E["3. BACK LIGHT OFF"]
    A --> F["4. WHITE BAL ATW"]
    A --> G["5. DAY & NIGHT AUTO ←"]
    A --> H["6. NR ←"]
    A --> I["7. SPECIAL ←"]
    A --> J["8. ADJUST ←"]
    A --> K["9. RESET ←"]
    A --> L["10. EXIT ←"]

    B --> M["1. SHUTTER AUTO"]
    B --> N["2. AGC IIIIIIIIIIIIIIII15"]
    B --> O["3. SENS-UP AUTO ←"]
    B --> P["4. BRIGHTNESS IIIIIIIIIIIIIIII25"]
    B --> Q["5. D-WDR OFF"]
    B --> R["6. DEFOG ON ←"]
    B --> S["7. RETURN RET"]
flowchart
graph LR
    A["DEFOG"] --> B["POSITION"]
    B --> C["1. POS / SIZE"]
    B --> D["2. GRADATION OFF"]
    B --> E["3. DEFAULT"]
    B --> F["4. RETURN RET"]
BACKLIGHT BLC
Select BACKLIGHT using the UP or DOWN button.
You can select OFF, BLC, or HSBLC menu using the LEFT or RIGHT button.
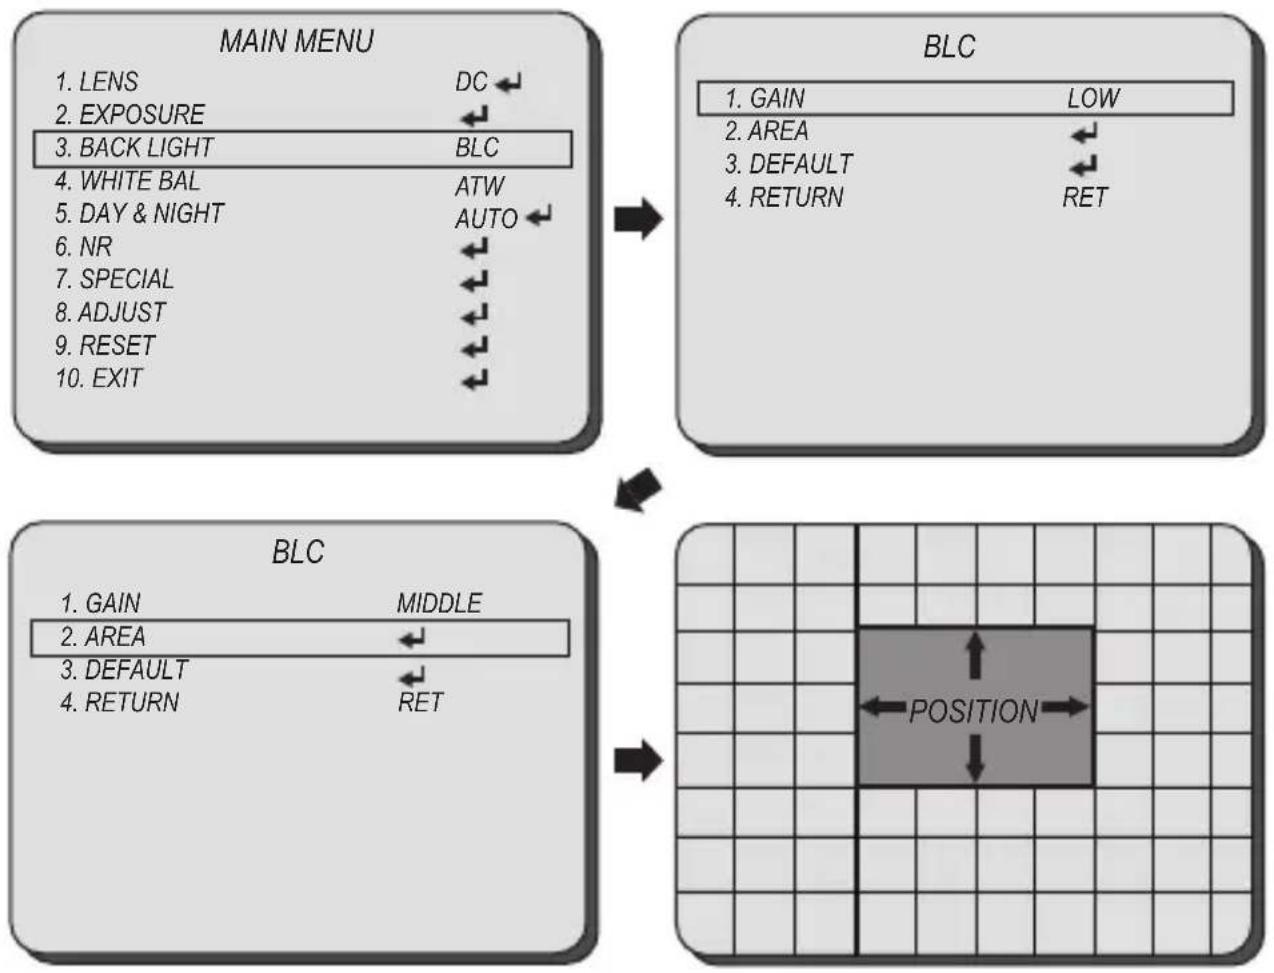
■ BLC: Enables a user to select a desired area on a picture and view that area more clearly.
● GAIN: Adjust level of the BLC function.
You can select the GAIN level from LOW, MIDDLE, and HIGH using the LEFT or RIGHT button.
● AREA: Select the area to be enhanced.
You can select the BLC area using the UP, DOWM, LEFT or RIGHT button.
● DEFAULT: Set the BLC setting value as default.
flowchart
graph TD
    A["MAIN MENU"] --> B["BLC"]
    B --> C["POSITION"]

    subgraph_A["MAIN MENU"]
        A1["LENS"] & A2["EXPOSURE"] & A3["BACK LIGHT"] & A4["WHITE BAL"] & A5["DAY & NIGHT"] & A6["NR"] & A7["SPECIAL"] & A8["ADJUST"] & A9["RESET"] & A10["EXIT"]
    end

    subgraph_B["BLC"]
        B1["GAIN"] & B2["LOW"] & B3["AREA"] & B4["DEFAULT"] & B5["RETURN"] & B6["RET"]
    end

    subgraph_C["BLC"]
        C1["GAIN"] & C2["MIDDLE"] & C3["AREA"] & C4["DEFAULT"] & C5["RETURN"] & C6["RET"]
    end
■ BACKLIGHT function will help distinguish an object in front of the strong background lighting.
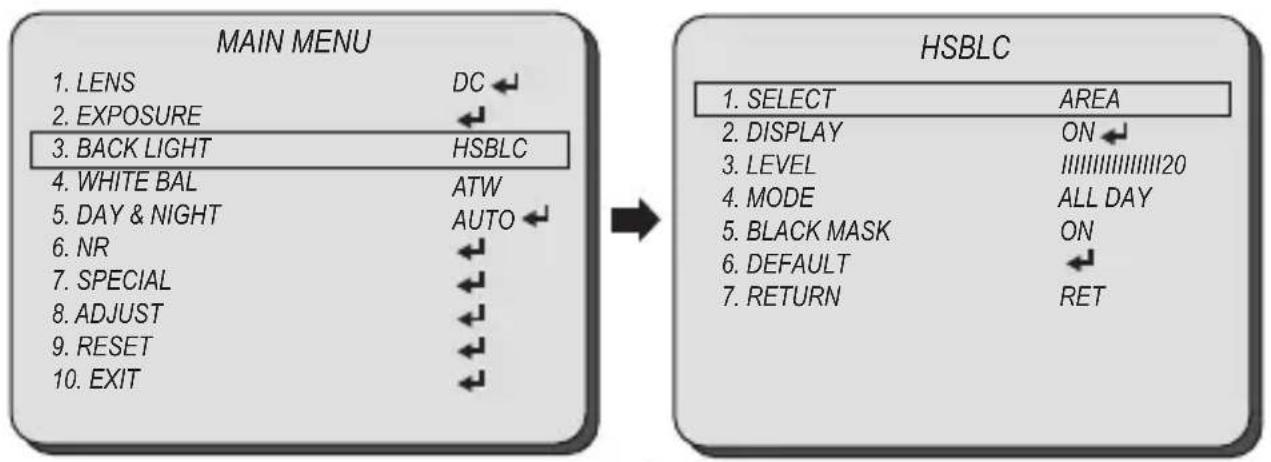
■HSBLC: If the scene contains extremely bright light areas such as; from car headlight, the light can mask out much of the on-screen detail.
- SELECT: Select the area to be enhanced (AREA1, AREA2, AREA3, AREA4)
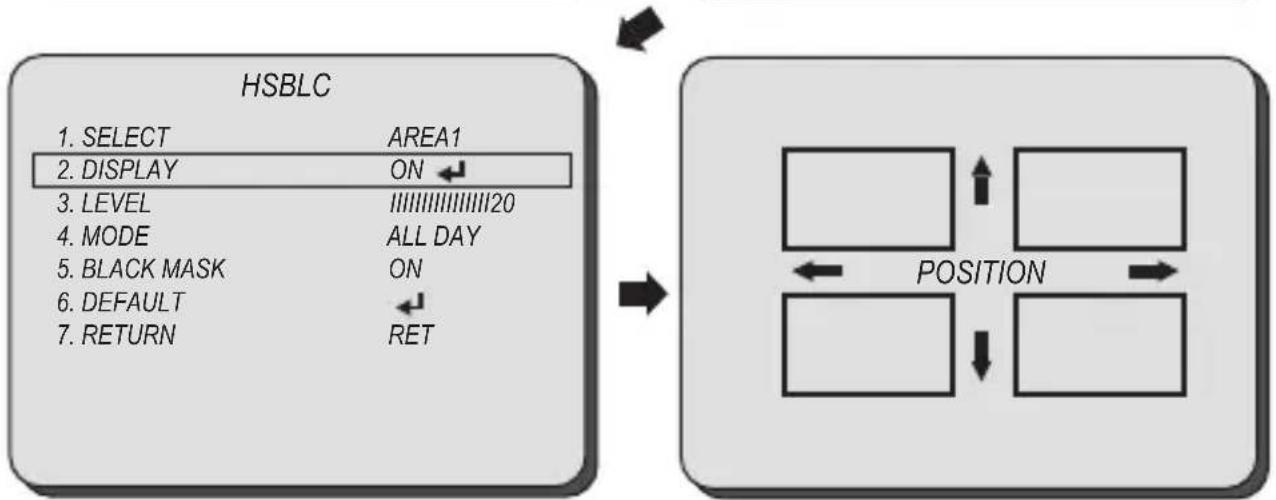
● DISPLAY: Display the zone or not and adjust the size and position.
■ POSITOIN: Adjust the position.
SIZE : Adjust the size.
● LEVEL: Adjust level of the HLC function.
● MODE: Select the HSBLC mode from NIGHT and ALL DAY.
- BLACK MASK: Enable/Disable BLACK MASK function.
● DEFAULT: Set the HSBLC setting value as default.
flowchart
graph LR
    A["MAIN MENU"] --> B["HSBLC"]
    A -->|1. LENS DC ←| A
    A -->|2. EXPOSURE ←| A
    A -->|3. BACK LIGHT HSBLC| A
    A -->|4. WHITE BAL ATW| A
    A -->|5. DAY & NIGHT AUTO ←| A
    A -->|6. NR ←| A
    A -->|7. SPECIAL ←| A
    A -->|8. ADJUST ←| A
    A -->|9. RESET ←| A
    A -->|10. EXIT ←| A
    B -->|1. SELECT AREA| B
    B -->|2. DISPLAY ON ←| B
    B -->|3. LEVEL IIIIIIIIIIIIIIII20| B
    B -->|4. MODE ALL DAY| B
    B -->|5. BLACK MASK ON| B
    B -->|6. DEFAULT ←| B
    B -->|7. RETURN RET| B
flowchart
graph LR
    A["HSBLC"] --> B["1. SELECT AREA1"]
    A --> C["2. DISPLAY ON ←"]
    A --> D["3. LEVEL IIIIIIIIIIIIIIII20"]
    A --> E["4. MODE ALL DAY"]
    A --> F["5. BLACK MASK ON"]
    A --> G["6. DEFAULT ←"]
    A --> H["7. RETURN RET"]
    I["POSITION"] --> J[" "]
    J --> K[" "]
    K --> L[" "]
■ Because there can be a difference in the effectiveness of HSBLC according to the amount of light area in the screen, optimize the installation angle for the best HSBLC performance.
■ HSBLC is only activated in low luminance condition if a bright area exceeds a designated size.
■ HSBLC is not activated in day light or when bright light is not present at night.
WHITE BALANCE
Select WHITE BALANCE using the UP or DOWN button.
You can change the white balance mode between ATW, AWC→ SET, INDOOR, OUTDOOR, AWB, or MANUAL using the LEFT or RIGHT button.
■ ATW (Auto Trace White Balance): continuously adjusts camera color balance in accordance with any change in color temperature. compensates for color temperature changes within the range of 2000K to 10000K.
■ AWC → SET: The white balance is automatically adjusted in a specific luminance environment. To find the optimal luminance level for the current environment, point the camera towards a shoot of white paper and press the SET button.
■ INDOOR: Select this when the color temperature is between 4,500°K and 8,500°K.
■ OUTDOOR: Select this when the color temperature is between 1,700°K and 11,000°K. (Ex. sodium light inclusion)
■ AWB (Auto White Balance): controls the automatic adjustment of the light source's color temperature.
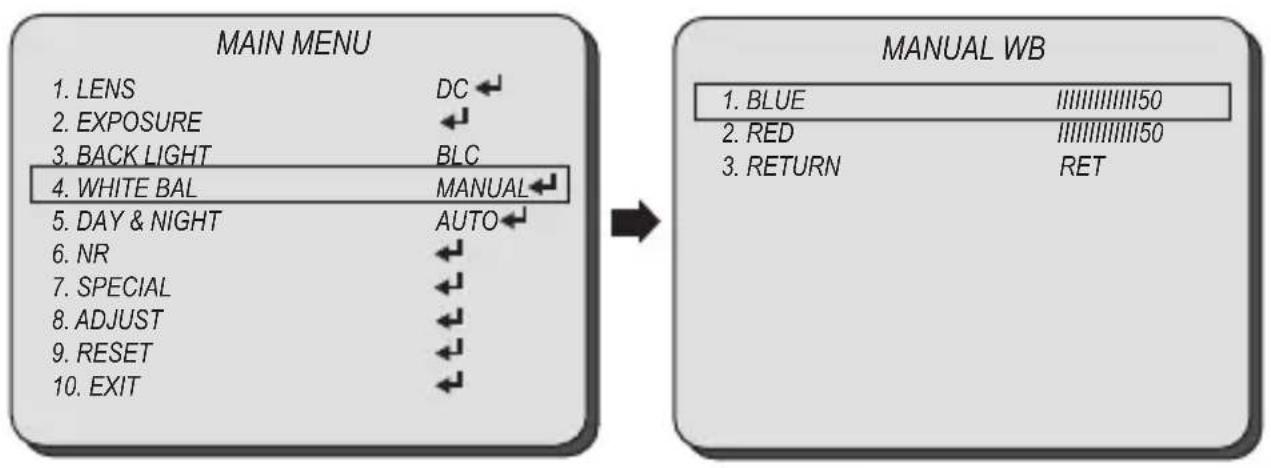
■ MANUAL: Select this to fine-tune White Balance manually.
You can adjust the blue and red tone level manually.
BLUE: Adjust the blue tone of the image. (0\~100)
■ RED: Adjust the red tone of the image. (0\~100)
flowchart
graph LR
    A["MAIN MENU"] --> B["MANUAL WB"]
    A --> C["1. LENS DC ←"]
    A --> D["2. EXPOSURE ←"]
    A --> E["3. BACK LIGHT BLC"]
    A --> F["4. WHITE BAL MANUAL ←"]
    A --> G["5. DAY & NIGHT AUTO ←"]
    A --> H["6. NR ←"]
    A --> I["7. SPECIAL ←"]
    A --> J["8. ADJUST ←"]
    A --> K["9. RESET ←"]
    A --> L["10. EXIT ←"]
    B --> M["1. BLUE IIIIIIIIIIIII50"]
    B --> N["2. RED IIIIIIIIIIIII50"]
    B --> O["3. RETURN RET"]
■ Set White Balance first by using the ATW or AWB mode. After that switch to MANUAL mode,
■ White Balance may not work properly under the following conditions. In this case, select the AWC mode.
- When the ambient illumination of the subject is dim.
- If the camera is directed towards a fluorescent light or is installed in place where illumination changes dramatically, the White Balance operation may become unstable.
- When the ambient illumination of the subject is dim.
- If the camera is directed towards a fluorescent light or is installed in place where illumination changes dramatically, the White Balance operation may become unstable.
DAY & NIGHT COLOR, B/W
Select DAY & NIGHT using the UP or DOWN button.
You can change the day & night mode between COLOR, B/W, AUTO, or EXT using the LEFT or RIGHT button.
■ COLOR: The picture is always displayed in color.
■ B/W: The picture is always displayed in black and white.
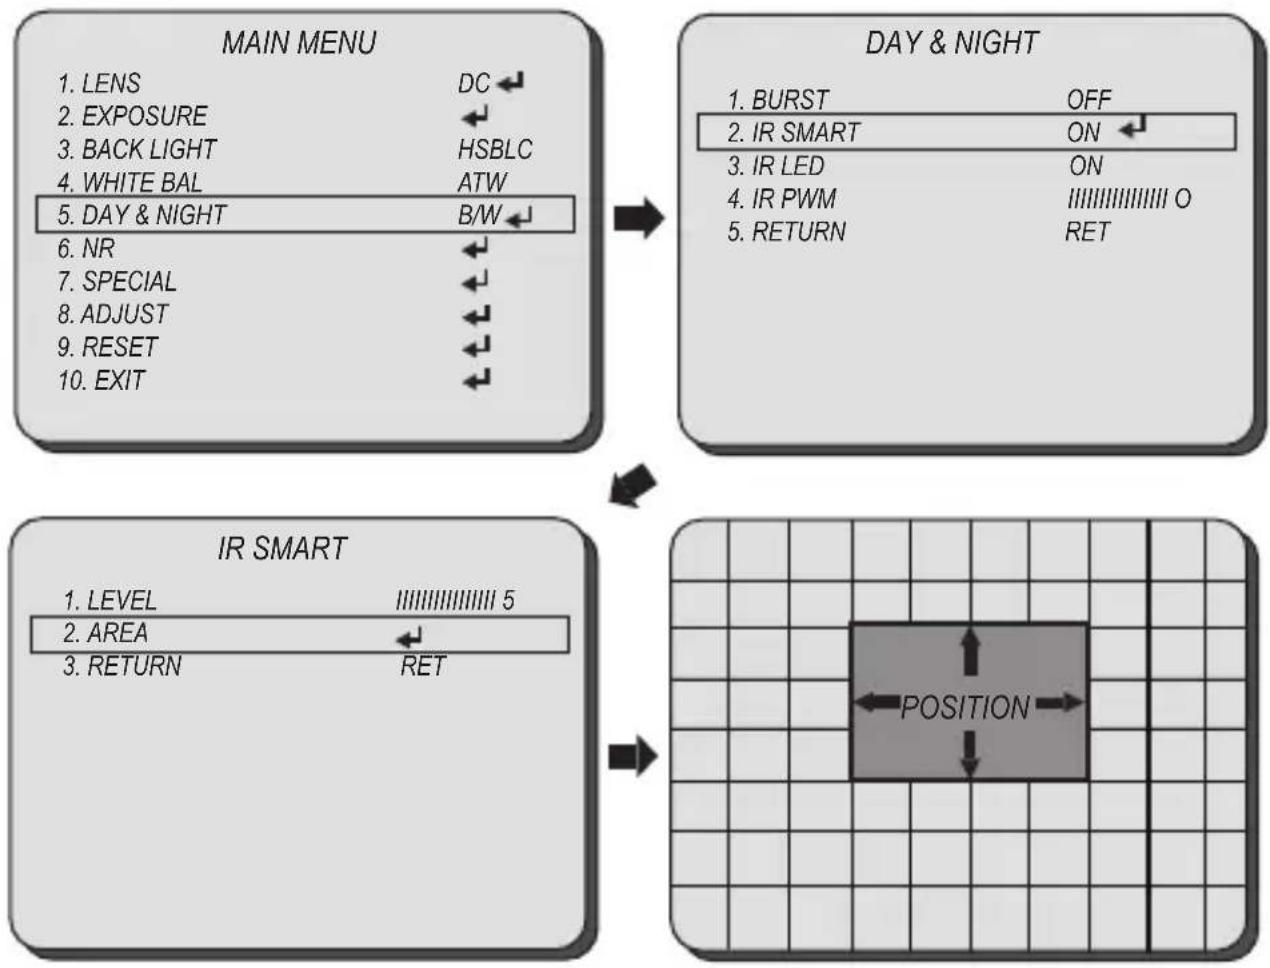
You can select and adjust BURST, IR SMART, IR LED, and IR PWM.
—BURST: Determines whether to transmit the burst signal or not.
■ IR SMART: Decrease screen saturation of objects within a short range.
— LEVEL: Adjust level of the IR SMART function.
— AREA: Select the area to activate the IR SMART.
You can select IR SMART area using the UP, DOWN, LEFT or RIGHT button.
— IR LED: Enable/Disable IR LEDs.
— IR PWM: Adjust the IR LEDs output level.
flowchart
graph TD
    A["MAIN MENU"] --> B["DAY & NIGHT"]
    B --> C["IR SMART"]
    C --> D["POSITION"]

    subgraph MAIN MENU
        E1["LENS DC"]
        E2["EXPOSURE"]
        E3["BACK LIGHT HSBLC"]
        E4["WHITE BAL ATW"]
        E5["DAY & NIGHT B/W"]
        E6["NR"]
        E7["SPECIAL"]
        E8["ADJUST"]
        E9["RESET"]
        E10["EXIT"]
    end

    subgraph DAY & NIGHT
        F1["BURST OFF"]
        F2["IR SMART ON"]
        F3["IR LED ON"]
        F4["IR PWM III III III III O"]
        F5["RETURN RET"]
    end

    subgraph IR SMART
        G1["LEVEL III III III III 5"]
        G2["AREA"]
        G3["RETURN RET"]
    end

    style MAIN MENU fill:#f9f,stroke:#333
    style DAY & NIGHT fill:#ccf,stroke:#333
    style IR SMART fill:#cfc,stroke:#333
Select DAY & NIGHT using the UP or DOWN button.
You can change the day & night mode between COLOR, B/W, AUTO, or EXT using the LEFT or RIGHT button.
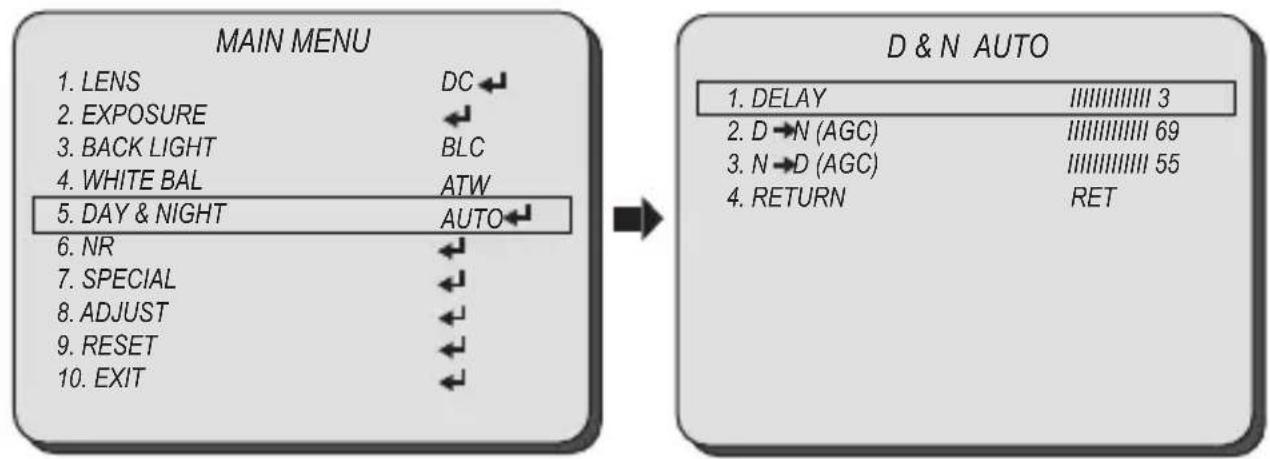
■ AUTO: The mode is switched to COLOR in a normal environment, but switched to B/W mode when ambient illumination is low.
- DELAY: You can select day/night switching delay time from. (0s \~ 60s)
- D→N (AGC): Adjust the brightness of the lighting where the mode switch occurs from day to night.
- N→D (AGC): Adjust the brightness of the lighting where the mode switch occurs from night to day.
flowchart
graph LR
    A["MAIN MENU"] --> B["D & N AUTO"]
    A --> C["1. LENS DC"]
    A --> D["2. EXPOSURE"]
    A --> E["3. BACK LIGHT BLC"]
    A --> F["4. WHITE BAL ATW"]
    A --> G["5. DAY & NIGHT AUTO"]
    A --> H["6. NR"]
    A --> I["7. SPECIAL"]
    A --> J["8. ADJUST"]
    A --> K["9. RESET"]
    A --> L["10. EXIT"]
    B --> M["1. DELAY III III III III 3"]
    B --> N["2. D →N (AGC) III III III III 69"]
    B --> O["3. N →D (AGC) III III III III 55"]
    B --> P["4. RETURN RET"]
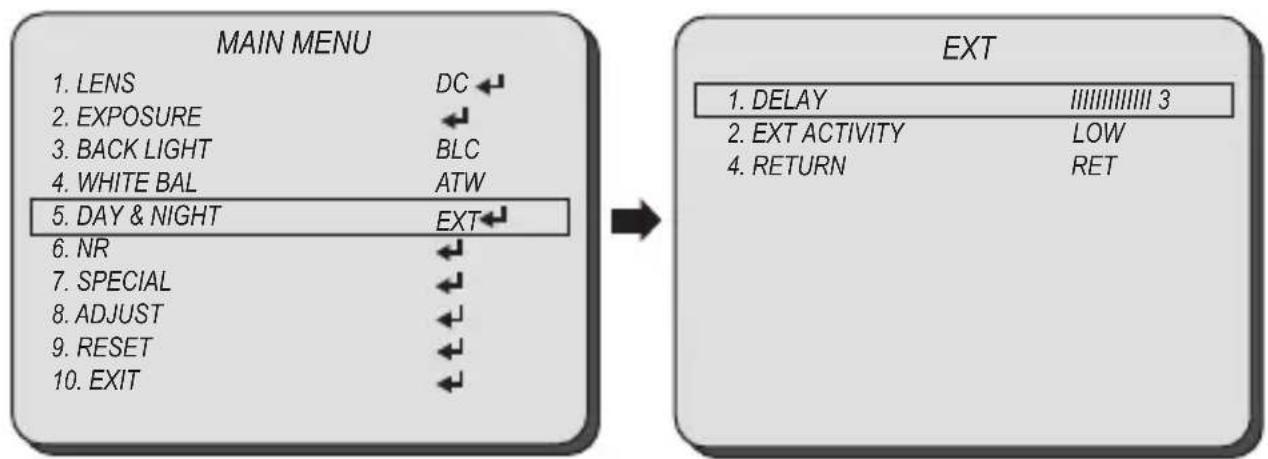
■ EXT: Control the image modes of Color and B/W when an external controller is synchronized via the D&N IN In port.
flowchart
graph LR
    A["MAIN MENU"] --> B["EXT"]
    A --> C["1. LENS DC ←"]
    A --> D["2. EXPOSURE ←"]
    A --> E["3. BACK LIGHT BLC"]
    A --> F["4. WHITE BAL ATW"]
    A --> G["5. DAY & NIGHT EXT ←"]
    A --> H["6. NR ←"]
    A --> I["7. SPECIAL ←"]
    A --> J["8. ADJUST ←"]
    A --> K["9. RESET ←"]
    A --> L["10. EXIT ←"]
    B --> M["1. DELAY IIIIII III III 3"]
    B --> N["2. EXT ACTIVITY LOW"]
    B --> O["4. RETURN RET"]
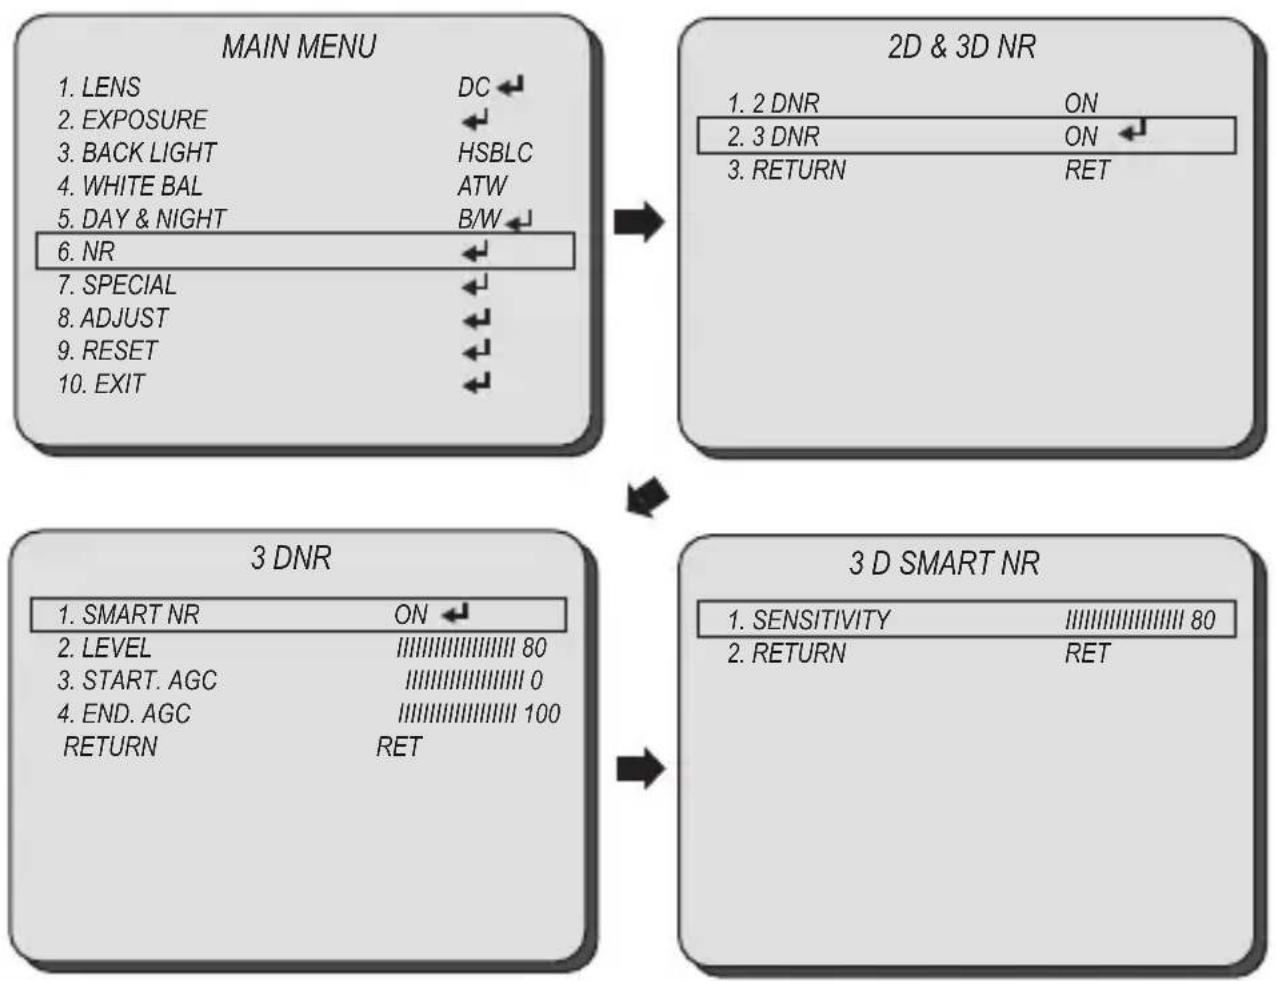
NR (Noise Reduction) 2 DNR, 3 DNR
Select NR (NOISE REDUCTION) using the UP or DOWN button
You can move the menu from 2DNR and 3DNR and set each menu using the LEFT or RIGHT button.
■ 2DNR: Reducing noise in the brightness of the image.
■ 3DNR: Reducing noise causing by movement.
● SMART NR: Automatically activates 3DNR according to environment and preset.
— SENSITIVITY: Adjust the sencivity of 3DNR level.
- LEVEL: Adjust 3DNR level.
- START. AGC: Set the start level of 3DNR function.
● END. AGC: Set the end level of 3DNR function.
flowchart
graph TD
    A["MAIN MENU"] --> B["2D & 3D NR"]
    A --> C["3 DNR"]
    A --> D["3 D SMART NR"]

    subgraph MAIN MENU
        E1["LENS DC"]
        E2["EXPOSURE"]
        E3["BACK LIGHT HSBLC"]
        E4["WHITE BAL ATW"]
        E5["DAY & NIGHT B/W"]
        E6["NR"]
        E7["SPECIAL"]
        E8["ADJUST"]
        E9["RESET"]
        E10["EXIT"]
    end

    subgraph 2D & 3D NR
        F1["2 DNR ON"]
        F2["3 DNR ON"]
        F3["RETURN RET"]
    end

    subgraph 3 D NDR
        G1["SMART NR ON"]
        G2["LEVEL I I I I I I I I I I I I I I I I I I I I I I I I I I I I I I I I I I I I I I I I I I I I I I I I I I I I I I I I I I I I I I I I I I I I I I I"]
        G3["START AGC II II II II II II II II II II II II II II II II II II II II II II II II II II II II II II II II II II II II II II II II II II II II II II II II II II II II II II"]
        G4["END AGC III III III III III III III III III III III III III III III III III III III III III III III III III III III III III III III III III III III III"]
        G5["RETURN RET"]
    end
■ When adjusting the noise reduction level in the NR mode, remember that the higher the level set, the more the noise level will be reduced, as will the brightness of the image.
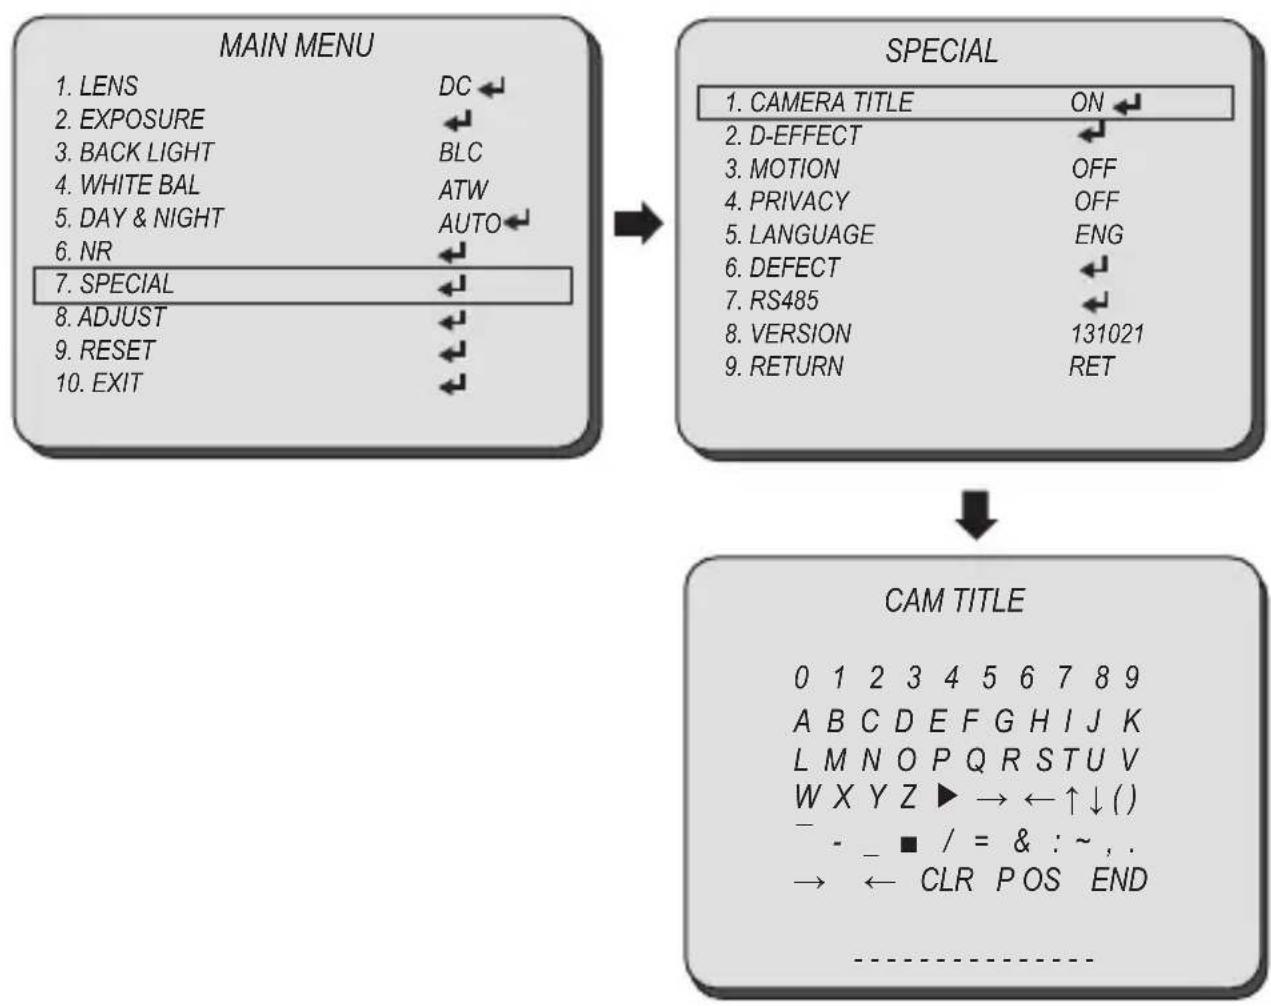
Select SPECIAL using the UP or DOWN button.
You can select the sub-menu from CAM TITLE, D-EFFECT, MOTION, PRIVACY, LANGUAGE, DEFECT, RS485, and VERSION using the UP or DOWN button.
■ CAM TITLE: If you enter a title, the title will appear on the monitor.
You can input the camera title from the virtual keyboard using the LEFT, RIGHT, UP, DOWN, and SET button.
flowchart
graph TD
    A["MAIN MENU"] --> B["SPECIAL"]
    B --> C["CAM TITLE"]

    subgraph MAIN MENU
        L1["LENS"] & L2["EXPOSURE"] & L3["BACK LIGHT"] & L4["WHITE BAL"] & L5["DAY & NIGHT"] & L6["NR"] & L7["SPECIAL"]
        L8["ADJUST"] & L9["RESET"] & L10["EXIT"]
    end

    subgraph SPECIAL
        M1["CAMERA TITLE ON"] & M2["D-EFFECT OFF"] & M3["MOTION OFF"] & M4["PRIVACY OFF"] & M5["LANGUAGE ENG"] & M6["DEFECT ↔"]
        M7["RS485 ↔"]
        M8["VERSION 131021"]
        M9["RETURN RET"]
    end

    subgraph CAM TITLE
        N0["0 1 2 3 4 5 6 7 8 9"]
        N1["A B C D E F G H I J K"]
        N2["L M N O P Q R S T U V"]
        N3["W X Y Z ▶ → ←↑↓()"]
        N4["— - _ ■ / = & : ~, ."]
        N5["→ ← CLR POS END"]
    end
Select SPECIAL using the UP or DOWN button.
You can select the sub-menu from CAM TITLE, D-EFFECT, MOTION, PRIVACY, LANGUAGE, DEFECT, RS485, and VERSION using the UP or DOWN button.
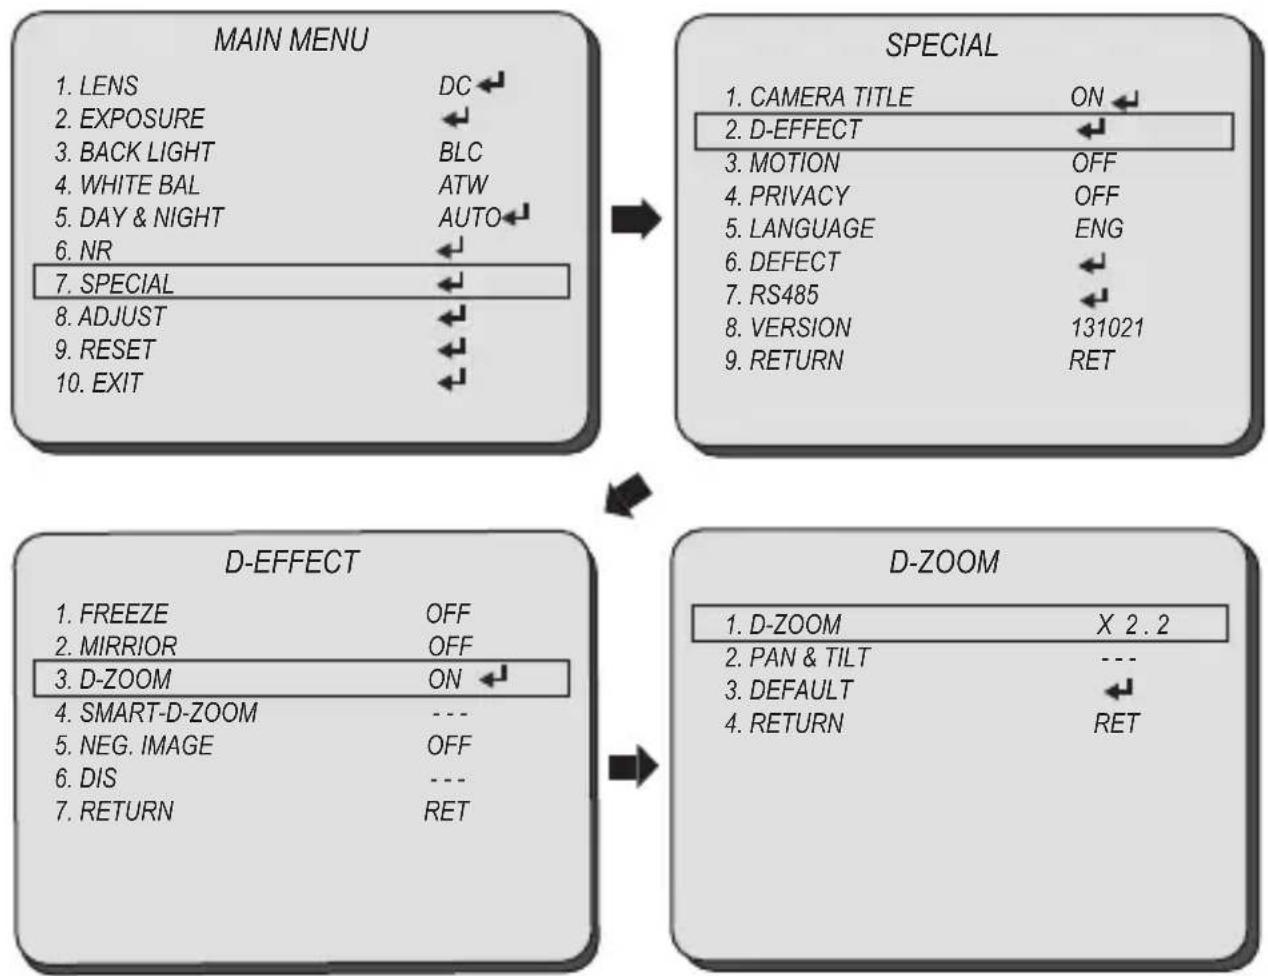
D-EFFECT
You can select the digital effect mode from FREEZE, MIRROR, D-ZOOM, and NEG.IMAGE using the UP or DOWN button.
- FREEZE: You can stop the image or reactivate it.
● MIRROR: You can adjust or rotate the picture vertically and or horizontally. You can select MIRROR, V-FLIP, and ROTATE using the LEFT or RIGHT button.
● D-ZOOM: You can use a digital zoom of X 1 \~ X 62.
Select ON using LEFT and RIGHT button and press SET button to display the DIGITAL ZOOM menu.
- NEG. IMAGE: You can flip the color on screen.
flowchart
graph TD
    A["MAIN MENU"] --> B["SPECIAL"]
    A --> C["D-EFFECT"]
    B --> C
    C --> D["D-ZOOM"]

    subgraph MAIN MENU
        L1["LENS"] & DC --> L2["EXPOSURE"] & L3["BACK LIGHT"] & L4["WHITE BAL"] & L5["DAY & NIGHT"] & L6["NR"] & L7["SPECIAL"]
        L8["ADJUST"] & L9["RESET"] & L10["EXIT"] & L11["←"]
    end

    subgraph SPECIAL
        M1["CAMERA TITLE ON"] & M2["D-EFFECT"] & M3["MOTION OFF"] & M4["PRIVACY OFF"] & M5["LANGUAGE ENG"] & M6["DEFECT ←"] & M7["RS485 ←"] & M8["VERSION 131021"]
        M9["RETURN RET"]
    end

    subgraph D-EFFECT
        N1["FREEZE OFF"] & N2["MIRROR OFF"] & N3["D-ZOOM ON ←"]
        N4["SMART-D-ZOOM ---"]
        N5["NEG. IMAGE OFF"]
        N6["DIS ---"]
        N7["RETURN RET"]
    end

    subgraph D-ZOOM
        O1["D-ZOOM X 2.2"]
        P1["PAN & TILT ---"]
        Q1["DEFAULT ←"]
        R1["RETURN RET"]
    end
Select SPECIAL using the UP or DOWN button.
You can select the sub-menu from CAM TITLE, D-EFFECT, MOTION, PRIVACY, LANGUAGE, DEFECT, RS485, and VERSION using the UP or DOWN button.
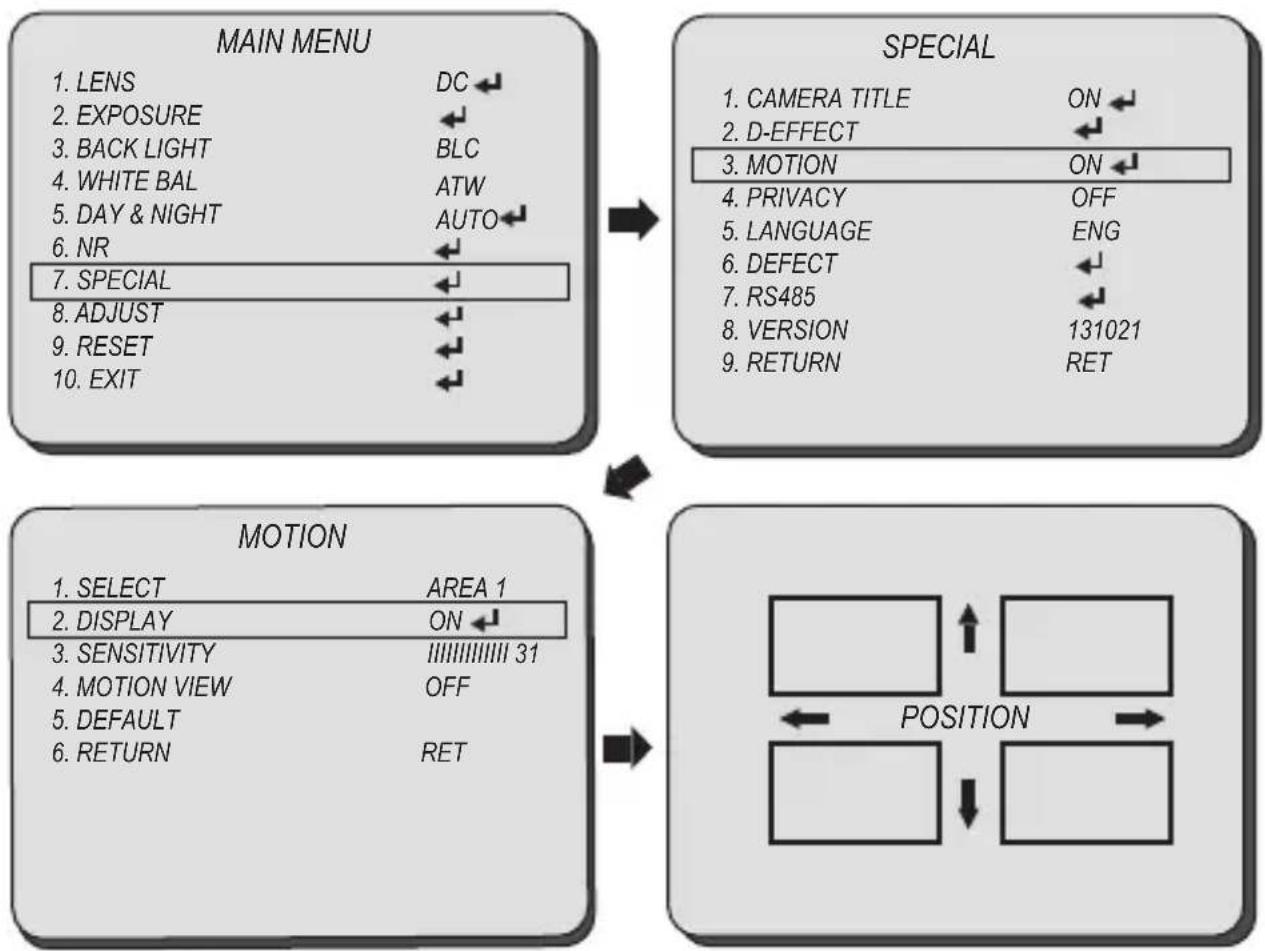
■ MOTION: This product has a feature that allows you to observe the object movement, and display
You can select the digital effect mode from SELECT AREA, DISPLAY, SENSIVITY, MOTION VIEW, and DEFAULT using the UP or DOWN button.
- SELECT AREA: You can select up to 3 motion detection areas.
You can select the motion detection area using the LEFT or RIGHT button.
• DISPLAY: Adjust the size and position of the selected area.
Select ON using LEFT and RIGHT button and press SET button to display the motion zone.
- POSITOIN: Adjust the position.
- SIZE: Adjust the size.
● SENSITIVITY: Adjust the sensitivity of the motion detection.
You can select the motion detection zone color using the LEFT or RIGHT button.
● MOTION VIEW: You can select ON to display the motion detection.
flowchart
graph TD
    A["MAIN MENU"] --> B["SPECIAL"]
    A --> C["MOTION"]
    B --> C
    C --> D["POSITION"]
Select SPECIAL using the UP or DOWN button.
You can select the sub-menu from CAM TITLE, D-EFFECT, MOTION, PRIVACY, LANGUAGE, DEFECT, RS485, and VERSION using the UP or DOWN button.
■ PRIVACY: Task an area you want to hide on the screen.
You can select the digital effect mode from SELECT AREA, DISPLAY, COLOR, TRANS., and DEFAULT using the UP or DOWN button.
- SELECT: You can select up to 8 PRIVACY areas.
You can select the privacy area using the LEFT or RIGHT button.
● DISPLAY: Adjust the size and position of the selected area.
You can select privacy area menu from OFF, INV., MOSAIC, COLOR using the LEFT or RIGHT button and press SET button to display the privacy zone.
- POSITOIN: Adjust the position
- SIZE: Adjust the size.
- COLOR: Determine area color. You can select 16 different colors.
You can select privacy area color from 0 to 15 using the LEFT or RIGHT button.
● TRANS.: Adjust the transparency of the selected privacy area.
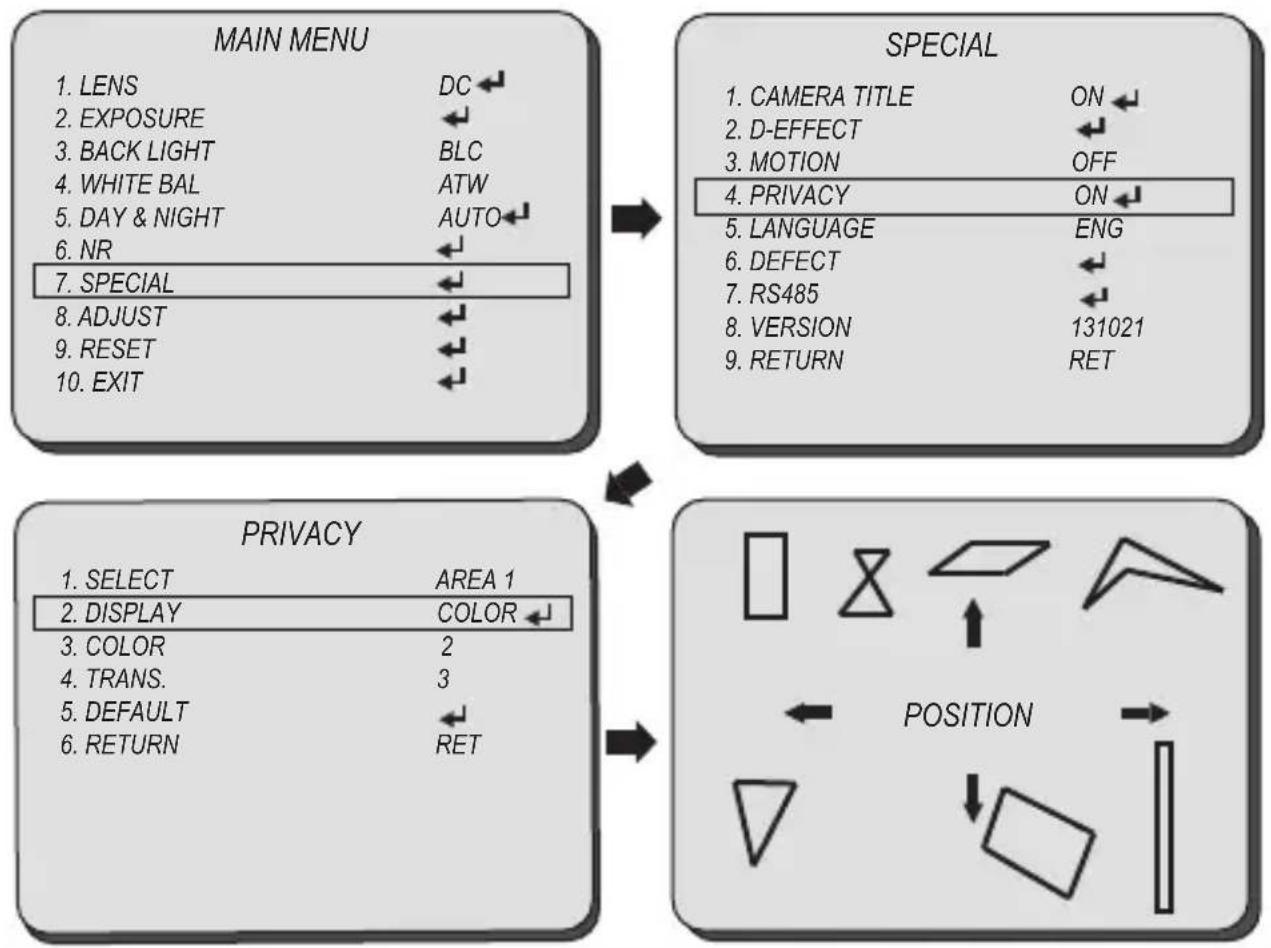
flowchart
graph TD
    A["MAIN MENU"] --> B["SPECIAL"]
    B --> C["POSITION"]

    subgraph MAIN MENU
        A1["LENS DC"]
        A2["EXPOSURE"]
        A3["BACK LIGHT BLC"]
        A4["WHITE BAL ATW"]
        A5["DAY & NIGHT AUTO"]
        A6["NR"]
        A7["SPECIAL"]
        A8["ADJUST"]
        A9["RESET"]
        A10["EXIT"]
    end

    subgraph SPECIAL
        B1["CAMERA TITLE ON"]
        B2["D-EFFECT"]
        B3["MOTION OFF"]
        B4["PRIVACY ON"]
        B5["LANGUAGE ENG"]
        B6["DEFECT"]
        B7["RS485"]
        B8["VERSION 131021"]
        B9["RETURN RET"]
    end

    subgraph PRIVACY
        C1["SELECT AREA 1"]
        C2["DISPLAY COLOR"]
        C3["COLOR 2"]
        C4["TRANS. 3"]
        C5["DEFAULT"]
        C6["RETURN RET"]
    end
Select SPECIAL using the UP or DOWN button.
You can select the sub-menu from CAM TITLE, D-EFFECT, MOTION, PRIVACY, LANGUAGE, DEFECT, RS485, and VERSION using the UP or DOWN button.
■ LANGUAGE: You can select the menu language according to your requirements.
You can select the language from ENG, JPN, CHN1, CHN2, KOR, GER, FRA, ITA, SPA, POL, RUS, POR, NED, TUR, HEB, and ARB using the LEFT or RIGHT button.
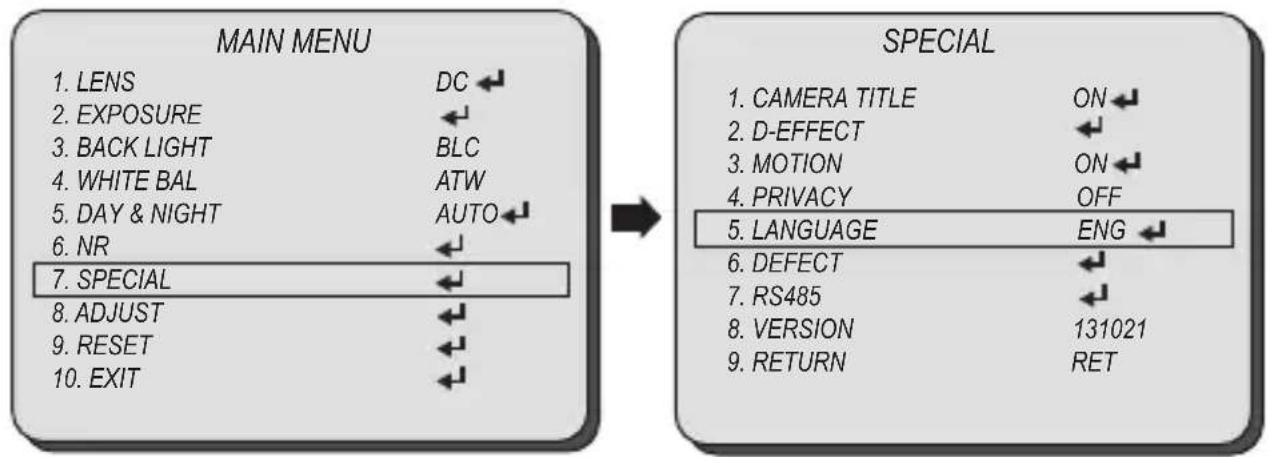
flowchart
graph LR
    A["MAIN MENU"] --> B["SPECIAL"]
    A --> C["→"]
    A --> D["1. LENS DC ←"]
    A --> E["2. EXPOSURE ←"]
    A --> F["3. BACK LIGHT BLC"]
    A --> G["4. WHITE BAL ATW"]
    A --> H["5. DAY & NIGHT AUTO ←"]
    A --> I["6. NR ←"]
    A --> J["7. SPECIAL ←"]
    A --> K["8. ADJUST ←"]
    A --> L["9. RESET ←"]
    A --> M["10. EXIT ←"]
    B --> N["1. CAMERA TITLE ON ←"]
    B --> O["2. D-EFFECT ←"]
    B --> P["3. MOTION ON ←"]
    B --> Q["4. PRIVACY OFF"]
    B --> R["5. LANGUAGE ENG ←"]
    B --> S["6. DEFECT ←"]
    B --> T["7. RS485 ←"]
    B --> U["8. VERSION 131021"]
    B --> V["9. RETURN RET"]
■ RS-485: Using RS-485 communication, the camera menu can be accessed using System Controller or the DVR (Other Equipment).
- CAM ID: You can select a camera ID from 0 to 254.
You can select the camera ID using the LEFT or RIGHT button. - ID DISPLAY: Select ON to display the camera ID.
● BAUD RATE: You can select a baud rate.
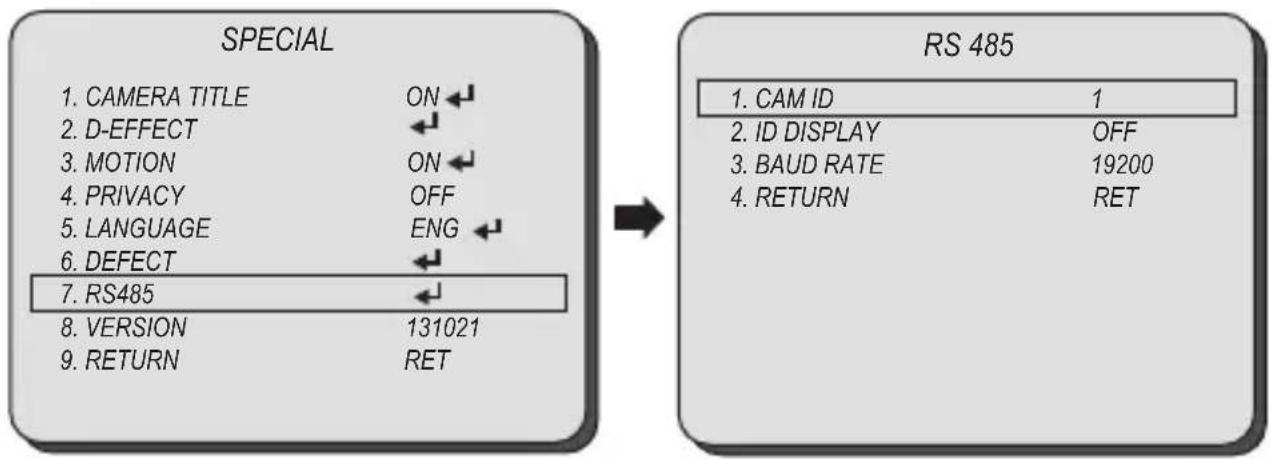
flowchart
graph LR
    A["SPECIAL"] --> B["RS 485"]
    A --> C["1. CAMERA TITLE ON ←"]
    A --> D["2. D-EFFECT ←"]
    A --> E["3. MOTION ON ←"]
    A --> F["4. PRIVACY OFF"]
    A --> G["5. LANGUAGE ENG ←"]
    A --> H["6. DEFECT ←"]
    A --> I["7. RS485 ←"]
    A --> J["8. VERSION 131021"]
    A --> K["9. RETURN RET"]
    B --> L["1. CAM ID 1"]
    B --> M["2. ID DISPLAY OFF"]
    B --> N["3. BAUD RATE 19200"]
    B --> O["4. RETURN RET"]
Select SPECIAL using the UP or DOWN button.
You can select the sub-menu from CAM TITLE, D-EFFECT, MOTION, PRIVACY, LANGUAGE, DEFECT, RS485, and VERSION using the UP or DOWN button.
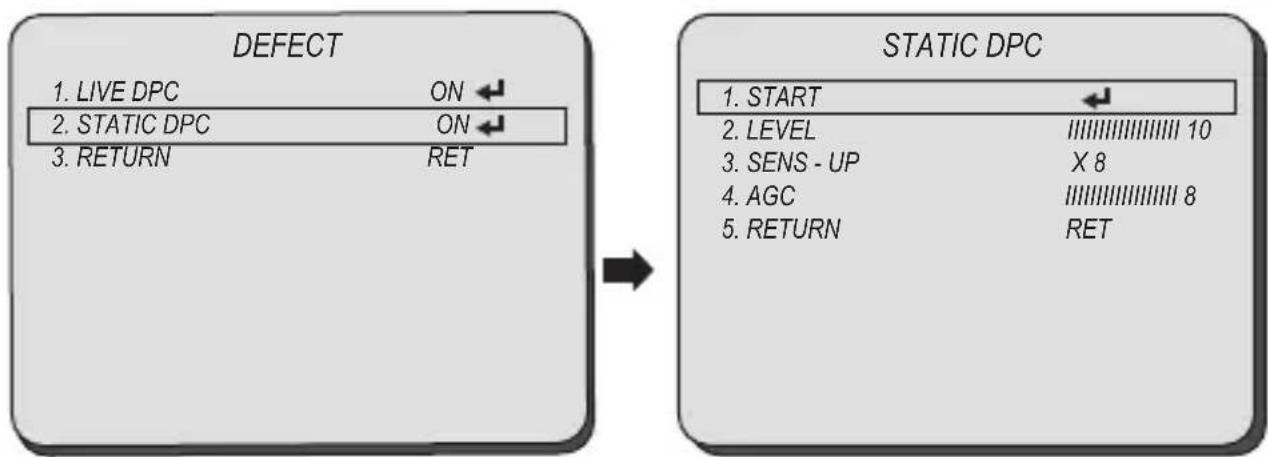
■ DEFECT: Dead pixels consist of two types: static dead pixel and dynamic dead pixel. The first can be found from the beginning while the second is found over time after using sensors for a certain period of time. Dynamic dead pixels may not be visible on the screen of ordinary illumination. However, they can be made visible by amplifying the analog/digital gain. Dead pixel correction (DPC) corrects such defects.
You can select the defect correction mode from LIVE DPC and STATIC DPC using the UP or DOWN button.
● LIVE DPC: Auto Dead pixel correction
■ LEVEL: Level of Auto Dead pixel correction
- STATIC DPC: Manual Dead pixel correction
■ START: Start Dead pixel correction
■ LEVEL: Level of Manual Dead pixel correction
■ SENS-UP: Select Sens-Up Value
■ AGC: Select Sens-Up Value
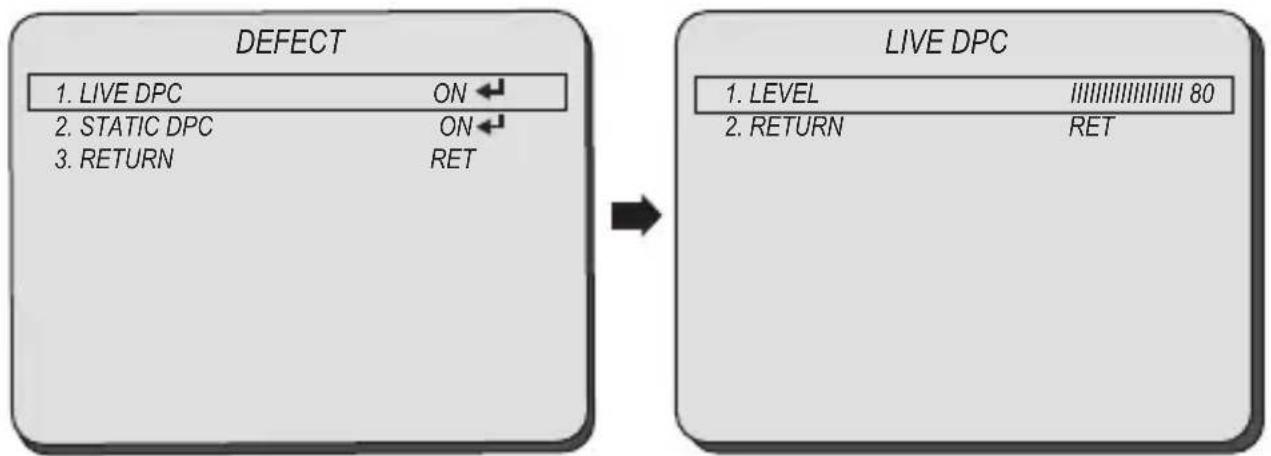
flowchart
graph LR
    A["DEFECT"] --> B["LIVE DPC ON ←"]
    A --> C["STATIC DPC ON ←"]
    A --> D["RETURN RET"]
    E["LIVE DPC"] --> F["LEVEL 80"]
    E --> G["RETURN RET"]
flowchart
graph LR
    A["DEFECT"] --> B["STATIC DPC"]
    A --> C["1. LIVE DPC ON ←"]
    A --> D["2. STATIC DPC ON ←"]
    A --> E["3. RETURN RET"]
    F["STATIC DPC"] --> G["1. START ←"]
    F --> H["2. LEVEL III III III III III 10"]
    F --> I["3. SENS - UP X 8"]
    F --> J["4. AGC III III III III III 8"]
    F --> K["5. RETURN RET"]
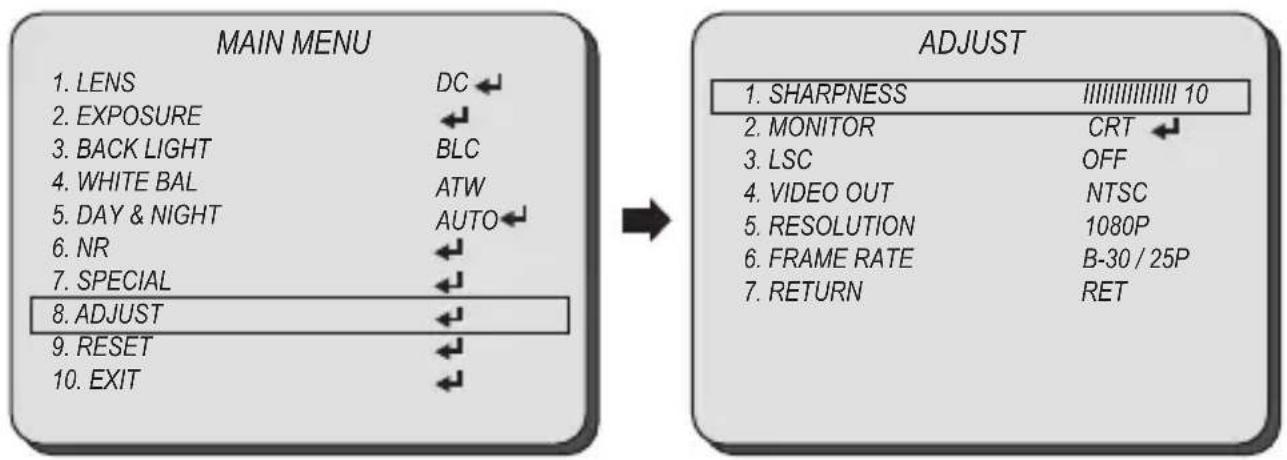
Select ADJUST using the UP or DOWN button.
You can select the sub-menu from SHARPNESS, MONITOR, LSC, VIDEO. OUT, RECOLUTION, and FRAME RATE using the UP or DOWN button.
■ SHARPNESS: As you increase this value, the picture outline becomes stronger and clearer. Adjust this value appropriately depending on the sharpness of the picture.
You can adjust the SHARPNESS level using the RIGHT or LEFT button.
■ LSC: Lens shading compensation.
Select ON to activate the brightness compensation on the corner of lens.
You can select the LSC function from OFF and ON using the RIGHT or LEFT button.
■ VIDEO. OUT: Select video type from NTSC or PAL.
You can select the VIDEO OUT mode from NTSC and PAL using the RIGHT or LEFT button.
flowchart
graph LR
    A["MAIN MENU"] --> B["ADJUST"]
    A --> C["1. LENS DC ←"]
    A --> D["2. EXPOSURE ←"]
    A --> E["3. BACK LIGHT BLC"]
    A --> F["4. WHITE BAL ATW"]
    A --> G["5. DAY & NIGHT AUTO ←"]
    A --> H["6. NR ←"]
    A --> I["7. SPECIAL ←"]
    A --> J["8. ADJUST ←"]
    A --> K["9. RESET ←"]
    A --> L["10. EXIT ←"]
    B --> M["1. SHARPNESS III III III III III 10"]
    B --> N["2. MONITOR CRT ←"]
    B --> O["3. LSC OFF"]
    B --> P["4. VIDEO OUT NTSC"]
    B --> Q["5. RESOLUTION 1080P"]
    B --> R["6. FRAME RATE B-30 / 25P"]
    B --> S["7. RETURN RET"]
Select ADJUST using the UP or DOWN button.
You can select the sub-menu from SHARPNESS, MONITOR, LSC, VIDEO. OUT, RECOLUTION, and FRAME RATE using the UP or DOWN button.
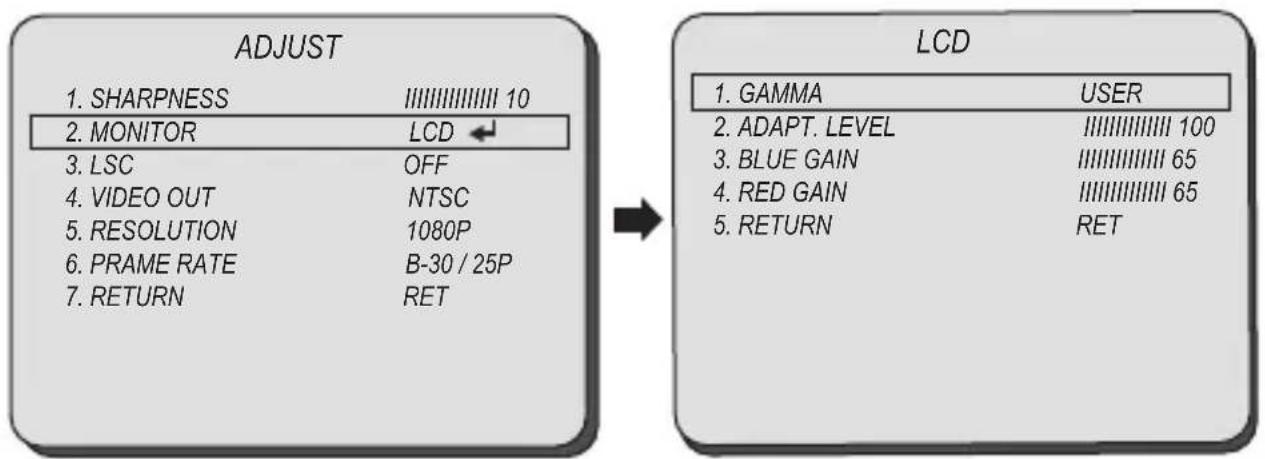
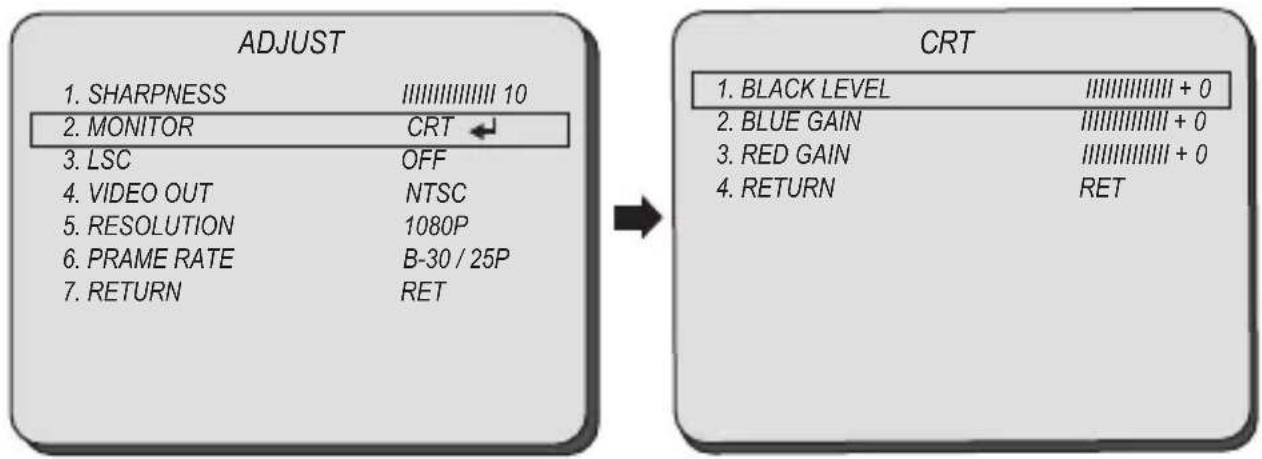
■ MONITOR: Choose the appropriate setting for your monitor.
You can select the monitor mode from LCD or CRT using the LEFT or RIGHT button.
- LCD: Select this menu item when using an LCD monitor.
- GAMMA: Select and adjust the gamma level.
- ADAPT. LEVEL: Adjust the adaption level.
- BLUE GAIN: Adjust the Blue gain level.
- RED GAIN: Adjust the Red gain level.
- CRT: Select this menu item when using an CRT monitor.
- BLACK: Adjust the contrast level.
- BLUE: Adjust the Blue gain level.
- RED: Adjust the Red gain level.
flowchart
graph LR
    A["ADJUST"] --> B["LCD"]
    A --> C["1. SHARPNESS III III III III III 10"]
    A --> D["2. MONITOR LCD ←"]
    A --> E["3. LSC OFF"]
    A --> F["4. VIDEO OUT NTSC"]
    A --> G["5. RESOLUTION 1080P"]
    A --> H["6. PRAME RATE B-30 / 25P"]
    A --> I["7. RETURN RET"]
    J["LCD"] --> K["1. GAMMA USER"]
    J --> L["2. ADAPT. LEVEL III III III III III 100"]
    J --> M["3. BLUE GAIN III III III III III 65"]
    J --> N["4. RED GAIN III III III III III 65"]
    J --> O["5. RETURN RET"]
flowchart
graph LR
    A["ADJUST"] --> B["CRT"]
    A --> C["1. SHARPNESS III III III III III 10"]
    A --> D["2. MONITOR CRT ←"]
    A --> E["3. LSC OFF"]
    A --> F["4. VIDEO OUT NTSC"]
    A --> G["5. RESOLUTION 1080P"]
    A --> H["6. PRAME RATE B-30 / 25P"]
    A --> I["7. RETURN RET"]
    B --> J["1. BLACK LEVEL III III III III III + 0"]
    B --> K["2. BLUE GAIN III III III III III + 0"]
    B --> L["3. RED GAIN III III III III III + 0"]
    B --> M["4. RETURN RET"]
Select ADJUST using the UP or DOWN button.
You can select the sub-menu from SHARPNESS, MONITOR, LSC, VIDEO. OUT, RECOLUTION, and FRAME RATE using the UP or DOWN button.
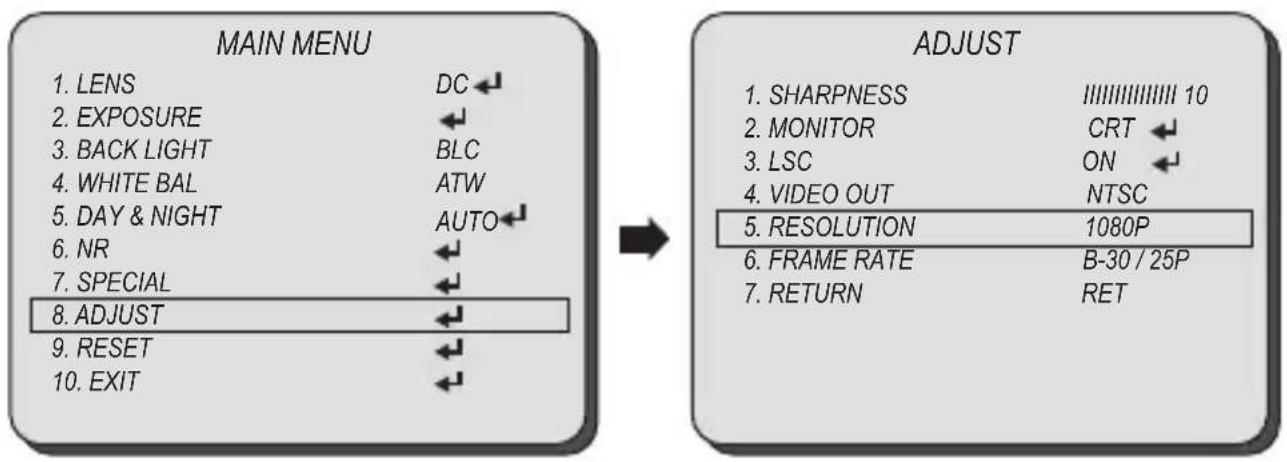
■ RESOLUTION: Select the resolution from 1080P or 720P.
You can select the RESOLUTION from 1080P and 720P using the LEFT or RIGHT button.
flowchart
graph LR
    A["MAIN MENU"] --> B["ADJUST"]
    A --> C["1. LENS DC ←"]
    A --> D["2. EXPOSURE ←"]
    A --> E["3. BACK LIGHT BLC"]
    A --> F["4. WHITE BAL ATW"]
    A --> G["5. DAY & NIGHT AUTO ←"]
    A --> H["6. NR ←"]
    A --> I["7. SPECIAL ←"]
    A --> J["8. ADJUST ←"]
    A --> K["9. RESET ←"]
    A --> L["10. EXIT ←"]
    B --> M["1. SHARPNESS III III III III 10"]
    B --> N["2. MONITOR CRT ←"]
    B --> O["3. LSC ON ←"]
    B --> P["4. VIDEO OUT NTSC"]
    B --> Q["5. RESOLUTION 1080P"]
    B --> R["6. FRAME RATE B-30 / 25P"]
    B --> S["7. RETURN RET"]
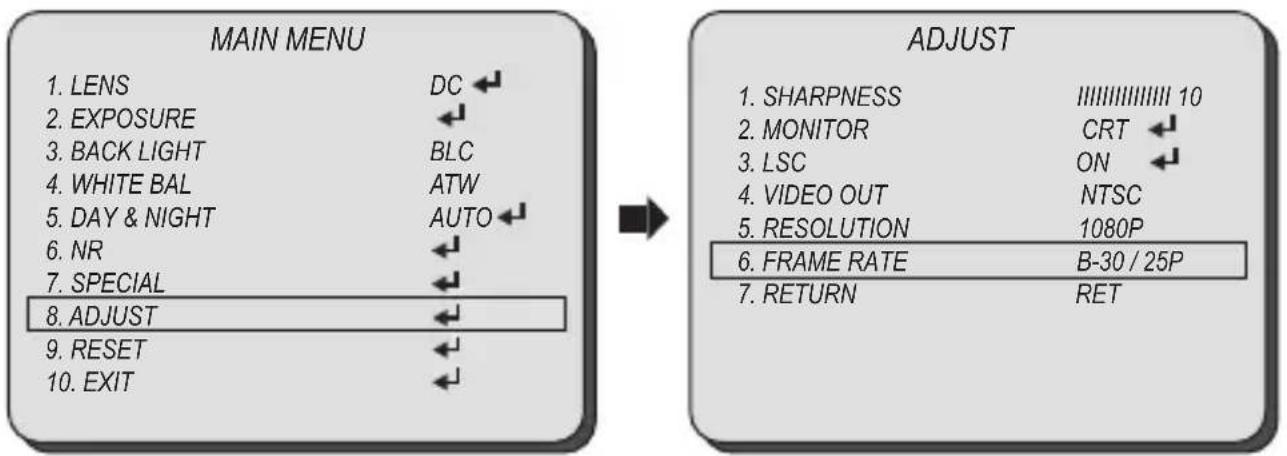
■ FRAME RATE: Select the frame rate.
● B-30/25P, A-30/25P, A-60/50P, 59.94I (RESOLUTION is set as 1080P)
You can select the FRAME RATE using the LEFT or RIGHT button.
● B-30/25P, 59.94P (RESOLUTION is set as 720P)
You can select the FRAME RATE using the LEFT or RIGHT button.
flowchart
graph LR
    A["MAIN MENU"] --> B["ADJUST"]
    A --> C["1. LENS DC ←"]
    A --> D["2. EXPOSURE ←"]
    A --> E["3. BACK LIGHT BLC"]
    A --> F["4. WHITE BAL ATW"]
    A --> G["5. DAY & NIGHT AUTO ←"]
    A --> H["6. NR ←"]
    A --> I["7. SPECIAL ←"]
    A --> J["8. ADJUST ←"]
    A --> K["9. RESET ←"]
    A --> L["10. EXIT ←"]
    B --> M["1. SHARPNESS III III III III III 10"]
    B --> N["2. MONITOR CRT ←"]
    B --> O["3. LSC ON ←"]
    B --> P["4. VIDEO OUT NTSC"]
    B --> Q["5. RESOLUTION 1080P"]
    B --> R["6. FRAME RATE B-30 / 25P"]
    B --> S["7. RETURN RET"]
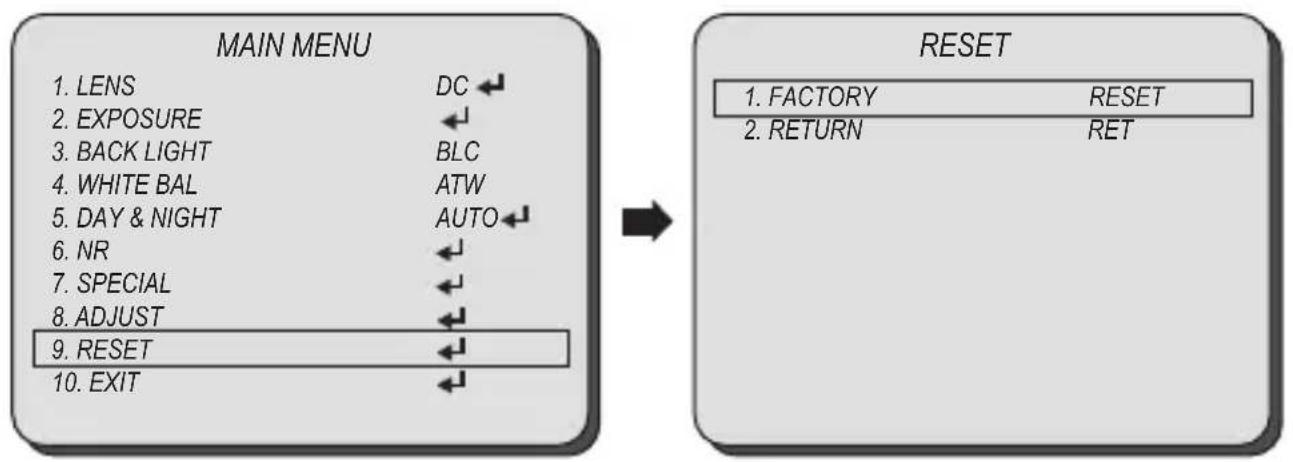
Select RESET using the UP or DOWN button.
■ RESET: Reset the camera settings to the factory defaults.
You can reset the camera setting using the SET button.
flowchart
graph LR
    A["MAIN MENU"] --> B["RESET"]
    A --> C["1. LENS DC ←"]
    A --> D["2. EXPOSURE ←"]
    A --> E["3. BACK LIGHT BLC"]
    A --> F["4. WHITE BAL ATW"]
    A --> G["5. DAY & NIGHT AUTO ←"]
    A --> H["6. NR ←"]
    A --> I["7. SPECIAL ←"]
    A --> J["8. ADJUST ←"]
    A --> K["9. RESET ←"]
    A --> L["10. EXIT ←"]
    B --> M["1. FACTORY RESET"]
    B --> N["2. RETURN RET"]
TROUBLE SHOOTING
| PROBLEM SOUTION | |
| Nothing appears on the screen. | ·Check that the power cord and line connection between the camera and monitor are properly connected.·Check that video cable is connected with the Analog BNC (Yellow).·When the camera's HD-SDI BNC output is directly connected to the monitor's BNC terminal: Make sure the monitor supports HD-SDI signal input.·When the camera's HD-SDI BNC output is connected to be DVR: Make sure the DVR supports HD-SDI signal input.·HD-SDI output is converted into other format such as DVI and VGA by using video converter: Make sure the converter's HD-SDI input format |
| The image on the screen is dim. | ·Is lens stained with dirt? Clean your lens with soft, clean cloth.·Set the monitor to the proper condition.·If the camera is exposed to very strong light, change the camera position.·Re-adjust the back- |
| The image on the screen is dim, when the LED is on. | ·Check if the LEDs are shaded and reflected by the camera ring, camera base, or other objects near the camera. |
| The LEDs are reflected over the dome or cover. | ·Check if the LEDs are shaded and reflected by the camera ring, camera base, or other objects near the camera. |
| The image on the screen is dark. | ·Adjust the contrast feature of the monitor.·If there is an intermediate device, set 75Ω properly; Check the termination. |
| The camera is not working properly, and the surface of the camera is hot. | ·Check that you have properly connected the camera to an appropriate power source. |
| The SENS-UP function does not work. | ·Check that AGC of EXPOSURE SETUP menu is 'OFF'. |
| The Motion Detection function does not work. | ·Check that MOTION DET of SPECIAL SETUP menus 'OFF'. |
| Color is not correct. Check the setting of WHITE BAL SETUP menu . | |
| The screen flickers continually. | ·Ensure the camera is not pointing towards the sun.·Is the camera framing the sun or other bright light source?·If there is an intermediate device, set 750Ω properly; Check the termination.·HD-SDI video may not appear to be normal if distance exceeds the maximum transferrable distance.·When a BNC cable adaptor is used to combine two or more BNC cables for distributed HD-SDI video transfer, make sure the impedance of the adaptor is 75Ω. Otherwise, it may cause shorter transfer distance or broken video transfer. |
HD


- Marshall
- OPERATION GUIDE
- MENU STRUCTURE
- OSD Joystick and Button
- Press SET button to access the MAIN MENU.
- ■ SHUTTER: You can adjust the shutter speed of the lens.
- EXPOSURE AGC
- EXPOSURE SENS-UP
- ■ BRIGHTNESS: Adjust the screen brightness.
- ■ D-WDR : DWDR(ACCE) illuminates darker areas of an image while retaining the same light level for brighter areas to even out the overall brightness of images with high contrast between bright and dark areas.
- BACKLIGHT BLC
- WHITE BALANCE
- DAY & NIGHT COLOR, B/W
- NR (Noise Reduction) 2 DNR, 3 DNR
- ■ CAM TITLE: If you enter a title, the title will appear on the monitor.
- D-EFFECT
- ■ RESOLUTION: Select the resolution from 1080P or 720P.
- ■ FRAME RATE: Select the frame rate.
- TROUBLE SHOOTING
- HD
Marke : MARSHALL
Modell : CV500-M2
Kategorie : Sicherheitskamera