
CRT182QB - Kühlschrank Crosley - Kostenlose Bedienungsanleitung
Finden Sie kostenlos die Bedienungsanleitung des Geräts CRT182QB Crosley als PDF.


| Produkttyp | Kühlschrank mit Gefrierfach |
| Marke | Crosley |
| Modell | CRT182QB |
| Abmessungen (ca.) | Siehe Installationsanleitung für genaue Maße |
| Kühlmittel | Nicht angegeben |
| Energieverbrauch | Nicht angegeben |
| Spannungsversorgung | Netzstecker an geerdete Steckdose |
| Wasseranschluss | Erforderlich für Eisbereiter; Kupferrohr 1/4 Zoll Außendurchmesser |
| Wasserdruck | 70–180 psi |
| Eisbereiter | Ja, mit Ein-/Ausschalter |
| Raumtemperaturbereich | 13°C bis 43°C |
| Freiraum Seiten & Oben | 38 Zoll (Hinweis: möglicherweise 3/8 Zoll) |
| Freiraum Hinten | 1 Zoll |
| Bodenanforderung | Ebener und tragfähiger Boden |
| Ausrichtung/Nivellierung | Seitlich waagerecht, vorne 1/4 Zoll höher als hinten |
| Türanschlag wechselbar | Ja (siehe Gebrauchsanleitung) |
| Sockelblende | Vorhanden, abnehmbar |
| Gemüsefach mit Feuchtigkeitsregler | Ja |
| Garantie | Nicht angegeben |
Häufig gestellte Fragen - CRT182QB Crosley
Benutzerfragen zu CRT182QB Crosley
0 Frage zu diesem Gerät. Beantworten Sie die, die Sie kennen, oder stellen Sie Ihre eigene.
Eine neue Frage zu diesem Gerät stellen
Laden Sie die Anleitung für Ihr Kühlschrank kostenlos im PDF-Format! Finden Sie Ihr Handbuch CRT182QB - Crosley und nehmen Sie Ihr elektronisches Gerät wieder in die Hand. Auf dieser Seite sind alle Dokumente veröffentlicht, die für die Verwendung Ihres Geräts notwendig sind. CRT182QB von der Marke Crosley.
BEDIENUNGSANLEITUNG CRT182QB Crosley

WARNING
To avoid electric shock, which can cause death or severe personal injury, do not connect your refrigerator to an electrical power source until you have completed Step 3 of these instructions.
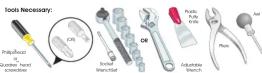
NOTE
These installation instructions are provided only as a possible customer option. We recommend that you use a service or kitchen contracting professional to install your refrigerator.

Prepare The Installation Site
Include these minimum guidelines in your site
- Choose a place near a grounded electrical outlet
- Do not use an extension cord or an adapter plug. - Avoid direct sunlight and close proximity to a range, dishwasher or other heat source.
• Floor should be level and able to support a fully loaded refrigerator.
Allow the following clearances for ease of installation, proper air circulation, and plumbing and electrical connections:
Sides & Top: 3/8 inch
Rear: 1 inch
NOTE
Information about cabinetry construction for your new appliance is available for contractors. Call 1-877-435-3287.
CAUTION
Room temperatures below 55°F (13°C) or above 110°F (43°C) will impair cooling ability of your refrigerator's compressor.

Transport Unpackaged Refrigerator To Site
By now, you have already removed your refrigerator's shipping carton. You may still need to use a hand truck to move it through close spaces of entrances. If the refrigerator is larger than an entrance, consider two options
- Remove the entrance door if one exists. - Remove the refrigerator doors (see how in your Use & Care Guide).
When using a hand truck:
- Load refrigerator from side of cabinet only.
- Do not run retaining straps over har
- Do not over-tighten retaining straps. - Never use refrigerator handles to move the refrigerator. - Remove tape from doors only after unit is in place.

CAUTION
Shifting the refrigerator from side to side may damage flooring.

Connect Water Supply
What you will need:
- Access to a cold water line with pressure of 70,180 psi
• Copper tubing with 1/4-inch (6.4mm) OD. Length for this tubing is the distance from the rear of the refrigerator to your household water supply line plus 7 feet (2.1 meters).
- A shut-off valve for the connection between your household water line and the refrigerator supply line. Do not use a self-piercing shut-off valve.
- A compression nut and ferrule (sleeve) for the water supply connection at the rear of your refrigerator.

CAUTION
To avoid property damage: - Use copper tubing for the water supply line (plastic tubing is more likely to leak). - Ensure water supply complies with local plumbing codes.
NOTE
Kit #53039117950, available from your dealer, provides all materials for a water supply installation, including 25 feet of copper tubing and full instructions.
To connect the water supply to the rear of your refrigerator:
1 Ensure that the refrigerator is not plugged in.
2 Flush the supply line until water is clear by placing the end of the copper tube in a sink or bucket and opening the shut-off valve.
3 Remove the plastic cap from the water valve inlet at the rear of your refrigerator. Discard the cap.
4 Slide the brass compression nut, then the ferrule (sleeve) onto copper tube.
5 Push the copper tube into water valve inlet as far as it will go (1/4 inch).
6 Slide the ferrule (sleeve) into valve and finger-tighten the compression nut onto valve. Tighten another half turn with a wrench. Do not over-tighten.
7 Secure the copper tube to your refrigerator's rear panel
with a steel clamp and screw (see illustration). 8 Coil the excess copper tubing (about 2½ turns) behind you
refrigerator as shown. Arrange coiled tubing to avoid vibration or wear against other surfaces. 9 Open water supply shut-off valve and tighten any connections that leak.

NOTE
- The ice maker's fill valve may operate noisily if the household water supply is shut off. - After ensuring no water leaks exist at any connection, be sure to check for leaks again in 24 hours.

Place In Permanent Position
If possible, use a hand truck to position the refrigerator directly in front of its cabinet enclosure. Be careful not to move the refrigerator beyond its water supply (copper tubing) connections. Plug in the power cord, and push the refrigerator straight back into place.

IMPORTANT
If you are installing your refrigerator without connecting it to a water supply, make sure the ice maker's power switch is turned Off (see the Use & Care Guide for more details).

(1) 2017年1月1日
d your
vibration or wear against other surfaces
vibration of wear ag
nnections that leak.
(1) 2017年1月1日 星期六、15:30分


Remove Internal Shipping Materials
We use packing foam and tape to secure the internal parts of your refrigerator for shipping. Once the refrigerator is in position, you can remove this material.


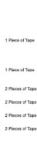
Location of these materials may vary depending on your model.

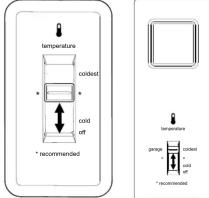
Controls
When changing controls, wait 24 hours before making additional adjustments.


Door Removal (if necessary)
If you need to remove the doors to get your refrigerator into the house, please see "Door Removal Instructions" in your Use S Care Manual.


Installation Checkoff List
Doors
- Handles are secure and tight - Door seals completely to cabinet on all sides - Freezer door is level across the top
Leveling
- Refrigerator is level, side to side and tilted 1/4'' (6mm) front to back
- Toe grille is properly attached to refrigerator
- Cabinet is setting solid on all corners
Electrical Power
□ House power turned on
□ Refrigerator plugged in
Ice Maker
□ House water supply connected to refrigerator
□ No water leaks present at all connections - recheck in 24 hours
□ Ice Malay is turned ON
□ Ice Maker is turned ON.
Final Checks
- Shipping material removed
- Fresh Food and Freezer controls set
- Crisper Humidity controls set
- Registration Card sent in
□ Crisper Humidity controls
□ Registration Card cont in


Marke : Crosley
Modell : CRT182QB
Kategorie : Kühlschrank