
M1 - Projektor INFOCUS - Kostenlose Bedienungsanleitung
Finden Sie kostenlos die Bedienungsanleitung des Geräts M1 INFOCUS als PDF.


| Produkttyp | Mini-Projektor (Pico-Projektor) |
| Marke | InFocus |
| Modell | M1 |
| Technologie | DLP |
| Auflösung | 854 x 480 (WVGA) |
| Helligkeit | 50 Lumen |
| Kontrastverhältnis | 1000:1 |
| Lichtquelle | LED (bis zu 20.000 Stunden) |
| Betriebsspannung | 100–240 V AC, 50/60 Hz |
| Stromverbrauch | ca. 12 W |
| Gewicht | ca. 0,54 kg |
| Abmessungen (B x T x H) | ca. 10 x 10 x 2,5 cm |
| Lautsprecher | Eingebauter Mono-Lautsprecher |
| Anschlüsse | HDMI, USB, AV-Eingang (3,5 mm) |
| Projektionsgröße | 15–100 Zoll |
| Projektionsentfernung | 0,5–3 m |
| Lebensdauer Lampe | bis zu 20.000 Stunden |
| Lampenwechsel | Siehe Bedienungsanleitung: Schritte zum Austausch |
| Betriebstemperatur | 5–35 °C |
| Lieferumfang | Projektor, Netzkabel, Tragetasche, Bedienungsanleitung |
| Entsorgung | Elektrogeräte nicht im Hausmüll entsorgen |
Häufig gestellte Fragen - M1 INFOCUS
Benutzerfragen zu M1 INFOCUS
0 Frage zu diesem Gerät. Beantworten Sie die, die Sie kennen, oder stellen Sie Ihre eigene.
Eine neue Frage zu diesem Gerät stellen
Laden Sie die Anleitung für Ihr Projektor kostenlos im PDF-Format! Finden Sie Ihr Handbuch M1 - INFOCUS und nehmen Sie Ihr elektronisches Gerät wieder in die Hand. Auf dieser Seite sind alle Dokumente veröffentlicht, die für die Verwendung Ihres Geräts notwendig sind. M1 von der Marke INFOCUS.
BEDIENUNGSANLEITUNG M1 INFOCUS
Replacing the Lamp

Before replacing the lamp, turn the power off, and unplug the power cord. Allow the projector to cool for 60 minutes.


natural_image
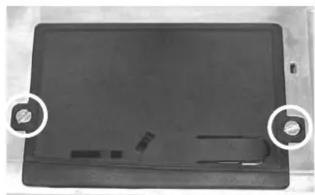
Black rectangular electronic device with two circular annotations pointing to the sides (no visible text or symbols)Loosen the two screws that fasten the lamp door to the bottom of the projector.

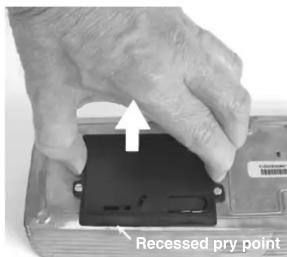
Insert a small bladed screw driver into the pry point and lift the lamp door off of the projector.

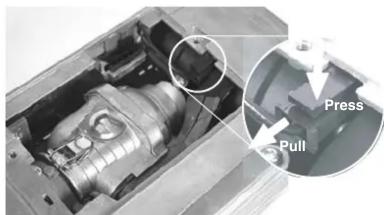
Disconnect the lamp power connector from its plug in the projector. To do this, press down on the latch on the top of the connector, while pulling the connector out of the plug.

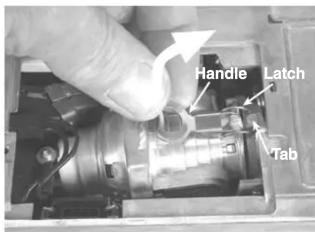
Lift the handle on the lamp to release the latch that holds the lamp in place. Then lift the latch off the tab inside the projector.

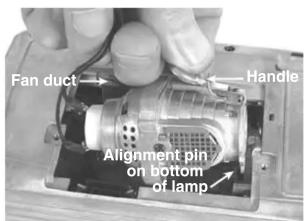
To remove the lamp, lift the handle upward and slightly back to disengage the alignment tab and fan ducting. If necessary, gently press down on the fan ducting.

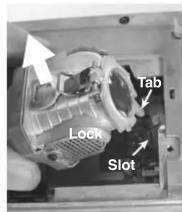
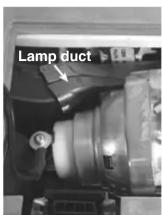
To install the lamp, first align the tab on the bottom of the lamp with the slot inside the projector. Then align the duct on the rear of the lamp with the duct inside the projector. Press the lamp into place.

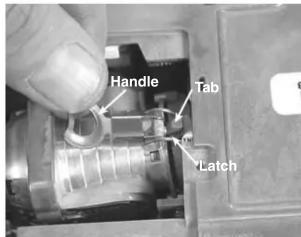
Place the latch over the tab in the projector. Make sure that the latch fully engages on the tab. Then press the handle down to lock the lamp in place.

natural_image
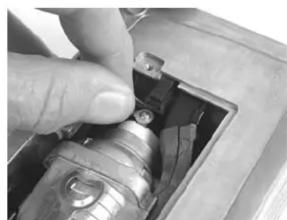
Close-up of a hand adjusting a mechanical component with a bolt (no visible text or symbols)Plug in the lamp power connector.


natural_image
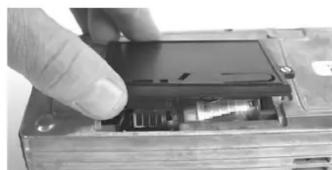
Close-up of a hand inserting a device into a circuit board (no visible text or symbols)Install the lamp door, making sure to align the connector on the lamp door with the connector inside the projector. Tighten the two screws. Plug in the power cord and turn on the projector. To reset the lamp timer, press and hold the Volume + and Volume - keys for 10 seconds.
Marke : INFOCUS
Modell : M1
Kategorie : Projektor