
LDS-4075 - Fernseher DENVER - Kostenlose Bedienungsanleitung
Finden Sie kostenlos die Bedienungsanleitung des Geräts LDS-4075 DENVER als PDF.


| Produkttyp | Smart TV |
| Marke | Denver |
| Modell | LDS-4075 |
| Bildschirmdiagonale | 100 cm (40 Zoll) |
| Auflösung | 1920 x 1080 (Full HD) |
| Empfang | DVB-T2/S2/C |
| Videocodec | H.265/HEVC |
| Smart-TV | Ja (Netflix, YouTube, Prime Video) |
| Anschlüsse | 2x HDMI (1x ARC), 2x USB, LAN (RJ45), CI-Slot, AV, Optischer Audioausgang, Kopfhörer |
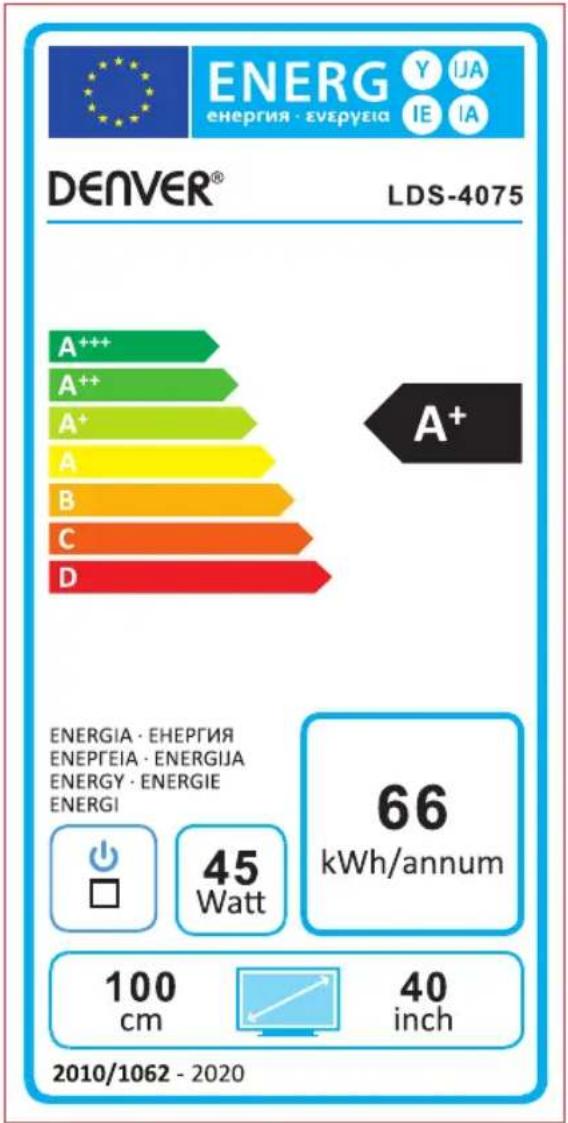
| Stromverbrauch (Betrieb) | 45 W |
| Stromverbrauch (Standby) | <0,5 W (typisch) |
| Jahresenergieverbrauch | 66 kWh |
| Energieeffizienzklasse | A+ |
| Gewicht (ca.) | 6,5 kg |
| Abmessungen (B x H x T) (ca.) | 90 x 55 x 20 cm (mit Fuß) |
| Wandmontage | VESA 200 x 200 mm |
| Fernbedienung | IR-Fernbedienung mit Direkttasten für Netflix, YouTube, Prime Video |
| Besonderheiten | Rocker-Taste am Gerät, Kindersicherung (V-Chip), HBBTV |
| Reinigung | Weiches, trockenes Tuch; keine Lösungsmittel |
| Reparierbarkeit | Keine vom Benutzer wartbaren Teile; Service nur durch qualifiziertes Personal |
Häufig gestellte Fragen - LDS-4075 DENVER
Benutzerfragen zu LDS-4075 DENVER
0 Frage zu diesem Gerät. Beantworten Sie die, die Sie kennen, oder stellen Sie Ihre eigene.
Eine neue Frage zu diesem Gerät stellen
Laden Sie die Anleitung für Ihr Fernseher kostenlos im PDF-Format! Finden Sie Ihr Handbuch LDS-4075 - DENVER und nehmen Sie Ihr elektronisches Gerät wieder in die Hand. Auf dieser Seite sind alle Dokumente veröffentlicht, die für die Verwendung Ihres Geräts notwendig sind. LDS-4075 von der Marke DENVER.
BEDIENUNGSANLEITUNG LDS-4075 DENVER
KTC 设计稿、样稿确认
(相同样稿以最新承认日期为准)
物料编号:
物料描述:40D1S Denver 英文 整机说明书(M2C1 欧洲 6683) F2007100
(148x210mm 28P)
设计申请人:____ 设计人:____
承认人:____ 承认日期:____
备注:封面,封底,内页70G双胶纸单黑印刷
贴膜:7372-2400D1-12322231
7372-2400D1-22000PI1
遥控器:7601-32P022-0244DNR1
40D1S 配BCCG-32A
2020.8.28修改倒数第二页内容
DENVER®
SMART TV with DVB-T2/S2/DVB-C and H.265/HEVC Support
Model: LDS-4075
natural_image
Blank whiteboard with two small metal clips at the bottom (no text or symbols)User's Guide
NOTE:
Read all of the instructions before using this TV and keep the instruction manual in a safe place for future reference.
Contents
| Safety Information | 1-3 |
| Product Introduction | 4 |
| Connections | 5 |
| Remote Control | 6-7 |
| Customizing TV Settings | 8-21 |
Safety Information
IMPORTANT SAFETY INSTRUCTIONS - READ CAREFULLY BEFORE USE.
Take note of the following safety information which appears on the back of the TV.

CAUTION TO PREVENT ELECTRICAL SHOCK, DO NOT REMOVE ANY COVER SCREWS, NO USER SERVICEABLE PARTS INSIDE, REFER SERVICING TO QUALIFIED SERVICE PERSONNEL.

This symbol indicates that there are important operating maintenance instructions in the literature accompanying this unit.

This symbol indicates that dangerous voltage constituting a risk of electric shock is present within this unit.
Keep these instructions
• Do not use this TV near water.
• Clean only with a slightly damp cloth.
• Do not block any ventilation openings.
• Install in accordance with the supplied Quick Start Guide and this User Guide.
- Protect the power chord from being walked on or pinched, particularly at plugs, and the point where it exits from the TV.
- Do not allow the power chord to overhang the edge of a table.
• Unplug this TV during lightening storms or when unused for long periods of time.

WARNING! TO REDUCE THE RISK OF FIRE OR ELECTRICAL SHOCK, DO NOT EXPOSE THIS TV TO RAIN OR MOISTURE. THE TV MUST NOT BE EXPOSED TO DRIPPING AND SPLASHING AND NO OBJECTS FILLED WITH LIQUIDS SHOULD BE PLACED ON THE TV.
NOTE: No naked flames such as candles should be placed on the TV.
IMPORTANT SAFETY INFORMATION (Continued)
This unit has been produced according to all current safety regulations. The following safety tips should safeguard users against careless use and the dangers connected with such use.
- Although this appliance has been carefully manufactured and rigorously checked prior leaving the factory, as with all electrical appliances it is possible for problems to develop. If you notice smoke, an excessive build up of heat or any other unexpected phenomena, you should disconnect the plug from the mains power socket immediately.
- Ensure that the unit is sufficiently ventilated! Never place next to or underneath curtains!
- The mains plug or appliance coupler is used as the disconnect device, the disconnect device shall remain readily operable.
- This set should only be connected to a mains power supply which matches that stated on the label on the rear of the TV – do not attempt to connect it to any other type of supply.
- The socket – outlet must be installed near the equipment and easily accessible.
- To prevent overload, don't share the same mains supply socket with too many other items of equipment.
- Apparatus with Class 1 construction shall be connected to a mains socket outlet with a protective earthing connection.
- Keep away from rodents. Rodents enjoy biting into electric flexes.
- Always hold the plug when pulling out the plug from the mains supply socket. Do not pull on the flex, the flex can become overloaded and cause a short circuit.
- Set up the unit so that no one is able to trip over the flex.
- Do not place heavy items on the flex, which may damage it.
- Take note that the flex cannot be reached and pulled by young children, avoiding injury.
- Do not set up the unit near to heat sources. The casing and the flex could be damaged by the impact of heat.
- The screen is made of plastic and can break if damage is done to it. Be careful when collecting sharp edged plastic splinters to avoid injury.
- Avoid placing the unit on any surfaces that may be subject to vibrations or shocks.
- To protect the unit during a thunderstorm unplug the AC power cable and disconnect the aerial. Caution: Do not touch the aerial (RF) connector.
- When you leave your home for long periods of time, unplug the AC power cable for safety reasons.
- The unit becomes warm when in operation. Do not place any covers or blankets on the unit in order to prevent overheating. The ventilation holes are not to be blocked. Do not set up near radiators. Do not place in direct sunshine. When placing on a shelf leave 5 cm (2") free space around the whole unit.
- Do not allow water or moisture to enter the TV. Do NOT use in wet or moist areas such as Bathrooms, steamy kitchens or near swimming pools.
- Do not use this unit when moisture condensation may occur
- Any repairs must be carried out by qualified personnel only.
- Do not open this unit. A non-expert attempting to repair the unit could be dangerous and potentially cause a fire hazard.
Safety Information
IMPORTANT SAFETY INFORMATION (continued)
- Liquids spilt into the unit can cause serious damage. Switch the set OFF and disconnect the mains power supply, then consult a qualified service person before attempting to use the unit again.
- Do NOT remove the safety covers. There are no useable or serviceable parts inside. You may invalidate the warranty. Qualified personnel must only service this apparatus.
- Do NOT tap or shake the screen, you may damage the internal circuits. Take good care of the remote control, do not drop.
- Never place hot objects or open flame sources on or close to the TV.
• High temperatures can melt plastic and lead to fires. - To clean the TV use a soft dry cloth. Do NOT use solvents or petrol based fluids. For stubborn stains, you may use a damp cloth with dilute detergent.
Headphone Warning
Loud music can damage your hearing irreversibly, therefore do not set the volume to a high level when listening through headphones, particularly for lengthy listening periods.
Where to install
Locate the television away from direct sunlight and strong lights, soft indirect lighting is recommended for comfortable viewing. Use curtains or blinds to prevent direct sunlight falling on the screen. Place the TV on a sturdy platform of which the surface should be flat and steady. This will prevent it from falling over.
Make sure the television is located in a position where it cannot be pushed or hit by objects, as pressure will break or damage the screen, and so that small objects cannot be inserted into the ventilation slots or openings in the cabinet.
Smell/odor from TV
New televisions may produce an unusual smell or odor when first turned on.
Due to the manufacturing process of components, televisions and other electronic products can have parts that may produce a smell after the product is first turned on and warms up. The smell will usually dissipate within a few days of use and does not return.
This is normal and occurs with many electronic products. Please ensure there is sufficient ventilation around the TV and in the room and the odor will dissipate.
Product Introduction
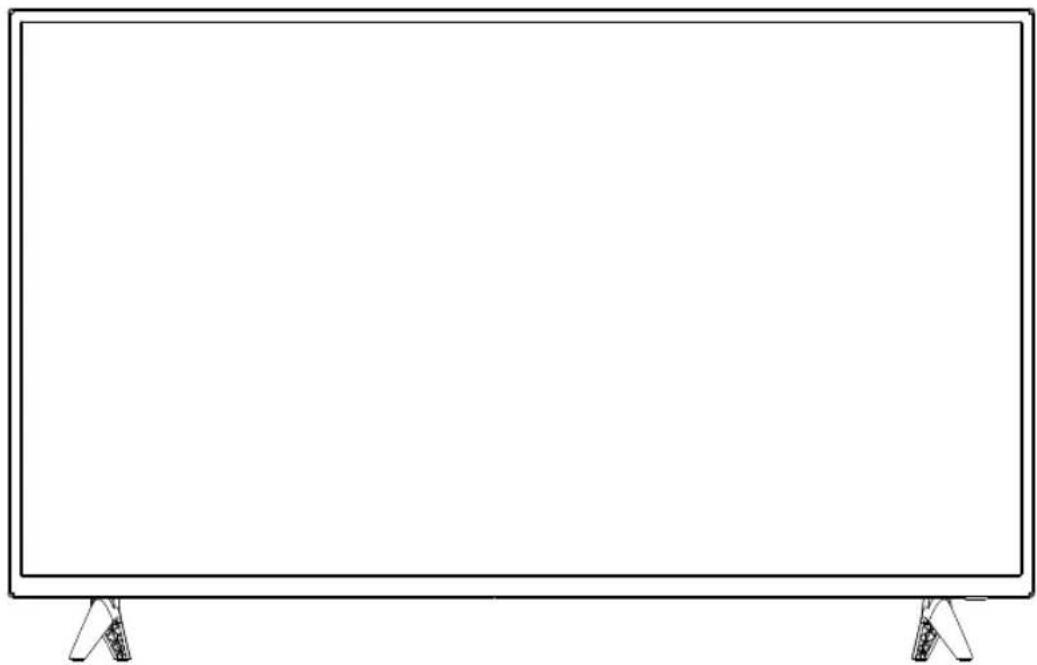
Front View

- Power LED indicator and remote receiving window.
- Rocker button combination key:
Power on or standby with OK rocker:
①. When Plugged power cord into the electrical socket, you can press OK rocker to turn on the TV.
②. In power on state, press OK rocker to display the function menu, then move rocker Left/Right to select ⏻ and press OK rocker to switch to standby mode.
After turn on the TV, Press OK Rocker:
①. In non-OSD menu operation, press OK rocker to display the function menu which includes 4 sorts.
②. During the menu operation, press OK rocker to confirm the operation and the function is the same as [OK] key on the remote control.
Move rocker Left/Right:
①. In non-OSD menu operation, move rocker Left/Right to decrease/increase the volume, the function is the same as [VOL-]/[VOL+] key on the remote control.
②. In OSD menu operation, move rocker Left/Right to adjust the analog value of selected item, the function is the same as [◀]/[▶] key on the remote control.
Move rocker Up/Down:
①. In non-OSD menu operation, move rocker Up/Down to select the channel, the function is the same as [CH^]/[CH] key on the remote control.
②. In OSD menu operation, move rocker Up/Down to select the adjustment items, the function is the same as [▲]/[▼] key on the remote control.
Note: Different models may have different appearances; please refer to the actual device.
Connections
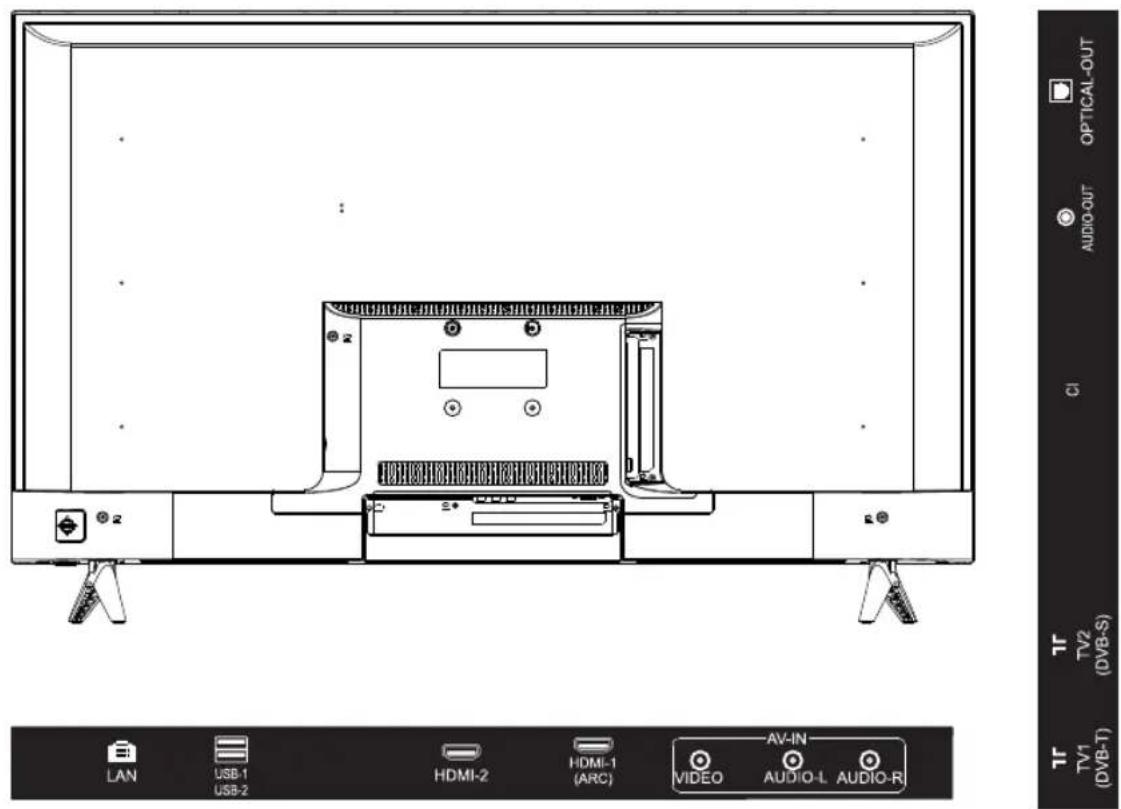
LAN(RJ45): RJ45 plug for connecting to external modem or network access equipment.
HDMI: Connect DVD/Blu-ray player or other equipment.
TV2(DVB-S) : Connect a Satellite signal.
TV1 (DVB-T) : To connect to the aerial socket on the wall with the RF coaxial cable.
Common Interface: CI slot.
AV: Connect it to the audio & video output terminal of DVD.
USB: Connect to USB device for multimedia.
Audio out : connect it to other audio equipment.
OPTICAL-OUT : Connect it to an external digital audio device
Remote Control
The remote control is using Infra-Red(IR). Point it towards the front of the LED TV. The remote control may not work correctly if it is operated out of range or out of angle.

☐ : Turn on or turn off the TV (standby mode).
OK: Mute the sound. Press again to restore the sound.
Number Button : Use with the 0-9 buttons to select digital channels.
LIST : Display or cancel channel list
ASPECT: select a aspect of picture
Youtube : Accesses the "YouTube" online service.
Source : Displays and selects the input source.
Prime Video : Accesses the "Prime Video" online service.
Netflix : Accesses the "Netflix" online service.
: Displays or cancel the home page.
□□ : Display or cancel the setting menu.
◀ ▲ ▼ ▶: To navigate up, down, left or right.
OK : To confirm a selection or setting.
: To switch back to the previous channel you selected. To close a menu without changing a setting.
EXIT : To exit the menu or a smart function. The last selected input source is displayed
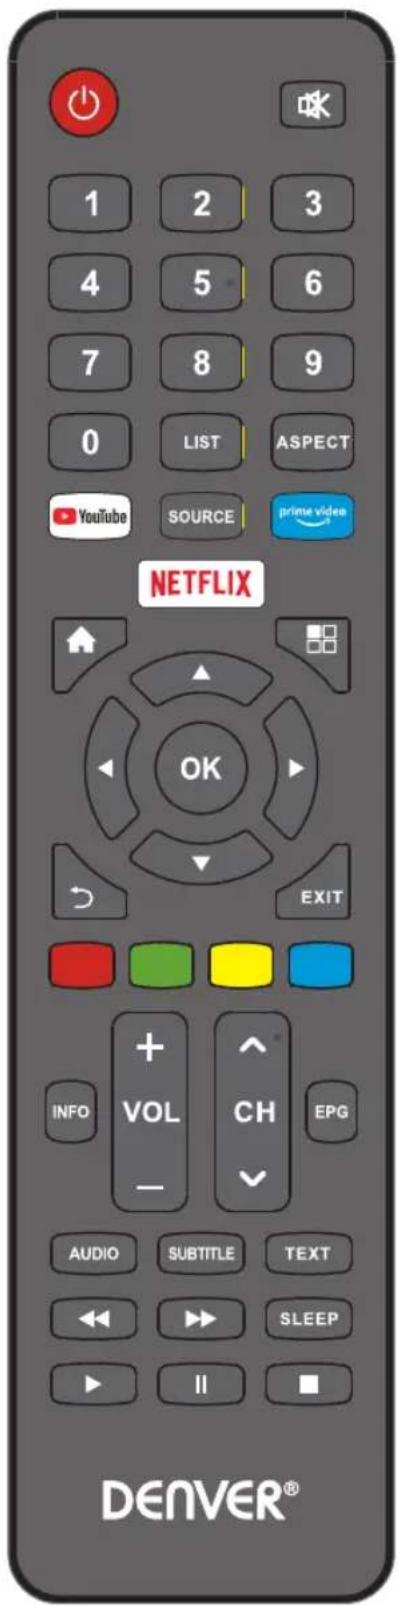
Colour keys: The buttons function follow the on-screen instructions.
Info : To open or close programme infomation.
VOL + - : To adjust the volume level.
CH^v: To switch to the next or previous channel in the channel list.
EPG : To open or close the TV Guide.
Audio : To switch the available sound-track in TV mode.
Subtitle: To switch the subtitles on/off, select a subtitle.
TEXT : To open or close Text / Teletext in DTV mode.
SLEEP: To set automatic sleep time.
◀: Previous programme
▶▶ : Next programme
▶ : To playback
II : To pause playback
■ : To stop playback
Customizing TV Settings
Turning On/Off Your TV
- Connect the power cord to the power socket after you have completed all the physical connections. At this stage, the TV will enter Standby Mode and the red LED indicator will illuminate.
- In Standby Mode, press the ⏻ button on the main unit or on the remote control to turn the TV on. The red LED indicator will turn.

The POWER button on the main unit or on the remote control can only switch the TV into standby. To completely turn off the TV, please disconnect the power cord from the power socket.
Initial Setup
LANGUAGE SETTINGS
Confirm your language setting
Deutsch
√ English
Español
Français
Polski
Português
Русский
- The first time you turn the TV on, it will go into the Setup Wizard.
1
Data collection and firmware updates notice
2
End-User License Agreement
Accept
√ View additional details
COUNTRY SETTINGS
Confirm your country settings
√ Germany
Russia
Algeria
Pakistan
India
Egypt
Thailand
Singapore
Malaysia
4
TIMEZONE SETTINGS
Confirm your timezone settings
√ Canary GMT
Lisbon GMT
Dublin GMT
London GMT
Accra GMT
Amsterdam GMT+1
Beograd GMT+1
Berlin GMT+1
Bratislava GMT+1
3
Customizing TV Settings
Initial Setup
5
TV MODE SETTINGS
Confirm your TV mode settings
√ Home Store
GET CONNECTED
Connect your SmartTV to the internet to enjoy great services like Netflix to watch TV shows and movies.
√ Wired Wifi Skip
6
PROGRAMME TUNING
Select programme tuning modes
√ DVBT DVBC DVBS Skip
- If channels cannot be found, this frame will be displayed automatically.
Customizing TV Settings
Source
DTV ATV HDMI1 HDMI2 AV
- Press SOURCE on the remote control or on the main unit to display the source menu, then use the Arrow buttons to cycle among the different input sources: DTV/ATV/HDMI1 / HDMI2/AV, then use the Arrow buttons to highlight the desired source and press OK to confirm.
Channel Selection
- Press the CH^/CH∨ buttons on the main unit or on the remote control repeatedly to select the channel.
- Press the 0-9 buttons on the remote control to select the channel directly.

Press "4", and then press OK button to select channel 4.
Press "4" and "5", and then press OK button to select channel 45.
Press "1", "2" and "3", and then press OK button to select channel 123.
Volume Adjustment
- Press the VOL-/+ buttons on the main unit or on the remote control to adjust the volume.
- If you wish to switch the sound off, press the Ⓧ MUTE button, and press again or the VOL+ button to resume the sound.
Customizing TV Settings
Streaming
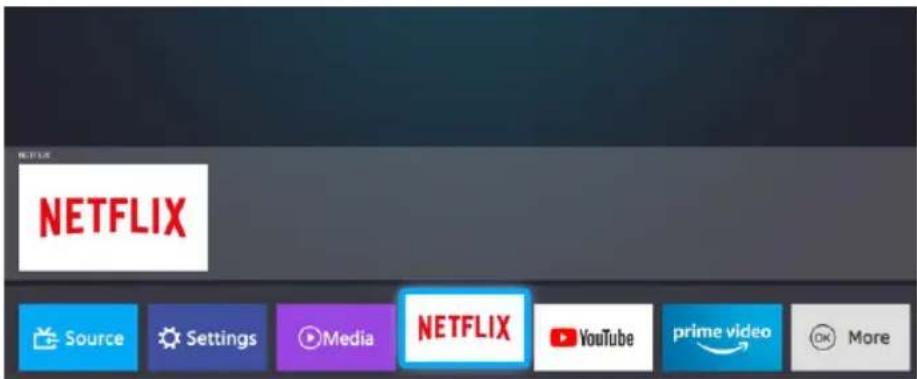
- Press ⬆ button on the remote to display the main interface. Then use the Arrow buttons to select apps and press OK to enter. Use the Arrow buttons to select the desired APP and press OK button to view. Or press the hotkey on the remote control to enter the desired APP directly.
| NETFLIX | Accesses the “Netflix” online service. |
| YouTube | Accesses the “YouTube”online service. |
| Prime Video | Accesses the “Prime Video”online service. |
| Facebook is an American online social media and social networking service company based in Menlo Park, California. | |
| Twitter is an online news and social networking service on which users post and interact with messages known as "tweets". | |
| SMART TV APPS | As one of the pioneers of Smart TV, NetRange is the leading global provider of white labeled, turnkey Smart TV and OTT ecosystems. |
Customizing TV Settings
Media
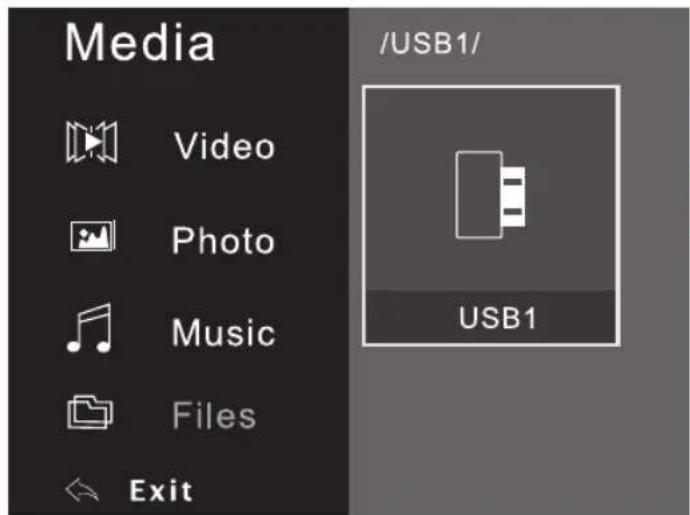
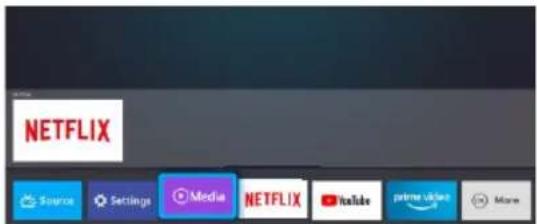
- Press ⬆ button to display the main interface, then use the Arrow buttons to highlight MEDIA and press OK to confirm. Select among Photo, Music and Video to view what you like.
Note: Portable drives should be inserted before entering MEDIA menu.
Viewing Photos
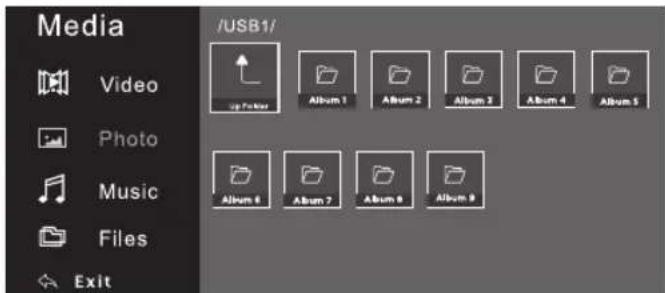
- Use the Arrow buttons to highlight the PHOTO option and press OK, then it will jump to confirm the inserted drive, press OK to enter. After entering PHOTO, use the Arrow buttons to select the picture file and press OK to enter.
natural_image
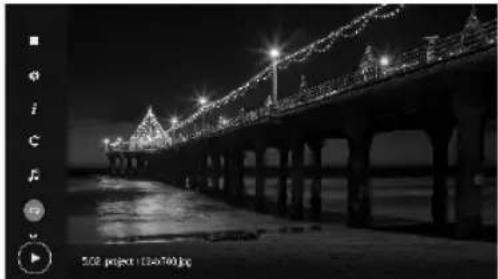
Nighttime black-and-white photo of a long illuminated suspension bridge over water, with no visible text or symbols.- After entering the picture file, use the Arrow buttons to select the desired picture, then press the ▶ to display. When the picture is playing, the picture Function Bar will be displayed. Use the Arrow buttons to select the desired function available on the bar.
Customizing TV Settings
Listening To Music
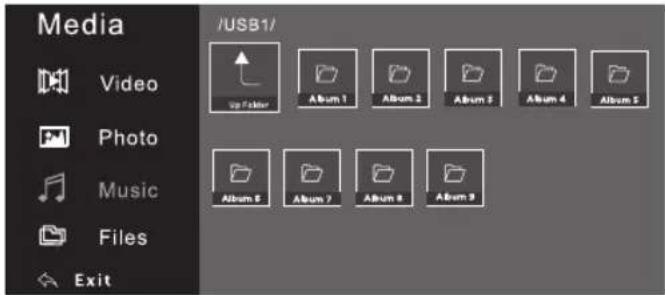
- Use the Arrow buttons to highlight the MUSIC option and press OK, then it will jump to confirm the inserted drive, press OK to enter. After entering MUSIC, use the Arrow buttons to select the audio file and press OK to enter.
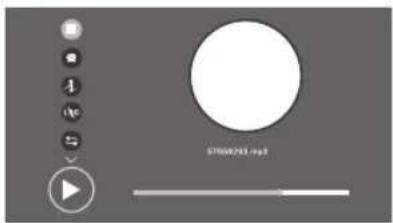
- After entering the audio file, use the Arrow buttons to select the desired music, then press the ▶ to display. When the music is playing, the music Function Bar will be displayed. Use the Arrow buttons to select the desired function available on the bar.
Watching Videos
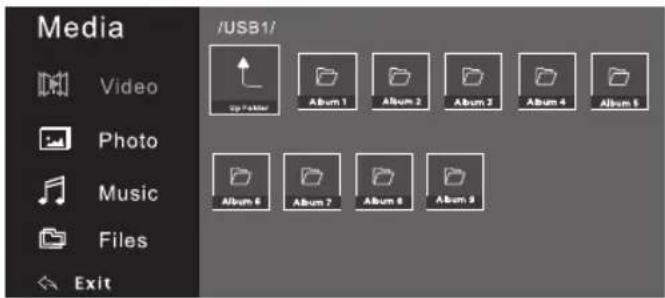
- Use the Arrow buttons to highlight the VIDEO option and press OK, then it will jump to confirm the inserted drive, press OK to enter. After entering VIDEO, use the Arrow buttons to select the video file and press OK to enter.
natural_image
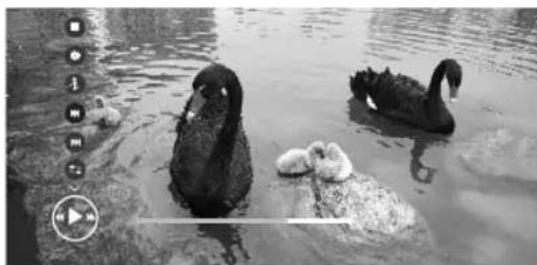
Black-and-white photo of two swans on water, one with wings and one with a gull, no visible text or symbols- After entering the video file, use the Arrow buttons to select the desire video, then press the ▶ to display. When the video is playing, the video function bar will be displayed. Use the Arrow buttons to select the desired function available on the bar.
Customizing TV Settings
TV Settings
Setting

Channel

Picture

Sound

Network

System

Lock

Timer

Support


Enter


Back
- Press the ☐ button on the main unit or on the remote control to display the main Setting. Then use the Arrow buttons to highlight TV Settings and press OK to enter. Then use the Arrow buttons to cycle among the following options and select the desired one to enter.
Customizing TV Settings
General
System
Setting/
| Language | English |
| Subtitle | Off |
| Subtitle Hearing Impaired | Off |
| Audio Language | |
| Subtitle Language | |
| HBBTV | On |
| Country | Germany |
| WOW | Off |
| HDMI_CEC | On |
| Environment | HOME |
| Restore Factory Default Settings | |
- Press ☐ to display the main Setting, then use the Arrow buttons to highlight TV Settings and press OK to confirm. Use the Arrow buttons to cycle among different options and select System to enter and adjust each option setting.
| Language | Select your preferred On Screen Display language. |
| Subtitle | Switch the Subtitle function on or off. |
| Subtitle Hearing Impaired | When hearing Impaired is ON, the TV screen will give some information to the people whose hearing are impaired. |
| Audio Language | Select your preferred audio language. (Available for digital channels if multiple audio languages are broadcasted.) |
| Subtitle Language | Select your preferred subtitle Language. (Available for digital channels if multiple subtitle languages are broadcasted.) |
| HBBTV | Switch the HBBTV function On or Off. |
| Country | Select your country |
| WOW | WOW allows remote systems to wake up the sleeping TV by sending a frame of a specific format which the client anticipates. |
| HDMI_CEC | The HDMI CEC system can be used only with devices that have the HDMI CEC feature. You must connect an HDMI CEC device using an HDMI cable. |
| Environment | You can select Home or Store for the TV environment. It is recommended to set the TV to Home Mode. |
| Restore Factory Default Settings | Restore the system setting to the factory default. When the restore is complete, the TV will enter standby mode. |
Customizing TV Settings
Picture Settings
Picture
Setting/
| Picture Mode | Standard |
| Color Temperature | Nature |
| Aspect Ratio | Auto |
| Noise Reduction | Middle |
- Press ☐ to display the main setting, then use the Arrow buttons to highlight TV Settings and press OK to confirm. Use the Arrow buttons to cycle among different options and select Picture to enter and adjust each option setting.
| Picture Mode | Select the type of picture which best corresponds to your viewing requirements. More detailed parameters can be adjusted when the picture mode is set to User. |
| Color Temperature | Select the color temperature of the picture. |
| Aspect Ratio | You can select the picture size which best corresponds to your viewing requirements. |
| Noise Reduction | Reduces screen noise without compromising video quality. |
Customizing TV Settings
Audio Settings
| Sound Setting/ | |
| Sound Mode | Standard |
| Surround Sound | Off |
| SPDIF Mode | PCM |
| AD Switch | Off |
| AD Volume | 35 |
| Audio Type | Normal |
| Audio Delay | |
- Press ☐ to display the main setting, then use the Arrow buttons to highlight TV Settings and press OK to confirm. Use the Arrow buttons to cycle among different options and select Sound to enter and adjust each option setting.
| Sound Mode | You can select a sound mode to suit your personal preferences. Five-stage equalization sound can be adjusted when the sound mode is set to User. |
| Surround Sound | Switch the Surround Sound function On or Off.. |
| SPDIF Mode | SPDIF provides digital audio output to speakers and various digital devices such as A/V Receivers and Home Theaters. |
| AD Switch | This is an auxiliary audio function which handles the Audio Stream for the AD (Audio Description),when it is sent along with the Main audio from the broadcaster. |
| AD Volume | The AD Volume can be adjusted here. |
| Audio Type | You can set the audio mode type. |
| Audio Delay | Correct audio-video sync problems, when watching DTV and when listening to digital audio output using an external device such as an audio receiver (0ms-250ms). |
Network Settings
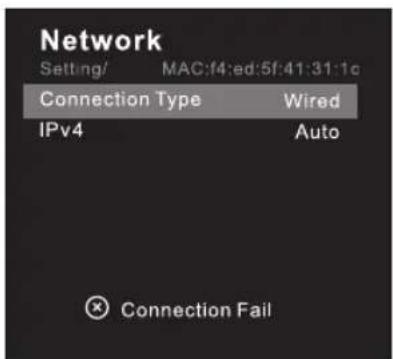
- Press ☐ to display the main setting, use the Arrow buttons to highlight TV SETTINGS and press OK to confirm. Then Use the Arrow buttons to select Network to enter and adjust each option setting.
| Connection Type | You can set up your TV so that it can access the Internet through your local area network (LAN) using a wired or wireless connection. |
| IPv4 | Wired network config of IPV4, to set the IP Address, Subnet Mask, Gateway and DNS manually or automatically. |
Customizing TV Settings
Channel Settings
| ChannelSetting/ | |
| Antenna Type | DVBT |
| Auto Tuning | |
| DTV Manual Tuning | |
| ATV Manual Tuning | |
| Programme Edit | |
| Signal Information | |
| Software Update (OAD) | On |
Press ☐ to display the main setting, then use the Arrow buttons to highlight TV Settings. Use the Arrow buttons to cycle among different options and select Channel to enter and adjust each option setting.
| Antenna Type | Selecting an antenna source. |
| Auto Tuning | Press [OK] button then select search to start Auto Tuning. The TV will begin memorizing all of the available channels. |
| DTV Manual Tuning | Manual store for digital channels. When a channel is found, the channel will be saved with current channel number. |
| ATV Manual Tuning | Manual store for ATV channels. |
| Programme Edit | Channallist for Edit including skip and set favorite channel. |
| Signal Information | Display the current Signal information. |
| Software Update (OAD) | You can set the switch for OAD upgrade, when the system needs to be upgraded through OAD, it needs to be set to on. |
Customizing TV Settings
Time Settings
| Timer Setting/ | |
| Auto Sync. | On |
| Time Zone | Berlin GMT+1 |
| Clock | 19:47 |
| Sleep Timer | Off |
| OSD Time | 15 Seconds |
| Auto Sleep | 2 Hours |
| No Signal Power Off | On |
- Press ☐ to display the main setting, then use the Arrow buttons to highlight TV Settings and press OK to confirm. Use the Arrow buttons to cycle among different options and select Timer to enter and adjust each option setting.
| Auto Sync. | If set it to On, the TV will sync the local clock according to the DTV broadcasting time automatically. |
| Time Zone | Select your time zone. |
| Clock | Set the TV clock manually. |
| Sleep Timer | Sleep Timer switches the TV to standby after a defined period of time. To cancel the Sleep Timer, set to Off. |
| OSD Time | OSD time setting menu disappears time. To cancel the OSD time, set to Always. |
| Auto Sleep | Select the Auto Sleep time as you want , The TV will enter into standby mode automatically when there is no operation in set time. |
| No Signal Power Off | When set to On, if there's no TV signal nor press-button operation ,the TV will enter standby status automatically about 5 minutes later. |
Customizing TV Settings
Lock Settings
| LockSetting/ | |
| Lock System | On |
| Set Password | |
| Block Programme | |
| Parent Lock | Off |
- Press ☐ to display the main setting, then use the Arrow buttons to highlight TV Settings. Use the Arrow buttons to cycle among different options and select Lock to enter and adjust each option setting.
Note: the default password is "0000".
| Lock System | 4-dight password can prevent unauthorized access of this TV set. |
| Set Password | You can set your private password. Press the number buttons on the remote control to set the new password. |
| Block Programme | Press the yellow button to lock or unlock the available program as you want. |
| Parent Lock | Set Content Rating limit & prevent your kids from watching any such programmes |
Customizing TV Settings
Motion Picture Association of America (MPAA) Rating System
| Grade | Meaning | |
| G | General Audiences | Content not offensive to most viewers. |
| PG | Parental Guidance Suggested | Content is such that parents may not want their children to view the program. |
| PG-13 | Parents Strongly Cautioned | Program is inappropriate for pre-teens, with a greater degree of offensive material suggested than a PG rated program. |
| R | Restricted | Not for children under 17, strong element of sex and/or violence. |
| NC-17 | No children under age 17 | Not for children under 17 under any circumstances. Strong sexual content. |
| X | Hard Core Films | Same as NC-17 rating. |
| No Rating | No Rating | MPAA Not Rated |
TV Parental Guideline Rating System
| Grade | Meaning | |
| TV-Y | All Children | Content not offensive to most viewers. |
| TV-Y7 | Directed to Older Children | Considered suitable for children over 7, may contain fantasy violence scenes. |
| TV-G | General Audience | Considered suitable for all audience; children may watch unattended. |
| TV-PG | Parental Guidance Suggested | Suggested unsuitable for younger children, may contain suggestive language, bad language, sex and violence scenes. |
| TV-14 | Parents Strongly Cautioned | unsuitable for children under 14, may contain strong language, bad language, sex and violence scenes. |
| TV-MA | Mature Audience Only | Adults only, may contain strong language, bad language, sex and violence scenes. |
Canadian Rating:
• Canadian English is used throughout all English-speaking Canada (C, C8+, G, PG, 14+, 18+).
• Canadian French is used in Quebec (G,8 ans+, 13 ans+,16 ans+, 18 ans+).

The V-Chip will automatically block certain categories that are "more restrictive". If you block TV-Y category, then TV-Y7 will be automatically blocked. Similarly, if you block TV-G category, then all the categories in the "young adult" will be blocked (TV-G, TV-PG, TV-14, and TV-MA).
Please notice - All products are subject to change without any notice. We take reservations for errors and omissions in the manual.
ALL RIGHTS RESERVED, COPYRIGHT DENVER ELECTRONICS A/S
DENVER®
www.denver-electronics.com

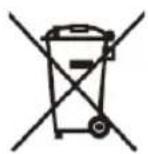

Electric and electronic equipment and included batteries contains materials, components and substances that can be hazardous to your health and the environment, if the waste material (discarded electric and electronic equipment and batteries) is not handled correctly.
Electric and electronic equipment and batteries is marked with the crossed out trash can symbol, seen above. This symbol signifies that electric and electronic equipment and batteries should not be disposed of with other household waste, but should be disposed of separately.
As the end user it is important that you submit your used batteries to the appropriate and designated facility. In this manner you make sure that the batteries are recycled in accordance with legislature and will not harm the environment.
All cities have established collection points, where electric and electronic equipment and batteries can either be submitted free of charge at recycling stations and other collection sites, or be collected from the households. Additional information is available at the technical department of your city.
Hereby, Inter Sales A/S declares that the radio equipment type LDS-4075 is in compliance with Directive 2014/53/EU. The full text of the EU declaration of conformity is available at the following internet address: www.denver-electronics.com and then click the search ICON on topline of website. Write model number: LDS-4075. Now enter product page, and red directive is found under downloads/other downloads.
Operating Frequency Range: (VHF)174\~230MHz ; (UHF)474\~862MHz.
Max Output Power: 55W
DENVER ELECTRONICS A/S
Omega 5A, Soeften
DK-8382 Hinnerup
Denmark
www.facebook.com/denverelectronics




- KTC 设计稿、样稿确认
- DENVER®
- SMART TV with DVB-T2/S2/DVB-C and H.265/HEVC Support
- User's Guide
- Safety Information
- Keep these instructions
- IMPORTANT SAFETY INFORMATION (Continued)
- Headphone Warning
- Where to install
- Smell/odor from TV
- Product Introduction
- Front View
- Connections
- Remote Control
- Customizing TV Settings
- Turning On/Off Your TV
- Initial Setup
- LANGUAGE SETTINGS
- 1
- Data collection and firmware updates notice
- 2
- COUNTRY SETTINGS
- 4
- TIMEZONE SETTINGS
- 3
- 5
- TV MODE SETTINGS
- GET CONNECTED
- 6
- PROGRAMME TUNING
- Source
- DTV ATV HDMI1 HDMI2 AV
- Channel Selection
- Volume Adjustment
- Streaming
- Media
- Viewing Photos
- Listening To Music
- Watching Videos
- TV Settings
- Setting
- General
- Picture Settings
- Audio Settings
- Network Settings
- Channel Settings
- Time Settings
- Lock Settings
- Canadian Rating:
Marke : DENVER
Modell : LDS-4075
Kategorie : Fernseher