91ST - Motorrad YS - Kostenlose Bedienungsanleitung
Finden Sie kostenlos die Bedienungsanleitung des Geräts 91ST YS als PDF.


Benutzerfragen zu 91ST YS
0 Frage zu diesem Gerät. Beantworten Sie die, die Sie kennen, oder stellen Sie Ihre eigene.
Eine neue Frage zu diesem Gerät stellen
Laden Sie die Anleitung für Ihr Motorrad kostenlos im PDF-Format! Finden Sie Ihr Handbuch 91ST - YS und nehmen Sie Ihr elektronisches Gerät wieder in die Hand. Auf dieser Seite sind alle Dokumente veröffentlicht, die für die Verwendung Ihres Geräts notwendig sind. 91ST von der Marke YS.
BEDIENUNGSANLEITUNG 91ST YS
OPERATOR'S MANUAL
91ST (Helicopter Engine)
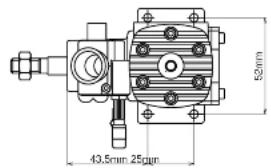
Fig.1
text_image
43.5mm 25mm 52mmSPECIFICATIONS
| Bore 27.7mm |
| Stroke 24.8mm |
| Displacement 14.95cc |
| Weight 540g |
| Practical rpm 2,000 ~17,000 |
text_image
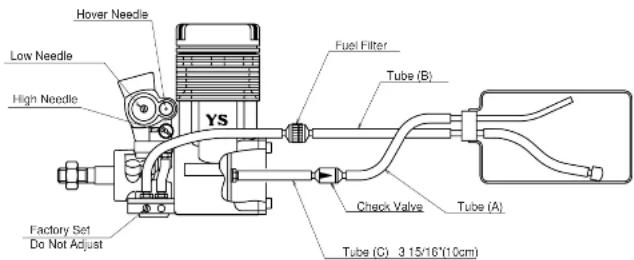
Hover Needle Low Needle High Needle YS Fuel Filter Tube (B) Check Valve Tube (A) Factory Set Do Not Adjust Tube (C): 3.15/16"110cmFEATURES
The 91ST is the latest in helicopter engine technology from YS. It is a bored and stroked version of our popular YS61ST-2 which has been optimized to provide the ultimate in reliable horsepower for your helicopter.
• New large bore cylinder design for superior operation.
- New carburetor design for easier adjustments.
- Same physical size as 61ST-2,80ST making it easy to add more power to your helicopter.
CAUTION
Using gear ratios higher than 9.0 to 1 may result in engine damage from overspeed.
GEAR RATIO
You should be using an engine to main rotor gear ratio of 1-7.5 to 1-8.0. Please check with your helicopter manufacturer to obtain the correct gear ratio.
INSTALLATION
-
The fuel lines should be connected to the fuel tank as shown in the above figure. Be careful to install the check valve in the correct direction. Since the tank is exposed to high pressures, be sure that all connections are tight to prevent pressures leakage.
-
Since the engine is sensitive to dirt in the fuel, a fuel filter must be used. (We recommend the 6720 fuel filter.)
- Tube(C) should be set exactly at 3 15/16" or (10cm) between the engine and check valve. DO NOT use any other type of check valve. The check valve is designed exclusively for the 91ST.
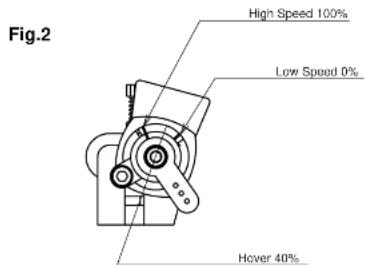
- Adjust your throttle linkage and curve using the alignment indentations on the carburetor body located on the throttle arm side of the carb body. PLEASE NOTE that the hover position is at 40% see FIG 2.
START UP
- Always remove Tube(A) at the check valve first before fueling. The fuel tank is pressurized and you need to relieve the pressure first. Disconnected Tube-b at the filter and fill the tank. Recconnect Tube(A) and (B)
- From the fully closed (clockwise) position, turn the needle valves counter clockwise as follows.
STARTING SETTINGS / OPERATING SETTINGS
• Hover 1.75 open 1.75 \~1.50
- Low 1.25 open 0.75 \~0.50
- Full 1.25 open 1.25 \~0.75
3. Close the throttle to the idle position and connect the glow plug driver. The engine is now ready for starting.
BREAK-IN
It is not necessary to mount this engine on a set stand for break-in. However, the engine should be adjusted slightly on the rich setting for the first few flights to insure proper break-in. Always use a good quality fuel which contain 15\~30% nitromethane and an oil content of 20\~23% low viscosity oil.
NEEDLE VALVE ADJUSTMENT
Idle, Hover and High needle valves all work the same way. Turning the needles clockwise will lean the fuel mixtures and counter clockwise will richen the fuel mixtures.
- Set needles as described in START-UP.
- Start the engine and check idle. Adjust as needed.
- Lift helicopter into a hover and check for the correct rotor RPM recommended by the kit manufacture. Once this is done take note of the amount of smoke being produced by the muffler. The mixture is correct for hover when there is a steady stream of smoke being produced.
- Land the helicopter for approximately 20\~30 seconds. Lift the helicopter into a hover again taking note of the transition from idle to hover. If the engine exhibits a large amount of smoke and the throttle response is sluggish, you will need to adjust the idle and or the hover needle leaner to achieved a smooth transition. If the engine detonates and the smoke is inconsistent or a small amount is produced, the mixture is to lean.
- The high speed needle refines the fuel mixture for forward flights without affecting the hovering adjustment.
After the engine is started and warned up, lift off into a hover and check that the engine is running smooth with a good trail of smoke. If everything is fine, open the throttle and enter forward flight. Take note of the amount of smoke like we did in a hover adjustment. It is correct when you see a noticeable steady smoke trail. Adjust the high-speed needle valve to obtain slightly rich but consistent setting.
STOPPING THE ENGINE
- Fully close the throttle barrel to stop the engine.
- As soon as the engine stops running, be sure that a fuel line clamp is used in Tube-B to prevent fuel from flowing into the engine.
- On the final flight of the day, the fuel line clamp should be used to stop the engine in order to prevent rust and corrosion.
FUEL AND GLOW PLUG
We have found that the fuel and glow plugs listed below will give the best engine performance.
Fuel Powermaster 30% Special Heli Blend Cool Power 30% Special Heli Blend
Glow Plug _ YS #2 Enya #3 OS #8
IMPORTANT!
Silicone rubber is used in many parts of the YS engine. Use only glow fuel of methanol for cleaning. Gasoline and other volatile solutions will damage silicone if used.
text_image
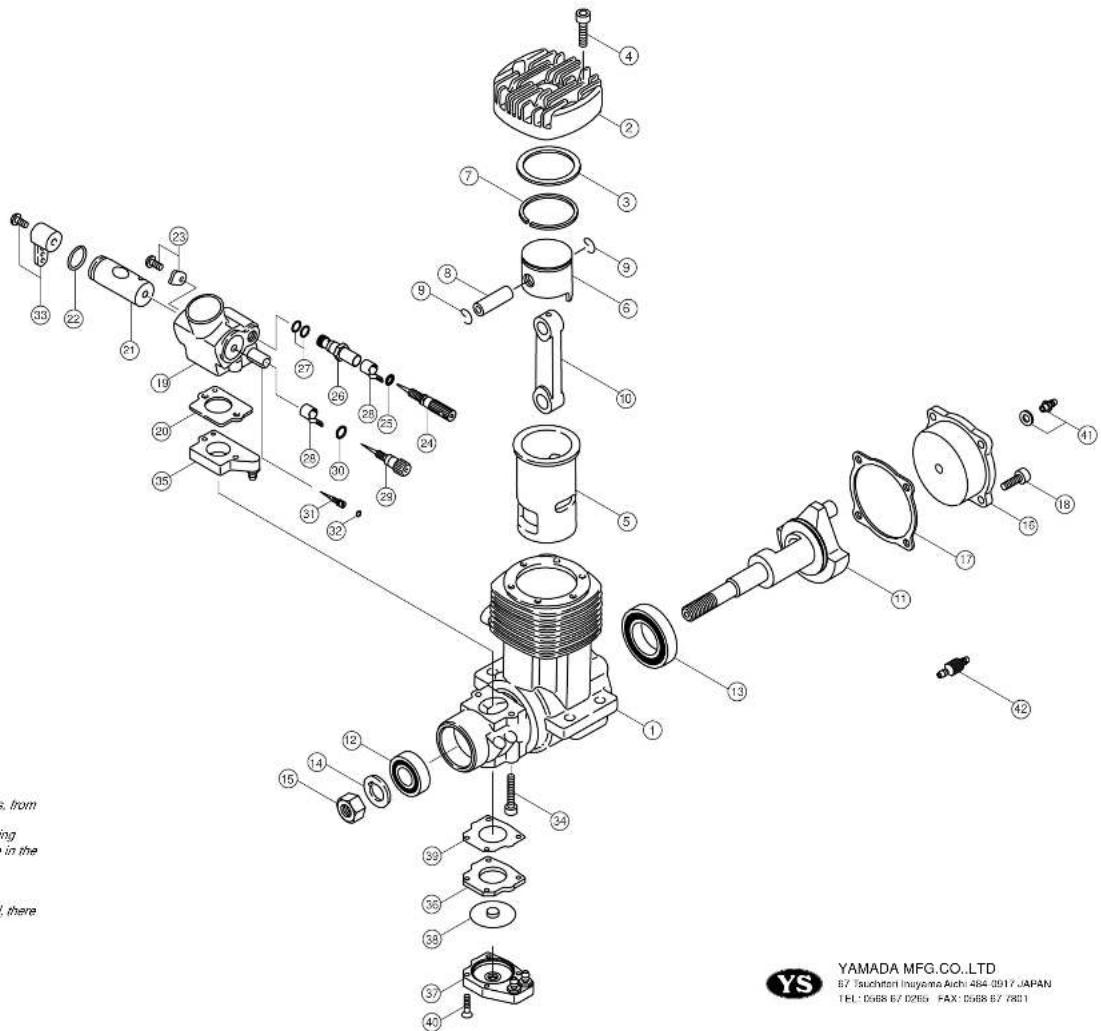
Fig.2 High Speed 100% Low Speed 0% Hover 40%91ST Parts List
| # | PART# | DESCRIPTION QTY | |
| 1 | S5101 Cranlcase 1 | ||
| 2 | S5102 Cylinder Head 1 | ||
| 3 | S5103 Head Gasket 1 | ||
| 4 | S5104 Head Screws 6 | ||
| 5 | S5105 Cylinder Liner 1 | ||
| 6 | S5106 Piston 1 | ||
| 7 | S7107 Piston Ring 1 | ||
| 8 | S7108 Wrist Pin 1 | ||
| 9 | R6108 | Wrist Pin Retainer | 2 |
| 10 | S5110 | Con Rod | 1 |
| 11 | S5111 | Cronkshaft | 1 |
| 12 | R6211 | Front Bending | 1 |
| 13 | S7113 | Rear Bearing | 1 |
| 14 | R6115 | Drive Washer Spacer | 1 |
| 15 | R6217 | Propeller Nut 1 | |
| 16 | S5118 | Back Plate 1 | |
| 17 | S5117 | Back Plate Gasket | 1 |
| 18 | R6120 | Back Plate Screw | 4 |
| 19 | S5119 | Carbustor Body | 1 |
| 20 | S5120 Carburetor Gasket | 1 | |
| 21 | S5121 Throttle Barrel 1 | ||
| 22 | S5122 Seal Ring | 1 | |
| 23 | R6124 | Throttle Barrel Retainer | 1 |
| 24 | S4125 Hover Needle Valve | 1 | |
| 25 | F1546 | Hover Needle O Ring | 1 |
| 26 | F1555 | Hover Needle Seat | 1 |
| 27 | F1556 | Hover Needle Seat O Ring | 2 |
| 28 | S5128 Needle Detent | 2 | |
| 29 | S8130 High Speed Needle | 1 | |
| 30 | H6200 | High Speed Needle O Ring | 1 |
| 31 | S5131 Low Speed Needle | 1 | |
| 32 | R6203 | Low Speed Needle O Ring | 1 |
| 33 | F126US | Throttle Arm | 1 |
| 34 | S7130 Carburetor Screws | 2 | |
| 35 | S5135 Carburetor Subplate | 1 | |
| 36 | S7134 Regulator Subplate | 1 | |
| 37 | S8138A | Regulator Assy. | 1 |
| 38 | S7130 Diaphragm | 1 | |
| 39 | S7140 Regulator gasket | 1 | |
| 40 | S7139 Regulator Screws | 2 | |
| 41 | S7143 Nipple | 1 | |
| 42 | S7144 Check Valve | 1 | |
| S5143 | Gasket Set | 3 | |
| S3146 | O ring set | 5 | |
| S8125 | Piston / Ring / Liner Set | 1 | |
| S51195 | Carburetor Assy. | 1 | |
| S4125 | Noodle Valve Assy. | 1 | |
WARRANTY
Strict quality control is implemented by our factory in all phases, from parts manufacturing to final assembly.
If performance deteriorates or a part fails due to a manufacturing error; YS engine will repair or replace the engine at no charge in the period of one year from date of purchase.
Warranty does not cover normal maintenance.
Should the engine be modified, incorrectly assembled or abused, there will be a normal charge for parts and labor.