Q36 - Smartphone Micromax - Kostenlose Bedienungsanleitung
Finden Sie kostenlos die Bedienungsanleitung des Geräts Q36 Micromax als PDF.


Benutzerfragen zu Q36 Micromax
0 Frage zu diesem Gerät. Beantworten Sie die, die Sie kennen, oder stellen Sie Ihre eigene.
Eine neue Frage zu diesem Gerät stellen
Laden Sie die Anleitung für Ihr Smartphone kostenlos im PDF-Format! Finden Sie Ihr Handbuch Q36 - Micromax und nehmen Sie Ihr elektronisches Gerät wieder in die Hand. Auf dieser Seite sind alle Dokumente veröffentlicht, die für die Verwendung Ihres Geräts notwendig sind. Q36 von der Marke Micromax.
BEDIENUNGSANLEITUNG Q36 Micromax

icromax
mobile
Nothing like Anything

natural_image
Black and white photo of a handheld device with a black cover and control buttons (no visible text or symbols)
text_image
Micromax Q24 Q W E R T Y U T O P A S D F G H J K L H1 Z X C V B N M Pac 0 Space
natural_image
Black rectangular device with a vertical handle and control panel, no visible text or symbols
natural_image
Black rectangular electronic device labeled 'micromax' with no visible text or symbols on its bodyQ36
User Guide
Welcome
Thank you for purchasing the Micromax Q36. The Micromax Q36 provides you with the following rich array of exciting features:
- Tri SIM-1 CDM A and 2 GSM cards
■ 0.3 MP Camera
■ MusicPlayer and FM Radiowith Recording
■ Video Record and Player
■ Sound Record
■ Bluetooth/WAP - Loud Speaker
■ Memory Cardsupport (up to 8 GB)
■ Java Opera Mini, Facebook
Please read this manual carefully to make the full use of ts features.
User Guide
Table of Contents
1 Know Your
Phone......6
1.1 Phone Layoutt....6
1.2 Keys and Parts....6
1.3 Icons and Indicators ..... 8
2 Getting Started......9
2.1 Remove/Insert Battery ..... 9
2.2 In set SIMCard.....11
2.3 In settMemoryy Card.....12
2.4 Charge the Battery....13
3 Basic
Operations......15
3.1 Switch Phone ON/OFF..15
3.2 Un b dk SIM/UIM Card... 15
3.3 Un b d k SIM/UIM Card...16
3.4 Make a Cal....16
3.5 Answer a Call.....17
3.6 Reject a Call.....18
3.7 Mute aCal....18
3.8 Hold a Call Conference .18
3.9 Swapa Cal....19
4 Phonebook....19
4.1 Add New Contact.....20
4.2 View Contad Deta il.....20
4.3 Send SMS Via Phonebook20
4.4 Send MMS ..... 20
4.5 Call a Contact.....21
4.6 Edt a Cont act....21
4.7 Delete a Contact.....21
4.8 Copy a Contact.....21
4.9 Move a Contad....21
4. 10 Send vCard....22
4. 11 Add to Blacklist.....22
4. 12 Mark Several ..... 22
User Guide
4.13Cal er Groups....22
4.14 Phone ebook Setting s.....23
5 Call Logs .... 24
5.1 View Call Logs.....24
5.2 View Missed Calls......25
5.3 View Dia led Calls ..... 25
5.4 View Received Calls.....25
5.5 Delete Call Logs.....25
6 Messaging....26
6.1 Write Text Messages.....26
6.2 W rte MMS....27
6.3 Broadcast Messages.....28
6.4 Voie mail Server.....28
6.5 Read a Message.....29
6.6 Delete Messages.....29
6.7 Message Settings .....30
7 FileManager ....30
7.1 Form at Memory Card.....32
7.2 Send Files....33
8 Multimedia....3 3
8.1 Camea....3 3
8.2 Image Viewer....3 5
8.3 Video Recorder....3 6
8.4 Video Player....3 7
8.5 MusicPlayer....3 8
8.6 Record Sounds......3 9
8.7 Play FM Rado .....4 0
9U ser Profiles....4 2
10 Connectivity ....4 4
10.1 Access Network Services 44
10.2 WAP Services and Settings44
10.3 Data Account .....44
11 Applications .....4 5
11.1 Java....45
11.2 Fun & Games....45
11.3 Calculator....46
11.4 Text Reader .... 46
11.5 Unit Converter......46
User Guide
12 Organizer......47
1 2.1 Schedule Tasks......47
1 22 Schedu b A la rm....47
1 23 World Clock....48
1 24 Currency Converter ..... 4 8
1 25 Stop watch .... 4 8
1 26 Time Mute .... 4 8
13 Settings 49
1 3.1 Reception Mode.....4 9
1 32 Phone Settings. .... 4 9
1 33 Network Settings....5 1
1 34 Security Settings ..... 5 1
1 35 Rest ore Factory Settings52
1 36 Blue both....5 4
14 Safety
Precautions ....56
15 Taking Care of
Your Device ....59
User Guide
1 Know Your Phone
1.1 PhoneLayout
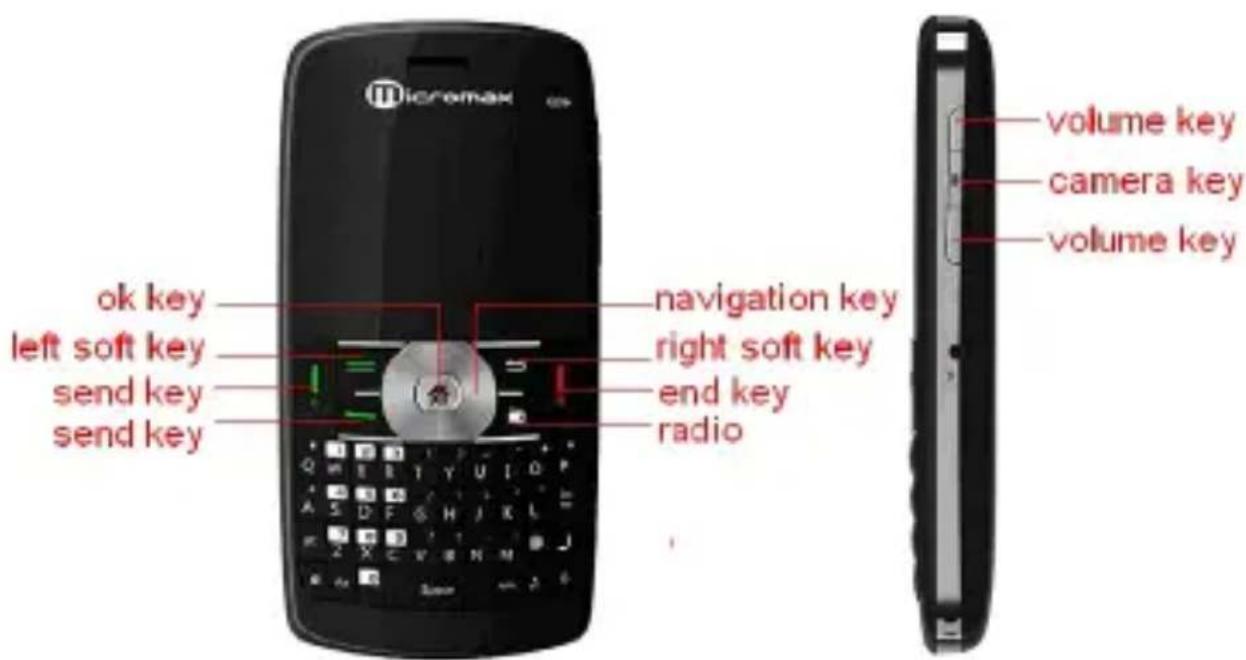
text_image
micromax ok key left soft key send key send key navigation key right soft key end key radio volume key camera key volume key12 Keys and Parts
Important keys and parts are listed here for you to use the phone better
Keys
Function Description
User Guide
| G 2 key | In idle mode, press to access SIM2 call logs.In edits screen, press to select and confirm. |
| Rights oft key | In idle mode, press to get into Phonebook.In edit screen press it to dear and cancel |
| Send key1/2 | Pres sto make or answ era call.Show call logs for SIM1/SIM 2. |
| Endkey | Pres sto end or reject a call. Press in edit screen to get back to idle mode. Holdit to turn on or off the phone |
| OK key | In idle mode, press to get into Main menu.Pres sto confirm. |
| Navigation keys | Pres s Left to access alarm. Press Right to access the Calendar. Press Up to access music player. Press Down to write SMS. |
| Rado | Pres si n idle mode to open Rad o directly. |
| Vdume keys | Vdume keys are at the right side of phonePres sthem i nidle mod et o ad just the |
User Guide
| volume. Press them to adjust the volume in some interface. Press them in menu to navigate through the menus. | |
| Camera Key | Press to access the camera |
13 Icons and Indicators
| Icons | Indication | Icons | Indication |
 | SIM 1n etwork signal level |  | Missed calls of slave SIM |
 | SIM 2n etwork signal level |  | Missed calls of CDMA . |
 | UIM network signal level |  | Alarm is set |
User Guide

Power level of Battery

The headset is plugged in.

Unr ead SMS of master SIM

Current profile is General.

Unr ead SMS of slave SIM

Current profile is Silent.

Unr ead SMS of CDMA /U IM.

Current profile is Meeting

Missed calls of master SM1

Current profile is Outdoor.

Bluetooth is powere do n.

Screen is bcked.
2 Getting Started
2.1 Remove/Insert Battery
You may need to remove the battery to insert SIM cards, Memory
User Guide
card or for replacing the battery.
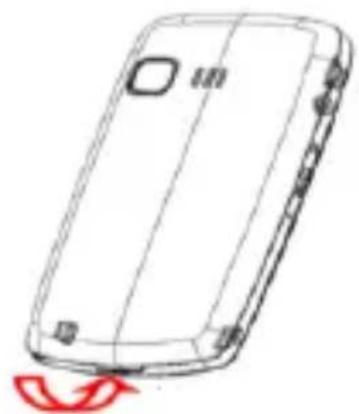
To rem o vet he b artery:
- Invert the back of the mobile phone upward and take off the rear cover according to the folb wing figure.
natural_image
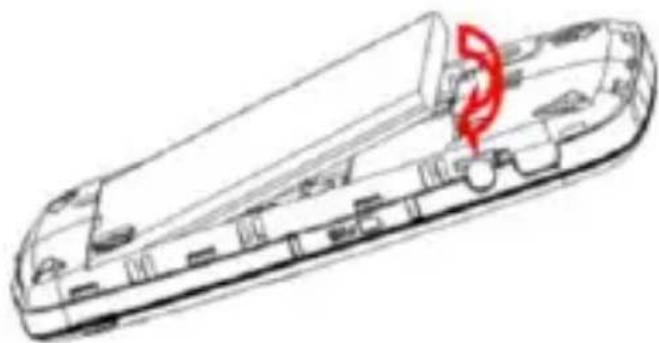
Line drawing of a smartphone showing the front panel and body (no text or symbols)- Take out the battery as shown in the following figure.
natural_image
Line drawing of a mechanical component with a red spiral symbol indicating a specific part (no text or labels present)- Finally place back the rear cover of the mobile phone after
User Guide
removing /inserting the battery as required.
Note: When inserting the battery, ensure that the metal teeth at the top of the battery comes in contact with the corresponding metal slot of them mobile phone. After this, press the battery down to insert the battery in place.
22 InsertSIM Card
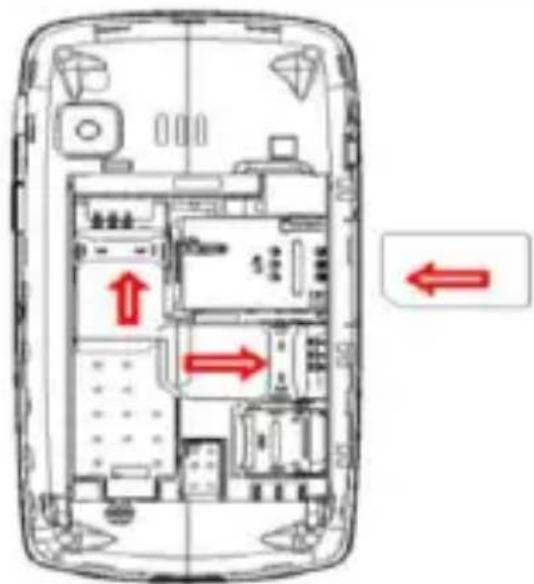
TheQ36 is a triple SIM mobile phone allowing you to use two GSM Cards and one UIM (ODMA) card To insert the SIM card(s):
- Switch off the mobile phone and remove therear cover and battery.
- Insert the SIM cards correctly in the SIM slot(s) as shown below.
User Guide
text_image
Diagram of a smartphone interior with red directional arrows indicating movement or flow, showing internal layout and component placement.- Finally, insert the battery and replace the rear cover of the mobile phone.
23 Insert MemoryCard
Use only compatible memory cards approved by Micromax. In compatible cards may damage the slot or corrupt the data stored in the card.
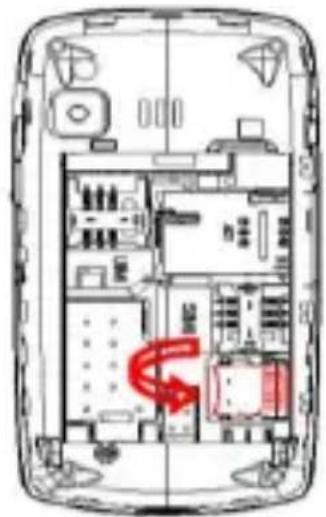
To insert the memory card:
- Switch off the phone and remove the rear cover and the battery.
User Guide
- Open the memory card sbt, and insert the memory card into the sbt.
natural_image
Interior view of a smartphone showing internal layout and ventilation duct (no text or symbols)-
Closet hem emory cards bt.
-
Finally, insert the battery and the rear cover of the mobile phone.
2.4 Charge the Battery
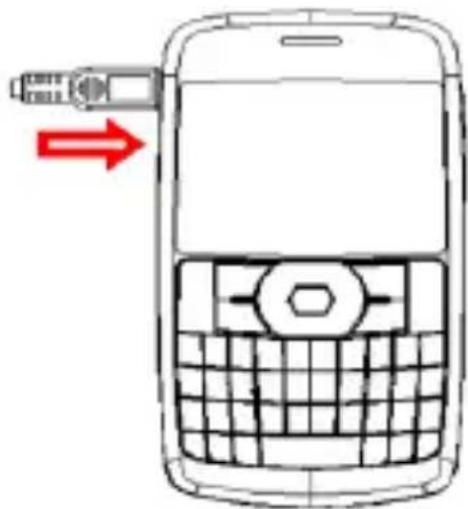
You can charge your battery via the charger or the USB cable supplied with this phone
- Connect the charger to the charger jack on the phone.
User Guide
- Connect the charger to a power socket. The charging starts, with the charging icon displayed in an animated state.
natural_image
Line drawing of a mobile phone with a keypad and screen, showing no text or symbols-
When the charging ion becomes static, it indicates that the battery is full.
-
Discon ne c the charge r from the p ow e r s o c k et and t he phone after c harg i ng.
Note: Slight heating during charging is normal. When the charging icon becomes static, it indicates that the battery is full.
User Guide
3 Basic Operations
3.1 Switch Phone ON/OFF
To switch ON your phone, press and hold the End key for a few seconds.
To turn OFF your phone, press and hold down the End key for a few seconds.
32 Unlock SIM/UI M Card
To eliminate unauthorized usage, SI Mcard can be locked by adding PIN1 number in security settings. If PIN bck is activated, PIN1 must be input every time the mobile is switch on.
If PIN is input 3 consecutive times, the SIM card will be locked by the network. In this case, contact your network provider to resolve this issue.
Note: The network supplier will set a standard PIN 1 (between 4 to 8 digitals) for your SIM card Please change it to your personal pass word. For detail please see Security settings. The operations with UIM card are similar with SIM card.
User Guide
33 Unbck SIM/UIMCard
To eliminate u ma authorized usage, your phone can be blocked by adding a ph on epass word in security settings
If you forget the mobile phone password, please contact the local sale branch or service center to unlock the mobile phone.
(De fault mobile phone password is 0000).
34 Make aCall
You can make a call in the following ways:
- Enter the desired number in standby mode and press the Call key.
- Go to Menu> Phonebook and then dial the desired number.
- Just press the Call key or the G1 key to dial the contacts listed in Call logs.
- You can also dial a contact from the messages.
- For international calls, add the + character that replaces the international access code and enter the
User Guide
country code, area code (omit the leading 0, if necessary), and phone number
35 Answer aCall
To answer a call, pres the Sendkey or select Options > Answer.
3.5.1 Options during a Call:
When you are connected, pressing the G2 key gives you these options:
- Hold Single Call: The Caller and receiver will not hear each other Enter Options again and choose Retrieve Single Call to go again connect with the other end.
- End Single Call: Choose this to end the current call.
- New Call: This is dependent on the network. If supported by network, you may dial another number while engaged in a call.
- Phonebook: While engaged in a call, you may browse the phonebook and make a new call
User Guide
- Messages: While engaged in a call, you can browse and /orsend/receive SMS.
- Mute: Your voice can not be heard at the other end if you mute the call.
- DIMF the digits entered can be interpreted as a DTM F signal response at the other end. This can offer dialing to the telephonenumber with extensions or IVR (interactive voice response) systems for menu driven options.
36 Rejecta Call
Torejecta cal, press the End key
37 Mute aCall
PressOptions and then Mutewhile a call isactive.
38 Ho Ha Call Conference
You can talk with more than one person at the same time through a l con fer ence.
- While on a call, go to phonebook and diall a contact. Once the
User Guide
new call gets connected, the first call will be put on hold.
- After this press Options and then choose Conference.
Note: This is network dependent and you may need to contact your network operator for this.
39 Swap a Call
- While on a call, got o phonebook and dial a contact. Once the call gets c nected, the first call will be put on hold.
- After this, press Options and then choose Swap. The active call and the call on hold will be swapped.
4 Phone book
Your phonebook stores all your saved contacts for anytime use. Your phonebook data can be stored in your SIM card or your phone memory. You can access your phonebook by going to:
Menu > Phonebook
User Guide
4.1 AddNew Contact
Menu > Phone book
To add a new contact:
- Select Menu > Phone book and press the Up navigation key once. Then press the OK key.
- Press Select and the choose storage location such as phone or SIM to store your contact.
- Enterthe desired contact name and number and press OK key.
42 View Contact Detail
Menu > Phone book > OK Key > View
Yo uneed to high light the contact to view its detail.
4.3 Send SMS Via Phone book
Menu > Phone book > OK Key > Send text message
4.4 SendMM S
Menu > Phone book > 0 K Key > Send multimedia message
Allows you to send a multimedia message to the desired contact.
User Guide
45 Call a Contact
Menu > Phore book > OK Key > Call
Allows you to make a call to the contact you are viewing. Or you can just highlight a number and press the Call key.
46 Edit a Contact
Menu > Ph o rebo ok > OK Key > Edit
Allows you to edit a high lighted contact.
47 Delete a Contact
Menu > Phonebook > OK Key > Delete
In the Contacts list, select the entry you want to delete
48 Copya Contact
Menu> Phone ebook > OK Key > Copy
You can copy all entries stored in the SIM card to the phone memory and vice-versa.
49 Move aContact
Menu > Phonebook> OK Key > Move
User Guide
Move the record from current storage to other storage.
410 Send vCard
Menu > Phonebook k> OK Key > Send vCard
Allows you to send vCard to other numbers.
4.1.1 Add to Blacklist
Menu > Phonebook k> OK Key > Add to Blacklist
Allows you to blacklistselected numbers. In this case the contact will be blocked from calling you up.
4.12 Mark Several
Menu > Phonebook k> OK Key > Mark Several
Allows you to mark single or several contacts to send SMS, vCard or just delete.
4.13 Caler Groups
Menu > Phonebook k> OK Key > Caller Groups
Create groups of contacts with common settings like ring one and caller picture.
User Guide
4.14 PhonebookSettings
Menu > Phonebook > OK Key > Phonebook settings
The phone book settings provide the following options:
■ Preferred Storage: Set the storage media as either SIM (1, 2), phone or all
■ Speed Dial: Assign speed dial for rapid dialing to desired numbers
■ My Number: Add my number to the phone.
- Extra Numbers: Add extra numbers like Owner, Fix dial or SOS numbers
■ Memory Status: Check the memory status of SIM, Phone and groups
- Copy Contacts: Allows you copy the contacts from phone to SIM and vice versa
■ Move Contacts: Move contacts from Phone to SIM or vice versa
- Delete All Contacts: Delete all contacts from phone or SIM.
5 Call Logs
51 View Call Logs
Menu > Cal Logs > SIM 1/SIM 2/UI M Call History
The Call loglists the calls you have recently dialed, received, missed for SIM1 and SIM 2 or UIMcard.
■ MissedCalls: Albws you toview missed calls
■ Dialled Calls:Albws you to view dialled Calls
- Received Calls: View received Calls.
■ All Calls: View all the recent calls.
- Delete Call Logs: Lets you delete the call bgs.
■ Call Times: View or reset call times
- Call Cost: View or set call cost
■ Text Msg Counter: Lets you view the text message count.
■ GPRS Counter: Let you view or reset the GPRS usage details.
Tip: You can also directly access the call logs of SIM 1 and SIM2
User Guide
by directly pressing the G1 key or the G2 key.
52 View Missed Cals
Menu> Ca ll Logs> SIM 1/ SIM2 /U IM Call History> SIM 1/SIM 2/U IM Missed Calls
View missed Calls.
53 View Dialled Calls
Menu> Ca ll Log s> SIM 1/ SIM2 /U IM Cal l Histo ry> SIM 1/SIM 2/U IM Dial ed Cal b.
View dialects
5.4 View Received Calls
Menu > Ca ll Log s> SIM 1/ SIM2 /U IM Call History> SIM 1/SIM 2/U IM Received Calls
View received calls.
55 DeleteCall Logs
Menu> Call Logs> SIM 1/ SIM2 /U IM Call History> Delete
User Guide
SIM1/SIM2/UIM Call bgs
Delet eCall Logs
6 Messaging
6.1 Write Text Messages
Menu >Messages >SM S>Write Messages
You can compose and send text messages with your acquaintances using this feature. Pressing G2 key during/after composing the message gives you these options:
- Send to: Send the message
- Input method: To choose a text input method
- Insert template: You can insert an existing text template into the SM S.
■ Advanced You can insert number/name/bookmark into the SMS. - Saveto drafts: Save the message for sending a latertime.
User Guide
62 Write MMS
Menu > Messages > M MS > Write Message
Allows you to write /compose a Multimedia message. You can fill in the recipient information such as To:, CC, B CC, and subject.
Next, just hig hlight the 5 ^th option and then pres s OK to the compose screen. Pressin gG2 key gives you these options:
- Done Select this option when you want to directly go ahead with the sending of the composed MMS.
- Input method: To choose an available input method.
- Add Picture/Audio/Video/Attachment: You can insert these files for sending with your MMS.
- Add Slide Before Add the slide before the current slide
- Add Slide After: Add the slide after the current slide
- Add Bookmark text: Add bookmarks to your MMS.
■ Preview: Preview your MMS before sending. - Slide Times Set the slidetransition timings
User Guide
63 Broadcast Messages
Menu > Messages > Broadcast message
Broadcast message is an information service to all users in a specific location sent by the network operator, such as weather forecast, transportation conditions and soon. You can access this feature via:
You have the following options under this feature:
- Receive mode: Choose whether to enable or disable cell broadcast.
- Read Message: Read the received message broadcast by the service provider.
■ Languages: Choose the display language of cell broad as t
■ Channel Settings: Set the channel of cell broadcast.
64 Voic em al Server
Menu>Messages >Vdic email Server
Configure your voic email server to have or retrieve voic emails. Please contact your network provider for more details regarding the voic emails server number.
User Guide
65 Read a Message
Press the Read option when the incoming message is highlighted on your LCD screen You can read a message by opening the Inbox of your SMS or MMS.
When reading a message, you can select G2 key to access the following.
- Reply: Allows you to reply to the message.
- Callsender. Call the message sender.
■ Forward: Forward the message - Delete: Delete the message
- Advanced: You can use number, URL, e mail, USSD, Move or copy the message.
In the same way you can view message in your draft, out box etc.
66 Delete Messages
Menu> Messages
In Message, go to the desired folder and then press Options > Delete / Delete All for the highlighted message.
User Guide
67 Message Settings
Menu > Messages > SMS / MMS > SMS / MMS Settings
You can set your desired parameters for Text message /Multimedia message including backups.
■ Prof i£ setting Activate /edity our desired prof i£
- Common Settings: Allows you to set preferences such as delivery report, and reply path.
■ Memory Status: View status of your phone and SIM memory.
- Prefer e dStor age: Set phone or SIM a sy our pre ferred storage bcation.
For MMS, you can set profile or common settings.
7 File Manager
Menu >File Manager
Allows you to view and manage files available in the Phone or memorycard.
User Guide
Menu > File Manager > Options
Depending on the type of memory you have highlighted, you have these options:
- Open: Op enthe current file or folder.
■ Format: Form at the selected memory. - Rename: Rename the highlighted file (Applicable to Card memory).
■ Details: View the details of the memory. (Applicable to Card memory).
When you open a file, depending on the folder content, pressing the Options allows you to view, rename, move or delete the file. In addition, you may have these options:
■ View: View the file.
- Send Send via M MS or Bluetooth.
■ Use as: Use the file according to the given option.
■ New Folder: Create a new folder in the current directory.
■ Rename: Rename the current file.
■ Delete: Delete the current file.
User Guide
- Sort by: Sort the file by the options listed.
- Mark Several Marks ever al ite ms to cop y, delete , or move.
- Copy: Copy the current file from current location to another location (phone eormemory card).
■ Move: Move the current file from current location to another location (phon eormemory card). - Delete all files Delete all the files from the current folder.
■ Details : View d eals of the current file.
71 Format Memory Card
Menu > File Manager > Memory Card
After this, press the Options and select Format to format the memory card
Warning: All existing file sin the memory card will be erased after your format at the memory card.
User Guide
72 Send Files
Menu > File Manager > Memory Card
Highlight or open the file and press Options key. Next, choose Send to send the file via MMS, or Bluetooth or according to the option provided.
8 Multimedia
81 Camera
Men u >Multi media > Camera
The built-in camera allows you to take photos and adjust the camera settings. You have the following options on press in G2 key:
■ Photos: View the saved photos.
■ Camera settings: Set relevant parameters for the camera
- Image settings Set the size and quality of photo.
- White balance: It cam set white balance of the camera.
■ Scene mode: Set the seen emode of photo.
- Effect settings: Set the different effect for display of fp hoto.
User Guide
■ Storage: Set the storage location for photo.
- Restore default: Restore camera settings to default.
Sh rt cutkey operations:
- OKkey or Camera key to take a photo.
- Up/Down key to adjust the focal distance.
■ Left/Right key to adjust EV.
■ 1 key to change image size
■ 2 key to change image quality.
■ 3 key to change white balance.
■ 4 key to change scene mode.
■ 5 key to change delay timer.
■ 6 key to change continuous shot. - 7 key to change effect settings.
■ 8 key to change banding.
■ 9 key to change shuttersound.
■ #key to show/hide the icons.
User Guide
82 Image Viewer
Menu >Mu timedia >Im age viewer
Pressi ng G 2 keyo n th eIm age viewer screen albws you to:
■ View: To view the picture.
- Browse Style: Set the picture browse style such as list or matrix mode.
- Send: Send present image through M MS or Blue to oth.
- Use As: You can use the image as wallpaper, screen saver or caller picture power on/off display.
■ Rename: Rename the highlighted file.
- Delete: Delete the highlighted file
- Sort by: Sort the images by desired method.
- Delete all files: Delete all the files from the list.
■ Storage: Set the storage location for photos.
Shortcut key operation
- Left/Right key or Volume keysto changethe picture.
- 1 key to zoom in the picture. (only forpicture size larger than n
User Guide
320*240).
- 2 key to zoom out the picture (only for picture size larger than 320*240).
■ 3 key to rotate the picture by 90°.
83 Video Recorder
Menu > Multimedia > Video Recorder
Pres the OK Key to start recording
Pressing G2 key before recording abws y out to access:
■ Video Recorder settings: Set relevant parameters for video shooting.
■ Vide o setting s: Set relevant parameters for th ev ideo.
- White balance: Allows you to set white ebalance for the video.
- Effect settings. Set the different effects for the video.
- Storage Set the storage location for the video file. It can be phone or memory card. You can select memory card only if you have inserted the correct memory card in the phone.
- Restore default: Restore video settings to default. In this case, all your video record settings will return to the original settings.
User Guide
Short cut keys:
- Press OK key or Camerakey to Start/Pause record.
- Press Up/Downkey to adjust the focal distance.
■ Press Left/Right key to adjust EV
84 Video Player
Menu > Multimedia > Videoplay
The Video Player plays all your video files stored in the Phone or card memory). The video player gives you the following options on presingG2 key:
■ Play: Enter th eplay mode.
- Send: Send current video through MMS or Bluetooth
■ Rename: Rename the current video file.
- Delete: Delete the current video
- Delete All Files: Delete all the files from the list.
- Sort By: Sort the videos by the method available under this option.
■ Storage Set the storagelocation for the video a s either phone or
User Guide
memory card.
While playing the video, press the G2 key to pause and Right key to stop.
Recommendation: If you have inserted the memory card and your phone does pick up the memory card, press the Left/right key once
Shortcut key operation:
■ OK key to Start/Pause e p hying.
■ While playing, press the Left/ Right key to change videos.
- Press the Volume key to adjust volume.
85 Music Player
Menu > Multimedia > Music
The Micromax Q36 comes with an in built music player that plays all your favorite songs stored in the phone memory or T-Flash memory card. It gives you a host of settings to make your listening experience interesting
Menu > Multimedia > Music > List
Lists the songs or music files available in the phone or memory card
User Guide
Menu > Multimedia > Music > List > G1 Key
Provides you the following features:
■ Pay: To start playing the music file.
■ Details: To show the details of the selected song.
- Add to Ringtone: Set the highlighted song as a ringtone.
- Add: Add music from desired file bcations.
- Remove/Remove all: Remove highlighted song from the music list
- Settings: Setsome relevant parameters for the music player.
Control Keys:
Shortcut key operation:
■ Pressok key to play/pause the song.
- Pressup/down key to stop the song.
■ PressLeft/Rightkeyto change songs
■ PressVolume keys to adjust volume.
86 Record Sounds
Menu > Multimedia > Sound recorder
User Guide
Pressing Options on the Sound Recorder screen gives you these options:
- New Record: Begin recording. The recordings will be saved in the audio folder.
■ List: List all the recorded files. - Settings: Set some relevant parameters for the sound recorder
Short cut key operation:
■ Press Up keyt to start/pause recording
- Press Downkeytop by the record.
- Press Left/Right key to change files.
87 Pay FM Radio
Menu >Multimedia >FMr radio
You can listen to your favorite FM channels using the inbuilt FM receiver of your phone.
Options> ChannelList
List all the currents saved channels. Just perform an auto search to fill
User Guide
up this list.
Options > Manual Tuning
Input the desired channel frequencies manually.
Options > Auto search
Automatically search FM channels and fill up your channel list.
Options > Settings
Select the FM Radio preferences such as background play, bud speaker, recording format, quality, storage location and so on.
Options > Record
Record the currently playing channel. You can also press the eDown navigation key to start recording.
Options > Append
Append your current recording with a previous recording to create combinations recording.
Options > FileList
View the existing list of recordings.
Short cut key operation:
User Guide
- Press Up key to On/Off search function. If enable the function, the phone will search the channel automatically when press Left /Right key.
- Press OK key to Play/Stop the program.
■ Press Left/Right key to change channel
■ Press Down key to Start/Pause record - Press Volume keys to adjust volume.
9 User Profiles
Menu >UserProfiles
Set your user profile as well as customize that profile to suite your requirement.
The phone provides a set of default profiles including:
■ General
■ Meeting
■ Outdoor
User Guide
- Indo or
- Headset
- Bluetooth
In standby screen, long press # key to activate silent mode. Only when the earphone is inserted, the headset profile can be automatically activated, while all other profile swill be automatically disabled.
Highlight a profile and press the G1 key to activate, customize or restore the settings. Depending on the profile, you can set the parameters such
- Tone settings: set tone for incoming call, alarm, message tone and key pad tone.
- Vdum e adju stt hevolume for ring tone and key tone.
- Alert type: select alert type. There are ring, vibration only, vibration and ring, vibration then ring
- Ring type select to sing b, repeatora scending.
- Extra tone set reminding sound for special cases such as warning, error, camp on or connect.
- Answer mode: turn on or off the feature of answering by any key.
10 Connectivity
10.1 Access Network kServices
Menu> Connectivity> Services/(Your Network) Services
Allows you to access the services offered by your service provider.
10.2 WAPServices and Settings
Menu>> Connectivity>WAP
WAP setting is required for surfing the Internet with WAP. This allows you to access the already configured internet services via home page, Bookmarks, in put address, Recent Pages or perform WAP settings.
10.3 Data Account
Menu> Connectivity> Data Accounts
Allows you to choose an appropriate data account as per your chosen network operator.
Please contact your network operator for the settings if the data
accounts are not listed.
11 Applications
Menu > Applications
The Q36 comes prebaded with the folb wing useful applications
11.1 Java
Menu > Applications > Java
You can directly access and enjoy Facebook, Opera Mini 4, and also play the PACMAN game.
For each of these applications, you have the option of setting preferences, viewing details, or re store default settings.
You can also choose your Java settings Java default security, and also chooses the network for your Java applications.
11.2 Fun & Games
Menu > Applications > Fun & Games
Lets you play interesting pre-baded games to keep you pleasantly
User Guide
occupied.
113 Calculator
Menu> Applications>Calculator
Helps you to do complex calculations instantly.
You also have the Unit converter, and currency converter and Stop watch to help instantly with your needs.
114 Text Reader
Menu > Applications > Text Reader
Lets you read files with txt extension.
115 Unit Converter
Menu > Applications > Unit Converter
Helps you convert from one unit of measurement to another.
12 Organizer
Menu > 0rganizer
Your phone can help you to organize your routines and tasks.
12.1 Schedule Tasks
Menu >Organizer> Tasks
Lets you schedule tasks on desired dates with alarm priority, periodicity etc. You will be reminded of the tasks on schedule.
The organizer also provides you alarm and world clock which you can use anytime
12.2 Schedule Alarm
Menu > Organizer > Alarm
Lets you schedule alarms with the required settings.
User Guide
123 World Cbck
Menu > Organizer > Word Clock
View the time zones of major cities and also your current city. You can also put on/off day light saving time.
124 Currency Converter
Menu > Applications > Currency Converter
Converts values from one currency to another based on rates you enter.
125 Stop watch
Menu > Organizer > Stopwatch
Use the stopwatch to count time elapsed and also view previously recorded counts.
126 Time Mute
Menu > Organizer > Time Mute
Lets you must your phone at a sett time.
13 Settings
Menu > Settings
You can customize your mobile phone to your needs through the settings provided on the phone:
13.1 Reception Mode
Menu > Settings > Reception Mode
Using this feature, you can choose how your phone receives signals. Depending on the number of SIM and UIM cards you insert, the following options are displayed:
■ Only UIMactive
■ Only SIM 1 active
■ Only SIM 2 active
13.2 Phone Settings
Menu > Settings > Phone Settings
Allows you to configure the following settings:
User Guide
■ Time and date: Lets you set the Time and date on the phone.
- Schedule power on/off: Lets you set a particular time on the phone when the phones should Power on/off itself.
■ Language: The Micromax Q36 currently supports English.
- Pref. input method: This enables you to select the text input method of your choice:
■ Display: You can set a host of display preferences of the phone.
- Greeting text: Lets you set your own greeting message when you power ON the phone.
- Dedicated key: This option helps you dedicate/map certain features of the phone with the Directional keys (UP/DOWN/LEFT/RIGHT) of the phone. At anytime, you can change the mapping and select a new feature from the features available.
- Shortcuts: Help you use certain key features of the phone instantly. You can choose the features at your own wish and set them in the menu. You can add new features to the list, delete, edit, disable and change the order.
User Guide
- Auto Update of Date and time: This feature automatically updates the date and time on the phone from the network.
- UART Settings: This option can be activated for either SIM1 or SIM2. With this option, you can choose the access of PC software to SIM1, SIM2 or UIMCard.
- Smart Dialing: Displays names of contact based on the number typed on the phone.
133 NetworkSetting
Men u> Settings> Network Setting s
Albws yo uto setthe 61 lowng:
- SIM1/SIM2 Network Settings: Let you select the network and associated preferences for SIM1/SIM2/UIM card.
134 Security Settings
Men u> Settings> Security settings
This function can prevent unauthorized use of your SIM or phone including tracking in case of the ftor b ss. You have the following security options:
User Guide
- SIM1 security settings: Lets you set up passwords against illegal use of SIM1.
- SIM2 security Settings: Lets you set up passwords against illegal use of SIM2.
■ UIM Security Setup: Set security for UIM card. - Phone Lock: Let you lock the phone or change the password as a security measure.
■ Auto Keypad Lock: Lets you book the keypad automatically or set the auto-keypad lock timings. - Th et Tracker: Lets you perform settings for tracking the mobile in case of theft or bss.
- Change Password: Lets you change your phone passwordThe default phone password is 0000
135 RestoreFactory Settings
Menu > Settings > Restore Factory Settings
Let you restore your phone settings to the original setting when you purchased the phone:
You need to enter your phone password to restore the phone to its factory or original settings. The default phone password is 0 000.
User Guide
Note: The Power Management option lets you view the current battery power.
13.5.1 Call Settings
Menu> Settings > Call Settings
You have the following options under call settings:
- SIM 1 /SIM 2/UIM Cal Settings: Set how calls will be handed by the selected SIM.
- Caller ID: Hide/unhide callerID or as set by network.
- Call Wa ting: If active, incoming calls during another active call will be put on wait.
- Call Divert: This feature is network dependent. You may divert incoming calls to another mobile phone or a direct line telephone, but not to any extensions of a fixed telephone.
- Call Barring: This is a GSM networking service and can restrict outgoing and incoming calls selectively. If you need to change the settings or restrict calls, please contact your network operator to obtain the password for opening this service.
User Guide
- Line switching: Allows you to switch between Line 1 and Line 2 for your outgoing and incoming calls. Press the OK key to switch the lines.
13.5.2 Advanced Settings:
Menu>Settings>Call Settings>Advanced Settings
You have the following advanced setting options.
■ Blacklist: B b d k s a l i s t o f c o n t a c t s a s p e r y o u r c h o i c e
- Auto Redial Redials automatically when call is no answered.
- Call time display: Displays duration of the call on the main screen.
- Call Time Reminder: Lets you set the time and reminds you for call
- Reject by SMS: Send an SMS to the contact immediately after rejecting a call
136 Bluetooth
Menu> Bluetooth
User Guide
You can connect wirelessly to other compatible device with Bluetooth technology. Compatible devices may include computers, mobile phones. You can use Bluetooth connectivity to exchange images, music and sound clips, video clips etc.
Selecting Menu >Connectivity >Bluetooth>Options gives you the following options:
■ Power: Turn Bluetooth On/Off
- Visibility: Set the visibility of your device against other Bluetooth devices.
■ My Device: Display device model when connected
- Search Audio Devices: Search for hands-free devices that supports Bluetooth. Pairing up with Bluetooth-enabled audio devices allows you to exchange audio video information with such devices.
- My Name: View or change the name of my phone as it appears to other Bluetooth devices.
- Advanced: Set your Bluetooth preferences. You need to first activate Bluetooth to perform advanced settings.
14 Safety Precautions

Please read these simple guidelines. Not following them may be dangerous or illegal.
Abo ut SAR
- Your phone is a bw-energy radio frequency receiver and transmitter. Upon switching on, your phone will emit bw-level radio frequency (RF).
- The specific absorption rate (SAR) is a measurement unit of body-absorbed RF quantity when the phone is in use.
- The SAR value is ascertained according to the highest RF level generated during laboratory tests. The true SAR level when the phone is operated will be far lower than this level. The nearer the phone is from a base station, the bwer is the RF energy emitted by the phone.
■ The highest SAR value is 0.412 W/kg averaged over 10 gms of human tissue.
SAR R eco mm enda tions
User Guide
- Please keep your calls short and use SMS whenever more convenient. This advice applies especially to children, adolescents and pregnant women
■ Prefer to use your cell phone when the signal quality is good.
■ People having activated medical implants should preferably keep the cellphone at least 15 cm away from the implant. - Maintain a preferable distance of 15 mm from the device.
Safe Driving
- Do not use the phone while driving. When you have to use the phone, please use the personal hands-free kit.
- Please put the phone safely in the phone stand. Do not put it onto any passenger seat or any place from which it may fall down in case of vehicular collision or emergency braking
During Flight
■ Flight is influenced by interference caused by the phone. It is illegal to use a phone on the airplane. Please turn off your phone during a flight
User Guide
In Hospitals
- Your Phone's radio waves may interfere with the functioning of inadequately shielded medical devices. Consult a physician or the manufacturer of the medical device to determine whether they are adequately shielded from external Radio Frequency. Switch off your device when regulations posted instruct you to do so.
- To avoid potential interference with implanted medical devices such as a pace maker or cardioverter defibrillator:
■ Always keep your phone at least 153 centimetres (6 inches) from the medical device. - Do not carry the wireless device in abreast pocket.
- Turn off the phone if there is any reason to suspect that interference is taking place.
- Follow the manufacturer directions for the implanted medical device.
If you have any questions about using your wireless device with an implanted medical device, consult your health care provider.
Unsafe Areas
- Please turn off your phone when you are close to a gas station or in
User Guide
the vicinity of any place where fuel and chemical preparations, or any other dangerous goods are stored
15 Taking Care of Your Device

Your device is a product of superior design and craftsmanship and should be handled with care: The following suggestions will help you protect your phone:
- Keep the device dry. Precipitation, humidity, and all types of liquids or moisture can contain minerals that will rust electronic circuits. If your device does get wet, remove the battery with outturning on the device, wipe it with a dry cloth and take it the service center.
- Do not store the device in high or cold temperature. High temperatures can shorten the life of electronic devices and damage batteries.
- Do not use or store the device in dusty dirty areas. Its moving parts and electronic components can be damaged.
- Do not store the device in high or cold temperature. High temperatures can shorten the life of electronic devices and damage batteries.
User Guide
- Do not attempt to open the device other than as instructed in this guide. Repairing this phone by yourself other than our authorized service agents/center sgo es against the warranty rules.
- Do not drop, knock, or shake the device. Rough handling can break internal circuit boards and fine mechanics.
- Do not use harsh chemicals, clearing solvents, or strong detergents to clean the device. Only use a soft, clean, dry cloth to clean the surface of the device
- Do not store your device near magnetic fields or allow your device to come in contact with magnetic fields for extended period of time.
- Use manufacturer approved batteries, chargers, accessories and supplies. Micromax will not be held responsible for user's safety when using una approved accessories or supplies.
Disdaime is :
- Micromax will not bear any responsibility for any in compliance with the above mentioned guidelines or improper usage of the mobile phone.
- Please note that the accuracy of some of these functions may vary depending on the surroundings and take a while to get accurate
User Guide
results.
- Microm ax keeps the right to make modifications to any of the content in this user guide without public announcement in advance.
- The content of this manual may vary from the actual content displayed in the mobile phone. In such a case, the latter shall govern.
Copyrights:
- All rights reserved. Reproduction, transfer, distribution or storage of part or all of the contents in this document in any form without the prior written permission of Micramax is prohibited.