BM5 - Monitor Portkeys - Kostenlose Bedienungsanleitung
Finden Sie kostenlos die Bedienungsanleitung des Geräts BM5 Portkeys als PDF.


Benutzerfragen zu BM5 Portkeys
0 Frage zu diesem Gerät. Beantworten Sie die, die Sie kennen, oder stellen Sie Ihre eigene.
Eine neue Frage zu diesem Gerät stellen
Laden Sie die Anleitung für Ihr Monitor kostenlos im PDF-Format! Finden Sie Ihr Handbuch BM5 - Portkeys und nehmen Sie Ihr elektronisches Gerät wieder in die Hand. Auf dieser Seite sind alle Dokumente veröffentlicht, die für die Verwendung Ihres Geräts notwendig sind. BM5 von der Marke Portkeys.
BEDIENUNGSANLEITUNG BM5 Portkeys
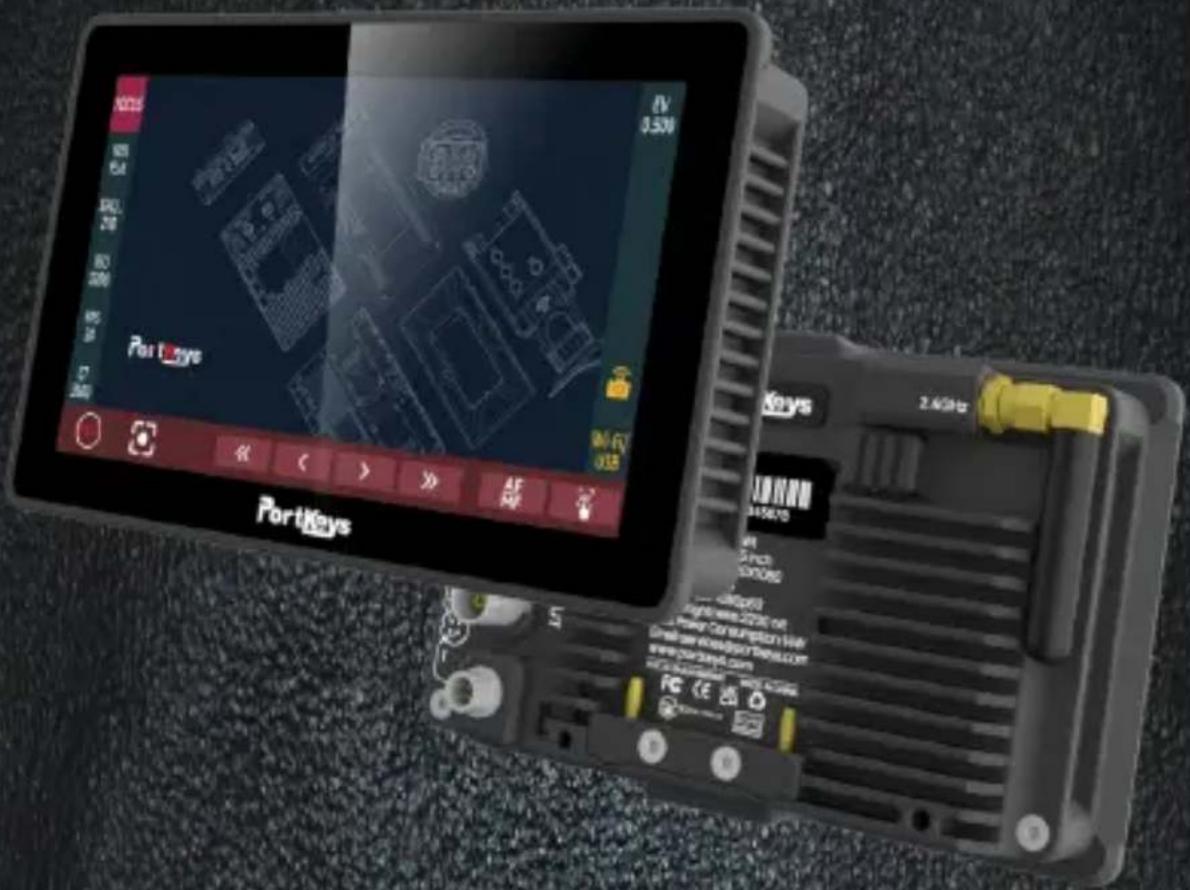
BM5IIIWR
2200nit Anti-Fingerprint 5.5 Inch Wide Color Gamut Screen
text_image
PortKeys 2.4GHz 3.5V HV 3.5V VR 3.5V OFF OFF OFF OFF OFF OFF OFF OFF OFF OFF OFF OFF OFF OFF OFF OFF OFF OFF OFF OFF OFF OFF OFF OFF OFF OFF OFF OFF OFF OFF OFF OFF OFF OFF OFF OFF OFF OFF OFF OFF OFF OFF OFF OFF OFF OFF OFF OFF OFF OFF Off Off Off Off Off Off Off Off Off Off Off Off Off Off Off Off Off Off Off Off Off Off Off Off Off Off Off Off Off Off Off Off Off Off Off Off Off Off Off Off Off Off Off Off Off Off Off Off Off Off 0.5V 3.5V 3.5V 3.5V 3.5V 3.5V 3.5V 3.5V 3.5V 3.5V 3.5V 3.5V 3.5V 3.5V 3.5V 3.5V 3.5V 3.5V 3.5V 3.5V 3.5V 0.5V 3.5V 3.5V 3.5V 3.5V 3.5V 3.5V 3.5V 3.5V 3.5V 3.5V 3.5V 3.5V 3.5V 3.5V 3.5V 3.5V 3.5V 3.5V 3.5VService Hotline: 18820958861
Email: services@portkeys.com
Website: www.portkeys.com
Company Address: 1406, 14th Floor, Block D, Building 3,
Cloud Park, Longgang District, Shenzhen, Guangdong, China
Factory Address: 2nd Floor, Building A, Jingjiang Industrial Park,
NO.101, Shangwei Road, Longhua District, Shenzhen, Guangdong, China

Contents
Product Information
Product Introduction 1.1
Packing List 1.2
Basic Parameters 1.3
Signal Specifications 1.4
Function Interface
Function Interface Gesture Switching 2.1
Function Introduction 2.2
Custom Function Keys Settings 2.3
Basic Operation 2.4
Settings Interface
Settings Interface Gesture Switching 3.1
Image Settings 3.2
Signal Source Settings 3.3
LUT Output Settings 3.4
Image and Menu Flip Settings 3.5
System Settings 3.6
3D LUT Settings 3.7
Volume Settings 3.8
Version Settings 3.9
Camera Control Interface
Camera Control Interface Gesture Switching 4.1
Camera Model Settings 4.2
Bluetooth Connection 4.3
Function Usage 4.4
WIFI Connection 4.5
Motor Control Interface
Motor Control Interface Gesture Switching 5.1
Motor Control 5.2
Warnings
Warning 6.1
Product Information 1.1
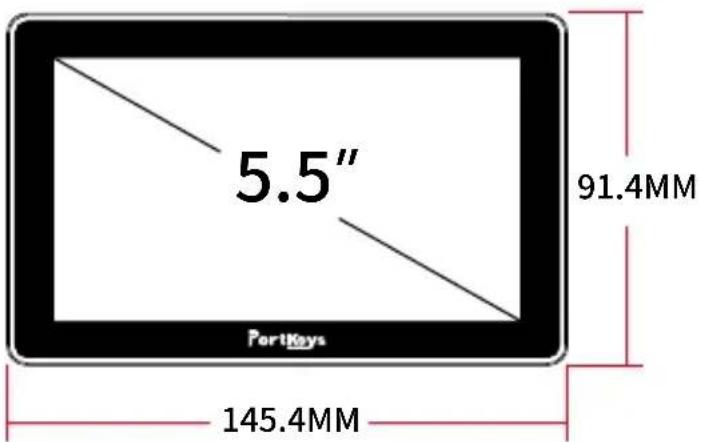
Product Introduction
text_image
5.5" PortKeys 91.4MM 145.4MMEXIT / Long press for 3 seconds
to switch the state of touch control
text_image
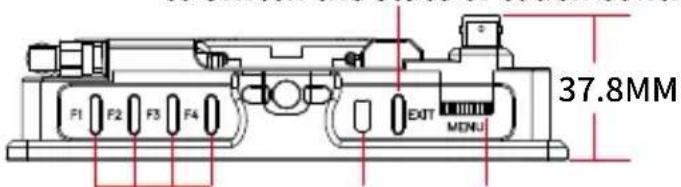
F1 F2 F3 F4 EXIT MENU 37.8MMIndicatorCustition Definition Keys
text_image
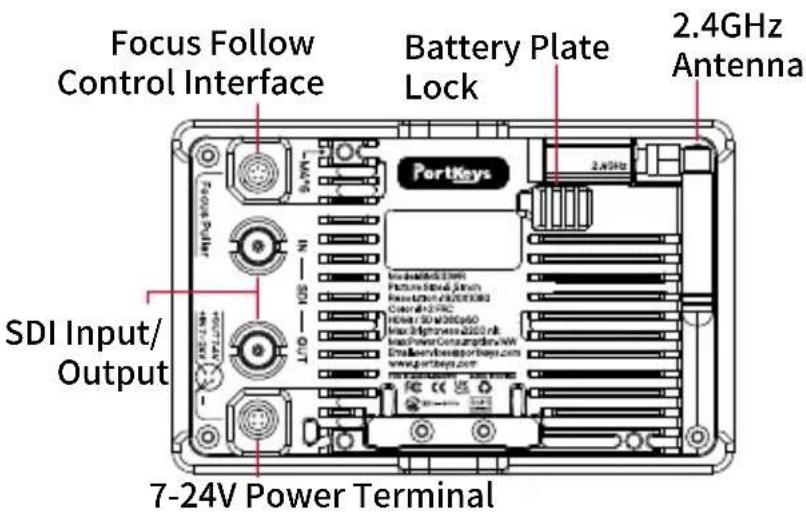
Focus Follow Control Interface Battery Plate Lock 2.4GHz Antenna SDI Input/Output 7-24V Power Terminal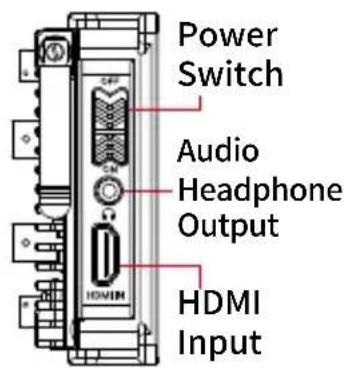
text_image
Power Switch Audio Headphone Output HDMI Input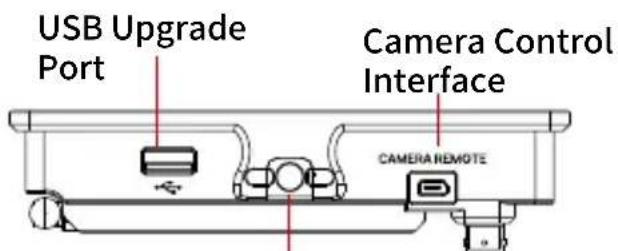
text_image
USB Upgrade Port Camera Control Interface CAMERA REMOTE1/4" Threaded Insert
Product Information 1.2
Packing List
BM5IIIWR Monitor X1
LANC Control Cable 0.4m X1
TYPE-C Control Cable 0.4m X1
Warm Prompt Card X1
Safety Box X1
L-Type Antenna X2
Power Cord 1m (Aviation
Connector - D-TAP) X1
Power Cord 0.4m (Aviation
Connector - DC) X1
U Disk (Manual, 3D LUTs,
Firmware Inside) X1
Product Information 1.3
Basic Parameters
| Size | 5.5" |
| Dimension | 145.4x91.4x37.8mm |
| Viewing Angle | 178°H/178°V |
| Brightness | 2200nit |
| Resolution | 1920x1080 |
| Contrast Ratio | 1000:1 |
| Weight | 383g |
| Color | 10bit(8+2 FRC) |
| Backlight | WLED |
| Material | Aluminum Alloy + Toughened Glass |
| Input Voltage | DC 7~24V |
| Max Power | 14W |
| Signal Input | 3G SDI、HDMI |
| Signal Output | 3G SDI |
| Headphone | Output |
| Menu Language | 简体中文/English |
| Power Input / Output | 4pin Aviation Connector |
| Signal Conversion | HDMI IN to SDI OUT |
| Camera Control Interface | CAMERA REMOTE |
| Motor Control Interface | Focus Puller |
| Support Battery Model | SONY NP-F970/F960/F750/F550 |
| Upgrade Firmware / Load LUT | USB-A |
| Fan | Yes |
| Antenna | 2.4G |
Product Information 1.4
Signal Specifications
Supported input resolution and frame rate
HDMI Signal
1920×1080p@23.97Hz,24Hz,25Hz,29.97Hz,30Hz,50Hz,59.94Hz,60Hz
1920×1080psf@23.97Hz,24Hz,25Hz,29.97Hz,30Hz
1920×1080i@50Hz,59.94Hz,60Hz
1280×720p@50Hz,59.94Hz,60Hz
720×576p&720×576i@50Hz
720×480p&720×480i@50Hz,59.94Hz,60Hz
Supported input/output resolution and frame rate
SDI Signal
1920×1080p@50fps,59.94fps,60fps
1920×1080p@50Hz,59.94Hz,60Hz YUV422
1920×1080p@23.98Hz,24Hz,25Hz,29.94Hz,30Hz YUV444/YUV422/RGB444
1920×1080psf@23.98Hz,24Hz,25Hz,29.97Hz,30Hz YUV444/YUV422/RGB444
1920×1080i@50Hz,59.94Hz,60Hz YUV444/YUV422/RGB444
1280×720p@50Hz,59.94Hz,60Hz YUV444/YUV422/RGB444
720×480i@59.94Hz YUV422
720×576i@50Hz YUV422
text_image
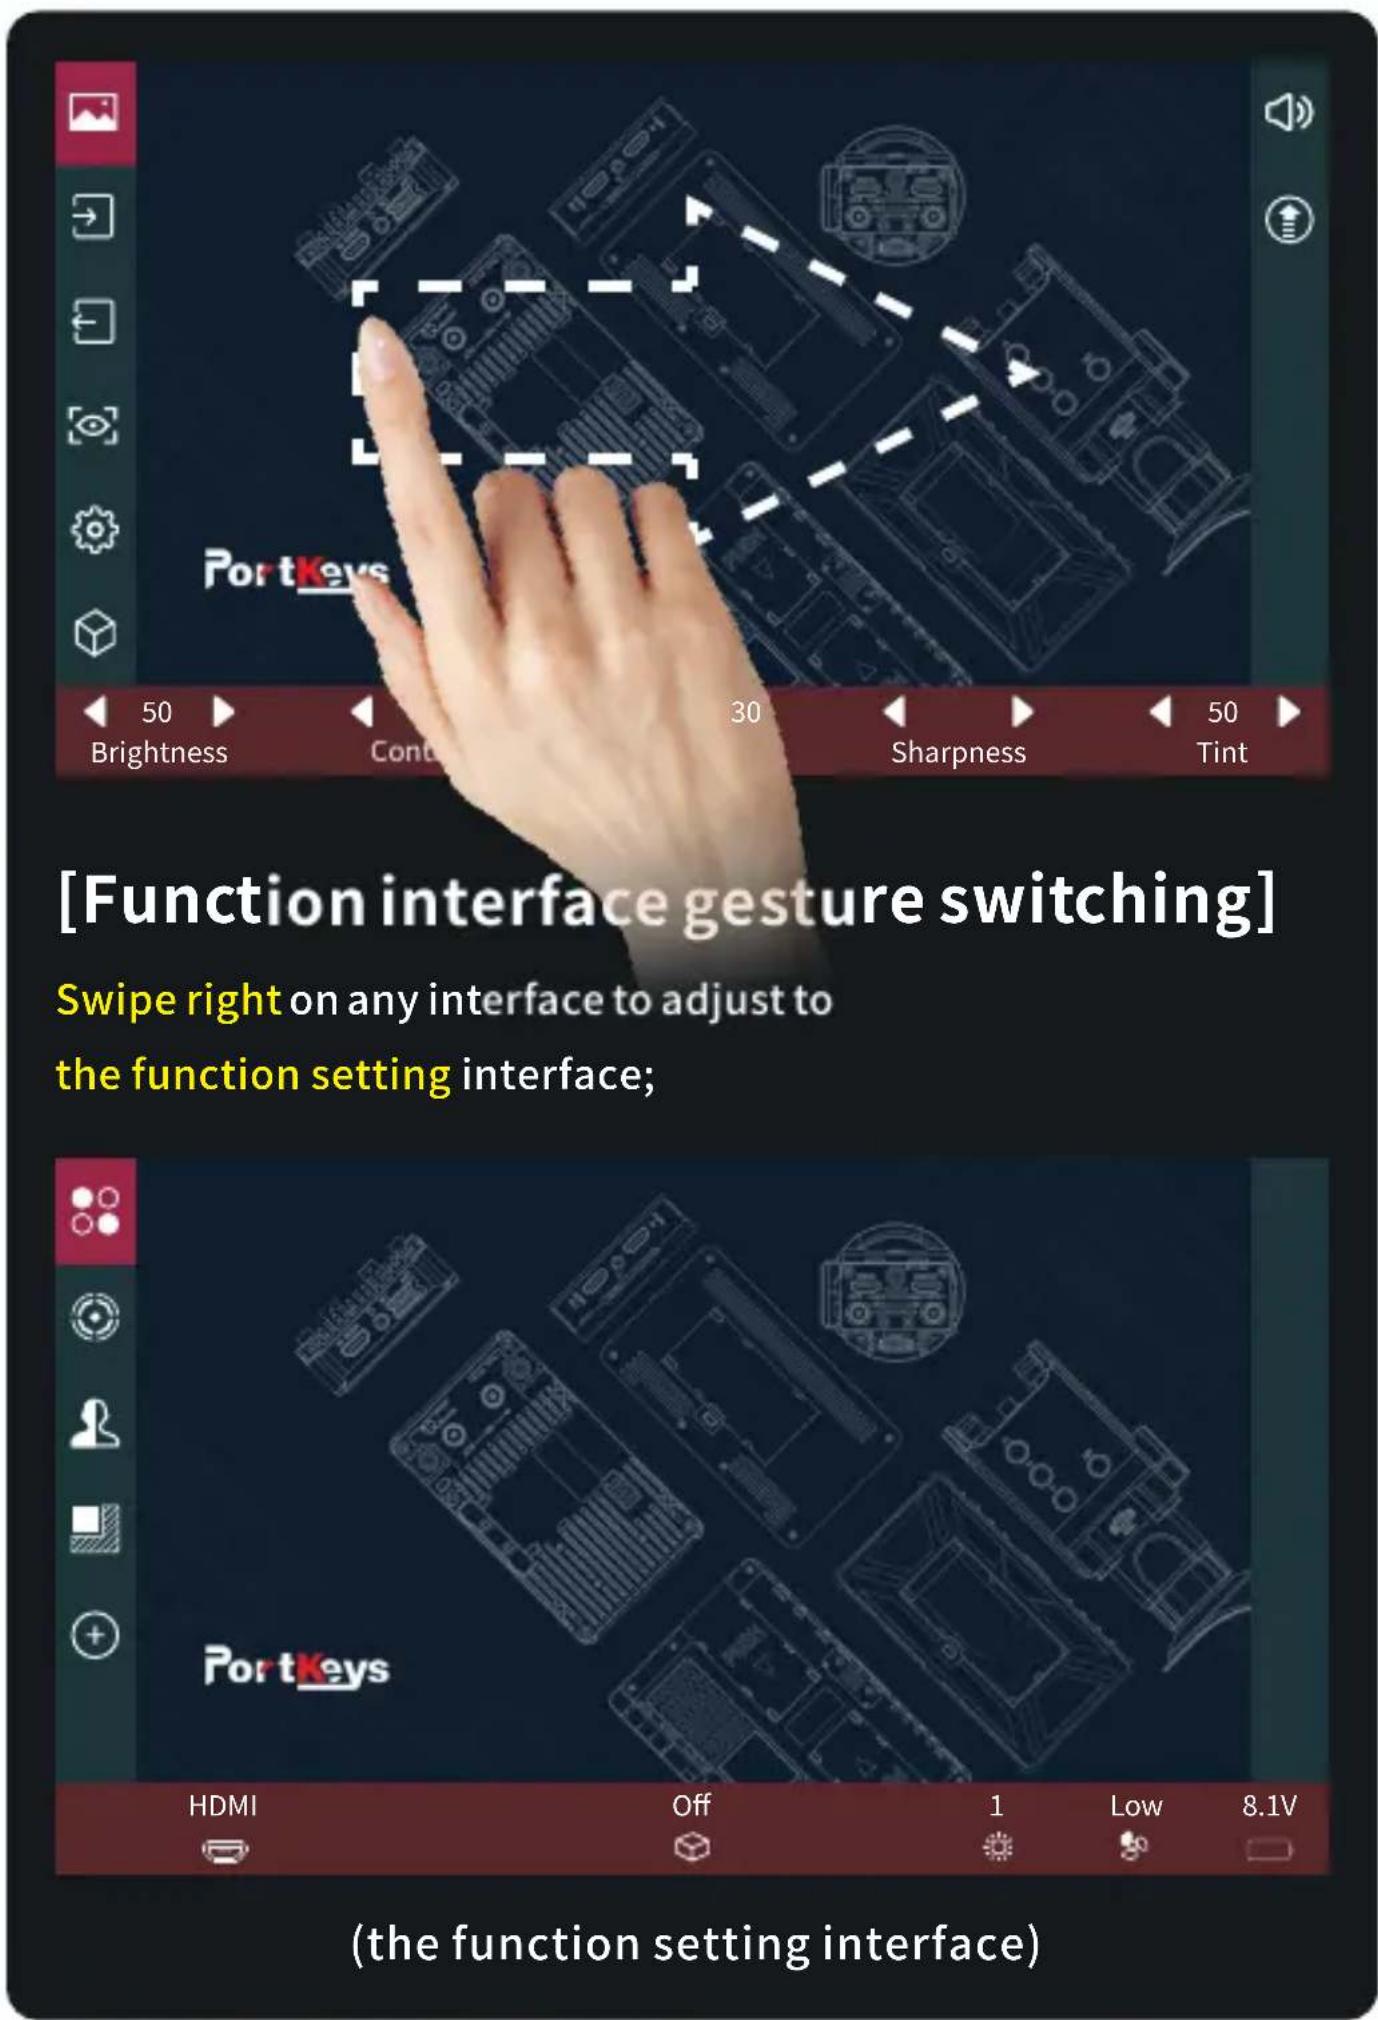
[Function interface gesture switching] Swipe right on any interface to adjust to the function setting interface; HDMI Off 1.Low 8.1V PortKeys 50 30 50 Brightness Conta Sharpness Tint PortKeys (the function setting interface)Function Interface
2.2
text_image
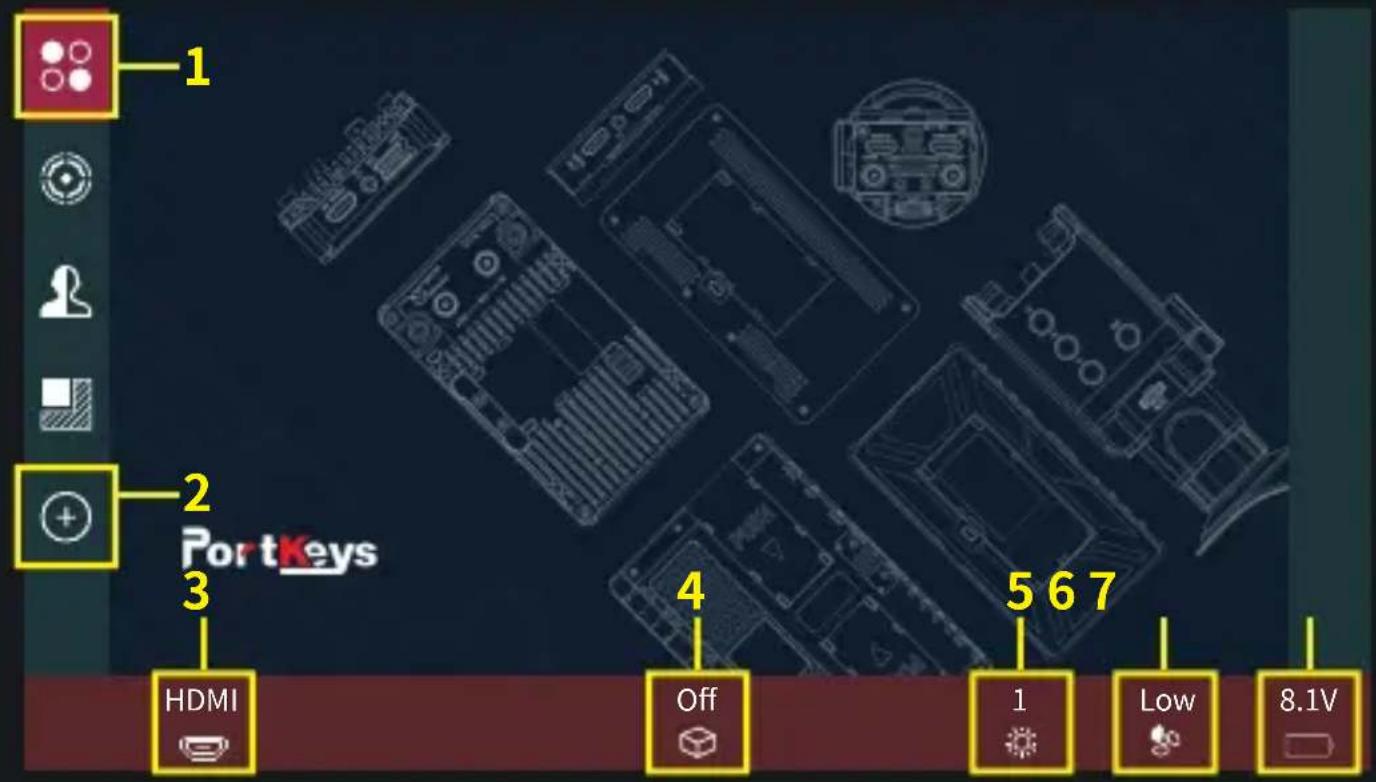
1 2 PortKeys 3 4 5 6 7 HDMI Off 1 Low 8.1V[Function Introduction]
- Software Function;
- Add Function Icon;
- Switch HDMI/SDI Signal;
- 3D LUT ON/OFF;
- Screen Brightness (1-10);
- Fan Strength (Low /High);
- Battery Level;
![Portkeys BM5 - [Function Introduction] - 1](/content/2026/05/811219/images/f1144132e814b317c2b948d9a87ca8db914235a693c23177f37c2b100c076ca2.jpg)
text_image
Check Field Guides Cross Hair Grids Peaking False Color Zebra UnderScan VectorScop Luma Histogram RGB RGB Waveform Waveform (All) Time Codec Audio Meters HDR(1LG) 3D LUT Image Crop Image Capture Image Overlay (Picture 1)[Custom Function Keys Settings]
- Click “+” add shortcut functions to the left and right sides; If the function icons on the left and right have been added (Picture 2); You can swipe down in the shortcut function title area to continue adding.
- Select the function icon to replace;
- Select the function icon and click "☐" to delete;
- “” Return key;
![Portkeys BM5 - [Custom Function Keys Settings] - 1](/content/2026/05/811219/images/67c3201fddcf19b1c6e66461100e1e66058e4424fa5ece861144a49c95d0c38a.jpg)
text_image
Port key Peaking Colour Style 6 Sensitivity 100% Grayscale Level(Picture 2)
![Portkeys BM5 - [Custom Function Keys Settings] - 2](/content/2026/05/811219/images/892d6c80230d2e5a2824823c2c4b22b59225cbc95b70837edfe23e4dace6b3e2.jpg)
text_image
Check Field Guides Cross Hair Grids Peaking False Color Zebra UndcrScan VectorScop Luma RGB Waveform Image Crop Image Capture Time Code Audio Meters RGB Histogram Luma Waveform HDR(HLG), 3D LUT(Picture 3)
- The first four functions are F1-F4 shortcut functions by default. You can swipe left/right to enter the function menu to change the custom functions (Picture 3);
![Portkeys BM5 - [Custom Function Keys Settings] - 3](/content/2026/05/811219/images/feead34f0abff01ec37adf881627683b45bb0003569af2bd5d793d63375719fc.jpg)
text_image
F1 F2 F3 F4 EXIT MENU 6 (Picture 4)- After F keys setting is completed, F1-F4 keys on the monitor can be used to turn on/off the functions (Picture 4);
[Basic Operation]
Long press “○○”,the function parameter setting shows at the bottom(Picture 5);
![Portkeys BM5 - [Basic Operation] - 1](/content/2026/05/811219/images/de43ba4b7f437777fe69b3197ab68e0a9ae5b32496af60f795e7477e548edf4e.jpg)
text_image
Check Field(Picture 5)
Swipe the icon “●●” to the right and enter the function menu, you could replace or delete functions(Picture 6);
![Portkeys BM5 - [Basic Operation] - 2](/content/2026/05/811219/images/95cb86c3199812afba53bc162f4305f958f99696660754552f4bb915a3af6ff7.jpg)
text_image
HDMI Off 1 Low 8.1V(Picture 6)
Swipe the icon “ 🔒 ” to the left and enter the function menu, you could replace or delete functions(Picture 7);
![Portkeys BM5 - [Basic Operation] - 3](/content/2026/05/811219/images/b098ebc69859d2d519ad34cbd9f245cc1c0eafdc802b70f9e43b9cc31768ab06.jpg)
text_image
Port keys HDMI Off 1.Low 8.1V(Picture 7)
![Portkeys BM5 - [Basic Operation] - 4](/content/2026/05/811219/images/ca67d442aaddd08e8e6666159ab404b827cbeb2f390937be58839e40d8464fb3.jpg)
text_image
PortKeys HDMI Low 8.1V[Settings interface gesture switching]
Swipe left on any interface to adjust to the system settings interface,
![Portkeys BM5 - [Settings interface gesture switching] - 1](/content/2026/05/811219/images/ed10de955cf4f5ffe84089f59c8ac7c45aab047d0dff283187222fe653148f7c.jpg)
text_image
PortKeys 50 Brightness Contrast Chroma Sharpness Tint( the system settings interface)
![Portkeys BM5 - [Settings interface gesture switching] - 2](/content/2026/05/811219/images/7c4a0d435c13c3ed19050b240f66712a7b8b6c576cd242da2d7fc887ba9dfca7.jpg)
text_image
1 2 50 50 50 30 50 Brightness Contrast Chroma Sharpness Tint![Portkeys BM5 - [Settings interface gesture switching] - 3](/content/2026/05/811219/images/a0f985096413bdf27ea3bcb6e973c3b025688e58dbcf4297dee6f5e1274208b5.jpg)
text_image
PortKeys 1.00X 1 ▶ Backlight ▶ 6500K ▶ Color TemperatureAnamorphic[Image Settings] ^1
- Click “ ”;
- Parameter setting information;
- Parameter setting information (Next page);
- Display the number of the page of Image parameter setting; Swipe left or right in the bottom information area to switch pages;
Setting Interface
3.3
text_image
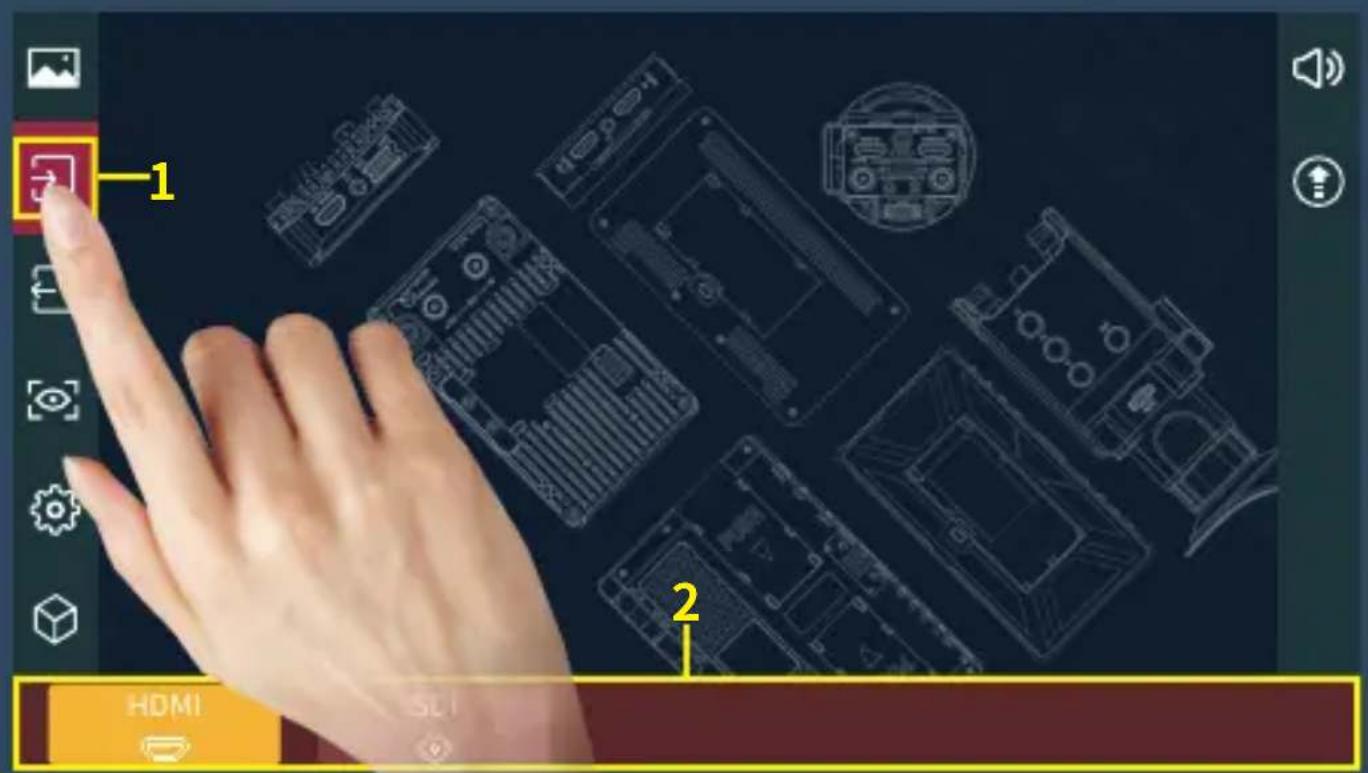
1 2 HDMI[Signal Source Settings]
- Click “→” ;
- Signal source setup information;
Setting Interface
3.4
text_image
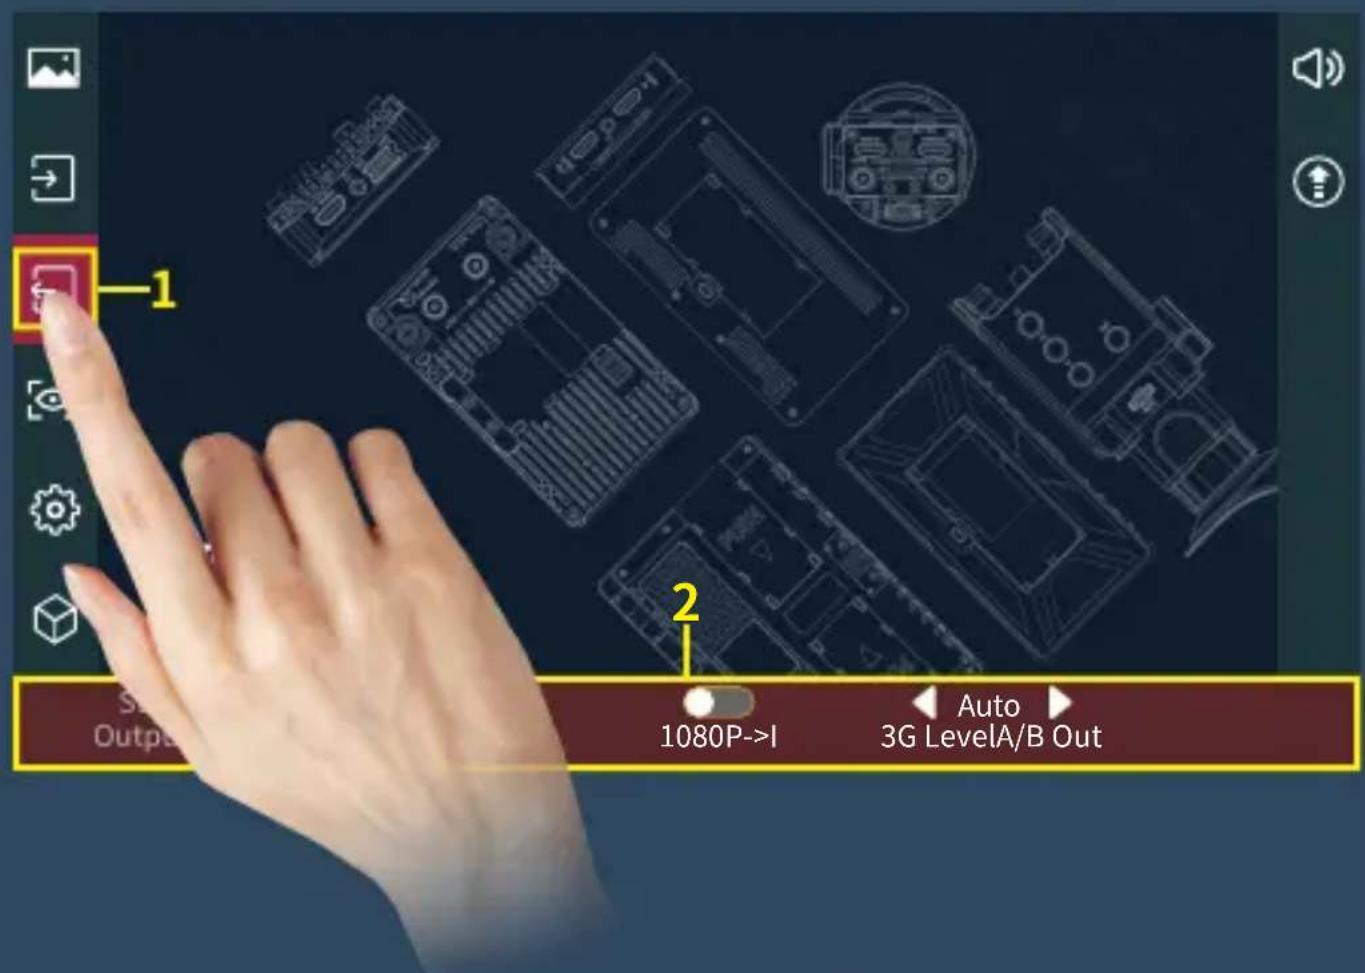
1 2 Output 1080P->I Auto 3G LevelA/B Out[LUT Output Settings]
- Click “←” ;
- LUT output and 1080P->I and other setting information;
Setting Interface
3.5
text_image
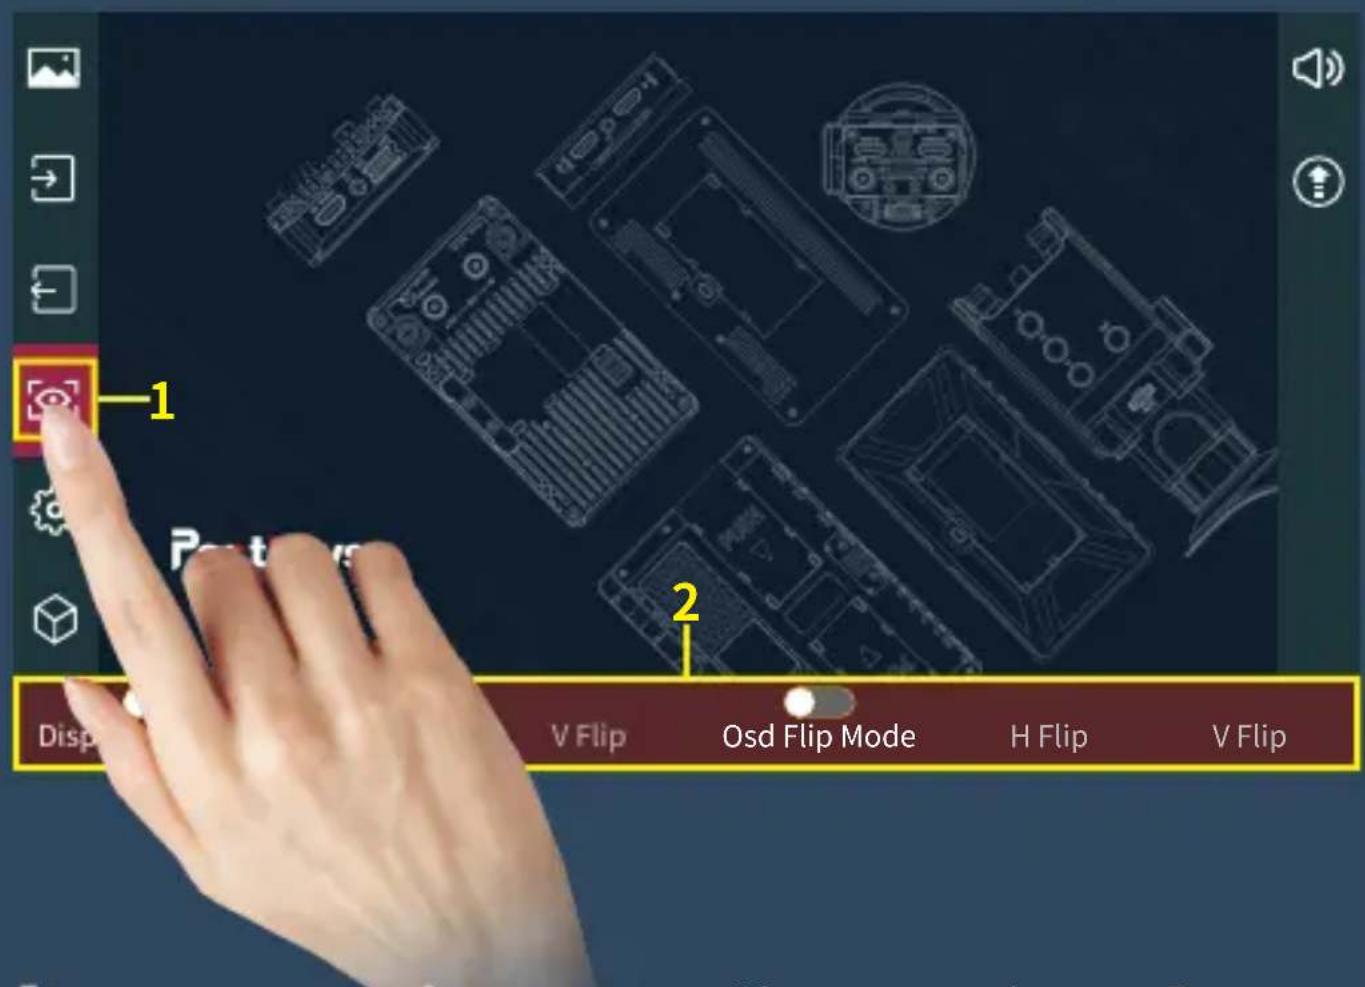
1 Post Display Mode V Flip Osd Flip Mode H Flip V Flip[Image and Menu Flip Settings]
- Click “[O]”;
- Image and menu flip setting information;
设置界面 3.6
text_image
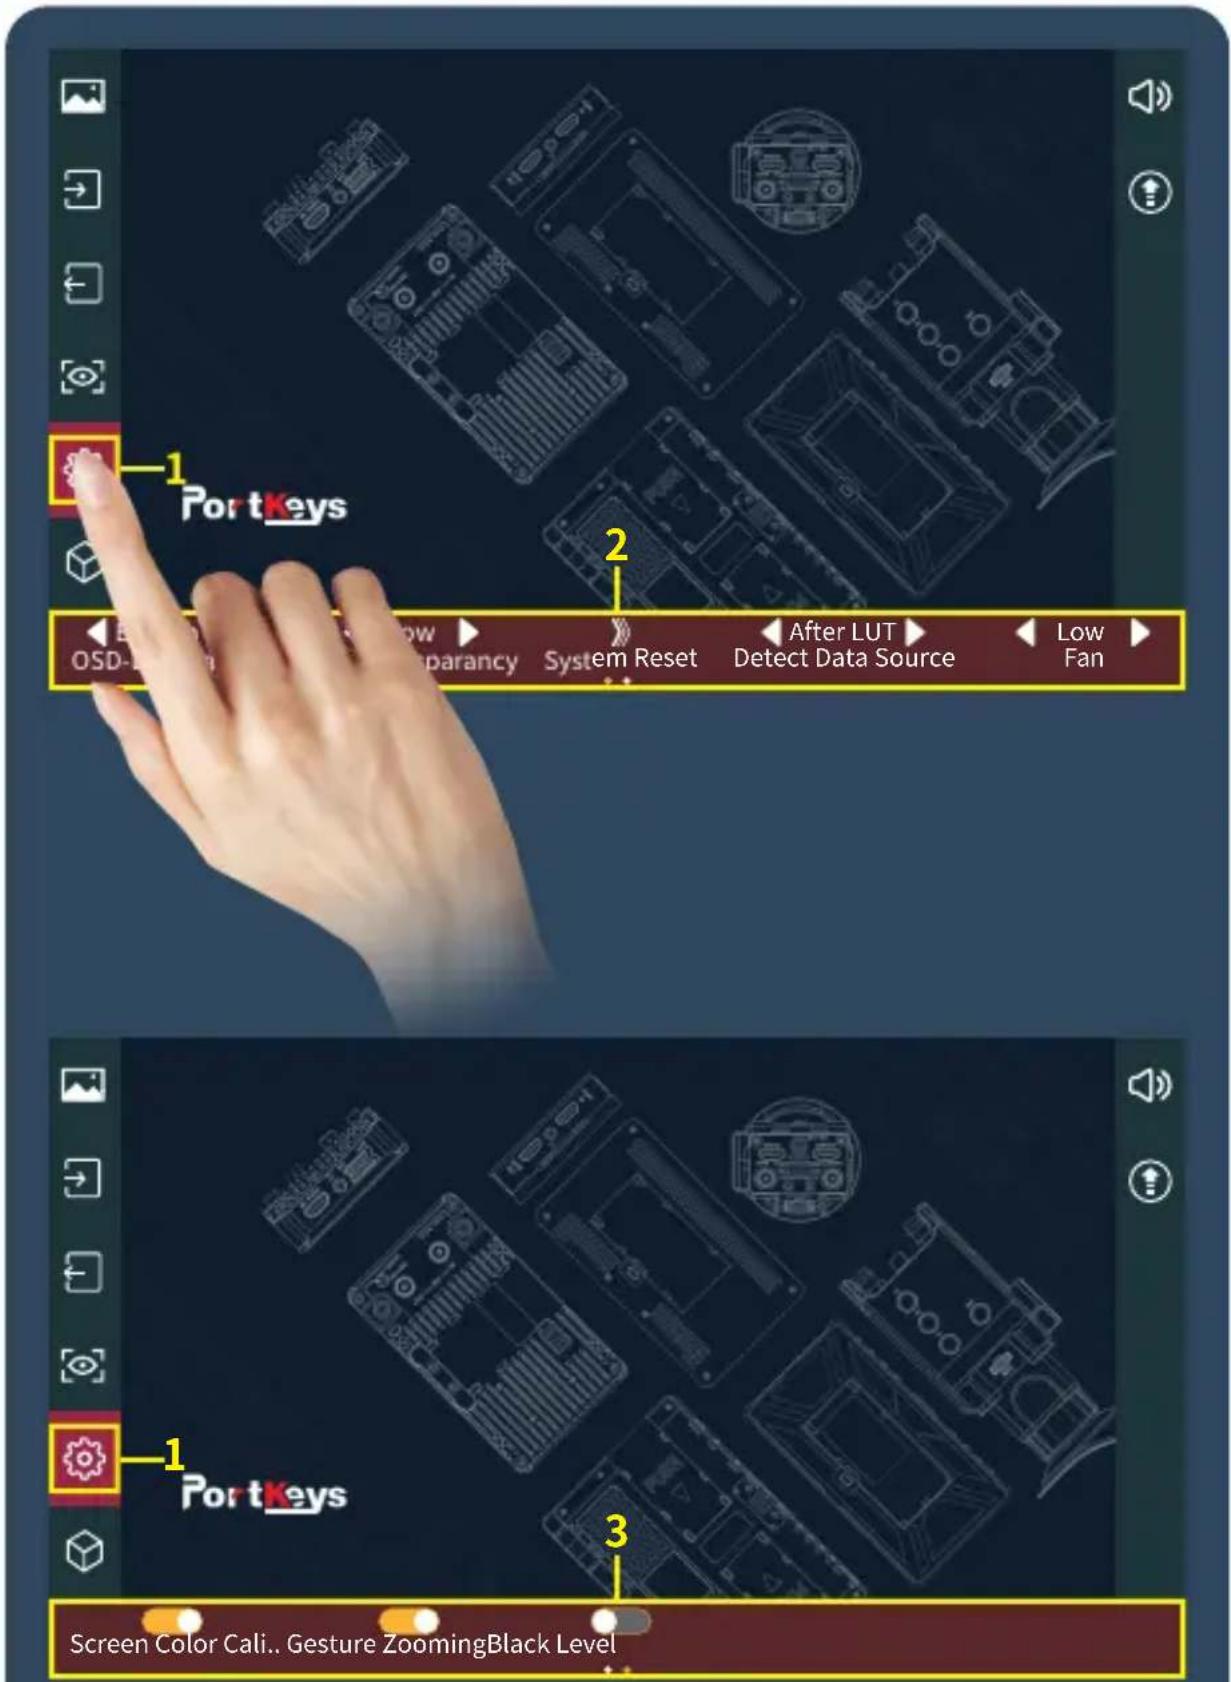
PortKeys 1 2 OSD-Blue System Reset After LUT Detect Data Source Low Fan 3 Screen Color Cali.. Gesture ZoomingBlack Level[System Setting]
- Click “⚙️”;
- System parameter setting information;
- System parameter setting information (Next page);
Setting Interface 3.7
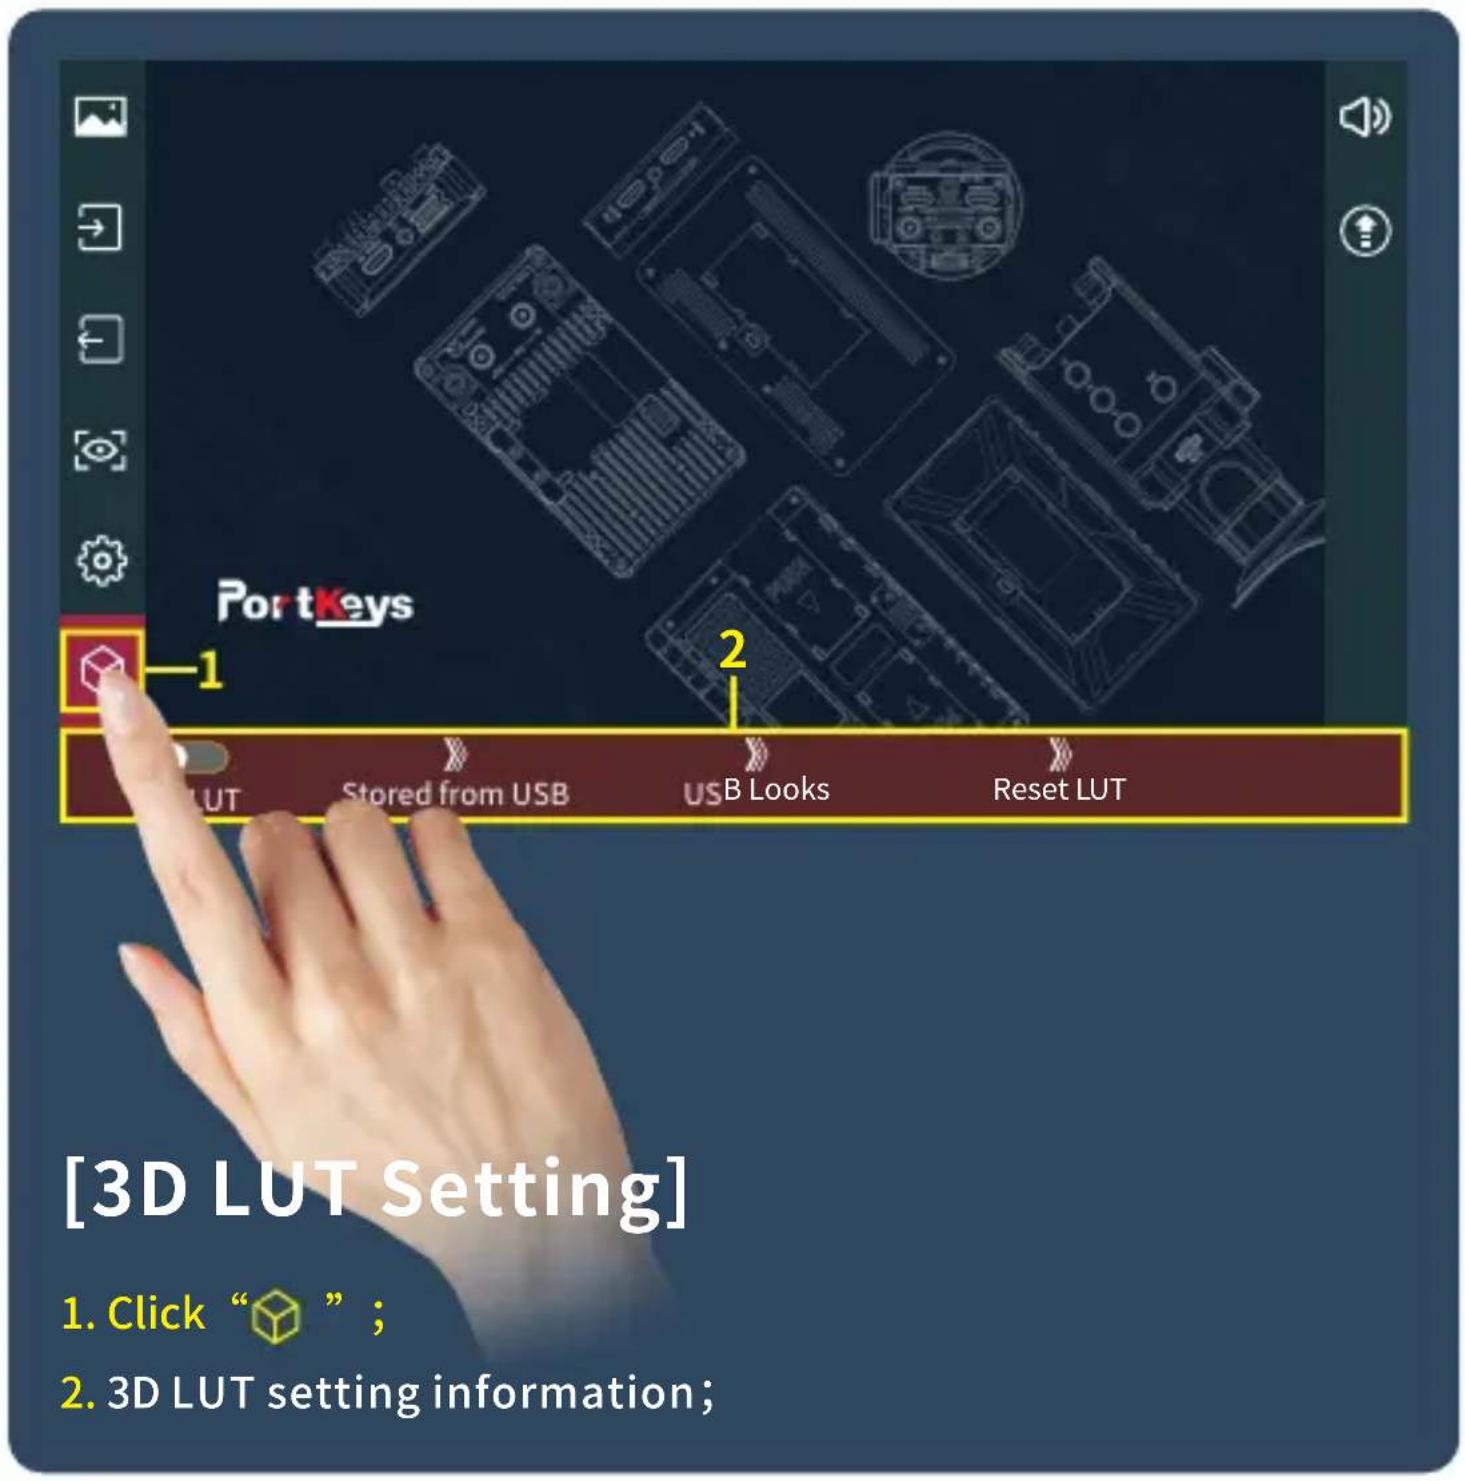
text_image
PortKeys 1 2 [3D LUT Setting] 1. Click " ; 2. 3D LUT setting information;Setting Interface 3.8
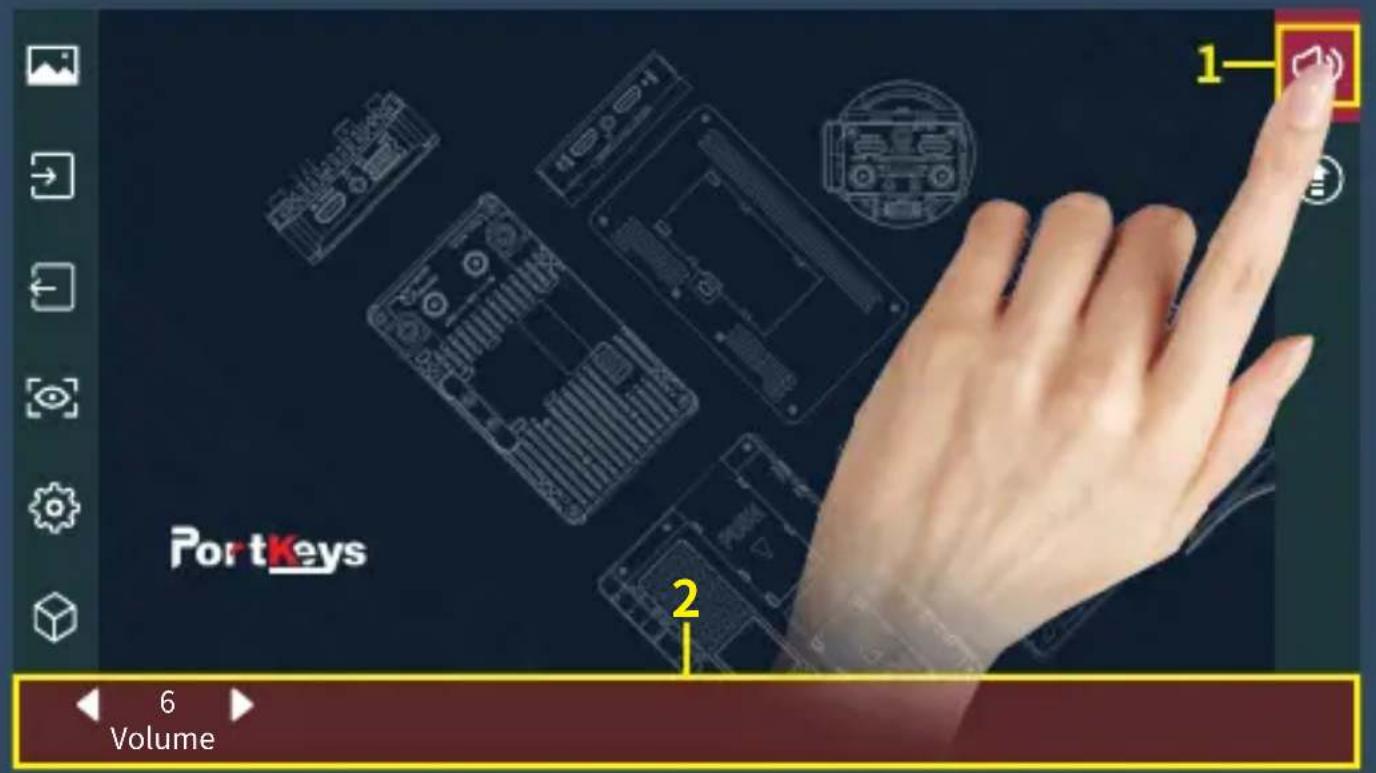
text_image
PortKeys 1 2 6 Volume[Volume Setting]
- Click “ speaker ” ;
- Volume information;
Setting Interface 3.9
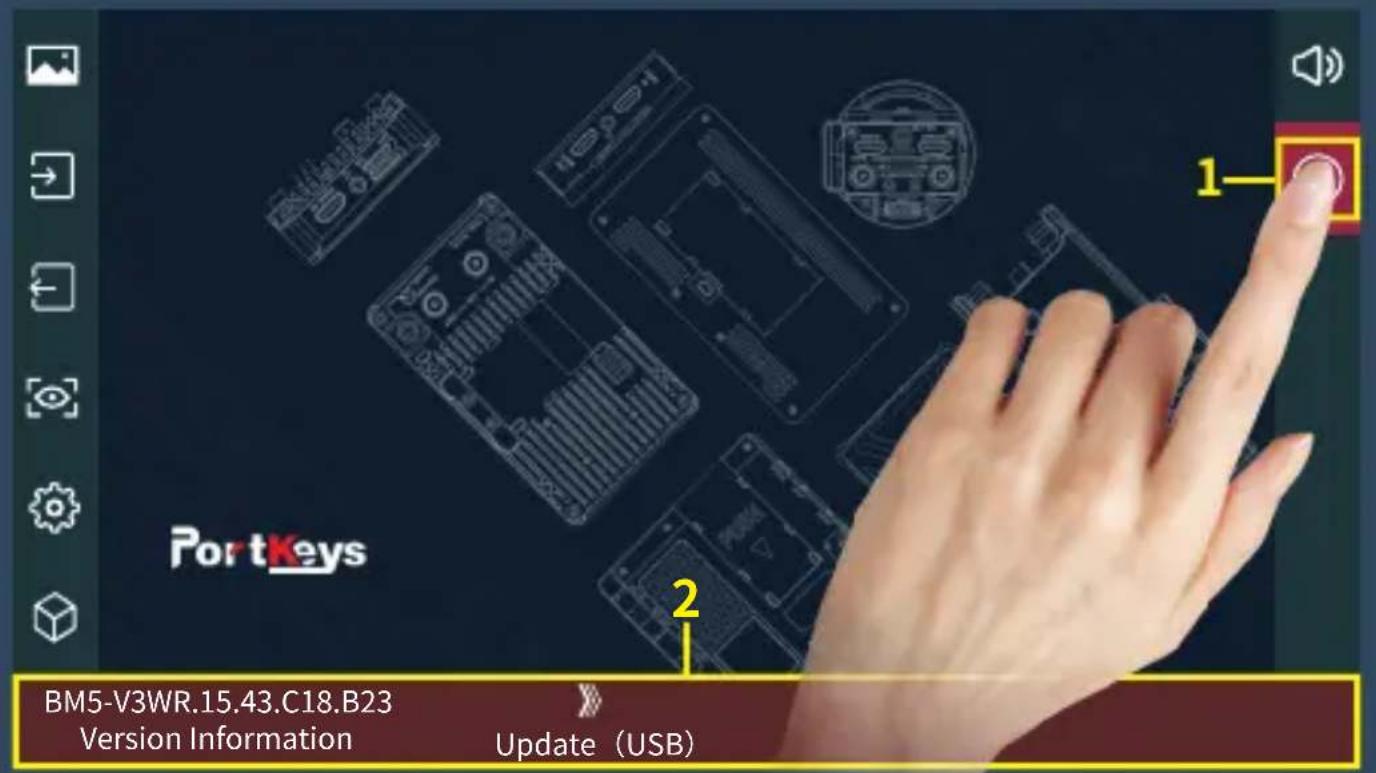
text_image
PortKeys 1 2 BM5-V3WR.15.43.C18.B23 Version Information Update (USB)[Version Setting]
- Click “!”;
- View version information and upgrades;
![Portkeys BM5 - [Version Setting] - 1](/content/2026/05/811219/images/c85b589c87b8bd3adc6ecec21b42b5d1751062b9c6aa98ed980b71ce4160ac75.jpg)
text_image
PortKeys HDMI Off 1 Low 8.1V[Camera control interface gesture switching]
Swipe down on any interface can be adjusted to the camera control settings interface;
![Portkeys BM5 - [Camera control interface gesture switching] - 1](/content/2026/05/811219/images/ee183baadda10588b182a9557b1623782cf36dce15a21fdc7d75305f591474c4.jpg)
text_image
PortKeys Z CAM E2(LANC) Canon(LANC)BMPCO Wi-Fi/ USB(the camera control settings interface)
Camera Control Interface
4.2
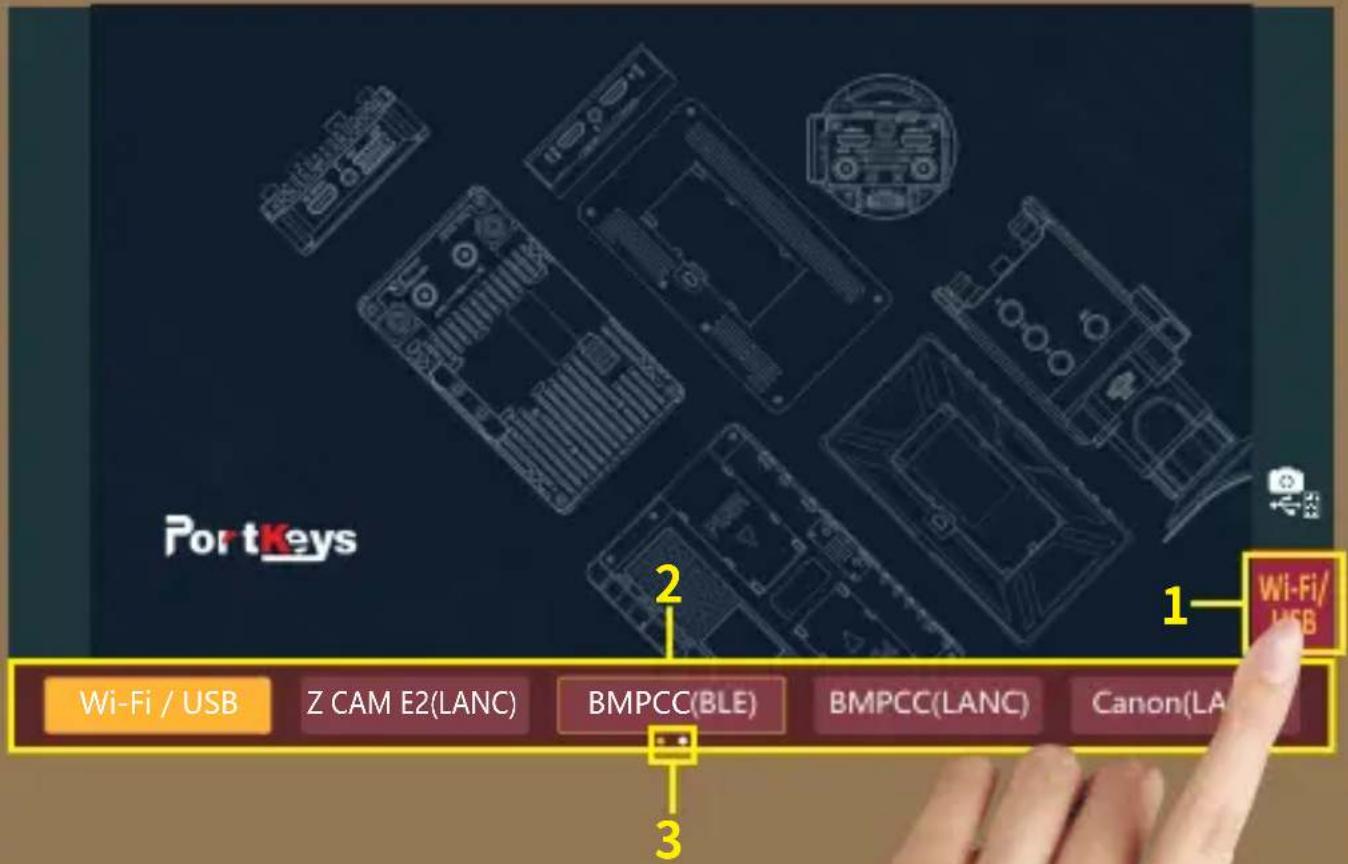
text_image
PortKeys 2 1 Wi-Fi/ USB Wi-Fi / USB Z CAM E2(LANC) BMPCC(BLE) BMPCC(LANC) Canon(LA) 3[Camera Model Setting]
- Click “Wi-Fi/USB”;
- Camera model options: Wi-Fi/USB、Z CAM E2(LANC)、BMPCC4K(BLE)、BMPCC(LANC)、Canon(LANC)、Sony(MUTI)、Sony(LANC)、Panasonic (Remote). Currently selected “Wi-Fi/USB”;
- Display the number of the page of camera brands Swiss or right in the bottom information area to switch pages;
![Portkeys BM5 - [Camera Model Setting] - 1](/content/2026/05/811219/images/5bbe0013b126aae967a4e04eba342d79e0f0e3696064f76712add00e3698bc7f.jpg)
text_image
FOCUS ZOOM IRIS 10.0 SMUTTER 0 ISO 100 FPS 60 Port Toys 2 3 device 4 WB 5600 TINT 10 ProRes HQ 4K DCI 400/72/25 1-[Bluetooth Connection]
- Select "BMPCC4K(BLE)";
- Click "B";
- Select "My device", For bluetooth connection (Record of successful bluetooth connection);
- Select "AKI new device", turn on the BMPCC4K/6K Bluetooth function and record the passcode (picture 1), enter the passcode on the monitor(Picture 2 and 3), click "Pair", After successful connection, The Bluetooth icon will be displayed in yellow "8"";
- Select "Disconnect" to disconnect the Bluetooth connection;
![Portkeys BM5 - [Bluetooth Connection] - 1](/content/2026/05/811219/images/6e5abbb57401d4cdc5047fee2cb75a887b9f2ada48c192674d01c1769a205b27.jpg)
text_image
404228 BN5-VZ wants to connect to this camera Enter the above package in the device to connect. Camera Bluetooth name is A:A0B10190(Picture 1)
![Portkeys BM5 - [Bluetooth Connection] - 2](/content/2026/05/811219/images/6e92f59ddfc0249d01e015d52ffcc5fd2add21d5bc48844c7ce480d29ec11168.jpg)
text_image
Bluetooth Pairing Request Would like to Pairing, Please input the code displayed on device. Cancel Pair 1 2 3 4 5 6 0 7 8 9(Picture 2)
![Portkeys BM5 - [Bluetooth Connection] - 3](/content/2026/05/811219/images/e58a271404a018cc0f8f124e9fb4e253cbe04ad2da9be552ec930aaf81fa2e43.jpg)
text_image
Bluetooth Pairing Request Would like to Pairing, Please input the code displayed on device.(Picture 3)
Camera Control Interface
4.4
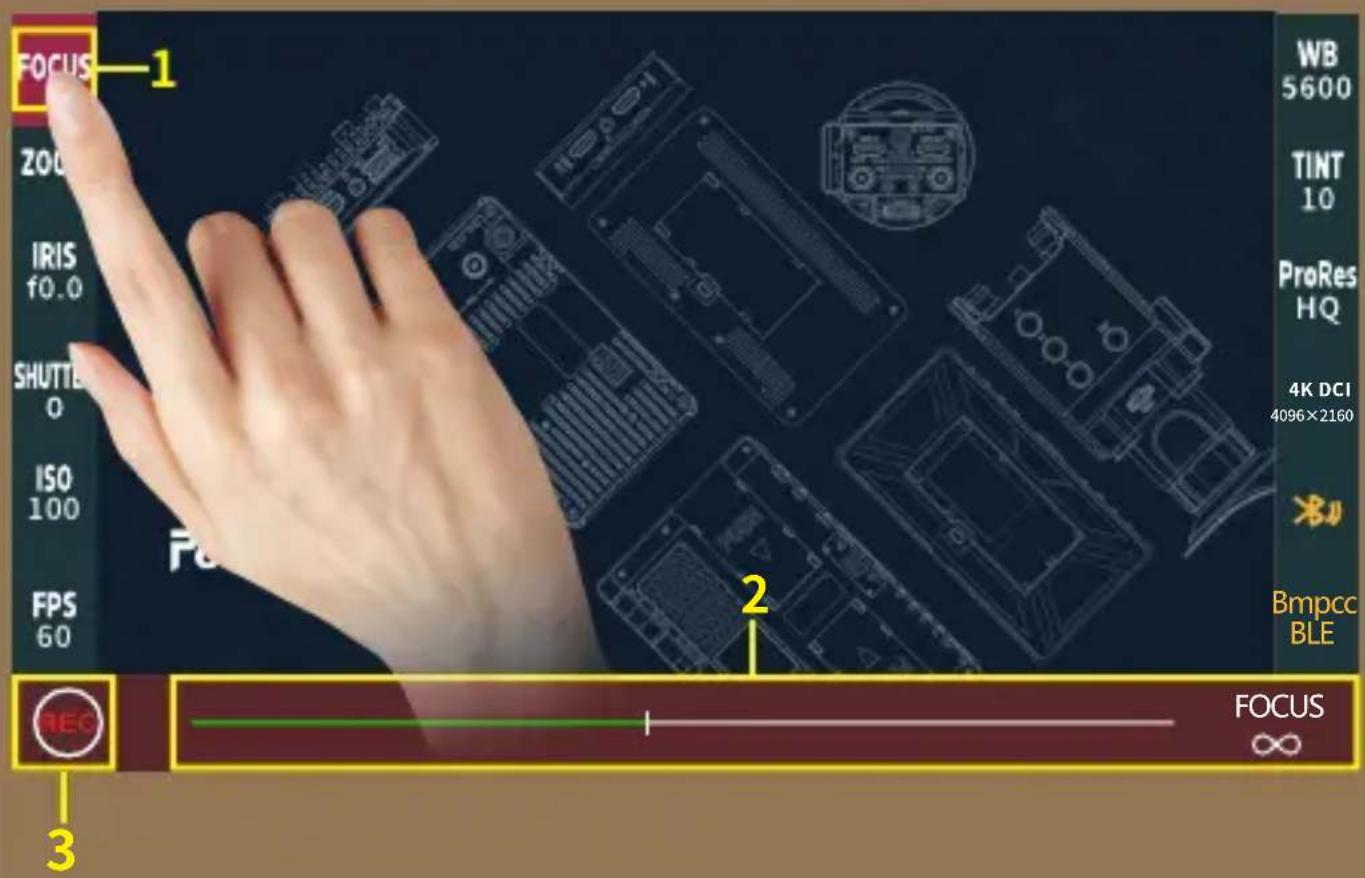
text_image
1 2 3 FOCUS WB 5600 TINT 10 ProRes HQ 4K DCI 4096×2160 Bmpcc BLE REC FOCUS[Function Usage]
- Click “FOCUS”;
- Adjust the parameter on the progress bar;
- Record;
[Wi-Fi Connection]
- On the KOMODO camera, go to the Main menu, find Communication, select Wi-Fi, and then enable "Ad-Hoc". Make sure that the SSID setting starts with "KOMODO" or "komodo" and the frequency band is "2.4GHz";
- Select the "Wi-Fi / USB" camera mode on the monitor, Click the " [icon] to open the "●" Wi-Fi;
![Portkeys BM5 - [Wi-Fi Connection] - 1](/content/2026/05/811219/images/43e435dba6807e5027b18253cca0a7c9ae1fa8557c58b5b88864a56552a92c93.jpg)
text_image
Porteys Wi-Fi USB- Select the " My device " to connect to the Wi-Fi (successfully connected WiFi record);
![Portkeys BM5 - [Wi-Fi Connection] - 2](/content/2026/05/811219/images/a4d613ca64886df5f90175a35ab3f775151a7676bc424b8058438a9afd278e22.jpg)
text_image
Port keys Wi-Fi Wi-Fi/US3 DisconnectAdd new deviceMy de- Select " Add new device ", select the Wi-Fi name on the monitor, And enter the password.Tap " OK ", the Wi-Fi icon will be displayed as " " after successful connection;
![Portkeys BM5 - [Wi-Fi Connection] - 3](/content/2026/05/811219/images/e403dd846fbfd388508d060812ac1c3f598e941e7c94120dee9c487b2914e4bc.jpg)
text_image
Portkeys KOMODO11 komodo22 Back Wi-Fi/ USB![Portkeys BM5 - [Wi-Fi Connection] - 4](/content/2026/05/811219/images/703500c8142315027e8af16ad6b1b17daa512deb02dafef4efd8c1dce369b0a1.jpg)
text_image
KOMODO11 12345678 1 2 3 4 5 6 7 8 9 0 q w e r t y u i o p a s d f g h j k l ↑ z x c v b n m <×> @%? OK![Portkeys BM5 - [Wi-Fi Connection] - 5](/content/2026/05/811219/images/fe89cba35771580b4c68145185c3e6871342da0d97231514976ee0be43cc4a57.jpg)
text_image
FOCUS IRIS 15.6 SHU... 270 ISO 3200 FPS 24 CT 3500 Portkeys EV 0.500 Wi-Fi/ USB- Select "Disconnect" to disconnect the Wi-Fi;
![Portkeys BM5 - [Wi-Fi Connection] - 6](/content/2026/05/811219/images/3e415a5a26de8709892c3c621b5440f649de810e3bc60f9673e1ef7868faadb0.jpg)
text_image
PortKeys HDMI Off Low 8.1V[Motor control interface gesture switching]
Swipe up on any interface can be adjusted to the motor control settings interface;
![Portkeys BM5 - [Motor control interface gesture switching] - 1](/content/2026/05/811219/images/8515298fa40af19c426fe0a9bbbd66c44058dab65fb62efdbbf91c926f51f956.jpg)
text_image
A B CAL + 10s A←B - PortKeys FOCUS NO:1 ZOOM NO:2 IRIS NO:3 REC(the motor control settings interface)
Motor Control Interface
5.2
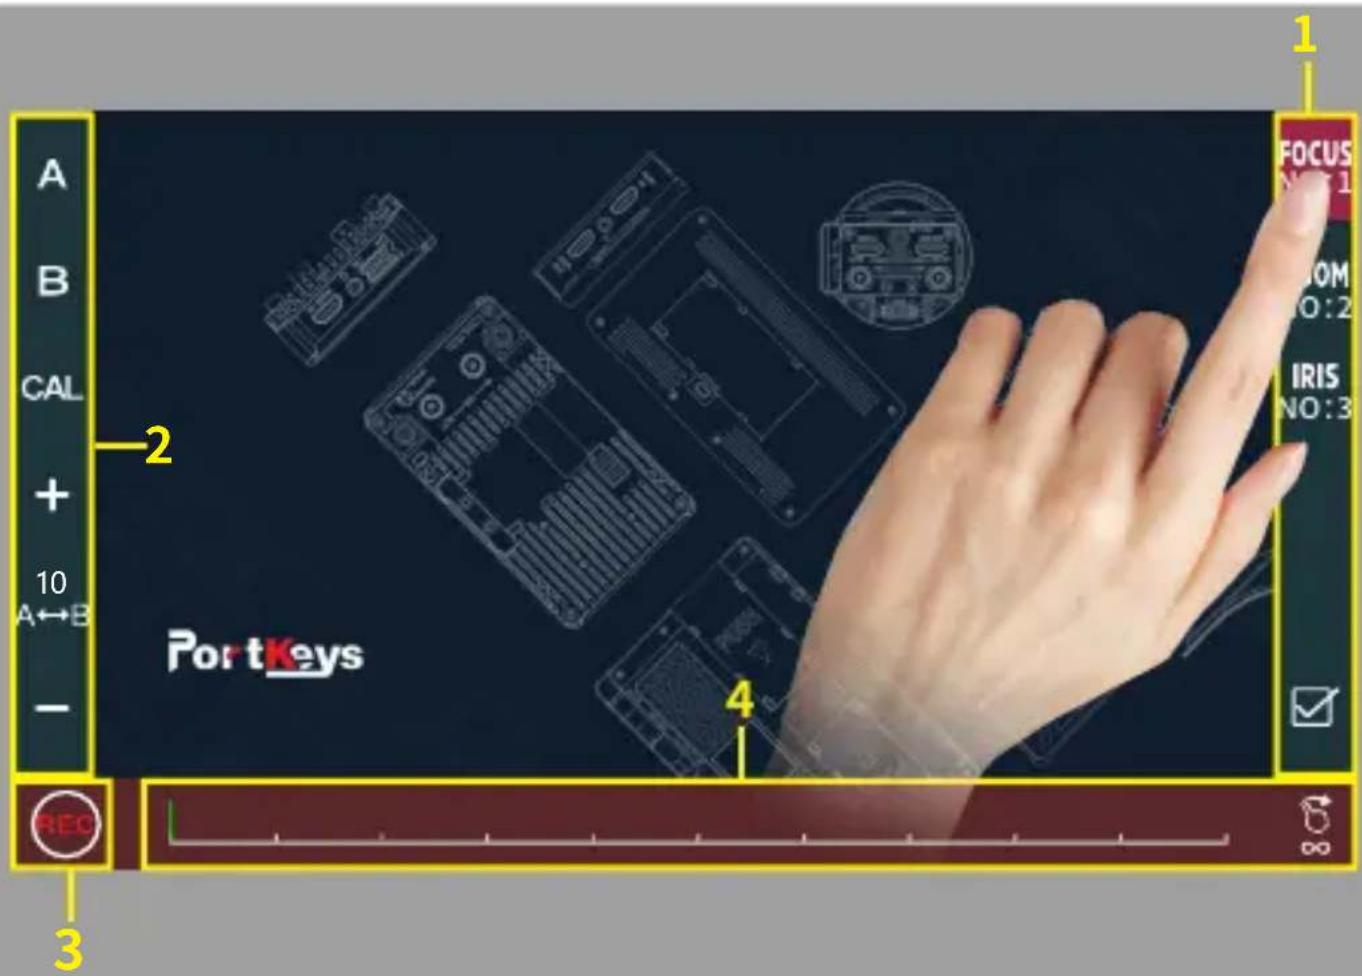
text_image
A B CAL + 10 A↔B - 2 PortKeys 4 1 FOCUS N:1 ROM NO:2 IRIS NO:3 REC 8[Motor Control]
- Click to select channel options “ FOCUS ” ;
- Select the channel option to set the channel parameters;
- Record;
- Adjust the motor stroke;
Warning:
Changes or modifications not expressly approved by the party responsible for compliance could void the user's authority to operate the equipment.
This device complies with Part 15 of the FCC Rules. Operation is subject to the following two conditions: (1) this device may not cause harmful interference, and (2) this device must accept any interference received, including interference that may cause undesired operation.
NOTE: This equipment has been tested and found to comply with the limits for a Class B digital device, pursuant to Part 15 of the FCC Rules. These limits are designed to provide reasonable protection against harmful interference in a residential installation. This equipment generates, uses and can radiate radio frequency energy and, if not installed and used in accordance with the instructions, may cause harmful interference to radio communications. However, there is no guarantee that interference will not occur in a particular installation.
If this equipment does cause harmful interference to radio or television reception, which can be determined by turning the equipment off and on, the user is encouraged to try to correct the interference by one or more of the following measures:
-- Reorient or relocate the receiving antenna.
-- Increase the separation between the equipment and receiver. -- Connect the equipment into an outlet on a circuit different from that to which the receiver is connected.
-- Consult the dealer or an experienced radio/TV technician for help.
RF Exposure Statement
This equipment complies with FCC radiation exposure limits set forth for an uncontrolled environment. This equipment should be installed and operated with a minimum distance of 20cm between the radiator & your body.
6. Set Up Photos-15C
I can not find the blow 1GHz test setup photo and AC line conducted emission setup photo.
Please provide.
For AC line conducted emission:
"If the EUT normally receives power from another device that in turn connects to the public utility ac power lines, measurements shall be made on that device with the EUT in operation to demonstrate that the device continues to comply with the appropriate limits while providing the EUT with power. If the EUT is operated only from internal or dedicated batteries, with no provisions for connection to the public utility ac power lines (600 VAC or less) to operate the EUT (such as an adapter), then ac power-line conducted measurements are not required."
The earphone normally receives power from charge box that in turn connects to the public utility AC power lines.so line conducted emission need to tested.
7. BLE-test report
For AC line conducted emission:
The earphone normally receives power from charge box that in turn connects to the public utility AC power lines, so line conducted emission need to tested.
8.A3-TZ2009001675-E2 BT
1).product name is incorrect.
Product description
Trade Mark : TECNO
Product name ......: Mobile Phone
Model No....: A3
Standards ...... FCC Rules and Regulations Part 15 Subpart C Section 15.247 ANSI C63.10;2013
2). For AC line conducted emission:
The earphone normally receives power from charge box that in turn connects to the public utility AC power lines. so line conducted emission need to tested.