
MTC-29UB - Subwoofer JBL - Kostenlose Bedienungsanleitung
Finden Sie kostenlos die Bedienungsanleitung des Geräts MTC-29UB JBL als PDF.

| Produkttyp | U-Halterung (U-Bracket) |
| Kompatibilität | JBL Control 29AV Lautsprecher |
| Material | Stahl, Edelstahlbeschläge |
| Oberfläche | Schwarz, pulverbeschichtet |
| Abmessungen (ca.) | 220 mm x 140 mm x 80 mm (B x T x H) |
| Gewicht (ca.) | 1,5 kg |
| Stromversorgung | Nicht zutreffend (passive Halterung) |
| Schwenkbereich | Ja, einstellbar (ca. ±30°) |
| Montageoptionen | Wand, Decke, Bühne |
| Befestigungsmaterial im Lieferumfang | 2 Reibungsdichtungen, 2 Bolzen (6 mm x 16 mm), 2 Unterlegscheiben, 2 Federringe |
| Maximale Traglast | 30 kg (basierend auf typischer Lautsprecherlast) |
| Installationshinweis | Nur durch Fachpersonal; bauseitige Befestigung an tragfähiger Struktur erforderlich |
| Sicherheitsempfehlung | Verwendung eines zusätzlichen Sicherungsseils (nicht im Lieferumfang) |
| Reinigung und Pflege | Mit einem feuchten Tuch abwischen; keine aggressiven Reinigungsmittel |
| Ersatzteile | Erhältlich über JBL-Kundendienst (z. B. Bolzen, Dichtungen) |
| Reparatur | Nicht reparierbar; bei Defekt Austausch der Halterung |
| Marke | JBL |
| Modell | MTC-29UB |
| Kategorie | Lautsprecherhalterung (Subwoofer-Halterung) |
Häufig gestellte Fragen - MTC-29UB JBL
Benutzerfragen zu MTC-29UB JBL
0 Frage zu diesem Gerät. Beantworten Sie die, die Sie kennen, oder stellen Sie Ihre eigene.
Eine neue Frage zu diesem Gerät stellen
Laden Sie die Anleitung für Ihr Subwoofer kostenlos im PDF-Format! Finden Sie Ihr Handbuch MTC-29UB - JBL und nehmen Sie Ihr elektronisches Gerät wieder in die Hand. Auf dieser Seite sind alle Dokumente veröffentlicht, die für die Verwendung Ihres Geräts notwendig sind. MTC-29UB von der Marke JBL.
BEDIENUNGSANLEITUNG MTC-29UB JBL

MTC-29UB Instructions
U-Bracket for Control 29AV Loudspeaker
The MTC-29UB bracket mounts the Control 29AV loudspeaker to the walls, decks and ceilings and provides a degree of swiveling capability. Read and follow these instructions carefully before beginning.
Installing speakers must be performed by experienced professionals. If you have any doubts about the integrity of the structure you are mounting to or are not sure about the proper hardware or method to use, consult a structural engineer.
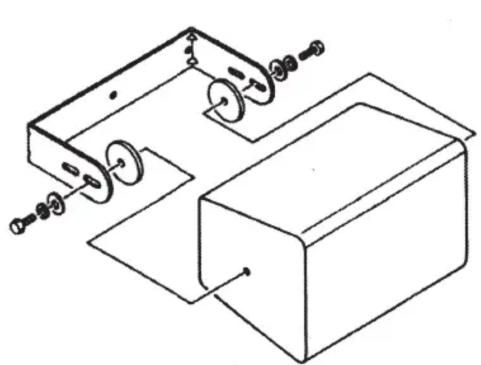
| Qty | Description |
| 1 pc. | Bracket |
| 2 pcs | Friction Gasket |
| 2 pcs | Bolt, 6mm, 1mm pitch, 16 mm long,18-8SS |
| 2 pcs | Fender Flat Washers for 6mm,18-8SS |
| 2 pcs | Spring Lockwasher for 6mm,18-8SS |
Step 1 – Test Fit the Bracket to the Speaker
Place the bracket over the speaker cabinet. Gaps between the speaker surface and the bracket arms are to be filled in with the included friction gasket. Test the included hardware to make sure the bolts, washers and lock washers fit correctly. Determine which slot you will be using and how the bracket will be positioned in relation to the speaker. Determine which threaded hole in the speaker will be used (Note: The center hole is closest to the center of gravity, so the speaker will stay in position best when using the center hole.) Make sure you will have enough wall clearance for your intended positioning. Remove the bracket from the speaker.
Step 2 – Install the Bracket Securely to Building Structure
Select the mounting area where the speaker will be positioned. Be sure there is adequate structural material for mounting, such as a stud. Do not rely on drywall, acoustic tiles, etc. to support the weight of the speaker. Follow building code requirements to safely install the bracket to the building structure. Tighten all hardware permanently.
Step 3 – Install Speaker into Bracket.
Position the speaker in between the bracket arms and install the included hardware through the desired slots and into the speaker cabinet's threaded holes. Be sure to place the friction gaskets between the speaker and the bracket arms then tighten the bolts loosely, not tight.
Step 4 – Aim the Speaker
Rotate the speaker until it is aimed in the desired direction, then secure the side bolts permanently with a wrench.
Step 5 – Recommendation: Safety Cable
It is strongly recommended that the speaker be secured to the mounting structure with a properly rated safety cable.
natural_image
Technical line drawing of a mechanical assembly with rollers and a rectangular block (no text or symbols)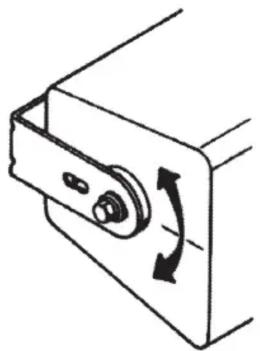
natural_image
Technical line drawing of a mechanical component with a curved arrow indicating rotation (no text or symbols)

Marke : JBL
Modell : MTC-29UB
Kategorie : Subwoofer