
SX-3900A - Orgel TECHNICS - Kostenlose Bedienungsanleitung
Finden Sie kostenlos die Bedienungsanleitung des Geräts SX-3900A TECHNICS als PDF.


| Produkttyp | Elektronische Orgel |
| Modell | Technics SX-3900A |
| Marke | Technics |
| Abmessungen (B×H×T) | 111 cm × 92,7 cm × 59 cm |
| Gewicht | 64 kg |
| Stromversorgung | 80 W AC 100–240 V, 50–60 Hz |
| Tastaturen | Obermanual: 44 Tasten; Untermanual: 44 Tasten; Pedal: 13 Tasten |
| Klangfarben (Obermanual) | Flöte 16′, 8′, 4′; Diapason 8′; Klarinette 16′; Oboe 8′; Streicher 8′, 4′ |
| Preset-Sounds | Piano, Cembalo, Vibraphon, Cancel |
| Harmonizer | Wellenform, Spitzenfrequenz, Auto Wah, Wah-Geschwindigkeit, Lautstärke, Obermanual-Add |
| Percussive Töne | 4′, Normal/Full, Short/Long |
| Effekte | Tremolo, Chorus, Delay-Tremolo, Delay-Vibrato, Vibrato (Tiefe), Hall, Brillanz, Obermanual-Sustain, Pedal-Sustain, Manual Balance, Pedal-Lautstärke, Glide Control |
| Automatik-Rhythmus | 12 Rhythmen (z.B. Marsch, Swing, Rock, Bossa Nova, Walzer) plus Fill In & Intro |
| Auto Play Chord | One Finger Chord, Fingered Chord, Separated Pedal, Pedal Constant, Memory, Walking Bass |
| Arpeggio | Ein, Auf/Ab, Soft/Loud |
| Programmierter Chord Computer | Record, Reset, Whole, Half, Back, End; bis zu 32 Akkorde speicherbar |
| Anschlüsse | Kopfhörer, Mikrofon (mit Lautstärke), Aux-Eingang, Line-Ausgang |
| Lautsprecher | 2 × 20 cm, 1 × 8 cm; Ausgangsleistung 35 W (Peak) |
| Pflege und Reinigung | Oberflächen mit feuchtem Tuch reinigen; keine Lösungsmittel oder Benzol verwenden; Gehäuse mit Wachspolitur pflegen |
| Sicherheit | Netzstecker ziehen bei Nichtgebrauch; kein Öffnen des Gehäuses; bei Störungen Fachhändler kontaktieren |
| Ersatzteile und Reparatur | Nur Originalteile verwenden; Reparaturen durch qualifiziertes Fachpersonal |
Häufig gestellte Fragen - SX-3900A TECHNICS
Benutzerfragen zu SX-3900A TECHNICS
0 Frage zu diesem Gerät. Beantworten Sie die, die Sie kennen, oder stellen Sie Ihre eigene.
Eine neue Frage zu diesem Gerät stellen
Laden Sie die Anleitung für Ihr Orgel kostenlos im PDF-Format! Finden Sie Ihr Handbuch SX-3900A - TECHNICS und nehmen Sie Ihr elektronisches Gerät wieder in die Hand. Auf dieser Seite sind alle Dokumente veröffentlicht, die für die Verwendung Ihres Geräts notwendig sind. SX-3900A von der Marke TECHNICS.
BEDIENUNGSANLEITUNG SX-3900A TECHNICS
Technics
Electronic Oragan
SX-3900A
Operating instructions

natural_image
Black and white photo of a modern office building (no visible text or signage)Before operating this set, please read these instructions completely

natural_image
Pure geometric lines forming a right angle with two black dots, no text or symbols presentOPERATING
INSTRUCTIONS
Thank you very much for selecting this organ. We are sure you will enjoy many happy hours of entertainment from this excellent musical instrument.
This organ is a unique musical instrument designed for playing performances from the simplest to the most complex music, and can be easily played by anyone, from the beginner to the most competent musician.
Read this booklet carefully to get the best results from your organ.
CONTENTS
NAMES OF PARTS 2
KEYBOARDS & COMPASS CHART 3
TONE TABS 4
PRE-SET SOUNDS 4
HARMONIZER CONTROLS 5
PERCUSSIVE TONE 7
EFFECT CONTROLS 8
AUTOMATIC RHYTHM CONTROLS 10
FILL IN 11
AUTO PLAY CHORD CONTROLS 12
WALKING BASS 13
AUTOMATIC ARPEGGIO 14
PROGRAMED CHORD COMPUTER 15
OTHER CONTROLS & FACILITIES 18
SYMPTOMS OFTEN MISTAKEN FOR TROUBLE 19
SPECIFICATIONS 20
MAINTENANCE 21
NAMES OF PARTS

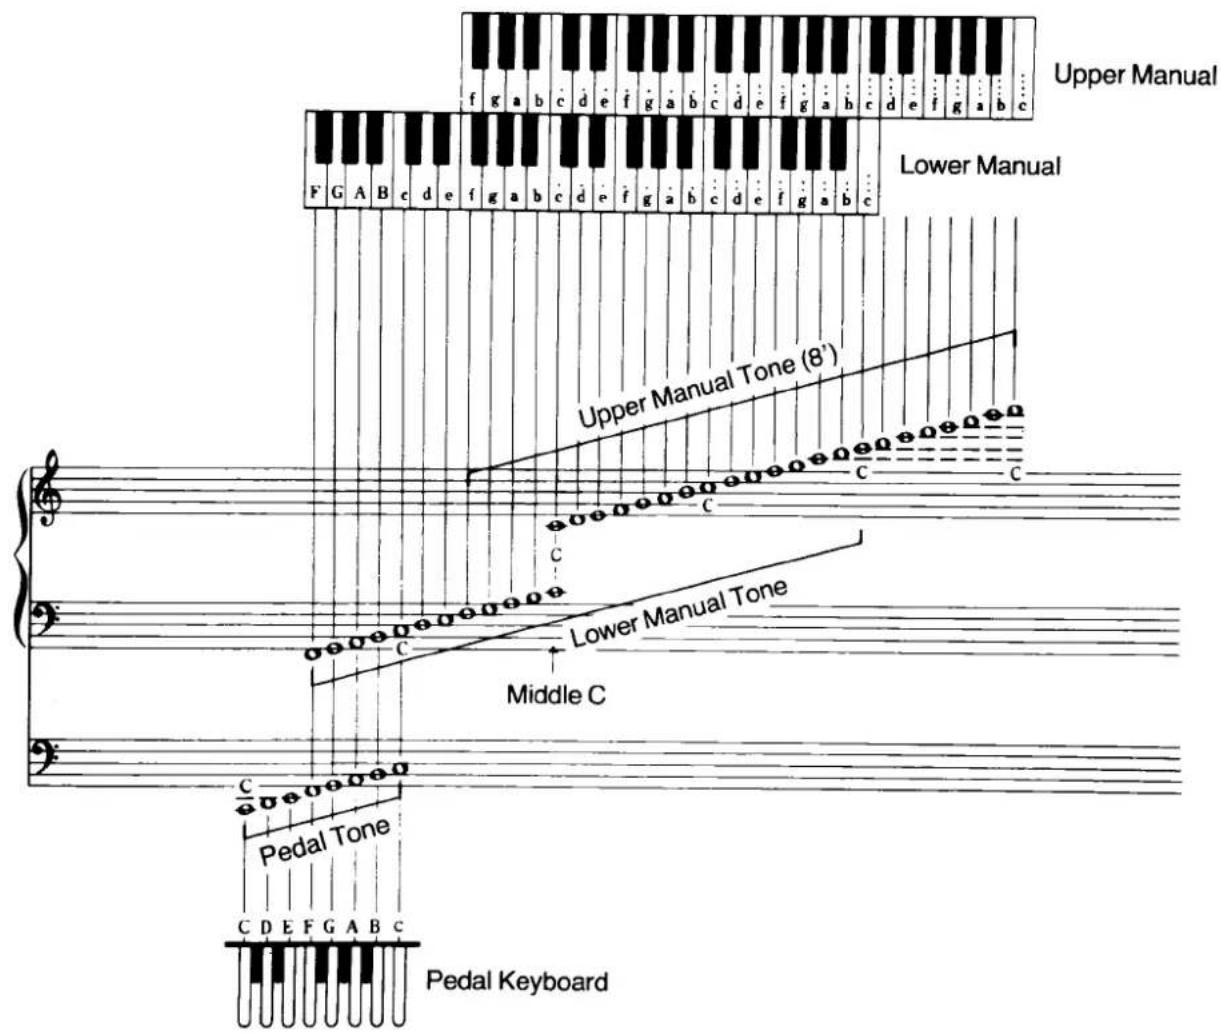
KEYBOARDS AND COMPASS CHART
Keyboards
Upper Manual
Generally, this manual is used for playing melodies, and is played with the right hand.
Range
44 keys
from
f
to
C
Lower Manual
Generally, this manual is used for playing accompaniments, and is played with the left hand.
Range
44 keys
from
F
to
C
Pedal Keyboard
These 13 pedals of the pedal keyboard are played with the toe of the left foot. The tones of these pedals add a rhythm, or a "beat" to the music played.
Range
13 pedals
from
C
to
C
Compass Chart
TONE TABS
Before we start explaining the organ in detail, it is important to examine the make-up of an organ in order that you may fully understand what is meant by Tones, Manuals, Footages, etc.
First, an organ obtains its "big sound" from the various pitch levels, which can be produced by depressing one key. For example, when you depress a note, say middle C, on a piano, the sound produced in musical terms is one note only in one pitch. If you depress the same note on an organ and select for example, 16', 8' and 4' tone tabs, the sound produced by that one key is in fact three C notes of three octaves.
On this organ, you can reproduce three pitch levels: 16', 8', and 4'. The footage classification, by the way, stems from the pipe organ; i.e., the length of pipe required to produce a particular frequency or note. 16' pipe would produce the sound an octave lower than 8' pipe, simply because it is twice in length, and so on. Each tone tab on this organ has a corresponding pitch level.

The four families of tone:—
Flutes
Upper 16' 8' 4'
Reeds
Upper 16' clarinet, 8' oboe
Lower 8'
Lower 8' horn
Strings
Upper 8' 4'
Diapason
Upper 8'
Lower 8' cello
Lower Manual Tone Tabs
The lower manual provides three 8' voices:— flute, horn and cello. These tones can be played as solo voices but are usually combined to provide a suitable accompaniment to the upper manual voices. Note: the voices on the lower manual do not sustain. When using these tones for solo work, ensure that the manual balance control is set to the lower manual position, otherwise the volume of the upper manual tones will be in excess of the lower manual solo voices.
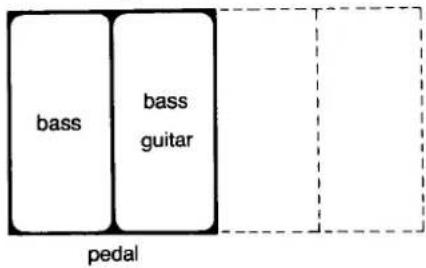
Pedal Keyboard
The pedal keyboard provides one pitch level, bass and bass guitar. To simulate the sound of the string bass add pedal sustain to the bass tablet.
PRE-SET SOUNDS

Pre-set sound means that the voices have been pre-determined. When a pre-set button is pressed, the tones of the upper keyboard are cancelled and only the selected pre-set sound will be produced as you play. To change back to the tones of the upper keyboard during a performance, simply press the "cancel" button at the extreme right; the changeover will be automatic. If two pre-set buttons are pressed at the same time, only the one on the right will take effect. Sustain is already set at its best. Vibrato and reverberation can be further added to the pre-set sound, but tremolo can not be added.
piano
A pre-set tone which combines the tones of the flute group with an appropriate sustain length; the tone gradually decays when the fingers are lifted from the keyboard.
harpsichord
Most widely used during the 17th and 18th centuries, the harpsichord tone is delicate, yet lively... like the snapping of fingernails on the strings of a chord.
vibraphone
The vibraphone resembles an iron xylophone. The pre-set tone causes the sound to vibrate and decay in the trembling manner characteristics of a vibraphone.
cancel button
This control is used when changing over to tablet voices of the upper keyboard from the pre-set sounds or harmonizer. Upon pushing this button the pre-set or harmonizer buttons will be switched off and the sound will revert to the voices produced by the upper manual tabs. When you wish to switch back to either harmonizer or pre-set simply depress the button required and the change will be automatic. If you so wish, you may combine the voices of the harmonizer and upper manual tone tabs simply by pressing the harmonizer button and then, once one has become accustomed to the instrument, it is a simple matter to create wonderfully varied sounds at the touch of a button. For example, if you have selected, 16', 8' flute in the organ tone tab section and wish to change in the space of a quaver rest to a solo vibraphone or piano (pre-set) or solo trumpet (Harmonizer), this will present little difficulty and will add great dimension to your organ playing.
HARMONIZER CONTROLS
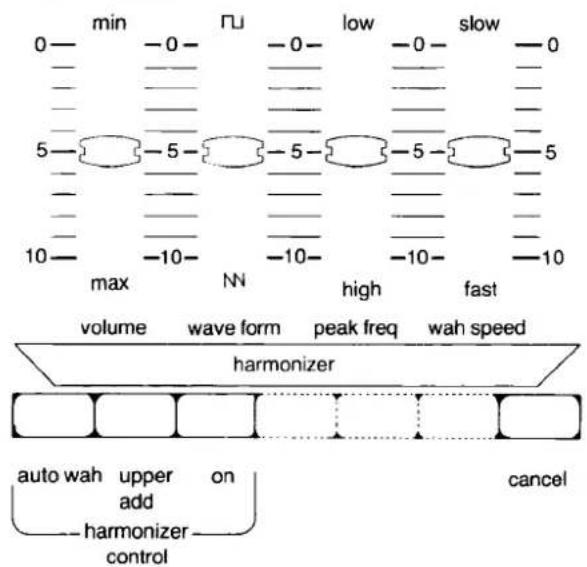
This ingenious tone generation system designed by MATSUSHITA offers tone colors rarely found on organs at any price, and we are quite sure that once you have accustomed yourself to using this feature, you will enjoy it. The following examples indicate a few recommended positions which will produce good examples of the many varied sounds of which the Harmonizer is capable. The principal of the Harmonizer is similar to a musical synthesizer except that the synthesizer is monophonic (only plays one note at a time). The Harmonizer is polyphonic (can play more than one note, i.e., a chord) which is a great advantage over normal synthesizers.
The tone of the Harmonizer is free of tremolo and chorus effects so that a clear, distinct tone is possible. However, vibrato, sustain and reverberation effects can be added to change the qualities of the sound.
on
When the Harmonizer control section is switched on, with the "on" button depressed, a wide variety of interesting sounds can be obtained using the controls. To change to tone tablet mode, push the "cancel" button on the right hand side.
Note that when the Harmonizer "volume" control is set at "0", no sound will be produced.
waveform
The many varied sounds of which the Harmonizer is capable are due to the infinite control of waveforms. MATSUSHITA has designed the Harmonizer unit to enable you to vary the frequency shape from the square-wave ( ) to the sawtooth-wave ( ) patterns. The result is a very pleasing and versatile sound effect. To produce the soft tones of the tube system (like the clarinet), slide and set the control to the square-wave side and, for a strong tone full of harmonics (like a trumpet), set the control to the sawtooth-wave side.
peak frequency
Tones consist of waveforms containing various components. By sliding this control either to the low or high, the characteristics of the music area you wish to emphasize will be changed. To stress and "round-out" the tone of the waveform you have selected, slide the control to the "low" side; to give gayness and brilliance to the selected waveform, slide the control to the "high" side.
auto wah
With this button on, and "speed" set to "zero", the muted effect of a wah turmpet can be obtained. If, on the other hand, "speed" is set to "10", the auto wah effect can be selected.
volume
The volume of the Harmonizer can be freely adjusted and will be most useful when mixing with upper manual voiced tabs. Note that no sound will be produced if the volume is set to "zero". When the Harmonizer is not required simply depress the "cancel" button.
wah speed
By using this knob in combination with the "auto wah" button, the repetition speed can be adjusted. Shifting the knob towards you increases the repetition speed. Mute trumpet sounds can be created by setting the knob to "0" position.
upper add
When this button is on, sounds of the tone tablets can be mixed with the sounds of the Harmonizer.
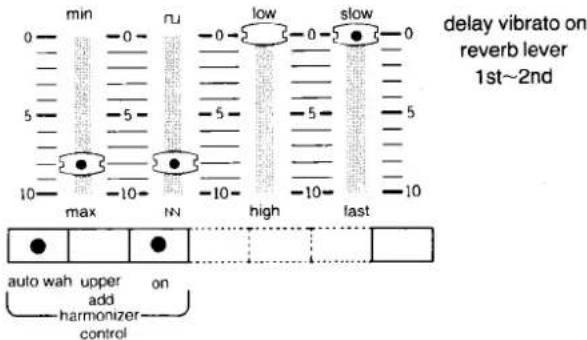
Some examples of the tones which can be created with Harmonizer are shown below.
Brass ensemble

Clarinet

Trumpet
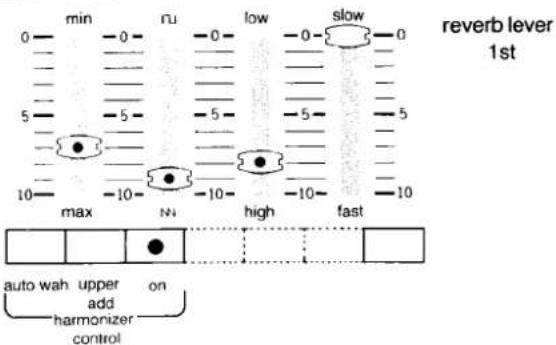
Wah trumpet


PERCUSSIVE TONE
The percussive tones fade even with the key kept depressed. When used together with the upper tones, it enables playing with a clear build-up and in staccato.
When playing legato, the percussive tone adds only to the first sound.
percussive tone
4' normal/full short/long

4'
With this button turned on, the upper tones can be played with the 4' percussive tone overlapped. When the percussive tone is not required, be sure to turn it off.
normal/full
This button is used to change the percussive tone levels. The percussive tone is normal in strength with the button turned off (normal) and full in strength when turned on (full).
short/long
This button is for use in changing the percussive tone fade in length. The length of fade is shortest when the button is turned off (short) and longer when turned on (long).
EFFECT CONTROLS
tremolo


Tremolo Buttons
These produce an electronic tremolo effect using the phase modulation, which adds a three-dimensional quivering effect to various sounds such as flute and strings, thus creating thick and expansive sounds.
Also, impressive sounds can be obtained by using the chorus effect.
●The tremolo and chorus effects are only effective with the upper and lower manual tablet tones.
tremolo
By depressing the "voice" and "tremolo" buttons, a tremolo effect, which resembles the sound given by a slowly rotating speaker, is added to the sound.
The sound is dispersed stereophonically and increases tonal richness.
chorus
By depressing the "voice" and "chorus" buttons, a chorus effect (very slow rotational effect) can be added to the sound. The sound increases tonal richness, as with the tremolo effect.
voice
With the “voice” button initially set on, when the tremolo or chorus button is pressed during performance, a rotational effect is introduced into the sound, similar to that brought about by turning the speaker slowly. Conversely, with the tremolo button depressed, when the “voice” button is turned on, a constant rotational effect can be readily obtained.
- If this button is not depressed, the tremolo or chorus button will not work.
- With only this button depressed, there will be some difference in sound volume depending on the key depressed. So, it is advisable to keep this button off when the tremolo or chorus effect is not used.
delay (upper manual only)
With the "voice" and "tremolo" buttons depressed, depressing this button introduces a delay effect whereby tremolo is applied slightly after the upper manual key is pressed.
●The delay tremolo effect works on the individual sounds when the performance is staccato but only on the initial sound when the performance is legato.
delay vibrato (upper manual only)
Pressing this button brings about a delay effect, whereby the vibrato effect is applied slightly after the upper manual key is pressed.
The violin or trumpet tones, in particular, can be enriched and enlivened with this effect.
●This delay effect works on the individual sounds when the performance is staccato but only on the initial sound when the performance is legato as well as delay tremolo.
- This delay vibrato effect brings about a constant depth of vibrato, irrespective of the “vibrato” lever setting.
Pedal Sustain Tabs
on
This tab gives sustain to the pedal notes. Pedal sustain means that a bass tone produced by the pedal keyboard decays gradually after the pedal is released.
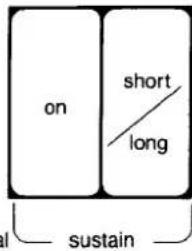
short/long
This tab changes the duration of the sustained bass notes. By operating this tab you can select long or short pedal sustain to suit the music being played.
Effect Levers
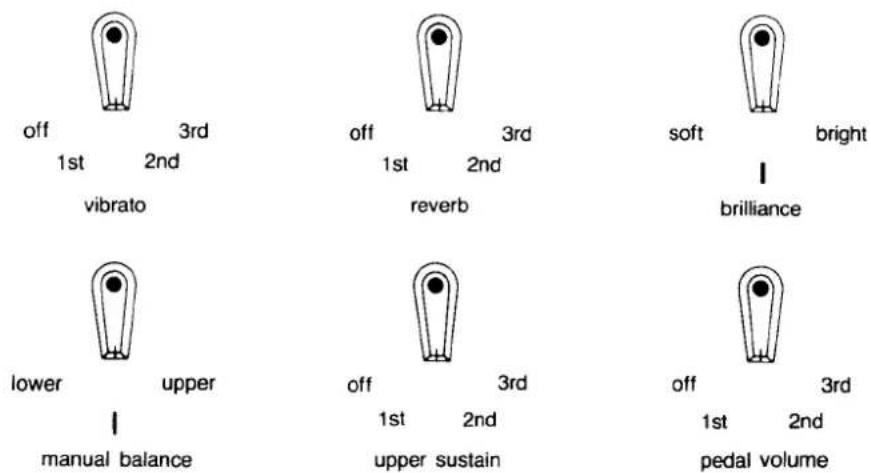
vibrato
The vibrato lever can change the depth of the vibrato effect from "off" to "3rd" degree. Although any degree of vibrato effect can be obtained at the discretion of the player, some music is more effective without it.
reverberation
The reverberation lever can change the length of the reverberation effect, giving a spaciousness and warmth to the music from "off" to "3rd" degree. By changing the degree of the reverberation effect, you can bring various special effects to the music.
brilliance
The brilliance lever is similar to the brilliance knob or the tone control knob on a good high fidelity amplifier system. It can control the upper harmonics of tones from "soft" to "bright", and its normal position is the center point. When turned to the "bright" position, the brilliance of tones of the manual keyboards is emphasized, and when turned to the "soft" position, the brilliance is reduced completely. This lever is particularly effective in making the string tone and the oboe tone more brilliant.
manual balance
The manual balance lever can control the volume balance between the upper manual and the lower manual at the discretion of the player. When this lever is set to the center point, the volume of both manuals becomes nearly equal. The lever set to the “upper” position causes the volume of the upper manual to exceed that of the lower manual, and vice versa with the lever set to the “lower” position.
upper sustain
The upper sustain lever controls the length of sustain heard after the key of the upper manual is released. Sustain is effective on all 16' 8' 4' voices but it does not affect the pre-set sounds. By setting this lever to a selected position you can obtain many degrees of sustain to suit the musical work being played.
pedal volume
The pedal volume lever can control the volume of the sounds of the pedal keyboard from "off" to "3rd" degree. Set the "pedal volume" lever to the proper position to balance the sound volume of the pedal keyboard with those of the upper and lower manuals.
AUTOMATIC RHYTHM CONTROLS
Here is the rhythm section with a wide variety of beats. You have a choice of 12 different rhythm sounds to select from. In addition, 16 beat rhythms can be used for crossover or soul tunes.

Rhythm Selector
This section has 8 selector buttons. Sixteen kinds of rhythms can be obtained using each in combination with the "rhythm I/II" button.
When any rhythm selector button is depressed, a particular rhythm is selected. The selected rhythm is automatically turned off when a new rhythm is selected. By depressing two or more selector buttons simultaneously, many interesting rhythm patterns can be created.
rhythm I/II
By depressing this button, the selected rhythm can be switched to the rhythm indicated on the second line ("rolling", "shuffle", etc.). For example, with "waltz/jazz waltz" button depressed, if the "rhythm I/II" button is at "I", the selected rhythm is "waltz". But it is switched to "jazz waltz" when the "rhythm I/II" button is pushed to setting "II". Pushing the button again to turn it back to "I" causes the rhythm to be changed back to the original one.

Rhythm Control Knobs
volume
When this knob is turned to the right (clockwise) the volume of the rhythm increases. Adjust the volume of the rhythm to suit the overall volume of the organ.
It should be noted that the main volume and the expression pedal of the organ affect the volume of the rhythm.
tempo
If you turn this knob clockwise, the tempo of the rhythm increases. Set the tempo of the rhythm to suit the music you are playing.
- The tempo lamp in the touch switch is designed to illuminate on the first beat. You can easily preset the tempo by watching the tempo lamp when the “synchronous start” button is depressed to the “on” position. In this situation the tempo lamp indicates a beat interval even though the rhythm is not sounding.
Rhythm Start Switches
There are two starting methods for the rhythm as shown below. In each case the rhythm begins always on the first beat.
synchronous start
When this button is depressed, the rhythm will start when either the lower manual or the pedal keyboard is played. By using the "touch switch", you can stop the rhythm.
If a performance is conducted without using the "synchronous start" button, this button should be pressed again and set to the "off" position. Note that the rhythm will stop by pushing this button during a performance.
touch switch
This switch is especially convenient because on-off control of the rhythm can be quickly accomplished by simply touching it (when the "touch switch on" buton is set to the "on" position). Note that, even when the synchronous start button is on, the "touch switch" can be used to control on-off operation.
touch switch on
This button is to prevent mistaken operation of the touch switch. When not using the rhythm, it should be set to the "off" position. When so set, the rhythm cannot be started even if the "touch switch" is accidentally touched. To start the rhythm, press this button to the "on" position and then use the "touch switch".
FILL IN
The "Fill In" means any rhythm inserted as a link at the start or halfway through a tune.
Combined with the automatic rhythms, this Fill In can be used at any point in a tune as required.
Indicator

full in & intro

fill in & intro
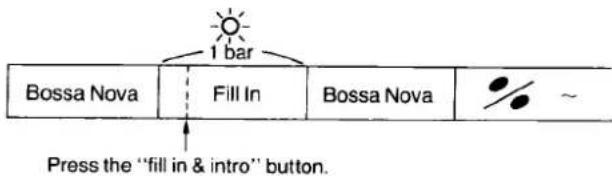
When this button is depressed and the rhythm has started, the rhythm is automatically played after the first bar of the introduction at the start of a tune. When the button is depressed during a tune, the Fill In is immediately inserted for the rest of the bar in the rhythm being played.
Example 1: To play an introduction followed by the bossa nova rhythm.
(1) Depress the "bossa nova" button on the rhythm selector.
(2) Depress the "fill in & intro" button. (The indicator lights up.)
(3) And then start the rhythm. The rhythm starts with the introduction and automatically continues to the bossa nova. (After the introduction is over, the indicator goes out.)

Example 2: To insert the Fill In while playing with the bossa nova rhythm.
(1) Depress the "bossa nova" button on the rhythm selector.
(2) Start the rhythm for the bossa nova.
(3) Depress the "fill in & intro" button. Immediately upon depression, the Fill In rhythm is inserted for the rest of the bar, after which the bossa nova rhythm automatically returns.
AUTO PLAY CHORD CONTROLS
The auto play chord is an automatic accompaniment function that allows automatic playing of the lower manual and pedal accompaniment chords in automatic rhythm when the lower manual keys are pressed. The lower manual accompaniment is only possible with the horn and cello sounds of the lower tone tabs. The flute sound is not effected, but it is sustained.
When the rhythm instrument sounds are not required, turn the rhythm control "volume" knob counterclockwise to set it at the "min" position.
No sound will be produced unless the lower manual and pedal tone tabs are turned on prior to the auto play chord functioning. This requires careful attention.

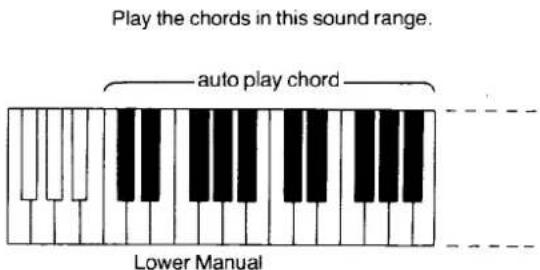
- When the auto play chord is in use, play the chord in the sound range shown in the figure below.
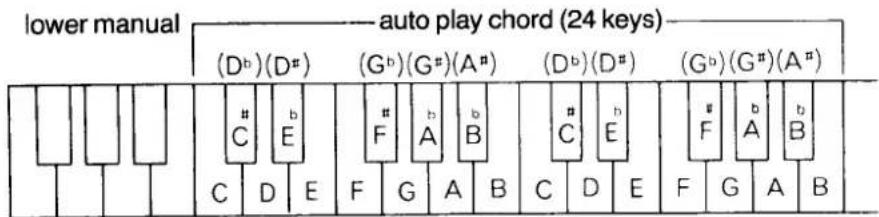
one finger chord
With this button pressed, playing a key on the lower manual automatically produces the basic chord (triad) in the lower manual and pedal tones. With the rhythm started, the accompaniment chords take effect according to the rhythm patterns for automatic playing.
This accompaniment chord will be in a major key. To change it to a minor, depress a black pedal key. To change it to the seventh, depress a white pedal key. Depressing the white and black keys together produces a minor seventh chord.
fingered chord
With this button on and a lower manual chord played and the rhythm started, the chord and its corresponding bass are automatically played for rhythm accompaniment.
separated pedal
There will be occasions when you will prefer to play the pedalboard separately but still have the use of auto play chord on the lower keyboard. To do this, simply depress the separated pedal button, and the pedal is separated from the auto play chord.
pedal constant
This button changes the bass linked to the automatic rhythm to a sustained sound.
memory
Pressing this button together with the "one finger" button allows a chord to be stored automatically once a lower manual key is played and even after the key has been released. The stored chord is repeatedly played unless another lower manual key is pressed.
When the "fingered" and "separated pedal" are used, depressing this button enables the pedal tones alone to be stored.
This button can be used as a memory button for the automatic arpeggio accompaniment.
cancel
Pressing this button permits ordinary playing.
- For the "composer" button, refer to the "Programed Chord Computer" on Page 15.
●Basic Chord Example

WALKING BASS
on
When the automatic playing of an accompaniment chord is in effect, the bass will play according to the preset rhythm. With this button pressed, however, the bass can be changed to a walking pattern.
Changing the type of rhythm while the auto play chord is on allows the walking bass matching the rhythm type to be automatically introduced.
Even during the automatic playing of the chord computer, the bass can be changed to a walking bass by pressing the walking bass "on" button.

Example:
Rhythm Selector: swing
(C chord)
The normal bass pattern is:

With the "on" button pressed, the bass is:
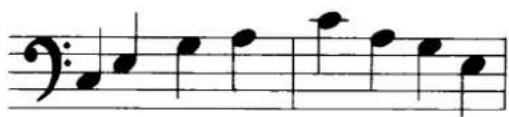
AUTOMATIC ARPEGGIO
The arpeggio is a function that can automatically play the varied chords over several octaves when the lower manual chords are played. Normally, arpeggios are very difficult to play, but this function makes it possible to play varied chords automatically. This, combined with the one finger chords, makes arpeggio playing with one finger possible.

Arpeggio playing is also possible in association with the automatic rhythm, thus enabling automatic playing in the same tempo as the selected rhythm.
If the auto play chord "memory" button is preset, the chord key is stored, allowing automatic playing of varied chord notes to continue, even with the finger released form the lower manual key, unless another key is pressed.
on
With this button depressed and the lower manual chords played and the automatic rhythm started, the various notes of chords will be automatically played.
up/up-down
This button changes the arpeggio playing patterns. With the button off, the various notes are automatically and repeatedly played in the up pattern. With the button on, the playing pattern can be changed to an up-down pattern.
C Major Chord Example


soft/loud
Depressing this button increases the volume of arpeggio. When the arpeggio volume is sufficient, play with the button in the "off" (soft) position.
PROGRAMED CHORD COMPUTER
The programmed chord computer automatically plays the different accompaniment chords for the melody as prestored in the computer.
With all the accompaniment operations performed by the computer, the player can concentrate on melody playing and tab operation.
For a player finding it difficult to match the rhythm, depress any lower manual keys without starting the rhythm. The chord develops with each key pressed allowing slow melody playing. (With the “memory” button depressed, the chord continues to sound after the lower manual key has been pressed just once.)
When you are more familiar with the melody, start the rhythm. For a player not interested in the auto play chords, use this function as an idea source or for adlib practicing.

flowchart
graph TD
    A["auto play chord"] --> B["programed chord computer"]
    B --> C["①"]
    B --> D["②"]
    B --> E["③"]
    B --> F["④"]
    B --> G["⑤"]
    C --> H["cancel"]
    D --> I["composer"]
    E --> J["finger-ed"]
    F --> K["sepa pedal"]
    G --> L["pedal const"]
    G --> M["memory"]

flowchart
graph TD
    A["⑥"] --> B["record"]
    C["⑦"] --> D["reset"]
    E["program chord"] --> F["..."]
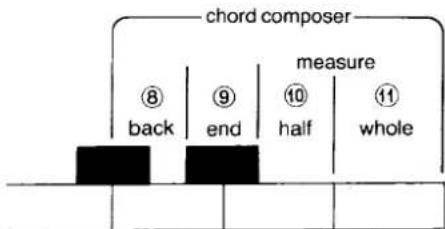
The four right lower manual keys are used.
record ⑥
After this button has been pressed, the chord can be stored.
reset ⑦
Depressing this button stops automatic chord playing for resetting.
composer ①
This button is used to play the stored chords.
- For buttons ② through ⑤, refer to the “Auto Play Chord” on Page 12.
back ⑧
In case there is an error in the chord storage operation, this key is pressed once to turn one chord back to correct chord storage operation.
end ⑨
This key is pressed after the chord storage operation has been completed.
half ⑩
This key is used to store the chord for a half measure.
whole ⑪
This key is used to store the chord for a whole measure.
For Chord Storage
(1) Depress the "record" button⑥.
(2) Select the chord playing modes.
●Depress the "one finger" button ② (play the lower manual with one finger), or
●Depress the "fingered" button ③ (press the chord with the lower manual), or
●Depress the “separated pedal” button ④ (play the chord with the lower manual and pedal).
(3) While playing the chord, depress the "half" key ⑩ to store the chord for a half bar or "whole" key ⑪ to store the chord for a whole bar. Upon depression of either key, a whistling sound is heard.
If a mistake is made in the operation of (3), depress the "back" key ⑧ once to turn one chord back to repeat the storage operation.
(4) The operation of (3) is repeated until all chords are stored.
(5) Depress the "end" key ⑨ after the storage operation has been completed.
(6) Depress the "record" button⑥ again to turn it off.
●To store no chord, carry out the operation of (3) without playing a chord.
- If a mistake is made during storage operation, depress the "reset" button ⑦ to carry out operations again from (3).
For Automatic Playing of the Stored Chords
(1) Depress the "composer" button①.
(2) With the rhythm started, the stored chords are repeatedly played automatically in the sequence in which they are stored.
Example:

To Play the above Chord using the One Finger Chord:
(1) Depress the "record" button⑥.
(2) Depress the "one finger" button②.
(3) While pressing the C key, depress the "whole" key⑪.
(4) While pressing the G key, depress the "half" key⑩.
(5) While pressing the C key, depress the "half" key⑩.
(6) For no chord, depress the "whole" key ^⑪ without playing any note.
(7) While pressing the G key, depress the "half key⑩.
(8) While pressing the C key, depress the "half" key⑩.
(9) Depress the "end"key⑨.
(10) Depress the "record" button ⑥ again to turn it off.
To Play the Stored Chords Automatically:
(1) Depress the "composer" button①.
(2) With the rhythm started, the stored chords are repeatedly played in sequence in which they are stored.
For Modification of the Stored Chords
(1) Turn on the "record" button⑥.
(2) Depress the "composer" button①.
(3) Start the rhythm for automatic playing.
(4) Stop the rhythm at the position of the chord to be modified.
Or
(3') Depress the lower manual keys (any keys) to sound chords intermittently, one by one, in sequence. With the "memory" button ⑤ preset, in this case, the chord continues even if the key is released, making it easy to locate the various chord positions.
(4') Stop the chord where modification is required.
(5) Depress one of the following: the “fingered” button②, “one finger” button ③ or “separated pedal” button④.
(6) While playing the correct chord in its matched playing mode, depress the "half" key ⑩ for half bar modification or the "whole" key ⑪ for whole bar modification.
(7) After the modification has been completed, depress the "record" button ⑥ to turn it off.
Example:

| © | G | © | No chord → © | G | © |
Store the C chord in the No Chord Position of the earlier Example.
(1) Turn on the "record" button ⑥ and depress the "composer" button ①.
(2) Depress the lower manual keys four times to stop at the no chord position.
(3) Depress the "one finger" button②.
(4) While pressing the C key with one finger, depress the "whole" key⑪.
(5) Depress the "record" button ⑥ again to turn it off.
Play the Modified Chords Automatically.
(1) Depress the "composer" button①.
(2) With the rhythm started, the modified chords are repeatedly played automatically.
●Chord Types to be Stored in the Chord Composer
| Types | major | minor | 7th | minor 7th | augumented | diminished 7th | minor 7th flat 5 | major 7th |
| Chords | C | Cm | C7 | Cm7 | Caug | Cdim7 | Cm7^b5 | CM7 |
- 32 chords can be stored at a time. When the 32nd chord is stored, the tempo lamp on the touch switch of the automatic rhythm lights up, indicating that no more chords can be stored.
- When the "reset" button ⑦ is pressed while the stored chords are automatically playing, the rhythm and chord stop, returning the chord to its original position. Starting the rhythm again allows the chords to be played from the first.
OTHER CONTROLS & FACILITIES

line out

min max mic volume

mic

aux

phones
phones jack
For silent practice, headphones can be used. When plugged in, the organ speaker system is automatically cut off; sound is heard only through headphones.
aux input jack (input level 150 mV, 20 kΩ)
If the organ is to be used in conjunction with other electronic equipment, the auxiliary input jack will be a useful advantage. Among the many items which can be connected to this are tape/disc pre-amp, portable synthesizer, etc.
microphone jack (input level 7.5 mV 20 kΩ)
For singing a song while playing the organ, a dynamic microphone of the uni-directional type can be used.
microphone volume
There is a volume control by the microphone jack in order to balance the voice with the organ volume. Increase the volume of the microphone by turning the control knob to the right (clockwise).
line out terminal (output level 360 mV, 600Ω)
By connecting a high-power amplifier to the line out terminal, the complete organ sound, including microphone and auxiliary instruments, can be reproduced at a very high volume level. Furthermore, the sound of this organ can be tape recorded most successfully by using this method of connection.
power switch & main volume knob
You will have found that by turning the knob to the right, the organ is switched on and, by continuing to turn the control, the volume of the organ increases.
This knob is to allow you to preset the maximum volume of the organ to suit the room in which the organ is being played, or the conditions under which the organ is used. After playing the organ, this knob is turned counterclockwise to the position at which the power is switched off.

main volume
expression pedal
The volume control pedal operated by the right foot is the expression pedal. This enables the player to express a feeling for the music by controlling the volume of the organ.

glide control switch
This switch is on the left of the expression pedal. (Refer to the figure at the right.) This switch is operated by the toe of the right foot. If this switch is pushed to the left, the sound glides down approximately one half of a tone. When the switch is released, the sound will return to the original tone with portamento.
SYMPTOMS OFTEN MISTAKEN FOR TROUBLE
Generally, an electronic organ often shows symptoms such as those given below. However, these are not indicative of trouble.
●Lower manual and pedal do not produce sound. (Rhythms are produced.)
If the "composer" button is turned on without any chord stored, the lower manual and pedal do not produce any sound. Turn the "composer" button off by pushing the "cancel" button for auto play chord.
●The pedal or both pedal and lower manual keep producing sounds.
This symptom appears when the "one finger", "fingered" or "separated pedal" is turned on while the "memory" button is on. Turn the "memory" button off.
●After depressing the pedal, when the power switch is turned off and then turned on again, depressing that key produces no sound.
When another key is depressed, the operation will return to normal.
●Bass and arpeggio sound problems or no sound is produced.
The precision of the built-in micro-computer may be sometimes affected due to a defective contact between the power cord plug and socket. Check the power cord plug and socket.
●Harmonizer, pedal and rhythm tones are not produced.
No sound is produced if the "volume" knob or lever is set at "min" or "off". Set the knob and lever to appropriate positions.
●There are some tones to which the chorus and tremolo effects cannot be added.
To make the most of the characteristics of individual tones, chorus and tremolo effects cannot be added to the tones of pedal, preset sound, Harmonizer, percussive tone, rhythm and arpeggio.
- "Manual balance" lever is not effective on preset sound, Harmonizer, percussive and arpeggio tones.
This is because the lever has been set so that it is effective in single or combination use.
●Rhythm does not start.
If the "record" button for the programmed chord and the "one finger", "fingered" or "separated pedal" buttons are on, the rhythm will not start. Turn the "record" button off.
- Playing an accompaniment with the "synchronous start" button depressed does not cause the rhythm to start.
Even with the “synchronous start” button turned on, if the tempo lamp is off, the rhythm cannot be started by depressing the lower manual or pedal. In such a case, set the “synchronous start” button to off and turn it on again so that the tempo lamp blinks. Then, the rhythm can be started as desired.
●The "flute" tone of the lower manual does not produce rhythm during automatic accompaniment. This is deliberately designed in order to make the sound more orchestral.
●The memory does not work when the programmed chord computer is used.
Do not release the left hand (chord) before pushing the "whole" or "half" key.
●Programed chord computer is unable to produce an inversion chord.
The chord can be stored in the memory, irrespective of its inversion form, but the inversion chord is not produced during the automatic playing of the stored chord because the chord is composed of notes from g to f# which sound most clearly.
- When a chord is stored in the programmed chord computer by the “separated pedal”, a different chord is sometimes stored.
This occurs when a note other than the root of the chord of the lower manual key is stored by depressing the pedal key. When storing a chord, depress the root pedal key.
SPECIFICATIONS
Specifications
| Keyboards: | Upper Manual | 44 keys |
| Lower Manual | 44 keys | |
| Pedal Keyboard | 13 keys | |
| Tones: | Upper Manual | Flute 16', Flute 8', Flute 4', Diapason 8', Clarinet 16', Oboe 8', String 8', String 4', |
| Pre-Set Sound | Piano, Harpsichord, Vibraphone, Cancel | |
| Harmonizer | Harmonizer On, Auto Wah, Upper Add, Wah Speed, Wave Form, Peak Frequency, Volume | |
| Percussive Tone | 4', Normal/Full, Short/Long | |
| Lower Manual | Flute, Horn, Cello | |
| Pedal | Bass, Bass Guitar | |
| Effects: | Tremolo | Voice, Chorus, Tremolo, Delay |
| Delay Vibrato, Vibrato (Depth), Pedal Sustain (On/Off, Short/Long), Upper Sustain (Length), Manual Balance, Reverberation, Brilliance, Pedal Volume, Glide Control | ||
| Automatic Rhythm: | Rhythm Selectors | March/Rolling March, Swing/Shuffle, Rock/Teen Beat, Slow Rock/Ballade, Samba/Soul, Bossa Nova/Cha-cha, Rumba/Beguine, Waltz/Jazz Waltz |
| Rhythm I/II, Synchronous Start, Touch Switch On, Touch Switch, Rhythm Volume, Tempo, Fill In & Intro | ||
| Auto Play Chord: | Cancel, Composer, One Finger Chord, Fingered Chord, Separated Pedal, Pedal Constant, Memory, Walking Bass | |
| Arpeggio | On, Up/Up-Down, Soft/Loud | |
| Chord Computer: | Program Chord | Record, Reset, Whole, Half, Back, End |
| Others: | Power Switch & Main Volume, Expression Pedal, Headphone Jack, Input Jack Microphone Jack (with Volume), Output Terminal (line out), Pilot Lamp | |
| Output: | 35 W (Peak power) | |
| Speakers: | 20 cm (8")×2, 8 cm (3")×1 | |
| L.S.I.: | 4 | |
| IC's: | 89 | |
| Transistors: | 153 | |
| Diodes: | 239 | |
| Power Requirement: | 80 W AC 100/120/220/240 V 50–60 Hz | |
| 80 W AC 120 V 60 Hz only for Canada | ||
| Cabinet: | Simulated Oceanian Rosewood | |
| 111 cm (43.9')(W)×92.7 cm (36.5')(H)×59 cm (23.3')(D) | ||
| Net Weight: | 64 kg. (141 lbs.) | |
MAINTENANCE
Maintenance
This organ is a very high quality product and built to a standard to ensure good performance, long life and high reliability. Nevertheless, even the finest merchandise requires service occasionally. In the unlikely event of failure, please insist, when contacting your organ dealer, that genuine replacement parts are used so that your instrument will continue to give you many years of trouble-free pleasure.
However, the following do's and dont's will assist you in keeping the organ in top condition:
- Be sure to switch the instrument off after use, and do not switch the organ on and off in quick succession, as this places an undue load on the electronic components.
- Do not, under any circumstances, remove the back from the organ and tamper with the electronic circuitry. If a fault does develop, switch the organ off, unplug it from the electrical outlet and contact your nearest organ dealer. To assist your dealer, please explain the nature of the fault.
●To keep the lustre of the keys and tabs, simply use a damp cloth to clean and finish with a soft duster. Polish may be used but do not use thinners or petrol chemical based polishes.
●The cabinet may be polished with a wax polish, although you will find that rubbing with a soft cloth will normally suffice.
Matsushita Electric Trading Co., Ltd.
P.O. Box 288, Central Osaka Japan

- Technics
- OPERATING
- INSTRUCTIONS
- CONTENTS
- NAMES OF PARTS
- KEYBOARDS AND COMPASS CHART
- Keyboards
- TONE TABS
- PRE-SET SOUNDS
- piano
- harpsichord
- vibraphone
- cancel button
- HARMONIZER CONTROLS
- on
- waveform
- peak frequency
- auto wah
- volume
- wah speed
- upper add
- PERCUSSIVE TONE
- normal/full
- short/long
- EFFECT CONTROLS
- Tremolo Buttons
- tremolo
- chorus
- voice
- delay (upper manual only)
- delay vibrato (upper manual only)
- Pedal Sustain Tabs
- Effect Levers
- vibrato
- reverberation
- brilliance
- manual balance
- upper sustain
- pedal volume
- AUTOMATIC RHYTHM CONTROLS
- Rhythm Selector
- rhythm I/II
- Rhythm Control Knobs
- tempo
- Rhythm Start Switches
- synchronous start
- touch switch
- touch switch on
- FILL IN
- fill in & intro
- AUTO PLAY CHORD CONTROLS
- C E # F A B # C E # F A B
- one finger chord
- fingered chord
- separated pedal
- pedal constant
- memory
- cancel
- WALKING BASS
- Example:
- AUTOMATIC ARPEGGIO
- up/up-down
- soft/loud
- PROGRAMED CHORD COMPUTER
- record ⑥
- reset ⑦
- composer ①
- back ⑧
- end ⑨
- half ⑩
- whole ⑪
- For Chord Storage
- For Automatic Playing of the Stored Chords
- To Play the above Chord using the One Finger Chord:
- To Play the Stored Chords Automatically:
- For Modification of the Stored Chords
- Or
- Store the C chord in the No Chord Position of the earlier Example.
- Play the Modified Chords Automatically.
- OTHER CONTROLS & FACILITIES
- phones jack
- microphone volume
- power switch & main volume knob
- expression pedal
- glide control switch
- SYMPTOMS OFTEN MISTAKEN FOR TROUBLE
- SPECIFICATIONS
- MAINTENANCE
Marke : TECHNICS
Modell : SX-3900A
Kategorie : Orgel