
CFM-A50 - Radio SONY - Kostenlose Bedienungsanleitung
Finden Sie kostenlos die Bedienungsanleitung des Geräts CFM-A50 SONY als PDF.


| Produkttyp | Radio-Kassettenrecorder |
| Modell | CFM-A50 |
| Marke | Sony |
| Abmessungen (B x H x T) | ca. 289 × 200 × 123 mm |
| Gewicht | ca. 2,4 kg (mit Batterien) |
| Stromversorgung | 120 V Wechselstrom, 60 Hz; 6 V Gleichstrom, vier R20 (Größe D) Batterien |
| Leistungsaufnahme | 6 W (Wechselstrom) |
| Lautsprecher | 9,2 cm Vollbereichs-Lautsprecher, 4 Ohm |
| Radioempfang | FM 87,6–108 MHz, AM 530–1710 kHz |
| Antenne | Teleskopantenne für FM, eingebaute Ferritstabantenne für AM |
| Kassettentyp | Nur TYPE I (Normal) |
| Aufnahmesystem | 2-Spur-Mono |
| Ausgang | Kopfhörerbuchse (Miniklinke, 32 Ohm) |
| Besondere Funktionen | Easy Listening, Langsamwiedergabe (15% verlangsamt), Skalenbeleuchtung, Kassetten-Sensor, Interferenzunterdrückung (ISS), Frequenzmarker |
| Batterielebensdauer (FM-Aufnahme) | ca. 13 h (R20P), ca. 35 h (Alkaline LR20) |
| Batterielebensdauer (Kassettenwiedergabe) | ca. 7 h (R20P), ca. 20 h (Alkaline LR20) |
| Reinigung und Wartung | Köpfe nach 10 h Betrieb reinigen; Entmagnetisierung nach 20–30 h |
| Sicherheitshinweise | Vor Regen und Feuchtigkeit schützen; Lüftungsschlitze frei halten; keine Änderungen am Gerät vornehmen |
| Mitgeliefertes Zubehör | Netzkabel, Kopfhörer |
Häufig gestellte Fragen - CFM-A50 SONY
Benutzerfragen zu CFM-A50 SONY
0 Frage zu diesem Gerät. Beantworten Sie die, die Sie kennen, oder stellen Sie Ihre eigene.
Eine neue Frage zu diesem Gerät stellen
Laden Sie die Anleitung für Ihr Radio kostenlos im PDF-Format! Finden Sie Ihr Handbuch CFM-A50 - SONY und nehmen Sie Ihr elektronisches Gerät wieder in die Hand. Auf dieser Seite sind alle Dokumente veröffentlicht, die für die Verwendung Ihres Geräts notwendig sind. CFM-A50 von der Marke SONY.
BEDIENUNGSANLEITUNG CFM-A50 SONY
Radio Cassette-Corder
Operating Instructions
CFM-A50
©1998 by Sony Corporation
WARNING
To prevent fire or shock hazard, do not expose the player to rain or moisture.
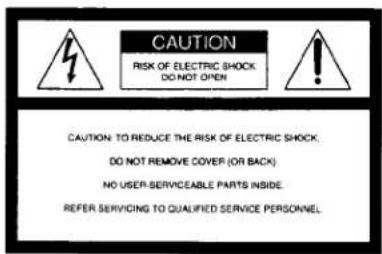
You are cautioned that any changes or modifications not expressly approved in this manual could void your authority to operate this equipment.
Owner's Record
The model number is located at the bottom and the serial number is located in the battery compartment lid. Record the serial number in the space provided below. Refer to them whenever you call upon your Sony dealer regarding this product.
Model No. CFM-A50
Serial No. ____

This symbol is intended to alert the user to the presence of uninsulated "dangerous voltage" within the product's enclosure that may be of sufficient magnitude to constitute a risk of electric shock to persons.

This symbol is intended to alert the user to the presence of important operating and maintenance (servicing) instructions in the literature accompanying the appliance.
WARNING
Do not install the appliance in a confined space, such as a bookcase or built-in cabinet.
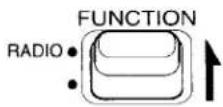
The FUNCTION selector is located at the top panel.
When you turn on the player, the OPR/BATT indicator lights up.
Table of contents
Basic Operations
4 Listening to the radio
6 Playing a tape
8 Recording on a tape
Useful Functions
10 Easy listening adjustment
10 Slow playback
Setting Up
11 Choosing the power sources
Additional Information
12 Precautions
13 Troubleshooting
14 Maintenance
14 Specifications
15 Location and function of controls
16 Index
Listening to the radio
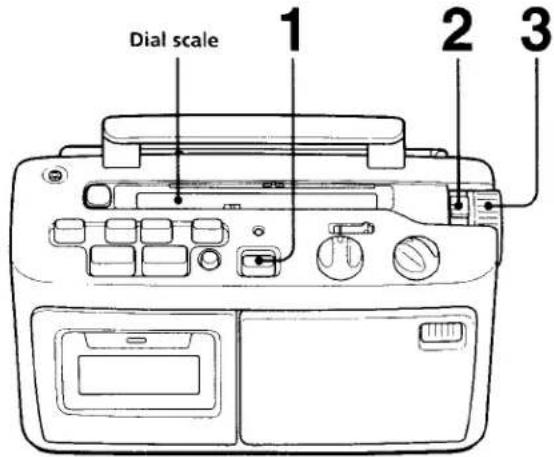
Connect the supplied AC power cord (see page 11).
1
Set FUNCTION to RADIO.
2
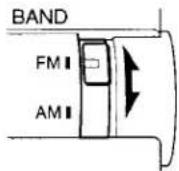
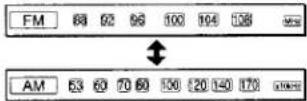
Set BAND to FM or AM.
The dial scale switches to the band you have chosen.
3
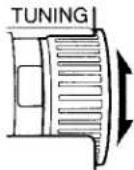
Turn TUNING to tune in a radio station.
Tips
• To listen by the earphone, connect the earphone to the Ⓤ (earphone) jack.
- There is a earphone box on the left side of this equipment. You may keep the supplied earphone in this box.
Use these buttons for additional operations
Basic Operations
| To | Do this |
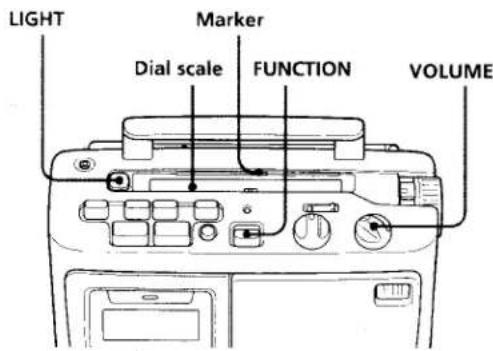
| Adjust the volume | Turn VOLUME. |
| Turn off the radio | Set FUNCTION to TAPE (RADIO OFF). |
To improve broadcast reception
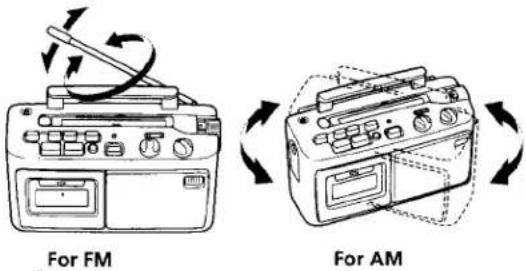
Reorient the antenna for FM. Reorient the player itself for AM.
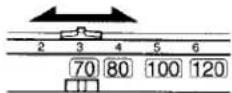
To mark the broadcast station you often listen to
If you set the marker to the frequency you often listen to, you can easily tune in to this frequency after listening to other stations.
Using the light
If the dial scale is hard to see, press LIGHT. The light will be lit for 7 seconds.
Playing a tape
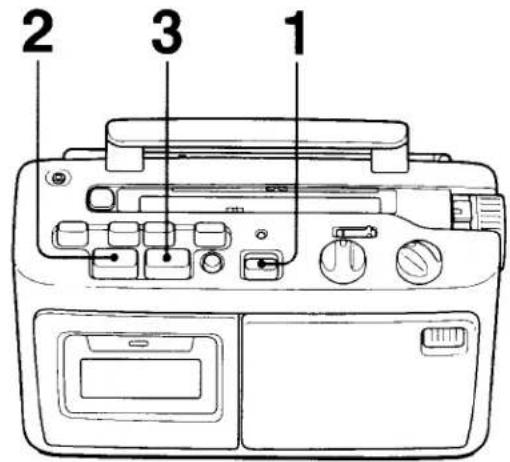
Connect the supplied AC power cord (see page 11).
1
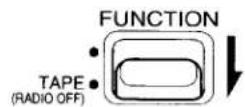
Set FUNCTION to TAPE (RADIO OFF).
2
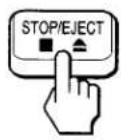
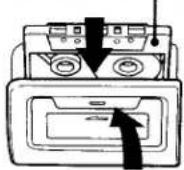
Press ■▲ STOP/EJECT to open the tape compartment and insert a recorded tape. Use TYPE I (normal) tape only. Close the compartment.
With the side you want to play facing forward
3

Press ◀ PLAY.
Tip
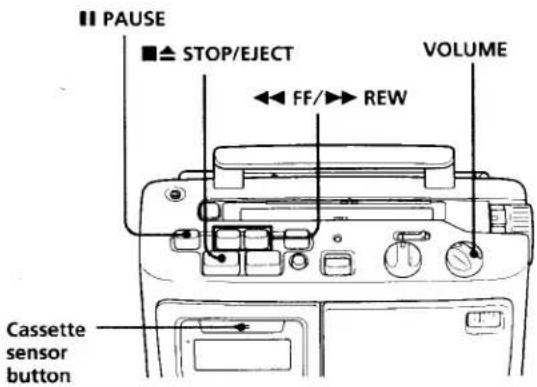
When a cassette is inserted, the cassette sensor button (≡/TAPE IN) comes out. You can touch the cassette compartment lid to find out if the cassette is inserted or not.
Use these buttons for additional operations
Basic Operations
| To | Do this |
| Adjust the volume | Turn VOLUME. |
| Stop playback | Press ■▲ STOP/EJECT |
| Fast-forward or rewind the tape* | Press ◀◀ FF or ▶▶ REW |
| Pause playback | Press ■■ PAUSEPress the button again to resume play after pause. |
| Eject the cassette | Press ■▲ STOP/EJECT |
*For the side facing forward
Recording on a tape
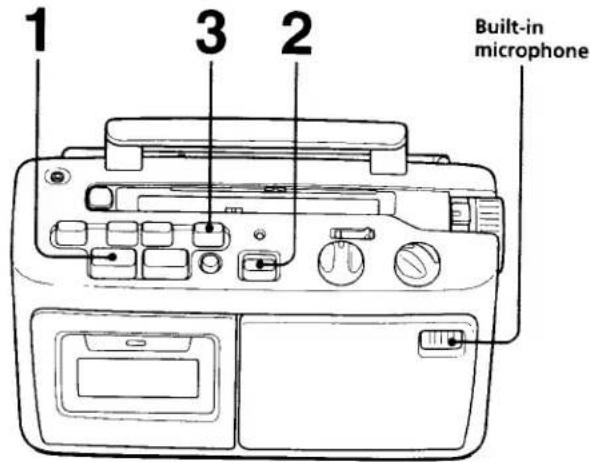
Connect the supplied AC power cord (see page 11).
1

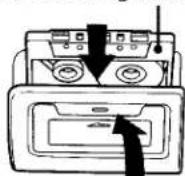
Press ■▲ STOP/EJECT to open the tape compartment and insert a blank tape. Use TYPE I (normal) tape only.
With the side you want to record on facing forward
2
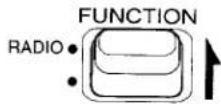
Select the program source you want to record.
To record from the radio, set FUNCTION to RADIO, set BAND to FM or AM and tune in the station you want (see page 4).
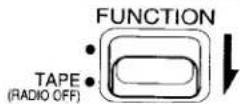
To record from the built-in microphone, set FUNCTION to TAPE (RADIO OFF).
3
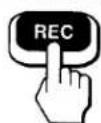
Press REC to start recording. (◀ PLAY is depressed automatically).
Tips
- Adjusting the volume or the tone will not affect the recording level.
- If the AM program makes a whistling sound after you have pressed the REC button in step 3, set the ISS (Interference Suppress Switch) at the rear to the position that most decreases the noise.
- For the best results, use the AC power as a power source for recording.
Notes
- If the SLOW PLAYBACK button is pressed during recording the tape speed will not change and recording will stay at normal speed.
- You cannot listen through the earphone when recording from the built-in microphone.
Use these buttons for additional operations
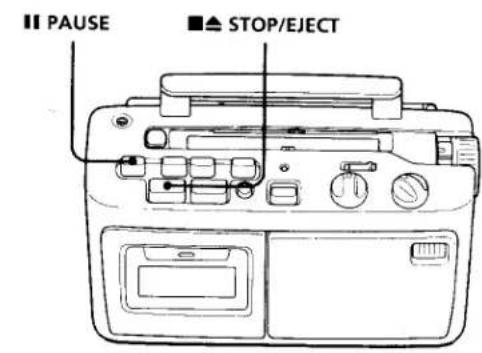
| To | Press |
| Stop recording | ■▲ STOP/EJECT |
| Pause recording | ■ PAUSEPress the button again to resume recording. |
Basic Operations
Easy listening adjustment
This function lets you adjust the sound to hear the main subject easier.
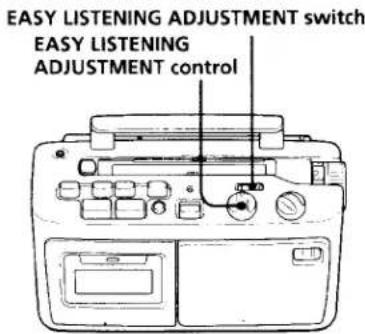
1 Playback a tape or turn on the radio.
2 Set the EASY LISTENING ADJUSTMENT switch to ON.
3 Turn the EASY LISTENING ADJUSTMENT control to adjust to the tone of your choice.
Set the EASY LISTENING ADJUSTMENT switch to OFF to cancel Easy Listening.
Slow playback
You can slow down the tape speed by about 15% to the normal tape speed.
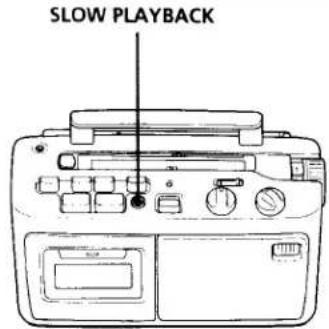
To slow down the tape speed
Press SLOW PLAYBACK to "≡ON" during playback.
To cancel the slow tape speed
Press SLOW PLAYBACK again to "☐OFF".
Note
You cannot use SLOW PLAYBACK on other modes.
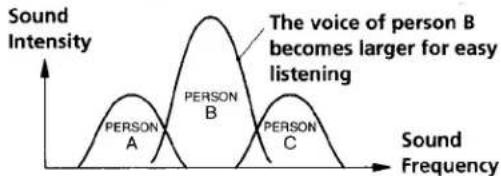
How the easy listening adjustment works
Sounds could be distinguished by their frequencies. When you have recorded voices of three people mixed together, for example, you will be able to hear the voice of a certain person better by emphasizing the frequency range matching to the tone of his/her voice.
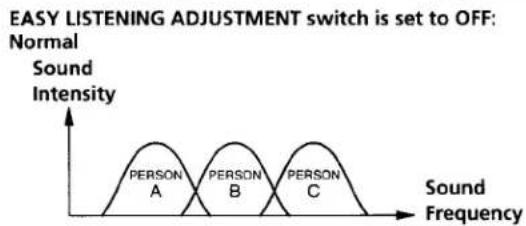
line
| Person | Frequency | Sound Intensity | |--------|-----------|-----------------| | A | 0 | Low | | B | 1 | Medium | | C | 2 | High |EASY LISTENING ADJUSTMENT switch is set to ON: Adjusted to match person B.
line
| Person | Sound Intensity Peak | |--------|----------------------| | A | 0 | | B | 1 | | C | 0 |Choosing the power sources
You can use the AC power or batteries as a power source.
Use the AC power source whenever you record, since recording consumes much power.
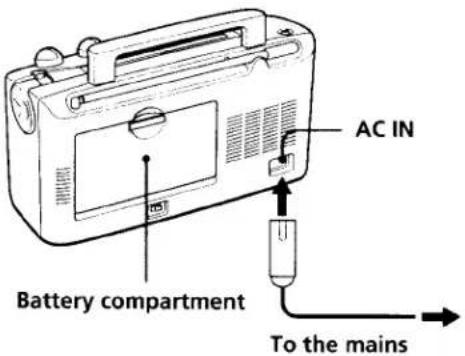
Connecting the AC power cord
Insert one end of the supplied AC power cord to the AC IN socket located at the rear of the player, and the other end to the mains.
Using the player on batteries
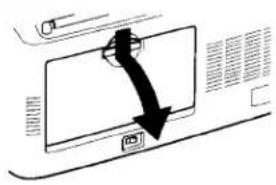
Insert four R20 (size D) batteries (not supplied) into the battery compartment.
To use the player on batteries, disconnect the AC power cord from the player.
natural_image
Diagram showing a device with a black arrow pointing to a screen and a USB port (no text or symbols present)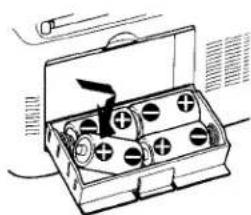
natural_image
Illustration of a hand holding a battery pack with multiple terminals (no text or symbols visible)When to replace batteries
Replace the batteries when the OPR/BATT indicator dims or when the player stops operating. Replace all the batteries with new ones.
Precautions
On safety
Should any solid object or liquid fall into the player, unplug the player, and have it checked by qualified personnel before operating it any further.
On power sources
- For AC operation, use the supplied AC power cord; do not use any other type.
- The player is not disconnected from the mains as long as it is connected to the mains, even if the player itself has been turned off.
- For battery operation, use four R20 (size D) batteries.
- When the batteries are not to be used, remove them to avoid damage that can be caused by battery leakage or corrosion.
- The nameplate indicating operating voltage, power consumption, etc. is located at the bottom.
On placement
- Do not leave the player in a location near heat sources, or in a place subject to direct sunlight, excessive dust or mechanical shock.
- Do not place the player on an inclined or unstable place.
- Do not place anything within 10 mm of the side of the cabinet. The ventilation holes must be unobstructed for the player to operate properly and prolong the life of its components.
- If the player is left in a car parked in the sun, be sure to choose a location in the car where the player will not be subjected to the direct rays of the sun.
- Since a strong magnet is used for the speakers, keep personal credit cards using magnetic coding or spring-wound watches away from the player to prevent possible damage from the magnet.
On operation
If the player has not been used for a long time, set it in the playback mode to warm it up for a few minutes before inserting a cassette.
If you have any questions or problems concerning your player, please consult your nearest Sony dealer.
Notes on cassettes
- Break off the cassette tab from side A or B to prevent accidental recording. If you want to reuse the tape for recording, cover the broken tab with adhesive tape.
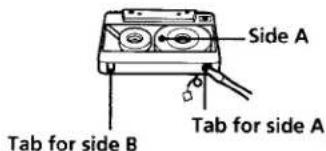
• To record on a tape with its tab broken off, cover the respective tab hole for side A or B with adhesive tape.
• The use of a cassette with more than 90 minutes of play time is not recommended except for long, continuous recording or playback.
Troubleshooting
| Symptom | Remedy | |
| General | There is no audio. | Connect the AC power cord securely.Make sure the batteries are inserted correctly.Replace all the batteries with new ones if they are weak.Adjust the volume.Unplug the earphone when listening through speakers. |
| Radio | The audio is weak or has poor quality. | Replace all the batteries with new ones if they are weak.Move the player away from the TV. |
| The picture of your TV becomes unstable. | If you are listening to an FM program near the TV with an indoor antenna, move the player away from the TV. | |
| Tape Player | The tape does not move when you press an operation button. | Close the cassette compartment securely. |
| The REC button does not function/ The tape does not move. | Make sure the safety tab on the cassette is in place. | |
| The tape does not erase completely. | Clean the erasing head (see page 14). | |
| The audio is weak/The audio quality is poor. | Press SLOW PLAYBACK to “ OFF”.Replace all the batteries with new ones if they are weak.Clean the heads, pinch roller and capstan (see page 14).Demagnetize the heads using a demagnetizer (see page 14). | |
| The sound is distorted. | The TYPE II (high position) or TYPE IV (metal) tape is being used. Use TYPE I (normal) tape only. |
Maintenance
Specifications
Cleaning the tape heads and tape path
Wipe the heads, the pinch roller and the capstan with a cleaning swab slightly moistened with cleaning fluid or alcohol after every 10 hours of operation for optimum playback and recording quality. To make the best possible recording, however, we recommend that you clean all surfaces over which tape travels before each recording.
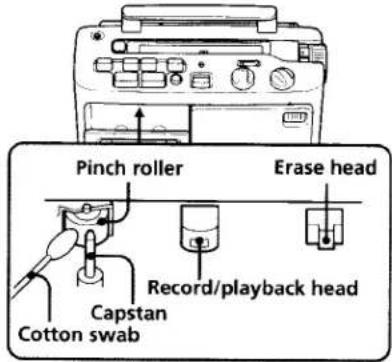
After cleaning, insert a tape when the areas cleaned are completely dry.
Demagnetizing the tape heads
After 20 to 30 hours of use, enough residual magnetism will have built up on the tape heads to begin to cause loss of high frequency sound and hiss. At this time, you should demagnetize the heads and all metal parts in the tape path with a commercially available tape head demagnetizer.
Cleaning the cabinet
Clean the cabinet, panel and controls with a soft cloth slightly moistened with a mild detergent solution. Do not use any type of abrasive pad, scouring powder, or solvent, such as alcohol or benzine.
AUDIO POWER SPECIFICATIONS POWER OUTPUT AND TOTAL HARMONIC DISTORTION:
With 4.0-ohm loads, from 125-8,000Hz; rated 2.1 W minimum RMS power, with no more than 10% total harmonic distortion in AC operation.
Radio section
Frequency range
FM 87.6 - 108 MHz
AM 530 - 1.710 kHz
Aerials
FM: Telescopic aerial
AM: Built-in ferrite bar aerial
Cassette-corder section
Recording system
2-track | channel monaural
Fast winding time
Approx. 120 s (sec.) with Sony cassette C-60
Frequency response
TYPE I (normal): 100-8,000 Hz
General
Speaker
Full range: 9.2 cm dia., 4 ohms, cone type (1)
Outputs
Earphone jack (minijack)
For 32 ohms impedance earphone
Power requirements
120 V AC, 60 Hz
6 V DC, four R20 (size D) batteries
Power consumption
AC6W
Battery life
| FM recording | |
| Sony R20P: | approx. 13 h |
| Sony alkaline LR20: | approx. 35 h |
| Tape playback | |
| Sony R20P: | approx. 7 h |
| Sony alkaline LR20: | approx. 20 h |
Dimensions
Approx. 289 × 200 × 123 mm
(w/h/d) (11 ½×7 ½×4 ½ inches)
(incl. projecting parts)
Mass
Approx. 2.4 kg (5 lb. 5 oz) (incl. batteries)
Supplied accessory
AC power cord (1)
Earphone (I)
Design and specifications are subject to change without notice.
Location and Function of controls
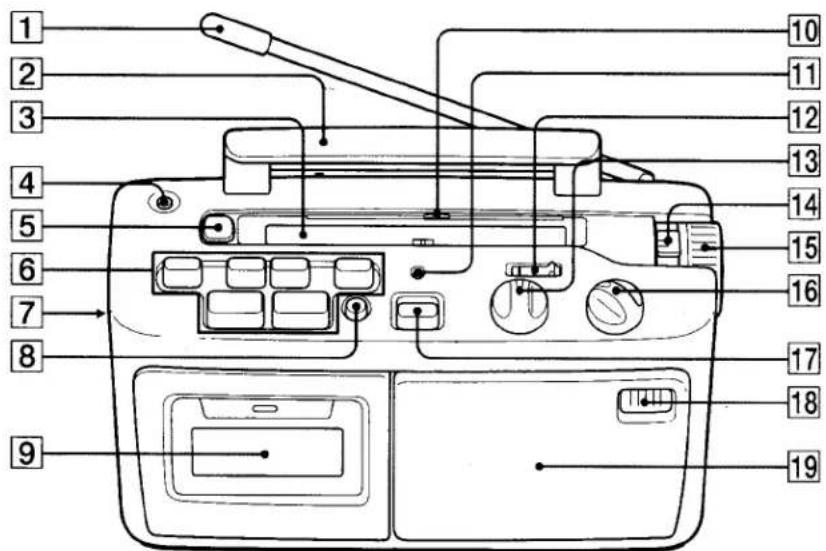
Additional information
① FM telescopic aerial (5)
② Carrying handle
3 Dial scale (4, 5)
4 ⑨ (earphone) jack (mini jack) (5)
5 LIGHT (Dial scale light) button (5)
6 Tape operation buttons (6, 7)
⑦ EARPHONE POCKET box (5)
8 SLOW PLAYBACK button (10)
9 Cassette compartment lid (7)
10 Frequency marker (5)
11 OPR/BATT indicator (11)
12 EASY LISTENING
ADJUSTMENT switch (10)
13 EASY LISTENING
ADJUSTMENT control (10)
14 BAND switch (4)
15 TUNING control (4)
16 VOLUME control (5, 7)
17 FUNCTION switch (4, 6, 8)
18 Built-in microphone (8)
19 Speaker
Index
A, B
Batteries for player 11
E, F, G, H
Easy listening adjustment 10
R
Recording on a tape 8
C
Choosing power sources 11
Cleaning
cabinet 14
tape heads and
tape path 14
I, J, K
Improving broadcast
reception 5
S
Setting up 11
Slow playback 10
L, M, N, O
Listening to the radio 4
T, U, V, W, X, Y, Z
Troubleshooting 13
D
Demagnetizing the tape heads 14
P, Q
Playing a tape 6



- Radio Cassette-Corder
- WARNING
- To prevent fire or shock hazard, do not expose the player to rain or moisture.
- Owner's Record
- Table of contents
- Basic Operations
- Useful Functions
- Setting Up
- Additional Information
- Listening to the radio
- Tips
- To improve broadcast reception
- To mark the broadcast station you often listen to
- Using the light
- Tip
- 1
- 2
- 3
- Notes
- Easy listening adjustment
- Slow playback
- To slow down the tape speed
- To cancel the slow tape speed
- Note
- How the easy listening adjustment works
- Choosing the power sources
- Connecting the AC power cord
- Using the player on batteries
- When to replace batteries
- Precautions
- On safety
- On power sources
- On placement
- On operation
- Notes on cassettes
- Maintenance
- Specifications
- Cleaning the tape heads and tape path
- Demagnetizing the tape heads
- Cleaning the cabinet
- AUDIO POWER SPECIFICATIONS POWER OUTPUT AND TOTAL HARMONIC DISTORTION:
- Radio section
- Cassette-corder section
- General
- Location and Function of controls
- Index
- A, B
- E, F, G, H
- R
- C
- I, J, K
- S
- L, M, N, O
- T, U, V, W, X, Y, Z
- D
- P, Q
Marke : SONY
Modell : CFM-A50
Kategorie : Radio