
M-2020 - Kassettenabspieler SONY - Kostenlose Bedienungsanleitung
Finden Sie kostenlos die Bedienungsanleitung des Geräts M-2020 SONY als PDF.


Benutzerfragen zu M-2020 SONY
0 Frage zu diesem Gerät. Beantworten Sie die, die Sie kennen, oder stellen Sie Ihre eigene.
Eine neue Frage zu diesem Gerät stellen
Laden Sie die Anleitung für Ihr Kassettenabspieler kostenlos im PDF-Format! Finden Sie Ihr Handbuch M-2020 - SONY und nehmen Sie Ihr elektronisches Gerät wieder in die Hand. Auf dieser Seite sind alle Dokumente veröffentlicht, die für die Verwendung Ihres Geräts notwendig sind. M-2020 von der Marke SONY.
BEDIENUNGSANLEITUNG M-2020 SONY
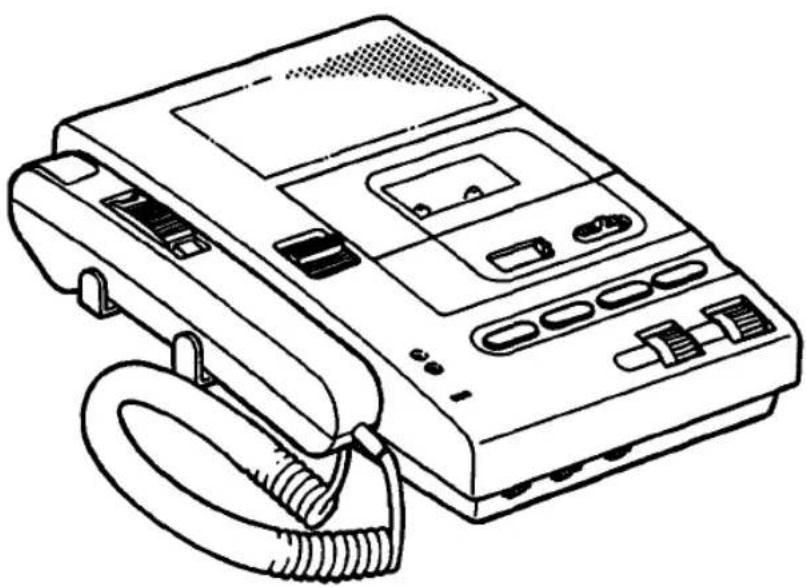
Microcassette™ Dictator/Transcriber
M-2020
Operating Instructions
Before operating the unit, please read this manual thoroughly, and retain it for future reference.
Owner's Record
The model and serial numbers are located at the bottom. Record the serial number in the space provided below. Refer to these numbers whenever you call upon your Sony dealer regarding this product.
Model No. M-2020 Serial No. ____
natural_image
Line drawing of a portable electronic device with coiled cable and control buttons (no text or symbols)To prevent fire or shock hazard, do not expose the unit to rain or moisture.
To avoid electrical shock, do not open the cabinet. Refer servicing to qualified personnel only.
INFORMATION
This equipment has been tested and found to comply with the limits for a Class B digital device, pursuant to Part 15 of the FCC Rules. These limits are designed to provide reasonable protection against harmful interference in a residential installation. This equipment generates, uses, and can radiate radio frequency energy and, if not installed and used in accordance with the instructions, may cause harmful interference to radio communications. However, there is no guarantee that interference will not occur in a particular installation. If this equipment does cause harmful interference to radio or television reception, which can be determined by turning the equipment off and on, the user is encouraged to try to correct the interference by one or more of the following measures:
- Reorient or relocate the receiving antenna.
- Increase the separation between the equipment and receiver.
- Connect the equipment into an outlet on a circuit different from that to which the receiver is connected.
- Consult the dealer or an experienced radio/TV technician for help.
This device complies with Part 15 of the FCC Rules.
Operation is subject to the following two conditions:
(1) This device may not cause harmful interference, and (2) this device must accept any interference received, including interference that may cause undesired operation.
You are cautioned that any changes or modifications not expressly approved in this manual could void your authority to operate this equipment.
Table of Contents
Features 3
Precautions 4
Notes on cassettes 5
Location and function of controls 6
Preparation 8
Power connection 8
Connecting the hand control unit 8
Connecting the foot control unit 9
Cassette insertion 9
Dictation 10
Transcription 12
Recording 13
Telephone Pick-up 13
Alarm system 14
Maintenance 14
Specifications 15
Troubleshooting guide 16
Features
• The supplied hand control unit remotely controls the M-2020 dictator/transcriber.
- Auto backspace function makes transcribing easy by reviewing the last few recorded words each time listening is resumed. (Only with the foot control unit.)
- Adjustable tape speed and tone control.
- Two alarms (end-of-tape, no-cassette) alert you.
- The supplied foot control unit makes Play/Stop/Rew possible with your foot. Convenient for transcribing with your hands free.
- Operate the unit only on 9 V DC.
- Use the supplied AC power adaptor. Do not use any other AC power adaptor as it may cause malfunction.
- Unplug the unit from the wall outlet when it is not to be used for an extended period of time. To disconnect the cord, pull it out by grasping the plug. Never pull it by the cord.
- Use only the MICROCASSETTE™ with this unit.
- Two tape speeds can be selected for recording with the SPEED selector: 2.4 cm/sec. or 1.2 cm/sec. Match the playback speed to the recording speed.
- Do not install the unit in a location near heat sources such as radiators or airducts, or in a place subject to direct sunlight, excessive dust, mechanical vibration, or shock.
- Allow adequate air circulation to prevent internal heat build-up. Do not place the unit near materials (curtains, draperies) that may block the ventilation holes.
- Should any solid object or liquid fall into the unit, unplug the unit and have it checked by qualified personnel before operating it any further.
- The AC power adaptor which has been supplied becomes hot if it is connected to an AC outlet for a long period of time. But this will not cause any trouble.
If you have any question or problem concerning your unit that is not covered in this manual, please consult the Sony dealer from whom you purchased the unit.
Notes on Cassettes
[Unreadable due to severe distortion and noise]
Slack in the tape
Before inserting, take up any slack in the tape by using a pencil.
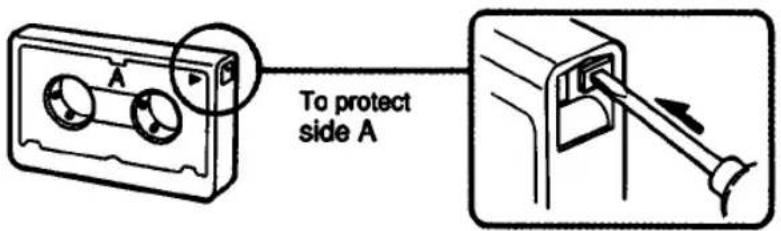
To prevent accidental erasure
When a recording is made, the previous recording is automatically erased. To prevent erasure, break the cassette tabs.
To record on a cassette with removed tabs
Cover each slot with a piece of plastic tape.
text_image
A To protect side ANote on the Microcassette
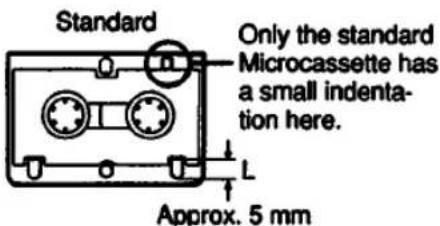
This unit uses only modern standard Microcassettes. The non-standard Microcassettes cannot be used because their "L" dimension shown in the illustration below is different.
text_image
Standard Only the standard Microcassette has a small indentation here. Approx. 5 mm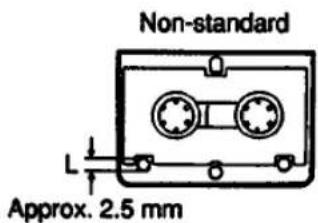
text_image
Non-standard L Approx. 2.5 mmLocation and Function of Controls
text_image
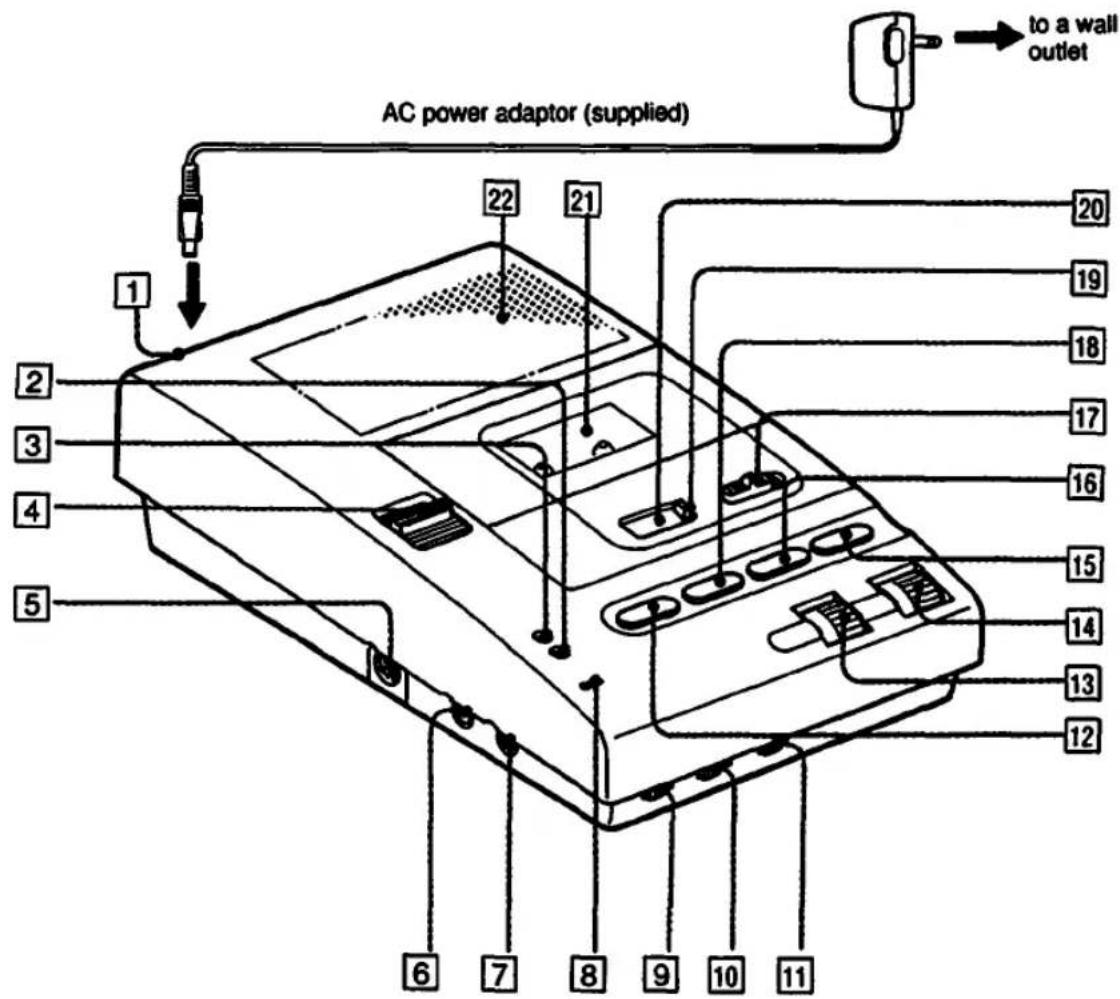
AC power adaptor (supplied) to a wall outlet 1 2 3 4 5 6 7 8 9 10 11 12 13 14 15 16 17 18 19 20 21 22Hand control unit (supplied)
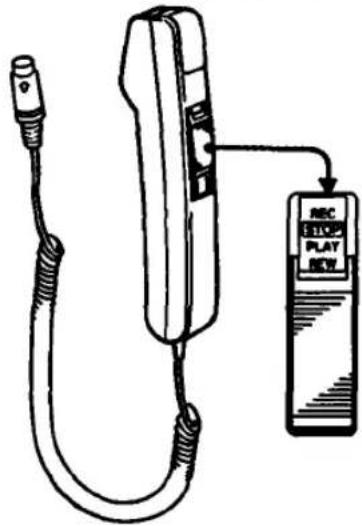
text_image
REC STOP PLAT RECFoot control unit (supplied)
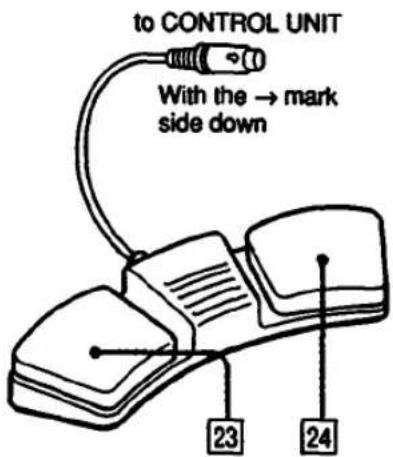
text_image
to CONTROL UNIT With the → mark side down 23 24Cradle (supplied)
① DC IN 9 V jack (external power input) jack
② OPR (operation) indicator
The indicator illuminates during tape operation.
③ REC (record) indicator
The indicator illuminates during recording.
4 ▲ EJECT (cassette eject) lever
⑤ CONTROL UNIT connector
6 MIC (external microphone) (PLUG IN POWER)
⑦ EARPHONE jack (minijack)
⑧ MIC (built-in microphone)
9 SPEED selector
2.4 cm: A 60-minute recording can be made using both sides of the MC-60 Microcassette.
This setting produces optimum sound and is recommended for normal use.
1.2 cm: A 120-minute recording can be made using both sides of the MC-60.
10 REV (reverse) TIME (0/1/3) (auto-backspace time) control
11 TONE control
Slide toward H (high) to reinforce treble, and L (low) to weaken it.
12 ← REW (rewind) button
13 SPEED CONTROL (tape speed control)
14 VOLUME control
15 ▶▶FF (fast forward) button
16 ▶ PLAY button
17 Recording (STOP/REC) switch
18 ■ STOP button
19 RESET button
Press to reset the counter to zero.
20 Tape counter
21 Cassette compartment
22 Built-in speaker
23 Rewind pedal
24 Playback pedal
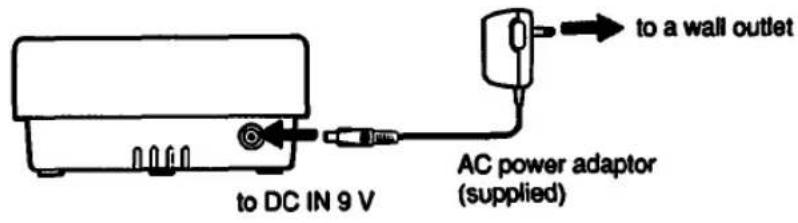
Power Connection
Note on the AC power adaptor Use only the AC power adaptor supplied. Do not use any other AC power adaptor.
text_image
to a wall outlet AC power adaptor (supplied) to DC IN 9 V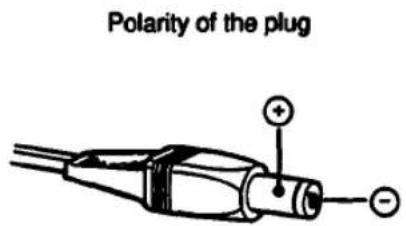
text_image
Polarity of the plugConnecting the Hand Control Unit (supplied)
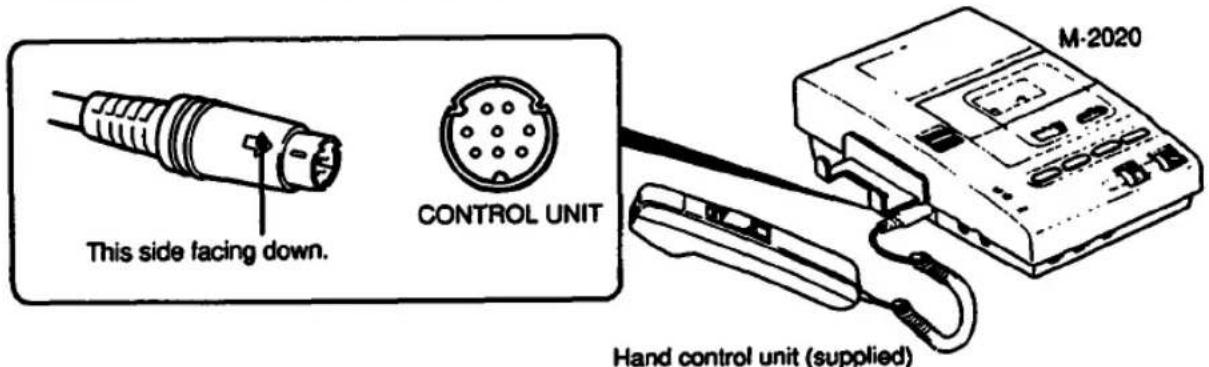
Be careful of the direction of the plug when connecting it to the unit.
text_image
M-2020 CONTROL UNIT This side facing down. Hand control unit (supplied)Attaching the cradle
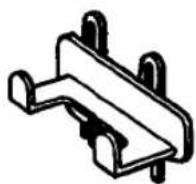
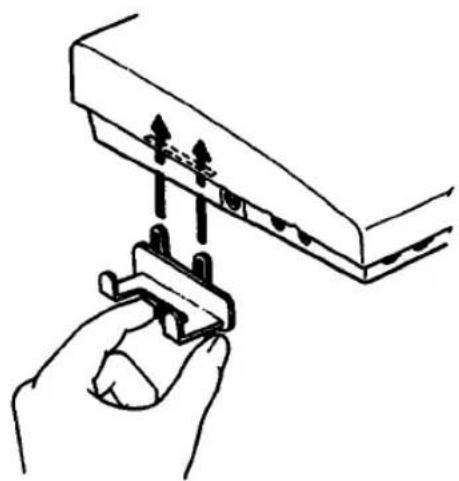
Attach the supplied cradle to the left side of the unit. Insert the cradle into the slots until there is a click sound to secure it. Place the hand control unit (supplied) on the cradle while not in use.
natural_image
Hand holding a small electronic component with arrows indicating direction (no text or symbols)Attaching the cradle
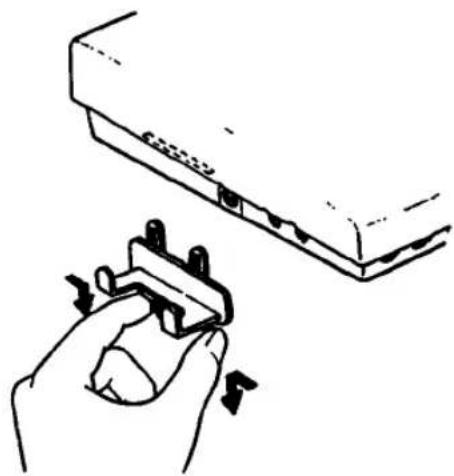
natural_image
Hand holding a small electrical plug with arrows indicating adjustment (no text or symbols)Disconnecting the cradle
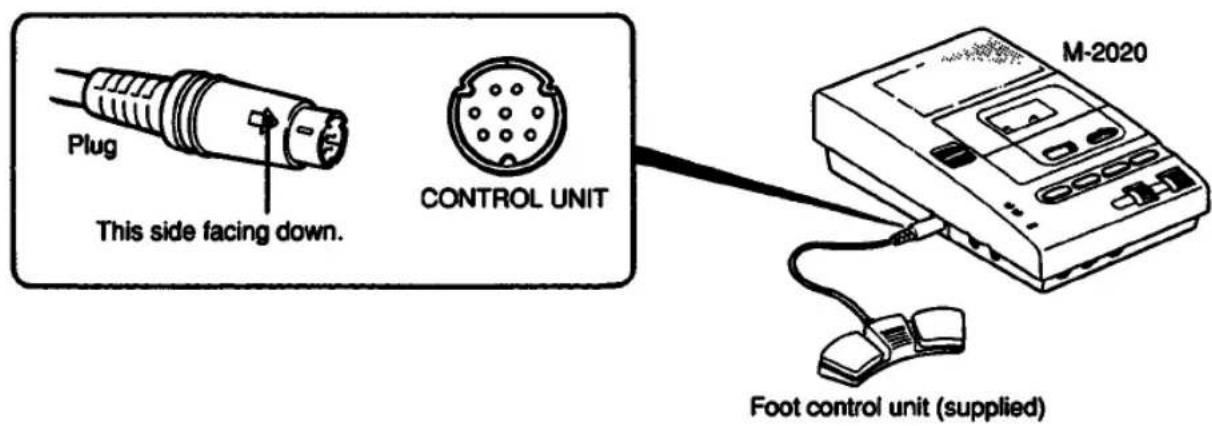
Connecting the Foot Control Unit (supplied)
Be careful of the direction of the plug when connecting it to the unit.
text_image
Plug This side facing down. CONTROL UNIT M-2020 Foot control unit (supplied)- Insertion
1
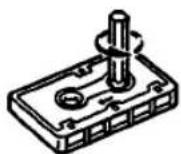
Cassette
text_image
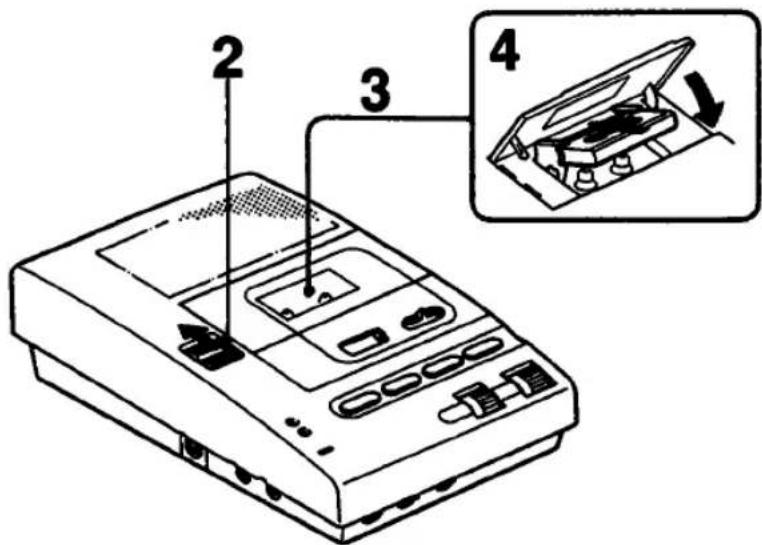
Diagram of a device with labeled parts and an inset showing a close-up of internal components.1 Take up any slack in the tape.
2 Slide the eject button in the direction of the arrow to open the cassette holder.
3 Insert a cassette into the cassette holder with the side to be recorded on or played back facing upward.
4 Close the cassette holder.
natural_image
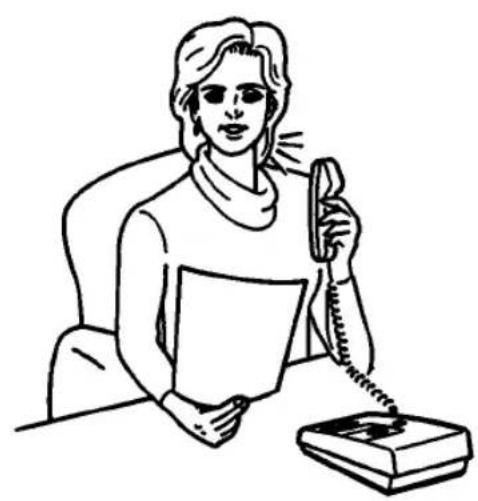
Line drawing of a person sitting at a desk using a telephone (no text or symbols present)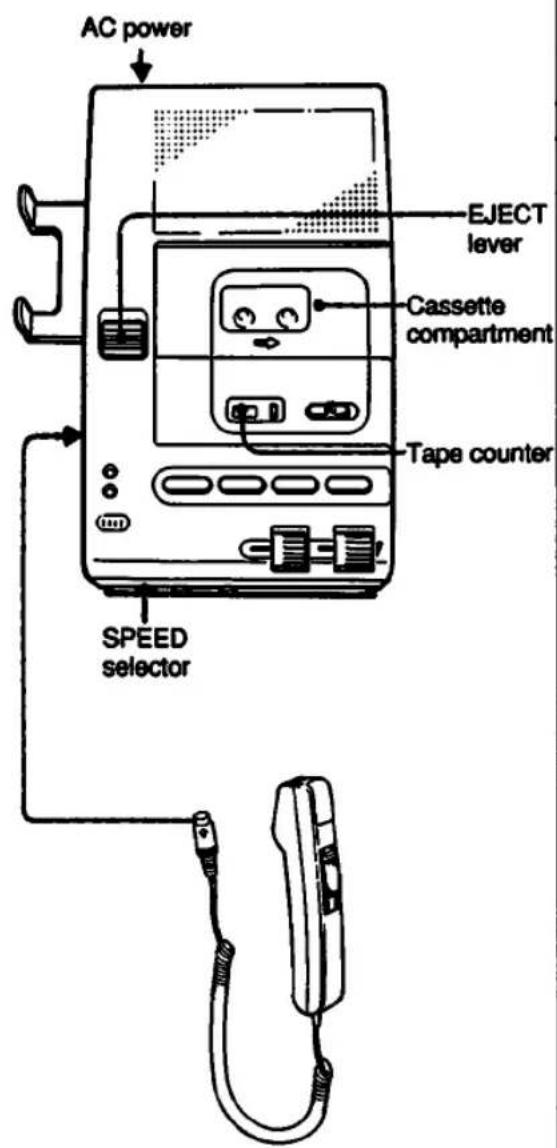
text_image
AC power EJECT lever Cassette compartment Tape counter SPEED selectorHand control unit (supplied)
flowchart
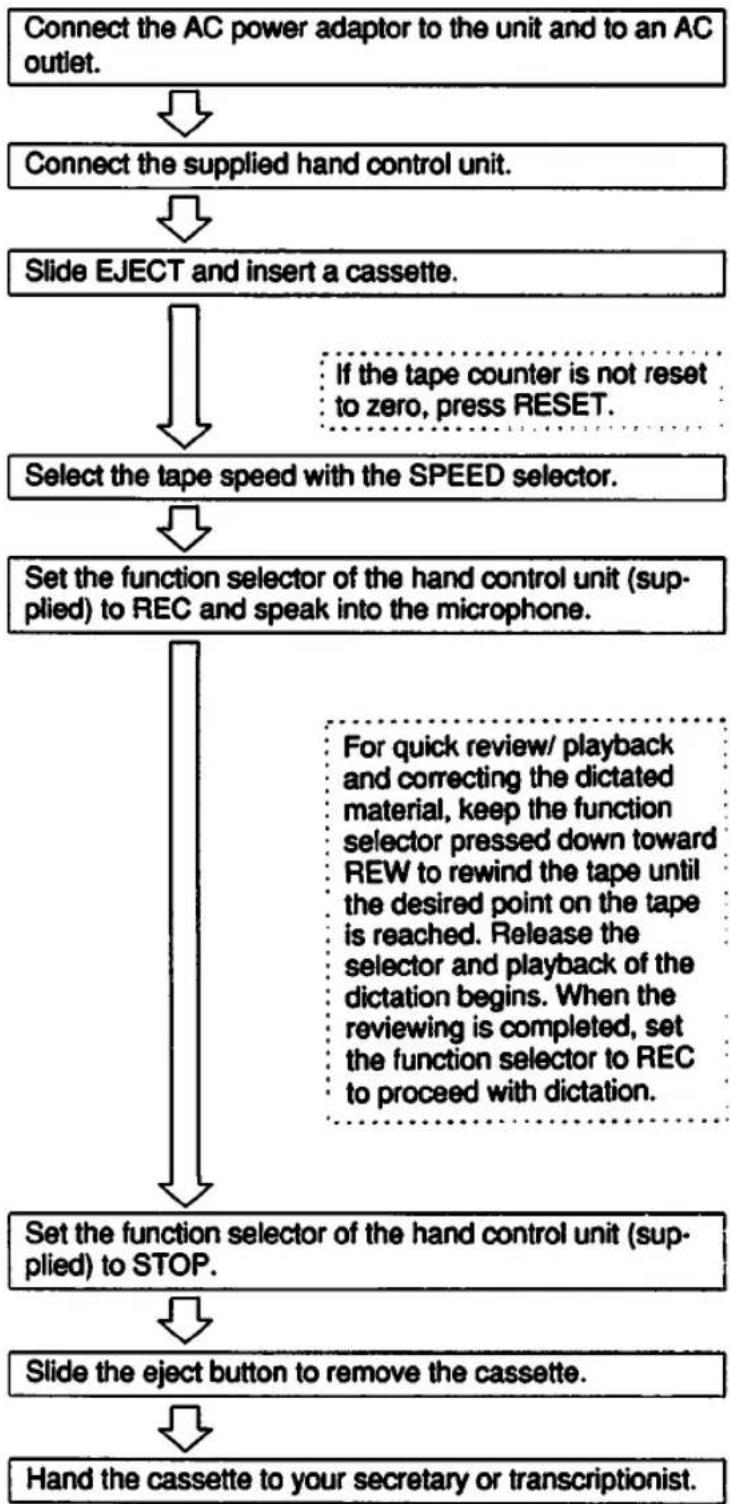
graph TD
    A["Connect the AC power adaptor to the unit and to an AC outlet."] --> B["Connect the supplied hand control unit."]
    B --> C["Slide EJECT and insert a cassette."]
    C --> D["Select the tape speed with the SPEED selector."]
    D --> E["Set the function selector of the hand control unit (supplied) to REC and speak into the microphone."]
    E --> F["Set the function selector of the hand control unit (supplied) to STOP."]
    F --> G["Slide the eject button to remove the cassette."]
    G --> H["Hand the cassette to your secretary or transcriptionist."]
    I["If the tape counter is not reset to zero, press RESET."] -.-> D
    J["For quick review/ playback and correcting the dictated material, keep the function selector pressed down toward REW to rewind the tape until the desired point on the tape is reached. Release the selector and playback of the dictation begins. When the reviewing is completed, set the function selector to REC to proceed with dictation."] -.-> F
For transcribing, refer to Transcription on page 12.
pipe transport operation
| M-2020 | Hand control unit (supplied) | Foot control unit (supplied) | |
| Rewind | Press ←→REW. | Keep the function selector pressed down toward REW. | Keep the left side of the pedal depressed. |
| Stop | Press ■ STOP. | Set the function selector to STOP. | Release the pedal. |
| Play | Press ► PLAY. | Set the function selector to PLAY. | Keep the right side of the pedal depressed. |
| Fast forward | Press ►FF. |
When the tape reaches its end or beginning, the unit automatically shuts off.
Tips for More Efficient Dictation
Before you start dictation
- Organize your thoughts.
• Make notes or an outline of what you want to dictate. - Check that the cassette is erased.
When you dictate
- Identify yourself. (Name, department, phone number)
- Indicate the type of dictation. (Memo, letter, etc.)
- Give transcribing instructions. (Type of stationery, number of copies and who they are for, envelopes, etc.)
- Specify distribution (Names, addresses, etc.)
During dictation
- Relax and speak clearly, at normal speed.
- Short sentences are best.
- Include punctuations.
- Spell out difficult or unusual words.
- Correct your mistakes. (Review and redictate.)
text_image
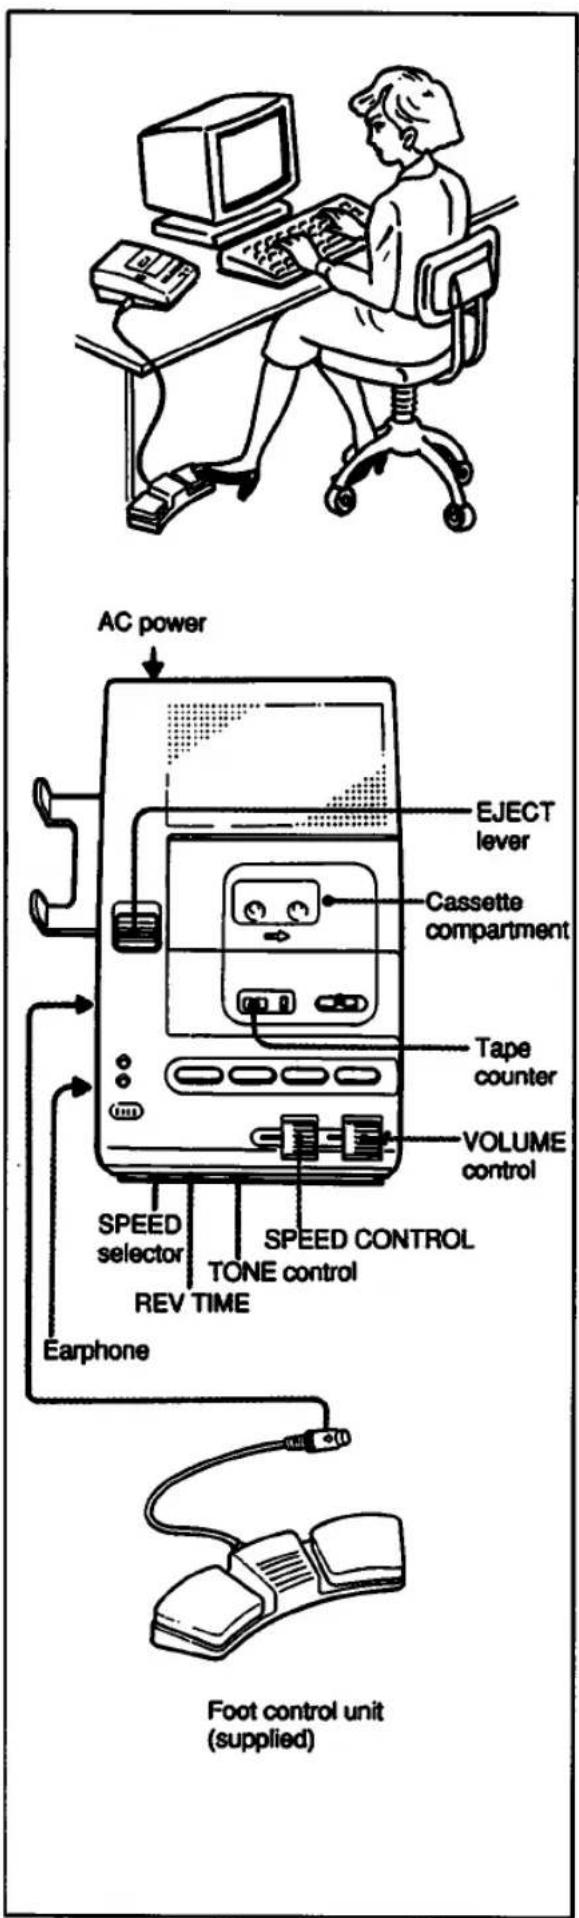
AC power EJECT lever Cassette compartment Tape counter VOLUME control SPEED selector REV TIME EARphone SPEED CONTROL TONE control Foot control unit (supplied)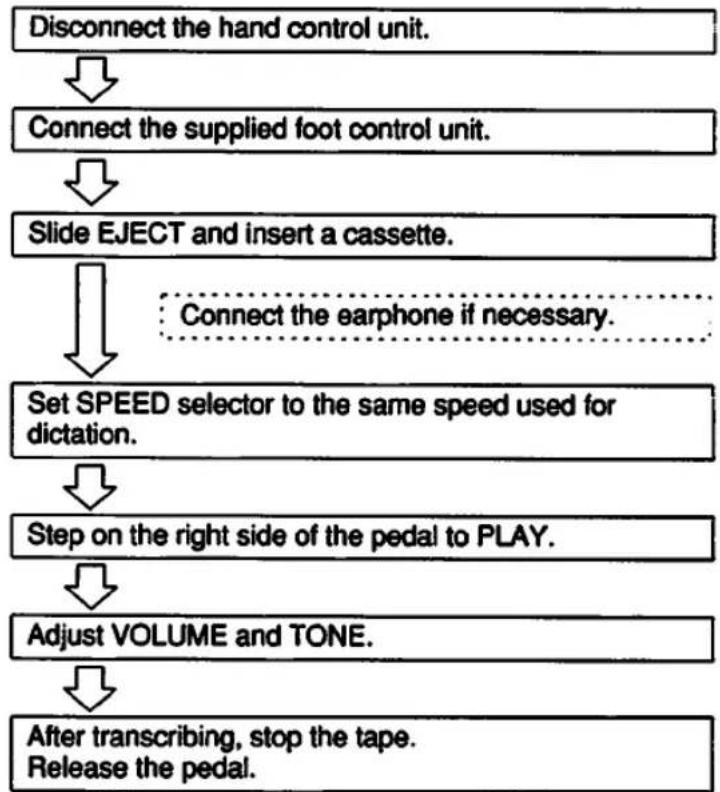
flowchart
graph TD
    A["Disconnect the hand control unit."] --> B["Connect the supplied foot control unit."]
    B --> C["Slide EJECT and insert a cassette."]
    C --> D["Set SPEED selector to the same speed used for dictation."]
    D --> E["Step on the right side of the pedal to PLAY."]
    E --> F["Adjust VOLUME and TONE."]
    F --> G["After transcribing, stop the tape. Release the pedal."]
    style A fill:#f9f,stroke:#333
    style G fill:#f9f,stroke:#333
Use of foot control unit
The foot control unit leaves your hands free, enabling you to control this transcriber with your foot.
Auto backspace
The tape rewinds a little each time it is stopped and the last few recorded words can be reviewed when you resume listening. Adjust REV (reverse) TIME to the desired length (position 1, about 1 second; position 3, about 3 seconds). At position 0, the tape stops without rewinding at all. This functions only when the foot control unit (supplied) is used.
Speed control
The tape speed is adjustable with the SPEED CONTROL. The tape runs at normal speed with the control set to the center click position.
text_image
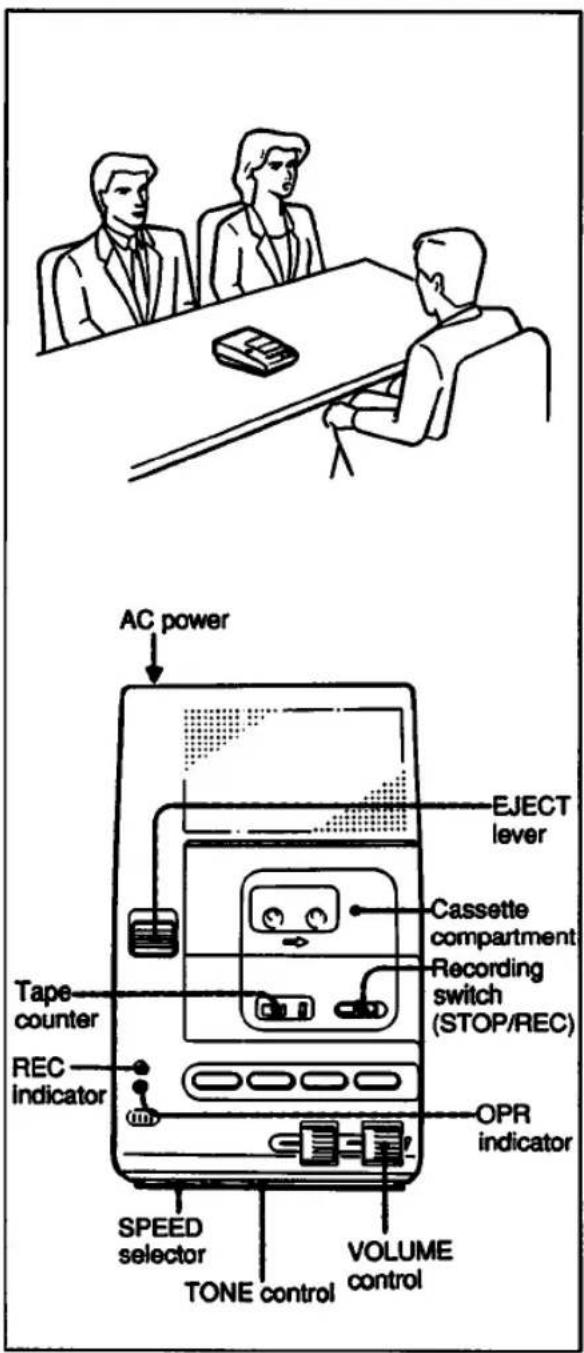
AC power Tape counter REC Indicator EJECT lever Cassette compartment Recording switch (STOP/REC) OPR indicator SPEED selector TONE control VOLUME control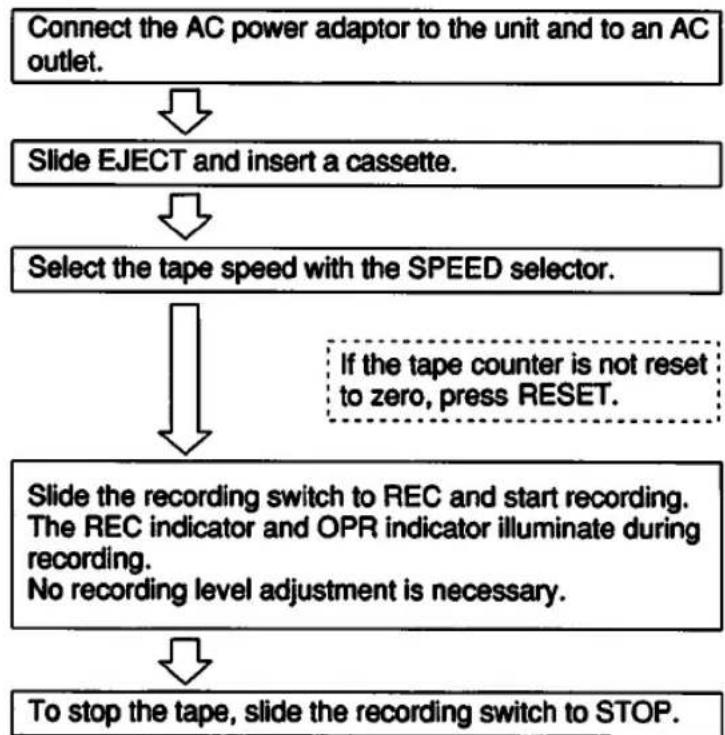
flowchart
graph TD
    A["Connect the AC power adaptor to the unit and to an AC outlet."] --> B["Slide EJECT and insert a cassette."]
    B --> C["Select the tape speed with the SPEED selector."]
    C --> D["Slide the recording switch to REC and start recording. The REC indicator and OPR indicator illuminate during recording. No recording level adjustment is necessary."]
    D --> E["To stop the tape, slide the recording switch to STOP."]
    C --> F["If the tape counter is not reset to zero, press RESET."]
When monitoring the recording
The recording can be monitored through the earphones (supplied). Adjust VOLUME if necessary.
What to be recorded
Conference or interview: Use the built-in microphone or an optional Sony microphone.
For better recording
Sony microphone, ECM-F01 or ECM-K7 are recommended.
Telephone Pick-up
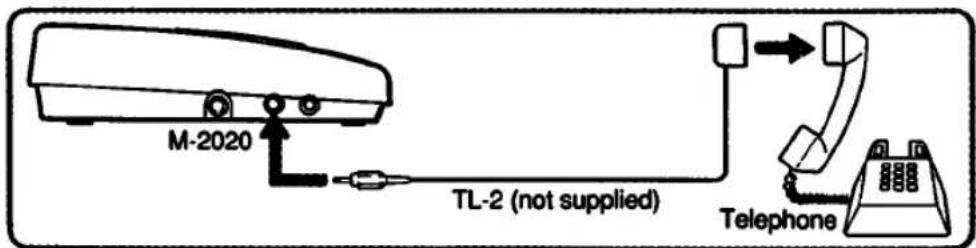
To record telephone conversation, connect the optional telephone pick-up to the MIC jack. For further details, refer to the instruction manual of the telephone pick-up.
text_image
M-2020 TL-2 (not supplied) Telephone* The telephone pick-up cannot be used on some telephones.
Alarm System
An alarm sounds in the following situations
| Unit | Function | Situation and indicator | |
| No cassette, or the cassette tabs have been removed. | The end/beginning of the tape. | ||
| Main unit | REW | ● | |
| PLAY | ● | ||
| FF | ● | ||
| REC | ● | ● | |
| Foot control | PLAY | ● | |
| REW | ● | ||
| Hand unit | REC | ● | ● |
| PLAY | ● | ||
| REW | ● | ||
To Stop the Alarm Sound
When using the main unit:
The alarm stops automatically at the end or beginning of the tape. However, when recording, slide the recording switch to STOP to stop the alarm.
When using the foot control unit:
Release it to stop the alarm.
When using the hand unit:
Slide the function selector to STOP. The alarm will stop.
Maintenance
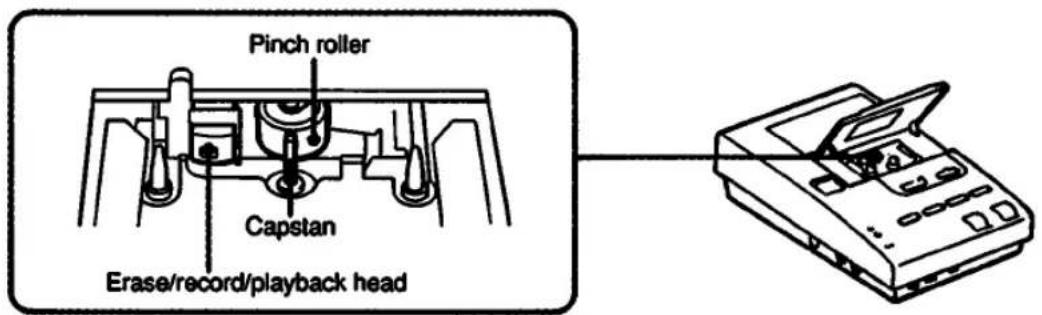
text_image
Pinch roller Capstan Erase/record/playback headCleaning the head
To produce optimum sound, keep the tape head clean.
Moisten a cotton swab or a soft cloth with alcohol, and wipe the parts shown above.
Cleaning the cabinet
Clean the cabinet with a soft cloth slightly moistened with a mild detergent solution. Never use strong solvents, such as thinner or benzine, since they may damage the finish.
| Tape | MICROCASSETTETM (normal position type) |
| Track system | 2-track 1-channel monaural |
| Tape speed | 2.4 cm/sec. (15/16 ips), 1.2 cm/sec. (15/32 ips) |
| Tape speed control | -10 % to +50 % |
| Auto back space | Approx. 0/1/3 sec. |
| Frequency | 250–4,000 Hz |
| response | (at 2.4 cm position) |
| Speaker | 5 cm (2 inches) dia. |
| Power output | 300 mW |
| Input | MIC (PLUG IN POWER): minijack, sensitivity 0.3 mV for 3 kilohm or lower impedance |
| Output | EARPHONE: minijack, for an 8–300 ohm earphone |
| Power requirements | DC IN 9 V jack accepts the supplied AC power adaptor. |
| Power consumption | 600 mA |
| Dimensions | Approx. 133×61.5×230 mm (w/h/d)(5%×2%×9% inches)not incl. projecting parts and controls |
| Weight | Approx. 0.8 kg (1 lb 2 oz) |
| Supplied accessories | Earphone (1)Foot control unit (1)AC power adaptor (1)Hand control unit (1)Cradle (1) |
Design and specifications subject to change without notice.
Optional Accessories
Microphone ECM-F01, ECM-K7
Microcassette MC-30, MC-60, 3MC-60
Cassette eraser BE-9H
Telephone pick-up TL-2, TP-15
Telephone recording adaptor TL-4
Your dealer may not handle some of the above listed optional accessories. Please ask the dealer for detailed information about the optional accessories available in your country.
Troubleshooting Guide
Should a problem occur, first check the following basic points. If the problem persists after you have made these checks, consult your nearest Sony dealer.
| Symptom | Cause and /or remedy |
| The unit does not operate. | Connect the AC power adaptor to a wall outlet. |
| No sound from the built-in speaker. | Turn up the volume.The earphone is plugged in. |
| The tape speed is too fast or too slow. | Set the SPEED selector correctly.Adjust the SPEED CONTROL. |
| The tape stops in the rewind or fast forward mode and the alarm sounds. | The entire tape has been wound onto the right or left reel. |
| Sound drop-outs, loss of high frequency sounds, or excessive noise. | The heads are dirty. See“Maintenance”. |
| No sound from the earphones. | The VOLUME control is set in the 0 position.The earphone is not plugged in correctly. |
| The tape does not move when either the hand control unit or foot control unit is used. | The plug is not connected correctly.Release the STOP button on the unit before operation. |