
SRS-A91 - Lautsprecher SONY - Kostenlose Bedienungsanleitung
Finden Sie kostenlos die Bedienungsanleitung des Geräts SRS-A91 SONY als PDF.


| Produkttyp | Aktives Lautsprechersystem |
| Modell | SRS-A91 / SRS-PC91 |
| Marke | Sony |
| Abmessungen (B x H x T) pro Lautsprecher | ca. 200 × 150 × 100 mm |
| Gewicht pro Lautsprecher | ca. 1,5 kg |
| Stromversorgung | Wechselstrom (Netzteil im Lieferumfang) |
| Leistungsaufnahme | 15 W |
| Eingänge | Stereo-Miniklinke (3,5 mm) |
| Frequenzgang | 50 Hz – 20 kHz |
| Gesamtleistung (RMS) | 2 × 5 W |
| Lautsprechertyp | 2-Wege (Hochtöner + Tieftöner) |
| Gehäusematerial | Kunststoff (MDF) mit schwarzer Oberfläche |
| Bedienelemente | Ein/Aus, Lautstärke, Balance (am Hauptlautsprecher) |
| Schutzfunktionen | Überlastungsschutz, Kurzschlusssicherung |
| Betriebsanleitung | Deutsch, Englisch, Französisch – PDF auf notice-facile.com |
| Reinigung | Mit einem trockenen, weichen Tuch abwischen. Keine Reinigungsmittel oder Wasser. |
| Sicherheitshinweise | Nicht Regen oder Feuchtigkeit aussetzen. Netzstecker vor Reinigung ziehen. |
Häufig gestellte Fragen - SRS-A91 SONY
Benutzerfragen zu SRS-A91 SONY
0 Frage zu diesem Gerät. Beantworten Sie die, die Sie kennen, oder stellen Sie Ihre eigene.
Eine neue Frage zu diesem Gerät stellen
Laden Sie die Anleitung für Ihr Lautsprecher kostenlos im PDF-Format! Finden Sie Ihr Handbuch SRS-A91 - SONY und nehmen Sie Ihr elektronisches Gerät wieder in die Hand. Auf dieser Seite sind alle Dokumente veröffentlicht, die für die Verwendung Ihres Geräts notwendig sind. SRS-A91 von der Marke SONY.
BEDIENUNGSANLEITUNG SRS-A91 SONY
SONY
3-800-389-21 (1)
Active Speaker System
SRS-A91
SRS-PC91
Operating Instructions
Before operating the unit, please read this manual thoroughly and retain it for future reference.
Owner's Record
The model and serial numbers are located at the rear. Record these numbers in the space provided below. Refer to them whenever you call upon your Sony dealer regarding this product.
Model No. ____ Serial No. ____
WARNING
To prevent fire or shock hazard, do not expose the unit to rain or moisture.
To avoid electrical shock, do not open the cabinet. Refer servicing to qualified personnel only.


This symbol is intended to alert the user to the presence of uninsulated "dangerous voltage" within the product's enclosure that may be of sufficient magnitude to constitute a risk of electric shock to persons.

This symbol is intended to alert the user to the presence of important operating and maintenance (servicing) instructions in the literature accompanying the appliance.
The graphical symbols are at the rear.
How to Use


1 Press the POWER switch (ON). The POWER indicator lights up.
2 Set the INPUT select switch.
To listen to the sound of only one source, set the INPUT select switch to 1 (for INPUT 1) or 2 (for INPUT 2). To mix the sound of both sources, set the INPUT select switch to MIX.
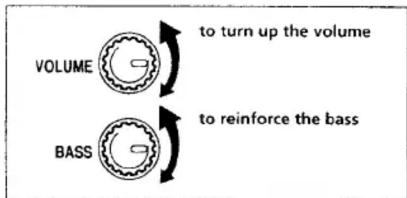
3 Adjust the VOLUME control.
4 Adjust the BASS control to your preference.
After listening, press the POWER switch (OFF). The POWER indicator goes off.
Listening to the sound through headphones
Connect the headphones to the PHONES (headphones) jack. The sound from the speakers is automatically turned off.
When you place the system on a desk, etc. with a smooth and slippery surface, attach the supplied rubber cushions on the bottom of the speakers for stability.
The rubber cushions may leave marks on the surface of the desk, etc.

Specifications
Amplifier section
Power output 10 W + 10 W (input impedance 1 kilohms (at 1 kHz))
Speaker section
System Full-range bass reflex type Speaker unit Full-range (magnetically shielded) × 0.65 mm (2 ^5/2 x in.) Nominal impedance 8 ohms Rated input power 10 W
General
Power requirement 120 V AC, 60 Hz Inputs Input cord left: stereo minplug (INPUT 1) (SRS-A9) / 1.5 m, (SRS-PC9) / 2.0 m)
right: monaural miniplug (1.5 m)
Stereo mini jack (INPUT 2) Output Stereo mini jack (PHONES) Dimensions Approx. 92 × 215 × 130 mm (w/h/d) (3 5/8 × 8 1/2 × 5 1/8 in.) Mass Left speaker: Approx. 850 g
(1 lb, 14 oz.), Right speaker: Approx. 700 g (1 lb 9 oz.) Supplied accessory AC power adaptor
Rubber cushions Optional accessories Connecting cord RK-G136HG, RK-G138, RK-G129HG Plug adaptor PC-234S, PC-236MS
Design and specifications are subject to change without notice.
Power Source
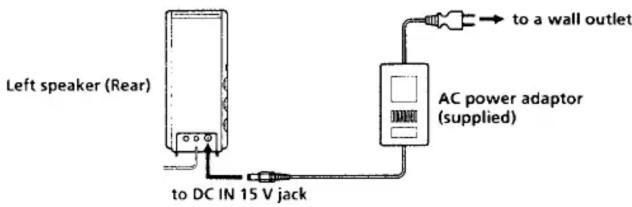
Connect the AC power adaptor to the wall outlet.
Note on the AC power adaptor
Use only the supplied AC power adaptor. Do not use any other AC power adaptor.

Polarity of the plug
Connections

flowchart
graph TD
    A["Right speaker (Rear)"] --> B["Left speaker (Rear)"]
    B --> C["to INPUT 2 jack"]
    C --> D["Connecting cord (not supplied)"]
    D --> E["Compact disc player, Cassette recorder, etc."]
    B --> F["to a headphones jack (stereo mini jack)"]
    F --> G["Discman, WALKMAN+, etc."]
    H["to R OUT jack"] --> B
    I["Personal computer, etc."] --> G
Connect the left speaker to the source equipment.
Use the INPUT 2 jack on the left speaker when connected to another source equipment.
To connect to a stereo mini jack (personal computer, CD-ROM, Disseman, etc.) use the optional connecting cord RK-C130HG. To connect to a pin jack (compact disc player, etc.), use the optional connecting cord RK-C129HG.
When the system is connected to a monaural jack of a radio, etc., the sound may only come through the left speaker. In such a case, use the optional Sony plug adaptor PC-236MS. The sound will come through both speakers.
To connect to a stereo phone-type headphones jack
Use the optional PC-234S plug adaptor or RK-G138 connecting cord.
Features
The Sony SRS-A91/SRS-PC91 is a compact-size speaker system with a built-in power amplifier. This system can be connected to a Discman, WALKMAX™ headphone stereo, personal computer, CD-ROM, MIDI sound source, etc.
• Power output of 10 W - 10 W
• The magnetically shielded speakers should have little effect on a TV screen or recorded tapes, etc. when placed close to them.
- Two input sources can be connected to this system with their sound coming out not only separately but also mixed together.
• The headphones output jack saves time to disconnect this system from the equipment when listening to the sound through the headphones.
- The "dynamic sound duct" assures a rich and powerful bass.
BALKMAN is a registered trademark of Sony Corporation.
Precautions
- Use only the supplied AC power adaptor. Do not use any other AC power adaptor.
- Disconnect the AC power adaptor from the wall outlet if the system is not to be used for an extended period of time. The POWER switch on the left speaker does not turn the AC power adaptor off.
- To disconnect the AC power adaptor, pull it out by grasping the plug. Never pull it by the cord.
- Do not open the cabinet. Refer servicing to qualified personnel only.
- Do not leave the system in a location near heat sources, or in a place subject to direct sunlight, excessive dust, moisture, rain or mechanical shock.
- Should any solid object or liquid fall into the system, disconnect the AC power adaptor and have the system checked by qualified personnel before operating it any further.
- Do not use alcohol, benzine, or thinner to clean the cabinet.
- Although this system is magnetically shielded, do not leave recorded tapes, watches, personal credit cards or floppy disks using magnetic coding in front of the system for an extended period of time.
If the TV picture or monitor display is magnetically distorted
Although this system is magnetically shielded, there may be cases that the picture on some TV sets / personal computer sets becomes magnetically distorted. In such a case, turn off the power of the TV set/personal computer set once, and after 15 to 30 minutes turn it on again. For the personal computer set, take the appropriate measures such as data storage before turning it off.
When there seems to be no improvement,
locate the system further away from the TV set/personal computer set. Furthermore, be sure not to place objects in which magnets are attached or used near the TV set-personal computer set, such as audio racks, TV stands, toys etc. These may cause magnetic distortion to the picture due to their interaction with the system.
If you have any questions or problems concerning your system that are not covered in this email, please consult your nearest Sony dealer.

- SONY
- Active Speaker System
- SRS-A91
- SRS-PC91
- Operating Instructions
- Owner's Record
- WARNING
- How to Use
- Listening to the sound through headphones
- Specifications
- Amplifier section
- Speaker section
- General
- Power Source
- Note on the AC power adaptor
- Connections
- To connect to a stereo phone-type headphones jack
- Features
- Precautions
- If the TV picture or monitor display is magnetically distorted
- When there seems to be no improvement,
Marke : SONY
Modell : SRS-A91
Kategorie : Lautsprecher