
CFD-560 - Hi-Fi-System SONY - Kostenlose Bedienungsanleitung
Finden Sie kostenlos die Bedienungsanleitung des Geräts CFD-560 SONY als PDF.


| Produkttyp | Hi-Fi-System (tragbar) |
| Marke | Sony |
| Modell | CFD-560 |
| Abmessungen (ca.) | 450 x 250 x 150 mm (B x H x T) |
| Gewicht (ca.) | 2,5 kg |
| Stromversorgung | Netzteil (230 V) oder 6 x C-Batterien |
| CD-Spieler | Ja, für Audio-CDs |
| Kassettendeck | Ja (Wiedergabe und Aufnahme) |
| Radio | UKW/MW |
| Ausgangsleistung | 2 x 5 W (RMS) |
| Lautsprecher | 2-Wege-System (65 mm Tieftöner + 50 mm Hochtöner) |
| Kopfhöreranschluss | 3,5 mm Klinke |
| CD-Titelprogrammierung | Ja, bis zu 20 Titel |
| Kassettendeck-Funktionen | Play, Stop, Pause, Rec, FF, REW |
| Radio-Festwertspeicher | Ja, für bis zu 30 Sender (UKW/MW) |
| Timer/Schlaffunktion | Schlaffunktion (SLEEP) und Einschalttimer (WAKE UP) |
| Display | LCD mit Hintergrundbeleuchtung |
| Anschlüsse | AUX-Eingang (3,5 mm) |
| Reinigung und Pflege | Äußere Gehäuseteile mit einem trockenen, weichen Tuch reinigen. Keine scharfen Reinigungsmittel verwenden. |
| Sicherheitshinweise | Nur das mitgelieferte Netzteil verwenden. Gerät vor Feuchtigkeit und extremen Temperaturen schützen. |
| Ersatzteile und Reparatur | Ersatzteile über den Sony-Kundendienst oder autorisierte Servicepartner beziehbar. Reparaturen nur von Fachpersonal durchführen lassen. |
| Sprache der Anleitung | Deutsch (DE) |
Häufig gestellte Fragen - CFD-560 SONY
Benutzerfragen zu CFD-560 SONY
0 Frage zu diesem Gerät. Beantworten Sie die, die Sie kennen, oder stellen Sie Ihre eigene.
Eine neue Frage zu diesem Gerät stellen
Laden Sie die Anleitung für Ihr Hi-Fi-System kostenlos im PDF-Format! Finden Sie Ihr Handbuch CFD-560 - SONY und nehmen Sie Ihr elektronisches Gerät wieder in die Hand. Auf dieser Seite sind alle Dokumente veröffentlicht, die für die Verwendung Ihres Geräts notwendig sind. CFD-560 von der Marke SONY.
BEDIENUNGSANLEITUNG CFD-560 SONY
CD-Radio-Kassettenrecorder
CFD-560
Bedienungsanleitung
WARNUNG
Um Brand- oder Stromschlaggefahr zu vermeiden, setzen Sie das Gerät nicht Regen oder Feuchtigkeit aus.
VORSICHT
STROMSCHLAGGEFAHR NICHT ÖFFNEN

VORSICHT: UM DAS RISIKO EINES ELEKTRISCHEN SCHLAGS ZU VERRINGERN,
ENTFERNEN SIE NICHT DIE ABDECKUNG (ODER DIE RÜCKSEITE).
KEINE VOM BENUTZER ZU WARTENDEN TEILE IM INNEREN.
ÜBERLASSEN SIE DIE WARTUNG QUALIFIZIERTEM SERVICEPERSONAL.
Dieses Symbol soll den Benutzer auf das Vorhandensein von nicht isolierter "gefährlicher Spannung" im Inneren des Produkts aufmerksam machen, die ausreichen kann, um eine Stromschlaggefahr für Personen darzustellen.

Dieses Symbol soll den Benutzer auf wichtige Betriebs- und Wartungsanweisungen in der dem Gerät beiliegenden Literatur aufmerksam machen.
VORSICHT
Die Verwendung optischer Instrumente mit diesem Produkt erhöht die Augengefahr.
Für Kunden in Kanada
Um einen elektrischen Schlag zu vermeiden, verwenden Sie diesen polarisierten Netzstecker nicht mit einem Verlängerungskabel, einer Steckdose oder einer anderen Steckdose, es sei denn, die Klingen können vollständig eingeführt werden, um eine Freilegung der Klingen zu verhindern.
Information
Für Kunden in den Vereinigten Staaten
Dieses Gerät wurde getestet und entspricht den Grenzwerten für ein digitales Gerät der Klasse B gemäß Teil 15 der FCC-Bestimmungen. Diese Grenzwerte sollen einen angemessenen Schutz gegen schädliche Störungen in einer Wohnanlage bieten. Dieses Gerät erzeugt, verwendet und kann Hochfrequenzenergie ausstrahlen und kann, wenn es nicht gemäß den Anweisungen installiert und verwendet wird, schädliche Störungen des Funkverkehrs verursachen. Es gibt jedoch keine Garantie, dass in einer bestimmten Installation keine Störungen auftreten. Wenn dieses Gerät schädliche Störungen des Radio- oder Fernsehempfangs verursacht, was durch Ein- und Ausschalten des Geräts festgestellt werden kann, wird der Benutzer aufgefordert, die Störungen durch eine oder mehrere der folgenden Maßnahmen zu beheben:
—Richten Sie die Empfangsantenne neu aus oder verlegen Sie sie.
—Vergrößern Sie den Abstand zwischen dem Gerät und dem Empfänger. —Schließen Sie das Gerät an eine Steckdose an, die zu einem anderen Stromkreis gehört als der, an den der Empfänger angeschlossen ist. —Wenden Sie sich an den Händler oder einen erfahrenen Radio-/Fernsehtechniker um Hilfe.
Sie werden darauf hingewiesen, dass Änderungen oder Modifikationen, die nicht ausdrücklich in diesem Handbuch genehmigt wurden, Ihre Berechtigung zum Betrieb dieses Geräts aufheben können.
Eigentümeraufzeichnung
Die Modell- und Seriennummern befinden sich auf der Rückseite des CD-Radio-Kassettenrekorders. Notieren Sie die Seriennummer im unten vorgesehenen Bereich. Beziehen Sie sich darauf, wenn Sie Ihren Sony-Händler zu diesem Produkt kontaktieren.
Modell-Nr. CFD-560
Serien-Nr. ____
Inhaltsverzeichnis
Sicherheitsmaßnahmen 3
Einrichtung
Bedienelemente im Überblick 4 Anschließen der Lautsprecher 7 Auswahl der Stromquellen 7 Einstellen des Klangs 8
Betrieb
Radiohören 9 Abspielen einer CD (normaler Wiedergabemodus) 10 Abspielen bestimmter Titel 11 Abspielen des Anfangs jedes Titels (Introscan) 12 Wiederholtes Abspielen von Titeln 12 Abspielen von Titeln in gewünschter Reihenfolge (Programmwiedergabe) 13 Abspielen einer Kassette 14 Aufnahme 15 Aufnahme von einer anderen Kassette (Kopieren) 16 Einrichten einer PA-Anlage 17
Weitere Informationen
Wartung 18 Technische Daten 19 Fehlerbehebung hintere Umschlagseite
Sicherheitshinweise
Zur Sicherheit
- Da der Laserstrahl im CD-Player-Bereich schädlich für die Augen ist, versuchen Sie nicht, das Gehäuse zu öffnen. Überlassen Sie Wartungsarbeiten nur qualifiziertem Fachpersonal.
- Falls ein fester Gegenstand oder eine Flüssigkeit in das Gerät gelangt, ziehen Sie den Netzstecker und lassen Sie das Gerät von qualifiziertem Fachpersonal überprüfen, bevor Sie es wieder verwenden.
Zu den Stromquellen
- Für den Betrieb mit Wechselstrom verwenden Sie das mitgelieferte Netzkabel; verwenden Sie kein anderes Kabel.
- Für den Batteriebetrieb verwenden Sie acht Batterien der Größe D (R20).
- Ziehen Sie den Netzstecker aus der Steckdose, wenn das Gerät längere Zeit nicht verwendet wird.
- Wenn die Batterien nicht verwendet werden, entfernen Sie sie, um Schäden durch Auslaufen oder Korrosion zu vermeiden.
- Das Typenschild mit Betriebsspannung, Leistungsaufnahme usw. befindet sich auf der Rückseite.
Aufstellung
- Das Gerät nicht in der Nähe von Wärmequellen oder an Orten aufstellen, die direktem Sonnenlicht, übermäßigem Staub oder mechanischen Stößen ausgesetzt sind.
Betrieb
- Wenn das Gerät direkt von einem kalten an einen warmen Ort gebracht wird oder in einem sehr feuchten Raum aufgestellt wird, kann sich Feuchtigkeit an der Linse im CD-Player-Teil kondensieren. In diesem Fall funktioniert der Player nicht ordnungsgemäß. Entfernen Sie in diesem Fall die CD und warten Sie etwa eine Stunde, bis die Feuchtigkeit verdunstet ist.
- Wenn der Player längere Zeit nicht benutzt wurde, schalten Sie ihn für einige Minuten in den Wiedergabemodus, um ihn aufzuwärmen, bevor Sie eine CD oder Kassette einlegen.
Hinweis zur Verwendung einer Kassette mit mehr als 90 Minuten Spielzeit
Die Verwendung einer Kassette mit mehr als 90 Minuten Spielzeit wird nicht empfohlen, außer für lange, kontinuierliche Aufnahmen oder Wiedergaben.
Wenn Sie Fragen oder Probleme bezüglich Ihres Players haben, wenden Sie sich bitte an Ihren nächsten Sony-Händler.
CD-Player
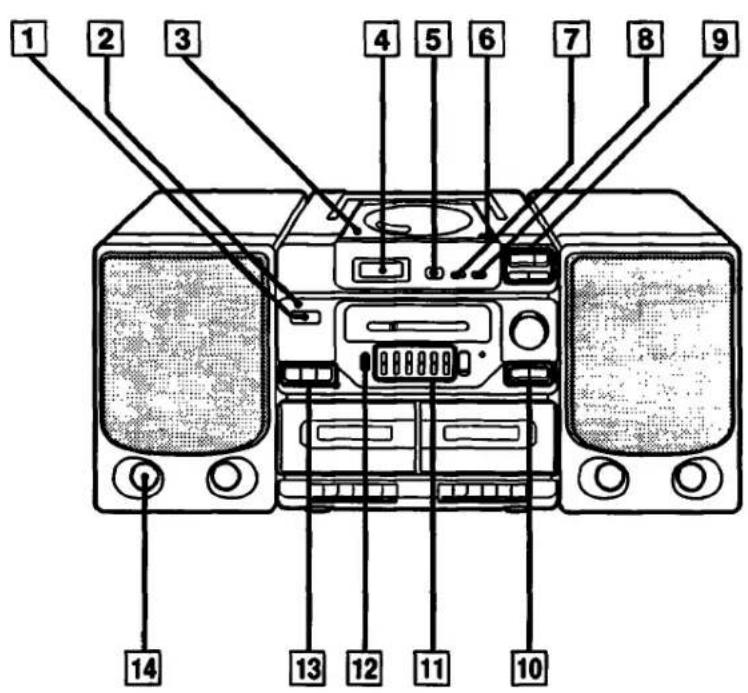
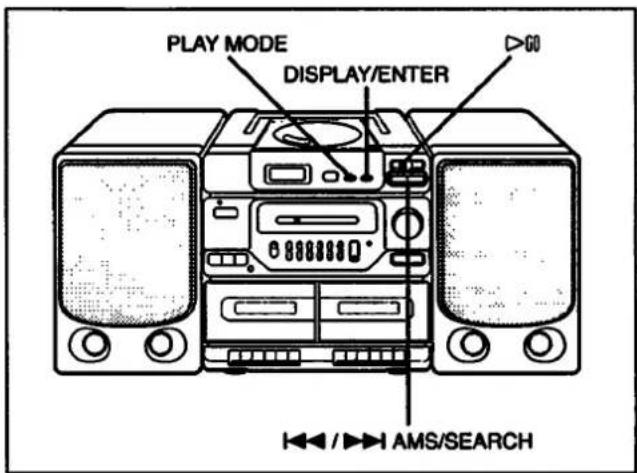
1 POWER-Schalter 2 OPR/BATT (Betrieb/Batterie)-Anzeige 3 CD-Fach 4 Display-Fenster 5 Fernbedienungssensor 6 ▲ (Öffnen)-Taste 7 PLAY MODE-Taste (12, 13) 8 DISPLAY/ENTER-Taste (12) CD-Bedientasten ▷III (Wiedergabe/Pause) □ (Stopp) I◀◀/▶▶ AMS*/SUCHE
•AMS Automatic Music Sensor
10 VOLUME-Tasten 11 MEGA BASS GRAPHIC EQUALIZER 12 PHONES (Kopfhörer)-Buchse (Stereo-Minibuchse) 13 FUNCTION-Tasten und Anzeigen TAPE: zum Abspielen oder Überspielen eines Bandes RADIO: zum Abspielen oder Aufnehmen eines Radioprogramms CD: zum Abspielen oder Aufnehmen einer CD 14 Duct Reproduces bass sound.
Radio- und Kassettenrecorder
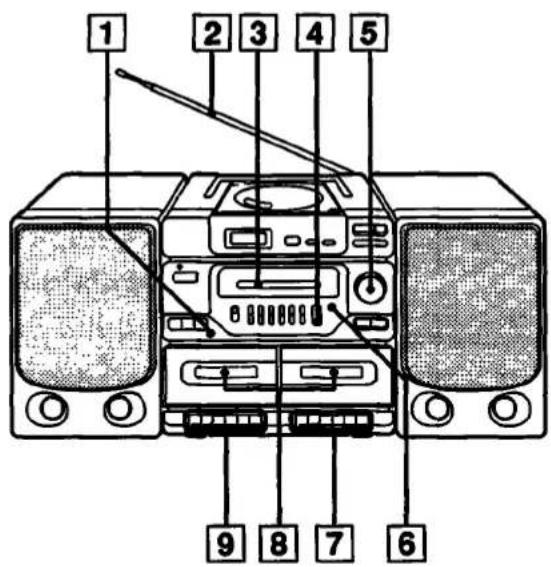
1 DUBBING-Taste und Anzeige 2 Teleskopantenne (9) 3 Skala und Zeiger 4 BAND-Wahlschalter (9) 5 TUNING-Regler (9) 6 FM ST (Stereo)-Anzeige 7 Bandbedientasten für Deck B 8 Kassettenfächer 9 Bandbedientasten für Deck A
Rückwand
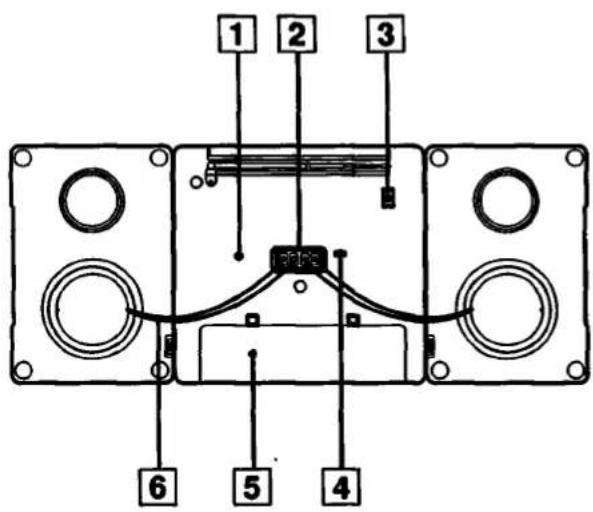
1 MIX MIC (Mischmikrofon) Buchse (Klinkenbuchse) (17) 2 LAUTSPRECHER-AUSGÄNGE Klemmen 3 AC IN (Netzanschluss) Buchse An die Netzsteckdose anschließen. 4 ISS (Entstörschalter) (9, 15) 5 Batteriefach (7) 6 Lautsprecherkabel
Fernbedienung
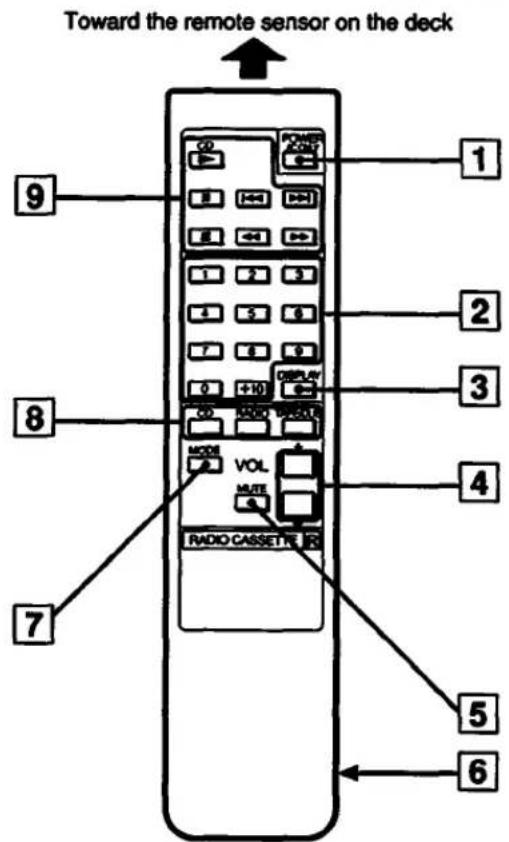
Bedienelemente auf der Fernbedienung, die dieselben Namen wie die auf dem Gerät haben, haben dieselbe Funktion. Einige Bedienelemente wie die Zifferntasten befinden sich nur auf der Fernbedienung.
1 POWER-Schalter
Wenn Sie das Gerät mit Batterien betreiben, können Sie es nicht mit der Fernbedienung einschalten.
2 Zifferntasten (13)
3 DISPLAY-Taste
4 VOL (Lautstärke) Tasten
5 MUTE-Taste
6 Batteriefach
7 MODE-Taste
8 FUNCTION-Tasten
CD: zum Abspielen oder Aufnehmen einer CD
RADIO: zum Abspielen oder Aufnehmen eines Radioprogramms
TAPE/DUB: zum Abspielen oder Überspielen eines Bandes
9 CD-Bedientasten
▶ (Wiedergabe)
II (Pause)
AMS
■ (Stopp)
◀ (Suche)
▶ (Suche)
Einlegen der Batterien
Legen Sie zwei Batterien der Größe AA (R6) (nicht im Lieferumfang enthalten) in das Batteriefach ein.
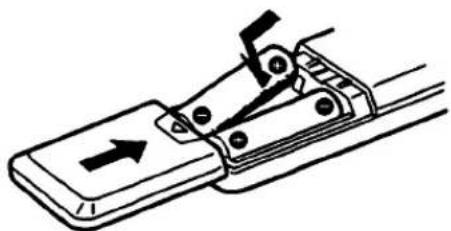
Um Fehlfunktionen zu vermeiden, halten Sie die Fernbedienung von direktem Sonnenlicht oder starker Beleuchtung fern.
Anschließen der Lautsprecher
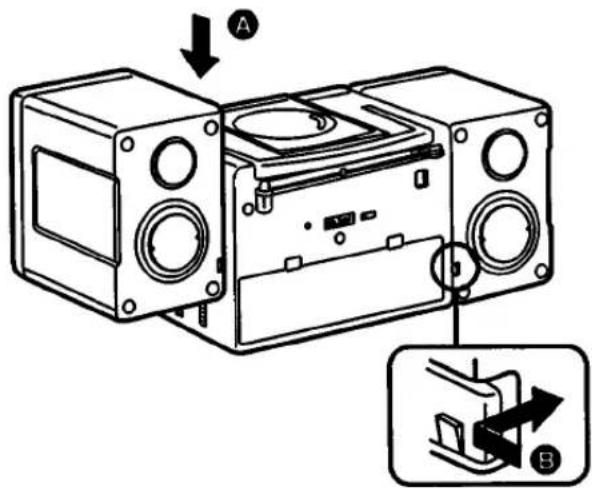
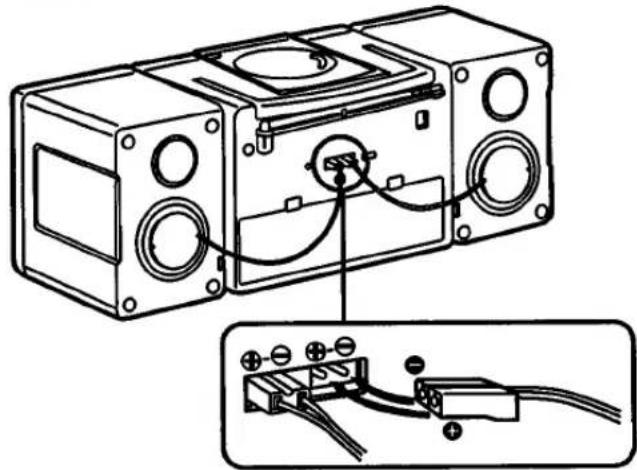
Für den einfachen Transport sind die beiden Lautsprecher abnehmbar. Bevor Sie mit dem Musikhören beginnen, befestigen Sie die Lautsprecherboxen und schließen Sie die Lautsprecherstecker wie unten gezeigt an. Stellen Sie sicher, dass Sie das Gerät ausschalten, bevor Sie Verbindungen herstellen.
1 Richten Sie die Nuten aus und schieben Sie die Lautsprecherbox nach unten, bis sie einrastet.
2 Verbinden Sie den rechten Lautsprecherstecker mit den RIGHT-Anschlüssen und den linken Lautsprecherstecker mit den LEFT-Anschlüssen.
Zum Abnehmen der Lautsprecher
Entsperren Sie den Lautsprecher Ⓔ und schieben Sie die Lautsprecherbox ganz nach oben und vom Player weg.
Auswahl der Stromquellen
Der CD-Kassettenrekorder hat zwei getrennte Stromquellen. Verwenden Sie die Wechselstromquelle (Haushaltsstrom) immer beim Aufnehmen, da das Aufnehmen am meisten Strom verbraucht. Verwenden Sie acht D-Batterien (R20), wenn der CD-Kassettenrekorder tragbar wird.
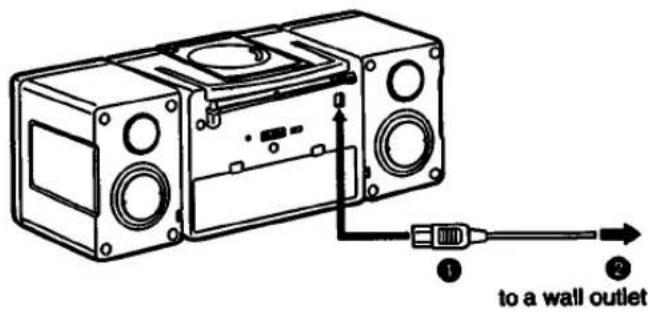
Betrieb des Players mit Wechselstrom
Stecken Sie ein Ende des mitgelieferten Netzkabels in die AC-IN-Buchse an der Rückseite des Players ① und das andere Ende in die Steckdose ②.
Betrieb des Players mit Batterien
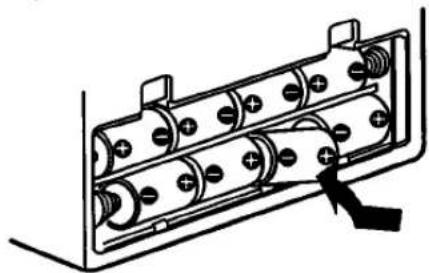
Um Ihren CD-Kassettenrekorder mit Batterien zu betreiben, muss das Netzkabel vom Player getrennt sein. Ziehen Sie den Player ab und legen Sie acht D-Batterien (R20) (nicht im Lieferumfang enthalten) in das Batteriefach ein.
Wann die Batterien ausgetauscht werden sollten
Ersetzen Sie die Batterien, wenn die OPR/BATT-Anzeige schwächer wird oder der Player nicht mehr funktioniert.
Wenn die Batterien schwach sind, ersetzen Sie alle Batterien durch neue.
Einstellen des Klangs
Verwenden Sie beim Abspielen von CDs, Kassetten oder Radiosendungen die MEGA BASS/GRAPHIC EQUALIZER-Regler, um den wiedergegebenen Klang zu entzerren. Sie können auch die Balance der linken und rechten Ausgangspegel einstellen.
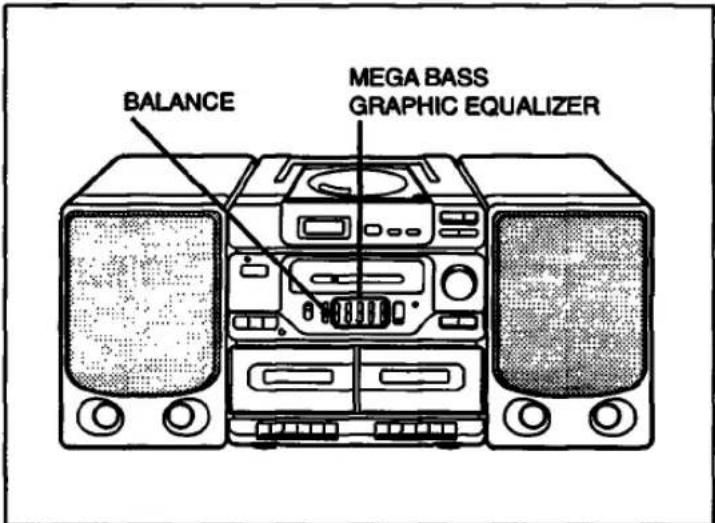
So entzerren Sie den wiedergegebenen Klang
Stellen Sie die MEGA BASS/GRAPHIC EQUALIZER-Regler ein.
| Frequency coverage | Slide the control toward +10 | Slide the control toward -10 |
| MEGA BASS 100 Hz | to increase heavy bass sounds | to decrease heavy bass sounds |
| 400 Hz | to emphasize speaking voice, middle frequencies of instrumental music | to de-emphasize speaking voice, middle frequencies of instrumental music |
| 1 kHz | to provide more presence of vocals | to provide less presence of vocals |
| 4 kHz | to heighten overall brightness of sound | to lessen overall brightness of sound |
| 10 kHz | to increase high treble sounds | to decrease high treble sounds or reduce high frequency noise/tape hiss |
So stellen Sie die Balance ein
Stellen Sie den BALANCE-Regler ein.
Verwenden Sie ihn, um das Stereobild anzupassen, insbesondere wenn die Lautsprecher nicht symmetrisch aufgestellt sind.
Zum Stummschalten des Tons
Drücken Sie MUTE auf der Fernbedienung, um den Ton sofort stummzuschalten; drücken Sie erneut, um den Ton wiederherzustellen. Während der Stummschaltung blinkt die Lautstärkeanzeige im Display.
Radio hören
Wenn Sie Radio hören möchten, drücken Sie die Taste RADIO.
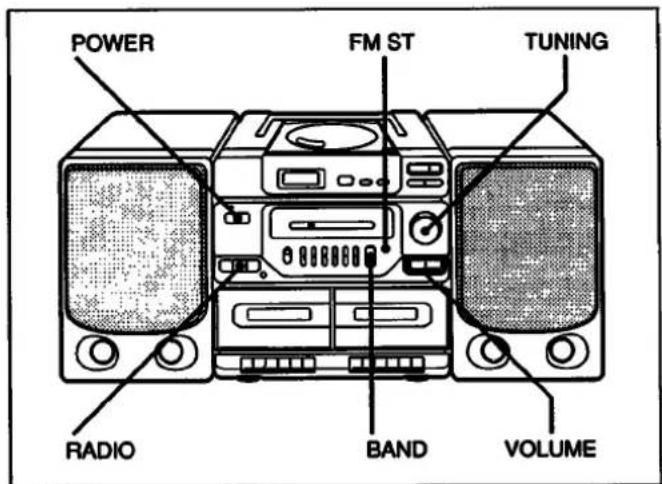
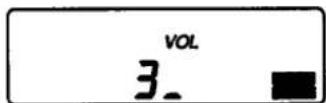
1 Schalten Sie das Gerät ein und drücken Sie RADIO. 2 Stellen Sie BAND auf FM oder AM. 3 Drehen Sie TUNING, um einen Radiosender einzustellen. Wenn das Radio einen FM-Stereosender empfängt, leuchtet die Anzeige FM ST auf. Wenn der empfangene FM-Stereosender zu schwach ist, wird der Empfang monaural und die Anzeige FM ST erlischt. 4 Drücken Sie VOLUME, um die Lautstärke einzustellen, und passen Sie die Klangbetonung an (siehe „Klang einstellen“ auf Seite 8).
Zum Ausschalten des Radios drücken Sie POWER.
Zur Reduzierung von Pfeifgeräuschen
Wenn das Radio pfeift, stellen Sie den ISS (Interference Suppress Switch) an der Rückseite des Players auf die Position, die das Geräusch am meisten reduziert. Normalerweise ist er auf "2" eingestellt.
Zur Verbesserung des Rundfunkempfangs
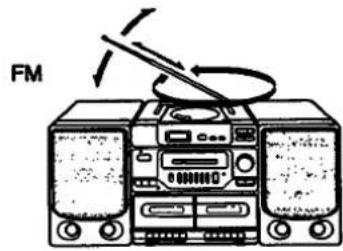
Richten Sie die Antenne (für FM) oder das Gerät selbst (für AM) neu aus.
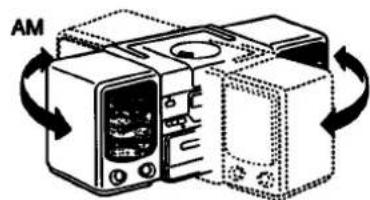
Sie können den CD-Kassettenrekorder über das Gerät oder mit der mitgelieferten Fernbedienung bedienen. Außerdem können Sie CDs mit 12 cm (5 Zoll) und 8 cm (3 Zoll) ohne Adapter abspielen.
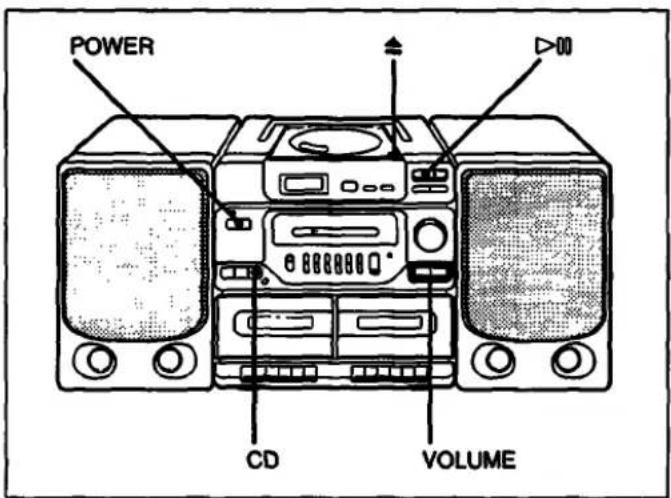
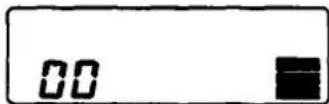
1 Schalten Sie das Gerät ein und drücken Sie CD. Wenn sich keine Disc im Fach befindet, erscheint "00" im Display.
2 Drücken Sie ≧ (Öffnen), um das Disc-Fach zu öffnen.
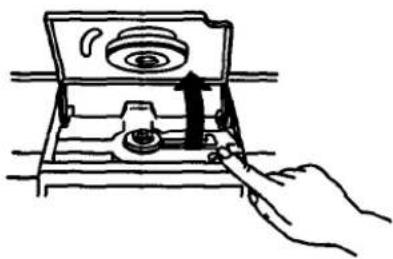
3 Halten Sie die CD am Rand und legen Sie sie mit der Etikettseite nach oben in das Disc-Fach.
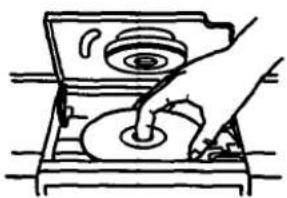
4 Schließen Sie den Deckel des Fachs. Die Anzahl der Titel auf der Disc und die Gesamtspielzeit erscheinen im Display.
5 Drücken Sie D>0 (Wiedergabe/Pause). Der CD-Player spielt alle Titel einmal ab. Titelnummer und Spielzeit erscheinen im Display.
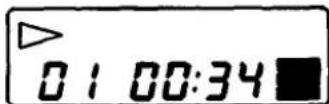
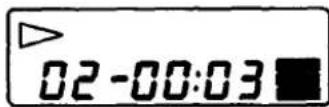
Zwischen den Titeln wird die verbleibende Zeit bis zum nächsten Titel angezeigt.
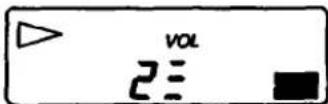
6 Stellen Sie die Lautstärke und den Klang ein (siehe „Einstellen des Klangs“ auf Seite 8). (Achten Sie darauf, die Lautstärke nicht übermäßig zu erhöhen, während Sie einen Teil mit sehr niedrigem Audioeingang hören. Wenn Sie dies tun, können die Lautsprecher beschädigt werden, wenn ein Spitzenpegel abgespielt wird.)
| To | Press | |
| Remote | Deck | |
| Stop play | ■ | □ |
| Pause | ■ | ▷□□ |
| Resume play after pause | ■ | ▷□□ |
| Remove the CD | — | First □, then ≈ |
| Turn off the power | POWER | POWER |
So überprüfen Sie die verbleibende Zeit Drücken Sie während der Wiedergabe DISPLAY/ENTER. Die verbleibende Zeit auf der CD und die Anzahl der verbleibenden Titel werden angezeigt.
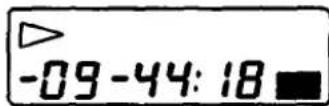
Um Titelnummer und Spielzeit anzuzeigen, drücken Sie erneut DISPLAY/ENTER.
Sie können den Anfang eines Titels oder eine Stelle in einem Titel finden, während der Player spielt oder pausiert. Finden Sie einen bestimmten Titel, indem Sie die Titelnummer angeben.
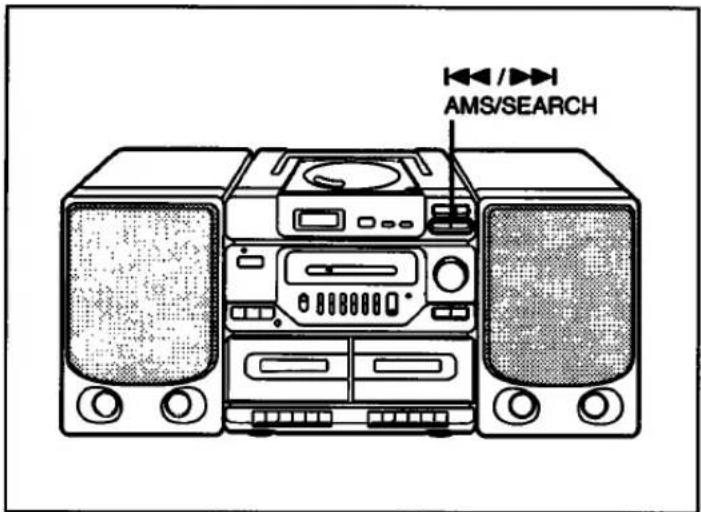
So finden Sie den Anfang eines Titels
| To find | Press* |
| the beginning of the current track | |◄◄ once |
| the beginning of the previous tracks | |◄◄ repeatedly |
| the beginning of the next track | ►►I once |
| the beginning of the succeeding tracks | ►►I repeatedly |
* Wenn eine der folgenden Anzeigen erscheint, drücken Sie die Taste □ (STOP), um die Anzeige zu löschen: INTRO, REP 1, REP ALL, SHUF REP, PGM REP MEM, PGM MEM.
So finden Sie eine Stelle in einem Titel
| To Search | Press down | |
| Remote | Deck | |
| by listening for the point you want to hear | ◀◀ or ▶▶ in play mode | ◀◀ or ▶▶ in play mode |
| by observing the time counter | ◀◀ or ▶▶ in pause mode | ◀◀ or ▶▶ in pause mode |
So hören Sie einen bestimmten Titel
Drücken Sie die Zifferntasten auf der Fernbedienung für den Titel, den Sie hören möchten. Die Wiedergabe beginnt sofort. Um Titel mit Nummern ab 10 abzuspielen, drücken Sie zuerst +10 und dann die Zifferntasten 1 bis 0. (Siehe die Beispiele unten.)
![graph TD A["Press +10"] --> B["0"] C["Display 1-"] --> D["10"] E["Press +10"] --> F["+10"] --> G["+10"] --> H["3"] I["Display 1-"] --> J["2-"] --> K["3-"] --> L["33"]](/content/2026/05/805602/images/fb48cd48c17b5ddcabb960a9761b624e3e7c056bd8b851c3b560f85a632ed7e7.jpg)
Abspielen des Anfangs jedes Titels (Intro-Scan)
Sie können die ersten 10 Sekunden jedes Titels auf einer CD anhören.
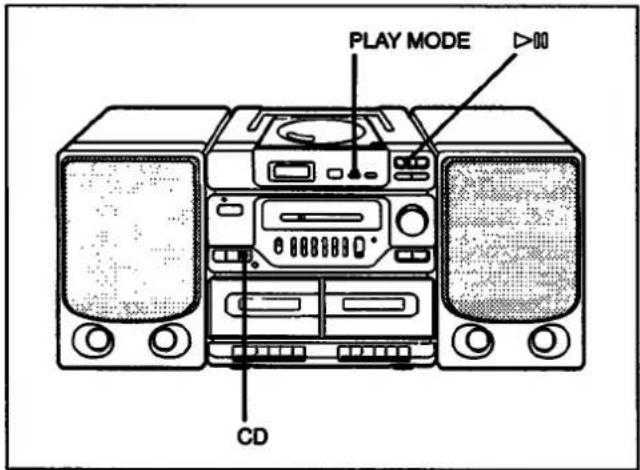
1 Drücken Sie CD.
2 Drücken Sie PLAY MODE einmal, um "INTRO" anzuzeigen, während der Player gestoppt ist.
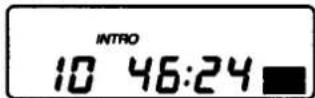
3 Drücken Sie ▷□ (Wiedergabe/Pause). Der erste Titel wird zehn Sekunden lang abgespielt. Danach springt der Player zum nächsten Titel, der abgespielt werden soll.
Um einen Titel abzuspielen, drücken Sie ◀◀◀.
Zum Abbrechen des Intro-Scans Drücken Sie eine beliebige Taste für den CD-Betrieb, außer DISPLAY/ENTER und ▷ (Wiedergabe/Pause).
Titel wiederholt abspielen
Sie können Titel wiederholt im normalen, Zufalls- oder Programm-Wiedergabemodus (Seite 13) abspielen. Im Zufallsmodus werden die Titel jedes Mal in einer anderen Reihenfolge abgespielt. Wiederholen Sie nur einen Titel oder alle Titel.
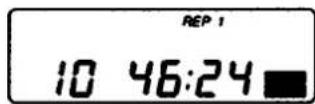
Einen einzelnen Titel wiederholen
1 Drücken Sie PLAY MODE, bis "REP.1" im Anzeigefenster erscheint.
2 Wählen Sie den Titel, den Sie wiederholen möchten, mit I◀◀/▶▶ AMS/SEARCH.
3 Drücken Sie ▷□□ (Wiedergabe/Pause). Der ausgewählte Titel wird wiederholt abgespielt.
Alle Titel wiederholen
1 Drücken Sie PLAY MODE, bis "REP ALL" im Anzeigefenster erscheint.
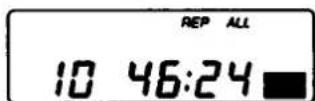
2 Drücken Sie D>00 (Wiedergabe/Pause). Der Player beginnt mit dem ersten Titel. Wenn alle Titel einmal abgespielt wurden, beginnt der Player wieder mit dem ersten Titel.
Titel in der gewünschten Reihenfolge abspielen (Programmwiedergabe)
Wiedergabe von Titeln in zufälliger Reihenfolge
1 Drücken Sie PLAY MODE, bis "SHUF REP" im Display erscheint.
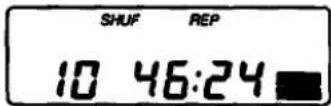
2 Drücken Sie ▷ III (Wiedergabe/Pause). Der Player spielt alle Titel wiederholt in unterschiedlicher Reihenfolge ab.
Hinweis Wenn Sie ◀◀◀ drücken, springt der CD-Player nur zum Anfang des aktuellen Titels zurück.
Wiedergabe programmierter Titel
1 Drücken Sie PLAY MODE, bis "PGM REP MEM" im Display erscheint.
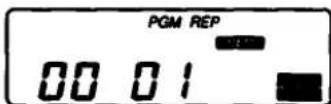
2 Wählen Sie einen Titel mit ◀◀/▶▶ AMS/SUCHE. 3 Drücken Sie DISPLAY/ENTER, um den Titel zu speichern. 4 Wiederholen Sie die Schritte 2 und 3, um Titel in der gewünschten Reihenfolge zu programmieren. Bis zu 16 Titel können programmiert werden. 5 Drücken Sie ▷□ (Wiedergabe/Pause). "MEM" verschwindet aus dem Display und die Wiedergabe beginnt.
| To | Press |
| Stop play | |
| Cancel repeat play | PLAY MODE until no indicationappears in the display window |
Programmieren Sie den CD-Kassettenrecorder, um Titel in einer von Ihnen gewählten Reihenfolge abzuspielen. Sie können hierfür auch die Fernbedienung verwenden.
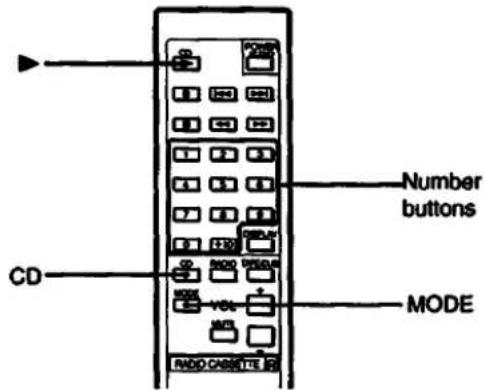
1 Drücken Sie CD.
2 Drücken Sie MODE, bis "PGM" im Display erscheint.
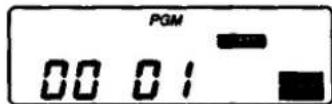
3 Drücken Sie die Zifferntasten auf der Fernbedienung für die Titel, die in der gewünschten Reihenfolge abgespielt werden sollen. Bis zu 16 Titel können programmiert werden.
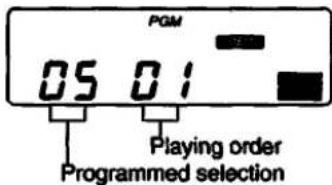
Wenn Sie einen Fehler machen Drücken Sie einmal DISPLAY/ENTER am Gerät und geben Sie die Titelnummer erneut ein.
4 Drücken Sie ▶ (Wiedergabe). Die Titel werden in der programmierten Reihenfolge abgespielt.
| To | Press |
| Stop play | |
| Cancel program play | MODE until no indicationappears in the display window |
Fortsetzung auf der nächsten Seite.
Wiedergabe von Titeln in der gewünschten Reihenfolge (Programmwiedergabe) (Fortsetzung)
Um die Reihenfolge der programmierten Titel zu überprüfen
Drücken Sie DISPLAY/ENTER am Deck. Bei jedem Drücken erscheinen die Auswahlen in der programmierten Reihenfolge.
Um die Reihenfolge der Titel zu ändern
Um die Reihenfolge der Titel zu ändern, müssen Sie das aktuelle Programm löschen und ein neues erstellen.
Um das aktuelle Programm zu löschen
Drücken Sie einmal ■ STOP oder öffnen Sie das Disc-Fach, wenn die CD gestoppt ist. Das aktuelle Programm wird gelöscht.
Befolgen Sie die Schritte unter "Titel in der gewünschten Reihenfolge abspielen", um ein neues Programm zu erstellen.
Um die Titel auf dem Deck zu programmieren
Drücken Sie I◄◄/►►I AMS/SEARCH, um den Titel auszuwählen, den Sie programmieren möchten, und drücken Sie dann DISPLAY/ENTER.
Wiederholen Sie diesen Vorgang für bis zu 16 Titel.
Abspielen einer Kassette
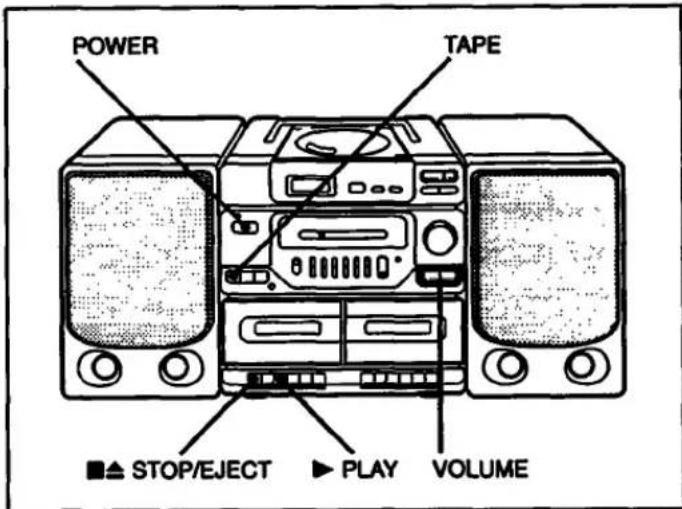
1 Schalten Sie das Gerät ein und drücken Sie TAPE.
2 Drücken Sie ■△ STOP/EJECT, um das Kassettenfach zu öffnen. Legen Sie eine bespielte Kassette mit der Seite, die Sie abspielen möchten, nach vorne ein. Schließen Sie das Fach.
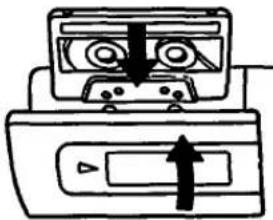
3 Drücken Sie ▶ PLAY, um die Wiedergabe zu starten.
4 Stellen Sie die Lautstärke und den Klang ein (siehe "Klang einstellen" auf Seite 8).
| To | Press |
| Stop play | ■▲ STOP/EJECT |
| Pause | II PAUSE |
| Resume play after pause | II PAUSE |
| Fast forward* | ▶▶ FF |
| Rewind* | ◀◀ REW |
| Remove the cassette | ■▲ STOP/EJECT |
* Für die nach vorne gerichtete Seite.
Aufnahme
Bei Aufnahmen empfehlen wir, das CD-Kassettenradio über das Stromnetz zu betreiben, anstatt Batterien zu verwenden, da Aufnahmen viel Batterieleistung verbrauchen. Wir empfehlen die Verwendung von TYPE I (Normal)-Bändern (auf der Kassette aufgedruckt).
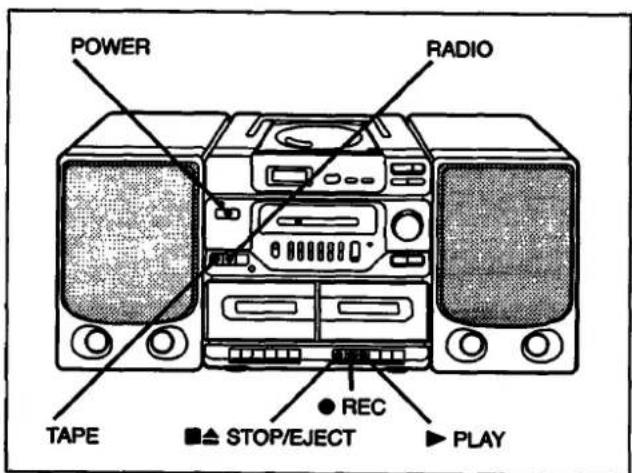
1 Schalten Sie das Gerät ein und drücken Sie RADIO oder CD.
| To record from | Do |
| the radio | Tune in the desired radio station. |
| a CD | Insert the CD. |
2 Drücken Sie ■△ STOP/EJECT und legen Sie ein leeres Band in Deck B ein, wobei die Seite, die Sie bespielen möchten, nach vorne zeigt.
3 Drücken Sie ● REC. ▶ PLAY wird automatisch gedrückt und die Aufnahme startet.
Der Aufnahmepegel wird automatisch eingestellt. Die Einstellung der Lautstärke oder des Klangs hat keinen Einfluss auf den Aufnahmepegel. Diese Regler ändern jedoch die Lautstärke, die Sie über Lautsprecher oder Kopfhörer hören.
Zur Rauschminderung bei AM-Aufnahmen Wenn das Radio pfeift, stellen Sie den ISS (Interference Suppress Switch) an der Rückseite des Geräts auf die Position, die das Rauschen am meisten reduziert. Normalerweise ist er auf "2" eingestellt.
Zum Stoppen der Aufnahme Drücken Sie ■▲ STOP/EJECT.
Aufnahme im PGM-Modus (Programm-Modus)
1 Drücken Sie CD. 2 Wählen Sie PGM-Wiedergabe (siehe "Wiedergabe von Titeln in gewünschter Reihenfolge (Programmwiedergabe)" auf Seite 13). 3 Drücken Sie ● REC. Die Disc-Wiedergabe und die Aufnahme starten automatisch.
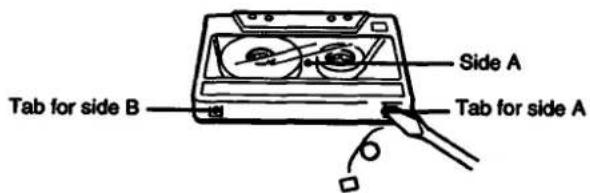
Band dauerhaft schützen
Um zu verhindern, dass ein Band versehentlich überspielt wird, brechen Sie die Kassettenlasche von Seite A oder B wie abgebildet ab. Wenn Sie das Band später wieder für Aufnahmen verwenden möchten, kleben Sie die abgebrochene Lasche mit Klebeband ab.
Löschen einer Aufnahme
1 Trennen Sie das Mikrofon, falls es an der MIX MIC-Buchse angeschlossen ist. 2 Drücken Sie TAPE. 3 Drücken Sie ● REC.
Sie können von einem Band auf ein anderes aufnehmen. Verwenden Sie für beste Ergebnisse TYPE I (Normalband).
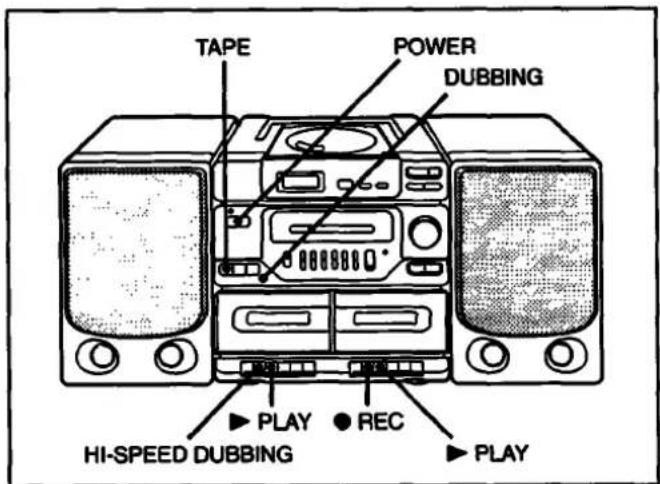
1 Schalten Sie das Gerät ein und drücken Sie TAPE. 2 Drücken Sie DUBBING. 3 Legen Sie ein bespieltes Band in Deck A ein, wobei die abzuspielende Seite nach vorne zeigt. 4 Legen Sie ein leeres Band in Deck B ein, wobei die Seite, die Sie bespielen möchten, nach vorne zeigt. 5 Drücken Sie ● REC an Deck B. ▶ PLAY an Deck B wird automatisch gedrückt und Deck B ist aufnahmebereit. 6 Wählen Sie die Aufnahmegeschwindigkeit. Wählen Sie eine von zwei Optionen:
| To record at | Press |
| Normal speed | ▶ PLAY on deck A |
| High speed | HI-SPEED DUBBING on deck A |
- Wenn das Band in Deck A zuerst endet, wird die ▶ PLAY-Taste ausgelöst und Deck B stoppt. Die ● REC- und ▶ PLAY-Tasten an Deck B bleiben gedrückt. Um sie zu lösen, drücken Sie die ■△ STOP/EJECT-Taste an Deck B.
- Wenn das Band in Deck B zuerst endet, werden die ● REC- und ▶ PLAY-Tasten an Deck B ausgelöst. Deck A spielt weiter.
Der Aufnahmepegel wird automatisch eingestellt Die Einstellung von Lautstärke oder Klang hat keinen Einfluss auf den Aufnahmepegel. Diese Regler ändern jedoch die Lautstärke, die Sie über Lautsprecher oder Kopfhörer hören.
| To | Press |
| Stop recording | ■▲ STOP/EJECT on deck A, then B |
| Stop playing | ■▲ STOP/EJECT on deck A |
| Pause during play | II PAUSE on deck A |
| Pause during record | II PAUSE on deck B |
Sie können den CD-Kassettenrecorder als Beschallungsanlage verwenden. Mischen Sie auch Klänge, indem Sie während der Aufnahme Ihre Stimme oder andere Audiosignale über das Mikrofon hinzufügen. Verwenden Sie ein monaurales Mikrofon mit Ministecker (nicht im Lieferumfang enthalten).
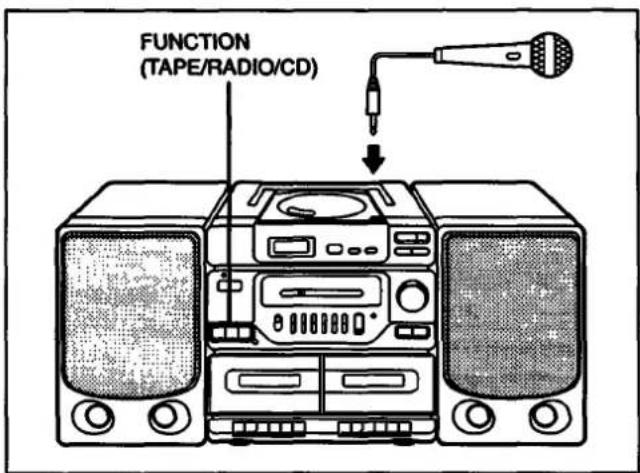
1 Stecken Sie das Mikrofon in die MIX MIC-Buchse und schalten Sie das Mikrofon ein.
2 Stellen Sie FUNCTION ein, um eine Tonquelle auszuwählen.
| To | Press |
| Use the CD cassette-corder as a public address system | TAPE |
| Mix sound | TAPE, RADIO or CD |
3 Singen oder sprechen Sie in das Mikrofon und stellen Sie die Lautstärke ein.
Zum Aufnehmen gemischter Klänge
Legen Sie ein Band (TYPE I) in Deck B ein und drücken Sie ●REC. Der Aufnahmepegel wird automatisch eingestellt.
Hinweis zum Mikrofon
Wenn akustische Rückkopplung (Pfeifen) auftritt, drehen Sie die Lautstärke herunter oder entfernen Sie das Mikrofon von den Lautsprechern. Wir empfehlen nicht, ein Mikrofon mit Echofunktion zu verwenden.
Wartung
Reinigen der Linse
Wenn die Linse verschmutzt ist, kann dies bei CD-Betrieb zu Tonaussetzern führen. Reinigen Sie sie mit einem handelsüblichen Gebläse.
Reinigung der Tonköpfe und des Tonbandpfads
Verschmutzte Köpfe verursachen schlechte Aufnahmen oder Tonausfälle bei der Wiedergabe. Wir empfehlen, nach jeweils 10 Betriebsstunden zu reinigen. Für die bestmögliche Aufnahme sollten Sie jedoch vor jeder Aufnahme alle Oberflächen reinigen, über die das Band läuft.
Wischen Sie die Köpfe, die Andruckrollen und die Capstan-Wellen mit einem Reinigungsstäbchen ab, das leicht mit Reinigungsflüssigkeit oder Alkohol befeuchtet ist.
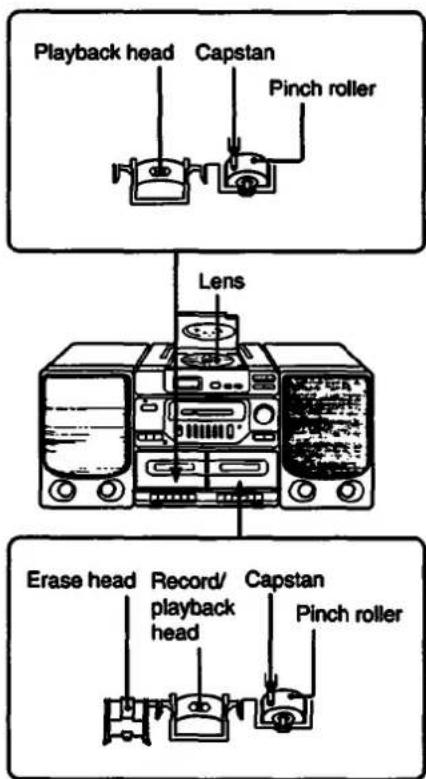
Nach der Reinigung der Köpfe, Rollen und des Bandpfads legen Sie ein Band ein, wenn die gereinigten Bereiche vollständig trocken sind.
Entmagnetisieren der Tonköpfe
Nach 20 bis 30 Betriebsstunden hat sich genügend Restmagnetismus auf den Köpfen aufgebaut, um einen Verlust an Hochfrequenzton und Rauschen zu verursachen. Entmagnetisieren Sie zu diesem Zeitpunkt die Köpfe und alle Metallteile im Bandpfad mit einem handelsüblichen Tonkopf-Entmagnetisierer.
Reinigung des Gehäuses
Reinigen Sie Gehäuse, Bedienfeld und Bedienelemente mit einem weichen Tuch, das leicht mit einer milden Reinigungslösung befeuchtet ist. Verwenden Sie keine Scheuermittel, Scheuerpulver oder Lösungsmittel wie Alkohol oder Benzol.
Hinweise zu Compact Discs
- Reinigen Sie die CD vor dem Abspielen mit einem Reinigungstuch. Wischen Sie die CD von der Mitte nach außen.
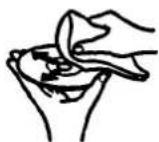
- Verwenden Sie keine Lösungsmittel wie Benzol, Verdünner, handelsübliche Reiniger oder Antistatik-Sprays, die für Vinyl-LPs bestimmt sind.
- Setzen Sie die CD keiner direkten Sonneneinstrahlung oder Wärmequellen wie Heißluftkanälen aus, und lassen Sie sie nicht in einem in der Sonne geparkten Auto liegen, da die Temperatur im Auto erheblich ansteigen kann. • Bewahren Sie die CD nach dem Abspielen in ihrer Hülle auf.
Wenn die CD Kratzer, Schmutz oder Fingerabdrücke aufweist, kann dies zu Tracking-Fehlern führen.
AUDIO-LEISTUNGSSPEZIFIKATIONEN
LEISTUNGSABGABE UND GESAMTE OBERSCHWINGUNGSVERZERRUNG
Bei 3,2-Ohm-Lasten, beide Kanäle betrieben von 150-15.000 Hz; Nennleistung 2 W pro Kanal – mindestens
RMS-Leistung, mit nicht mehr als 10 % gesamter Oberschwingungsverzerrung im Wechselstrombetrieb.
| Other Specifications | |||||
| CD player section | Power requirements | 240 V AC, 50 Hz (Australian model) | |||
| System | Compact disc digital audio system | 120 V AC, 60 Hz (Other models) | |||
| Laser diode properties | Material: GaAIAs | DC 12 V, 8 size D (R20) batteries | |||
| Wave length: 780 nm | Power consumption | Canada model: AC 27 W | |||
| Emission duration: Continuous | Other models: AC 25 W | ||||
| Laser output: Less than 44.6 μW | Battery life | For CD radio cassette-corder: | |||
| (This output is the value measured at a distance of about 200 mm from the objective lens surface on the optical pick-up block.) | FM recording | Tape playback | CD playback | ||
| Sony SUM-1 (NS) | approx. 11 h | approx. 6 h | approx. 4 h | ||
| Sony Alkaline AM1 | approx. 16 h | approx. 10 h | approx. 6 h | ||
| Spindle speed | 200 r/min (rpm) to 500 r/min (rpm) (CLV) | Dimensions | Approx. 678 × 288.3 × 217 mm (w/h/d) | ||
| Error correction | Sony Refined Super Strategy | (26% × 11% × 8% in.) incl. projecting parts | |||
| Cross Interleave Reed Solomon Code | Mass | 7.6 kg (16 lb 12 oz) (incl. batteries) | |||
| Number of channels | 2 | Supplied accessories | AC power cord (1) | ||
| Frequency response | 20–20,000 Hz ± 1 dB | Remote commander (1) | |||
| Wow and flutter | Below measurable limit | Design and specifications subject to change without notice. | |||
| Radio section | Optional accessories | ||||
| Frequency range | FM: 87.6–108 MHz | Sony DYNAMIC MICROPHONE series | |||
| AM: Australian model | Sony MDR stereo headphone series | ||||
| 530–1,605 kHz | |||||
| Models for other countries | |||||
| 530–1,710 kHz | |||||
| Antennas | FM: Telescopic antenna | ||||
| AM: Built-in ferrite bar antenna | |||||
| Cassette-corder section | |||||
| Recording system | 4-track 2-channel stereo | ||||
| Frequency response | TYPE I (normal) cassette: 40–10,000 Hz | ||||
| General | |||||
| Speaker | Woofer: 10 cm dia., 3.2 ohms cone type | ||||
| Tweeter: 2 cm | |||||
| Inputs | Mixing microphone input jack (minijack): Sensitivity 2.45 mV | ||||
| For low impedance microphone | |||||
| Outputs | Headphones jack (stereo minijack) | ||||
| For 8–32 ohms impedance headphones | |||||
| Power output (excluding USA model) | 4.3 W + 4.3 W (at 3.2 ohms, 10% harmonic in DC operation) | ||||
Fehlerbehebungsanleitung
| Symptom | Remedy | |
| General | The power does not come on.There's no audio. | Connect the AC power cord securely.Insert the batteries with the correct polarity, p. 7.Replace the batteries with new ones if they are weak, p. 7.Make sure the function button is pressed to the function you want to operate.Adjust the volume.Unplug the headphones when listening through speakers. |
| Radio | The audio is weak or poor quality.The picture of the TV is unstable. | Replace all the batteries with new ones if they are weak, p. 7.Move the player away from the TV.If you are listening to an FM program near the TV with an indoor antenna, move the player away from the TV. |
| CD Player | The CD does not play.The sound drops out. | Make sure the disc compartment is closed.Place the CD with the label facing up.Clean the CD, p. 18.Take out the CD and leave the disc compartment open for about an hour to dry moisture condensation.Make sure the CD button is pressed to CD.Reduce the volume.Clean the CD, or replace it if the CD is badly damaged.Place the player in a location free from vibration. |
| Tape Player | The tape does not move when you press an operation button.The ● REC button does not function.The tape does not erase completely.The tape does not record (dubbing).The audio is weak.The audio quality is poor. | Close the cassette compartment.Make sure the safety tab of the cassette is in place, p. 15.Make sure the TAPE button is pressed.Clean the erasing heads.Replace all the batteries with new ones if they are weak, p. 7.Make sure the tape is inserted properly.Make sure the safety tab of the cassette in deck B is in place, p. 15.Clean the heads, pinch rollers and capstans, p. 18.Demagnetize the heads using a demagnetizer, p. 18. |
| Remote Commander | The remote commander does not function. | Replace all the batteries in the remote commander with new ones if they are weak, p. 7.Make sure you are pointing the remote commander at the remote sensor on the deck.Remove any obstacles in the path of the remote commander and the player.Make sure the remote sensor is not exposed to strong light such as direct sunlight or fluorescent lamp light.Move closer to the deck when using the remote commander. |


- CFD
- WARNUNG
- VORSICHT
- FÜR KUNDEN IN KANADA
- INFORMATION
- FÜR KUNDEN IN DEN VEREINIGTEN STAATEN
- EIGENTÜMERAUFZEICHNUNG
- INHALTSVERZEICHNIS
- EINRICHTUNG
- BETRIEB
- WEITERE INFORMATIONEN
- SICHERHEITSHINWEISE
- ZUR SICHERHEIT
- ZU DEN STROMQUELLEN
- AUFSTELLUNG
- HINWEIS ZUR VERWENDUNG EINER KASSETTE MIT MEHR ALS 90 MINUTEN SPIELZEIT
- CD-PLAYER
- RADIO- UND KASSETTENRECORDER
- RÜCKWAND
- FERNBEDIENUNG
- ANSCHLIESSEN DER LAUTSPRECHER
- ZUM ABNEHMEN DER LAUTSPRECHER
- AUSWAHL DER STROMQUELLEN
- BETRIEB DES PLAYERS MIT WECHSELSTROM
- BETRIEB DES PLAYERS MIT BATTERIEN
- WANN DIE BATTERIEN AUSGETAUSCHT WERDEN SOLLTEN
- EINSTELLEN DES KLANGS
- SO ENTZERREN SIE DEN WIEDERGEGEBENEN KLANG
- SO STELLEN SIE DIE BALANCE EIN
- ZUM STUMMSCHALTEN DES TONS
- RADIO HÖREN
- SO HÖREN SIE EINEN BESTIMMTEN TITEL
- ABSPIELEN DES ANFANGS JEDES TITELS (INTRO-SCAN)
- TITEL WIEDERHOLT ABSPIELEN
- EINEN EINZELNEN TITEL WIEDERHOLEN
- ALLE TITEL WIEDERHOLEN
- TITEL IN DER GEWÜNSCHTEN REIHENFOLGE ABSPIELEN (PROGRAMMWIEDERGABE)
- WIEDERGABE VON TITELN IN ZUFÄLLIGER REIHENFOLGE
- WIEDERGABE PROGRAMMIERTER TITEL
- WIEDERGABE VON TITELN IN DER GEWÜNSCHTEN REIHENFOLGE (PROGRAMMWIEDERGABE) (FORTSETZUNG)
- UM DIE REIHENFOLGE DER PROGRAMMIERTEN TITEL ZU ÜBERPRÜFEN
- UM DIE REIHENFOLGE DER TITEL ZU ÄNDERN
- UM DAS AKTUELLE PROGRAMM ZU LÖSCHEN
- UM DIE TITEL AUF DEM DECK ZU PROGRAMMIEREN
- ABSPIELEN EINER KASSETTE
- AUFNAHME
- BAND DAUERHAFT SCHÜTZEN
- LÖSCHEN EINER AUFNAHME
- ZUM AUFNEHMEN GEMISCHTER KLÄNGE
- HINWEIS ZUM MIKROFON
- WARTUNG
- REINIGEN DER LINSE
- REINIGUNG DER TONKÖPFE UND DES TONBANDPFADS
- ENTMAGNETISIEREN DER TONKÖPFE
- REINIGUNG DES GEHÄUSES
- HINWEISE ZU COMPACT DISCS
- AUDIO-LEISTUNGSSPEZIFIKATIONEN
Marke : SONY
Modell : CFD-560
Kategorie : Hi-Fi-System