
Walkman WM-FX267 - Kassettenabspieler SONY - Kostenlose Bedienungsanleitung
Finden Sie kostenlos die Bedienungsanleitung des Geräts Walkman WM-FX267 SONY als PDF.


Benutzerfragen zu Walkman WM-FX267 SONY
0 Frage zu diesem Gerät. Beantworten Sie die, die Sie kennen, oder stellen Sie Ihre eigene.
Eine neue Frage zu diesem Gerät stellen
Laden Sie die Anleitung für Ihr Kassettenabspieler kostenlos im PDF-Format! Finden Sie Ihr Handbuch Walkman WM-FX267 - SONY und nehmen Sie Ihr elektronisches Gerät wieder in die Hand. Auf dieser Seite sind alle Dokumente veröffentlicht, die für die Verwendung Ihres Geräts notwendig sind. Walkman WM-FX267 von der Marke SONY.
BEDIENUNGSANLEITUNG Walkman WM-FX267 SONY
Radio Cassette Player
Operating Instructions
WALKMAN
WALKMAN is a registered trademark of Sony Corporation
WM-FX269/FX267/FX261
©1998 by Sony Corporation
Printed in Malaysia
Owner's Record
The model number is located at the rear and the serial number is located inside the cassette holder. Record the these numbers in the space provided below. Refer to them whenever you call upon your Sony dealer regarding this product.
Model No.
Serial No.
For customers in the United States
INFORMATION
This equipment has been tested and found to comply with the limits for a Class B digital device, pursuant to Part 15 of the FCC Rules. These limits are designed to provide reasonable protection against harmful interference in a residential installation. This equipment generates, uses, and can radiate radio frequency energy and, if not installed and used in accordance with the instructions, may cause harmful interference to radio communications. However, there is no guarantee that interference will not occur in a particular installation. If this equipment does cause harmful interference to radio or television reception, which can be determined by turning the equipment off and on, the user is encouraged to try to correct the interference by one or more of the following measures:
- Reorient or relocate the receiving antenna.
- Increase the separation between the equipment and receiver.
- Connect the equipment into an outlet on a circuit different from that to which the receiver is connected.
- Consult the dealer or an experienced radio/TV technician for help.
This device complies with Part 15 of the FCC Rules. Operation is subject to the following two conditions:
(1) This device may not cause harmful interference, and (2) this device must accept any interference received, including interference that may cause undesired operation.
You are cautioned that any changes or modifications not expressly approved in this manual could void your authority to operate this equipment.
SAFETY NOTES ON THE UNIT
WARNING
• To prevent fire or shock hazard, do not expose the unit to rain or moisture.
- Do not use headphones/earphones while driving, cycling, or operating a motorized vehicle. It may create a traffic hazard and is illegal in some areas. It can also be potentially dangerous to play your headphones/earphones at high volume while walking, especially at pedestrian crossings. You should exercise extreme caution or discontinue use in potentially hazardous situations.
- To prevent shock hazards, never open the unit while it is connected to the power source.
CAUTION
- Do not use headphones/earphones at high volume. Hearing experts advise against continuous, loud and extended play. If you experience a ringing in your ears, reduce volume or discontinue use.
- Keep the volume at a moderate level. This will allow you to hear outside sounds and to be considerate to the people around you.
SAFETY NOTES ON POWER SOURCES
To avoid battery leakage, fire, damage, explosion, etc., follow the descriptions below.
DANGER
- Do not carry dry batteries with coins or other metallic objects. It can generate heat if the positive and negative terminals of the batteries are accidentally contacted by a metallic object.
WARNING
- Use only the recommended AC power adaptor (not supplied). Check also the local voltage to avoid a short circuit to the AC power adaptor.
- To disconnect the AC power adaptor, only use the plug and not the cable.
- Do not charge a dry battery.
- Check the + and - on the batteries, and be sure to insert them like the illustration in this manual.
CAUTION
- When you are not going to use your Walkman for a long time, remove the batteries to prevent damage from battery leakage and corrosion.
About This Manual
The instructions in this manual are for WM-FX269, WM-FX267 and WM-FX261. Before you start reading, check your model number. WM-FX269 is the model used for illustration purposes. Any differences in operation are clearly indicated in the text, for example, "FX269/FX267 only".
Precautions
- Do not leave the unit in a location near heat sources, or in a place subject to direct sunlight, excessive dust or sand, moisture, rain, mechanical shock, or in a car with its windows closed.
- Do not wind the headphones/earphones cord around the unit. The buttons may be kept pressed, causing unnecessary battery usage.
- Do not use cassettes longer than 90 minutes except for long continuous playback.
- If the unit has not been used for a long time, set it in the playback mode to warm it up for a few minutes before inserting a cassette.
- For cleaning the case, use a soft cloth slightly moistened with mild detergent solution. Do not use alcohol, benzine or thinner.
If you have any questions or problem concerning your Walkman, please consult your nearest Sony dealer.
Specifications
• Frequency range
For U area indication:
FM: 87.5-108MHz
AM: 530-1710kHz
For E area indication:
FM: 87.5-108MHz
AM: 531-1602kHz
• Power requirements
3V DC batteries AA (R6) x 2/External DC 3V power sources
- Dimensions
115 x 90.5 x 34.4 mm (4 % x 3 % x 1 % inches)
(w/h/d) incl. projecting parts and controls
- Mass
Approx. 150g (5.3 oz)
Approx. 230g (8.2 oz) incl. batteries and a tape
• Supplied accessories
Stereo headphones or earphones (1)/Carrying case (1)
Design and specifications are subject to change without notice.
Troubleshooting
The volume is not turned up.
• AVLS is set to LIMIT.
The sound is unstable or no audio.
- Insert two size AA (R6) batteries properly.
-Replace all batteries if they are weak.
- Insert two size AA (R6) batteries properly. - Replace all batteries if they are weak.
The display shows incorrect information
• The display may show incorrect information or the preset stations may not be recalled correctly when you use the unit for the first time, or when you have left the unit without batteries for a long time. In these cases, turn the tape and radio off and then press BAND for about 10 seconds, you will hear a beep sound through the headphones/earphones and the memories of all the preset stations will be canceled. Reset these functions again.
Poor tape playback quality.
•Clean the headphones/earphones plug.
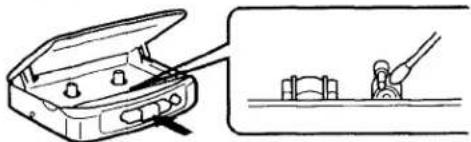
- Dirty heads. Clean them with a cotton swab slightly moistened with cleaning fluid or alcohol.
- Clean the headphones/earphones plug. - Dirty heads. Clean them with a cotton swab slightly moistened with cleaning fluid or alcohol.
natural_image
Diagram showing a briefcase with a handle and a separate mechanical component (no text or symbols)Preparations
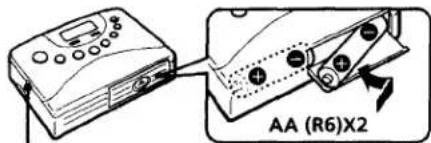
To Insert batteries
text_image
AA (R6)X2DC IN 3V
Battery life (approximate hours) (EIAJ*)
| Sony alkaline LR6 ( SG ) | Sony R6P ( SR ) | |
| playback | 24 | 7.5 |
| radio | 33 | 13 |
* Measured value by the standard of EIAJ (Electric Industries Association of Japan). (Using a Sony HF series cassette tape)
Notes
- When the batteries become weak, the sound will be unstable or cannot be heard. In such case, replace both batteries.
- When replacing batteries, replace both batteries within 30 minutes; otherwise all the memories will be canceled.
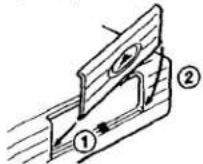
• The battery life may shorten depending on the operation of the unit. - If the battery compartment lid comes off, attach it as shown.
To use external power
- For house current: Connect AC-E30HG AC power adaptor (not supplied) to the DC IN 3V jack.
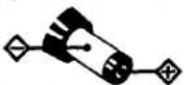
The polarity of the plug
- Specifications for AC-E30HG varies for each area. Check your local voltage and the shape of plug before purchasing.
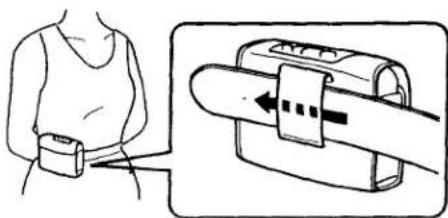
To use the carrying case
text_image
Diagram showing a person using a belt buckle and a close-up of the belt buckle with a pull-up arrow indicating compression or movement.When using headphones/earphones
Wear the "L" marked side to the left ear and the "R" marked side to the right ear.
This warranty is valid only in the United States.
SONY.
Tape Cassette Player/Recorder/CD Player/Mini Disc DAT/RadioHead Phone/Speaker/MIC/Personals
LIMITED WARRANTY
Portable Audio
Sony Electronics Inc. ("Sony") warrants this Product (including any accessories) against defects in material or workmanship at follows:
- LABOR: For a period of 90 days from the date of purchase, if this Product is determined to be defective. Sony will repair or replace the Product, at its option, at no charge, or pay the labor charged to any Sony authorized service facility. After the Warranty Period, you must pay for all labor charges.
- PARTS: M addition, Sony will supply, at no charge, new or rebuilt replacements in exchange for defective parts for a period of one (1) year. After 90 days from the date of purchase, labor for removal and installation is available from Sony authorized service facilities or a Sony Service Center at your expense.
To obtain warranty service, you must take the Product, or deliver the Product freight prepaid, in either its original packaging or packaging affording an equal degree of protection, to any authorized Sony service facility.
This warranty does not cover customer instruction, installation, set up adjustments or signal reception problems.
This warranty does not cover cosmetic damage or damage due to acts of God, accident, misuse, abuse, negligence, commercial use, or modification of, or to any part of the Product, including the antenna. This warranty does not cover damage due to improper operation or maintenance, connection to improper voltage supply, or attempted repair by anyone other than a facility authorized by Sony to service the Product. This warranty does not cover Products sold AS IS or WITH ALL FAULTS, or consumables (such as fuses or batteries). This warranty is valid only in the United States
Proof of purchase in the form of a bill of sale or receipted invoice which is evidence that the unit is within the Warranty period must be presented to obtain warranty service.
This warranty is invalid if the factory applied serial number has been altered or removed from the Product.
REPAIR OR REPLACEMENT AS PROVIDED UNDER THIS WARRANTY IS THE EXCLUSIVE REMEDY OF THE CONSUMER. SONY SHALL NOT BE LIABLE FOR ANY INCIDENTAL OR CONSEQUENTIAL DAMAGES FOR BREACH OF ANY EXPRESS OR IMPLIED WARRANTY ON THIS PRODUCT, EXCEPT TO THE EXTENT PROHIBITED BY APPLICABLE LAW, ANY IMPLIED WARRANTY OF MERCHANTABILITY OR FITNESS FOR A PARTICULAR PURPOSE ON THIS PRODUCT IS LIMITED IN DURATION TO THE DURATION OF THIS WARRANTY.
Some states do not allow the exclusion or limitation of incidental or consequential damages, or allow limitations on how long an implied warranty tests, so the above limitations or exclusions may not apply to you. In addition, if you enter into a service contract with the Sony Partnership within 30 days of the date of sale, the limitation on how long an implied warranty tests does not apply to you. This warranty gives you specific legal rights, and you may have other rights which vary from state to state.
For your convenience, Sony Electronics Inc. has established telephone numbers for frequently asked questions:
To locate the service or dealer nearest you, or for service assistance or resolution of a service problem, or for product information or operation, call:
Sony Direct Response Center 1/001-222-2599
or write to:
Sony Direct Response Center
12451 Gateway Blvd.
Fort Myers, FL 32513
For an accessory or part not available from your authorized dealer, call
1-(800) 488 SONY (7569)
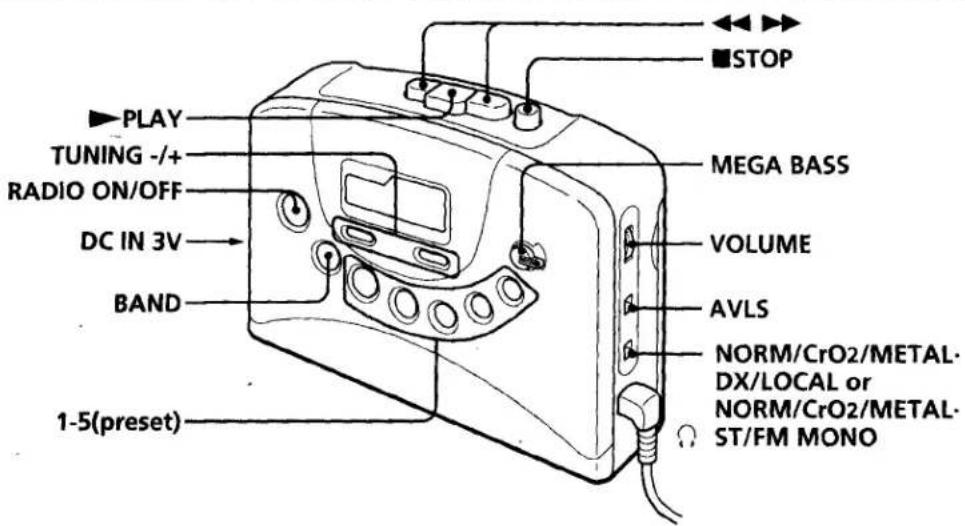
Location of parts and controls
text_image
PLAY TUNING -/+ RADIO ON/OFF DC IN 3V BAND 1-5(preset) ■STOP MEGA BASS VOLUME AVLS NORM/CrO2/METAL- DX/LOCAL or NORM/CrO2/METAL- ST/FM MONOPlaying a tape
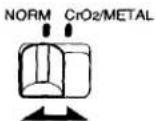
1 Set NORM•CrO2/METAL to match the tape type.
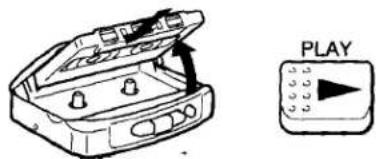
2 Insert a cassette and press ▶PLAY.
text_image
PLAY| To | Press |
| Stop playback | ■ |
| Fast-forward or rewind the tape | ▶▶ or ◀◀ (For the side facing forward) |
To limit the maximum volume automatically
Set AVLS (Automatic Volume Limiter System) to LIMIT. The maximum volume is kept down to protect your ears, even if you turn the volume up. To cancel the AVLS function, set AVLS to NORM.
To emphasize sound (FX269/FX267only)
To emphasize deep bass sound, set the MEGA BASS to ON.
Notes
- When you set AVLS to LIMIT(FX269/FX267only):
- the MEGA BASS effect is reduced.
- turn down the volume, if the bass-boosted sound becomes distorted or unstable.
- Do not open the cassette holder while the tape is running.
Listening to the radio
1 Press RADIO ON/OFF.

RADIO ON/OFF
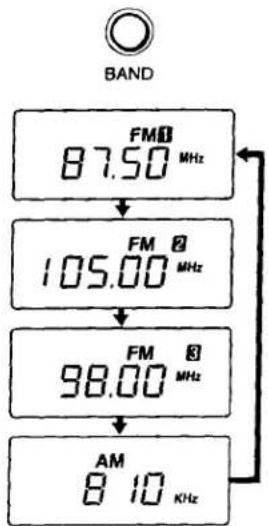
2 Press BAND to select the band (FM1, FM2, FM3 or AM).
Each time you press the button, the display changes.
other
| Frequency | Signal Strength (MHz) | | :--- | :--- | | 87.50 | 87.50 | | 105.00 | 105.00 | | 98.00 | 98.00 | | 810 | 810 |3 Press TUNING -/+ to tune the station you want.

To turn off the radio
Press RADIO ON/OFF.
To tune the station quickly
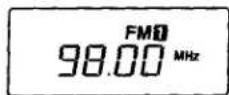
Hold down TUNING -/+ in step 3. The frequency digits change quickly. When you release the button, the frequency digits change slowly. When the desired frequency digits appear, press TUNING -/+ again.
■ To improve broadcast reception
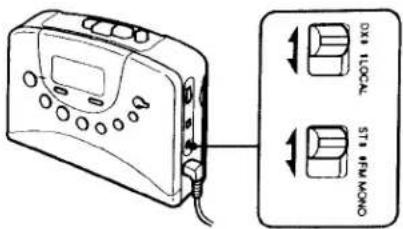
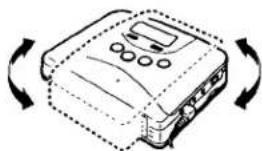
For FM, extend the headphones/earphones cord or adjust the DX/LOCAL or ST/FM MONO. For AM, reorient the unit itself.
FM
text_image
DXI LOCAL STI REMOKOAM
natural_image
Diagram of a device with circular ports and directional arrows indicating rotation (no text or symbols)Note
If the broadcast becomes noisy when a cassette with a metallic shell or label is inserted, remove the cassette.
To listen to the radio abroad (Excluding model for Europe and Saudi Arabia)
The frequency range differs depending on the area. If you listen to the radio in an area of different frequency range, change the area indication in the display.
1 Press BAND for about 10 seconds while the radio is turned on.
2 Press TUNING - or + to change the area indication.
("U": U.S.A., Canada and Central and South America, "E": European and other countries).
3 Press BAND to set the frequency range.
Notes
- If you change the frequency range, all the preset stations will be canceled.
- When you want to cancel during a change of the area indication.
Press BAND after pressing TUNING - or +, all the preset stations will be canceled.
To preset radio stations
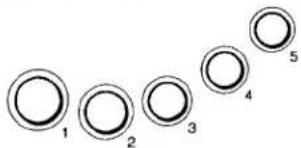
You can store radio stations into the unit's mem. You can preset up to 20 radio stations, 5 for each FM1, FM2, FM3 or AM bands.
1 Press RADIO ON/OFF.

RADIO ON/OFF
2 Tune in the desired station by using the BAND and TUNING - or +.
3 Press a preset number (1-5) for 2 seconds the displayed frequency will flash with beep sound and the station is stored. If a station is already stored, the new station replaces the old one.
chemical
Simple diagram showing five labeled circular rings connected in a row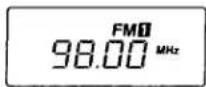
To play the preset radio stations
Press BAND to select the band, and then press the corresponding preset button.