
Walkman WM-F2031 - Kassettenabspieler SONY - Kostenlose Bedienungsanleitung
Finden Sie kostenlos die Bedienungsanleitung des Geräts Walkman WM-F2031 SONY als PDF.


| Produkttyp | Kassettenabspieler mit UKW/MW-Radio |
| Marke | Sony |
| Modell | Walkman WM-F2031 |
| Abmessungen (ca.) | 90,5 x 134 x 38,7 mm (B x H x T) |
| Gewicht (ca.) | 205,4 g (ohne Zubehör) |
| Stromversorgung | 3 V Gleichstrom, 2 x AA-Batterien (R6) oder Netzteil (optional Sony AC-D2M) oder Autobatteriekabel (optional Sony DCC-70) |
| Batterielebensdauer (ca.) | 8 Stunden Kassette-Wiedergabe (mit Sony Alkalibatterien) |
| Radiofrequenzbereich | UKW: 87,5–108 MHz; MW: 530–1710 kHz (10-kHz-Schritte) oder 531–1602 kHz (9-kHz-Schritte) |
| Antenne | UKW: Kopfhörerkabel dient als Antenne; MW: eingebaute Ferritstabantenne |
| Sender-Speicher | 7 Sender für UKW und 7 für MW |
| Frequenzgang (Kassette) | 40–14.000 Hz |
| Ausgangsleistung | 10 mW + 10 mW (bei 32 Ohm) |
| Kopfhöreranschluss | 3,5-mm-Stereoklinke |
| Kassettentyp | Kompaktkassetten (C60, C90, C120) |
| Funktionen | UKW/MW-Radio mit automatischem Sendersuchlauf, manuellem Sendersuchlauf, Festsenderspeicher; Kassettenwiedergabe, Schnellvorlauf, Rücklauf; Wecker, Uhr |
| Reinigung | Kopf reinigen nach jeweils 10 Betriebsstunden mit in Alkohol getränktem Wattestäbchen; Außengehäuse mit weichem, feuchtem Tuch reinigen |
| Mitgeliefertes Zubehör | Stereo-Kopfhörer, Gürtelclip, Bedienungsanleitung |
Häufig gestellte Fragen - Walkman WM-F2031 SONY
Benutzerfragen zu Walkman WM-F2031 SONY
0 Frage zu diesem Gerät. Beantworten Sie die, die Sie kennen, oder stellen Sie Ihre eigene.
Eine neue Frage zu diesem Gerät stellen
Laden Sie die Anleitung für Ihr Kassettenabspieler kostenlos im PDF-Format! Finden Sie Ihr Handbuch Walkman WM-F2031 - SONY und nehmen Sie Ihr elektronisches Gerät wieder in die Hand. Auf dieser Seite sind alle Dokumente veröffentlicht, die für die Verwendung Ihres Geräts notwendig sind. Walkman WM-F2031 von der Marke SONY.
BEDIENUNGSANLEITUNG Walkman WM-F2031 SONY
SONY
AUDIO TAPE RECORDER
COMPACT DISC COMPACT PLAYER
LIMITED WARRANTY
SONY CORPORATION OF AMERICA ("SONY") warrants the product against defects in material or workmanship, as follows:
-
For a period of 90 days from the date of purchase, SONY will pay the labor charges of your SONY authorized service facility to repay the defective product. After this 90-day period, you must pay for all labor charges.
-
In addition, SONY will supply in no charge, new or rebuilt replacements for defective parts for a period of 1 year from the original date of purchase.
Labor and Parts
To obtain warranty service during the initial 90-day period, you must take the product, or deliver the product prepaid to a SONY authorized service facility.
Parts Only
During the reminder of the warranty period, any defective part will be replaced if it is taken or delivered prepared, to a SONY service center. Labor for removal and installation is available from your SONY authorized service facility or SONY service center, at your expense
This warranty does not cover cosmetic damage, and damage due to acts of God, accident, measures, abuse or negligence to the product, including the antenna. This warranty is valid only in the United States of America.
Proof of purchase in the form of a bill of sale or accepted invoice which is evidence that the unit is within the warranty period must be presumed to obtain warranty service.
This warranty is valid only if the serial number appears on the product.
REPAIR OR REPLACEMENT AS PROVIDED UNDER THIS WARRANTY IS THE EXCLUSIVE REMOY OF THE CONSUMER SONY SHALL NOT BE LIABLE FOR ANY INCIDENTAL OR CONSEQUENTIAL DAMAGES FOR BREACH OF ANY EXPRESS OR IMPLIED WARRANTY ON THIS PRODUCT. EXCEPT TO THE EXTENT PROHIBITED BY APPLICABLE LAW, ANY IMPULD WARRANTY OF MERCHANTABILITY OR FITNESS FOR A PARTICULAR PURPOSE ON THIS PRODUCT IS LIMITED IN DURATION TO THE DURATION OF THIS WARRANTY.
Some states do not allow the exclusion or limitation of incidental or consequential damages, or allow limitations on how long an implied warranty lasts, so the above limitations or exclusions may not apply to you. In addition, if you enter into a service contract with the Sany Partnership we within 90 cents of the date of sale, the limitation on how long an implied warranty lasts does not apply to you. This warranty gives you specific legal rights, and you may also have other rights which vary from state to state.
For your convenience, Sony Corporation of America has established the Customer Information Center to supply you with product or service information.
SONY CUSTOMER INFORMATION CENTER
201-930-SONY (7688)
or writes to
Sore Customer Information Center
ony Drive Mail Drop #M
Pam Ridge, NJ 07656
SONY CORPORATION OF AMERICA
Sory Drive Park Ridge, New Jersey 07858
SONY
PROPERTY OF THE
Radio Cassette Player
NATIONAL TECHNICAL DEPT.
WM-F2031
FILE COPY
Operating Instructions
Before operating the unit, please read this manual thoroughly and retain it for future reference.
Owner's Record
The model number is located at the bottom and the serial number is located in the battery compartment. Record the serial number in the space provided below. Refer to these numbers whenever you call upon your Sony dealer regarding this product.
Model No.WM-F2031 Serial No.
Features
The synthesized tuner can:
—receive a station automatically
—memorize 7 stations for each FM and AM.
Sony Service Center
| Address | Hansell | Mission |
| Florida | ||
| 2340 North Storbidas Road | ||
| Samps, AZ 99387 | 950 Magamorex Bronx | In. Louis |
| CA 969-7689 | Hansells, IN 96988 | 13483.0 Holland Ridge Blvd |
| 8008 834-8422 | Babcock, MO 83504 | |
| (214) 281-2205 | ||
| California | ||
| Burberry Lake Ampillea area | ||
| 4190 Phoenix Road, Lake A | Ixia Kinngon (RVI) | Mamash, NY 103000 |
| Buenos, CA 95605 | 7540 North Central Avenue | Machado, NY 57366 |
| (24) 842-1969 | Niles, IL 60648 | Mashado, NY 67436 |
| (310) 047-3400 | (210) 529-9455 | |
| Cold Lake Missings County area | ||
| 2172 Brown Hills South | Wilmington, OH 1 | Odds |
| Cape Hills, CA 97826 | 9038 South Central Avenue, OH | Cladstone |
| (174) 949-4833 | Hammerson, C. 40089 | 61570 North Road |
| San Barbara Bay-Elkington area | ||
| 71 Canico Plaza | Kunnae | Homa Heights, OH 44130 |
| San Brays, CA 94966 | 11712 West 899 Street | (24) 845-7969 |
| (45) 871-2913 | Davonee Park | Perseesville |
| San Diego | ||
| 2475 Tampa Drive | KS 86214 | Palmazville |
| San Diego, CA 95123 | KS 868-3612 | ENI Park Avenue |
| (91) 871-2724 | (91) 888-3612 | King Park Avenue, MA 19426 |
| (215) 785-0810 | ||
| San Jose | ||
| 1308 Old Coltone Road | Washington DC | Presenola |
| San Jose, CA 95110 | 1168 Houston Lane | Workday Plaza |
| (46) 280-7989 | Langley Park, MO 10338 | 10000 West 10000 West Ave., 1996 |
| (30) 439-360005 | Workday, PA 15000 | |
| m2 D: 825-8488 | ||
| Colorado | ||
| Houston Plaza Center | ||
| 10140 East Way Avenue | Boston | Stella |
| Aurora, GA 90204 | 100 University Avenue | Dallas |
| (361) 765-7948 | 128 Wilmington Central | Fortress Valley Shopping Center |
| (10) 320-4130 | Delaware, TX 79120 | |
| (214) 465-2527 | ||
| Florida | ||
| Port Lauderdale | Montague | Houston |
| 2850 Bronx, TN North Village | Summit | 1767 Philadelphia Avenue |
| Redwood, FL 32002 | 43304 Bronx Hills Road | Houston, TX 17007 |
| (365) 810-5400 | Mon, MA 68050 | (73) 783-8765 |
| (315) 364-4044 | ||
| Georgia | ||
| Atlanta | ||
| 131 Westbridge North Philadelphia East | Minnesota | Washington |
| Sumo 410 | Minnesota | Seattle |
| Asparia, CA 90339 | 4300 W 901-14 Drive | East of Virginia |
| (464) 855-5871 | 34 Laon Park, NM 55418 | (200) 742-6500 |
Sony District Service Offices
| Museum Name | Current Name | Extrarch Name |
| Harrison Dhanie | High-Value Medicine | Eastern Medicine |
| Sons Service Company | Sons Service Company | Sons Service Company |
| 1720 Brown Street South | 1540 North Clothing Avenue | 300 House 17 Bales |
| Cassier, New York 19826 | Nokia, 4, 400K | Nokia, 4, 400K |
| 1761 548-4836 | 3121 847-3426 | 2019 528-9160 |
| Northwestern Medicine | East Central Medicine | Northwestern Medicine |
| Sons Service Company | Sonic Service Company | Sonic Service Company |
| 1208 One Chateau Road | 16100 Town Center Avenue | Ric Rian Avenue |
| San Jose, CA 9197 | Santa 200 Home, MI 40050 | King of Platte, MA 9606 |
| 4028 280-1875 | 3231 347-2297 | 1938 748-8649 |
| Southwestern Medicine | Southwestern Medicine | |
| Dona Service Company | Sonic Service Company | |
| 3201 Phoenix Dr. Raye 100 | 120 Hills County North Parkwide East | |
| 171 75953 | Santa 410 | |
| 1250 490-6270 | Anapta, CA 91559 | |
| Bridg, CA 91559 |
INFORMATION
This equipment generates and uses radio frequency energy and if not installed and used properly, that is, in strict accordance with the manufacturer's instructions, may cause interference to radio and television reception. It has been type tested and found to comply with the limits for a Class B computing device in accordance with the specifications in Subpart J of Part 15 of FCC Rules, which are designed to provide reasonable protection against such interference in a residential installation. However, there is no guarantee that interference will not occur in a particular installation. If this equipment does cause interference to radio or television reception, which can be determined by turning the equipment off and on, the user is encouraged to try to correct the interference by one or more of the following measures:
Reorient the receiving antenna
Relocate the equipment with respect to the receiver
Move the equipment away from the receiver
Plug the equipment into a different outlet so that equipment and
receiver are on different branch circuits.
If necessary, the user should consult the dealer or an experienced radio/television technician for additional suggestions. The user may find the following booklet prepared by the Federal Communications Commission helpful:
"How to Identify and Resolve Radio-TV Interference Problems". This booklet is available from the U.S. Government Printing Office, Washington, DC 20402, Stock No. 004-000-00345-4.
Sony Corporation © 1990 Printed in Taiwan, R. O. C.
text_image
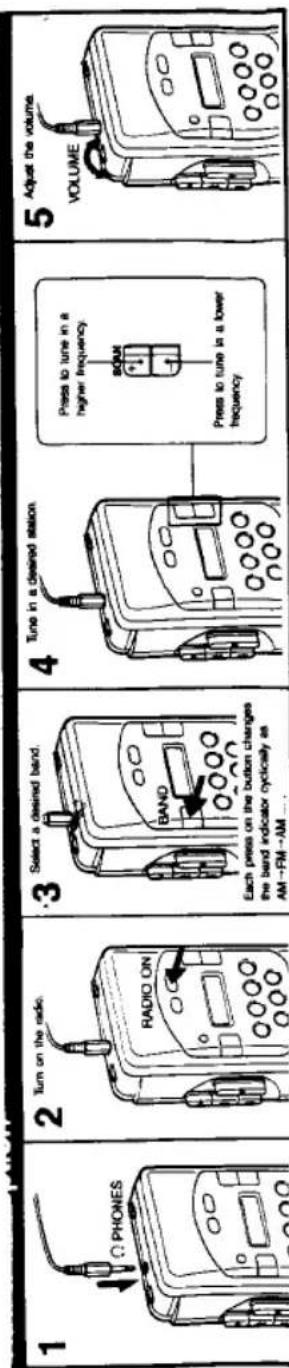
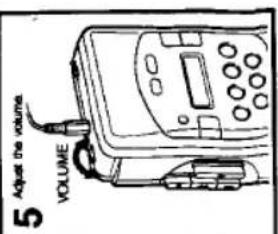
1 Ω PHONES 2 Turn on the radio. RADIO ON 3 Select a desired band. BAND Each press on the button changes the band indicator cyclically as AM→FM→AM... 4 Tune in a desired station. Press to tune in a higher frequency. SOUM Press to tune in a lower frequency. 5 Adjust the volume. VOLUME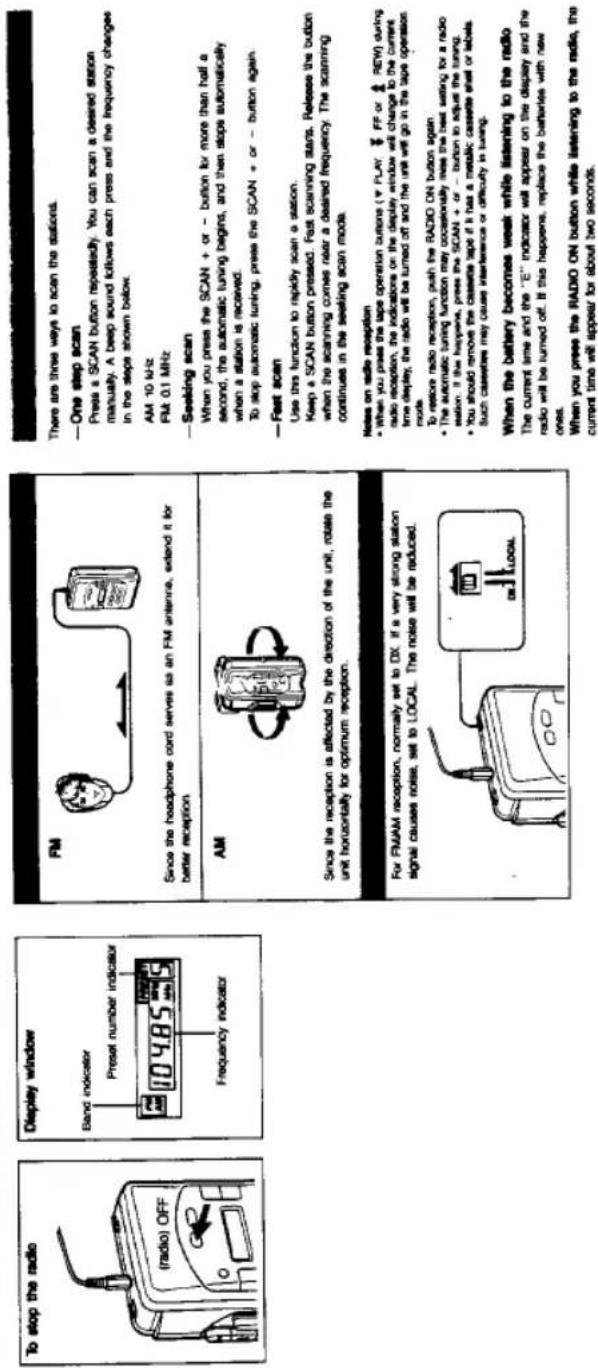
text_image
To stop the radio (radio) OFF Display window Band indicator Preset number indicator 104.85 Frequency indicator FM Since the headphone cord serves as an FM antenna, extend it for better reception. AM Since the reception is affected by the direction of the unit, rotate the unit horizontally for optimum reception. For FM/AM reception, normally set to DX. If a very strong station signal causes noise, set to LOCAL. The noise will be reduced. DR LOCAL There are three ways to scan the stations. —One step scan Press a SCAN button repeatedly. You can scan a desired station manually. A beep sound follows each press and the frequency changes in the steps shown below. AM 10 kHz FM 0.1 MHz —Seeking scan When you press the SCAN + or - button for more than half a second, the automatic tuning begins, and then stops automatically when a station is received. To stop automatic tuning, press the SCAN + or - button again. —Fast scan Use this function to rapidly scan a station. Keep a SCAN button pressed. Fast scanning starts. Release the button when the scanning comes near a desired frequency. The scanning continues in the seeking scan mode. Notes on side reception • When you press the tape operation buttons (▼ PLAY ▼ FF or ▲ REW) during radio reception, the indications on the display window will change to the current time display, the radio will be turned off and the unit will go in the tape operation mode. To restore radio reception, push the RADIO ON button again. • The automatic tuning function may occasionally miss the best setting for a radio station. If the happens, press the SCAN + or - button to adjust the tuning. • You should remove the cassette tape if it has a metallic cassette shell or labels. Such caselines may cause interference or difficulty in tuning. When the battery becomes weak while listening to the radio The current time and the "E" indicator will appear on the display and the radio will be turned off. If this happens, replace the batteries with new ones. When you press the RADIO ON button while listening to the radio, the current time will appear for about two seconds.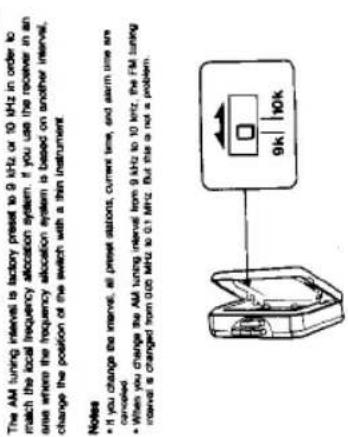
text_image
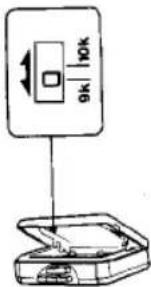
The AM tuning interval is factory reset to 9 kHz or 10 kHz in order to match the local frequency allocation system. If you use the receiver in an area where the frequency allocation system is based on another interval, change the position of the switch with a thin instrument. Notes • If you change the interval, all preset stations, current time, and alarm time are cancelled • When you change the AM tuning interval from 9 kHz to 10 kHz, the FM tuning interval is changed from 0.00 MHz to 0.1 MHz. But this is not a problem.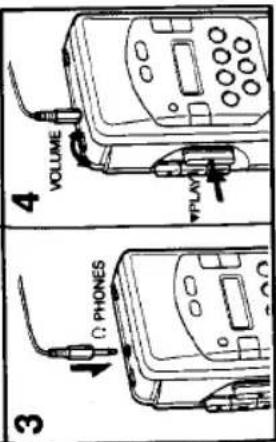
text_image
3 PHONES VOLUME PLAY| To stop the tape | DepressSTOP |
| To wind the tape rapidly | DepressFForREW |
text_image
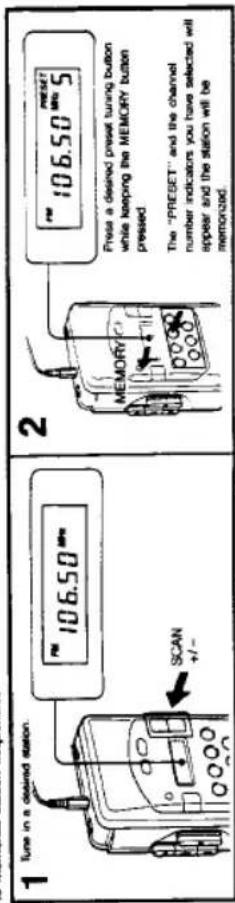
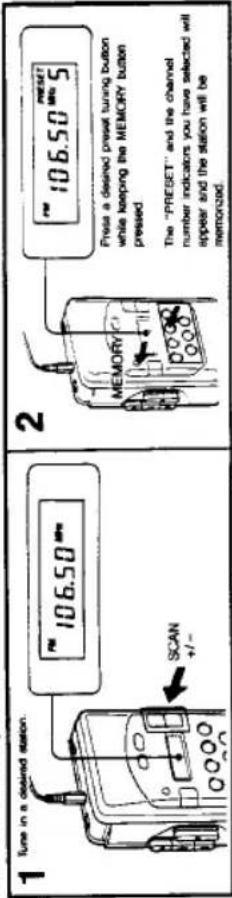
1 Tune in a desired station. PM 106.50 MHz SCAN +/- 2 PM 106.50 MHz Preset 106.50 MHz Press a desired preset tuning button while keeping the MEMORY button pressed. The "PRESET" and the channel number indicators you have selected will appear and the station will be memorized.to tune in a preset station
1 Press the RADIO ON button to turn on the radio.
2 Select a desired hand by pressing the BAND button.
3 Press a desired preset tuning button.
4 Adjust the volume.
广力云智慧零售收银系统
text_image
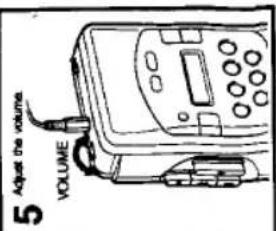
5 Adjust the volume. VOLUME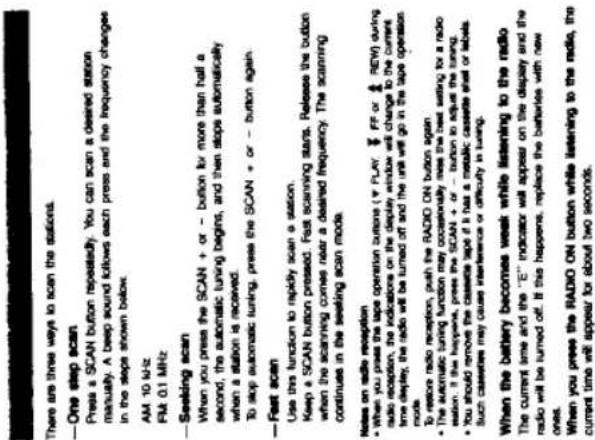
text_image
There are three ways to scan the stations. —One step scan Press a SCAN button repeatedly. You can scan a desired station manually. A beep sound follows each press and the frequency changes in the steps shown below. AM 10 kHz Fut 0.1 MHz —Seeking scan When you press the SCAN + or - button for more than half a second, the automatic tuning begins, and then stops automatically when a station is received. To stop automatic tuning, press the SCAN + or - button again. —Fast scan Use this function to rapidly scan a station. Keep a SCAN button pressed. Fast scanning starts. Release the button when the scanning comes near a desired frequency. The scanning continues in the seeking scan mode. Notes on radio reception • When you press the tape operation buttons (▼ PLAY. ▼ FF or ▲ REW) during radio reception, the indications on the display window will change to the current time display, the radio will be turned off and the unit will go in the tape operation mode. To restore radio reception, push the RADIO ON button again. • The automatic tuning function may occasionally miss the best setting for a radio station. If the happens, press the SCAN + or - button to adjust the tuning. • You should remove the cassette tape if it has a metallic cassette shell or labels. Such causes may cause interference or difficulty in tuning. When the battery becomes weak while listening to the radio The current time and the "E" indicator will appear on the display and the radio will be turned off. If this happens, replace the batteries with new ones. When you press the RADIO ON button while listening to the radio, the current time will appear for about two seconds.To memorize station frequencies
text_image
1 Tune in a desired station. 106.50 Mpa SCAN + - 2 106.50 PRESET Mpa 5 PRESS A desired preset tuning button while keeping the MEMORY button pressed. The "PRESET" and the channel number indicators you have selected will appear and the station will be memorized.Repeat steps 1 to 2 for both AM and FM. Up to 7 stations each can be
memorized for AM and FM.
To turn off the radio press the (radio) OFF button.
(五) 2017年1月1日,公司召开2017年第一次临时股东大会,并于2017年3月15日以现场会议形式召开。
text_image
5 Adjust the volume. VOLUME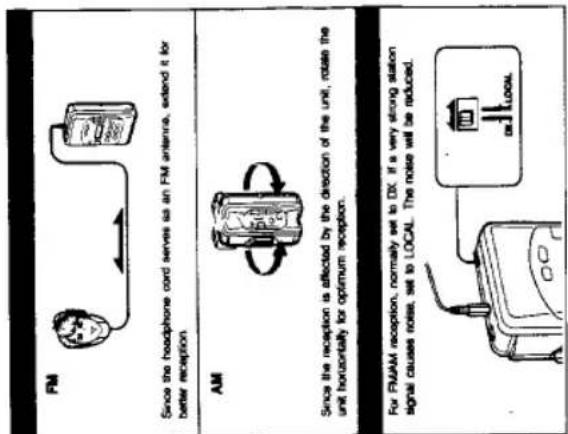
text_image
FM Since the headphone cord serves as an FM antenna, extend it for better reception. AM Since the reception is affected by the direction of the unit, rotate the unit horizontally for optimum reception. For FM/AM reception, normally set to DX. If a very strong station signal causes noise, set to LOCAL. The noise will be reduced.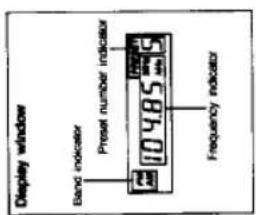
text_image
Display window Band indicator Preset number indicator 104.85 Frequency indicator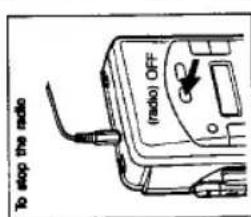
text_image
To stop the radio (radio) OFFThe AM tuning interval is factory preset to 9 kHz or 10 kHz in order to
match the local frequency allocation system. If you use the receiver in an one-way the frequency allocation system is based on another interval.
and where the frequently allowed system is based on a better reference, change the position of the switch with a thin instrument.
(3) 2017年1月1日
Notes
* If you change the interval, all preset stations, current time, and alarm time are
cancelled
A When you change the AM tuning interval from 9 kHz to 10 kHz, the FM tuning
interval is changed from 0.05 MHz to 0.1 MHz. But this is not a problem.
text_image
9k | 10k
text_image
3 PHONES VOLUME PLAY| To stop the tape | DepressSTOP |
| To wind the tape rapidly | DepressFForREW |
text_image
5 Adjust the volume. VOLUME
1 Before inserting a cassette, take up any slack in the tape with a thick pencil.
2
1 Before inserting a cassette, take up any slack in the tape with a thick pencil.
2
1 Before inserting a cassette, take up any slack in the tape with a thick pencil.
2
1 Before inserting a cassette, take up any slack in the tape with a thick pencil.
2
1 Before inserting a cassette, take up any slack in the tape with a thick pencil.
2
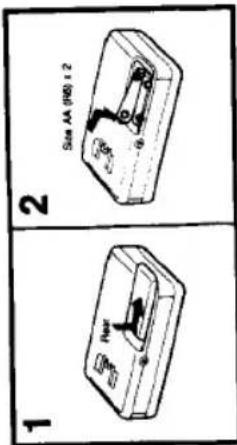
Using with Batteries
text_image
1 2 Rest Size AA (R6) x 2Notes - When the playback sound becomes distorted or unstable, replace the batteries with new ones. - When the "E" indicator appears on the display, replace the batteries with new ones. - Inset the batteries with correct polarity. - When the unit is not to be used for a long period of time, remove the batteries to avoid damage caused by battery leakage and corrosion. - Concerning the battery life, see "Specifications".
To keep the preset memories Replace the batteries within about ten minutes The memories of the current time and the preset stations will be erased about ten minutes after the batteries are removed.
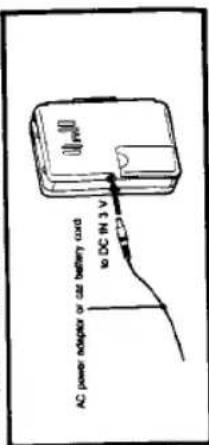
Using the External Power Sources
Use the optional AC-D2M AC power adaptor or DCC-70 car battery cord.
text_image
AC power adaptor or case battery cord to DC IN 3 VNote Remove the batteries before using the unit on an external power source. Otherwise, the batteries will be damaged.
Specifications
Radio section
Frequency range FM: 875–108 MHz
AM: 530–1,710 kHz (10 kHz step)
531 - 1,602 MHz (9 MHz step)
Autonom
FM: Headphone card antenna
AM: Built-in ferrite bar antenna
Tape player section
Frequency response 40 - 14,000 Hz
Power output 10mW + 10mW 32 ohms at DC operation
Headphones (bipolar min/kw) load impedance B - 300 ohms
Power requirements 3 V DC
DC IN 3 V pack accepts
Optional Sony EBP-5008 battery case for use with size D (R20) batteries
Precautions
Note on cassetiles longer than 90 minutes The use of cassetiles longer than 90 minutes is not recommended except for a long continuous playback.
If you have any question or problem concerning your unit that is not covered in this manual, please consult the nearest Sony dealer.
Cleaning
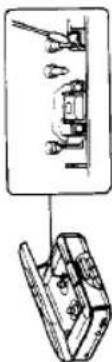
Cleaning the head
Clean your tape head after every 10 hours of use to enjoy optimum stereo sound. Moaten a cotton swab or a soft cloth with alcohol and wipe the head, the pinch-rollers and the capetars.
natural_image
Illustration of a briefcase with a lamp and two light bulbs, alongside a photo of a table setup (no text or symbols)Cleaning the headphones plug
to obtain the opemium sound, keep the plug of your headphones cloth by wiping it with a dry, soft cloth.
Cleaning the unit's exterior
Clean your unit's exterior with a water moistened soft cloth. Do not use alcohol, benzine or thinner to clean the unit's exterior
Cleaning the unit's exterior
Clean your unit's exterior with a alcohol, benzine or thinner to ch
Cleaning the unit's exterior
Clean your unit's exterior with a alcohol, benzine or thinner to ch
Cleaning the headphones plug
To obtain the opemum sound, keep wiping it with a dry, soft cloth.
text_image
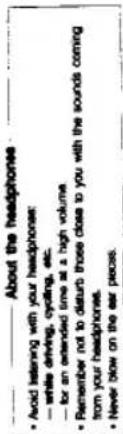
About the headphones • Avoid listening with your headphones: — white driving, cycling, etc. — for an extended time at a high volume • Remember not to disturb those close to you with the sounds coming from your headphones. • Never blow on the ear pieces.Notes on the display The digital display will be
which is extremely hot or cold. Do not piece the unit in:
—a place continuously suspected to direct sight of ultraviolet light (or example, on the seaside, etc.).
- a temperature below 0°C (32°F) or over 40°C (10°F). In a hot place, the display will be seen as 26:88:88, and in a cold place, the display may change slowly. (However, this is not a trouble. Use the unit in normal
temperature.) a room class (the microwave in a bathroom, etc.) It will cause
- a being place (for example) in a certain area, but not a malfunction.
—a place subject to mechanical vibration or shock.
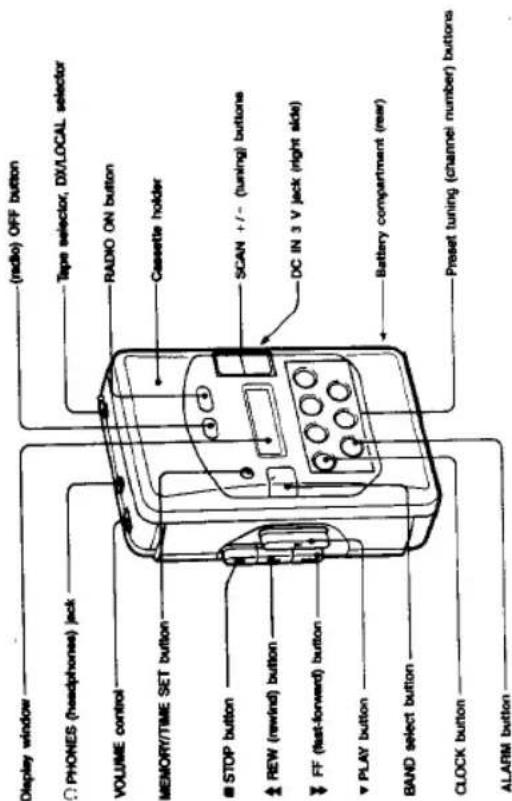
Parts Identification
text_image
Display window ○ PHONES (headphones) jack VOLUME control MEMORY/TIME SET buttonSTOP button
↑ REW (rewind) button ↓ FF (fast-forward) button ▼ PLAY button BAND select button CLOCK button ALARM button (radio) OFF button Tape selector, DX/LOCAL selector RADIO ON button Cassette holder SCAN +/- (tuning) buttons DC IN 3 V jack (right side) Battery compartment (rear) Preset tuning (channel number) buttons
The following table is provided in the image.
Design and specifications subject to change without notice
A. 2016年1月1日,公司与关联方发生的关联交易情况如下:
Accessories supplied Stereo headphones (1). Belt dep (1)
and batteries
Weight Inventory 205.4 (9.3 oz)
not incl. projecting parts and controls
(35) • 55 × 17 inches
Dimensions Approx 905 x 134 x 387 mm (ref:6)
reception, using Sony alkaline berlern
Battery life Approx. 8 hours of tape playback and
battery
Optional Sony DCC-70 car cabinry
AC 60 Hz
Optional Sony AC-02M AC power
(1) 2014年1月1日
(1) AD = BD = 1
[Non-Text]
Pointy of the Sony plug
•

The alarm will be heard the (radio) OFF button.
While listening to the tape
The alarm will be heard from inside the unit (not from the headphones). Press the (radio) OFF button to stop the alarm, or press the RADIO ON button to stop the alarm and to turn on the radio, or depress the PLAY button to stop the alarm and to start the tape playback. The "H" indicator on the display goes off when you stop the alarm.
text_image
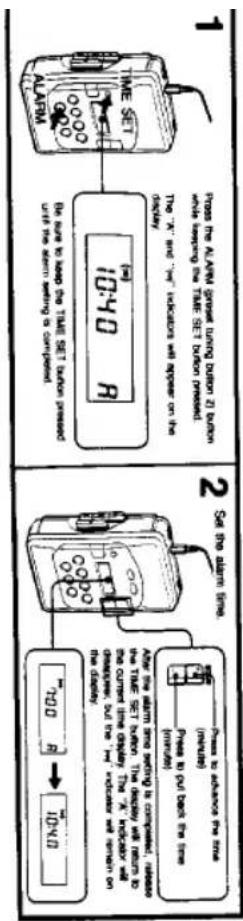
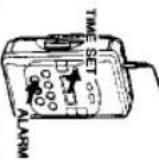
1 Press the ALARM (preset tuning button Z) button while keeping the TIME SET button pressed. The "A" and "m" indicators will appear on the display. (=) 10:40 R Be sure to keep the TIME SET button pressed until the alarm setting is completed. 2 Set the alarm time. Press to advance the time (minute) Press to put back the time (minute) After the alarm time setting is completed, release the TIME SET button. The display will return to the current time display. The "A" indicator will disappear, but the "m" indicator will remain on the display. 700 R → 10:40If you want to cancel the alarm, press the ALARM (preset tuning button 2) button twice while keeping the TIME SET button pressed. At the first pressing, the "A", "B" and alarm time indicators appear on the display and at the second pressing, the "B" indicator goes off and the alarm setting is canceled. Release the TIME SET button to return to the current time display.
text_image
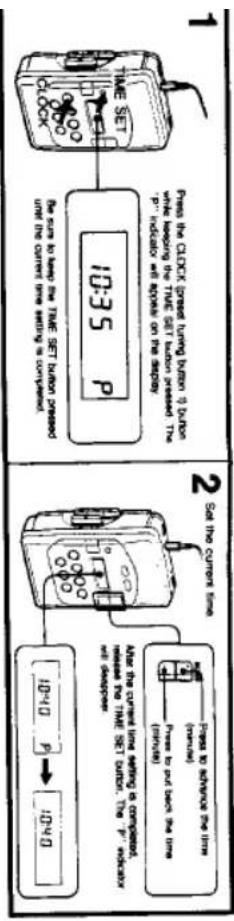
1 TIME SET CLOCK Press the CLOCK (preset tuning button 1) button while keeping the TIME SET button pressed. The 'P' indicator will appear on the display. 10:35 P Be sure to keep the TIME SET button pressed until the current time setting is completed. 2 Set the current time Press to advance the time (minute) Press to put back the time (minute) After the current time setting is completed, release the TIME SET button. The 'P' indicator will disappear. 10:40 P → 10:40- When the SCAN + or - button is kept pressed, the digits advance rapidly
- The hour display is on a 12-hour cycle
- Replace the batteries within about one hour, or the time you set will be cancelled
- The hour display advances by one when the minute display returns to "00" after "59".
