
VM-ES77P - Camcorder SANYO - Kostenlose Bedienungsanleitung
Finden Sie kostenlos die Bedienungsanleitung des Geräts VM-ES77P SANYO als PDF.


| Produkttyp | 8-mm-Camcorder (Hi8 kompatibel) |
| Modell | VM-ES77P |
| Marke | Sanyo |
| Abmessungen (B x H x T) | 180 mm x 69 mm x 183 mm |
| Gewicht (ohne Akku und Kassette) | 810 g |
| Stromversorgung | Akku NP-55 (6 V / 7,5 V / 9 V) oder Netzteil VAR-20 (100–240 V AC) |
| Akku-Ladezeit | Ca. 1 Stunde (NP-55) |
| Akku-Betriebsdauer (Daueraufnahme) | Ca. 55 Minuten (NP-55) |
| Bildsensor | 1/3-Zoll-CCD, 320.000 Pixel |
| Objektiv | 8-fach Motorzoom, f = 7–56 mm, F1.8, Filterdurchmesser 37 mm, Autofokus |
| Sucher | Elektronischer Sucher (0,6 Zoll, Schwarzweiß) |
| Verschlusszeiten | 1/60, 1/1000, 1/2000, 1/50 (Normal), Hochgeschwindigkeitsverschluss |
| Mindestbeleuchtung | 5 Lux |
| Weißabgleich | Automatisch (Fuzzy-Logik) |
| Kassettenformat | 8-mm-Videokassette (P5-15 bis P5-90) |
| Maximale Aufnahmezeit | 180 Minuten (SP-Modus mit P5-90) |
| Bildstabilisierung | Nicht vorhanden |
| Besondere Funktionen | Titeleinblendung (digitaler Speicher), Datum/Uhrzeit-Einblendung, Szenensuche, Glatter Übergang, Aufnahme-Review |
| Anschlüsse | Video-Ausgang, Audio-Ausgang, AV-Buchse, Mikrofonbuchse (3,5 mm), Kopfhörerbuchse (3,5 mm), LANC-Steuerung |
| Reinigung und Wartung | Videoköpfe regelmäßig von Fachpersonal reinigen lassen; Sichtprüfung alle 1000 Betriebsstunden empfohlen |
| Sicherheitshinweise | Nicht hohen Temperaturen, Feuchtigkeit oder starken Magnetfeldern aussetzen; Lithiumbatterie CR2025 vorsichtig behandeln |
| Ersatzteile / Reparierbarkeit | Akku NP-55/NP-77/NP-77H, Lithiumbatterie CR2025, Netzteil VAR-20; Reparatur durch autorisiertes Sanyo-Personal |
| Allgemeine Informationen | PAL-Farbsystem, CCIR-Norm; Betriebstemperatur 0–40 °C, Lagertemperatur -20–60 °C |
Häufig gestellte Fragen - VM-ES77P SANYO
Benutzerfragen zu VM-ES77P SANYO
0 Frage zu diesem Gerät. Beantworten Sie die, die Sie kennen, oder stellen Sie Ihre eigene.
Eine neue Frage zu diesem Gerät stellen
Laden Sie die Anleitung für Ihr Camcorder kostenlos im PDF-Format! Finden Sie Ihr Handbuch VM-ES77P - SANYO und nehmen Sie Ihr elektronisches Gerät wieder in die Hand. Auf dieser Seite sind alle Dokumente veröffentlicht, die für die Verwendung Ihres Geräts notwendig sind. VM-ES77P von der Marke SANYO.
BEDIENUNGSANLEITUNG VM-ES77P SANYO
Instruction Manual
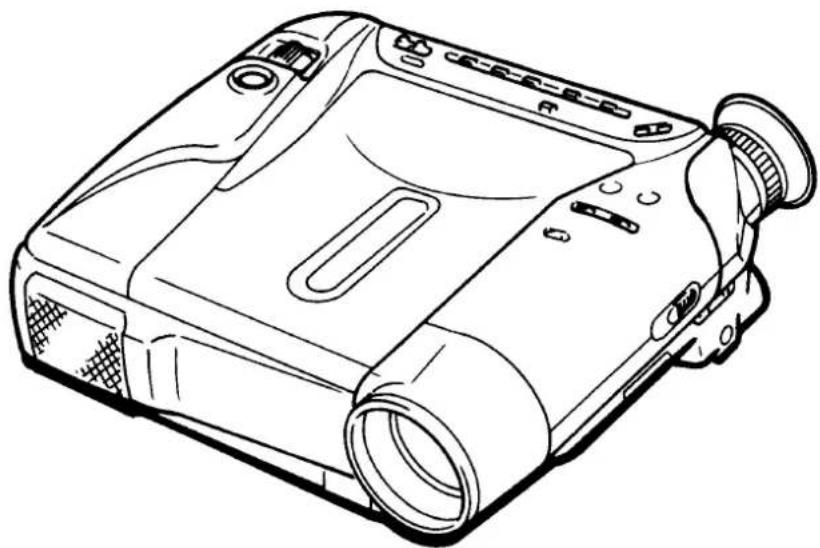
8 mm Camcorder
VM-ES77P With AC adaptor VAR-20
8 PAL
natural_image
Line drawing of a compact digital camera with visible lens and ventilation slots (no text or symbols)CONTENTS
FEATURES 1
ACCESSORIES 2
PART NAMES 4
PREPARATIONS 7
REAL TIME TAPE COUNTER 13
HOLDING THE CAMERA 14
CAMERA RECORDING 15
PLAYBACK 17
SMOOTH TRANSITION 19
ZOOM 19
CALLING UP FUNCTIONS 20
TITLE INSERT 21
HIGH SPEED SHUTTER 23
DATE/TIME IMPRINT 24
FOCUSING 26
AUTO IRIS 27
MICROPHONE 28
CONNECTIONS 29
TAPE COPY 31
ON-SCREEN DATA 32
IMPORTANT NOTES 33
MAINTENANCE 33
USE IN OTHER COUNTRIES 34
TROUBLESHOOTING 34
DEW CONDENSATION 35
SPECIFICATIONS 36
FEATURES
● Fuzzy logic auto focus in full range
● Fuzzy logic auto iris
● Automatic white balance with fuzzy logic
● High speed shutter
● Title insert (superimpose)
- Scene search
- Date/time imprint
● Eight-power zoom-in/zoom-out powered
● Electronic viewfinder for immediate playback
● Recording review for checking the last part of a recording
● Still frame/picture search
● Real time tape counter
● Maximum recording time : 180 minutes
●1/3" CCD, 320, 000 pixels
● Multi angle viewfinder
● Multi- voltage (100 V to 240 V)
ACCESSORIES
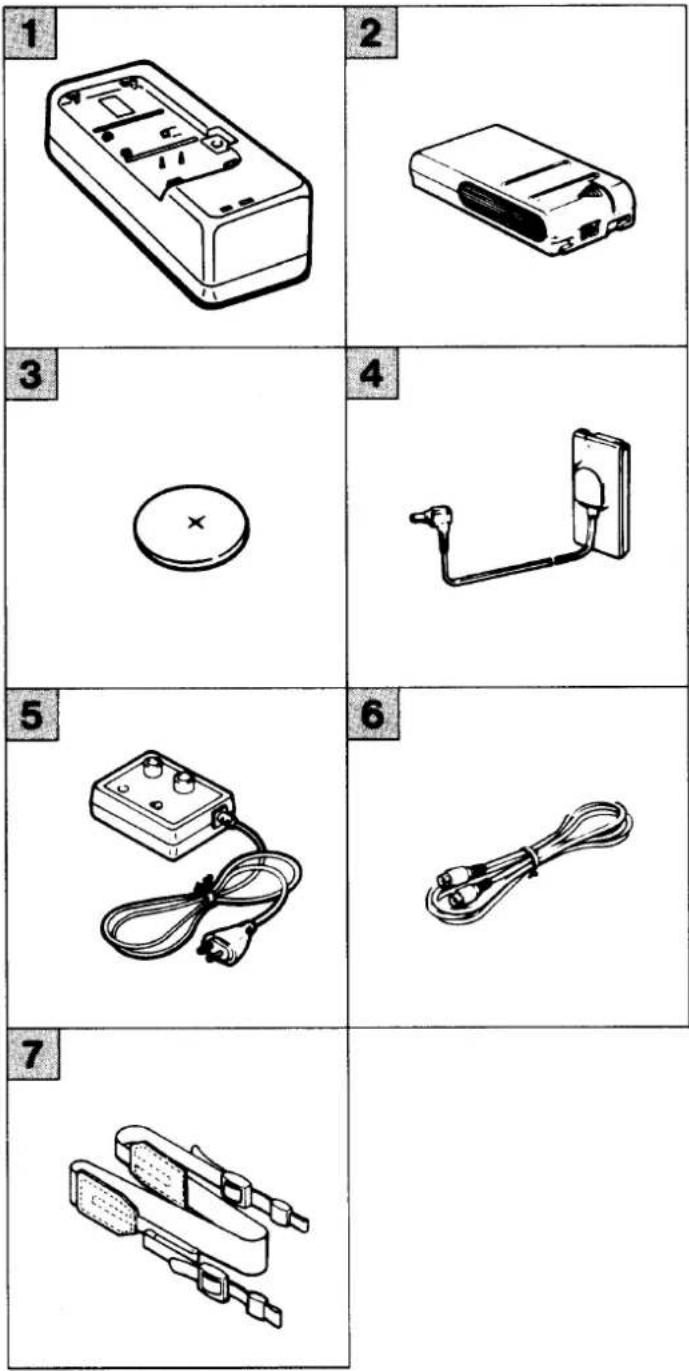
1 VAR-20 AC adaptor 1
2 NP-55 Battery pack 1
3 Lithium battery (CR2025) 1
4 Power connection cord 1
5 VRF-550 RF adaptor 1
6 Coaxial cable 1
7 Shoulder belt 1
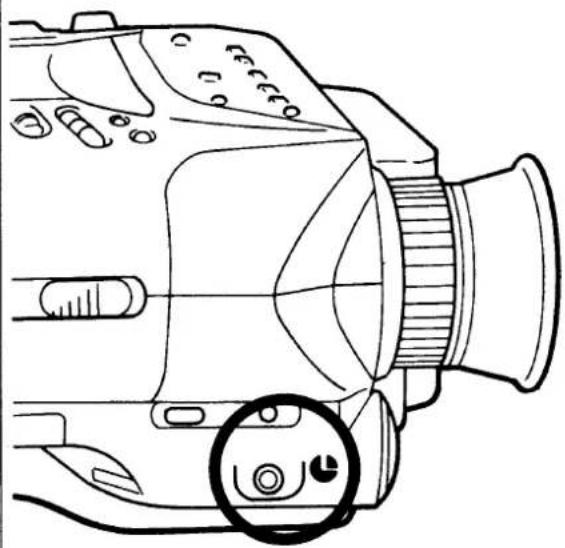
Regarding LANC Terminal/ Symbol
The symbol " " is for LANC (Local Application Control Bus System) terminal. LANC terminal is intended for connecting video equipment with peripheral equipment, and allows controlling of tape running and others.
Note :
Be careful not to insert a plug of instruments that are not responsive to LANC, such as microphones or earphones, otherwise, it may cause operation troubles.
natural_image
Line drawing of a DSLR camera with lens and control knob (no text or symbols)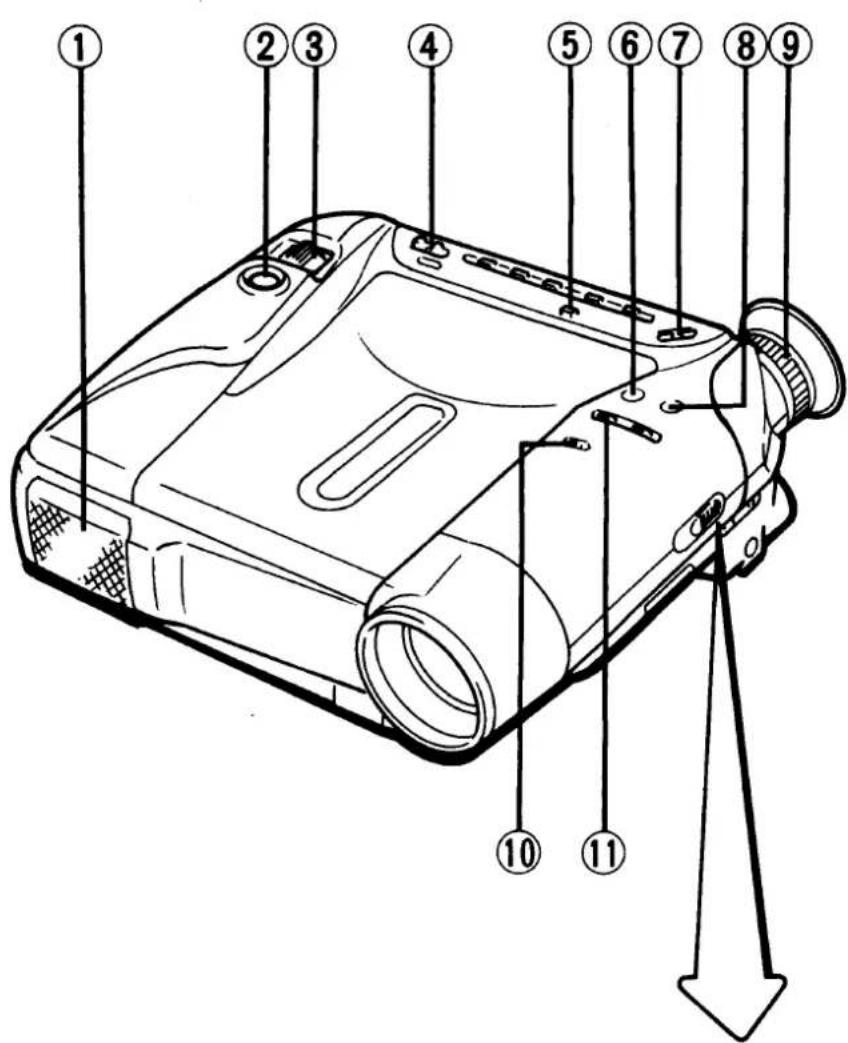
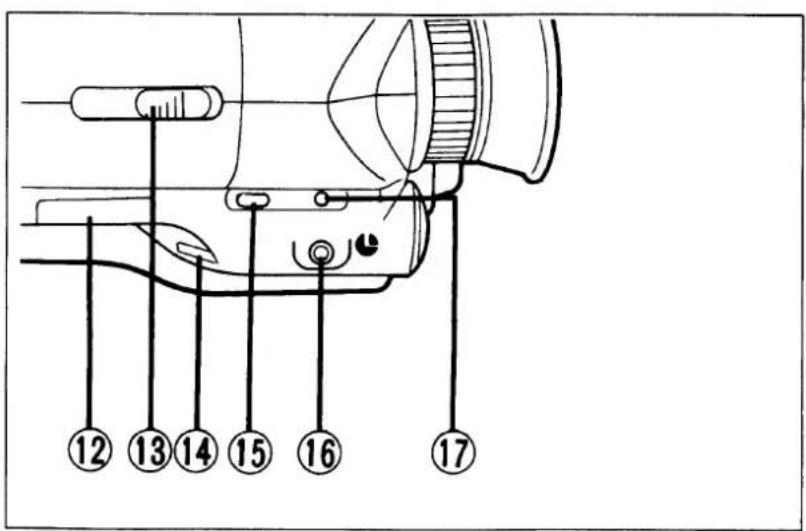
PART NAMES
① Microphone
② REC START/STOP button
③ Zoom lever
④ POWER switch
⑤ DATA button
⑥ MEMORY button
⑦ SCENE SEARCH button
⑧ RESET button
⑨ Eyesight compensation ring
⑩ AUTO LOCK switch
⑪ DRIVE button
⑫ Lithium battery tray
⑬ VF (viewfinder) lever
⑭ IRIS control knob
⑮ DATE/TIME button
⑯ LANC terminal
⑰ ADJ button
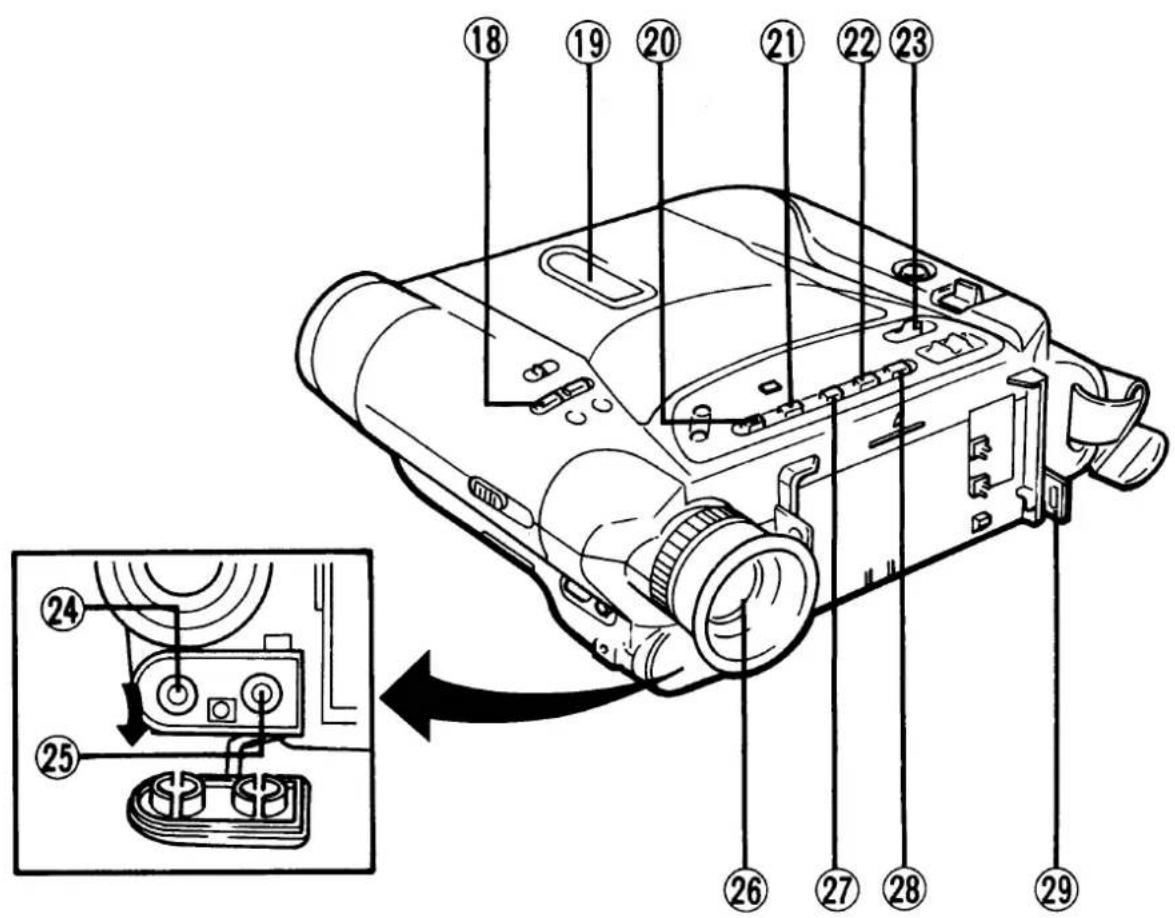
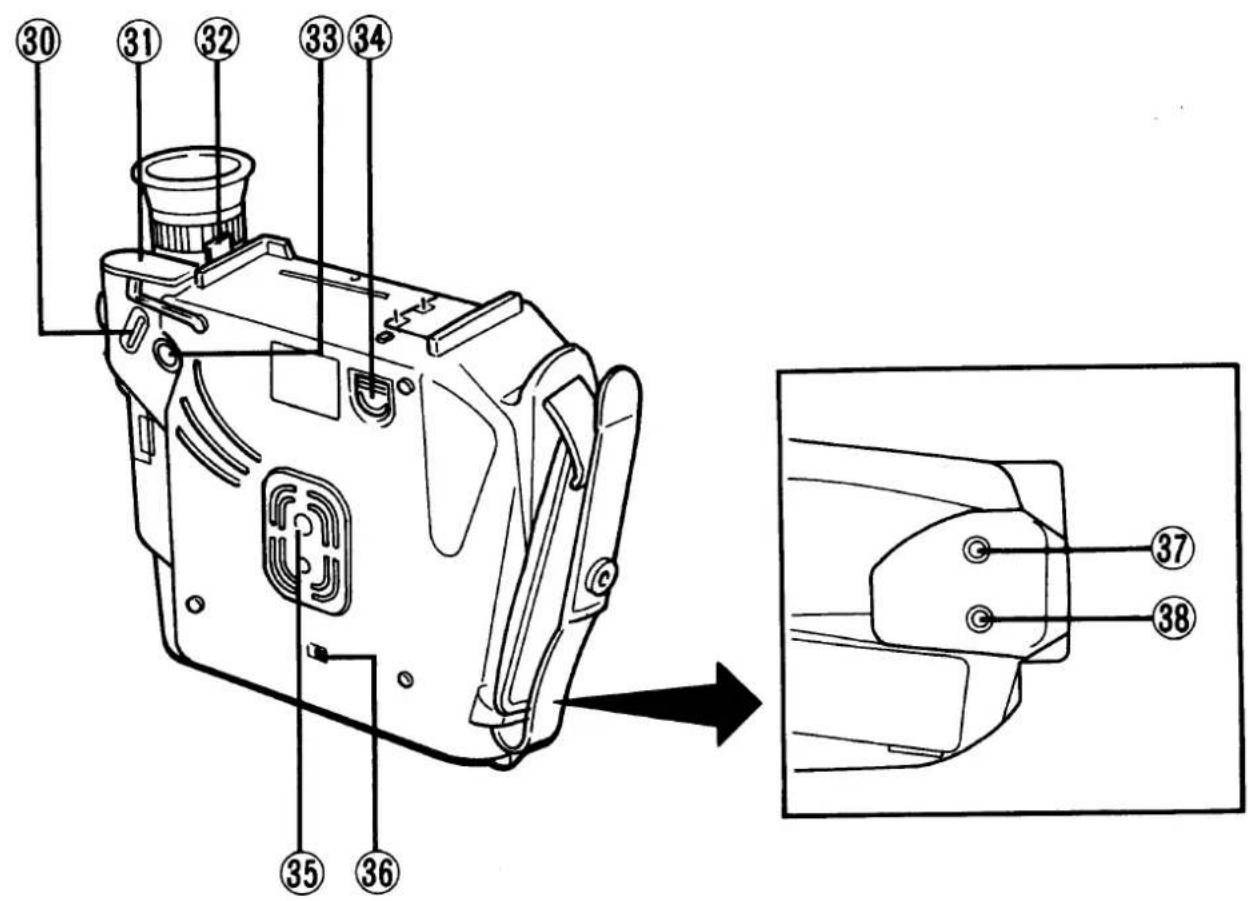
⑱ TITLE/SHUTTER button
⑲ Cassette holder
⑳ REW button
⑳ PLAY button
②2 STOP button
②3 EJECT lever
⑳ Video output terminal
⑳ Audio output terminal
26 Viewfinder
⑳ FF button
28 STILL button
⑲ 29 Shoulder belt hook
③0 M.FOCUS button
③1 AV jack cover
③2 Shoulder belt hook
③3 FOCUS button
③4 Battery eject lever
③5 Tripod screw mount
③6 REC MODE/EDIT switch
③7 EARPHONE jack
38 MIC jack
PREPARATIONS
1
2
3
natural_image
Line drawing of a video camera connected to a battery via cable (no text or symbols)POWER SOURCE
Outdoor Use :
For outdoor recording, use supplied battery pack NP-55.
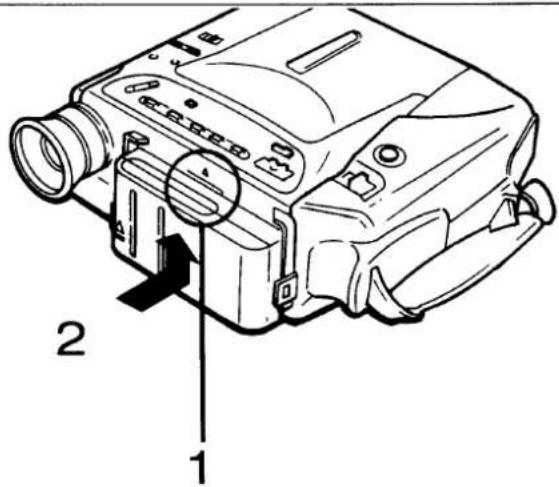
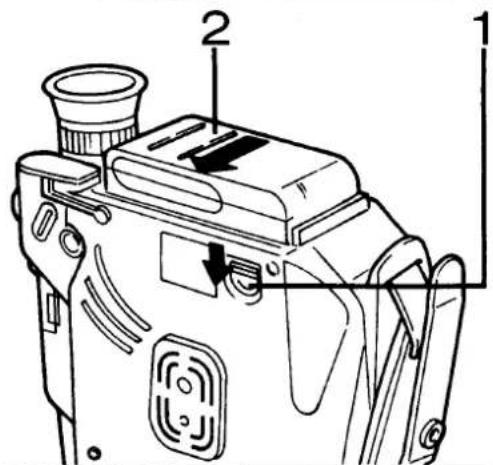
1
Attaching the Battery Pack
- Align the line on the this unit and the side of battery pack.
- Gently press the battery pack toward the unit, then slide it up until it "clicks" into place.
2
Removing the Battery Pack
- Press and hold down the battery eject lever.
- Slide the battery pack to the left.
Indoor Use :
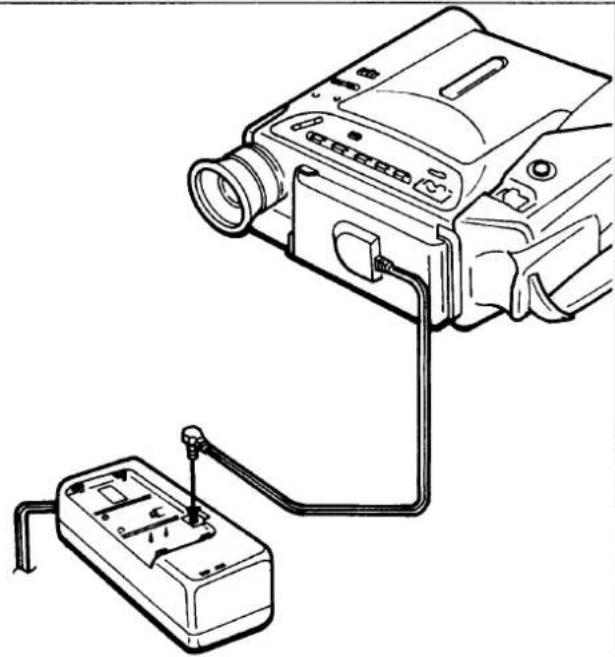
For indoor recording, use supplied AC adaptor VAR-20.
3
a) Attach (or remove) the power connection cord following the steps 1 and 2 above "Attaching the Battery Pack" (or "Removing the battery pack").
b) Connect the power connection cord to the AC adaptor, plug the adaptor to an AC outlet. The green power lamp will light.
c) After recording or playback, disconnect the AC adaptor's plug from the AC outlet.
The AC adaptor can be used in countries with line voltages between 100 V AC and 240 V AC.
Notes :
● The battery pack supplied with this unit has not been charged. Charge it before initial use.
- Do not use VAR-20 AC adaptor to supply power for other than 8mm camcorder.
- When removing the battery pack or power connection cord, power should be switched OFF.
IMPORTANT
The wires in this mains lead are coloured in accordance with the following code:

☐ As the colours of the wires in the mains lead of this apparatus may not correspond with the coloured markings identifying the terminals in your plug proceed as follows.
☐ The wire which is coloured blue must be connected to the terminal which is marked with the letter N or coloured blue or black.
☐ The wire which is coloured brown must be connected to the terminal which is marked with the letter L or coloured brown or red.
☐ On no account connect either of these wires to the terminal marked E or 12 .
1
2
natural_image
Line drawing of a computer monitor case with ventilation slots and an attached port (no text or symbols)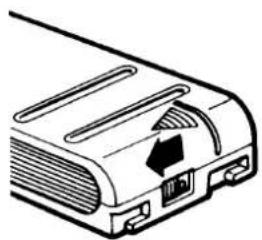
natural_image
Diagram of a device rear panel with a black arrow indicating a component (no text or symbols present)CHARGING
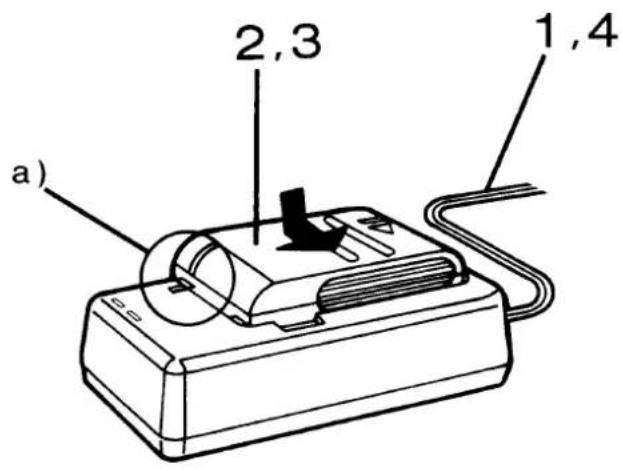
Use the VAR-20 AC adaptor to charge the battery pack.
1
- Plug the AC adaptor into an AC outlet. The green power lamp will light.
- Attach the battery pack.
a) Align the line marks.
b) Gently press down on the battery pack. Slide it into place as shown by the arrow.
The charge lamp will light and charging will begin.
When the battery pack has been fully charged, the charge lamp will go out. The NP-55 battery pack can be charged in about one hour. (NP-77 battery pack: about 120 minutes, NP-77H battery pack: about 140 minutes)
- Slide out the battery pack in the opposite direction.
- Disconnect the plug of the AC adaptor from the AC outlet.
2
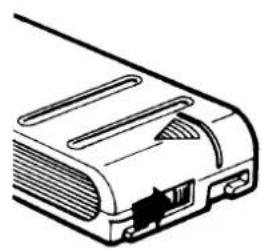
After charging :
Slide the cover on the battery pack as shown to cover the red circle.
When the battery pack is exhausted :
Slide the cover on the battery pack as shown to reveal the red circle.
Duration of fully charged battery pack (for continuous camera recording)
NP-55 : about 55 minutes
NP-77: about 110 minutes
NP-77H : about 120 minutes
Notes :
● Always use the battery pack until the empty battery symbol on the camcorder appears. If a battery pack is often recharged when not empty, a loss of capacity will occur, providing much less recording time.
- At normal temperatures, a fully charged NP-55 battery pack will provide enough power to record for about 55 minutes. It will provide much less recording time in cold locations.
- Do not use VAR-20 AC adaptor for other purposes than charging NP-55, NP-77 or NP-77H battery packs.
- Do not continue charging a fully charged battery pack, because doing so will adversely affect its performance.
- Although charging is possible within a temperature range of 5^ 35^ , for best results, a temperature range of 10^ 30^ is suggested.
- Be sure to detach battery pack from the unit when the unit is not to be used for a long time, because with battery pack held set in the unit, a very small amount of current will flow in the unit even if POWER SWITCH is turned off.

8mm CASSETTE TAPE
Only 8mm video cassette can be used in this unit.
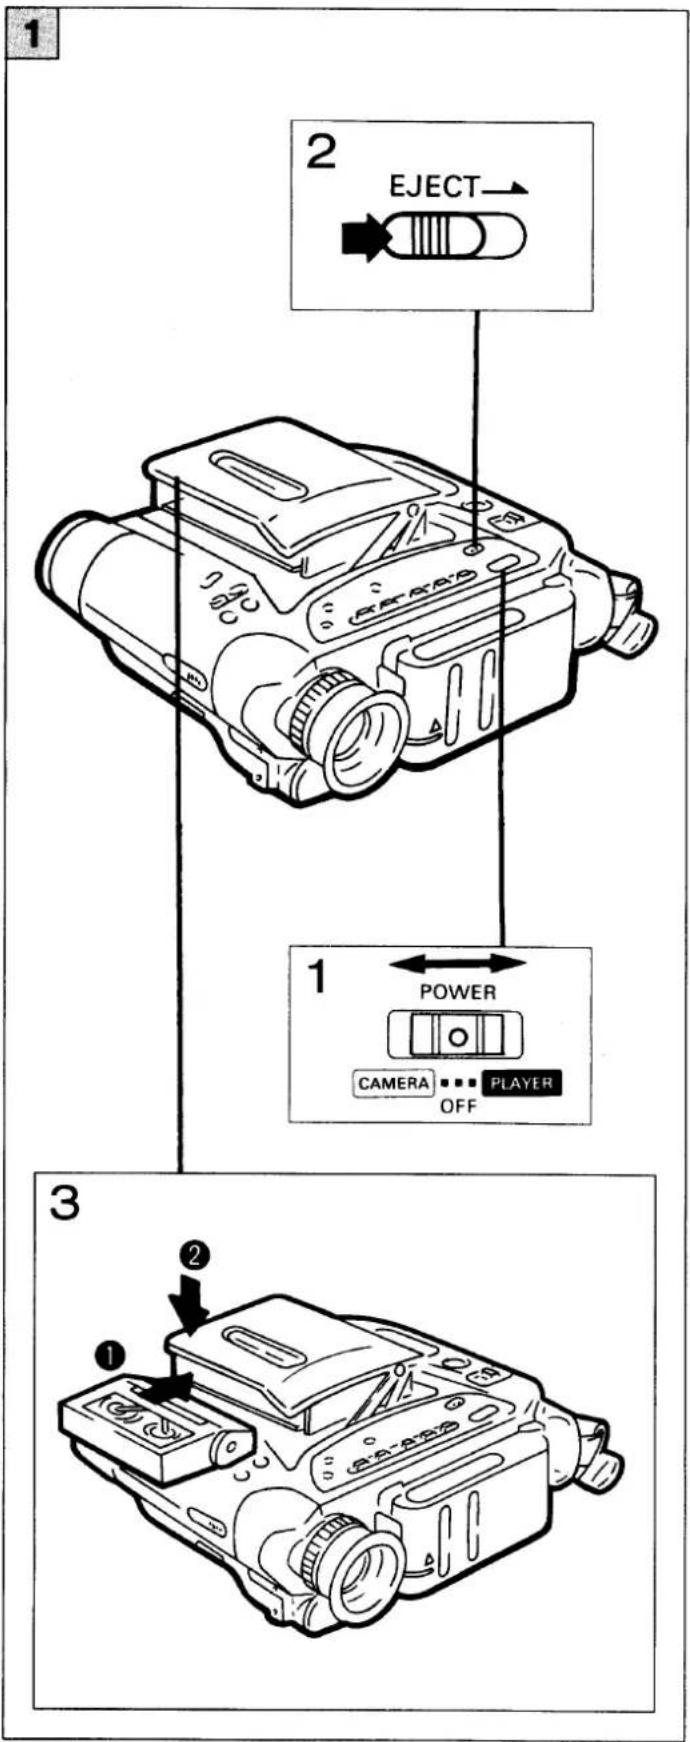
Loading Cassette
1
- Set the POWER switch to the CAMERA or PLAYER position.
Switch while pressing the button in the middle of power switch. - Slide the EJECT lever.
The cassette holder will open. - Insert a cassette. Gently press the "PUSH" indicator on the cassette holder.
Ejecting Cassette
Eject cassette by following the same steps as "Loading Cassette".
Notes :
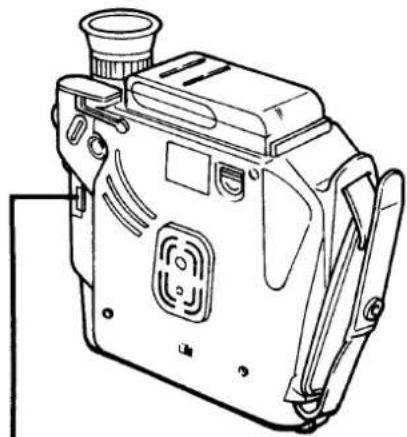
● Never hold this unit by the cassette holder or the viewfinder.
- Do not cover the holes on the bottom of the cassette. These holes are used to detect the type and length of tape and whether or not recording is possible.
- Store each video tape cassette in its case, standing upright (vertical). This will prevent the entrance of dust and uneven tape winding.
● Tapes recorded with Hi8 system can not be played back by this unit.
1
natural_image
Line drawing of a rectangular electronic device with a labeled port (A) and internal waveform lines, no text or symbols present.2
natural_image
Line drawing of a vintage camera with lens and control panel (no text or symbols)1
natural_image
Diagram showing a mechanical component with an arrow indicating direction, no text or symbols present2
natural_image
Simple line drawing of a mechanical component with a circular symbol and arrow indicating direction (no text or labels)3
natural_image
Diagram showing a mechanical component with an arrow indicating direction, no text or symbols present1
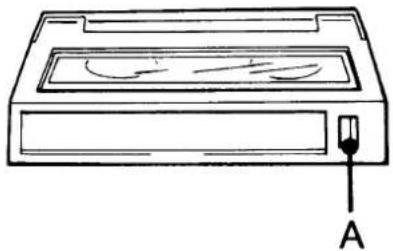
A : ERASURE-PREVENTION switch
To prevent accidental erasure of recorded material, set the switch on the spine of the cassette to the red position. Recording then cannot be made on that cassette. To record on it later, return the switch to the original position.
Video tape recording/playback time [unit : min]
| Size | Mode SP | Mode LP |
| P5-15 | 15 | 30 |
| P5-30 | 30 | 60 |
| P5-60 | 60 | 120 |
| P5-90 | 90 | 180 |
LITHIUM BATTERY
2
The date/time imprint function of this unit requires a lithium battery to prevent the loss of the date/time memory when the power is switched off.
The lithium battery has a life of approximately 1 year when used normally.
Installing/Replacing the Lithium Battery
(Lithium Battery : CR2025 [3V])
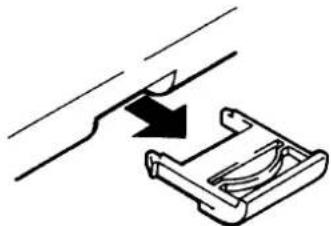
- Pull out the lithium battery tray.
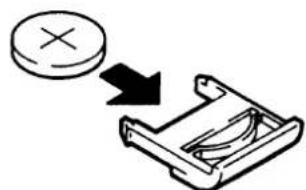
- Lithium battery insertion.
a) Wipe the battery clean with a dry cloth to prevent faulty contact.
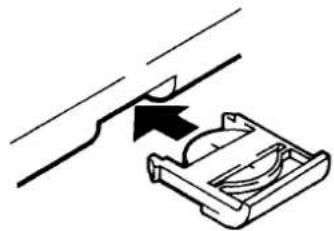
b) Insert the battery properly with the + side up.
- Insert the lithium battery tray.
● After replacing the battery, reset the DATE/TIME. (See SETTING THE DATE/TIME.)
Notes :
- WHEN REPLACING THE BATTERY USE ONLY THE SAME TYPE. Use of another lithium battery may present a risk of fire or explosion.
● If swallowed promptly see doctor.
● WARNING : The lithium battery may explode resulting in a fire or chemical burn hazard if mistreated. Do not recharge, disassemble, heat above 100°C (212°F) or incinerate. - Dispose of used lithium battery promptly. Keep away from children. Do not disassemble and do not dispose of in fire.

GRIP BELT
1
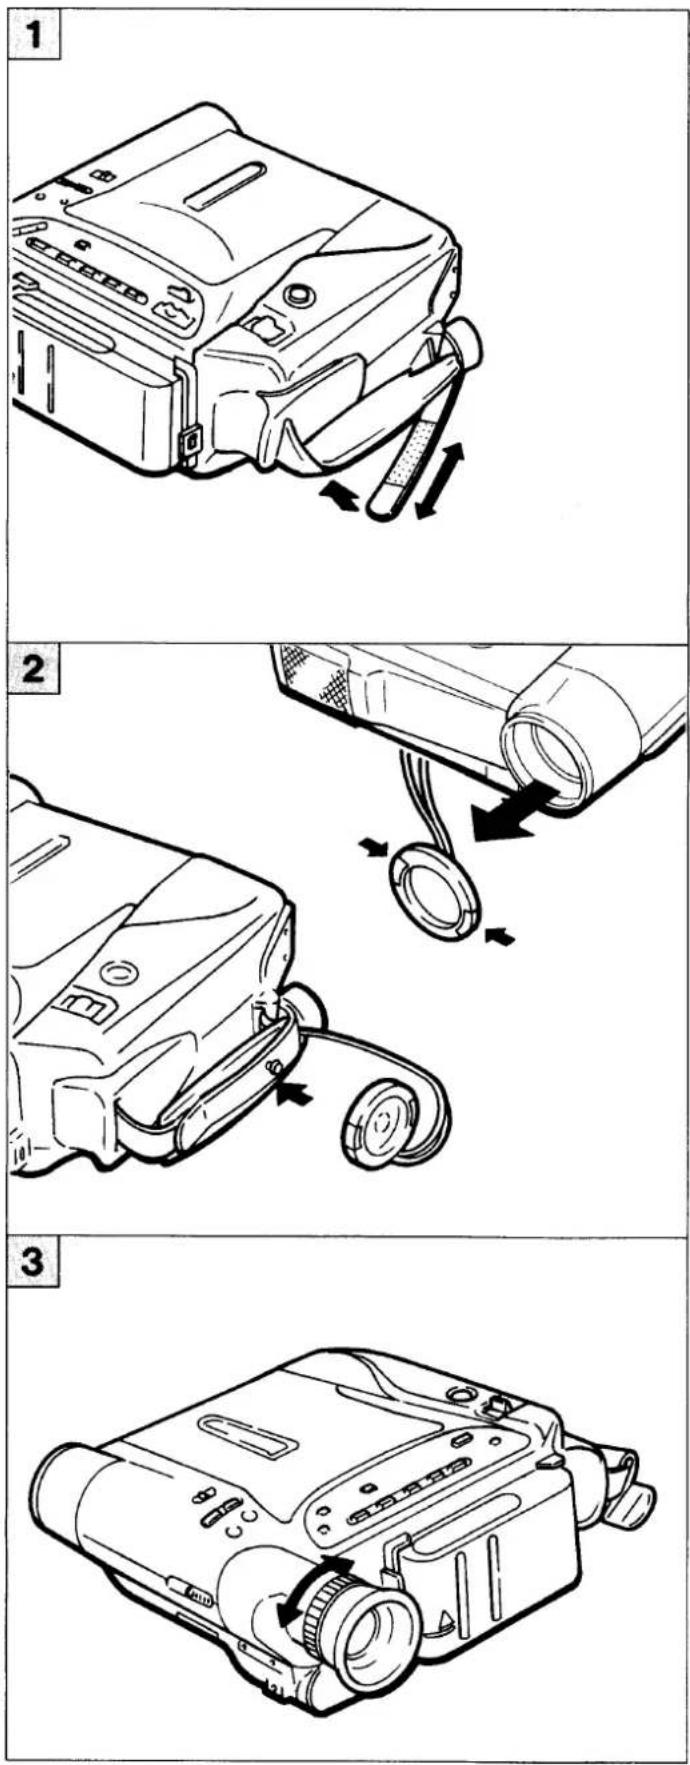
- Ajust the length of grip belt.
- Secure the belt.
LENS CAP
2
Attach the lens cap to the lens cap snap located on the grip belt.
EYESIGHT COMPENSATION
3
a) Set the POWER switch to the CAMERA position.
b) Look through the viewfinder and observe the indications.
c) Move the adjustment ring (see arrow) left or right to obtain the clearest possible image of the indications.
Note :
- Eyesight compensation must be readjusted whenever the camcorder is operated by someone with different eyesight from the previous operator.
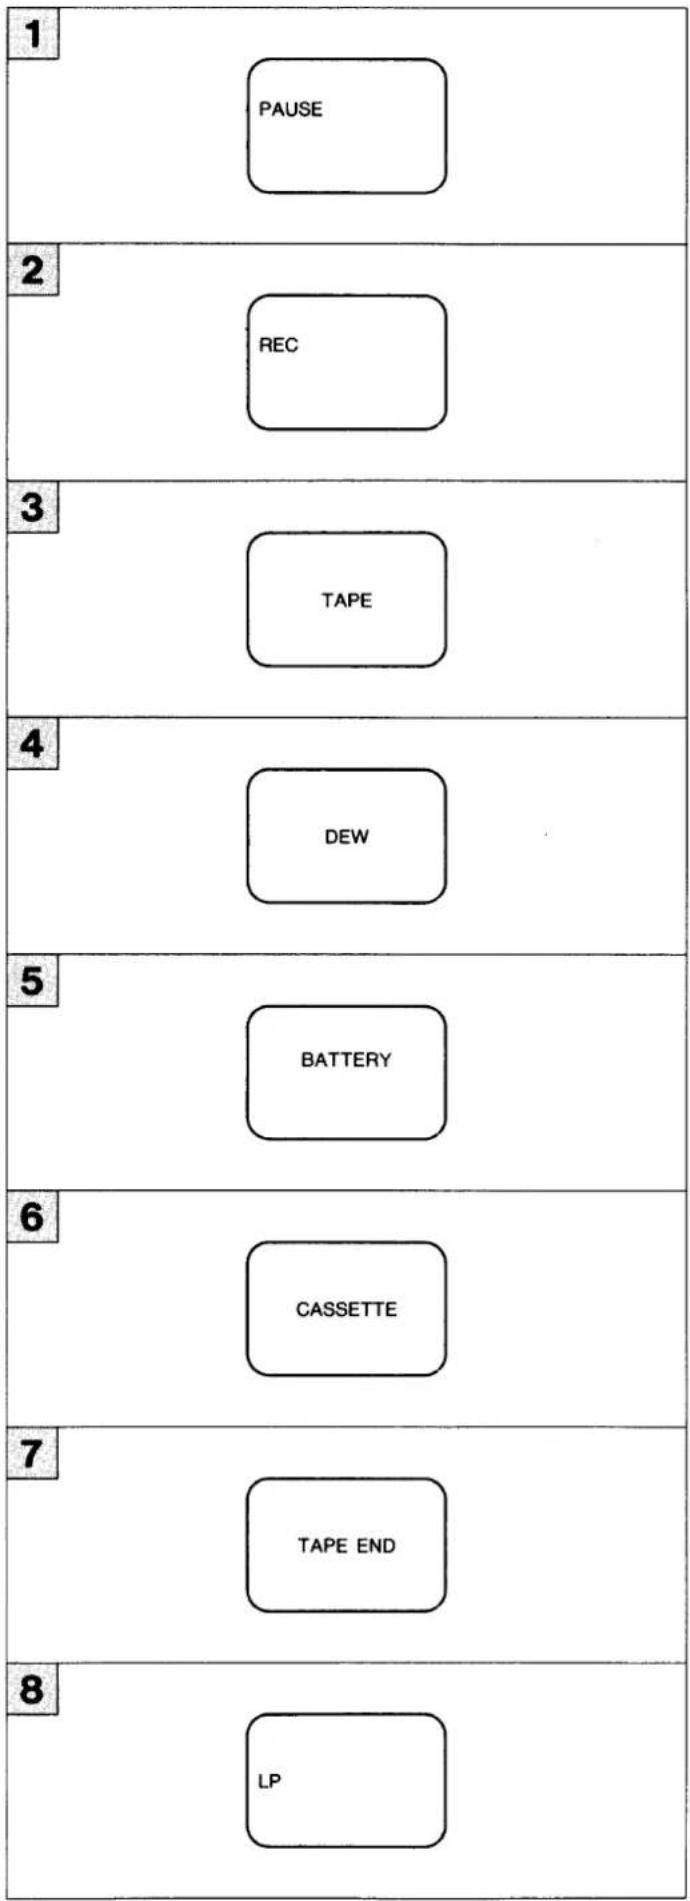
flowchart
graph TD
    1 --> PAUSE
    2 --> REC
    3 --> TAPE
    4 --> DEW
    5 --> BATTERY
    6 --> CASSETTE
    7 --> TAPE_END
    8 --> LP
INSIDE THE VIEWFINDER
1
This indication appears during the recording pause mode.
2
This indication appears during the recording mode.
3
This indication appears about 5 minutes before the tape reaches its end.
4
This indication will appear and flash when dew has condensed inside the unit.
5
This indication will appear and flash when the battery becomes weak.
6
This indication will appear and flash when the cassette has been set for erase prevention or no cassette has been loaded into the camcorder.
7
This indication will appear and flash when the tape has been wound to its end. If this condition continues for more than five minutes, the indication will disappear.
8
This indication will appear when the REC MODE/EDIT switch set to the LP position.
REAL TIME TAPE COUNTER
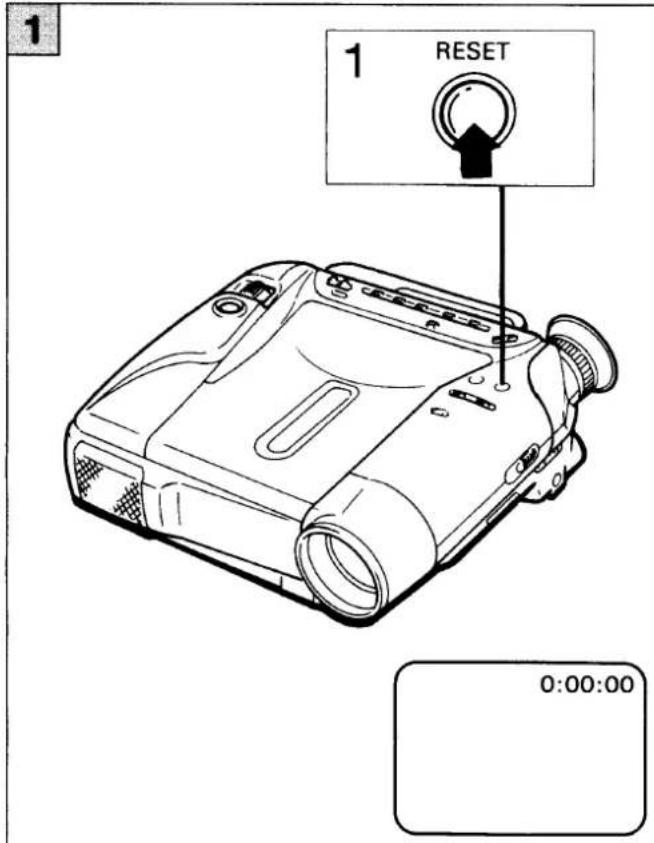
The real time tape counter indicates elapsed tape running time in hours, minutes and seconds in SP mode based. Reset the counter to 0:00:00 at the beginning of recording or playback to find out how much of the tape remains or to search a recorded scene.
RESET
1
- Press the RESET button before starting recording. The tape counter will reset to "0:00:00" in the viewfinder. The remaining tape length can be found out by subtracting the current counter reading from the nominal recording time of the tape.
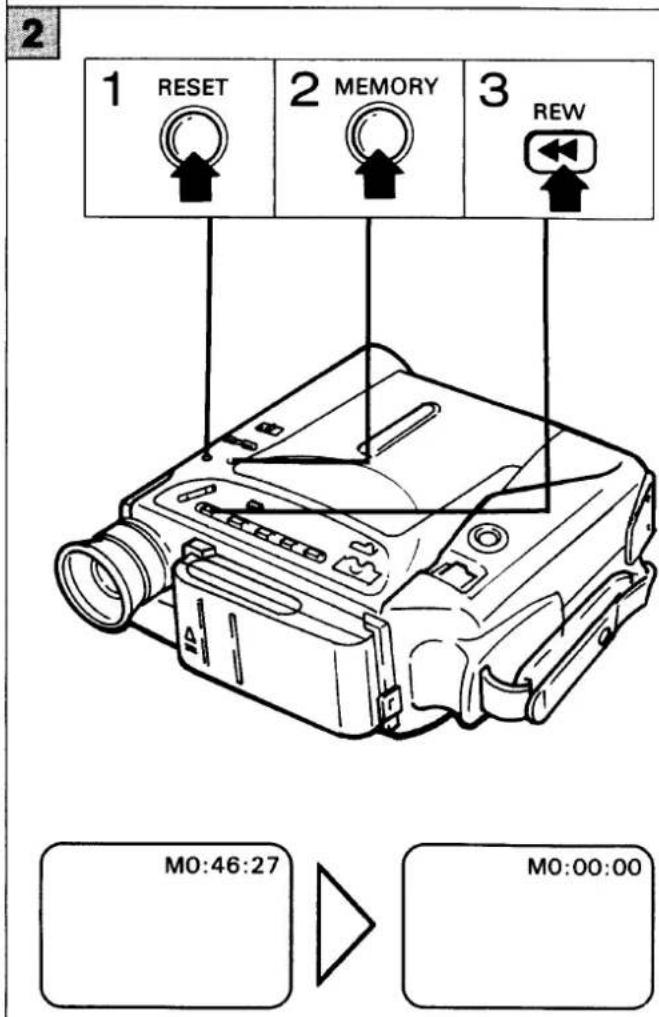
COUNTER MEMORY FUNCTION
2
Using this function you can automatically rewind the tape to the exact position where you have reset the timer.
- Reset the counter when you are recording or playing back a scene you want to see later.
- Press the MEMORY button. The counter memorizes the tape position you have reset. The letter "M" will appear in the viewfinder. To cancel the memory mode, press the MEMORY button again.
- Press the REW button after you are finished recording (or playback). The tape will rewind and automatically stop in the vicinity of the "0:00:00" counter reading. If the counter shows a minus value, press the FF button.
Notes :
● In LP mode, the counter will indicate every two (2) seconds.
● There may be a small discrepancy between the counter reading and the actual tape running time.
● The counter will indicate a minus reading when the tape is rewound beyond 0 : 00 : 00 reading.
1
2
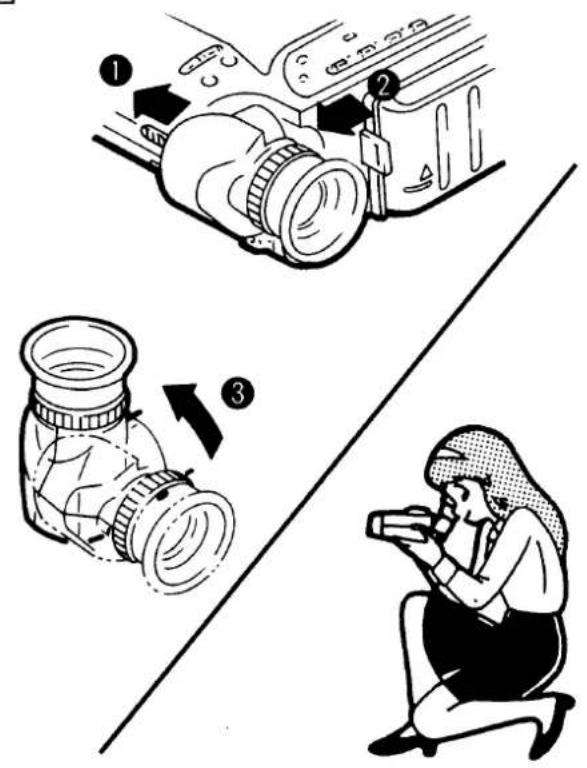
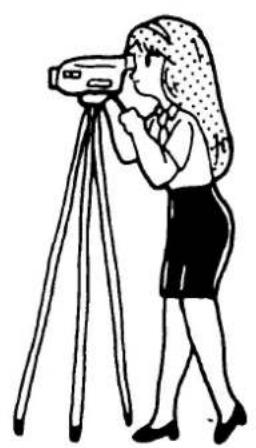
HOLDING THE CAMERA
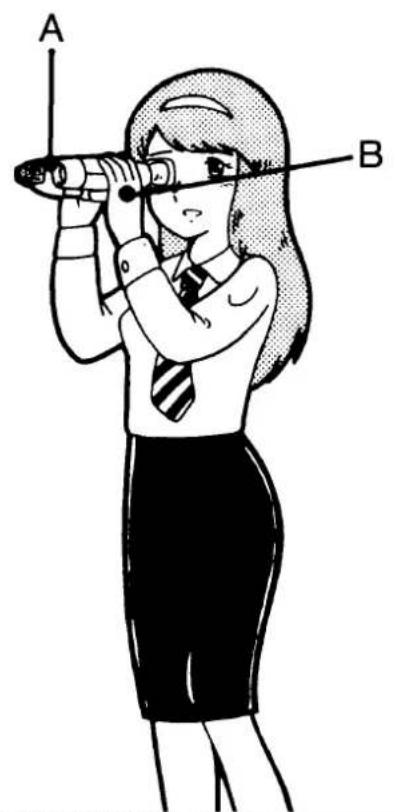
HOLDING
1
A : Hold horizontally
B: Let your left hand free so that you can handle operation buttons by left hand.
LOW ANGLE
2
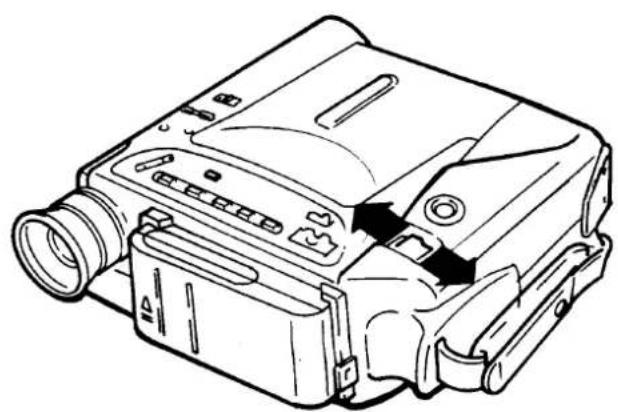
- Slide the viewfinder lever.
- Pull up the eyepiece of the viewfinder completely.
- Adjust it to the desired angle.
TRIPOD
3
A: Stopper hole
B : Tripod mounting hole
Align the tripod mounting hole and the stopper hole of this unit with the tripod mounting screw and stopper. Tighten the mounting screw securely.
3
natural_image
Illustration of a person using a surveying instrument on a tripod (no text or symbols)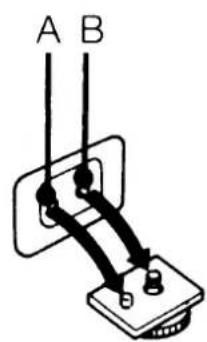
CAMERA RECORDING
1
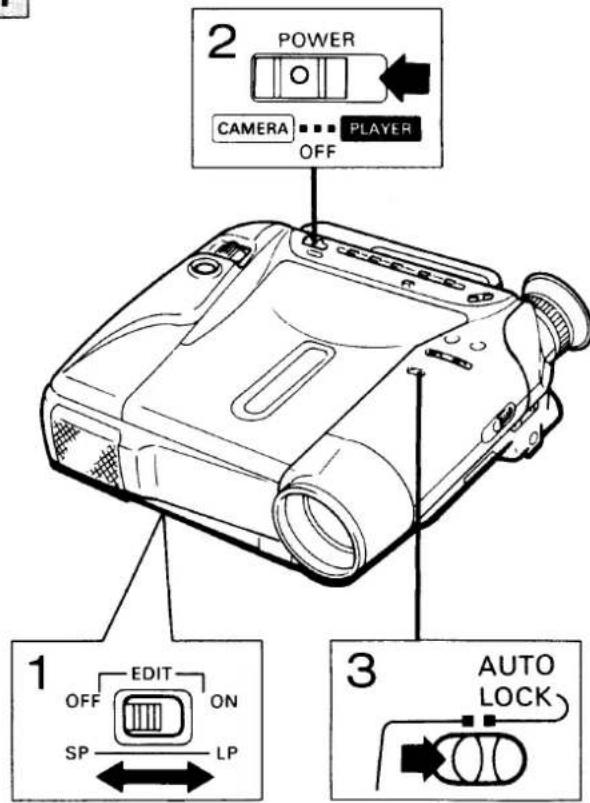
1
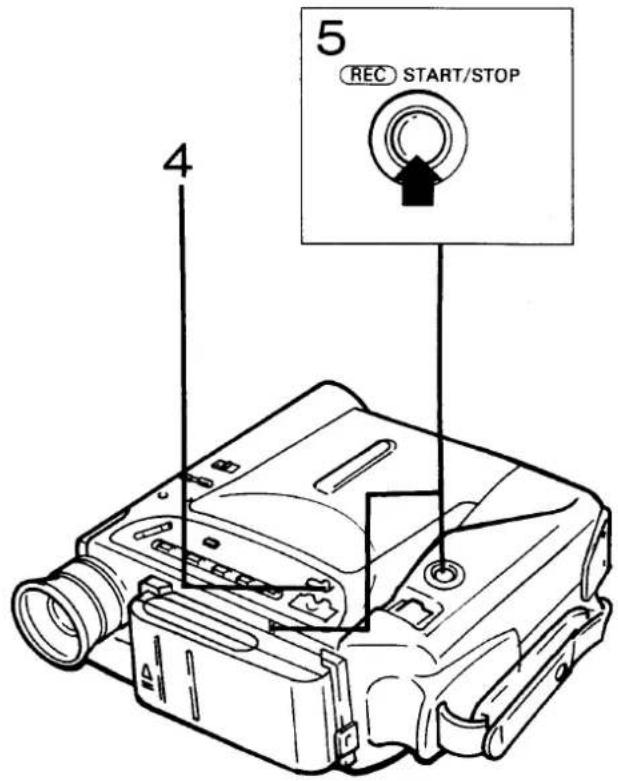
- Set the REC MODE/EDIT switch to the SP or LP position.
- By pressing the button at the center of POWER switch, set it for CAMERA. Then VTR system will not work even if buttons for VTR system are pressed by mistake.
- Set the AUTO LOCK switch to the AUTO LOCK position. (See page 16)
- Insert a cassette. (See page 9) The camcorder enters the recording pause mode.
- a) Press the REC START/STOP button once. The REC/PAUSE lamp stops blinking, and recording begins.
b) Press the REC START/STOP button a second time. The REC PAUSE mode begins, and the REC/PAUSE lamp blinks.
c) Repeat steps a) and b) to continue recording.
d) After recording, eject the cassette and set the POWER switch to the "OFF" position.
Energy-saving function of battery pack
- If recording pause mode lasts for more than five minutes, power will be shut off automatically. To start camera recording again, press REC START/STOP button.(Recording pause mode will be set.)
- With stop mode lasting for more than five minutes, power will be shut off automatically. So to turn the power on again, set the POWER switch to OFF and then to PLAYER.
Notes :
- Vertical stripes may appear if recording is attempted under candle light or in other conditions where the light is dim. This is not an indication of a malfunction.
- When fluorescent lamps or mercury-vapor lamps are used for lighting, the recorded images may flicker.
- If recording pause mode lasts for more than five minutes while AC adaptor in use, recording stop mode will be set automatically. To start camara recording again, press REC START/STOP button. Then recording will start soon.

natural_image
Blank white image with no visible content, text, or symbolsAUTO LOCK
Set the AUTO LOCK switch to the AUTO LOCK position. The camcorder will then automatically be set for these functions.
Focus : automatic (see page 26)
Title insert : off (see page 21)
High speed shutter : normal (see page 23)
When the DRIVE button is pressed, only the on/off operation for titles is possible.
When readjusting the title picture memory, colour, or the speed of the high speed shutter, set the AUTO LOCK switch to TITLE/SHUTTER. It will then return to the original setting.
RECORDING REVIEW
1
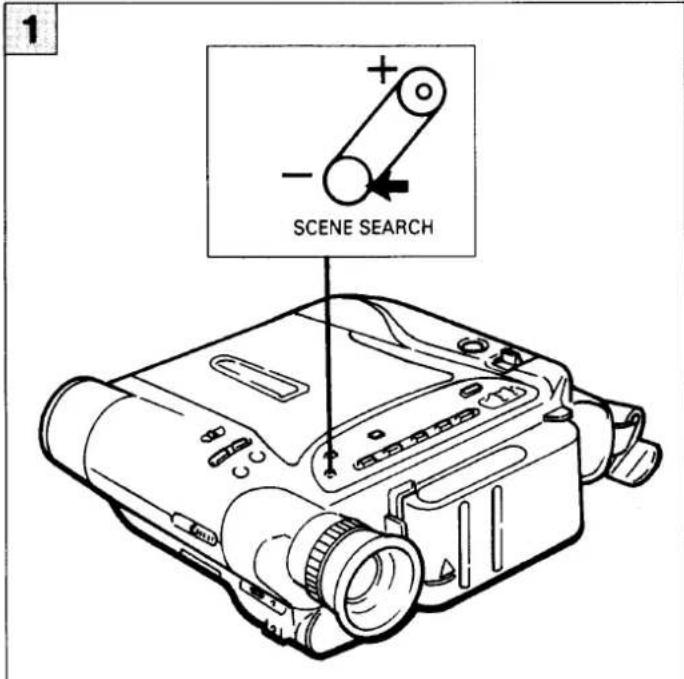
Press the SCENE SEARCH (−) button during the recording pause mode immediately after recording. The last 2 seconds of the recording will be played back in the viewfinder. The unit will re-enter the recording pause mode after the recording review.
Note :
- Do not keep pressing SCENE SEARCH (−) button, or scene search picture will be given.
FF/REWIND
2
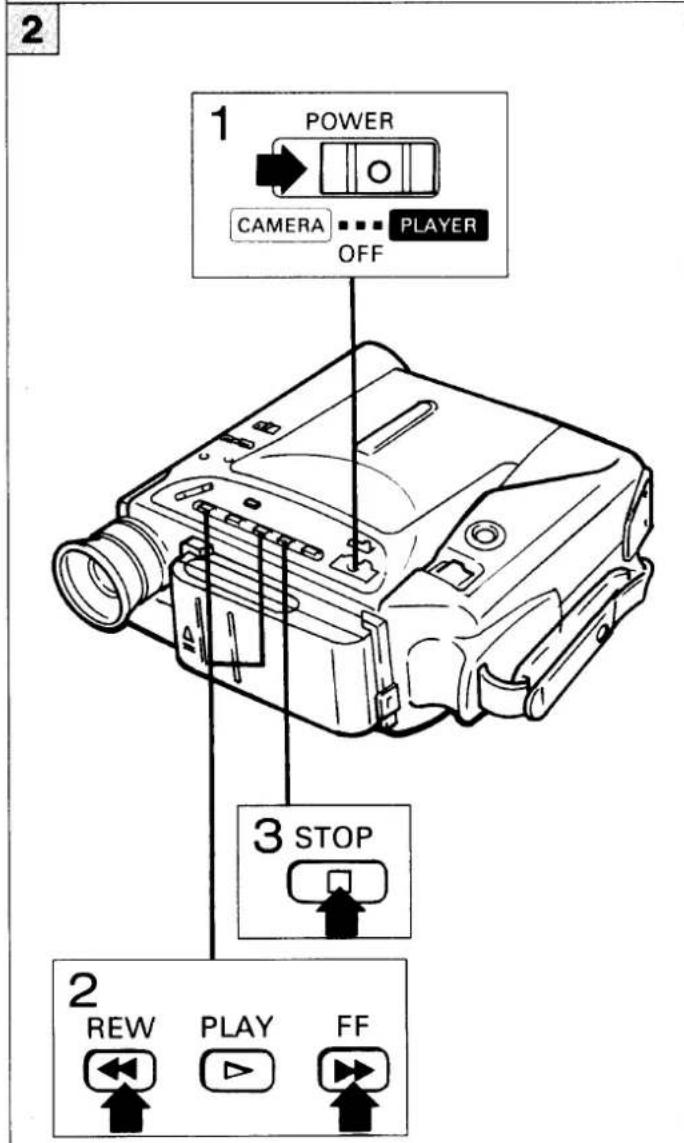
- By pressing the button at the center of POWER switch, set it for PLAYER. Then operation button of video system will work, and the power for camera system will be shut off so as to save energy.
- Press the FF button or REW button.
- To stop the tape, press the STOP button.
PLAYBACK
The tape recorded by this camcorder can be viewed on a TV screen, or in the viewfinder of this unit.
Connect the unit to TV according to the steps shown in "CONNECTION".
1
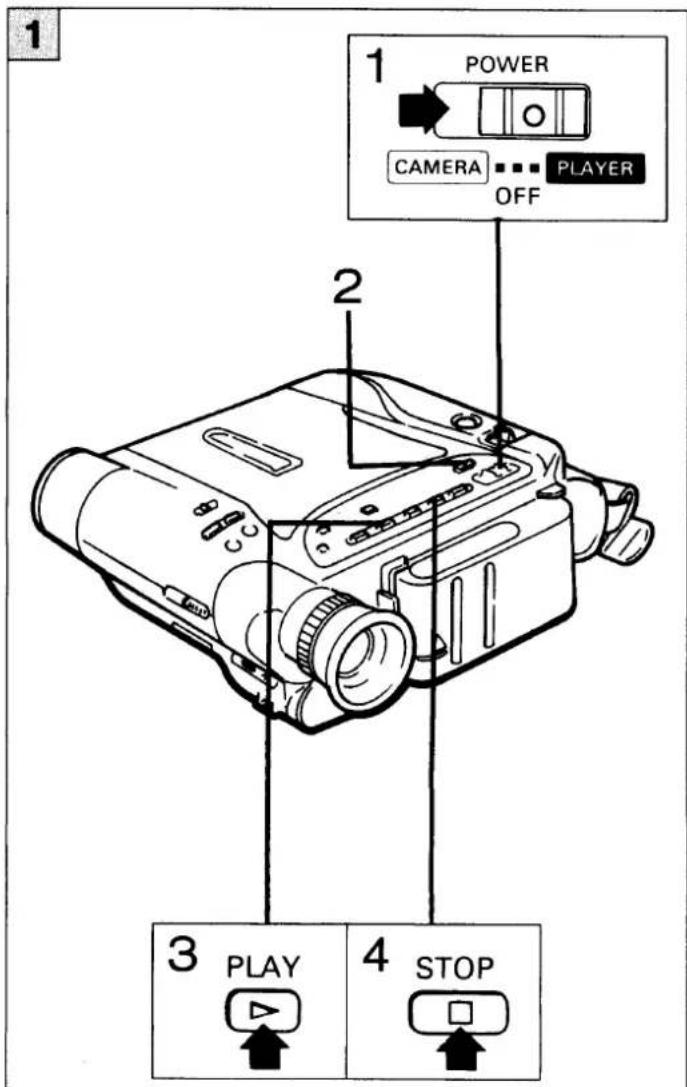
- By pressing the button in the center of POWER switch, set it for PLAYER.
- Insert a recorded cassette. (see page 9)
- Press the PLAY button.
Playback will begin.
- To stop the tape, press the STOP button.
EARPHONE
2
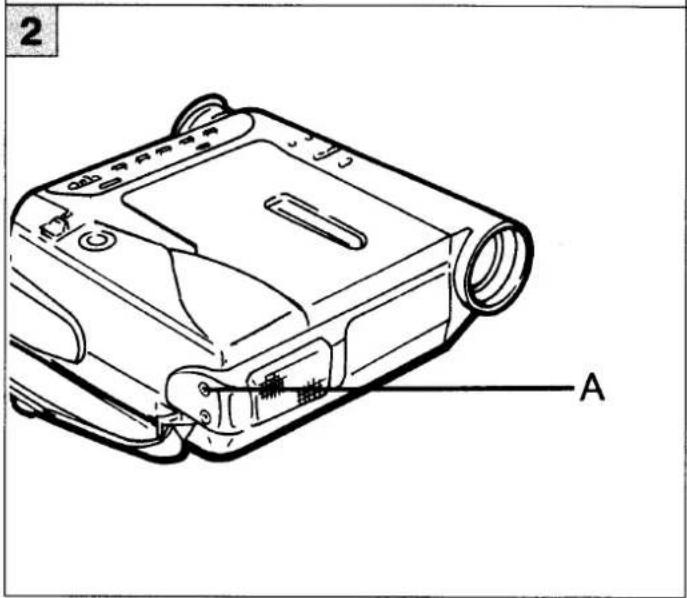
A : EARPHONE jack
To listen to the sound while playing back in the viewfinder, connect a commercially available earphone to the EARPHONE jack.
Notes :
●The quality of the reproduced scene recorded in LP mode will be slightly inferior to SP mode.
- If the tape recorded by this unit from the beginning is played back by an other 8 mm video recorder, the head part of the tape may be omitted due to mechanical difference.
SPECIAL PLAYBACK MODES
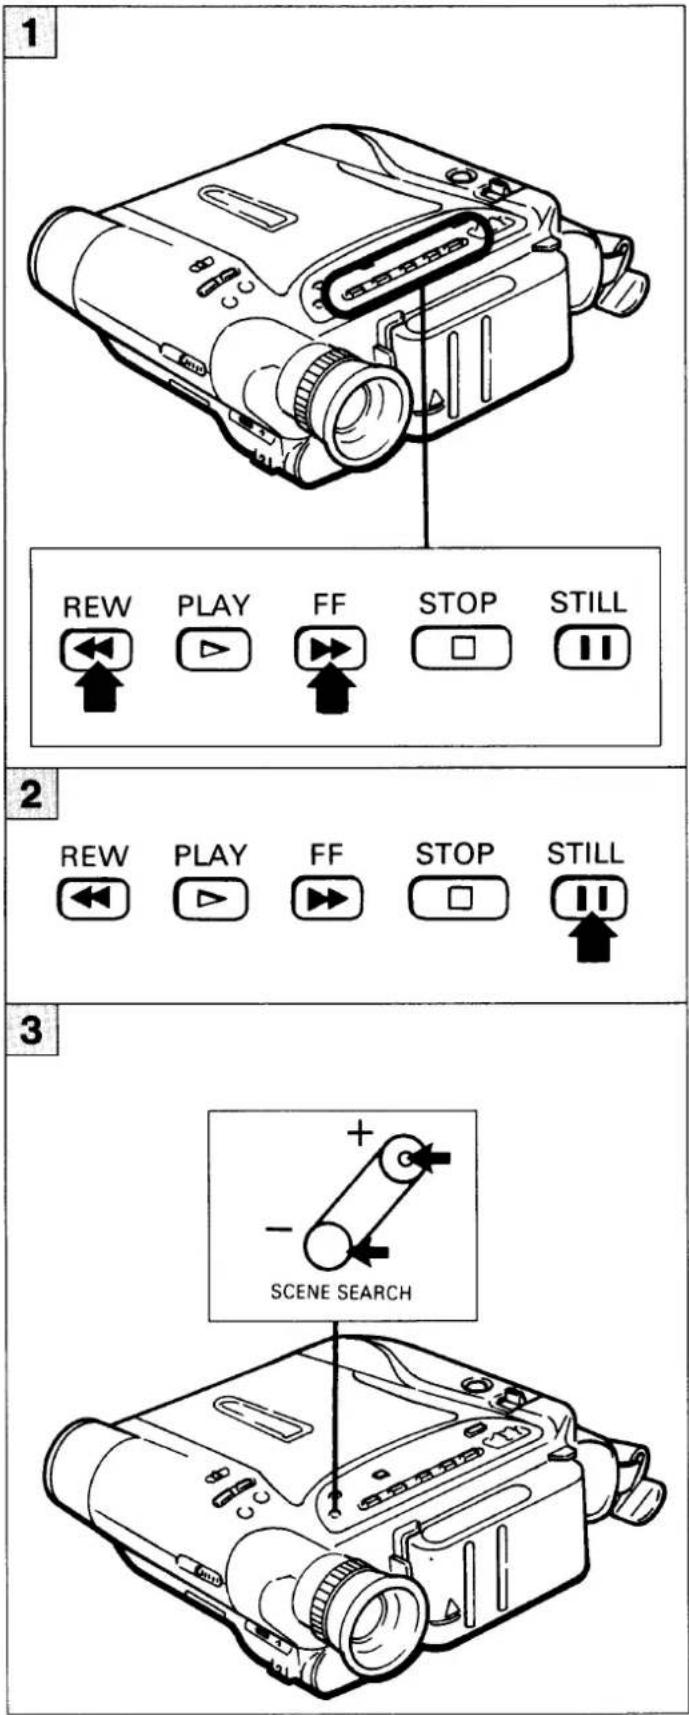
Picture search
1
Press and hold the FF or the REW button during playback or still playback. The tape will move quickly forward or reverse respectively until the FF or REW button is released.
● Note that horizontal lines appear in the picture during picture search.
Still playback
2
Press the STILL button during playback to view a still picture. To return to normal playback, press the STILL button or the PLAY button.
Notes :
- If the still mode continues for about 5 minutes, the unit will automatically switch to the stop mode.
●The image may sway vertically.
● Some noise may appear during still mode.
Scene search
3
Use this feature to locate a particular scene at normal playback speed. No sound is reproduced. Press and hold the SCENE SEARCH button ("+" or "-" during recording pause or still playback.
Press "+" button ... Forward scene search starts at normal speed.
Press “−” button … Reverse scene search starts at normal speed
Release the button when the desired scene appears. The camcorder returns to the previous mode (recording pause or still playback).
● Some noise may appear during scene search mode.
1
2
natural_image
Line drawing of a mechanical device with no visible text or symbolsSMOOTH TRANSITION
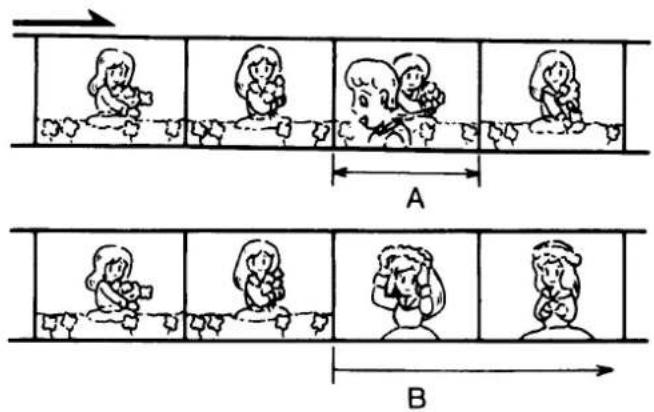
Using the scene search feature, starting a new recording from the exact beginning of an undesired scene is very easy. For example, you have stopped recording because somebody just passed in front of your camera. You can now locate the unwanted scene in the viewfinder with scene search while remaining in recording pause mode, and then start next recording from there.
A : Undesired scene
B : New recording
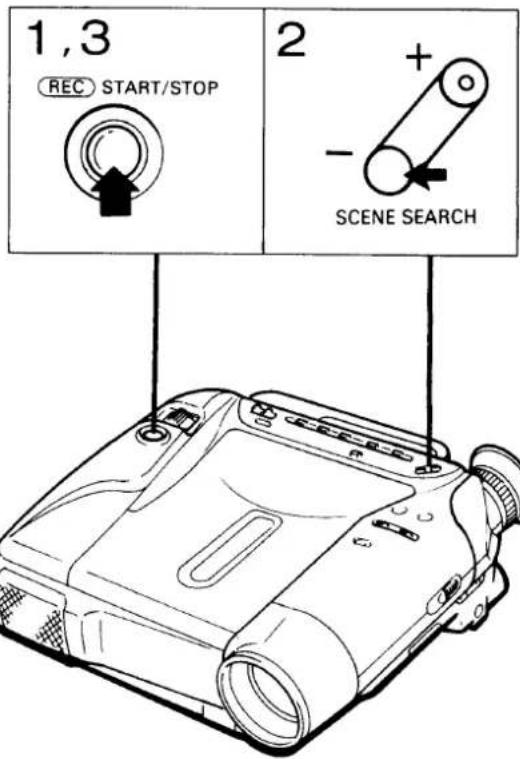
1
- Press the REC START/STOP button to enter the recording pause mode.
- Press and hold a SCENE SEARCH button ("+" or "-"), until the beginning of the unwanted scene is located in the viewfinder.
- Start recording by pressing the REC START/STOP button.
Note :
● During SCENE SEARCH in the chain-recording, noise may appear in the viewfinder irrespective of the playback direction, normal or reverse.
ZOOM
2
Electric zooming allows up to 8 times zooming.
Slide to the "W" side of the lever for wide angle recording, and slide to the "T" side for tele recording. Zooming speed is proportional to the pressure applied on the lever.
CALLING UP FUNCTIONS
flowchart
graph TD
    A["1 POWER"] --> B["2 AUTO LOCK"]
    B --> C["3 TITLE/SHUTTER"]
    C --> D["4 DRIVE"]
    style A fill:#f9f,stroke:#333
    style B fill:#ccf,stroke:#333
    style C fill:#cfc,stroke:#333
    style D fill:#fcc,stroke:#333
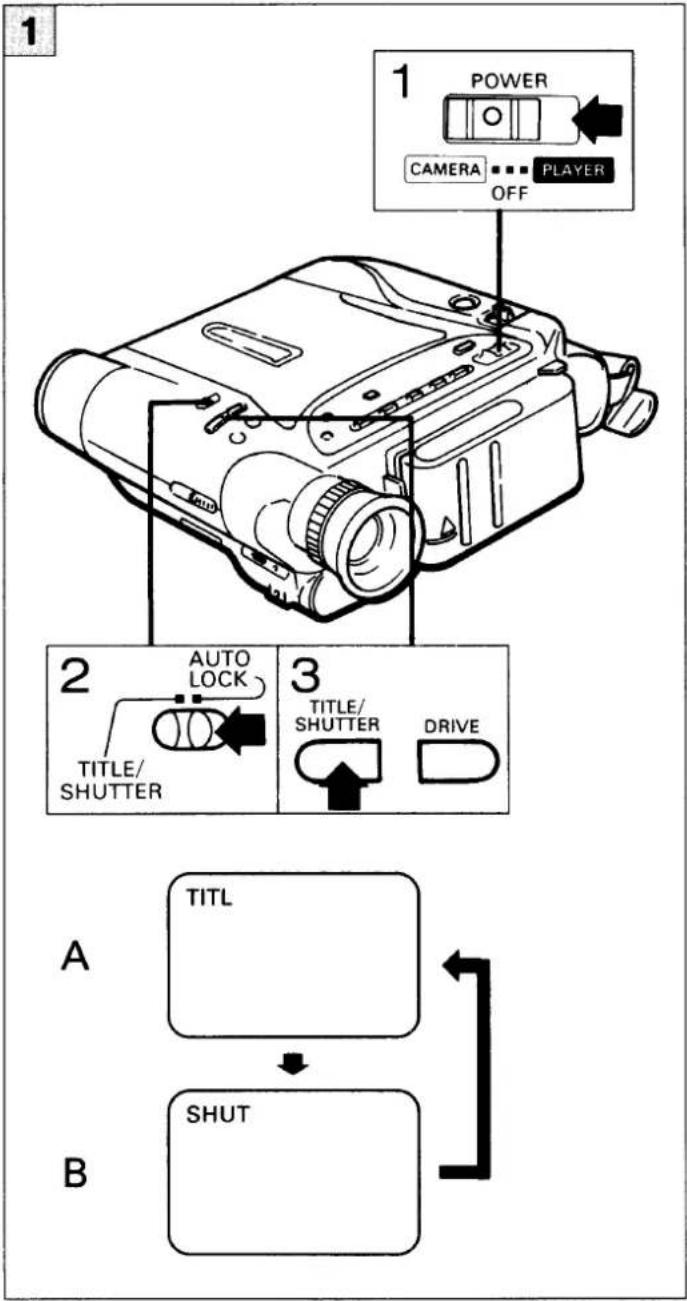
When you press the TITLE/SHUTTER button on the camcorder, the two inactive functions are called up. Pressing this button also changes the functions.
SELECTION OF FUNCTIONS
1
- Press the button at the center of the POWER switch to set it for CAMERA.
- Set the AUTO LOCK switch to the TITLE/SHUTTER position.
- Press the TITLE/SHUTTER button and select the desired function.
A : Title insert function
B : High speed shutter function
To return to normal shooting, set the AUTO LOCK switch to the AUTO LOCK position.(See page 16)

TITLE INSERT
(Digital Memory Superimpose)
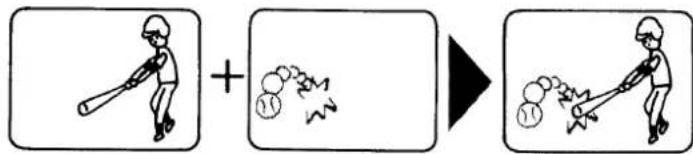
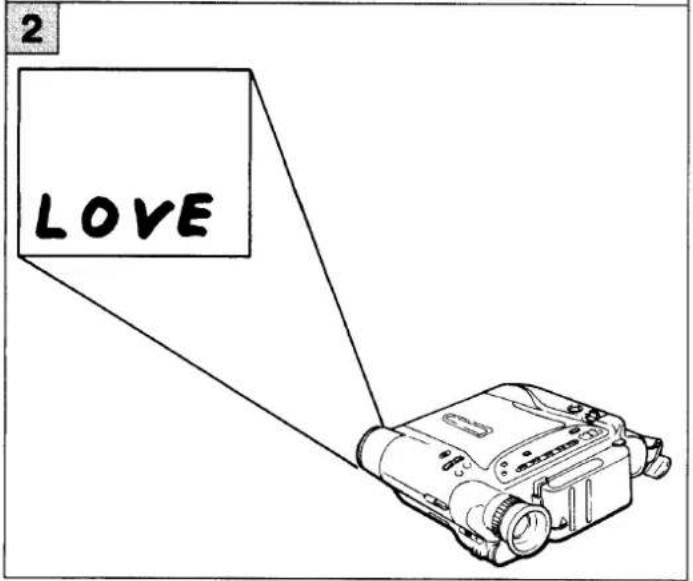
You can superimpose your hand-drawn title or an illustration over the picture while you record or play back. A title picture can be recorded in advance and stored in the digital memory. When you want to add the title while shooting or playing back. Just press the DRIVE button to recall the stored title. The title can be superimposed in one of eight colours.
1
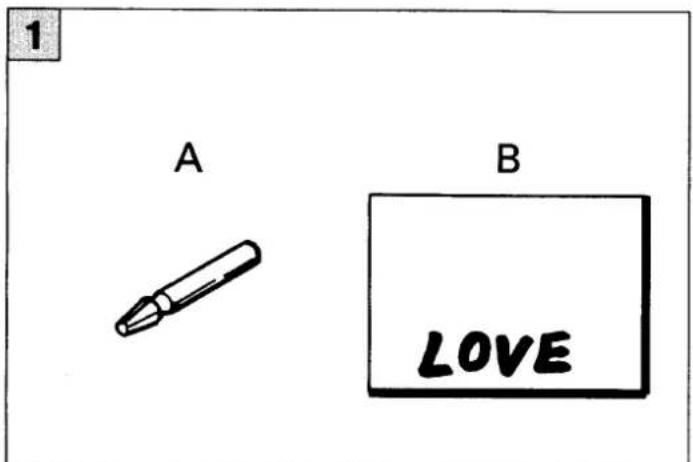
Draw a title or illustration by using :
A : Black felt tip pen
B: White card
● Make the design with clear outline, like the one drawn on white card with black felt tip pen.
● Draw the title clearly in bold strokes.
2
Record the title or illustration card under bright light.
Before going on to the next page of this instruction manual, please have a good look at the following chart of procedures.
- Select title insert function.
- Set to the title picture setting mode.
- Store the title picture in the memory.
- Choose a colour for the title picture.
- Select 'negative' or 'positive'.
- End the title picture setting mode.
- Insert the title picture.

1
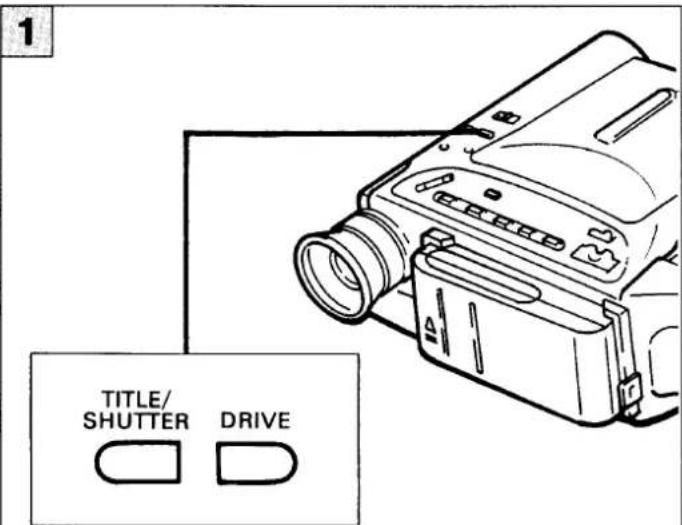
- Press the TITLE/SHUTTER button and select the title insert function.
- Keep pressing the TITLE/SHUTTER button for about one or two seconds.
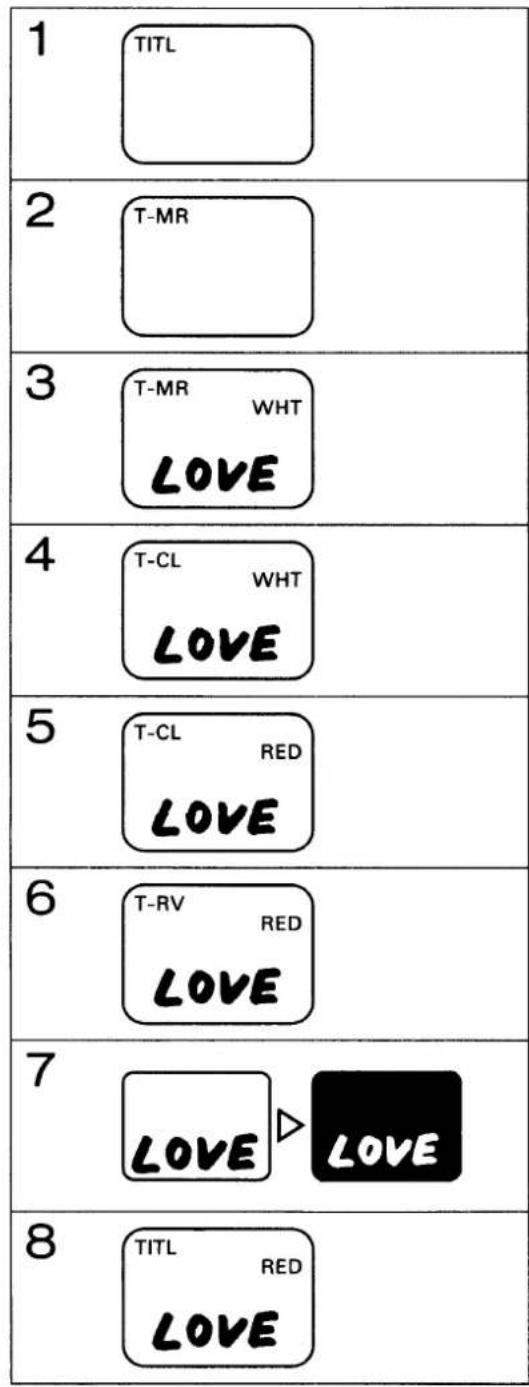
The display inside the viewfinder will change as follows: TITL → SHUT → T-MR
- Keep pressing the DRIVE button for about one second. The Memorized title picture will appear with colour indication.
The previously memorized picture will be erased each time a picture is memorized.
- Press the TITLE/SHUTTER button.
When the colour setting for the title picture comes up, the display inside the viewfinder changes from "T-MR" to "T-CL".
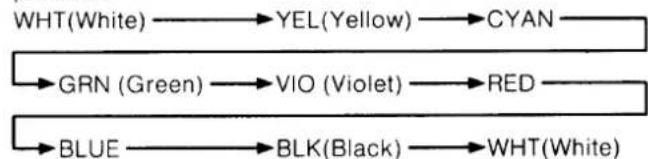
- Press the DRIVE button and select the desired colour. Colour indication will change each time the button is pressed.
flowchart
graph LR
    A["WHT(White)"] --> B["YEL(Yellow)"]
    B --> C["CYAN"]
    D["GRN (Green)"] --> E["VIO (Violet)"]
    E --> F["RED"]
    G["BLUE"] --> H["BLK(Black)"]
    H --> I["WHT(White)"]
- Press the TITLE/SHUTTER button.
When the negative-positive selection for the title picture comes up, the display inside the viewfinder changes from "T-CL" to "T-RV".
- Press the DRIVE button and select either positive or negative.
- Press the TITLE/SHUTTER button.
The camcorder leaves the title insert mode, and the display inside the viewfinder returns from "T-RV" to "TITL".
-
Start recording.
-
To remove the title, press the DRIVE button.
To put title again, press the same button.
When editing on another video recorder, it is also possible to insert the title in the same manner as during recording by pressing DRIVE button at any time.
Notes :
- When pressing the TITLE/SHUTTER button quickly, the display in the viewfinder will change as

For the title memory, press for one-two second.
● The lithium battery keeps memorized picture even after power switch is turned off.
- Inserting a title in still playback mode may shear off the top portion of the title picture.
● The title picture can be more clearly memorized as the intensity of the light is increased.
1
1
TITLE/
SHUTTER

SHUT
2
DRIVE

SHUT
1000
2
A

natural_image
Simple line drawing of a person playing golf, no text or symbols presentB

natural_image
Simple line drawing of a person playing golf, no text or symbols presentHIGH SPEED SHUTTER
Use high speed shutter to shoot fast-moving objects such as a golf or tennis player. The picture recorded with high speed shutter can produce the image without blurring in the still playback mode.
1
- Press the TITLE/SHUTTER button and select the high speed shutter function.
- Press the DRIVE button and select a desired shutter speed. The shutter speed indication will appear and change each time the button is pressed.
$$ 6 0 \rightarrow 1 0 0 0 \rightarrow 2 0 0 0 \rightarrow \text { No indication. } $$
$$ (1 / 6 0) \quad (1 / 1 0 0 0) \quad (1 / 2 0 0 0) \quad (1 / 5 0) $$
-
Start recording
-
To return to normal shutter speed, press the DRIVE button and make the shutter speed indication disappear.
Flickering may occur during indoor recording if fluorescent lamp is used. Set the shutter speed to 1/60 sec. for reducing the effect.
2
Still playback
A: Without high speed shutter.
● The picture is blurred.
B: With high speed shutter.
●The picture is clear without blurs.
● There may be picture noise during still playback.
Notes :
- If the high speed shutter is used for shooting in locations with low illumination such as indoors, the screen will be dimmer than usual. Shoot in a bright location such as outdoors on a clear day.
- Use the high speed shutter effectively. During normal playback, movement in pictures shot with the high speed shutter will not appear smooth.
1
natural_image
Line drawing of a portable projector with control panel and display (no text or symbols)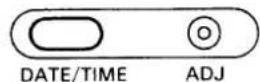
1
2
3
4
5
6
DATE/TIME IMPRINT
The date/time of the recording can be imprinted in your recording.
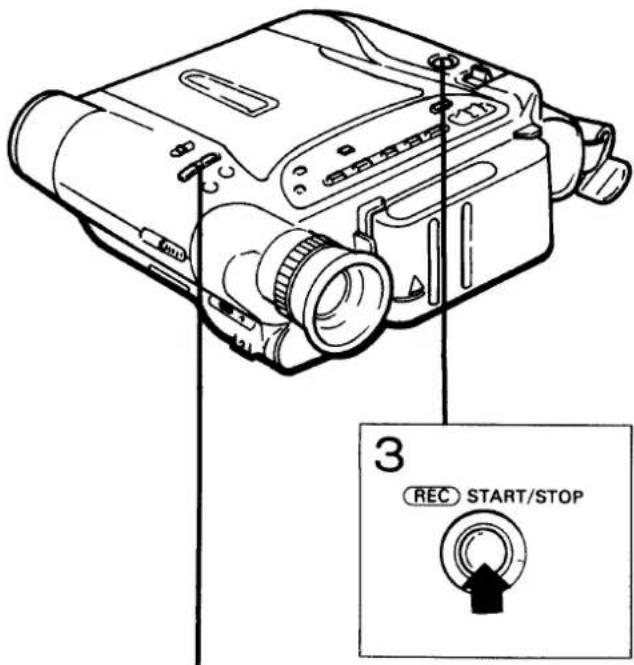
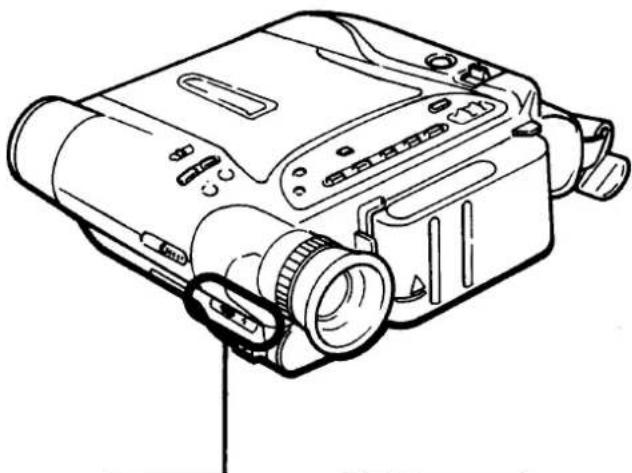
SETTING THE DATE/TIME
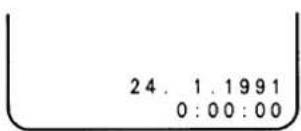
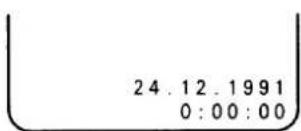
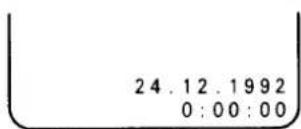
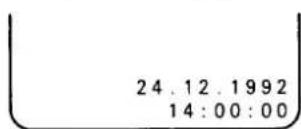
1
Example : 14 : 10 December 24, 1992
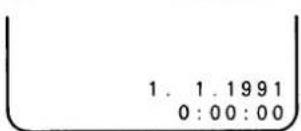
- Press and hold down the ADJ button for about one second. The date indication will appear in the viewfinder.
- Press and hold down the DATE/TIME button until the day indication approaches the desired one. Release the button, then press it repeatedly to slowly change the day indication (e.g. set to "24").
- Press and release the ADJ button, then press the DATE/TIME button to set the month indication (e.g. set to "12").
- Press and release the ADJ button, then press the DATE/TIME button to set the year indication (e.g. set to "1992").
- Press and release the ADJ button, then press the DATE/TIME button to set the hour indication (e.g. set to "14").
- Press and release the ADJ button, then press the DATE/TIME button to set the minutes indication (e.g. set to "10").
- Press and release the ADJ button. Then, the date/time adjustment is complete.
Note :
● The date/time cannot be set during recording.
flowchart
graph TD
    A["Device"] -->|DATE/TIME| B["Date/Time"]
    B --> C["24.12.1992"]
    C --> D["14:10:00"]
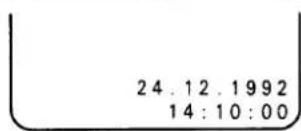
    D --> E["24.12.1992\n14:10:00"]


DATE/TIME IMPRINT
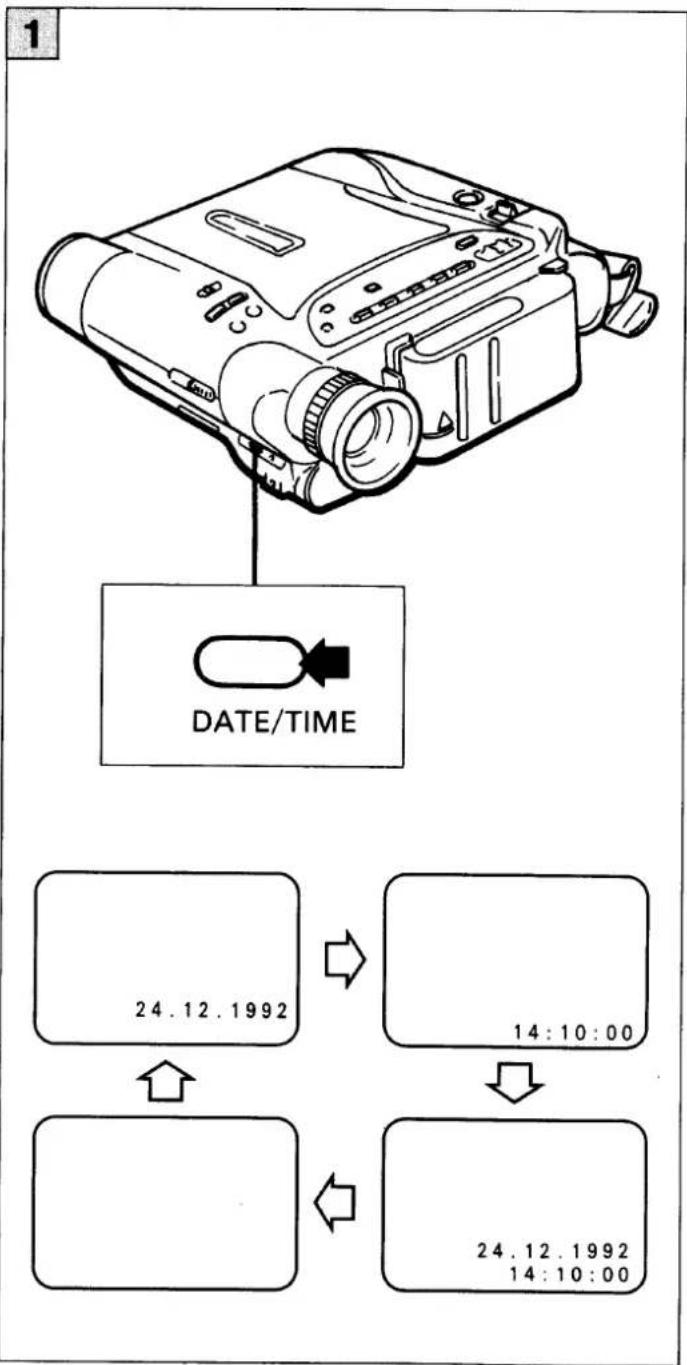
Press the DATE/TIME button and select the desired indication.
The displayed messages will appear in this order :
date → time → date and time → no indication
Important Note :
If "88:88" flashes when the DATE/TIME button is pressed, it is because either that date has been erased due to exhaustion of the lithium battery or that the date has not yet been set. Replace the lithium battery if this is the source of the problem, and set the date.
Note :
● During playback, no date/time indication appear in the viewfinder.
FOCUSING
AUTO FOCUSING
At a distance of more than 1.1 m from the subject, the auto focus will not be affected by the zoom. For closer distances, set the zoom to the wide-angle position. The auto focus will function even as close as 1 cm, if the zoom has been set to a full wide-angle position.
1
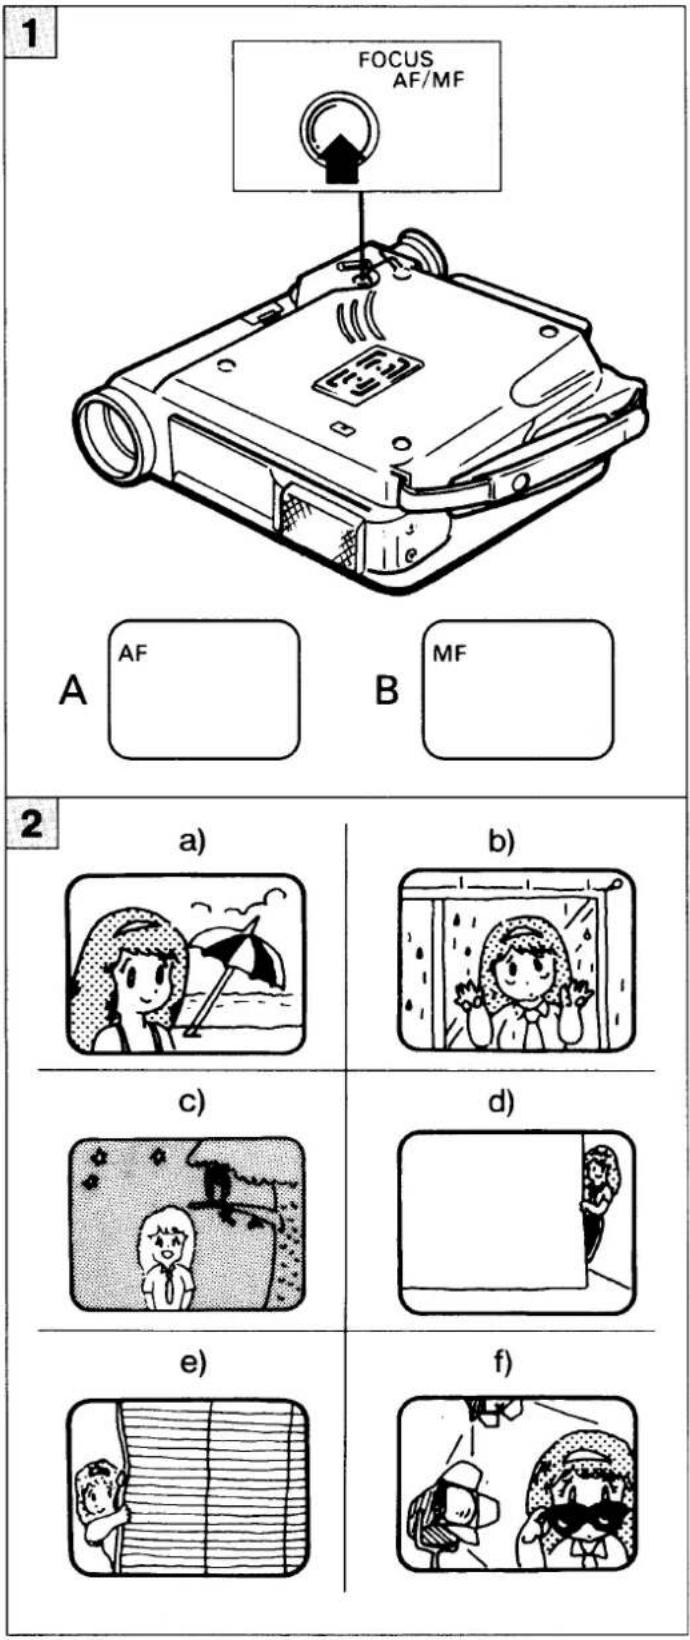
By pressing the FOCUS button, set the focus mode display inside the viewfinder to "AF" to activate the auto-focus function. In the case of manual focus, "MF" will be displayed.
A : Auto
B : Manual
2
The auto-focus feature will not operate normally in the following circumstances. Use the manual focusing.
a) The camecorder cannot focus on a nearby subject and a distant subject at the same time.
b) When shooting a subject through glass which has something visible on it (e.g. dirt, water drops, etc.), the auto-focus will focus on the objects on the glass, instead of the desired subject.
c) When shooting a dark subject.
d) When shooting subjects which have no contrast such as a white wall, sky, etc.
e) When shooting a subject which has lateral stripes.
f) When shooting an extremely bright subject.
Notes :
- If a special filter is used (for vari-cross, mirages, etc.), the automatic focus feature may not function normally. Manual focusing is recommended.
- Focus manually when shooting fast-moving subjects or moving the camcorder (rapid panning, tilting, etc.), or when objects are passing between the camcorder and the subject being recorded.
1
2
A
B
natural_image
Technical line drawing of a mechanical component with no visible text or symbols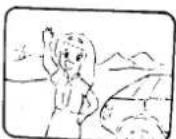
MANUAL FOCUSING
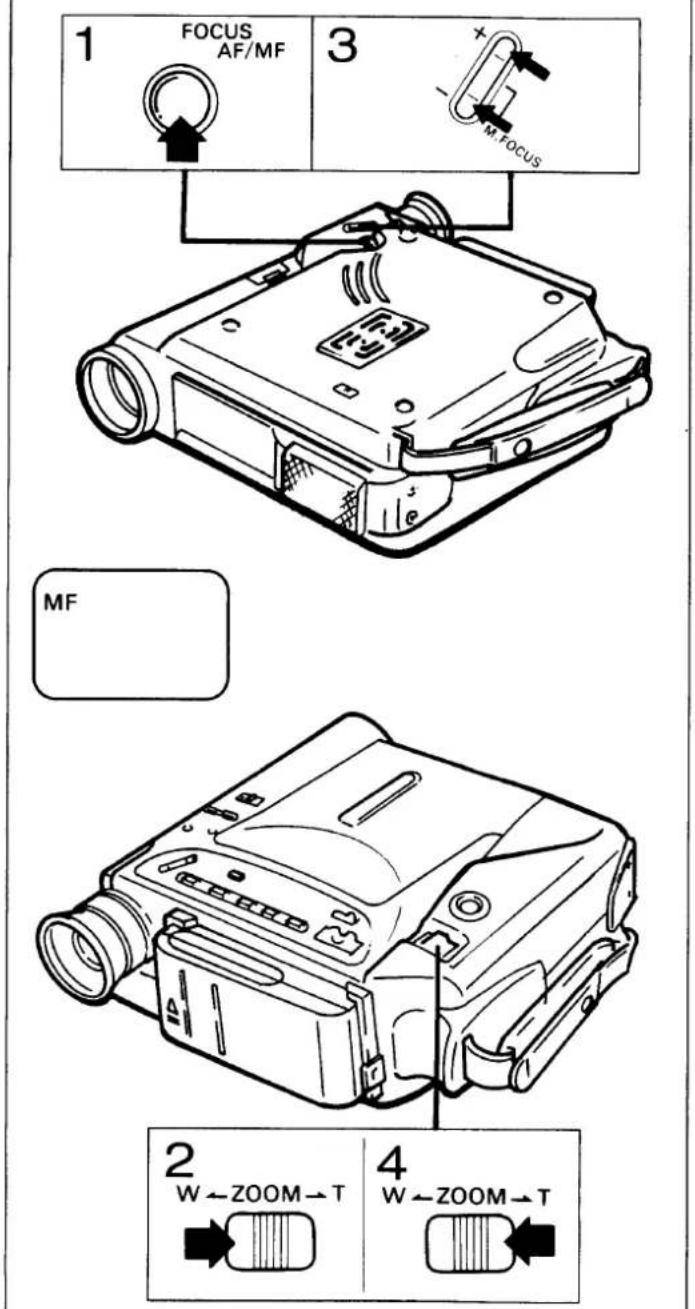
1
- Set the manual focus mode by pressing the FOCUS button so that the focus mode display changes to "MF".
- Slide the ZOOM lever to the 'T' side to bring the subject as close as possible.
- Adjust the focus by pressing the M.FOCUS button.
- Slide the ZOOM lever to the 'W' side and adjust the size of the subject to your liking.
Note :
- When using the manual focus for the zoom feature, adjust the focus at the telephoto (close-up) position, return to the wide-angle (distant) position, then zoom to the telephoto position while recording. The focus will be blurred at the telephoto position if it is set at the wide-angle position.
AUTO IRIS
2
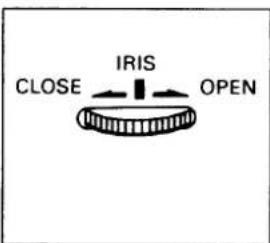
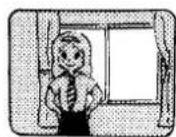
The AUTO IRIS is operated for most illuminative conditions by setting the iris controlling volume at the center. For shooting to or against intense light, control the iris adjusting volume to introduce appropriate light to clear scene. Under usual light conditions, set the iris adjusting volume at the center.
A : Back light … to OPEN side.
B : High light … to CLOSE side.
1
natural_image
Illustration of a person using a phone to listen, with a separate illustration of a vintage desktop computer (no text or symbols present)2
natural_image
Illustration of a child and a woman reacting to a device, showing motion with arrows (no text or symbols)3
natural_image
Cartoon illustration of a bird singing into a microphone above a rock, with musical notes falling out (no text or symbols)MICROPHONE
1
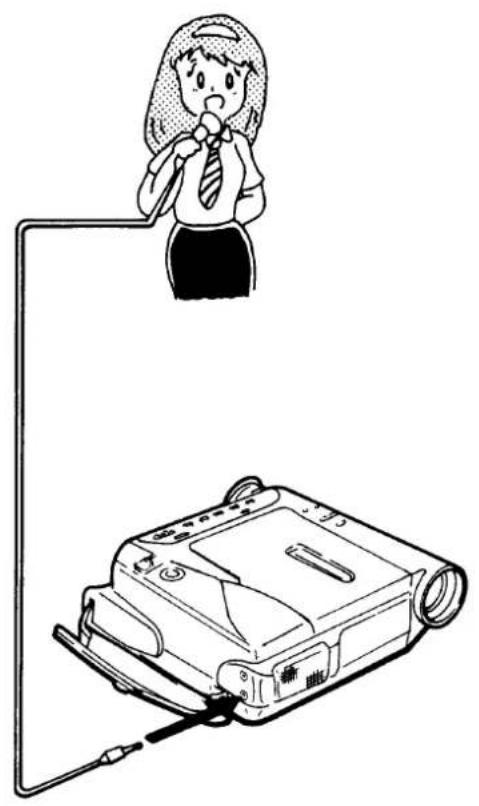
The built-in omnidirectional microphone is more or less evenly receptive to sound coming at it from all directions.
This makes the recorded sound heard natural when playing back. A little distant sound can be effectively recorded by using an available microphone.
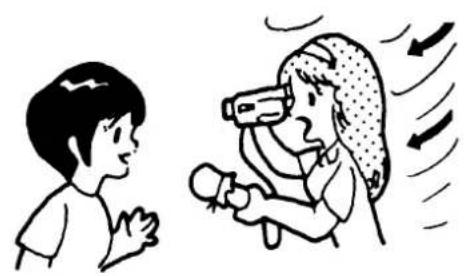
RECORDING IN A HIGH WIND
2
A popping sound will be produced. Use a handkerchief and wrap an external microphone head with it to shield the wind.
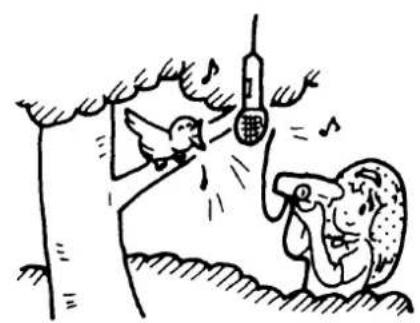
RECORDING DISTANT OBJECT
3
Place an external microphone close to the subject to get a clear sound.
Note :
●The built-in microphone will not function while an external microphone is connected.
1
CONNECTIONS
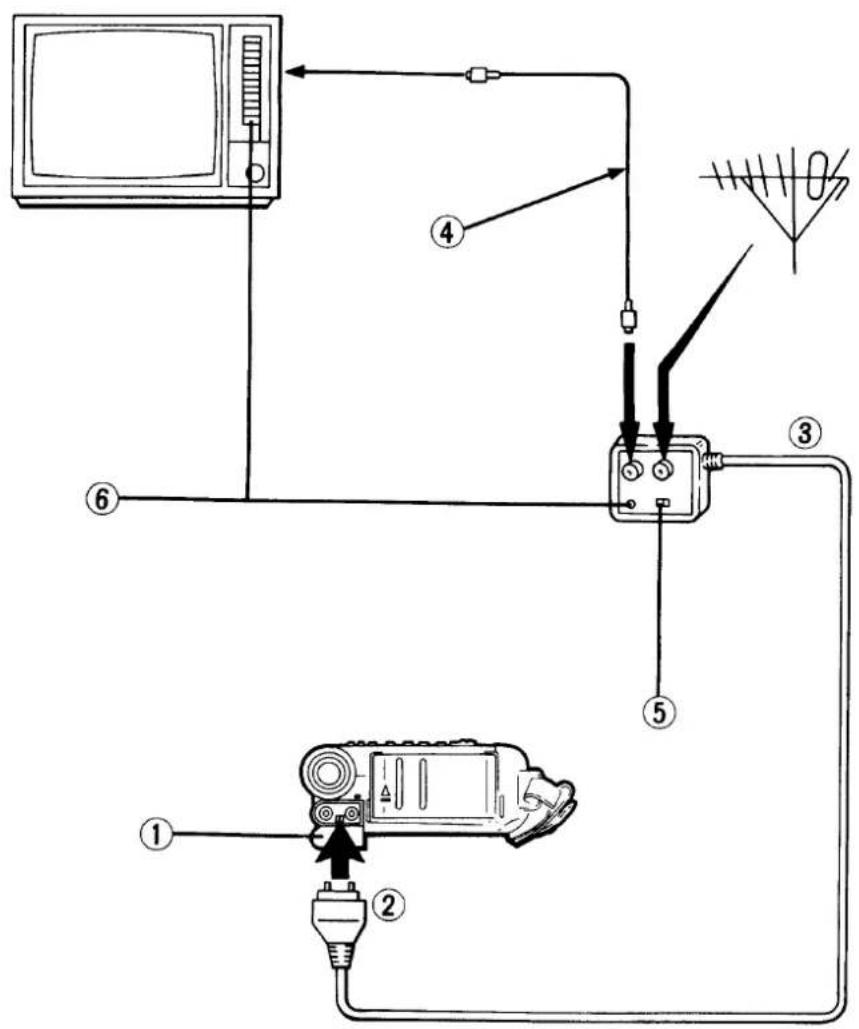
FOR TV'S WITHOUT AUDIO/VIDEO INPUT JACKS
1
① Open the AV jack cover.
② Insert the RF adaptor VRF-550 connecting terminal.
③ Remove the antenna connected to the TV unit, then connect it to the ANT IN terminal on RF adaptor.
④ Connect the ANT OUT terminal on RF adaptor to the TV unit through the coaxial cable.
⑤ Set the RF adaptor I/G selector to the proper position.
⑥ Adjust the RF CHANNEL screw of the RF adaptor and the TV's channel to the unused channel on which there are no TV broadcasts in your locality.
1
2
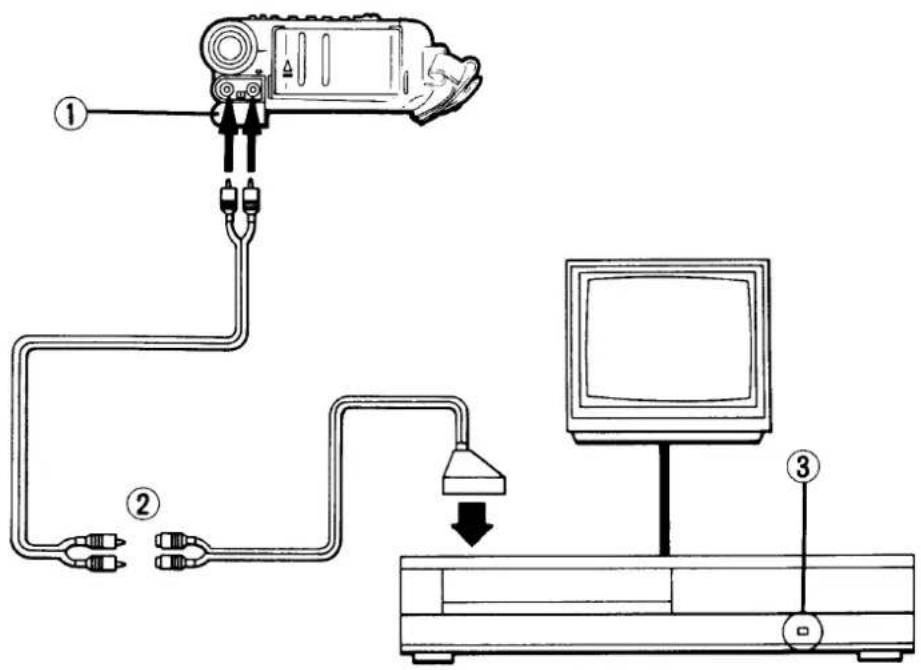
FOR USING A VCR IN YOUR HOME
1
① Open the AV jack cover.
② Connect the audio/video input terminals on the VCR to the camera with the AV scart adaptor VCE-212 (optional) and connection cord.
③ Set the input select switch on the VCR to "external source".
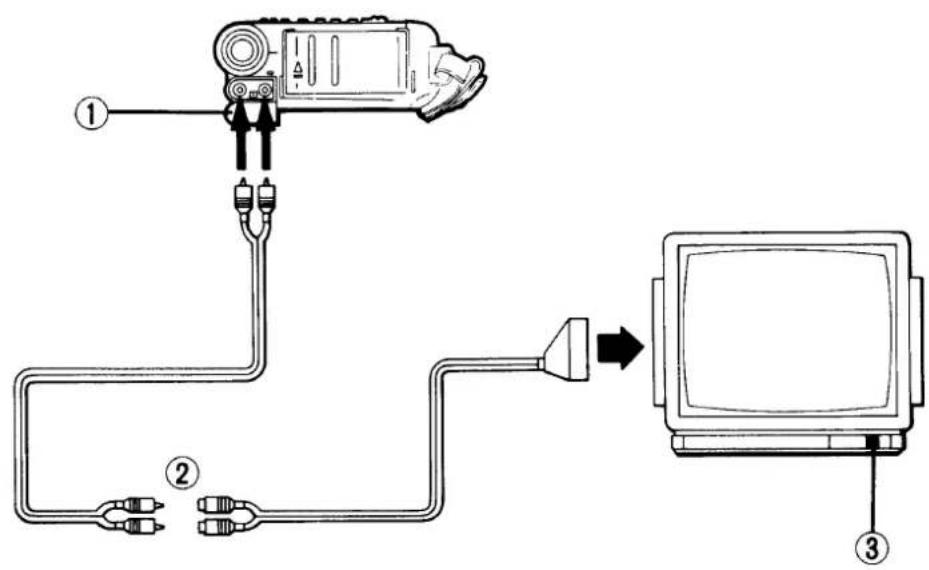
FOR TV'S WITH AUDIO/VIDEO INPUT TERMINAL
2
① Open the AV jack cover.
② Connect the audio/video input terminals on the TV unit to the camera with the AV scart adaptor VCE-212 (optional) and connection cord.
③ Set the TV/VIDEO select switch on the TV unit to "VIDEO".
1
TAPE COPY
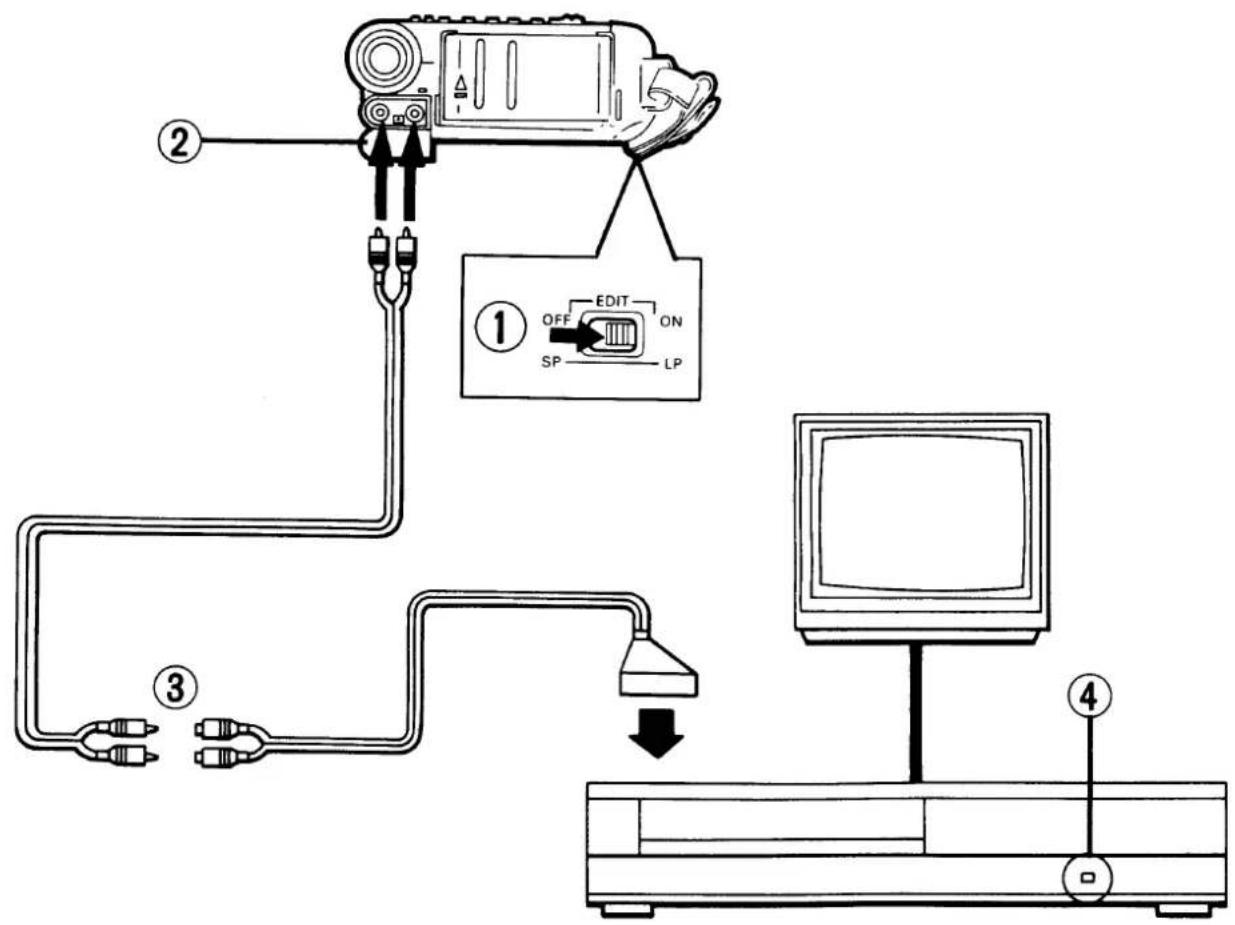
CONNECTION
1
① Set the REC MODE/EDIT switch of the unit to the ON position.
(It will prevent the deterioration of picture quality.)
② Open the AV jack cover.
③ Connect the unit to the audio/video input terminals of VCR with the AV scart adaptor VCE-212 (optional) and connection cord.
④ Set the input selector switch of VCR to the external source position.
In addition to the above-mentioned connections, you can use the included RF adaptor and coaxial cable. Simply connect the ANT OUT terminal of the RF adaptor to the ANT IN terminal of the VCR using the cable. This offers another way to copy tapes, but picture quality will suffer slightly.
OPERATION
- Set the POWER switch of the unit to PLAYER position, and then insert the original tape to be copied.
- Switch on VCR and insert a new tape for copying.
- Set the VCR to recording pause mode.
- Start playback on this unit.
- Release pause button on the VCR; copying starts.
- When tape copying is finished, set the REC MODE/EDIT switch to the OFF position.
Notes :
● The copying or dubbing of video tapes is permissible only insofar as copyright or other rights of third parties are not thereby infringed.
●The quality of pictures and sounds of the copy will be inferior than the original.
1
ON-SCREEN DATA
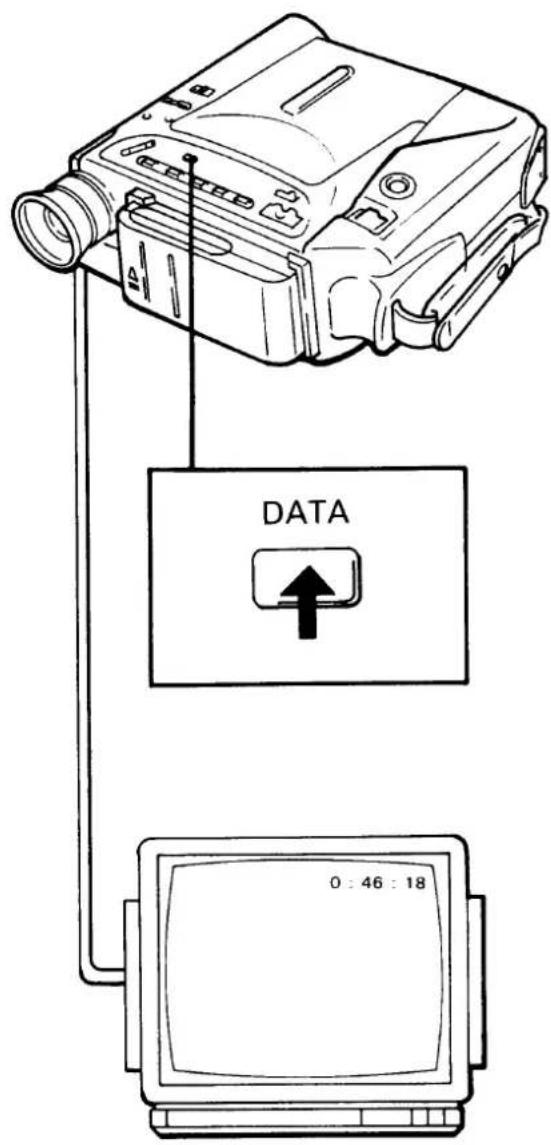
It is likewise possible to have the data inside the viewfinder displayed on the monitor.
If, for example, you would like to view a tape from counter position "0:46:18", the counter display will appear in the image on the monitor. This is a very convenient function for finding locations on a tape.
1
Make the necessary connections to the monitor etc. as described in "CONNECTIONS".
Press the DATA button.
The same display as in the viewfinder will then appear on the monitor.
For cancelling the monitor display, press DATA again.
IMPORTANT NOTES
1. Do not expose this unit to high temperatures.
Excessive heat may damage the unit.
- Do not place this unit near a heat source (heaters, etc.).
- Do not leave this unit in a closed car on warm or hot days.
2. Abnormal operation.
If you notice anything unusual (smoke, strange noise or odour, etc.), switch the unit off immediately. Consult the dealer where the unit was purchased, or contact a Sanyo-authorized service station.
3. Moisture and foreign objects.
- Do not allow moisture (rain, steam, dew, salt water, etc.) to enter the unit.
- Do not allow any foreign objects (sand, metal objects, flammable articles, etc.) to enter the unit.
- Do not place anything except tape cassettes in the unit.
4. Strong lights.
- Do not aim the camcorder directly at bright light sources.
- Do not place the unit near bright light sources, as heat damage may result.
- Do not point the eyepiece lens of the viewfinder directly at the sun.
5. Do not use this unit under the following conditions :
● In location with high humidity.
● In areas subject to high vibration.
● Where excessive dust or dirt is present.
● Near strong magnetic fields (e.g. near transmitting antennas, motors, fluorescent lights).
6. Do not use the unit for monitoring only.
If the unit is used to record the same subject for a long time, e.g. for special applications such as security monitoring, the picture quality will deteriorate.
7. Do not wrap the unit in a cloth etc.
If wrapped in a cloth during operation, the temperature inside the unit will rise excessively causing the unit to malfunction.
8. Be careful with foreign objects
Make sure that no foreign objects, such as pins or dirt particles, can enter the cassette holder.
MAINTENANCE
Video heads
When the video heads have been used for a long time, the playback picture may become fuzzy, and eventually there may be no picture at all.
This is caused by dirty video heads, and is an indication that they should be cleaned.
To clean the heads, Sanyo recommends that you have them cleaned by Sanyo-authorized personnel.
● Note that the video heads can be damaged if a cleaning tape cassette is used incorrectly.
Video heads wear in the same way as a turntable stylus.
If the picture is not clear even though the heads have been cleaned, it is possible that the heads themselves are worn. If so, they must be replaced.
For detailed information and assistance, please consult your dealer.
Inspect at 1000 hour intervals
This unit requires an extremely high degree of precision to record images from the video camera onto magnetic tape and then to correctly reproduce those images. In particular, the video heads and mechanical parts which handle the tape are especially liable to becoming dirty and worn after long use.
For continued trouble-free operation, Sanyo recommends that the unit be inspected (including cleaning, lubrication and possible replacement of some parts) after every 1000 hours of use (approximately).
For detailed information and assistance, please consult your dealer.
Viewfinder
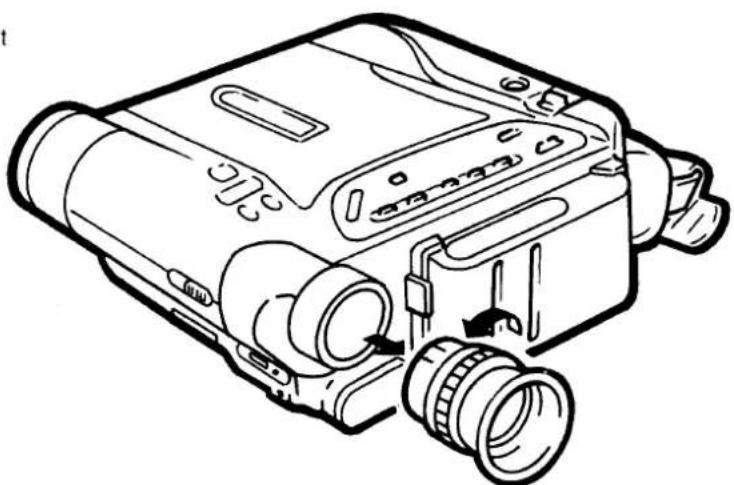
The miniature picture tube inside the viewfinder produces static electricity, which in turn may cause dust particles to cling to the monitor surface. These dust particles must be removed if image visibility is impaired.
natural_image
Line drawing of a digital camera with lens and control panel (no text or symbols)USE IN OTHER COUNTRIES
All you need for recording in a foreign country is a charged battery pack (s) and cassette (s). If you want to play back the tape in that country, you will have to use a TV which uses the PAL colour system and which has audio/video input terminals.
| Main countries using the PAL system : |
| England, Italy, Austria, Australia, Holland, Kuwait, Singapore, Switzerland, Sweden, Spain, Thailand, People's Republic of China, Denmark, New Zealand, Norway, Belgium, Portugal, Hong Kong |
| Main countries using the NTSC system |
| Canada, Japan, Korea, Mexico, the Philippines, Taiwan, U.S.A. |
| Main countries using the SECAM system : |
| Iran, Iraq, USSR, Hungary, France, Bulgaria, Poland, Monaco, Luxemburg |
If a malfunction should unexpectedly occur while in another country, contact the dealer where the unit was purchased.
TROUBLESHOOTING
First check the items below. If operation still seems abnormal, consult the dealer where the unit was purchased for assistance.
| Symptom | Probable cause |
| No power. | ●Battery pack is exhausted.●AC adaptor is turned off. |
| Nothing happens even with batteries attached. | ●Moisture exists. |
| Power is suddenly turned off during use. | ●Battery pack is exhausted.●Stop mode or pause mode is continued for 5 minutes or longer. |
| Can't record. | ●No cassette.●Cassette is set for erase prevention.●Tape has been wound to its end. |
| Can't focus. | ●The subject is difficult to focus. |
| No picture on the TV | ●Wrong connection. |
| Playback picture flickers or blurs. | ●Video heads are dirty. |
| Battery pack charge is exhausted too quickly. | ●Incompletely charged.●Used in cold environment. |
DEW CONDENSATION
1
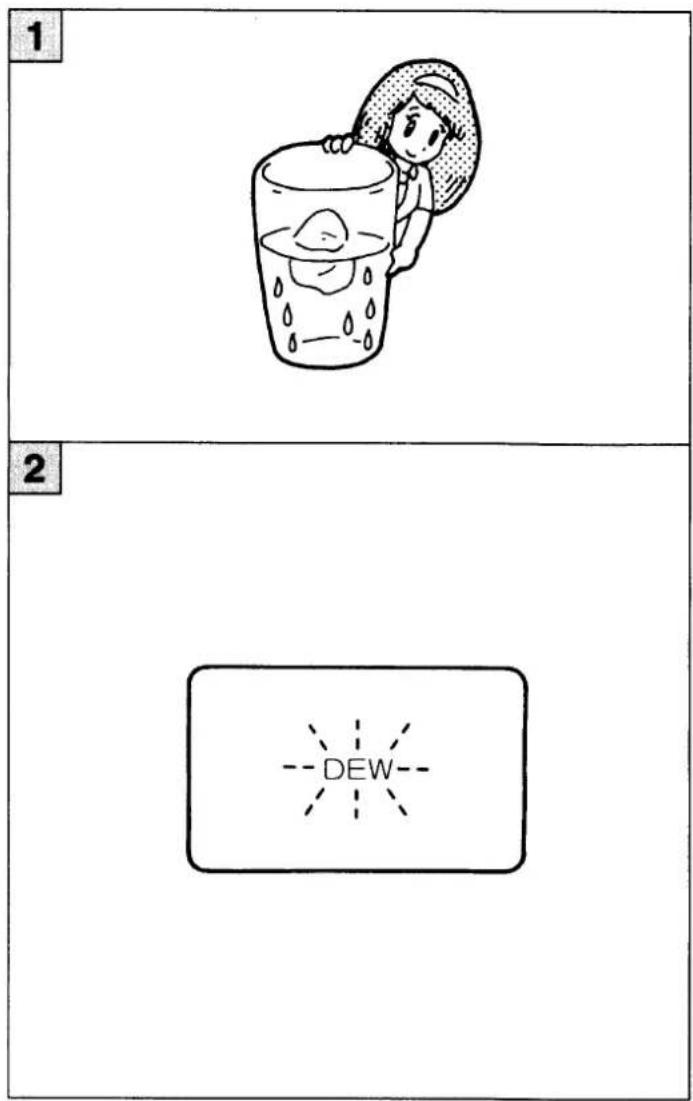
The same moisture which forms on windows on cold days can also appear within this unit under certain conditions. This is called condensation, or "DEW".
Special care must be taken if this occurs.
CONDENSATION ("DEW") INDICATION
2
Condensation inside the unit can, if the tape moves, damage the tape as well as internal parts of the camcorder.
To prevent this, this unit includes a special safety device.
When condensation occurs, the DEW symbol (flashing) will appear in the viewfinder, respectively. The unit will not accept commands even if the power is ON, for any operation except cassette ejection.
The cassette holder won't allow cassette insertion.
If condensation occurs
The DEW symbol will disappear when the moisture is no longer present.
The time required will depend on the surrounding temperature.
Note :
- It sometimes happens that the DEW symbol doesn't illuminate immediately, even though internal condensation is present. Do not use the unit for a short time if it has been subjected to a sudden change in temperature.
Moisture on a tape
Moisture can condense on a tape when the tape is moved from a cold place to a warm place. If a cassette with this problem is inserted, the CASSETTE indication will flash when one of the control buttons (PLAY button, etc.) is pressed, and only the EJECT lever will function. Note that the DEW symbol will not appear in this instance.
Take out the cassette and let it dry naturally.
SPECIFICATIONS
| Television system | PAL, CCIR |
| Video recording system | Rotating 2-head helical-scan FM, colour under system |
| Audio recording system | Rotating head FM system |
| Cassette type | 8 mm video tape cassette |
| Tape speed | SP : 20.051 mm/sec.LP : 10.025 mm/sec. |
| Recording/ playback time | 180 minutes (P5-90 cassette) |
| Fast forward/rewind time | Approx. 8 minutes(P5-90 cassette) |
| Pickup element | CCD solid-state type |
| Viewfinder | Electronic (0.6 inch type, black and white) |
| Lens | Electro-powered-8X zoom lensf = 7mm ~ 56mmF 1.8Automatic focusFilter diameter 37mm |
| White balance adjustment | Automatic |
| Minimum subject illumination | 5 lux |
| Subject illumination range | 5 lux ~ 100,000 lux |
| Power supply voltage | Battery holder input6V / 7.5V / 9V |
| Power consumption | 6.0 W during camera recording |
| Operation temperature range | 0°C ~ 40°C(32°F ~ 104°F) |
| Storage temperature range | -20°C ~ +60°C(-4°F ~ 140°F) |
| External dimensions(W × H × D) | 180mm × 69mm × 183mm |
| Weight (approximately)(not including battery pack and cassette) | 810 g |
| Microphone | Electret condenser type(Omnidirectional) |
| AUDIO/VIDEO terminal | Video output 1 Vp-p, 75Ω unbalanced, negative syncAudio output -6dBs, 2.2kΩ or less |
| Microphone jack | Mini jack, -66dBsFor low-impedance microphone |
| Earphone jack | Mini jack, for 8Ω earphone |
- Because its products are subject to continuous improvement, Sanyo reserves the right to modify product designs and specifications without notice and without incurring any obligation.
WARRANTY TO CUSTOMER
Sanyo Marubeni (UK) Ltd. (the Company) warrants to the initial retail purchaser that if this equipment is or becomes defective and that, in the opinion of the Company, the defect is due to faulty material or workmanship the Company will, for a period of 12 calendar months from the date of sale to the original purchaser repair or replace, at its sole option, free of charge, any such defective component part of the equipment, always provided that:-
- The equipment has at all times been used in accordance with the operating instructions issued by the Company, and has not been connected to an electrical mains supply for which it has not been adjusted.
- Accidental damage, or damage caused by negligence of misuse by the user, including leakage from exhausted batteries, is specifically excluded.
- Unauthorised repairs, or any modification to the equipment which has not been expressly approved by the Company, shall render this warranty null and void.
- Failure due to fair wear and tear of any item, such as batteries, record playing styli, and tape recording, playback and erase heads is specifically excluded.
This warranty is not transferable and is only applicable within the United Kingdom (and the Republic of Ireland).
Nothing in this express warranty affects the statutory rights available to the purchaser of this equipment.
Note: This warranty supersedes any other form of guarantee that may inadvertently have been enclosed with or attached to the product. (August 1978).
DearCustomer
Thank you for buying Sanyo. This equipment should give you many years of pleasure and faithful service but in the event that a fault occurs, the following notes for your guidance may be helpful:-
- PLEASE RETAIN YOUR PURCHASE RECEIPT WHICH WILL BE REQUIRED FOR SERVICE DURING WARRANTY.
- If your Sanyo equipment proves faulty during the period of guarantee, take it or send it back to the dealer who originally supplied it together with this guarantee and the proof of purchase. We have made arrangements with our approved dealers under which they will carry out in guarantee service repairs on our behalf. In this way, we hope to reduce to a minimum the amount of time you will be without your equipment.
- If for some reason it is impossible to return the equipment to the original supplier, please contact our Service Department at the address below for further advice.
- Should the equipment require servicing after the expiry of the guarantee period, take or send it to the original supplier or any other Sanyo dealer. He will be pleased to give you a quotation for the repair. If you are in any doubt about what to do, write to us at the address below or telephone:
Service Departments,
Sanyo Marubeni (UK) Limited,
Sanyo House
Otterspool way, Watford,
Hertfordshire WD2 8JX
Tel: Watford 46363
- Instruction Manual
- CONTENTS
- FEATURES
- ACCESSORIES
- Regarding LANC Terminal/ Symbol
- Note :
- PART NAMES
- PREPARATIONS
- POWER SOURCE
- Outdoor Use :
- 1
- Attaching the Battery Pack
- 2
- Removing the Battery Pack
- Indoor Use :
- 3
- Notes :
- IMPORTANT
- CHARGING
- After charging :
- When the battery pack is exhausted :
- Duration of fully charged battery pack (for continuous camera recording)
- 8mm CASSETTE TAPE
- Loading Cassette
- Ejecting Cassette
- A : ERASURE-PREVENTION switch
- LITHIUM BATTERY
- Installing/Replacing the Lithium Battery
- GRIP BELT
- LENS CAP
- EYESIGHT COMPENSATION
- INSIDE THE VIEWFINDER
- REAL TIME TAPE COUNTER
- RESET
- COUNTER MEMORY FUNCTION
- HOLDING THE CAMERA
- HOLDING
- LOW ANGLE
- TRIPOD
- CAMERA RECORDING
- Energy-saving function of battery pack
- AUTO LOCK
- RECORDING REVIEW
- FF/REWIND
- PLAYBACK
- EARPHONE
- SPECIAL PLAYBACK MODES
- Picture search
- Still playback
- Scene search
- SMOOTH TRANSITION
- ZOOM
- CALLING UP FUNCTIONS
- SELECTION OF FUNCTIONS
- TITLE INSERT
- (Digital Memory Superimpose)
- HIGH SPEED SHUTTER
- DATE/TIME IMPRINT
- SETTING THE DATE/TIME
- Important Note :
- FOCUSING
- AUTO FOCUSING
- MANUAL FOCUSING
- AUTO IRIS
- MICROPHONE
- RECORDING IN A HIGH WIND
- RECORDING DISTANT OBJECT
- CONNECTIONS
- FOR TV'S WITHOUT AUDIO/VIDEO INPUT JACKS
- FOR USING A VCR IN YOUR HOME
- FOR TV'S WITH AUDIO/VIDEO INPUT TERMINAL
- TAPE COPY
- CONNECTION
- OPERATION
- ON-SCREEN DATA
- IMPORTANT NOTES
- Do not expose this unit to high temperatures.
- Abnormal operation.
- Moisture and foreign objects.
- Strong lights.
- Do not use this unit under the following conditions :
- Do not use the unit for monitoring only.
- Do not wrap the unit in a cloth etc.
- Be careful with foreign objects
- MAINTENANCE
- Video heads
- Video heads wear in the same way as a turntable stylus.
- Inspect at 1000 hour intervals
- Viewfinder
- USE IN OTHER COUNTRIES
- TROUBLESHOOTING
- DEW CONDENSATION
- CONDENSATION ("DEW") INDICATION
- If condensation occurs
- Moisture on a tape
- SPECIFICATIONS
- WARRANTY TO CUSTOMER
- DearCustomer
Marke : SANYO
Modell : VM-ES77P
Kategorie : Camcorder