
NV-FV1B - Videorekorder PANASONIC - Kostenlose Bedienungsanleitung
Finden Sie kostenlos die Bedienungsanleitung des Geräts NV-FV1B PANASONIC als PDF.

| Produkttyp | Videorekorder |
| Marke | Panasonic |
| Modell | NV-FV1B |
| Abmessungen (B x H x T) | ca. 430 x 85 x 280 mm |
| Gewicht | ca. 4,5 kg |
| Stromversorgung | 220-240 V AC, 50 Hz |
| Leistungsaufnahme | ca. 20 W |
| Aufnahmeformat | VHS |
| Wiedergabeformat | VHS (PAL) |
| Anschlüsse | SCART (Euro-AV), HF-Antenneneingang, HF-Ausgang, Cinch (Audio/Video) |
| Timer-Aufnahme | Ja, mit Programmierung |
| Fernbedienung | Infrarot-Fernbedienung enthalten |
| Besondere Funktionen | Automatische Kopfsynchronisation, Suchlauf, Standbild, Zeitlupe |
| Reinigung | Reinigungskassette für Videoköpfe empfohlen |
| Sicherheitshinweise | Gerät vor Feuchtigkeit schützen; keine Gegenstände in Schlitze stecken |
| Ersatzteile und Reparatur | Reparatur durch Fachpersonal; Ersatzteile über Panasonic-Service |
| Allgemeine Informationen | Umlaufbandgeschwindigkeit: 23,39 mm/s; Video-Frequenzbereich: 3 MHz |
Häufig gestellte Fragen - NV-FV1B PANASONIC
Benutzerfragen zu NV-FV1B PANASONIC
0 Frage zu diesem Gerät. Beantworten Sie die, die Sie kennen, oder stellen Sie Ihre eigene.
Eine neue Frage zu diesem Gerät stellen
Laden Sie die Anleitung für Ihr Videorekorder kostenlos im PDF-Format! Finden Sie Ihr Handbuch NV-FV1B - PANASONIC und nehmen Sie Ihr elektronisches Gerät wieder in die Hand. Auf dieser Seite sind alle Dokumente veröffentlicht, die für die Verwendung Ihres Geräts notwendig sind. NV-FV1B von der Marke PANASONIC.
BEDIENUNGSANLEITUNG NV-FV1B PANASONIC
Panasonic
Portable TV with VTR
NV-FV1B
Operating Instructions
Page
| 3 | CAUTIONS |
| 4 | CONTROLS AND COMPONENTS |
| 8 | ACCESSORIES FOR THE PORTABLE TV WITH VTR SYSTEM |
| 9 | THE POWER SUPPLY UNITS |
| 11 | THE VIDEO CASSETTE |
| 11 | AUTO OPERATION |
| 12 | ON-SCREEN DISPLAY (OSD) |
| 14 | TV ANTENNAS |
| 15 | WATCHING TV PROGRAMMES |
| 16 | PLAYBACK |
| 18 | RECORDING FROM A TV BROADCAST SIGNAL |
| 19 | CAMERA RECORDING |
| 20 | DUBBING (COPYING) |
| 21 | ACCESSORY CONNECTIONS |
| 23 | BEFORE REQUESTING SERVICE |
| 25 | SPECIFICATIONS |
IMPORTANT
Your attention is drawn to the fact that recording of pre-recorded tapes or discs or other published or broadcast material may infringe copyright laws.
WARNING
TO REDUCE THE RISK OF FIRE OF SHOCK HAZARD, DO NOT EXPOSE THIS EQUIPMENT TO RAIN OR MOISTURE.
AC Adaptor VW-AM10
- The rating plate is on the bottom panel of the unit.
This apparatus was produced to BS 800.
FOR YOUR SAFETY
■ DO NOT REMOVE OUTER COVER.
To prevent electric shock, do not remove cover. No user serviceable parts inside. Refer servicing to qualified service personnel.
■ AC MAINS LEAD CONNECTION
The wires in the mains lead of this apparatus are coloured in accordance with the following code.

As the colours of the wires in the mains lead may not correspond with the coloured markings identifying the terminals in your plug proceed as follows: The wire which is coloured BLUE must be connected to the terminal which is marked with the letter N or coloured BLACK. The wire which is coloured BROWN must be connected to the termianl which is marked with the letter L or coloured RED.
Under no circumstances must either of the above wires be connected to the earth terminal of a three pin plug.
is the safety information.
HQ (High Quality) Picture System
Video recorders carrying the HQ symbol mark feature the new VHS High Quality Picture System. This system assures complete compatibility with VTRs that use the conventional VHS system.
HQ
Please read these cautions before you operate this Portable TV with VTR.
Avoid Sudden Changes in Temperature
If the Portable TV with VTR is suddenly moved from a cold place to a warm place, moisture may form on the tape and inside the Portable TV with VTR itself. In this case, the Dew Indicator "DEW" will flash on and off and the Portable TV with VTR will not operate.
Humidity and Dust
Avoid places where there is high humidity or much dust, which may cause damage to internal parts.
Do Not Obstruct the Ventilation Holes
The ventilation holes prevent abnormal increase in temperature. Do not block or cover these holes. Especially avoid covering the holes with soft materials such as cloth or paper.
Keep the Portable TV with VTR Away from High Temperature
Keep the Portable TV with VTR away from extreme direct heat such as direct sunlight, heating radiators, or closed automobiles.
Keep Magnets Away
Never bring a magnet or magnetized object near the Portable TV with VTR because it may adversely affect its performance of the Portable TV with VTR.
No Fingers or other Objects Inside
Touching internal parts of the unit is dangerous, and may cause serious damage to the Portable TV with VTR. Do not attempt to disassemble the unit. There are no user serviceable parts inside.
Keep Water Away
Keep the Portable TV with VTR away from flower vases, tubs, sinks, etc.
CAUTION: If liquids are spilled into the Portable TV with VTR, serious damage could occur. If you spill any liquid into the unit, consult qualified service personnel.
Cleaning
Wipe the Portable TV with VTR with a clean, dry cloth. Never use cleaning fluid, or other chemicals. And do not use compressed air to remove dust.
Positioning
Place the Portable TV with VTR in a horizontal position, and do not place anything heavy on it.
Video Head Clogging
The video heads are the means by which the Portable TV with VTR places picture signals on the tape during recording, and reads picture signals from the tape during playback. If these heads become dirty and clogged from long use, the signals can no longer be recorded correctly, and the playback picture will be distorted accordingly. This is the case, for example, if during the playback of a tape, the sound is reproduced normally, but no picture is seen, or the picture is greatly distorted. When such a symptom case occurs have the Portable TV with VTR checked by qualified service personnel.
The Portable TV with VTR is equipped with head clogging detection function. When the heads have become clogged, the "×" Indication on the LCD Monitor Screen will appear. As the accumulation of dirt on the heads may be dislodged by the movement of the tape, this indication may appear sometimes, but may not reappear on the next recording starts.
If Dew Condensation Forms in the Portable TV with VTR
Condensation may form in the Portable TV with VTR if:
●The Portable TV with VTR is in a room where the heater has just been turned on.
- The Portable TV with VTR is in a room with steam or high humidity.
- The Portable TV with VTR is brought from cold surroundings into a well-heated room.
- The Portable TV with VTR is suddenly brought from cool surroundings, such as an air-conditioned room or car, to a place which is hot and humid.
When dew forms in the Portable TV with VTR: (Refer to page 13.)
The Dew Indicator "DEW" in the LCD Monitor Screen will flash and all the function buttons are made non-operational to protect the tape and the video heads.
When the Dew Indicator flashes, wait until this indicator disappears.
- If dew condensation forms inside the Portable TV with VTR while the Operation On/Off Button is set to "OFF", it will turn on automatically and the Dew Indicator will flash. As soon as the dew condensation has been dissolved, the Portable TV with VTR will turn itself off again.
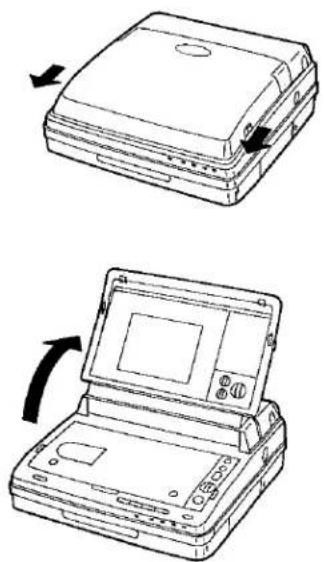
Top View

| No. | Description | Page |
| 1 | VHF/UHF Rod Antenna | 14 |
| 2 | Cover with Integrated LCD Monitor Screen | — |
| 3 | Hook Levers | — |
| 4 | Carrying Handle | — |
Note:
To carry the Portable TV with VTR, pull out the Carrying Handle toward you.
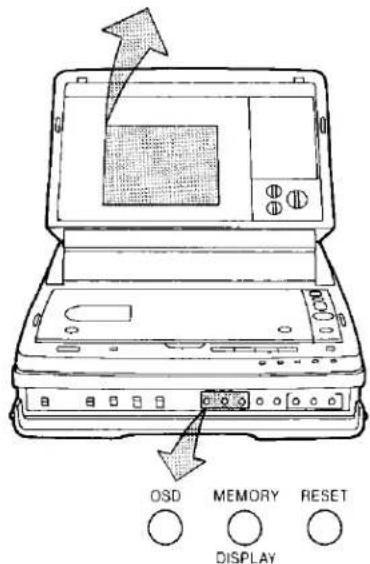
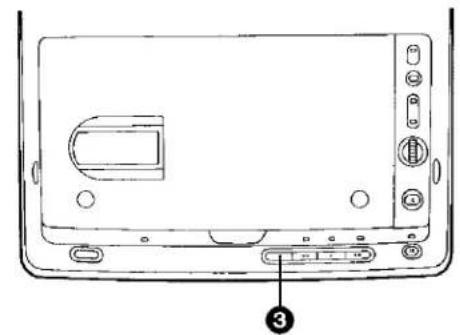
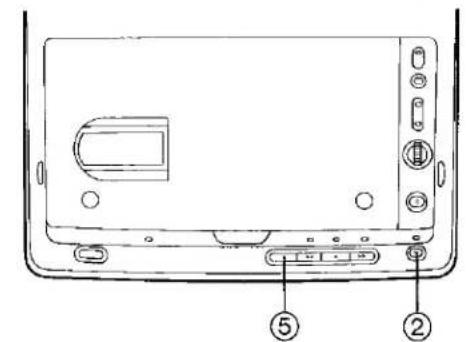
② How to Open the Cover
While pushing both Hook Levers ③ in the direction of the arrow, open the Cover upward.
natural_image
Line drawings of a device with open lid and internal panel, showing two states of change (no text or symbols)② How to close the Cover
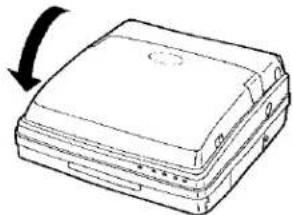
Be sure to close the Cover slowly.
natural_image
Line drawing of a rectangular electronic device with a curved arrow indicating rotation (no text or symbols)Notes:
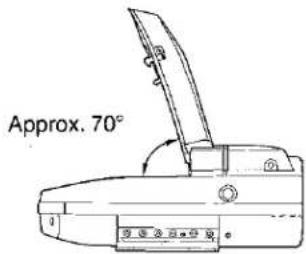
- To prevent damage and injury, do not move the unit while opening the Cover.
- To prevent malfunction and picture distortion, do not open or close the Cover during recording.
- Open the Cover more than 70°, otherwise the LCD Monitor Screen and the Speaker will not work, and the cassette cannot be removed.
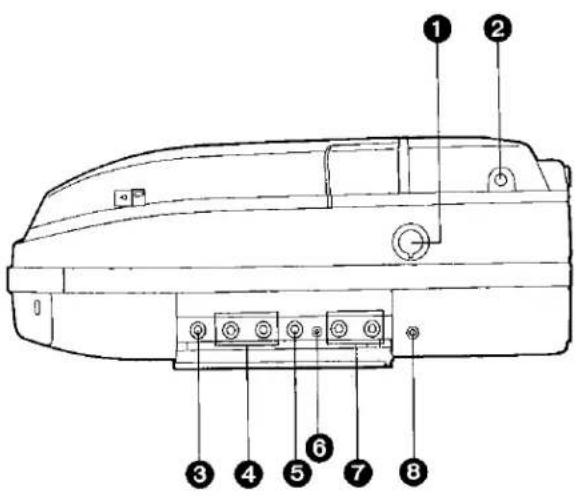
Top View
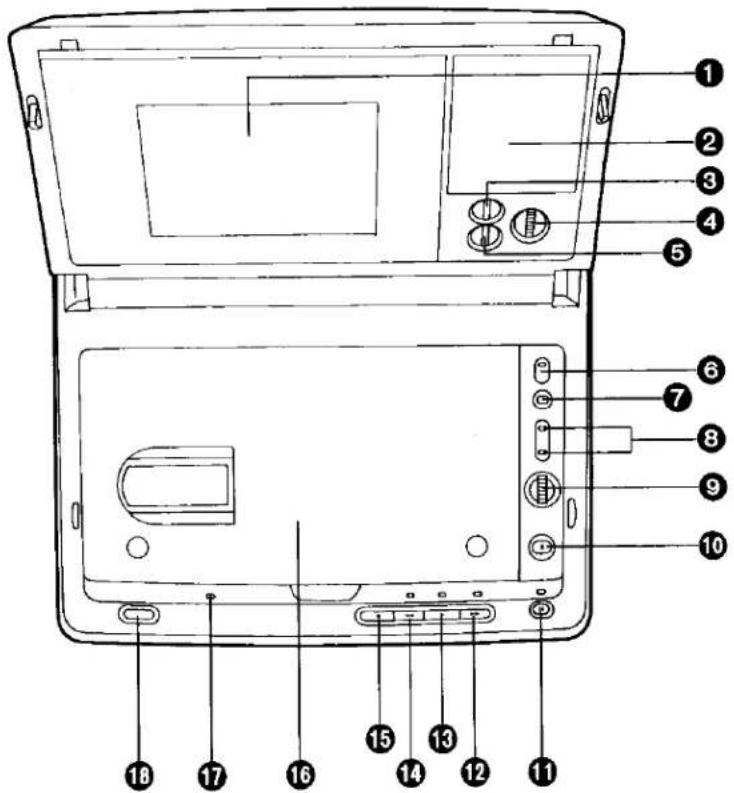
| No. | Description | Page |
| 1 | LCD Monitor Screen | 12 |
| 2 | Speaker | 16 |
| 3 | Colour Control | 15 |
| 4 | Brightness Control | 15 |
| 5 | Sharpness Control | 15 |
| 6 | Band Selector Switch (VHF/UHF) | 15 |
| 7 | Channel Display Button | 15 |
| 8 | Channel Buttons | 15 |
| 9 | Volume Control | 15 |
| No. | Description | Page |
| 10 | Eject Button | 11 |
| 11 | Still Button | 16 |
| 12 | Fast Forward ▶▶/Cue ▶▶Button | 16 |
| 13 | Play Button (▶) | 16 |
| 14 | Rewind ◀◀/Review ▶◀Button | 16 |
| 15 | Stop Button (■) | 16 |
| 16 | Cassette Compartment | 11 |
| 17 | Hi-Fi Indicator | 16 |
| 18 | Operation On/Off Button | 15 |
Front
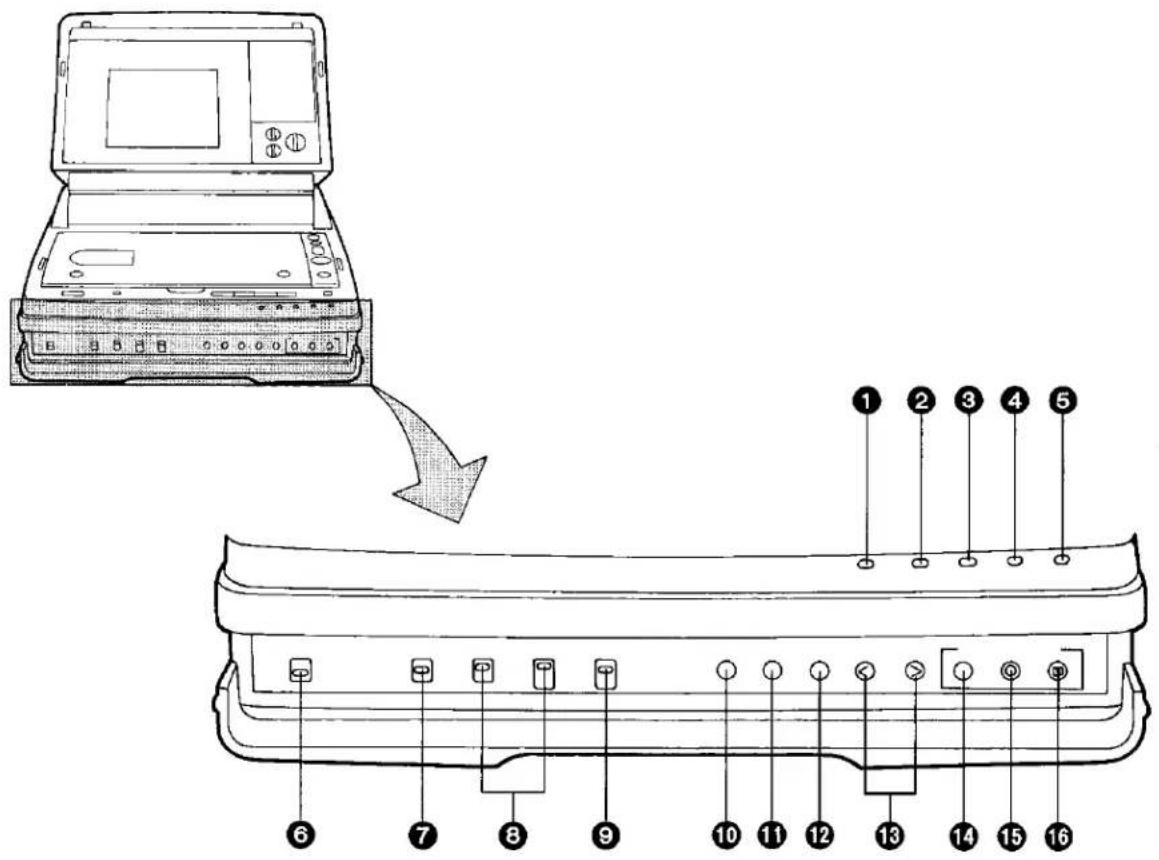
| No. | Description | Page |
| 1 | Operation Indicator | 15 |
| 2 | Dew Indicator | 3 |
| 3 | Stand-by Indicator | 19 |
| 4 | Recording Indicator | 18 |
| 5 | Pause Indicator | 18 |
| 6 | Playback System Selector Switch | 17 |
| 7 | Edit On/Off Switch | 20 |
| 8 | Audio Selector Switches | 16 |
| No. | Description | Page |
| 9 | Input Signal Selector Switch | 15 |
| 10 | OSD (On-Screen Display) Button | 12 |
| 11 | Memory/Display Selector Button | 12 |
| 12 | Reset Button | 12 |
| 13 | Tracking Control Buttons | 17 |
| 14 | Stand-by Button | 19 |
| 15 | Recording Button | 18 |
| 16 | Pause Button | 18 |
Right Side
| No. | Description | Page |
| 1 | Camera Socket | 19 |
| 2 | Antenna Input Socket | 14 |
| 3 | Video Input Socket | 20 |
| 4 | Audio Input Sockets | 20 |
| 5 | Video Output Socket | 20 |
| 6 | RF DC Output Socket | 21 |
| 7 | Audio Output Sockets | 20 |
| 8 | Phones Socket | 16 |
Left Side
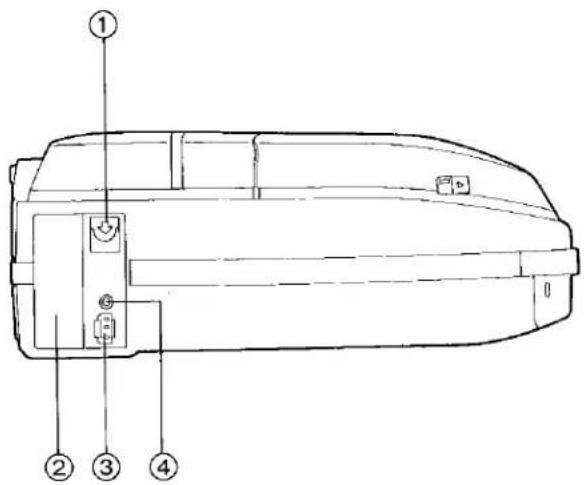
| No. | Description | Page |
| 1 | Battery Eject Button | 9 |
| 2 | Battery Compartment | 9 |
| 3 | DC Input Socket | 9 |
| 4 | Remote Socket | 22 |
Bottom Side
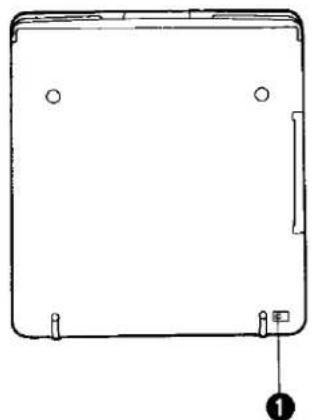
natural_image
Simple line drawing of a rectangular device with mounting holes and a numbered label (1) at the bottom right corner.| No. | Description | Page |
| 1 | TV System Selector Switch | 15 |
CONTROLS AND COMPONENTS (CONT'D)
AC Adaptor (VW-AM10)
Precautions
- Avoid violent shocks and rough handling of the unit.
- Do not allow liquids to spill into the unit.
- Do not place heavy objects on the unit.
- When unplugging the mains lead or other connection cables, be sure to grasp the plug, not the cable.
- Do not block or cover the ventilation slots on the side of the unit, especially by soft material such as cloth or paper.
- When listening to the radio while the AC Adaptor is in operation, the radio reception may be distorted. In this case, move the radio away from the AC Adaptor.
Controls and Components
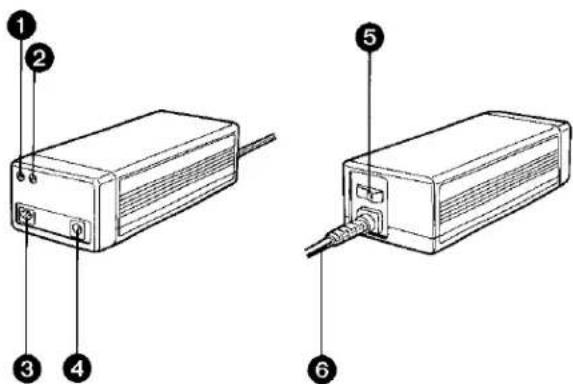
| No. | Description | Page |
| 1 | Power Indicator | 9 |
| 2 | Charging Indicator | 10 |
| 3 | DC Output Socket | 9 |
| 4 | Battery Pack Charging Socket | 10 |
| 5 | Power On/Off Switch | 9 |
| 6 | Mains Lead | 9 |
ACCESSORIES FOR THE PORTABLE TV WITH VTR SYSTEM
Standard Accessories
AC Adaptor
Battery Pack
Battery Pack Charging Connector
Audio/Video Cable
Antenna Cable
Stereo Earphones
DC Input Cable
BNC/PHONO Adaptor Plug
Optional Accessories
Pause Remote Control Unit (VW-RM1)
Car Battery Cord (VW-ACM10E)
RF Adaptor (VW-RF7E)
Carrying Case (VW-SHFV1)
CAUTION: TO REDUCE THE RISK OF FIRE OR SHOCK HAZARD AND ANNOYING INTERFERENCE, USE THE RECOMMENDED ACCESSORIES ONLY.
is the safety information.
Inserting the Battery Pack (supplied)
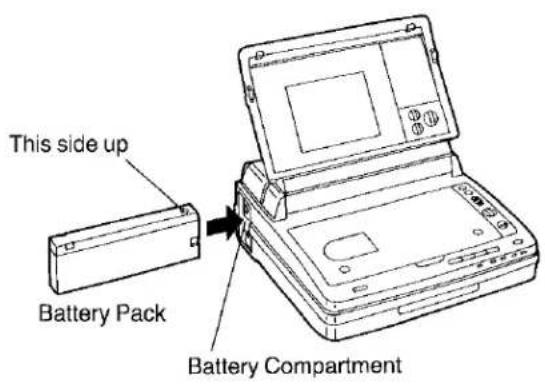
Insert the Battery Pack into the Battery Compartment of the Portable TV with VTR.
Push it in until it clicks into place.
●Always use a fully charged Battery Pack.
Removing the Battery Pack
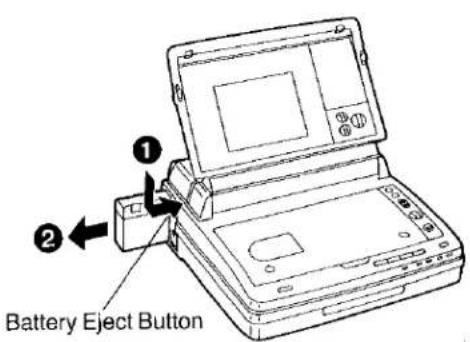
To remove the Battery Pack, release it by pressing the Battery Eject Button downward and inward, then slide the Battery Pack out.
AC Adaptor (supplied)
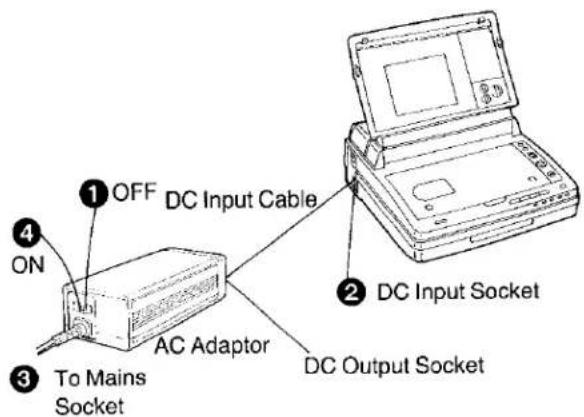
- It is possible to recharge one or even two Battery Packs simultaneously by using the AC Adaptor (supplied). For more details about charging, refer to page 10.
- Never use any other AC Adaptor than the one specified.
Car Battery Cord (optional)
- The Car Battery Cord can only be used with 12 V DC negative-grounded vehicles.
- If the supplied voltage from the vehicle drops too low, the Portable TV with VTR will turn itself off automatically to prevent any malfunctioning. When this happens, wait about 10 seconds before switching the Portable TV with VTR on again.
- It is not possible to recharge the Battery Pack by using the vehicle's battery and/or the Car Battery Cord.
- Do not start the car engine while the Portable TV with VTR is powered by the car battery.
- Before disconnecting the AC Adaptor or the car battery cord, be sure to turn the Portable TV with VTR off.
If they are disconnected during recording or play-back, the tape will remain wound around the head cylinder and may be damaged.
Charging the Battery Pack
To Charge an Inserted Battery Pack in the Portable TV with VTR
●The Charging Indicator Lamp will go out about 100 minutes after charging was started.
•Charging Indicator Lamp
Red ..... When the charging starts.
Green ..... When the Battery Pack is charged approx. 70%.
Not lit .... When the charging is completed.
To Charge the Battery Pack Connected to the AC Adaptor
Use the Battery Pack Charging Connector provided with the AC Adaptor.
- It is possible to charge two Battery Packs simultaneously—one connected to the AC Adaptor and another inserted in the Portable TV with VTR. However, charging them at the same time takes twice as long as charging them separately.
Cautions for Using Battery Packs
Operating Time with the Battery Pack
- With a fully charged Battery Pack (supplied), the Portable TV with VTR can play back continuously for approx. 80 minutes or record TV programmes continuously for approx. 70 minutes, when used at normal temperature (25°C).
If it is used for recording intermittently or at low temperature, the total possible recording time will be reduced. It is recommended to turn the Portable TV with VTR off or switch over to the stand-by mode when not actually recording.
- Never use an insufficiently charged or exhausted Battery Pack, because a drop in the voltage during recording or playback will cause the Portable TV with VTR to be switched off to protect the Battery Pack and the Portable TV with VTR itself.
- The Battery Pack can become exhausted not only during recording and playback, but also when it is in the stand-by mode for long periods of time. It is recommended to carry Battery Packs along which will last two or three times the intended recording duration.
To Extend the Life of the Battery Pack
- Be sure to recharge the Battery Pack soon after use. If the Battery Pack is left in discharged condition for a long period of time, it may not be possible to recharge it.
- Be sure to recharge the Battery Pack before use. If it was stored for a long time after recharging, the voltage level may be reduced and the operation time could be shortened.
- Be sure to recharge the Battery Pack once every six months even if it is not used.
- To protect the Battery Pack, avoid recharging it for more than 24 hours.
- Do not overcharge nor completely discharge Battery Packs.
- Store it in a dry and cool place.
Inserting a Video Cassette
① Press the Eject Button.
2 Insert the video cassette into the cassette Compartment in the direction of the arrow with its window facing upward.
③ Push the Cassette Compartment down, until it locks with a click.
- Use VHS video cassette tapes only.
Removing a Video Cassette
① Press the EJECT Button.
② Pull out the video cassette from the Cassette Compartment.
③ Push the Cassette Compartment down, until it locks with a click.
- Do not close the Cover while Cassette Compartment is open. It could cause malfunction.
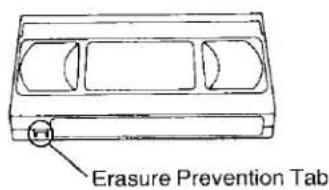
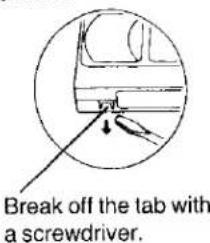
To prevent accidental erasure
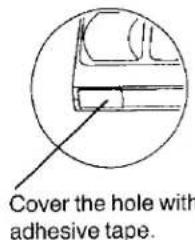
To record again
AUTO OPERATION
Auto Play
If the tab of the inserted cassette is broken out, playback will start automatically without having to press any button.
Auto Rewind
When the tape reaches its end during recording, playback or fast-forwarding, it will automatically be rewound to the beginning.
Portable TV with VTR-Off Eject
When a power supply unit (Battery Pack, AC Adaptor or car battery) is connected to the Portable TV with VTR, the Eject Button remains operative, even if the Portable TV with VTR has been switched off with the Operation On/Off Button.
Indications on the LCD Monitor Screen
When the OSD Button is pressed, the following indications will appear on the LCD Monitor Screen. Press the OSD Button one more time to erase them.
1 Counter Indications
When pressing the Memory/Display Selector Button, the Counter Indication will be shown even if you do not press the On-Screen Button.
M0000: Tape Counter
The figures in the indication will change according to the tape movement.
(The counter will work, even if it is not displayed on the screen.)
- When the Reset Button is pressed, the indication will be reset to "0000".
- When the Memory/Display Selector Button is pressed, the Memory Indication "M" mark will be displayed.
0:00.00: Lap Time Counter
When the Memory/Display Selector Button is pressed two times, the elapsed recording time will be indicated. This function does not work during playback.
- When the cassette is ejected or the Reset Button is pressed, it will be reset to "0:00.00".
2 Tape Running Indications
PLAY A tape is being played back. ▶ Depending on the operation, the following indications will be displayed:
STOP Stop Mode
Rewind Mode
PLAY Review Playback Mode
◀◀
▶▶ Fast Forward Mode
PLAY Cue Playback Mode
▶▶
PLAY Still Playback Mode
11
REC Recording Mode
▶
REC Recording Pause Mode
11
3 Cassette-in Indication
The "oo" Indication indicates that a cassette tape is inserted in the Portable TV with VTR. When the cassette tape is ejected, this indication will disappear.
4 Remaining Battery Power Indication
E----F The "—" indications begin to disappear from right to left as the power of the Battery Pack weakens.
5 Remaining Recording Pause Time Indication
0.5 When temporarily interrupting a recording by pressing the Pause Button, a maximum pause time of 5 minutes with be indicated by 5 solid white squares. Whenever one minute has elapsed, one of these squares will become an empty frame starting from the right. 5 seconds after all five squares have become empty frames, the Remaining Recording Pause Time Indication will disappear, and the Portable TV with VTR will switch over to the Stop mode.
6 Input Indications
TUNER: The setting of the Input Signal Selector Switch is indicated.
CAMERA
LINE: When the Switch is set to "CAMERA" or "LINE", but no signal source is connected with this unit, the corresponding indication will not be displayed.
●The indication will disappear after 5 seconds.
7 Playback Sound Indications
HiFi L-R The setting of the Audio Selector Switches is indicated.
HiFi L-R: Stereo sound from the hi-fi audio tracks
HiFi L: Left channel sound from the hi-fi audio tracks
HiFi R: Right channel sound from the hi-fi sound tracks
NORMAL: Sound from the normal audio track
●The Playback Sound Indication will disappear after 5 seconds.
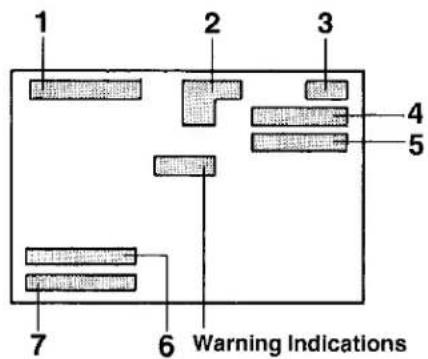
Warning Indications
These Warning Indications will be indicated, even if the OSD Button is not pressed.

When the Remaining Battery Power BATT Indication becomes "E- F", the Alarm Indication "BATT" will flash.
When the Remaining Battery Power Indication becomes "E F", the Power Indicator will flash and the Portable Video TV will turn off approx. 15 seconds later.

Condensation has formed inside the unit. When attempting to record on a cassette with broken out erasure prevention tab, the indication "TAPE" will flash.
- It will disappear after 5 seconds.

When the tape has almost reached its end during recording, the indication "END" will flash.
- It will disappear after 5 seconds.

Video Head Clogging (see page 3.)
Note:
●These indications cannot be recorded.
- Before watching a TV programme, press the On-Screen Button to erase them.
- If these indications are left indicated for a long period, an after-image will remain on the LCD Monitor Screen. However, this is not a malfunction and will disappear after a while.
- When the TV reception is weak, the On-Screen Indications may be distorted. In this case, press the On-Screen Button to erase them.
- If the letters of the On-Screen Indications are difficult to read, try to adjust with the Brightness Control. It may be possible to make them a little clearer.
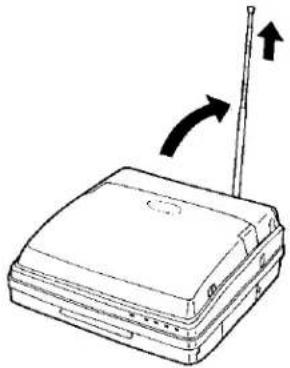
VHF/UHF Rod Antenna
① Turn the Rod Antenna upward and extend it.
natural_image
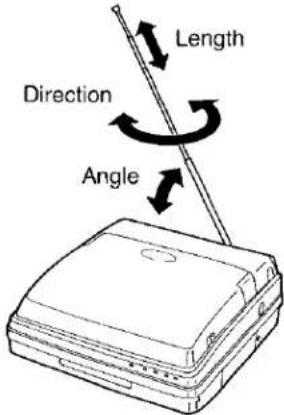
Line drawing of a device with a vertical pole and two arrows indicating motion (no text or symbols)② Adjust the Rod Antenna for best possible reception.
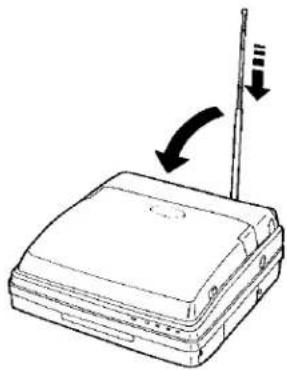
③ After watching TV, contract the Rod Antenna carefully without bending it.
natural_image
Line drawing of a device with a sensor emitting signal waves (no text or symbols)- When using the Rod Antenna indoors in areas of extremely weak reception, the AC Adaptor or other electric systems could cause picture distortion. In that case, place this unit farther away from these systems or use an outdoor aerial.
- If an outdoor aerial is connected to this unit, the Rod Antenna is automatically disconnected.
Outdoor Aerial
In areas where clear TV picture reception is not possible with the Rod Antenna, connect an outdoor aerial.
flowchart
graph TD
    A["UHF Aerial"] --> B["Mixer"]
    C["VHF Aerial"] --> B
    B --> D["Splitter"]
    D --> E["Antenna Cable (supplied)"]
    D --> F["Antenna Input Socket"]
- Keep the Antenna Cable (connected to the Antenna Input Socket) as well as the Mains Lead and the DC Cable from the AC Adaptor (connected to this unit) separate from one another. If these cords become entangled, the pictures may be distorted.

① Press the Operation On/Off Button.
●The Operation Indicator lights up.
② Set the Input Signal Selector Switch to "TUNER".
Channel Indication Line
- The Channel Indication Line appears on the screen. It moves from left to right and stops at the first channel that is received.
③ Select the VHF or UHF reception band with the Band Selector Switch.
Channel VHF, Red Line
Channel UHF, Green line
The Channel Indication Line will appear in red or green according to the selected reception band (VHF or UHF) and it will move from left to right. When the next TV station is received, the line will stop and automatically disappear.
4 Select the desired TV programme position (channel).
| VHF | UHF |
| 2-12 | 21-69 |
When this unit is used in the United Kingdom, the receivable frequency range is UHF channels 21 to 69.
: Each push of this button advances to the next higher channel number.
<: Each push of this button advances to the next lower channel number.
- When pressing either of the two Channel Buttons, the Channel Indication Line will appear on the screen, and when the next channel is selected, the line will disappear automatically.
- If either of the Channel Buttons is kept pressed, the channel will change continuously.
⑤ Adjust the sound volume with the Volume Control.
+: The sound volume increases.
-: The sound volume decreases.
6 Adjust the colour, sharpness and brightness of the picture to your preference.
Confirming the Set Reception Channels
① Press the Channel Display Button.
- The Channel Indication Line will appear and indicate the position of the received TV station in the selected frequency band. The line will disappear automatically as soon as the Channel Display Button is released.
Note:
- In areas with weak signal reception, the Channel Indication Line may not stop at the tuning position of a weak TV station. If the Rod Antenna is used, it may be possible to tune such a TV station by pressing one of the Channel Buttons while adjusting the direction, angle and length of the Rod Antenna.
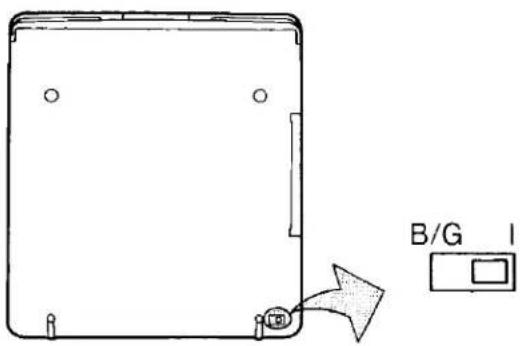
B/G-I TV System Selector Switch (Bottom Side)
Set the TV System Selector Switch on the bottom of the unit according to the area where the Portable TV with VTR is to be used.
I: for UK only
B/G: for Continental Europe

Preparation
- Insert a recorded video cassette.
When a video cassette is already inside the Portable TV with VTR, press the Operation On/Off Button to turn it on.
- Set the Edit On/Off Switch to "OFF".
- For normal use, set the Playback System Selector Switch to "PAL".
① Normal Playback
Press the Play Button (▶).
●The Playback Indicator lights up.
Use the Audio Selector Switch to choose the sound track which you want to listen to.
When the Audio Selector Switch is set to "Hi-Fi", the sound from the Hi-Fi tracks will be reproduced.
For normal use, this position should be selected. (The Hi-Fi Indicator lights up.)
- Playback of the Hi-Fi audio tracks is possible in the following 3 ways:
| Selector Position | Tape with Bilingual Recording | Tape with Stereo Recording |
| Stereo | Main language from left speaker. Sub-language from right speaker. | Stereo |
| Left | Main language | Sound of left Stereo channel |
| Right | Sub-language | Sound of right Stereo channel |
- As the Portable TV with VTR is equipped with a mono speaker system, the sound from the hi-fi audio tracks will be reproduced in mono. In case of tapes with bilingual recordings, both languages will be mixed together, if the Sound Selector Switch is in the "STEREO" position during playback. Therefore, to listen to either the main or the sub-language, set the Selector to "LEFT" or "RIGHT".
- The sound output through the Phones Socket will also be as shown in the table above.
When the selector is set to "NORMAL", the main language of a bilingual recording will be reproduced, and stereo recordings will be reproduced in mono. When playing back a tape on which audio dubbing was performed on another VTR, set the selector to "NORMAL".
(The Hi-Fi Indicator will go out.)
Note:
- If the OSD Button is pressed, the Tape Running Indications will be displayed on the screen.
- When playing back a tape which was recorded on this unit, on another VTR not equipped with hi-fi audio system, the sound from the normal audio track will be reproduced.
- Do not bring a watch or magnetic card close to the speaker, because it could cause the watch to malfunction and the card to become unusable.
② To Finish Playback
Press the Stop Button (■).
③ Still Playback
When the Portable TV with VTR is in the playback mode, press the Still Button (Ⅱ) to view a still-picture. To continue the normal playback, press this button again.
●The Still Indicator lights up.
④ Cue Playback
When the Fast Forward ▶▶/Cue ▶▶ Button is kept pressed while the Portable TV with VTR is in the playback mode, the tape will be played back at high speed in forward direction.
⑤ Review Playback
When the Rewind ◀◀/Review ⏻ Button is kept pressed while the Portable TV with VTR is in the playback mode, the tape will be played back at high speed in reverse direction.
Rewind and Fast Forward
Press the Fast Forward ▶▶/Cue 📋 Button to wind the tape forward rapidly.
Press the Rewind ◀◀/Review □ Button to rewind the tape rapidly.
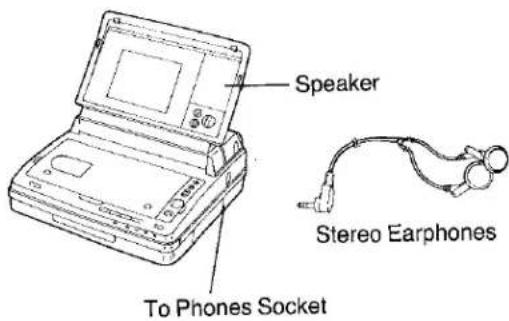
Playback with Sound Reproduction Through Stereo Earphones
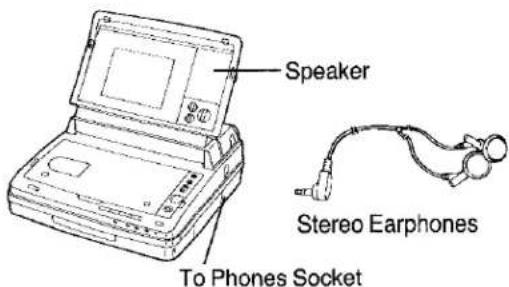
- When connecting Stereo Earphones (supplied) to the Phones Socket, no sound will be reproduced from the speaker.
- When only listening to the sound with the Stereo Earphones and not watching the picture, close the Cover to turn off the LCD Monitor Screen in order to save power.
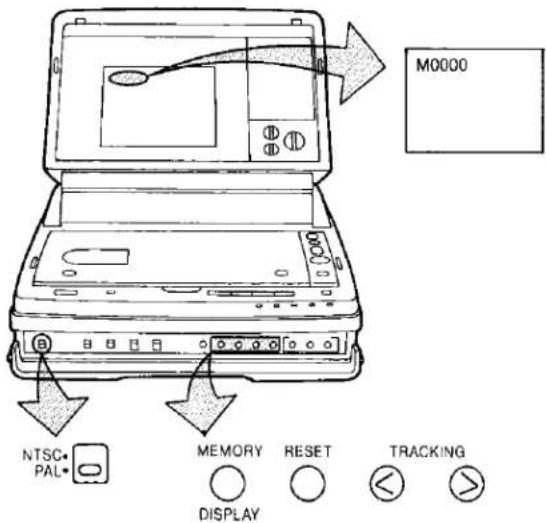
Memory Function
The Memory function makes it simple and fast to find a certain position on the tape later again. To activate it, press the Reset Button at a desired point during recording or playback and then press the Memory/Display Selector Button.
- The Tape Counter is reset to "0000" and the Memory Indication "M" appears on the screen.
After pressing the Stop Button to end the recording or playback, press the Rewind/Review Button.
- The tape will automatically stop at about the point where the Tape Counter reads "0000".
Memory/Display Selector Button
By repeatedly pressing the Memory/Display Selector Button, the Counter Indication can be changed in the following sequence.
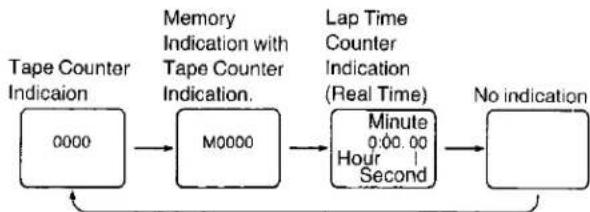
flowchart
graph LR
    A["0000 Tape Counter Indication"] --> B["M0000 Memory Indication with Tape Counter Indication."]
    B --> C["Lap Time Counter Indication (Real Time) Minute 0:00.00 Hour/Second"]
    C --> D["No indication"]
●The Lap Time Counter Indication counts up only during recording.
Tracking Control Buttons
- When the playback picture is distorted by noise bars, press both Tracking Control Buttons simultaneously and then adjust with the (<) or (>) Button until the noise bars are eliminated.
- When playing back a tape that has been recorded on another video recorder, it may not be possible to completely eliminate this distortion.
- The sound will be played back only during normal playback.
- If the Portable TV with VTR is left in the still playback mode for more than 5 minutes, it will automatically switch over to the Stop mode to protect the tape and the video heads.
- In the Cue or Review Playback mode, noise bars will appear in the upper and lower parts of the picture, and the picture may become black and white. However, this is not an indication of a malfunction. In the Cue Playback mode, the noise bars are not in the same positions as in the Review Playback mode.
- In the Still Playback mode, noise bars will appear in the upper and lower parts of the picture may become black and white. However, this is not an indication of a malfunction.
NTSC Playback
With the Portable TV with VTR, tapes recorded in the NTSC system can be played back.
- Set the Playback Selector Switch to "NTSC". When not using a tape recorded in NTSC, the Playback Selector Switch should always be in the "PAL" position.
Watching the NTSC Playback on the Portable TV with VTR
- Black area may appear around the picture on the LCD Monitor Screen. However, this is not malfunction.
- Recording in the NTSC system is not possible with the Portable TV with VTR.
Watching the NTSC Playback on a PAL System TV Set
- Depending on the TV set used, the picture may shrink vertically and black bars may appear both at the top and bottom of the screen.
This is not an indication of a malfunction.
- The playback picture may roll up or down. If the TV set is equipped with a V-HOLD control, it may be possible to stop the picture movement by adjusting this control.
- Depending on the TV set used, the picture may be in black and white. However, this is not an indication of a malfunction.
- If the Playback Selector Switch is not set correctly, it is not possible to receive a normal picture.
When using the Rod Antenna during recording of TV programmes, the picture quality may be unsatisfactory. Therefore, it is recommended to use an external aerial whenever possible.
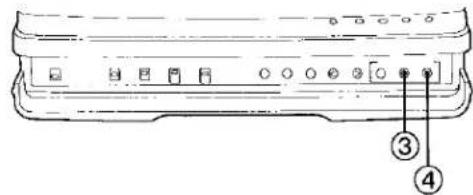
natural_image
Line drawing of a device rear panel with labeled ports and a numbered marker (3), no text or symbols present.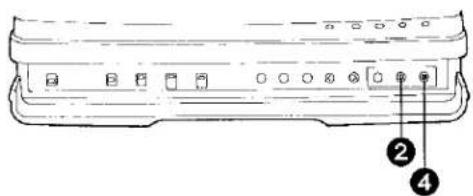
Preparation
- Insert a video cassette with intact erasure prevention tab. When a video cassette is already inside the Portable TV with VTR, press the Operation On/Off Switch to turn it on.
1 Press the Channel (>) or (<) Button repeatedly to select the programme position (channel) on which the TV programme to be recorded is broadcast. (See page 14 and 15.)
② Press the Record Button (●).
•The Recording Indicator lights up.
To Finish the Recording
③ Press the Stop Button (■).
If You wish to Avoid Recording Unwanted Material
4 Press the Pause Button (11) to stop the tape temporarily.
●The Pause Indicator lights up.
- Press the Pause Button (11) again to continue the recording.
- If the Portable TV with VTR is left in the pause mode for more than 5 minutes, it will automatically switch over to the stop mode to protect the tape and the video heads.
Note:
- Do not change the position of Band Selector Switch during recording.
- When recording TV broadcasts via the built-in tuner, the sound will be recorded on the hi-fi audio tracks. However, the sound of a stereo programme will be recorded only in mono, and only the main language of a bilingual programme will be recorded.
Assemble Editing
Preparation
- Insert the cassette tape on which you want to add a new recording, and put the Portable TV with VTR into the playback mode.
① Use either Channel Button to select the programme position on which the TV programme to be recorded is broadcast. (See page 14 and 15.)
② Locate the end of the previous recording and press the Still Button when it is reached.
●The Still Indicator lights up.
③ Press the Record Button to put the Portable TV with VTR into the recording pause mode.
●The Still Indicator disappears and the Recording Indicator and Pause Indicator light up.
④ Press the Pause Button to start recording.
Be sure to read the operating instructions of the Micro Camera (optional).

Preparation
- Connect the Micro Camera (optional) to the Portable TV with VTR as shown above.
- Set the Input Signal Selector Switch to "CAMERA".
- Insert a video cassette with intact erasure prevention tab. When a video cassette is already inside the Portable TV with VTR, press the Operation On/Off Button to turn it on.
When the Record Button (●) is pressed, the Portable TV with VTR is automatically put into the recording pause mode.
2 The camera recording can be started by pressing the Pause Button (II) on the Portable TV with VTR or the Button on the Pause Remote Control (optional).
●Pausing and restarting the recording can be performed by pressing the same button again.
3 Press the Stop Button (■) on the Portable TV with VTR to stop the recording.
Note:
- The recording can also be started and paused with the start/stop button on the camera. For details, see the operating instructions of the camera.
- If the Portable TV with VTR is left in the pause mode for more than 5 minutes, it will automatically switch over to the stop mode to protect the tape and the video heads.
- Prolonged playback of a still picture can cause an after-image on the LCD Monitor Screen. However, this is not a malfunction and will disappear after a while.
- When monitoring the sound through the Speaker of the Portable TV with VTR while camera-recording or using an external microphone, reduce the volume level or place the Portable TV with VTR as far away from the camera or external microphone in order to prevent howling.
STAND-BY FUNCTION
The Stand-by Function is convenient to save power and extend the life of the Battery Pack when pausing more than a few minutes during recording.
- Perform the following operations during recording.
During Recording
① Press the Pause Button to stop the recording temporarily.
●The Pause Indicator will light up.
Recording Pause
② Press the Stand-by Button.
- The picture disappears and the Portable TV with VTR switches over to the stand-by mode (stand-by condition for the assemble editing and the power saving condition).
●The Stand-by Indicator lights up.
Recording Stop
③ Press the Stand-by Button again to make the Portable TV with VTR ready for recording the next scene.
- Wait for approx. 5 seconds until the picture becomes stable.
●The Recording Indicator and the Pause Indicator light up.
Recording Pause
④ Press the Pause Button to start recording again.
Note:
- It is not possible to turn off the Portable TV with VTR while it is in the stand-by mode. First, press the Stand-by Button to release the stand-by mode and then turn the power off with the Operation On/Off Button.
- Even if the Cover is closed, the Portable TV with VTR automatically switches over to the stand-by mode if it is left in the pause mode for more than 5 minutes.
- If the stand-by function is activated during the recording of a TV programme, the selected programme position (channel) will not be retained.
When the Portable TV with VTR Is Used as Recording VTR
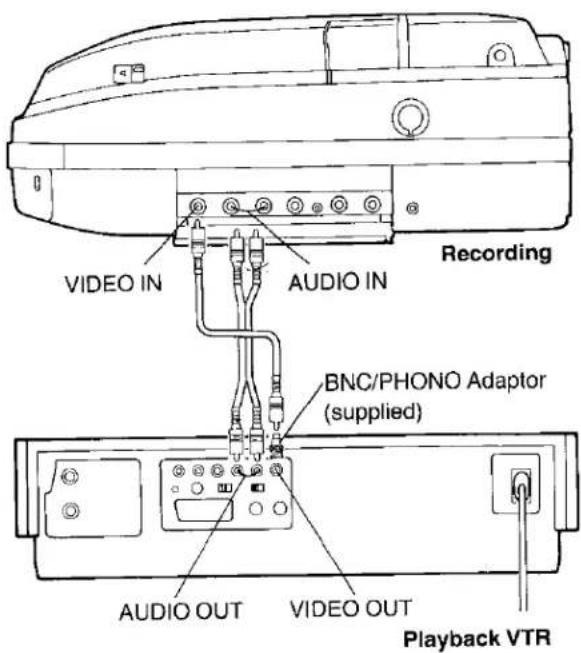
Preparation
●Make the necessary connections as shown above.
- Set the Input Signal Selector Switch to "LINE".
- Set the Edit On/Off Switch to "ON".
① Insert the recorded cassette tape in the playback VTR and a blank cassette tape with intact erasure prevention tab in the Portable TV with VTR.
2 Press the Record Button and then the Pause Button on the Portable TV with VTR to put it into the recording pause mode.
③ Press the Play Button (▶) on the playback VTR.
4 Press the Pause Button on the Portable TV with VTR at the point where you want to start the dubbing.
5 To stop the dubbing, press the Stop Button (■) on both the Portable TV with VTR and the playback VTR.
Synchro Editing
- For details, refer to the operating instructions of the recording VTR.
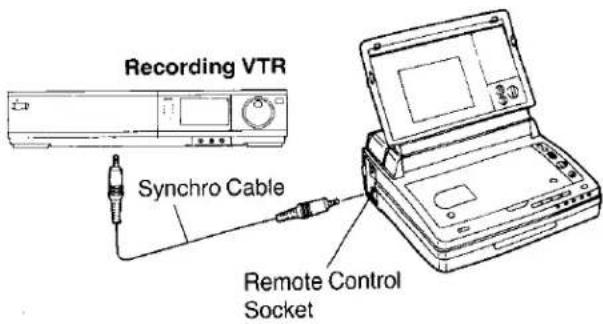
If the recording VTR is equipped with synchro edit socket, use the Synchro Editing Cable (optional) to connect the Remote Control Socket on the Portable TV with VTR with the synchro edit socket on the recording VTR.
- This connection makes it possible to operate the Portable TV with VTR from the recording VTR, i.e. playback start and stop of the Portable TV with VTR will be synchronized with recording start and stop on the VTR.
Connection to a TV Set without Video and Audio Input Sockets
The AC Adaptor and RF Adaptor are required:
Before connecting the RF Adaptor to the Portable TV with VTR, turn the Portable TV with VTR off with the Operation On/Off Switch.
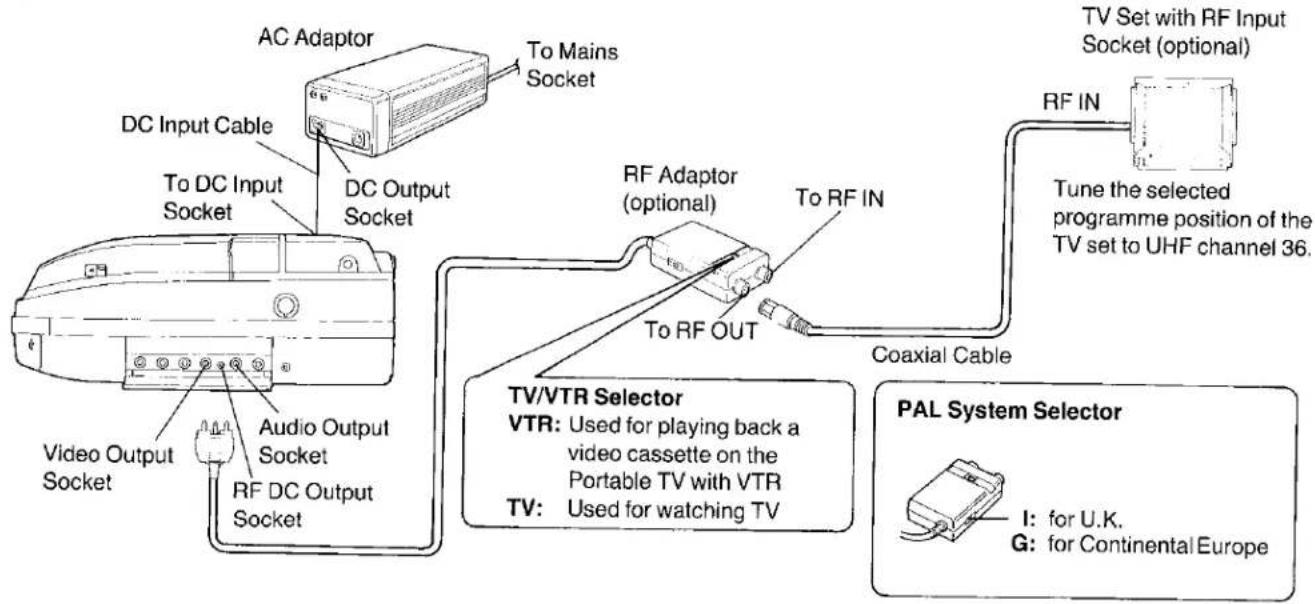
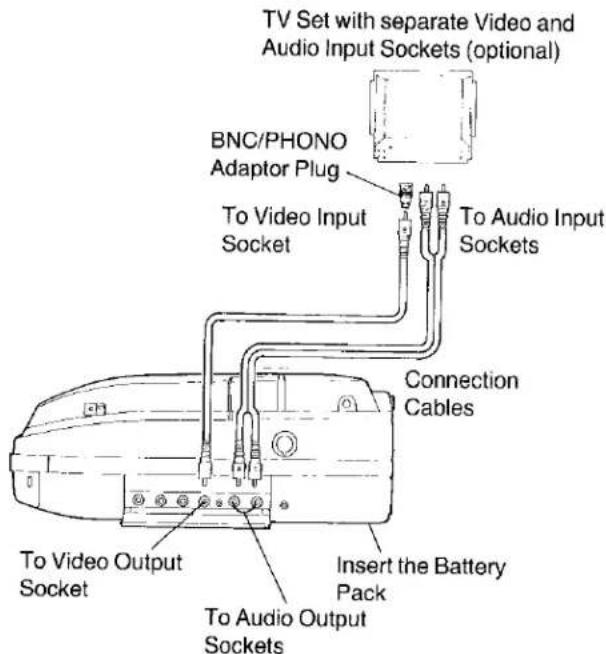
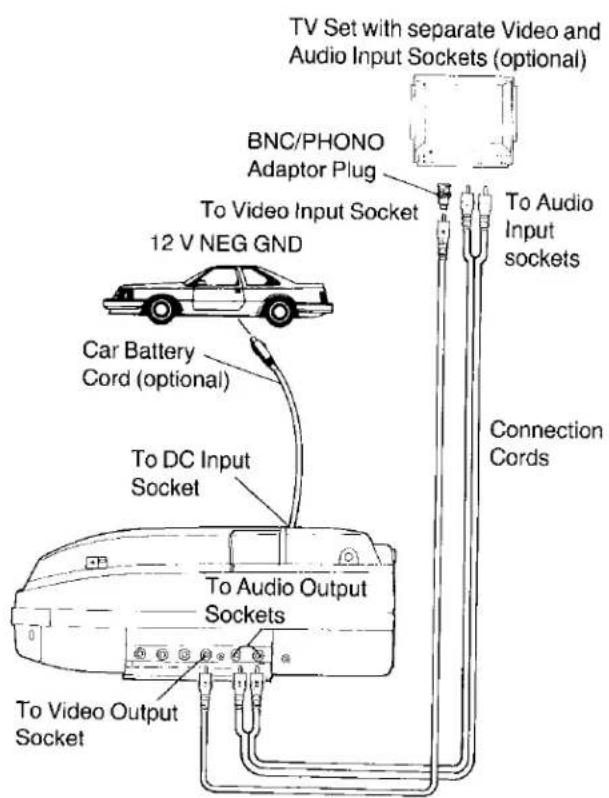
Connection to a TV Set with Video and Audio Input Sockets
When using the Battery Pack as power source:
When using the Car Battery Cord as power source:
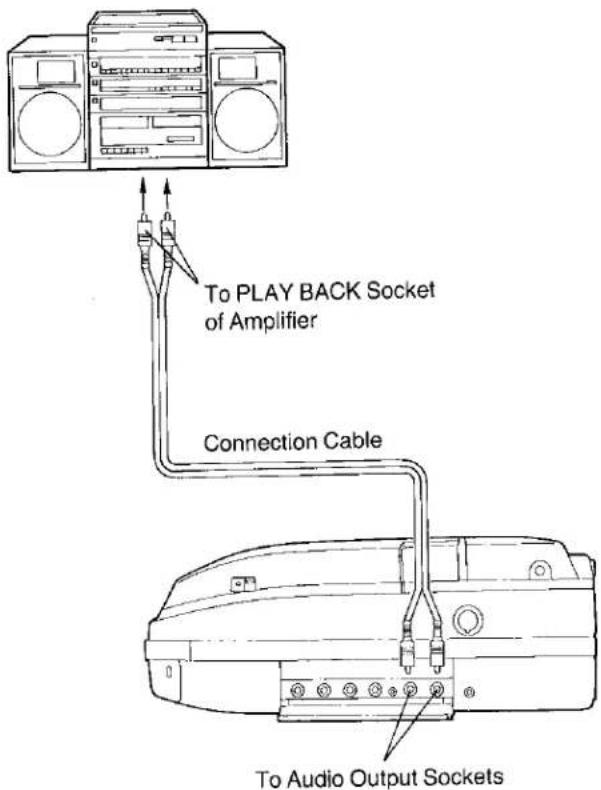
Connection to a Stereo System
Carefully read the operating instructions of the stereo system.
Note:
Recording only the sound without picture is not possible on the Portable TV with VTR.
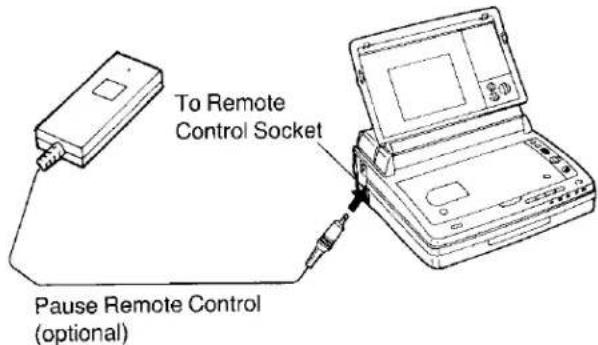
Pause Remote Control (Optional)
The Pause Remote Control (VW-RM1; optional) makes it possible to operate the recording start/stop functions from a distance of up to approx. 5 meters.
Stereo Earphones
Before requesting service, check the following points.
| SYMPTOM | CAUSE | REMEDY |
| Power doesn't turn on. | Mains Lead is not connected correctly. | Connect mains lead to mains outlet. |
| Power turns off immediately after the power is turned on. | The Battery Pack is not charged. | Use after recharging the Battery Pack. |
| The Battery Pack is exhausted. | Use fully-charged Battery Pack. | |
| Dew has formed inside the unit. | Wait until the dew condensation is dissolved. | |
| TV programmes cannot be received. | The Input Signal Selector Switch is not set to "TUNER". | Set the Input Signal Selector Switch to "TUNER". |
| The selected TV station cannot be received with clear picture. | The TV signal is too weak. | Use an external aerial. |
| The TV signal is inferior due to reflection from mountains and/or buildings. | ||
| The Rod Antenna is not pointing in the right direction. | Adjust the direction of the Rod Antenna. | |
| Picture is dark.Picture is whitish. | The Brightness Control is not adjusted correctly. | Adjust the Brightness Control correctly. |
| Tint of colours is bad. | The Colour Control is not adjusted correctly. | Adjust the Colour Control correctly. |
| No sound is reproduced from the speaker. | The Volume Control is not adjusted correctly. | Adjust the Volume Level Control correctly. |
| Stereo Earphones are connected. | Disconnect the Stereo Earphones. | |
| Recording cannot be performed. | The erasure prevention tab of the cassette is broken out. | Cover the hole with adhesive tape. |
| TV programmes cannot be recorded. | The Input Signal Selector Switch is not set to "TUNER". | Set the Input Signal Selector Switch to "TUNER". |
| Camera recording cannot be performed. | The Input Signal Selector is not set to "CAMERA". | Set the Input Signal Selector to "CAMERA". |
| Connection is not correct. | Make the connections again according to the diagrams. | |
| Playback picture is not in colour.Playback picture has large amounts of "snow". | The tracking is not properly adjusted. | Adjust the tracking. |
| The video heads are dirty. | Clean the video heads with a video head cleaning cassette. | |
| The video heads are damaged. | The video heads need to be replaced. | |
| The tape is old. | Use a new tape. | |
| The Playback System Selector Switch is not set correctly. | Set the Playback System Selector Switch to the proper position. |
BEFORE REQUESTING SERVICE (CONT'D)
| SYMPTOM | CAUSE | REMEDY |
| The sound of the TV programme is distorted. | The TV System Selector Switch is not set correctly. | Set the TV System Selector Switch to the correct position. |
| Hi-Fi sound is not correctly reproduced. | The Audio Selector Switch is not set correctly. | Select the desired audio playback mode with the Audio Selector Switch. |
| The tracking is not properly adjusted. | Adjust the tracking. | |
| Battery Pack is exhausted in a very short time. | The Battery Pack was not fully charged. | Fully recharge the Battery Pack. |
| The unit is used in a place with extremely low temperature. | ____ | |
| The unit switches over to the stop mode during fast-forwarding or rewinding of the tape. | The Memory Indication “M” is indicated together with the Tape Counter Indication. | Press the Memory/Display Selector Button to clear the “M” Indication. |
| Picture and sound cannot be played back even if the power is turned on. | The Cover of the Portable TV with VTR is not opened far enough. | Open the Cover more than 70°. |
| The cassette tape cannot be removed. | The Cover of the Portable TV with VTR is not opened far enough. | Open the Cover more than 70°. |
NV-FV1B
| Power Source: | DC 12 V | |
| Power Consumption: | Recording mode; 14 W (without camera) | |
| is the safety information. | ||
| Video Recording System: | Rotary four heads, helical scanning system | |
| Tape Speed: | 23.39 mm/sec. | |
| Tape Format: | VHS tape | |
| Record/Playback Time: | 240 min. with NV-E240 VIS | |
| FF/REW Time: | Approx. 12 min. with NV-E180 | |
| VIDEO | ||
| Television System: | CCIR; 625 lines, 50 fields, PAL colour signal | |
| Modulation System: | Luminance; FM azimuth recordingColour signal; converted subcarrier phase shift recording | |
| Input Level: | VIDEO IN(PHONO); 1.0 Vp-p, | 75 ohm, unbalanced |
| Output Level: | VIDEO OUT (PHONO); 1.0 Vp-p, | 75 ohm, unbalanced |
| AUDIO | ||
| Input Level: | AUDIO IN (PHONO); -10 dB, | more than 47 kohm, unbalanced |
| Output Level: | AUDIO OUT (PHONO); -8 dB, | less than 600 ohm, unbalanced |
| Head Phones: | M3 Stereo; -29 dB, | 8 ohm, unbalanced |
| Audio Track: | 1 track (Normal-mono), 2 channels (Hi-Fi sound-stereo) | |
| External Antenna Input: | M3 | |
| TV Channel: | VHF; 2-12chUHF; 21-69ch | |
| TV Screen Device: | 5" colour LCD | |
| Tuning Method: | auto tuning | |
| Antenna: | built-in rod antenna | |
| Display Counter: | 4 digit/lap time | |
| Speaker: | 45 mm dynamic speaker | |
| Video Horizontal | ||
| Resolution Colour: | VHS; More than 220 lines | |
| Audio Frequency Response: | HiFi; 50-20,000 HzLinear; 120-8,000 Hz | |
| Signal-to-Noise Ratio: | Video; More than 41 dBAudio (HiFi); More than 45 dB(Normal); More than 40 dB | |
| Operating Temperature: | 5°C-40°C | |
| Operating Humidity: | 35%-80% | |
| Weight: | 3 kg | |
| Dimensions: | 259 (W)×106 (H)×277 (D) mm | |
| VW-AM10B | ||
| Power Source: | AC 100-240 V, 50-60 Hz (Automatic voltage adjustment) | |
| Power Consumption: | 44 W | |
| DC Output: | DC 12 V 1.8 A (Portable TV with VTR)DC 12 V 1.5 A (Battery pack charging) | |
| is the safety information. | ||
| Weight: | Approx. 0.62 kg | |
| Dimensions: | 80 (W)×54 (H)×196 (D) mm |
Weight and dimensions shown are approximate.
Specifications are subject to change without notice.
| .100 | ||
| .200 | .200 | .200 |
| .300 | .300 | .300 |
| .400 | .400 | .400 |
| .500 | .500 | .500 |
| .600 | .600 | .600 |
| .700 | .700 | .700 |
| .800 | .800 | .800 |
| .900 | .900 | .900 |
| .1000 | .1000 | .1000 |
| .1100 | .1100 | .1100 |
| .1200 | .1200 | .1200 |
| .1300 | .1300 | .1300 |
| .1400 | .1400 | .1400 |
| .1500 | .1500 | .1500 |
| .1600 | .1600 | .1600 |
| .1700 | .1700 | .1700 |
| .1800 | .1800 | .1800 |
| .1900 | .1900 | .1900 |
| .2000 | .2000 | .2000 |
| .2100 | .2100 | .2100 |
| .2200 | .2200 | .2200 |
| .2300 | .2300 | .2300 |
| .2400 | .2400 | .2400 |
| .2500 | .2500 | .2500 |
| .2600 | .2600 | .2600 |
| .2700 | .2700 | .2700 |
| .2800 | .2800 | .2800 |
| .2900 | .2900 | .2900 |
| .3000 | .3000 | .3000 |
| .3100 | .3100 | .3100 |
| .3200 | .3200 | .3200 |
| .3300 | .3300 | .3300 |
| .3400 | .3400 | .34, 35, 36, 37, 38, 39, 4, 4, 4, 4, 4, 4, 4, 4, 4, 4, 4, 4, 4, 4, 4, 4, 4, 4, 4, 4, 4, 4, 4, 4, 4, 4, 4, 4, 4, 4, 4, 4, 4, 4 , 4, 4, 4, 4, 4, 4, 4, 4, 4, 4, 4, 4, 4, 4, 4, 4, 4, 4, 4, 4, 4, 4, 4, 4, 4, 4, 4, 4, 4, 4, 4 , |


Printed in Japan
VQT3907
F0790M1070-2000⑧

Matsushita Electric Industrial Co., Ltd.
Central P.O. Box 288, Osaka 530-91, Japan