S-2070 - Beleuchtung SWIT - Kostenlose Bedienungsanleitung
Finden Sie kostenlos die Bedienungsanleitung des Geräts S-2070 SWIT als PDF.


Benutzerfragen zu S-2070 SWIT
0 Frage zu diesem Gerät. Beantworten Sie die, die Sie kennen, oder stellen Sie Ihre eigene.
Eine neue Frage zu diesem Gerät stellen
Laden Sie die Anleitung für Ihr Beleuchtung kostenlos im PDF-Format! Finden Sie Ihr Handbuch S-2070 - SWIT und nehmen Sie Ihr elektronisches Gerät wieder in die Hand. Auf dieser Seite sind alle Dokumente veröffentlicht, die für die Verwendung Ihres Geräts notwendig sind. S-2070 von der Marke SWIT.
BEDIENUNGSANLEITUNG S-2070 SWIT
USER MANUAL
SWIT Electronics Co., Ltd.
Tel:+86-25-85805753
Fax:+86-25-85805296
http://www.swit.cc
E-mail: contact@swit.cc
Congratulations on your purchase of this product. Please read this user manual carefully.
Features
◆ New generation chip-array LED technology, outputs bright but soft & glareless light;
◆ 60° wide beam angle, equally spread light, no visible lighting edge and single shadow;
◆ 13W lower power consumption, 800Lux @ 1meter, equivalent to 70W halogen bulb, 10%-100% dimmer
◆ 5000K output, 5600K/3200K filter;
◆ 6V-17V wide voltage input, support D-tap power, standard DV battery and special slim battery;
◆ High intensity and toughness glass fiber housing, cool-touch, and both screw and cold shoe install.
Product view
text_image
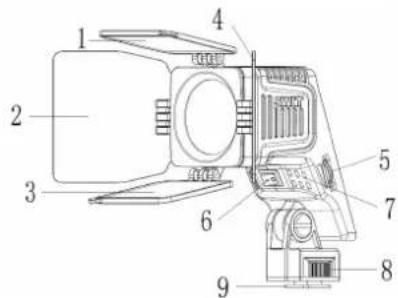
Labeled diagram of a camera or electronic device with numbered parts for identificationFig1

text_image
10 11 12Fig2
1 5600K filter 7 Cooling vent
2 Barn door 8 Fasten knob
3 3200K filter 9 Cold shoe
4 Barn door 10 Cooling vent
5 Dimmer knob 11 DV plate install
6 Switch on/off 12 DC-IN socket
Caution
- Never attempt to open the device. Refer all servicing to qualified personnel.
- Never insert anything into the cooling vent to avoid damage or short circuit.
- Keep the light away from rain or moisture.
- Please do not stare at the turned on LED light.
- Keep the filters clean.
- When powering through DC-IN socket by D-tap cable, please make sure the power supply's voltage and power meet the light input requirements.
- Working temperature: -10℃40 ℃
- Keep the cooling vent clear to avoid damage.
Clean
Use a soft, dry cloth to clean the LED light. If you clean the light with soft cloth slightly moistened with neutral detergent, please dry the surface of the light with a soft, dry cloth. Do not use a damp cloth or alcohol, gasoline and other solvents of any kind.
Specification
| Model | S-2070 |
| Input DC 6V-17V | |
| Power Approx. 13W | |
| Beam angle Approx. 60° | |
| Illuminance 800 lux @ 1 meter | |
| Color temperature | 5000K itself, with 5600K&3200K filter |
| Working temp. -10°C~+40°C | |
| Storage temp. -20°C ~+55°C | |
| Dimension 108×80×133mm | |
| Mass | Approx. 274g |
Package
| S-2070 light | x1 |
| S-7004 snap-on DV battery plate(Optional types for different batteries) | x1 |
| DC cable (D-tap or Pole-tap optional) | x1 |
| User manual | x1 |
| Warranty card | x1 |
| Portable bag | x1 |
Usage
1 Power the light
S-2070 is 6-17V voltage input and offers various power supply methods.
● By special slim battery S-8040 (Optional purchase)
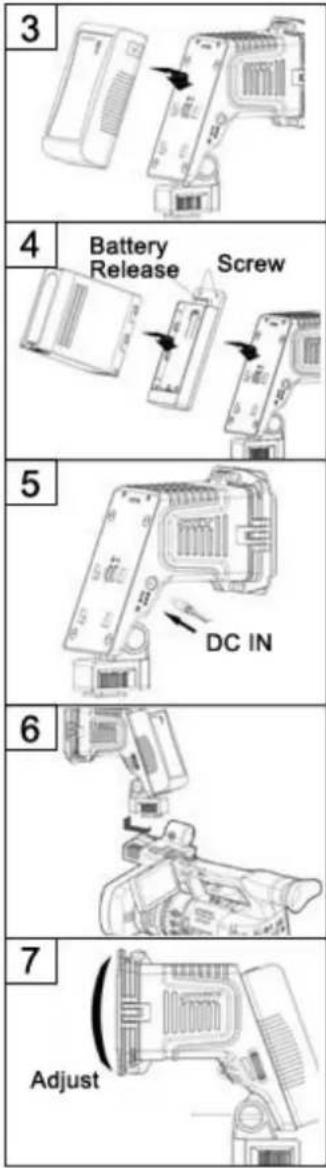
① Make sure there's no power lead connected into DC-IN socket and the light is switched off (turn the switch to "O"). ② Align a fully charged S-8040 battery to the DV mount slot to same side and press tightly in. Slide the battery downward to snap together. See Fig 3
● By various standard DV camera batteries
① Align the S-7004 series battery plate to the DV mount slot to same side, and press tightly in. Then slide the S-7004 downward to snap together. See Fig 4
② Fix the DV mount with two screws.
③ Make sure the light is switched off (turn the switch to “ O”). Mount a fully charged battery to the S-7004 mount. Fig 4
Remark: Select a compatible S-7004 battery plate to match your DV battery:
| Model Compatible battery Recommended SWIT | ||
| S-7004F | SONY NP-F770/970 | S-8972, S-8970, S-8770 |
| S-7004D | Panasonic D54/VW-VBD58 | S-8D62, S-8D58 |
| S-7004J | JVC BN-V428U | S-8428 |
| S-7004C | Canon BP-930/945 | S-8945, S-8845 |
| S-7004U | SONY BP-U60/30 | S-8U62 |
| S-7004E | Canon DSLR LP-E6 | S-8PE6 |
| S-7004B | Panasonic VW-VBG6 | S-8BG6 |
| S-7004V | JVC BN-VF823 | S-8823 |
| S-7004I | JVC SSL-JVC50 | S-8I50 |
By DC cable
① Make sure the light is switched off (turn the switch to "O"). Plug the pole end of package supplied DC cable into the DC-IN socket. ② Plug the other end* of DC cable to camera auxiliary power tap or the battery DC output socket.
*Remark: S-2070 supplied 2 kinds of DC cables, optional for different power sources:
| Cable Model | Connector description | Length |
| S-7104 Battery | D-tap output→Role-tap input to S-2070 0.6m | |
| S-7108 Battery | Pole-tap output→Pole-tap input to S-2070 | 1m |
③ For third-party DC cables, please make sure the DC connector is 5.5/2.1mm pole and input voltage should be 6-17V; and inner: positive, Outer: negative. See Fig 5.
2 Fix the LED light to the camera
- By Cold shoe
① Anticlockwise revolve the fasten knob, till the screw bolt is back into the cold shoe slice.
② Align the cold shoe slice with the cold shoe mount on the camera handle.
③ Clockwise revolve the fasten knob to install the light onto the camera.
- By 1/4" screw mount
① Clockwise revolve the fasten knob, till the screw bolt is out of the cold shoe slice.
② Align the screw bolt with the 1/4" screw thread on the camera handle.
③ Continuously clockwise revolve the fasten knob to install the light onto the camera.
3 Adjust the angle of the light:
Hold the light, and adjust the light upward or downward. See Fig 7.
4. Open barn doors and filters:
Open the barn doors and filters to about 45°. See Fig 1
5. Switch on: Turn the switch to "I".
6. Adjust the illuminance:
Adjust the illuminance from 10% to 100% by the dimmer.
7. Adjust color temperature:
Output 5600K light by using 5600K filter(See Fig1 -①); Output 3200K light by using 3200K filter(See Fig1 -③)