
CarDVR-72 - Dashcam ROLLEI - Kostenlose Bedienungsanleitung
Finden Sie kostenlos die Bedienungsanleitung des Geräts CarDVR-72 ROLLEI als PDF.


| Produkttyp | Dashcam |
| Marke | Rollei |
| Modell | CarDVR-72 |
| Abmessungen (ca.) | 70 x 55 x 30 mm |
| Gewicht (ca.) | 80 g |
| Stromversorgung | 12-24 V über Zigarettenanzünder |
| Videoauflösung | Full HD 1920x1080p |
| Blickwinkel | 120° (Weitwinkel) |
| Nachtsicht | Ja (Infrarot-LEDs) |
| Bewegungserkennung | Ja |
| G-Sensor | Ja (Aufprallerkennung) |
| Loop-Aufnahme | Ja (überschreibt älteste Dateien) |
| Speichermedium | MicroSD-Karte (bis 32 GB, Klasse 10) |
| Display | 2,4 Zoll LCD-Farbdisplay |
| Befestigung | Saugnapfhalterung |
| Reinigung | Linsen mit Mikrofasertuch reinigen, Gehäuse mit feuchtem Tuch abwischen |
| Sicherheitshinweise | Nicht in der Sichtlinie des Fahrers montieren; von Kindern fernhalten |
| Ersatzteile | Halterung, USB-Kabel, Saugnapf erhältlich beim Hersteller |
| Reparatur | Nur durch autorisiertes Servicepersonal öffnen; kein Benutzerservice |
| Betriebstemperatur | -10°C bis +60°C |
| Garantie | 2 Jahre (bei gewerblicher Nutzung abweichend) |
Häufig gestellte Fragen - CarDVR-72 ROLLEI
Benutzerfragen zu CarDVR-72 ROLLEI
0 Frage zu diesem Gerät. Beantworten Sie die, die Sie kennen, oder stellen Sie Ihre eigene.
Eine neue Frage zu diesem Gerät stellen
Laden Sie die Anleitung für Ihr Dashcam kostenlos im PDF-Format! Finden Sie Ihr Handbuch CarDVR-72 - ROLLEI und nehmen Sie Ihr elektronisches Gerät wieder in die Hand. Auf dieser Seite sind alle Dokumente veröffentlicht, die für die Verwendung Ihres Geräts notwendig sind. CarDVR-72 von der Marke ROLLEI.
BEDIENUNGSANLEITUNG CarDVR-72 ROLLEI
User Manual
| Precaution | Page | 1 |
| DVR Special Features | Page | 1 |
| Accessories | Page | 2 |
| DVR Interface | Page | 2 |
| DVR Operation | Page | 2 |
| Power on/off | Page | 2 |
| Video Mode | Page | 3 |
| Normal recording | Page | 3 |
| Loop recording | Page | 4 |
| Picture Mode | Page | 4 |
| Playback Mode | Page | 4 |
| Delete Files/Protect | Page | 4 |
| Menu Setting | Page | 4 |
| Playback on HDTV/PC | Page | 5 |
| Technical specification | Page | 6 |
| GPS Video Player | Page | 6 |
Precaution
Please read the following guidelines and the whole user manual carefully before you use this DVR.
Please refer to the manual instruction and operate the camera correctly. Illegal operation may cause damage to the camera internal components.
Do not let the camera fall, it may damage the internal components.
Do not alter or dismantle the DVR, to avoid the damage to the DVR.
The temperature rise is normal when the cameras is in use for a long time.
Do not touch the lens when recording which will affect the video quality.
DVR Special Features:
G-Sensor
The G-sensor is built-in with three-axis acceleration sensor. The DVR will save videos as undeletable files when gravity acceleration is noted, e.g. if an accident happens.
- SOS function
Under recording mode, press the UP button shortly to activate the SOS function. The current video will be saved as undeletable file.
WDR function
When there is overexposure or underexposure, WDR makes the image clearer.
♦ Motion Detection
If the car stops, the camera will stop the recording after 10 sec. If anything in front of the car is moving, e.g. you start driving, the camera will automatically start to record again.
Accessories
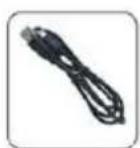
USB cable
Car charger
Suction cup
User Manual (not shown)
GPS module


Operation Interface
- Menu Button 9. Microphone
- Up Button 10. Lens
- Down Button 11. TF Card Slot
- OK Button 12. Power Button
- Microphone Indicator 13. Reset Button
- Working Indicator 14. HDMI Port
- Charging Indicator 15. USB Port
- Speaker 16. GPS Port
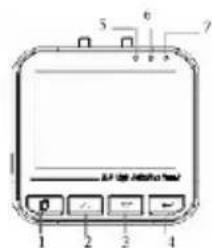


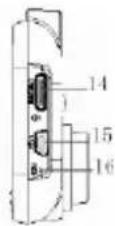
Power Button: Turn ON/OFF the camera
Menu Button: Press the menu button for about 3 seconds to switch between video / picture / playback. Press the button shortly to enter the menu setting.
Up Button: This button is used to page up in the setting menu or to select the file under playback mode. While taking a video press this button shortly to activate the SOS recording.
Down Button: This button is used to page down in the setting menu or to select the file under playback mode.
OK Button : Start/Stop recording; To Take pictures; To confirm menu setting; Start/pause playback under playback mode.
Reset Button: Restart the camera.
Operation
1. Power ON/OFF
Power ON: Shortly press the power button. You will hear a beep sound, the blue working indicator will light up and the CarDVR enters the standby mode.
Power OFF: Long press the power button. You will hear a beep sound, the blue working indicator will turn off and the CarDVR powers off.
If the camera is connected with the car charger to the car, the camera will turn on automatically if the car ignites and it will turn off when the car stalls.
2. Video Mode
Normal Recording
In standby mode, the video mode icon is on the top left corner of the screen. The video quality icon is next to the video mode icon. The video resolution icon is on the top of the screen.
The remaining recording time is shown on the top right corner. Microphone and battery icons are on the left bottom. The time stamp is shown on the middle bottom.
Press the OK button to start the recording and the blue indicator will flash. The flashing red recording icon is on the top of the screen. The recording time is on the top right corner.
Loop recording (refer to menu setting)
In the menu setting set seamless to 1 minute, 3 minutes or 5 minutes. The seamless icon is upon the microphone icon. Press the OK button to start recording and the blue indicator will flash. If the video is recorded up to the time you set (1 minute, 3 minutes or 5 minutes), the camera will save the video automatically and continue recording.
If the TF card is full, camera will overwrite the first video by time sequence and continue recording.
Press the OK button again to stop recording.
3. Picture Mode
In standby mode, press the menu button for about 3 seconds to enter the picture mode. Aim at the object you want to shoot and press the OK button to take a picture. The camera will save the picture automatically.
4. Playback Mode
In standby mode, press the menu button long twice to enter the playback mode. Press the up/down button to select the event/video/picture, then press OK button to play back.
Delete and protect files
Under playback mode, press the menu button once to enter the delete mode. Press the up/down button to select Delete or Protect and press the OK button to confirm. Then press the up/down button again to select the option, and press the OK button to confirm.
Press the menu button to go back into the standby mode.
5. Menu Setting
Press the menu button for 3 seconds to switch between video mode/picture mode/playback mode.
Press the menu button shortly to enter each relative menu.
Press the up/down button to set the menu. Then press OK button to confirm the setting.
Press the menu button shortly to exit the menu setting.
Each mode, video mode/picture mode/playback mode, has two menus: mode menu and system menu.
Video Menu:
Movie Size: 1080P(30fps)/720P(30fps)/720p(60fps)
Video Quality: Super Fine/Fine/Normal
Seamless: Off/1 Min/3 Min/5 Min
White Balance: Auto/Daylight/Cloudy/Tungsten/Fluor H
WDR: Off/On
Motion Detect: Off/On
Date Stamp: Off/Date/Date&Time
Picture Menu:
Resolution: 10M/8M/6M/3M/2M/VGA
White Balance: Auto/Daylight/Cloudy/Tungsten/Fluor H
Driver Mode: Off/2S/10S/Double
Photo Burst: Off/3 photos/5 photos/10 photos
Playback Menu:
Protect: Single/Protect All/Unprotect All
Delete: Single/All
System Menu:
Sound: Beep: Off/On
Volume: 0/1/2/3
Voice Rec: Off/on
Power Save: Off/1 Min/3 Min/5 Min
Date & Time: 2016/09/09 10:05 YY/MM/DD
Language: English / German / Italian / Spanish / Portuguese / Dutch / French / Greek / Hungarian / Slovak / Czech / Swedish / Danish / Norwegian / Finnish / Traditional Chinese
G-Sensor: Off/Low/Normal/High/Sport
Light Freq: 50HZ/60HZ
GPS: Off/On
Stabilizer: Off/On
Invert Mode: Off/On
Time Zones: -12/-11/-10/-9/-8/-7/-6/-5/-4/-3/-2/-1/0/+1/+2/+3/+4/+5/+6/+7/+8/+9/+10/+11/+12
System: Factory Reset: Yes/No
System Info:
Card Info:
GSV Info:
USB: MSDC/PC CAM
Format: Yes/No
FW Update:
Playback on HDTV/PC
(1) HDMI mode
Turn on the DVR and connect it to a HD TV video input port and audio input port with the HDMI cable. Choose HDMI mode on the TV. The DVR screen will be off, all operations on DVR can be checked on TV.
(2) PC mode
Turn on the DVR, connect it to a PC via the USB cable.
In System Menu set the USB to MSDS.
Open "My computer", check a new disk on your computer, open the "Event" "Video" "Picture" in DCIM folder, you can check and download the videos and pictures.
In System Menu set the USB to PC cam so that the camera will work as a PC cam.
Technical specification
| Screen | 2.4 inch LCD screen |
| Resolution | 1080P 1920x1080 30fps720P 1280x720 30fps720P 1280x720 60fps |
| Image size | 10M / 8M / 6M / 3M / 2M / VGA |
| Sensor | 3M CMOS sensor |
| View angle | 120 degree |
| File format | MOV H.264 / JPG |
| GPS | Support |
| Battery | Built in battery 240mAh |
| Power | Auto recording while vehicle ignites, charging while recording |
| Storage | Support Micro SD card to 32GB (not included) |
| SOS recording | One key to start emergency recording, is undeletable |
| Loop recording | seamlessly recording, automatically overwrite function, |
| G-sensor | Support, built-in gravity sensor |
| Motion detection | Support, built-in motion sensor |
| Audio | Built-in Microphone/Speaker |
| Interface | USB2.0/HDMI |
| Time stamp | Support |
| Menu language | English / German / Italian / Spanish / Portuguese / Dutch / French / Greek / Hungarian / Slovak / Czech / Swedish / Danish / Norwegian / Finnish / Traditional Chinese |
| Current frequency | 50Hz/60Hz |
GPS video player
The GPS software is on the disc. Insert the disc in the PC and click the file to install. Once it is done,

will be placed on the desktop.
Disposal

Disposal of Packaging: For disposal please separate packaging into different types. Cardboard and board must be disposed of as paper and foil must be recycled.
Disposal of Waste Electrical and Electronic Equipment and/or Battery by users in private households in the European Union.

This symbol on the product or on the packaging indicates that this cannot be disposed of as a household waste. You must dispose of your waste equipment and battery by handling it over to the applicable take - back scheme for the recycling of electrical and electronic equipment and battery. For more information about recycling of this equipment and battery, please contact your city office, the shop where you purchased the equipment or your household waste disposal service. The recycling of materials will help to conserve natural resources and ensure that it is recycled in a manner that protects human health and environment.
Battery Warning
- Never dismantle, crush, or pierce the battery, or allow the battery to short - circuit. Do not expose battery being placed in high temperature environment, if battery leaks or bulges, stop continue to use.
• Always charge using the charger. Risk of explosion if battery is replaced by an incorrect typ, - Keep the battery out of the reach of children.
- Batteries may explode if exposed to fire. Never through batteries into the fire.
• Never exchange batteries by yourself, please let it be done by the retailer.
• Dispose used batteries by observing local regulations. - Before disposing the device, please remove the battery. For removing the battery open the housing via the screws.
Attention: It is not allowed to exchange the battery independently!
Conformity
The Manufacturer hereby declares that the CE marking was applied to the Rollei CarDVR-72 in accordance with the basic requirements and other relevant provisions of the following CE Directives:
2011/65/EC RoHs Directive
2014/30/EU EMC Directive
2014/35/EU LVD Directive
• 2012/19/EC WEEE Directive
2014/53/EU RED-Directive
The EC Declaration of Conformity can be requested from the address specified on the Warranty card.

- User Manual
- Precaution
- DVR Special Features:
- Accessories
- Operation Interface
- Operation
- Power ON/OFF
- Video Mode
- Normal Recording
- Loop recording (refer to menu setting)
- Picture Mode
- Playback Mode
- Delete and protect files
- Menu Setting
- Video Menu:
- Picture Menu:
- Playback Menu:
- System Menu:
- Playback on HDTV/PC
- HDMI mode
- PC mode
- GPS video player
- Disposal
- Disposal of Waste Electrical and Electronic Equipment and/or Battery by users in private households in the European Union.
- Battery Warning
- Conformity
Marke : ROLLEI
Modell : CarDVR-72
Kategorie : Dashcam