ADP4524 - Ofen Diplomat - Kostenlose Bedienungsanleitung
Finden Sie kostenlos die Bedienungsanleitung des Geräts ADP4524 Diplomat als PDF.


Benutzerfragen zu ADP4524 Diplomat
0 Frage zu diesem Gerät. Beantworten Sie die, die Sie kennen, oder stellen Sie Ihre eigene.
Eine neue Frage zu diesem Gerät stellen
Laden Sie die Anleitung für Ihr Ofen kostenlos im PDF-Format! Finden Sie Ihr Handbuch ADP4524 - Diplomat und nehmen Sie Ihr elektronisches Gerät wieder in die Hand. Auf dieser Seite sind alle Dokumente veröffentlicht, die für die Verwendung Ihres Geräts notwendig sind. ADP4524 von der Marke Diplomat.
BEDIENUNGSANLEITUNG ADP4524 Diplomat
DIPLOMAT
DIPLOMAT
ADP4520
20034007314 046103003 21 01

text_image
Barcode image containing encoded digital informationUser & Installation Handbook
natural_image
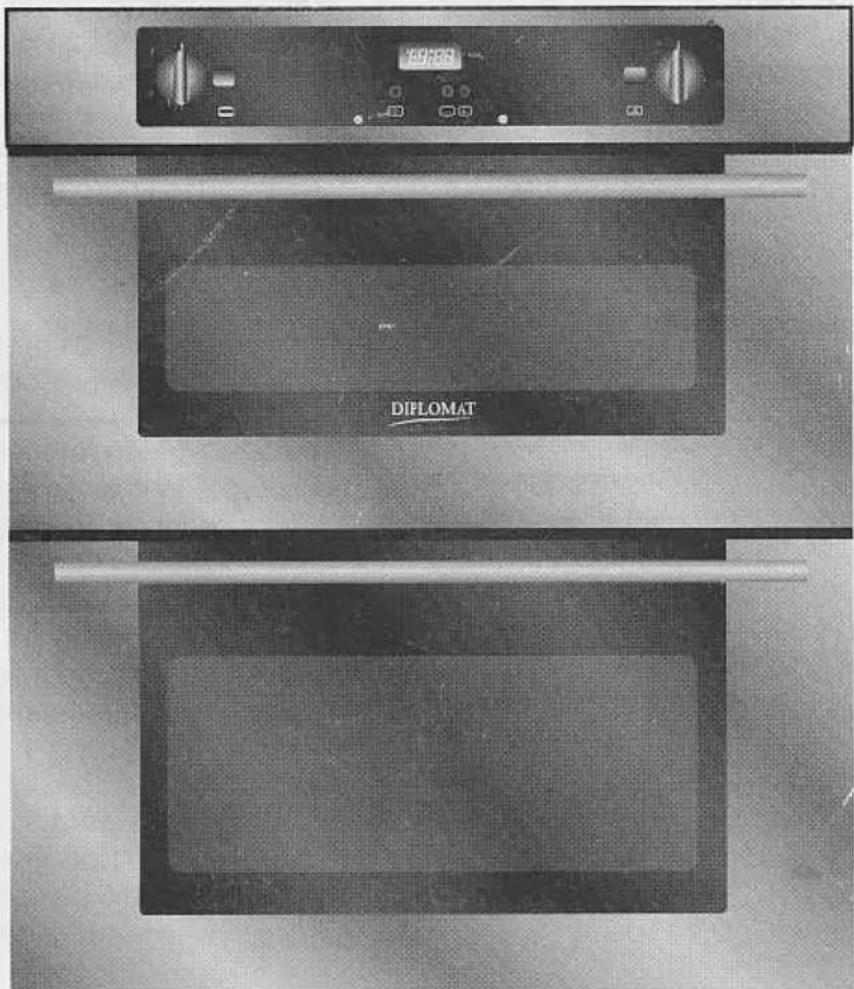
Exterior view of a two-tier oven with digital display and a horizontal rack (no visible text or symbols)ADP4520 (Stainless)
ADP4521 (mocca)
ADP4522 (white)
ADP4524 (green)
CONTENTS
- IMPORTANT NOTES AND SAFETY PRECAUTIONS page 3
- DESCRIPTION OF THE APPLIANCE
General page 4
Control panel and controls page 5
- USER INSTRUCTIONS
How to make the most of your oven page 6
Baking table page 7
Grilling table page 7
Cleaning and maintenance page 8
- TROUBLESHOOTING page 9
- TECHNICAL FEATURES page 9
- INSTALLATION INSTRUCTIONS
Technical information page 10
Installing the built-in oven page 11-12
Electrical connection page 13
Warranty, Spares and Service rear cover
Space for data label
1. IMPORTANT NOTES AND PRECAUTIONS
Thank you for purchasing one of our appliances; we are confident that this modern, functional and practical new model, produced with top quality materials, will meet all your expectations. Although this appliance is very simple to use, we strongly recommend that you read this handbook thoroughly and carefully
Please retain this handbook in a safe place for future reference.
The appliance was designed and made in accordance with the European standards EN 60 335-1 and EN 60 335-2-6 (electrical) plus relative amendments.
The appliance complies with the prescriptions of the European Directives as listed below:
- 73/23 + 93/68 EC concerning electrical safety.
- 89/336 + 92/31 + 93/68 EC concerning electromagnetic compatibility
Oven accessories that could come into contact with foods are made with materials that comply with the provisions of the 89/109 EC directive dated 21/12/88.
• This appliance must be earthed
- We strongly recommend that this appliance be installed by a N.I.C.I.E.C. registered engineer.
- The mains switch for the appliance must be accessible after installation.
- Once all external and internal packaging/wrappings have been removed, check that the appliance is intact.
In case of doubt, do not use the appliance and contact the service organisation.
- All packaging materials used (cardboard boxes, bags, polystyrene foam, nails, etc.) are a potential hazard source and must be kept out of the reach of children. All packaging materials used are environmentally friendly and recyclable.
A list of few basic rules that must be observed when using the oven:
- Before cooking for the first time, ensure the ovens are empty and the doors closed. Heat the ovens at maximum temperature for about 2 hours to ensure all new odours are gone. Ensure adequate ventilation during this process.
- The appliance must only be used for domestic cooking. Any other use is considered improper, may be dangerous and will invalidate your guarantee. The manufacturer cannot be held responsible for any personal injury or damage to property resulting from incorrect installation, maintenance or use of the appliance.
- During cooking and for a while after use, the glass of the oven door and accessible parts can be hot, so keep children at a distance.
- Keep the appliance clean; food deposits can cause a fire risk.
- Before proceeding with the cleaning of your oven ensure that the appliance is switched off.
- In the unlikely case of a failure or malfunction, turn the oven off and contact the service department following the procedure on the rear cover of this booklet.
- Do not leave the oven unattended during grilling.
- Wear oven gloves when placing or removing pans from the oven.
- Beware of hot steam when opening the oven door.
- During baking, do not cover the bottom of the oven or the shelves with tin foil or other material.
- After use of the appliance, make sure that all the controls are set to the off position and the doors are closed.
2. DESCRIPTION OF THE APPLIANCE
GENERAL
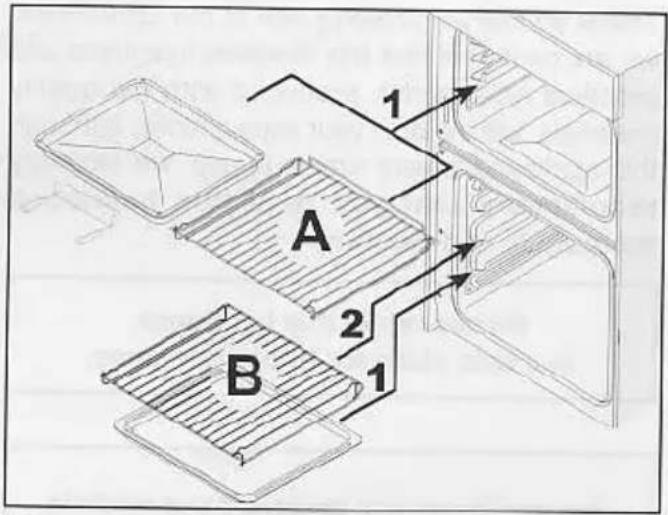
The oven side walls feature several positions, which allow for housing a number of accessories.
- Top oven / grill compartment shelf (A) (with rear stop) – only for top oven
- Grill pan, grid and handle
- Main oven compartment shelf (B) – only for lower oven
• Aluminium baking tray
When grilling, the grill pan and grid can be placed on top the shelf.
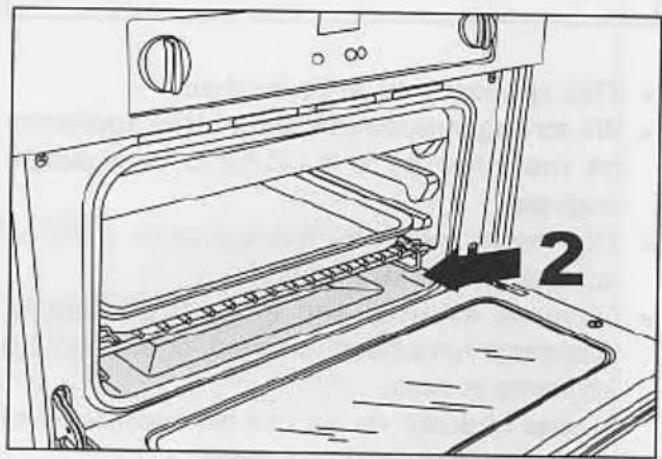
To grill thicker foods, the shelf is designed so that the grill pan can be located into the runners below the shelf with the food positioned directly on the shelf.
text_image
A B 1 2 1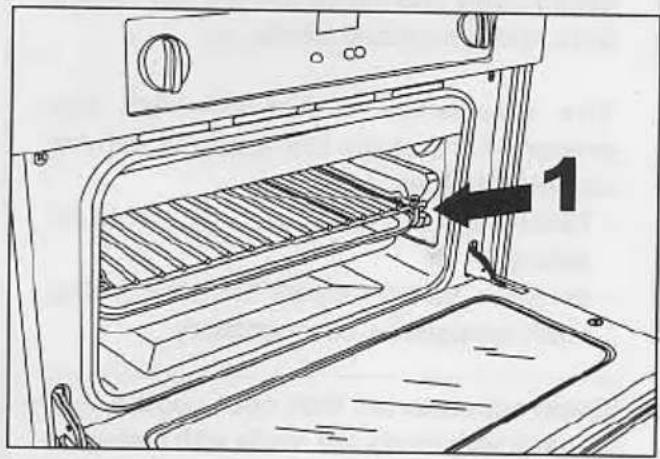
text_image
1To grill the thickest food, locate the shelf on the floor of the top oven with the grill pan and food support on top of the shelf.
natural_image
Line drawing of an oven with a numbered component, showing internal structure and tray (no text or symbols)2. APPLIANCE FEATURES: CONTROL PANELS
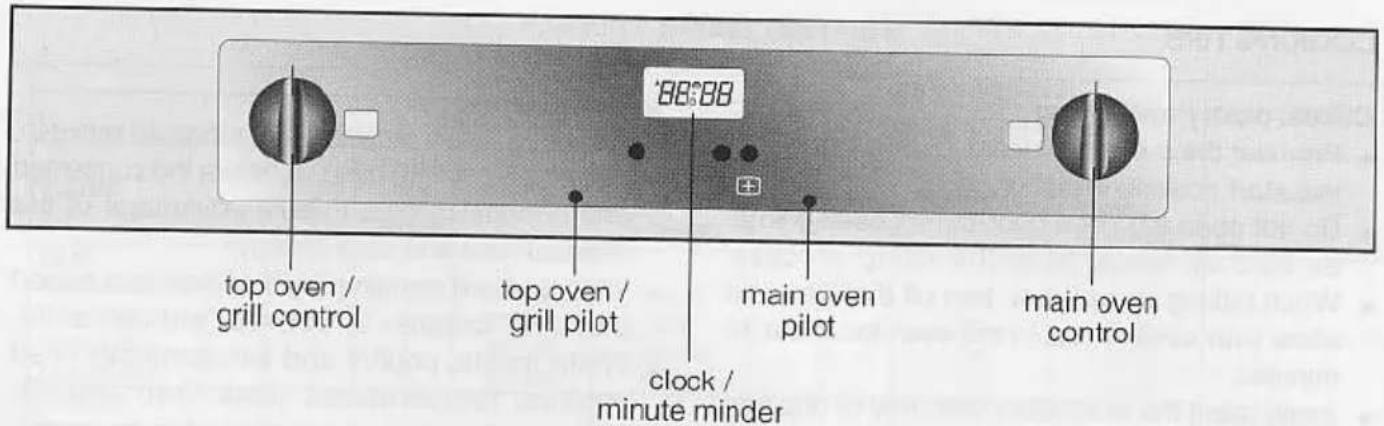
text_image
top oven / grill control top oven / grill pilot clock / minute minder *88°88 main oven pilot main oven controlCLOCK /MINUTE MINDER
Setting the Time of Day
If the display is flashing, the time of day needs to be set.
Press '1' and then set the correct time using buttons '2' or '3', the clock will begin approximately seven seconds after the buttons are released.
Setting the minute minder
Press and release button 3; display will show '0:00' Press and hold button 3 and the time will increase until the desired time is displayed, reduce using button 2 if necessary. The minute minder will begin approximately seven seconds after the buttons are released. While the minute minder is in use, the time of day will not be displayed.
Cancelling the minute minder
To cancel the minute minder, press and hold button 2 until the display reads '0:00' Approximately seven seconds after the button is released, the timer will revert to displaying the time of day.
TOP OVEN / GRILL CONTROL
IMPORTANT: Always ensure that the top door is fully open during grilling
To bake, rotate the oven knob clockwise to select the desired oven temperature. The oven pilot will operate as the thermostat maintains the oven temperature.
To grill, rotate the oven knob clockwise to select the grill function. The oven pilot will operate as the thermostat maintains the oven temperature. Select '0' to turn the grill off after use.
MAIN OVEN CONTROL
Rotate the oven knob clockwise to select the desired oven temperature.
The oven pilot will operate as the thermostat maintains the oven temperature.
Rotate the control anti-clockwise to turn the oven off after use.
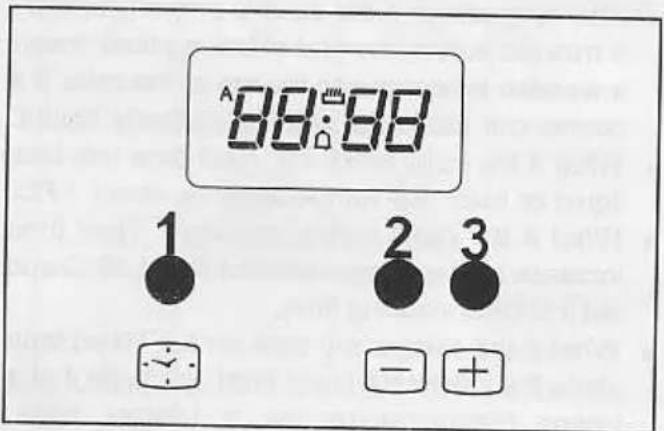
text_image
88:88 1 2 3 - +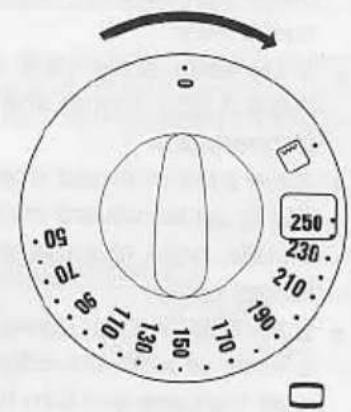
text_image
0 70 50 90 110 130 150 170 190 210 230 250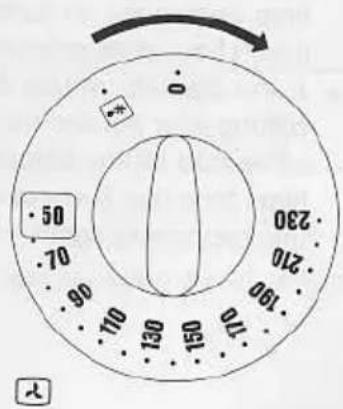
text_image
0 50 70 96 110 130 150 170 190 210 2303. USER INSTRUCTIONS: HOW TO MAKE THE MOST OF YOUR OVEN
COOKING TIPS
Cakes, pastry and bread
- Pre-heat the oven for at least 15 minutes before you start cooking bread or cakes.
- Do not open the oven door during baking time, as cold air would stop the rising process.
- When baking time is over, turn off the oven and allow your cake to rest in the oven for about 10 minutes.
- Avoid using the enamelled oven tray or drip pan to cook cakes in. Use only suitable ovenware.
- How to establish if the cake is properly baked? 5 minutes before the end of baking time, insert a wooden toothpick into the top of the cake. If it comes out clean the cake is properly baked.
- What if the cake sinks in? Next time use less liquid or lower the temperature by about 10°C.
- What if the cake results too dry? Next time increase baking temperature of about 10°C and set a shorter cooking time.
- What if the cake is too dark on top? Next time place the cake on a lower level and bake it at a lower temperature for a longer time.
- If its top is burnt? Cut off the burnt layer and cover with sugar or decorate it with cream, jam, custard etc..
- If the cake is too dark underneath? Next time place it on a higher shelf and lower the baking temperature.
- If the cake or bread looks cooked on its surface but is undercooked inside? Next time use less liquids, bake at a lower temperature and for a longer time.
- If the cake will not come out of the tin/pan? Slide a knife around the edges, place a damp cloth over the cake and turn the tin upside down. Next time grease the tin surface evenly and sprinkle it with flour or breadcrumbs.
- If the biscuits refuse to come away from the baking tray: put the tray back in the oven for a while and lift the biscuits up before they cool. Next time use a sheet of baking foil to prevent this happening again.
Meals - Meats:
- If cooking meals requiring more than 40 minutes, turn off the oven 10 minutes before the suggested end of cooking time to take advantage of the residual heat and save energy.
- Your roast will remain juicy if cooked in a closed pan and crispier if cooked without a lid.
- White meats, poultry and fish generally need medium temperatures (less than 200°C).
- Red meats, which are intended to be "rare", require high temperatures (over 200°C) and short cooking times.
- For tastier roasted meats, place bacon and spices on them.
- If your roast turns out hard and dry. Next time allow the meat to rest longer in its marinade.
- If your roast is too dark on top or underneath: when next roasting, position the meat on a higher or lower level, reduce the temperature and cook for a longer period.
- Your roast is underdone? Cut it in slices, arrange them on a baking tray with the gravy and finish cooking it.
Grilling:
- Sparingly grease and flavour the food before grilling it.
• Turn the food over when half way through cooking. - When roasting fat poultry like goose, pierce the skin under the wings after about one hour cooking to allow the release of fats and obtain a crispier finish.
As aluminium can easily corrode by direct contact with chemical organic substances like lemon juice and vinegar, it is strongly recommended that foods are not placed directly onto aluminium or enamelled pan surfaces, and to use baking foil all the time.
3. USER INSTRUCTIONS: COOKING TIMETABLE
COOKING/ BAKING TIMETABLE
| TOP OVEN UNIT | BOTTOM OVEN UNIT | |||||||
| NATURAL CONVECTION | FAN-FORCED AIR CONVECTION | |||||||
| FOODS | Weight kilos | N. slots level from bottom | Temperature in °C | Cooking/Baking Time (in minutes) | N. slots level from bottom | Temperature in °C | Cooking/Baking Time (in minutes) | Notes |
| MEAT | Roasting tin or other ovenware placed on the grill shelf | |||||||
| Roasted Veal | 1 | 1 | 200-225 | 100-120 | 2 | 190 | 100-120 | |
| Roast Beef | 1 | 1 | 200-225 | 40-50 | 1 | 190 | 40-50 | |
| Roasted Pork | 1 | 1 | 200-225 | 100-120 | 2 | 190 | 100-120 | |
| Roasted Lamb | 1 | 1 | 200-225 | 100-120 | 1 | 190 | 100-120 | |
| POULTRY | ||||||||
| Roasted Chicken | 1 | 1 | 200-225 | 80-90 | 2 | 190 | 70-80 | |
| Roasted Turkey | 1 | 1 | 200-225 | 100-120 | 2 | 190 | 90-110 | |
| Roasted Duckling | 1 | 1 | 200-225 | 90-110 | 2 | 190 | 80-100 | |
| FISH | ||||||||
| Roasted fish | 1 | 1 | 200 | 30-35 | 2 | 170-190 | 25-30 | |
| Stewed fish | 1 | 1 | 175 | 20-25 | 2 | 160-170 | 15-20 | |
| BAKED PASTA | ||||||||
| Lasagne | 2.5 | 1 | 210-225 | 60-75 | 1 | 220-230 | 30-40 | |
| Cannelloni | 2.5 | 1 | 210-225 | 60-75 | 1 | 220-230 | 30-40 | |
| PIZZA | 1 | 1 | 225-max. | 25-30 | 2 | 220-230 | 20-25 | |
| BREAD | 1 | 1 | 225-max. | 20-25 | 2 | 220 | 20 | |
| PATISSERIE/ PASTRIES | Baking tray placed on grill shelf | |||||||
| Biscuits / Cookies | 1 | 190 | 15 | 2 | 170-190 | 15 | ||
| Shortbread | 1 | 200 | 20 | 2 | 190-200 | 20 | ||
| Ciambella | 0.8 | 1 | 200 | 40-45 | 2 | 190-200 | 40-45 | |
| CAKES | ||||||||
| Angel Cake/Sponge | 0.8 | 1 | 190 | 52 | 2 | 170-190 | 45 | Cake tin or mould placed on grill shelf |
| Fruit Tart | 0.8 | 1 | 200 | 65 | 2 | 190-200 | 65 | |
| Chocolate cake | 0.8 | 1 | 200 | 45 | 2 | 190-200 | 45 | |
Values indicated in the tables (temperatures and cooking times) are approximate and may vary according to each person's cooking habits. The timetable refers to cooking times on one level tray. When cooking with the fan-forced air convection (in the bottom oven unit), if more shelves are used (as in fig. 1), an average addition of 5 (+) to minutes to the scheduled cooking time should be calculated.
GRILLING TIMETABLE - TOP OVEN UNIT
| NATURAL CONVECTION OVEN | ||||||
| FOODS | Weight kilos | N. slots level from bottom | Temperature in °C | Knob position | Grilling time (in minutes) | |
| 1^st side | 2^nd side | |||||
| MEAT | ||||||
| T-bone Steak | 0,50 | 1 | 225-max. | 11-12 | 15 | 15 |
| Steak | 0,15 | 1 | 225-max. | 9-10 | 5 | 5 |
| Chicken (half) | 1 | 1 | 225-max. | 11-12 | 25 | 25 |
| FISH | ||||||
| Trout | 0,42 | 1 | 225-max. | 7-8 | 18 | 18 |
| Sole | 0.20 | 1 | 225-max. | 7-8 | 10 | 10 |
| BREAD | ||||||
| Toast slices | 1 | 225-max. | 5-6 | 2-3 | 2-3 | |
Values indicated in the tables (temperatures and cooking times) are approximate and may vary according to each person's cooking habits.
Grilling time depend also on meat thickness and on personal taste.
3. USER INSTRUCTIONS: CLEANING AND MAINTENANCE
Prior to any maintenance work or cleaning, disconnect the appliance from the electricity mains.
CLEANING THE OVEN SURFACE
Proceed with the use of a wet cloth and soapy water.
Never use abrasive sponges or detergents nor use solvents or acids to eliminate stains and glue residuals from stainless steel and enamel surfaces.
CLEANING INSIDE THE OVEN
The oven should be cleaned after each use to remove cooking residuals like fats or sugar which, burnt afterwards, can encrust or form permanent stains and unpleasant smells.
The oven should always be cleaned when it is still warm with soapy water, rinsed and dried properly on all surfaces.
Never use abrasive powder cleaners or sponges. Also wash any accessory used.
Do not leave ingredients like vinegar, coffee, milk, salty water, lemon juice or tomato sauce on enamelled surfaces for a long time.
Do not use acid-based detergents (check the information label on the product you are using).
OVEN DOOR SEALS
The condition of the oven seal is vital for the correct functioning and performance of the oven.
We recommend you:
- Clean it, avoiding abrasive tools or products.
- Check its condition occasionally.
In case the seal has hardened or is damaged, contact your nearest service centre and avoid using the oven until it has been repaired.
SELF-CLEANING OVEN SIDEWALLS
The inner walls of the oven are protected by purpose made panels whose surface presents a microporous enamel which absorbs fat spatters during baking. These panels are designed to aid oven cleaning. To avoid food residuals accumulating inside the oven and the resultant bad odour, it is good practice to perform the following operations periodically: To clean excessive spilling of liquids or fats proceed as follows:
- Remove all accessories and removable parts from the oven
- Wipe with a cloth or sponge
- Heat the oven at maximum temperature for about 2 hours, this will allow the self-cleaning panels to clear any residual cooking stains
- Wait until the oven cools off then wipe it again with a damp cloth.
REPLACING THE OVEN LIGHT BULB (bottom oven unit)
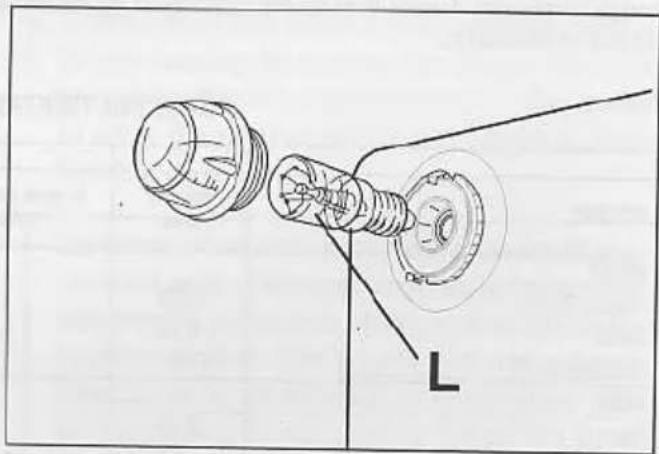
If the oven lamp (L) needs replacing the new lamp must be obtained from your service agent.
Carefully unscrew the glass cover and then the light bulb. Replace the bulb and then the cover taking care that the cover is not cross-threaded. Do not operate the appliance without the cover in position.
natural_image
Technical line drawing of a mechanical component with threaded ends and a central shaft (no text or symbols)4. TROUBLESHOOTING
In the unlikely event that you experience technical problems with your appliance please check the following before calling the service organisation for technical assistance.
| PROBLEM | SOLUTION |
| The oven does not work | Check that the appliance has a mains supply.Check that the knobs are set to the correct position. |
| During cooking the thermostat pilot light is not on | The pilot light will cycle with the thermostat, this is normal.Check that the knob is set to the correct position. |
| The light inside the oven does not turn on (bottom oven unit) | Check that the oven bulb is properly fitted.If it has blown, replace it with a bulb specific from your Service Centre and fit it following the instructions given on page 8. |
5. TECHNICAL FEATURES
OVEN CAVITY DIMENSIONS
| height mm | width mm | depth mm | volume lt. | |
| Top cavity Natural convection oven | 174 | 422 | 415 | 30 |
| Bottom cavity Ventilated oven | 246 | 422 | 397 | 41 |
ELECTRICAL COMPONENTS REQUIREMENTS
| Description | Nominal data | |
| Top oven / grill compartment | Grill elementOven element | 1800 W1600 W |
| Main oven compartment | Rear heating element of the ovenOven light bulbFan of the rear heating elementCooling fanSupply cable | 1000 W15W - E 14 - T30025 - 29 W18 - 22 WH05 RR-F 3x 1.5mm ^2 |
6. INSTRUCTIONS FOR THE INSTALLER
TECHNICAL INFORMATION
All instructions related to installation and maintenance operations listed in this section The installation of this appliance must be carried out by a N.I.C.I.E.C. registered installer following the instructions in this section.
- Once the packaging has been removed from the oven and all its ancillary equipment, thoroughly check that the appliance is in perfect condition. If you have any doubts do not use the appliance and report to your Service Organisation.
- Some parts on the appliance are protected by a plastic film. This protection must be removed before using the appliance.
- Do not move the appliance by its door handles.
All packaging materials used (cardboard boxes, bags, polystyrene foam, nails, etc.) must be kept out of the reach of children as they are a potential hazard. All packaging materials used are environmentally-friendly and recyclable (wooden struts are free from chemicals, cardboard is 80-100% recycled, protective bags are made in polyethylene (PE), bands in polypropylene (PP) and padding in polystyrene foam made without CFC's.
INSTALLATION INSTRUCTIONS
Before you start - please read the instructions carefully - planning your installation will save you time and effort.
Look at the different ways the appliance can be installed - as shown on the following pages - and plan the installation to suit your situation.
Leave the appliance in the base tray packaging until you are ready to install it.
When you remove the appliance from the base tray packaging, take care not to damage it.
Whilst every care is taken to eliminate burrs and raw edges from this product, please take care when handling – we recommend the use of protective gloves during installation.
Please note that the weight of this appliance is approximately 42 kg (unpacked). Take care when lifting it into the housing unit always use an appropriate method of lifting.
This appliance must be installed only at low level - ie; under a worktop. The controls have been designed for viewing at a low level, and it should therefore not be installed at high level.
Please note that all dimensions and sizes given are nominal, some variation is to be expected. If this appliance is to be installed near to a corner where the adjacent cabinets run at right angles forward of the appliance, there must be a gap of at least 90mm between the appliance and the cabinets, to prevent overheating of the cabinets.
Important: Do not modify the outer panels of this appliance in any way.
Fixing screws - The fixing screws are in a polythene bag in the oven pack.
Depending on the method of installation, some of the screws may not be needed.
6. INSTRUCTIONS FOR THE INSTALLER
Step 1: Prepare for installation
There are 3 methods of installing the appliance:
Method 1: Into a space between two base units, ie; without a housing unit.
Method 2: Into a housing unit, with an internal height of less than 710 mm, which can be modified to obtain the required dimensions.
Method 3: Into a housing unit, with an internal height of 710 mm or more.
If you have a non standard size of cabinet which leaves a gap above or below the appliance, you may be able to buy a trim kit (to fill in the gap) from the supplier of your cabinets.
text_image
sidetrim min 550 mm 598 - 602 mm 684 mm 715 mm runners 50 mmStep 1: Prepare for installation
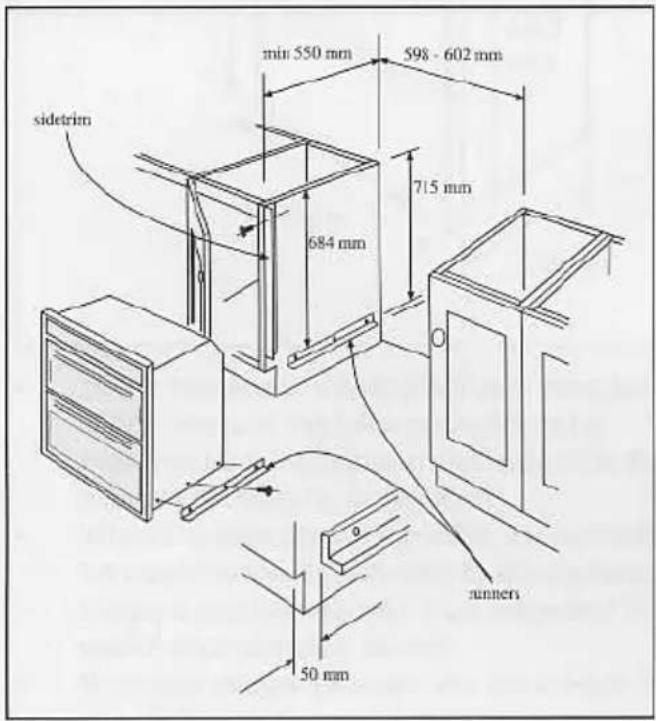
Method 1: Without housing unit (between 2 base units)
Before installing the appliance, check the internal dimensions as shown opposite.
The space for the appliance must be clear of obstruction. You may have to cut into or remove any rear cross members to obtain the 550 mm minimum depth.
The fixing kit is packed onto the oven under the polystyrene packaging. You will find 2 side trims (712 mm long) and 4 runners (423 mm long). The fixing screws are in a polythene bag in the oven.
- Take the 6 No 4.2 x 13 mm long self tapping screws from the polythene bag, and use them to fit one runner to each side of the appliance.
- Make sure they are the right way up as shown.
- Take one of the side trims, hold it against the side of the base unit, and mark off 684 mm from the top edge of the base unit, to the top edge of the runner. Note: This ensures a 5 - 8 mm clearance from the underside of the worktop to the top of the appliance.
- Measure 50 mm from the front edge of the base units, to mark the front edge of the runners.
- Take 6 of the No 4 x 16 mm chipboard screws and screw the runners into opposition the right way up as shown.
- Fit the side trims to be flush to the top and front edges of the base units, using the remaining 6 No 4 x 16 mm chipboard screws.
6. INSTRUCTIONS FOR THE INSTALLER
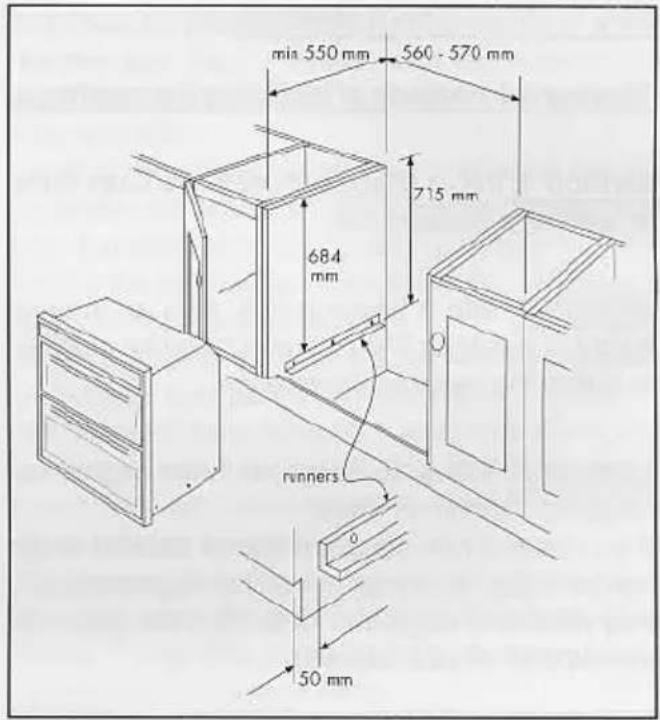
Method 2: Housing unit with internal height less than 710 mm.
Note: You will not need the 2 side trims (712 mm long) or the appliance runners for this installation. You will need the 2 runners to fix to the adjacent cabinets.
Before you start:
Before removing the bottom shelf or modifying the housing unit, make sure that it will remain structurally sound - eg; by fixing to adjacent cabinets, floor or worktop.
You may have to cut into or remove any rear cross members to obtain the 550 mm minimum depth. To obtain the required 715 mm height, you may have to lower or remove the bottom shelf - remove any cross rails and reposition brackets.
To fix the runners
- Take the side trims, hold it against the side of the base unit, and use it to mark off the 684 mm from the top edge of the side unit, to the top edge for the runner.
Note: This ensures a 5–8 mm clearance from the underside of the worktop to the top of the appliance. - Measure 50 mm from the front edges of the base units, to mark the front edge for the runners.
- Take 6 of the No 8 x 12 mm chipboard screws and screw the runners into position the right way up as shown.
- If necessary, adjust the height of the plinth to just below the bottom edge of the runners.
text_image
min 550 mm 560 - 570 mm 715 mm 684 mm runners 50 mm6. INSTRUCTIONS FOR THE INSTALLER
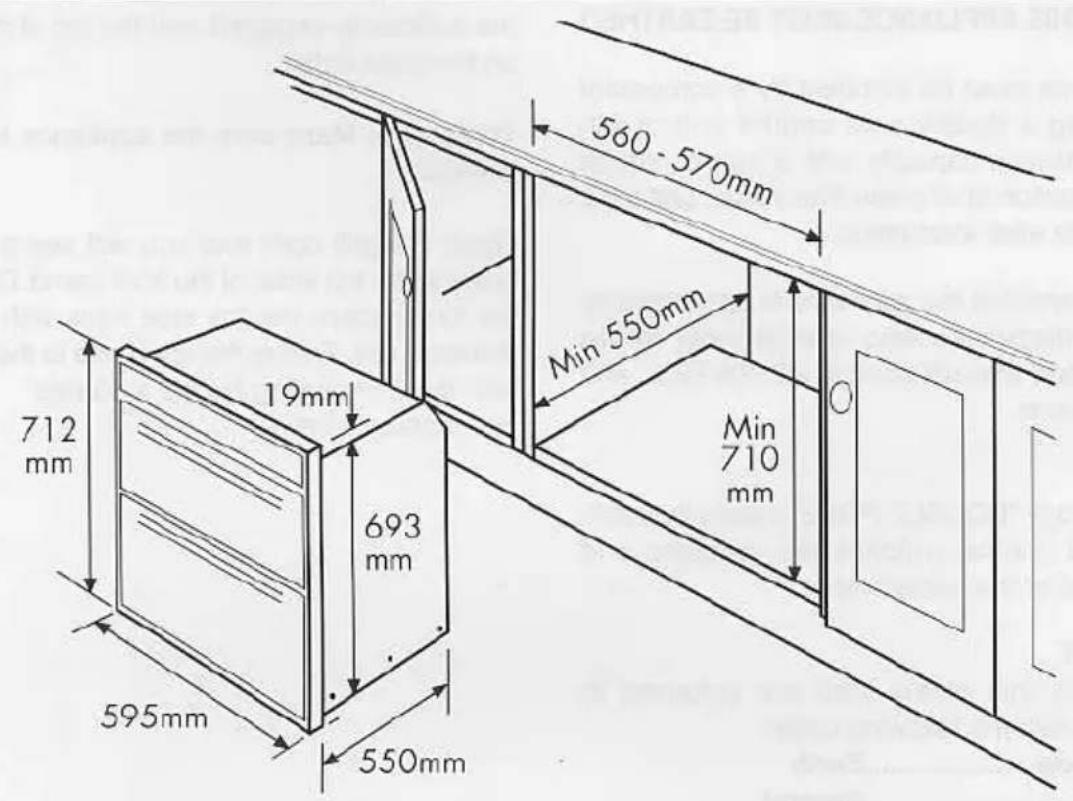
Method 3: Housing unit with internal height of 710 mm or more.
Note: You will not need the 4 runners and 2 trims that are packed with the oven for this installation.
Remove any fixings that may prevent entry of the oven into the housing. The cabinetry should be kept structurally sound by fixing to adjacent cabinets, floor or worktop. 560 – 570 mm
text_image
560 - 570mm Min 550mm 712 mm 19mm 693 mm 595mm 550mm Min 710 mm- When installed in a typical 600 mm deep built in housing unit, the false back should be removed from the housing unit to provide the necessary depth for installation.
- When the false back is removed, it is normally the case that the support shelf for the appliance leaves a gap between the back edge and the wall of approximately 80 mm.
- If no gap occurs between the back edge of the shelf and the wall behind the unit, we recommend that a gap of at least 30 mm is made by shortening the shelf.
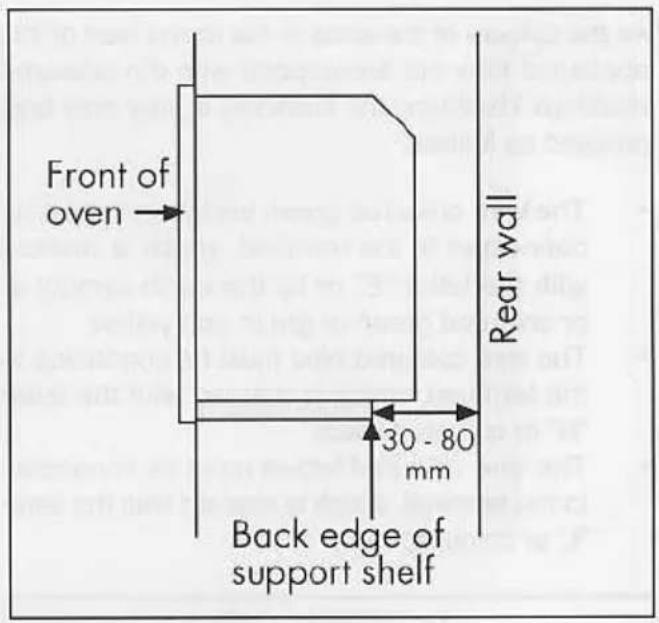
text_image
Front of oven 30 - 80 mm Back edge of support shelf Rear wall6. INSTRUCTIONS FOR THE INSTALLER
Step 2: Connection to the Electricity Supply
IMPORTANT: ENSURE THAT THE ELECTRICITY SUPPLY IS SWITCHED OFF BEFORE CONNECTING.
WARNING THIS APPLIANCE MUST BE EARTHED
The appliance must be installed by a competent person using a double-pole control unit of 20-ampere minimum capacity with 3 mm minimum contact separation at all poles. The control unit must be accessible after installation.
We recommend that the appliance is connected by a qualified electrician who is a member of the N.I.C.E.I.C. and who will comply with the I.E.E. and local regulations.
NOTE:
The terminology "DOUBLE-POLE" means that both the live and neutral supplies are switched and disconnected at the same time.
IMPORTANT
The wires in this mains lead are coloured in accordance with the following code:-
Green / Yellow......Earth
Blue....Neutral
Brown Live
As the colours of the wires in the mains lead of this appliance may not correspond with the coloured markings identifying the terminals in your spur box, proceed as follows:
- The wire coloured green and yellow must be connected to the terminal, which is marked with the letter "E" or by the earth symbol ⊕ or coloured green or green and yellow.
- The wire coloured blue must be connected to the terminal, which is marked with the letter "N" or coloured black.
- The wire coloured brown must be connected to the terminal, which is marked with the letter "L" or coloured red.
TECHNICAL DATA
FUSE RATING:
20 AMP
Step 3: Insert appliance and secure in position
Note: The unit housing the appliance must be appropriately fixed.
Care must be taken to ensure the appliance runners are sufficiently engaged over the top of the runners on the base units.
To secure: Make sure the appliance is centrally located.
Open the grill door and you will see the 2 fixing holes at the top sides of the front frame. Drill through the fixing holes into the side trims with a 3.2 mm diameter drill. Secure the appliance to the side trims with the 2 remaining No 4,2 x 13 mm self-tapping screws.
• 12 Months Guarantee
GUARANTEE CONDITIONS
(a) Any claim during the period of the guarantee MUST BE ACCOMPANIED WITH THE RECEIPT relating to the original purchase.
(b) The unit must be correctly installed and operated in accordance with the manufacturer's instructions and used for normal domestic purposes.
(c) The guarantee does not cover accidental damage, misuse or alterations which are likely to affect the units.
(d) The guarantee is invalid if the unit is tampered with or repaired by any unauthorised poison.
(e) The guarantee in no way affects your statutory rights.
(f) Mainland U.K only
• Procedure when reporting a fault
- Give full name, address including post code, home telephone number and business telephone number if appropriate.
-
Quote sales receipt number, make and model number of faulty appliance. This sheet covers the following products:-
-
Give a summary of the problem.
LOW CALL SERVICE
LOW CALL SERVICE
LOW CALL SERVICE
LOW CALL SERVICE
08457 959722
LOW CALL SERVICE
LOW CALL SERVICE
LOW CALL SERVICE
LOW CALL SERVICE