Select 910 - Ofen Diplomat - Kostenlose Bedienungsanleitung
Finden Sie kostenlos die Bedienungsanleitung des Geräts Select 910 Diplomat als PDF.


| Produkttyp | Doppelbackofen (Einbaubackofen) |
| Modell | Select 910 (AHY43**) |
| Abmessungen (HxBxT) für Tower-Einbau | 895 x 560 x 550 mm |
| Gewicht | 55 kg |
| Stromversorgung | 230 V ~ 50 Hz |
| Maximale Leistungsaufnahme | 4,07 kW |
| Sicherung | 20 A |
| Funktionen Hauptofen | Beleuchtung, Umluft, Ober-/Unterhitze, Auftauen, Schmoren |
| Funktionen Oberofen | Konventionelle Hitze, Grill (Dual Zone) |
| Timer | Elektronische Zeitschaltuhr mit Minutentimer |
| Reinigung | Leicht zu reinigender Emaille, Stay-Clean-Beschichtung |
| Sicherheit | Kindersicherung, doppelpoliger Ausschalter, Gehärtete Glasscheiben |
| Garantie | 12 Monate |
| Kundendienst-Telefon | 0345 - 959722 |
| Zubehör | Einschubgitter, Grillpfanne, Grillrost |
Häufig gestellte Fragen - Select 910 Diplomat
Benutzerfragen zu Select 910 Diplomat
0 Frage zu diesem Gerät. Beantworten Sie die, die Sie kennen, oder stellen Sie Ihre eigene.
Eine neue Frage zu diesem Gerät stellen
Laden Sie die Anleitung für Ihr Ofen kostenlos im PDF-Format! Finden Sie Ihr Handbuch Select 910 - Diplomat und nehmen Sie Ihr elektronisches Gerät wieder in die Hand. Auf dieser Seite sind alle Dokumente veröffentlicht, die für die Verwendung Ihres Geräts notwendig sind. Select 910 von der Marke Diplomat.
BEDIENUNGSANLEITUNG Select 910 Diplomat
SERVICE CENTRE
Telephone Number
0345 - 959722
12 Months Guarantee
GUARANTEE CONDITIONS
(a) Any claim during the period of the guarantee MUST BE ACCOMPANIED WITH THE RECEIPT relating to the original purchase.
(b) The unit must be correctly installed and operated in accordance with the manufacturer's instructions and used for normal domestic purposes.
(c) The guarantee does not cover accidental damage, misuse or alterations which are likely to affect the units.
(d) The guarantee is invalid if the unit is tampered with, or repaired by any unauthorised person.
(e) The guarantee in no way affects your statutory rights.
(f) Mainland U.K. only
Your SELECT OVEN by
DIPLOMAT
CONTENTS
YOUR NEW OVEN
Before You Begin 2
INSTALLATION
Installation 2
Dimensions 3
USING YOUR OVEN
Cleaning 4
Fitting "Stay Clean" Shelf Runners 5
Removal or Oven Door and Interior Glass Door 5
MODEL IDENTIFICATION
Model Identification 6
Control Panel Symbols 7
OPERATING YOUR OVEN
Light Only, Fan Cooking, Conventional Cooking and Grilling 8
Top Heat Only, Bottom Heat Only, Defrost and Slow Cooking 9
Using Your Electronic Minute Minder
Setting the Time of Day, Setting the Minute Minder and Audible Signal 10
Using Your Electronic Timer
Setting the Time of Day and Semi-Automatic Cooking 10
Fully Automatic Cooling, Audible Signal and Programme Verification 11
TECHNICAL DATA
Single Oven 12
Double Oven 13
TROUBLESHOOTING
Not Working Property 14
FAULT REPORTING
Reporting a Fault 15
GUARANTEE
12 Months Guarantee 16
AHY35** Select 610 Fan Oven
AHY36** Select 620 Multi-Function Oven
AHY43** Select 910 Fan Double Oven
AHY44** Select 920 Multi-Function Double Oven
CE
Before You Begin .....
You and your new oven are capable of great things, but remember no two ovens are the same. Rather than jump in at the deep end with an appliance that may differ radically in its characteristics from one of its predecessors, we strongly recommend you take time to read this leaflet fully from cover to cover.
Get to know all there is to know about cooking with your oven before preparing some of the many mouth-watering meals your oven is capable of producing. It may seem like a chore, but it'll pay off in the long run.
Glass Door Panels
To meet the relevant Standards of Domestic cooking appliances, all the glass panels on this appliance are toughened to meet the fragmentation requirements of BS3193. This ensures that, in the unlikely event that a panel breaks, it does so into small fragments to minimise the risk of injury.
Installation
Although it is relatively easy to install, we strongly recommend that the oven is installed by a N.I.C.I.E.C. or Corgi registered Engineer. The latter has the advantage of being conversant with gas as well as electrical appliances.
Your brand new oven is produced to stringent EEC regulations and is compatible with most 600mm wide housing units.
Your Engineer may want to study the Dimensions on page 3 and the Technical
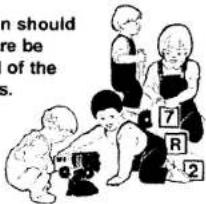
Remember - OVENS GET HOT !!
Although the appliance complies with current European Norms governing external temperature of ovens and that cool touch doors have been incorporated into the design of this appliance, some parts of the oven inevitably become hot during use.
Children should therefore be warned of the dangers.
text_image
n should re be of the s.Please take care when handling, using or cleaning all glass panels as any damage to the surfaces or edges may result in the glass breaking without warning or apparent cause at a later date. Should any glass panel be damaged we strongly recommend that it is replaced immediately.
Details on page 10 before proceeding with the installation, so keep it handy for reference.
IMPORTANT: Ensure that the electricity supply is switched off before connecting.
Your appliance must be connected to fixed wiring via the use of a double pole switched outlet, i.e. one in which both the live and the neutral supplies are switched and disconnected at the same time, with a contact separation of at least 3mm.
Procedure when Reporting a Fault
If having followed the advice in the above section and your oven is still not working, please call our Service Centre with the following information.
- Your name, address and post code
- Your telephone number (home and business if appropriate)
• The make and model number of your appliance.
• A brief summary of the problem.
This products reference is as follows:
SELECT 610 FAN OVEN:
AHY35**
SELECT 620 MULTI-FUNCTION OVEN: AHY36**
SELECT 910 FAN DOUBLE OVEN:
AHY43**
SELECT 920 MULTI-FUNCTION DOUBLE OVEN: AHY44**
Not Working Properly? Check these points first
1. Smoke Coming from Oven?
If the oven is still relatively new, this problem is usually due to protective oil on elements.
Otherwise, the answer may be oil or fat which has become deposited on the elements during cooking.
In either event, continued use should burn away the residues.
On future occasions, try to shield food with foil or keep it further away from element, particularly when grilling.
Note: See 'Using Your Oven for the First Time' on page 4.
2. Light bulb does not come on?
A replacement is probably necessary.
Proceed as follows:
- Set the oven to position 0 and switch off power.
- Check the oven is cool.
- Unscrew the protective glass cover, anti-clockwise, making sure that the washer stays in place.
- Replace the bulb with a new bulb of the same specification (type 15W - 230V - 300°C)
- Screw back until hand tight.
Note: Bulb replacement is not covered by your guarantee
3. Oven does not work at all?
- Check appliance is switched on at the mains.
- Check for an unexpected power failure by switching on adjacent lights, etc.
- Finally, check fuses. If all these prove satisfactory, call a qualified engineer.
Note:
The oven needs to be secured after being fitted into either of the housing units.
To do this, open the oven door and secure with suitable chipboard screws (not supplied) through the holes in the oven casing.
BUILT-IN TOWER DIMENSIONS (SINGLE OVEN)
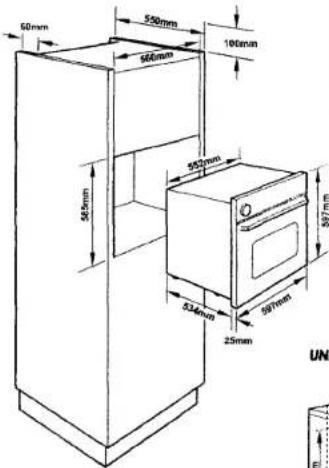
text_image
50mm 550mm 100mm 560mm 580mm 592mm 536mm 597mm 25mm UNIBUILT-IN TOWER DIMENSIONS (DOUBLE OVEN)
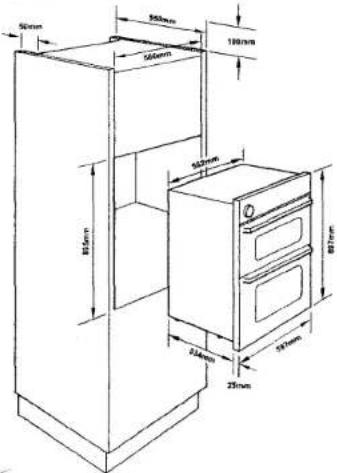
text_image
50mm 500mm 100mm 500mm 85mm 85mm 25mm 87mmUNDER-COUNTER DIMENSIONS
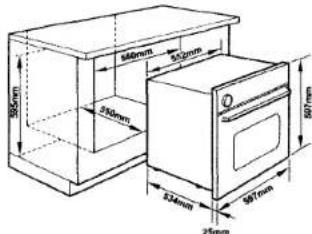
text_image
50mm 350mm 840mm 820mm 507mm 834mm 501mm 25mmUsing Your Oven For the First Time
In the interests of hygiene we strongly recommend you take the following precautions before use.
Wash the inside of your oven and the enamelled accessories with soap and water before fitting the 'Stay Clean' shelf runners (shown on page 5) and switching on the electrical power.
It's quite safe to wipe the element as long as the appliance is disconnected. It is standard procedure for all manufacturers of electric ovens to leave a light film of protective oil on the element to prevent corrosion. This is invariably burnt off early in the life of the oven, but often glves rise
to an acrid smell, sometimes accompanied by smoke.
To pre-empt this normal experience we suggest that after having washed the inside of your oven with soap and water as directed and before using it to prepare food for the first time you heat it up for some 30 minutes. This should dissipate the majority of the oil, but don't be surprised if a slight smell persists every time the element is heated for a few weeks after this initial use. Eventually, all traces of odour should disappear.
A Few Words About Cleaning ...
It's always a good idea to leave the oven to cool for at least an hour before you attempt to clean it.
The interior of your oven is high gloss easy clean enamel and should be cleaned with luke-warm water, detergent and a soft cloth. On no account should you use abrasives or other coarse cleaning agents as these may permanently damage the enamelled surfaces.
Dried-on or baked-on stains should be removed with one of the many non-caustic cleaners especially formulated for oven cleaning.
Always follow the manufacturer's instructions.
The shelves, grill pan, grilling grid and grill deflector, where fitted, can be cleaned with water, detergent and a synthetic cleaning sponge.
The side and back panels have a special 'Stay Clean' coating (except model)
AHY4301). In normal use this is practically self cleaning but occasionally it may be necessary to clean by hand.
This can be done using clean warm water and a soft nylon brush. If the soiling is heavy, a mild detergent can be used, although this could cause discolouration.
Never use abrasive cleaners, powders, aerosols or caustic oven cleaners as these will destroy the coating.
Cleaning Stainless Steel
Cleaning stainless steel can be done using a hot water solution containing a mild detergent or washing up liquid and wiping over with a soft, dry cloth. Alternatively use a cleaner specifically designed for cleaning and polishing stainless steel.
Never use abrasive cleaners, powders or caustic oven cleaners as these will destroy the surface.
Technical Data - Double Oven
| Weight: | 55 kg |
| Power Supply: | 230V - 50Hz |
| Power Max Usage: | 4.07 kW |
| Fuse Rating: | 20 AMP |
Size of opening required for oven dimensions: Tower Unit - H895 x W560 x D550
CONNECTING CABLE:
THIS APPLIANCE SHOULD BE FITTED USING A TWIN AND EARTH CABLE OF 2.5mm CROSS SECTIONAL AREA, MANUFACTURED TO BS6004.
The switched outlet should comply with BS 3676 Part 1 1989
WARNING:
THIS APPLIANCE
MUST
BE EARTHED
IMPORTANT : ENSURE THAT THE ELECTRICITY SUPPLY IS SWITCHED OFF BEFORE CONNECTING.
Your appliance must be connected to fixed wiring using a double pole switched outlet, i.e. one in which both the live and the neutral supplies are switched and disconnected at the same time, with a contact separation of at least 3mm.
The terminals marked 'SUPPLY' are for the internal housing wiring and the terminals marked 'LOAD' are for the connection of the appliance.
We strongly recommend that the appliance is connected by a qualified electrician who is a member of N.I.C.E.I.C. or Corgi who will comply with the I.E.E. and any local Regulations.
Technical Data - Single Oven
| Weight: | 35 kg |
| Power Supply: | 230V - 50Hz |
| Power Max Usage: | 2.07 kW |
| Fuse Rating: | 13 AMP |
Size of opening required for oven dimensions: Under Counter - H595 x W560 x D550 Tower Unit - H585 x W560 x D550
CONNECTING CABLE: THIS APPLIANCE SHOULD BE FITTED USING A TWIN AND EARTH CABLE OF 1mm CROSS SECTIONAL AREA, MANUFACTURED TO BS6004.
The switched outlet should comply with BS 1363 Part 4
WARNING: THIS APPLIANCE MUST BE EARTHED
Fitting the Shelf Runners
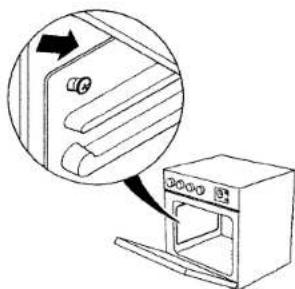
The shell runners supplied in the accessory kit have keyhole slots to hang the side panels to inside the oven cavity.
To fit the shelf runners into your oven, hook the keyhole slots located at the top of the panels over the screw heads in the oven cavity sides.
Slide the runners down at an angle as shown in the diagram.
natural_image
Diagram showing a door opening with a magnified view of the interior (no text or symbols present)Removal of Oven Door
- Completely open the door.
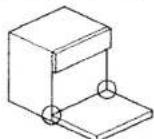
- Pull the locking catches back as indicated in details A & B.
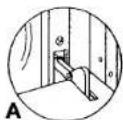
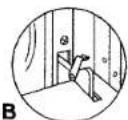
- Push the door back up into its first resting position (the door naturally stops at this point).
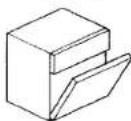
- Carefully lift the door upwards and out to unhook the door catches.
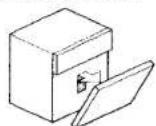
- To replace the door, hook the hinges into their locations and carry out the operations in the reverse order.
Push the locking catches down into their original positions.
Removal of Interior Glass Door
The interior glass door can only be removed and cleaned once the oven door has been removed. Remove the glass from the top of the door, clean and replace ensuring that the glass is the correct way up.
IMPORTANT : ENSURE THAT THE ELECTRICITY SUPPLY IS SWITCHED OFF BEFORE CONNECTING.
Your appliance must be connected to fixed wiring using a double pole switched outlet, i.e. one in which both the live and the neutral supplies are switched and disconnected at the same time, with a contact separation of at least 3mm.
The terminals marked 'SUPPLY' are for the internal housing wiring and the terminals marked 'LOAD' are for the connection of the appliance.
We strongly recommend that the appliance is connected by a qualified electrician who is a member of N.I.C.E.I.C. or Corgi who will comply with the I.E.E. and any local Regulations.
Technical Data - Single Oven
| Weight: | 35 kg |
| Power Supply: | 230V - 50Hz |
| Power Max Usage: | 2.07 kW |
| Fuse Rating: | 13 AMP |
Size of opening required for oven dimensions: Under Counter - H595 x W560 x D550 Tower Unit - H585 x W560 x D550
CONNECTING CABLE: THIS APPLIANCE SHOULD BE FITTED USING A TWIN AND EARTH CABLE OF 1mm CROSS SECTIONAL AREA, MANUFACTURED TO BS6004.
The switched outlet should comply with BS 1363 Part 4
WARNING: THIS APPLIANCE MUST BE EARTHED
Fitting the Shelf Runners
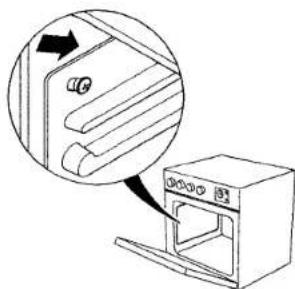
The shelf runners supplied in the accessory kit have keyhole slots to hang the side panels to inside the oven cavity.
To fit the shelf runners into your oven, hook the keyhole slots located at the top of the panels over the screw heads in the oven cavity sides.
Slide the runners down at an angle as shown in the diagram.
natural_image
Diagram showing a door handle opening into a kitchen appliance, with an arrow indicating the process (no text or symbols present)Removal of Oven Door
- Completely open the door.
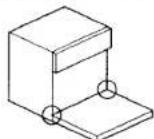
- Pull the locking catches back as indicated in details A & B.
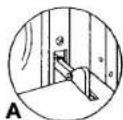
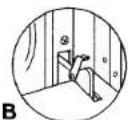
- Push the door back up into its first resting position (the door naturally stops at this point).
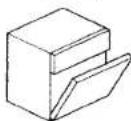
- Carefully lift the door upwards and out to unhook the door catches.
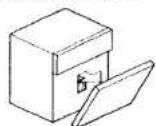
- To replace the door, hook the hinges into their locations and carry out the operations in the reverse order.
Push the locking catches down into their original positions.
Removal of Interior Glass Door
The interior glass door can only be removed and cleaned once the oven door has been removed. Remove the glass from the top of the door, clean and replace ensuring that the glass is the correct way up.
Model Identity Panels -
Glass control panels
Identify which model you have from the following features and control panel pictures.
AHY35**
• Light
• Fan Assisted Oven
• Single Zone Temperature Controlled Grill
• Electronic Minute Minder
AHY36**
• Light
• Conventional Oven
- Slow cook
• Electronic Timer
• Dual Zone Temperature
Control Grill
AHY43**
Top Oven
• Conventional Oven
• Dual Zone Temperature
Control Grill
• Electronic Minute Minder
AHY44**
Top Oven
• Conventional Oven
• Dual Zone Temperature
Control Grill
Main Oven
• Light
• Fan Assisted Oven
• Conventional Oven
- Bottom Heat
- Top Heat
- Slow Cook
- Defrost
• Electronic Timer
Model Identity Panels -
Stainless steel
Identify which model you have from the following features and control panel pictures.
AHY3601
• Light
• Conventional Oven
- Slow cook
• Electronic Timer
- Dual Zone Non
Variable Grill
AHY4301
Top Oven
• Conventional Oven
• Dual Zone Non
Variable Grill
• Electronic Minute
Minder
AHY4401
Top Oven
• Conventional Oven
• Dual Zone Non
Variable Grill
Main Oven
• Light
• Fan Assisted Oven
• Conventional Oven
- Bottom Heat
- Top Heat
- Slow Cook
- Defrost
• Electronic Timer
Fully Automatic Cooking
Set the oven to Fan, Conventional, etc. as described in the previous section.

Press and hold the Cook Time button on the timer display and set the required cooking time using the Plus + and/or Minus - buttons.
The AUTO symbol will illuminate on the timer display.

Press and hold the Stop Time button on the display timer and set the required stopping time (actual time of day) your require your meal to be ready using the Plus + and/or Minus - buttons.
The oven will automatically calculate the start time to begin cooking.
At the end of the stopping time there will be an audible signal and the AUTO symbol will flash.

The Cook Time symbol in the display will now be off and the oven will now be in stand by mode.
Note: To use the oven in Manual Mode you must reset the timer to Manual by pressing the Manual switch. Remember to switch the oven off when setting to Manual.
If the cooking time is stopped before the set period could be completed there will be an audible signal to indicate the error.
Audible Signal
The audible signal sounds at the end of any selected programme for a period of approximately 7 minutes. The sound can be cancelled by pressing any of the function buttons.
Pressing the Minus - switch twice without having previously selected a function changes the frequency of the sound. There are 3 frequencies to choose from.
Program Verification
A short time after any function has been set the timer display will revert back to time of day. If at any time you wish to either verify the set time or how long remains push the relevant button. To cancel any programme push the Manual button.
Using Your Electronic Minute Minder
This timer operates in the 24 hour mode, for example 1 pm is set as 13.00.
Setting the Time of Day
When the electricity supply is first switched on, or if the supply has been interrupted, e.g. by a power cut, the timer display will flash.
√ Press and release the Time of day button on the timer display and
immediately set the time using the
☒ Minute Minder Plus + and/or Minus - buttons.
To adjust the time of day press and
release the Time of Day button on the
timer display and set the time using
the Minute Minder Plus + and/or Minus - buttons.
Setting the Minute Minder
Set by pressing the Minute Minder Plus + button on the timer display until the desired time is reached.
Adjust at any time by pressing the
X Minute Minder Plus + and/or Minus - buttons.
Audible Signal
The audible signal sounds at the end of the set time for a period of approximately 7 minutes. The sound can be cancelled by pressing the
X Minute Minder Plus + button (once only).
X Pressing the Minute Minder Minus - button twice changes the frequency of the sound.
There are 3 frequencies to choose from.
Using Your Electronic Timer
This timer operates in the 24 hour mode, for example 1 pm is set as 13.00.
The timer on Single ovens will control the oven, the grill is not controlled by the timer.
The timer on Double ovens will control the main oven, the top oven and grill is not controlled by the timer.
Setting the Time of Day
When the electricity supply is first switched on, of if the supply has been interrupted, e.g. by a power, cut, the time display will flash.
Press and release the Manual button on the timer display and immediately set the time using the Plus + and/or Minus - buttons.
The Cook Time symbol will illuminate on the timer display to indicate the timer is in manual mode.
To adjust the time of day press and release the Manual button on the timer display and set the time using the Plus + and/or Minus - buttons.
Semi-Automatic Cooking
Set the oven to Fan, Conventional, etc. as described in the previous section.
SSS Press and hold the Cook Time button on the timer display and set the required Cook Time using the Plus + and/or Minus - buttons.
The AUTO symbol will illuminate and the Cook Time symbol will remain on in the timer display.
The oven will operate immediately and for the period of time you have set. At the end of this period the oven will automatically turn off and there will be an audible signal and the AUTO symbol will flash on the timer display.
Note: To use the oven in Manual Mode you must reset the timer to Manual by pressing the Manual switch. Remember to switch the oven off when setting to Manual.
Control Panel Symbols
Oven controls

Top oven

Main Oven

Thermostat

Selector Switch

Light

Conventional Cooking

Top Heat Only

Bottom Heat Only

Half Grill

Full Grill

Slow cook

Timer/Minder Controls

Manual

Cook Time

Stop Time

Alarm

Minute Minder

Plus Time

Minus Time

Time of Day
AUTO Auto
Operating Your Oven
Please check which Model you have to see which features are applicable.
Light Only
Dependant on your model turn either

the Selector dial or

the Oven Thermostat dial to show the

light symbol in the window.
Note: The light will come on and stay on while you are cooking.
Fan Cooking

Turn the Selector dial to show the

Fan Defrost and Fan Oven symbol in the window.

Dependant on your model turn either

the Oven Thermostat dial or the
Conventional Cooking
FOR MAIN OVEN

Turn the Selector dial to show the

Conventional Cooking symbol in the window.
Dependent on your model turn either

the Oven Thermostat dial, or the Main

Oven dial to the desired temperature. FOR TOP OVEN

Turn Top Oven dial to the desired temperature.
Note: The light behind the oven thermostat will go out when the set temperature is reached. It will then go on and off as the thermostat cycles to keep the oven at the required temperature.
Warning: In common with other manufacturers, we advise not to place trays, pots or other large items on the bottom of the oven when cooking. This may cause heat to be reflected downwards and overheat the housing unit. Such damage will not be covered by your guarantee.
Grilling
Dependent on your model turn either

the Selector dial or

the Oven Thermostat dial to show the

W Half Grill or Full Grill symbol in the window.
Warning: When using the grill on a single oven the oven door must be partly open. When grilling in the top oven of a double oven the door must be fully open.
Variable Grilling
Vary the temperature by turning the

Full Grill Temperature dial.
The highest setting is 5 and the lowest setting is 1.
Non Variable Grilling
To vary the temperature move the grill pan either to or away from the grill.
Note: For best results always pre-heat the grill for approximately 5 minutes before use.
Remember: Oven parts get hot when grilling - keep children away.
Top Heat Only

Turn the Selector dial to show the

Top Heat only symbol in the window.

Turn the Main Oven dial to the desired temperature.
Note: The light behind the oven thermostat will go out when the set temperature is reached. It will then go on and off as the thermostat cycles to keep the oven at the required temperature. This feature is normally used in the last stages of cooking for 15 minutes to brown roasts or crackling.
Bottom Heat Only

Turn the Selector dial to show the

Bottom Heat only symbol in the window.
Dependant on your model turn either

the Oven Thermostat dial or the

Main Oven dial to the desired
temperature
Note: The light behind the oven thermostat will go out when the set temperature is reached. It will then go on and off as the thermostat cycles to keep the oven at the required temperature. This feature is normally used in the last stages of cooking to ensure that moist cakes and pies are cooked right to the bottom.
Defrost

Turn the Selector dial to show the

Fan Defrost symbol in the window. Dependant on your model turn either

the Oven Thermostat dial or the

Main Oven dial to the 'off' position ●
Note: Do not use heat to aid the defrosting. Place the frozen product into a suitable tray to catch any defrost water.
Slow Cooking

Turn the Selector dial to show the

Slow Cooking symbol in the window on double ovens

or the Conventional Cooking symbol on single ovens.
Dependant on your model turn either

the Oven Thermostat dial or the

Main Oven dial to 200°C and cook the food for 30 minutes then turn the Oven Thermostat or Main Oven dial

to show the Slow cook symbol in the window.
Note: The controls cooling fan will only operate when a pre-set temperature has been reached and not when the appliance is switched on. Conversely, the fan may run on after the appliance is switched off until the appliance has cooled