
UB-DXR12 - Beschallungssystem YAMAHA - Kostenlose Bedienungsanleitung
Finden Sie kostenlos die Bedienungsanleitung des Geräts UB-DXR12 YAMAHA als PDF.

| Produkttyp | Aktivlautsprecher (Powered Speaker) |
| Modell | UB-DXR12 |
| Marke | Yamaha |
| Abmessungen (B x H x T) | 362 mm x 601 mm x 350 mm |
| Gewicht | 17,8 kg |
| Verstärkerleistung | 1100 W (Dynamisch) |
| Frequenzbereich | 52 Hz – 20 kHz |
| Maximaler Schalldruckpegel | 132 dB |
| Treiber | 12" Tieftöner, 1,75" Hochtöner |
| Gehäusematerial | Polypropylen |
| Eingänge | 2x XLR/Kombibuchse, 1x RCA |
| Ausgänge | 1x XLR (Thru) |
| Stromversorgung | 100-240 V AC, 50/60 Hz |
| Leistungsaufnahme | 100 W (Standby: 0,5 W) |
| Entsorgung | Nicht im Hausmüll entsorgen; gemäß lokaler Vorschriften |
| Reinigung | Mit einem weichen, trockenen Tuch abwischen |
| Sicherheitshinweise | Gerät nicht öffnen; vor Feuchtigkeit schützen; keine Gegenstände einführen |
| Reparatur | Nur von autorisiertem Servicepersonal durchführen lassen |
| Garantie | 3 Jahre bei bestimmungsgemäßer Nutzung |
Häufig gestellte Fragen - UB-DXR12 YAMAHA
Benutzerfragen zu UB-DXR12 YAMAHA
0 Frage zu diesem Gerät. Beantworten Sie die, die Sie kennen, oder stellen Sie Ihre eigene.
Eine neue Frage zu diesem Gerät stellen
Laden Sie die Anleitung für Ihr Beschallungssystem kostenlos im PDF-Format! Finden Sie Ihr Handbuch UB-DXR12 - YAMAHA und nehmen Sie Ihr elektronisches Gerät wieder in die Hand. Auf dieser Seite sind alle Dokumente veröffentlicht, die für die Verwendung Ihres Geräts notwendig sind. UB-DXR12 von der Marke YAMAHA.
BEDIENUNGSANLEITUNG UB-DXR12 YAMAHA
U BRACKET
UB-DXR15 / UB-DXR12 / UB-DXR10 / UB-DXR8
OWNER'S MANUAL
取扱説明書
PRECAUTIONS
PLEASE READ CAREFULLY BEFORE PROCEEDING
* Please keep this manual in a safe place for future reference.

WARNING
Always follow the basic precautions listed below to avoid the possibility of serious injury or even death from electrical shock, short-circuiting, damages, fire or other hazards. These precautions include, but are not limited to, the following:

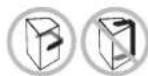
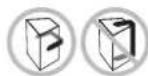
- If the bracket arms are attached to the top and bottom surface of the speaker, do not install the speaker vertically. Otherwise, the speaker weight may cause the bracket to bend.

CAUTION
Always follow the basic precautions listed below to avoid the possibility of physical injury to you or others, or damage to the device or other property. These precautions include, but are not limited to, the following:

- Before doing any installation or construction work, consult with an installation expert.
- Make sure that the surface this bracket is being mounted on has the strength to handle the weight of both the speaker and this bracket.
- Use bolts and nuts as well as washers for installation and tighten them firmly so that the speaker is secure and does not move.
- Always loosen the corresponding screw before adjusting the angle or direction of the speaker. Never force this adjustment with the screw still tightened.
- Some fittings may deteriorate over extended periods of time due to wear and/or corrosion. For optimum safety, the installation should be checked thoroughly at regular intervals.
Yamaha cannot be held responsible for damage or injury caused by insufficient strength of the support structure or improper installation.
* Illustrations herein are for explanatory purposes only, and may not match actual appearance during operation.
* Company names and product names herein are trademarks or registered trademarks of their respective companies.
- Specifications and descriptions in this owner's manual are for information purposes only. Yamaha Corp. reserves the right to change or modify products or specifications at any time without prior notice. Since specifications, equipment or options may not be the same in every locale, please check with your Yamaha dealer.
安全上のご注意
ご使用の前に、必ずこの「安全上のご注意」をよくお読みください。
ここに示した注意事項は、製品を安全に正しくで使用いただき、お客様やほかの方々への危害や財産への損害を未然に防止するためのものです。必ずお守りください。お読みになったあとは、使用される方がいつでも見られる所に必ず保管してください。
■ 記号表示について
この製品や取扱説明書に表示されている記号には、次のような意味があります。
| ~しないでくださいという「禁止」を示します。 | |
| 「必ず実行」してくださいという強制を示します。 |

- スピーカーの天面と底面に取り付けた状態で地面に対して垂直方向にして使用しないでください。スピーカーの重量によってブラケットが曲がるおそれがあります。

- 設置および取り付け工事につきましては、専門の業者に依頼してください。
- 取り付けの際は、取り付け面が重量に充分耐えられる強度があるか、確認の上で使用してください。
- 取り付けにはボルト、ナット、および座金を使用して、スピーカーが動かないように確実に締めてください。
- スピーカーの角度、方向の調節は、必ず該当するネジをゆるめてから行なってください。ネジをゆるめないで無理に動かさないでください。
- 安全にご使用いただくため、定期的に保守点検を行なってください。摩耗や腐食などにより、部品が劣化する場合があります。
取り付け箇所の強度不足や、取り付け方法の不備による落下などの事故に対しては、当社は一切の責任を負いかねます。
* この取扱説明書に記載されている会社名および商品名は、各社の登録商標および商標です。
この取扱説明書に掲載されているイラストは、すべて操作説明のためのものです。したがって実際の仕様と異なる場合があります。
* 仕様および外観は改良のため予告なく変更することがあります。

Thank you for purchasing a Yamaha product. Before you attach the U bracket to your speaker, please be sure to read this Owner's Manual.
Package Contents
- Brackets x 2
● Rubber spacers, 10mm thick x 2
● M5×10 screws with flat washer and spring washer x 4
● M5×16 screws with flat washer and spring washer x 2
● M8×25 hexagon bolts x 2
● M8 flat washers x 2
● M8 spring washers x 2
● Bottom plate x 1
- Spacers x 2
- Owner's Manual (this book)
Installation Instructions
CAUTION
- Make sure that the wall surface is strong enough to support the total weight of the speaker and the U bracket. Avoid attaching the U bracket to drywall, such as acoustic tiles.
- Secure the speaker to the mounting structure with a properly rated safety wire.
Vertical installation
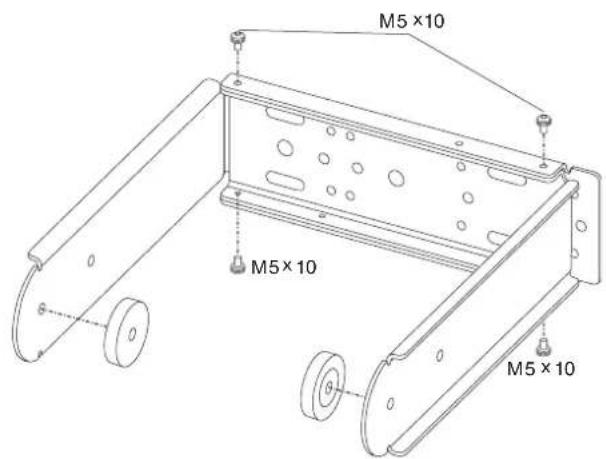
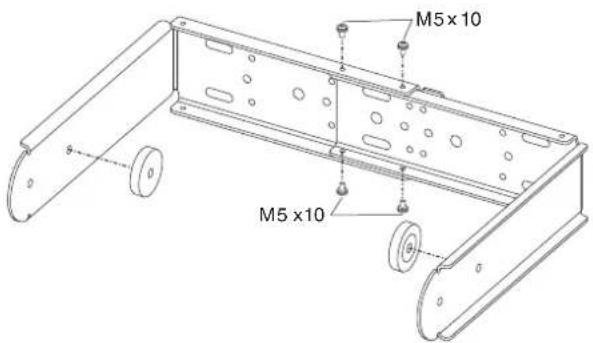
1 Assemble two L-shaped brackets into a U-shape using the included M5x10 screws as shown in the figure below. Peel off the sheet from each rubber spacer, and then attach the spacers to the inside of each bracket arm by aligning the holes so that the hexagon bolts can be inserted.
2 Make sure that the width of the U bracket matches the speaker width.
3Affix the U bracket on the wall or ceiling using appropriate metal brackets and bolts. These metal brackets or bolts are not included in the package. If you are not sure what to use to affix the U bracket, consult a specialist.
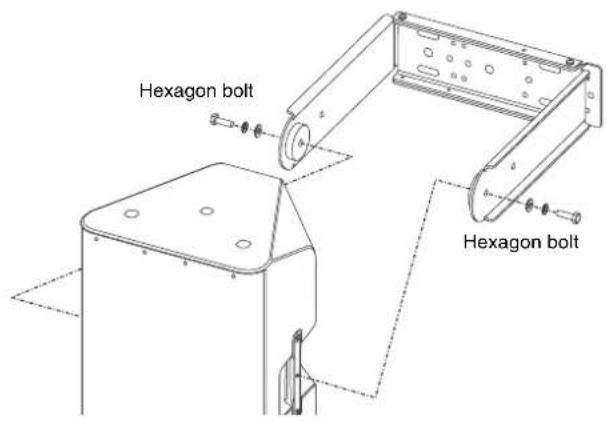
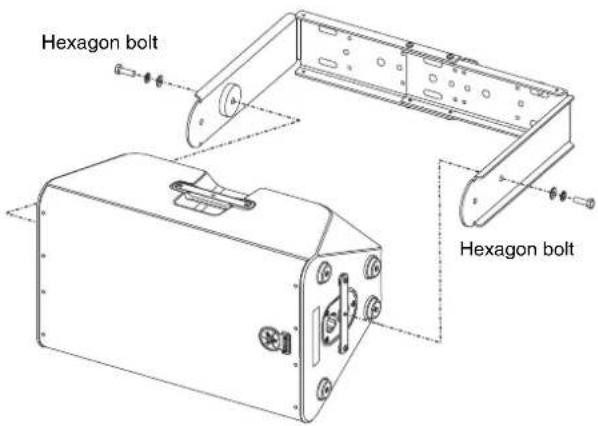
4 Use the included M8x25 hexagon bolts, spring washers, and flat washers to attach the speaker to the U bracket.
■ UB-DXR15 / UB-DXR12
Use the bolt hole in the center of the handle on each side of the speaker.
■ UB-DXR10 / UB-DXR8
Use the bolt hole on each side of the speaker.
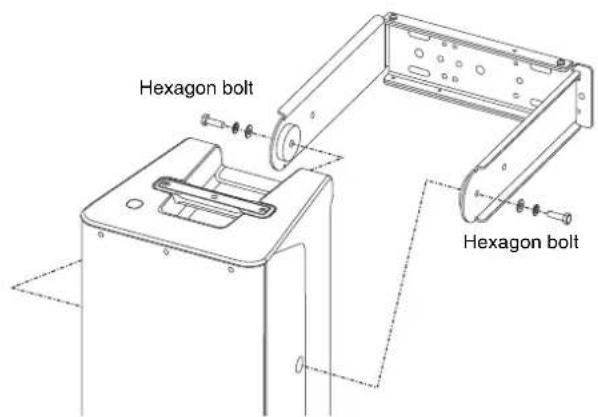
5 Adjust the speaker angle, then tighten the bolts until the speaker is securely affixed.
Horizontal Installation
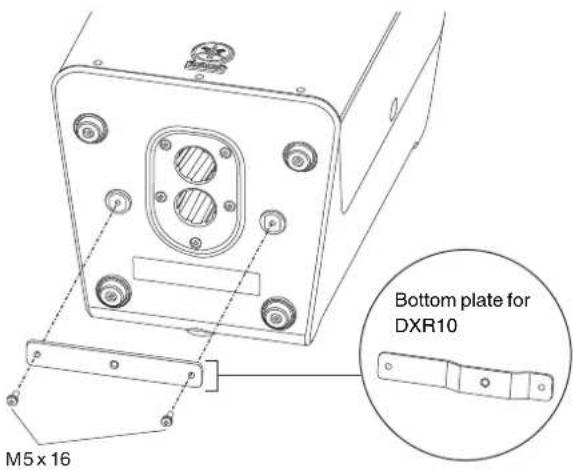
1 Attach the bottom plate to the bottom of the speaker using the included M5x16 screws, as shown in the figure below.
The bottom plate for DXR10 features a different shape than the one shown in the figure.
2 Assemble two L-shaped brackets into a U-shape using the included M5x10 screws as shown in the figure below. Peel off the sheet from each rubber spacer, and then attach the spacers to the inside of each bracket arm by aligning the holes so that the hexagon bolts can be inserted.
3 Make sure that the width of the U bracket matches the speaker width.
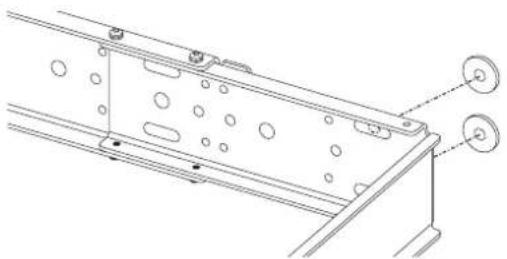
4Affix the U bracket on the wall or ceiling using appropriate metal brackets and bolts. There will be a slight gap between the U bracket and the wall surface. Insert spacers into the gap and affix them with bolts. These metal brackets or bolts are not included in the package. If you are not sure what to use to affix the U bracket, consult a specialist.
natural_image
Technical line drawing of a mechanical assembly with mounting brackets and circular holes (no text or symbols)5Use the included M8x25 hexagon bolts, spring washers, and flat washers to attach the speaker to the U bracket.
■ UB-DXR15 / UB-DXR12
Use the bolt hole on the top of the speaker.
■ UB-DXR10 / UB-DXR8
Use the bolt hole in the center of the handle on the top of the speaker.
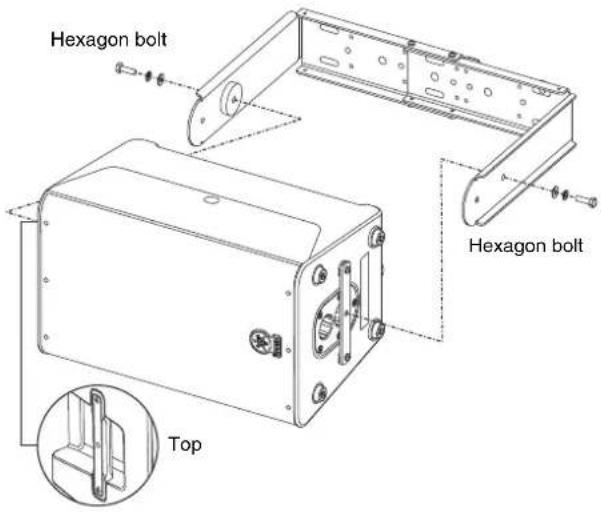
6 Adjust the speaker angle, then tighten the bolts until the speaker is securely affixed.
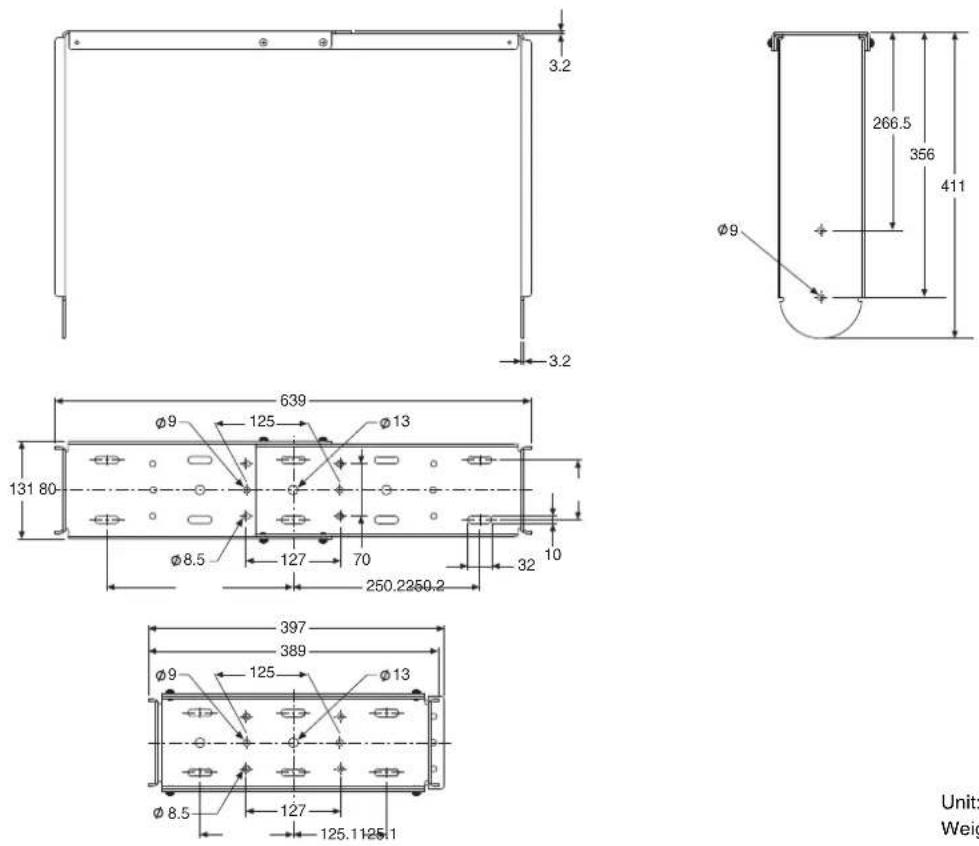
UB-DXR15
Unit: mm
Weight: 7.6kg
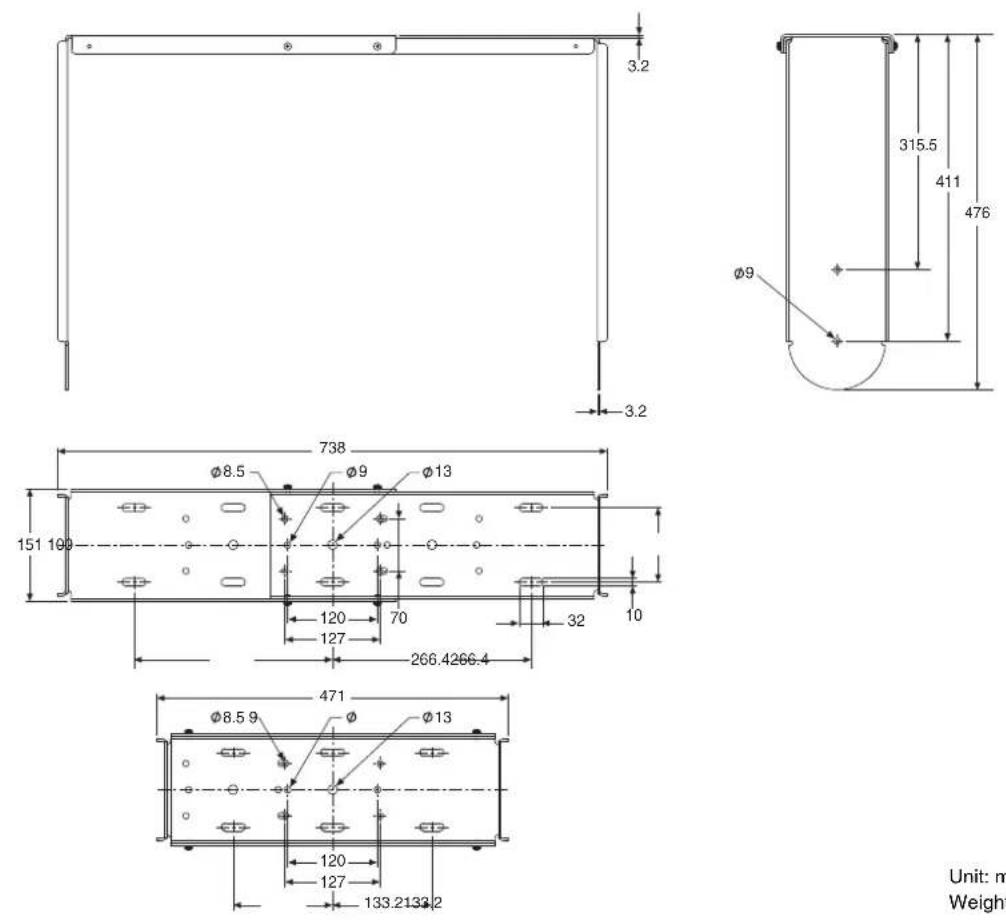
UB-DXR12
Unit: mm
Weight: 5.7kg
UB-DXR10
Unit: mm
Weight: 4.2kg
UB-DXR8
Unit: mm
Weight: 3.7kg

Yamaha Pro Audio global web site
http://www.yamahaproaudio.com/
Yamaha Manual Library
http://www.yamaha.co.jp/manual/
C.S.G., Pro Audio Division
© 2011 Yamaha Corporation
110MWAP*.*-**A0
Printed in China
WZ17740