
MC-5230DAB+ - Hi-Fi-System DENVER - Kostenlose Bedienungsanleitung
Finden Sie kostenlos die Bedienungsanleitung des Geräts MC-5230DAB+ DENVER als PDF.


| Produkttyp | Hi-Fi-System |
| Marke | Denver |
| Modell | MC-5230DAB+ |
| Abmessungen (ca.) | 40 x 20 x 30 cm |
| Gewicht (ca.) | 5 kg |
| Stromversorgung | 230 V AC, 50 Hz |
| Radiofunktionen | DAB+ und UKW (FM) mit RDS |
| Wiedergabeformate | CD, CD-R/RW, MP3-CD, USB-Stick (MP3) |
| Bluetooth | Ja, zum Streaming von Smartphones/Tablets |
| AUX-Eingang | 3,5 mm Klinke |
| Kopfhörerausgang | 3,5 mm Klinke |
| Lautsprecher | 2-Wege-Lautsprecher (Stereo) |
| Leistung | 2 x 20 W RMS |
| Display | LCD mit Hintergrundbeleuchtung |
| Reinigung und Pflege | Nur mit weichem, trockenem Tuch reinigen. Keine Flüssigkeiten oder Reinigungsmittel verwenden. |
| Sicherheitshinweise | Gerät vor Nässe und Feuchtigkeit schützen. Keine Gegenstände in Öffnungen stecken. |
| Ersatzteile und Reparatur | Im Fachhandel oder beim Hersteller erhältlich. Reparaturen nur durch qualifiziertes Personal. |
Häufig gestellte Fragen - MC-5230DAB+ DENVER
Benutzerfragen zu MC-5230DAB+ DENVER
0 Frage zu diesem Gerät. Beantworten Sie die, die Sie kennen, oder stellen Sie Ihre eigene.
Eine neue Frage zu diesem Gerät stellen
Laden Sie die Anleitung für Ihr Hi-Fi-System kostenlos im PDF-Format! Finden Sie Ihr Handbuch MC-5230DAB+ - DENVER und nehmen Sie Ihr elektronisches Gerät wieder in die Hand. Auf dieser Seite sind alle Dokumente veröffentlicht, die für die Verwendung Ihres Geräts notwendig sind. MC-5230DAB+ von der Marke DENVER.
BEDIENUNGSANLEITUNG MC-5230DAB+ DENVER
DENVER®
Instruction manual
MC-5230DAB+
Dear Customer,
Congratulations on purchasing this product. Please read and follow these instructions, in order to avoid damaging the item. We do not cover any damages that may arise from improper use of the item or the disregard of the safety instructions.
Important Safety Advice
• Read all instructions before using.
• To protect against a fire, electric shock or personal injury, do not immerse cord, electric plugs or device in water or other liquids.
- Do not expose the appliance to extreme temperatures. The appliance shall be used in moderate climates.
- The use of attachments that are not recommended by the appliance manufacturer may result in fire, electric shock or personal injury.
- Do not open the unit by removing any cover parts. Do not attempt to repair the unit. Any repairs or servicing should be done by qualified personell only.
- Only qualified persons may perform technical work on the product. The product may not be opened or changed. The components cannot be serviced by the user. The manufacturer is not responsible for any radio or TV interference caused by unauthorized modifications.
- The appliance is not a toy. Do not let children play with it. Never let children insert foreign objects into the appliance.
- Never clean the surface of the device with solvents, paint thinners, cleansers or other chemical products. Instead, use a soft, dry cloth or soft brush.
• Save these instructions.
Small objects
Keep small objects (i.e. screws, mounting material, memory cards etc.) and packaging out of the range of children. Do not let Children play with foil. Choking hazard!
Transporting the device
Please keep the original packaging. To gain sufficient protection of the device while shipment or transportation, make sure to put it back in its original packaging.
Cleaning the surface
Do not use any volatile liquids, detergents or the like. Use a clean dry cloth.
Technical Data
| Item #. | MC-5230DAB+ |
| Power supply | AC 230V ~ 50Hz, power consumption max. 27W |
| Speaker | 2x 3", 10W @ 4Ω (THD @ 1kHz: max. 10%) |
| Radio Band | FM: 88MHz - 108MHz / DAB: 174 - 240MHz |
| USB | Compatible w/ USB 1.1 & USB 2.0File types: MP3 (32 ~ 320 kbps) |
| CD | D/A converter: Multi bit D/A converterFrequency response: 20 - 20,000 Hz |
| Scope of delivery | Device, RC, user manual |
Overview
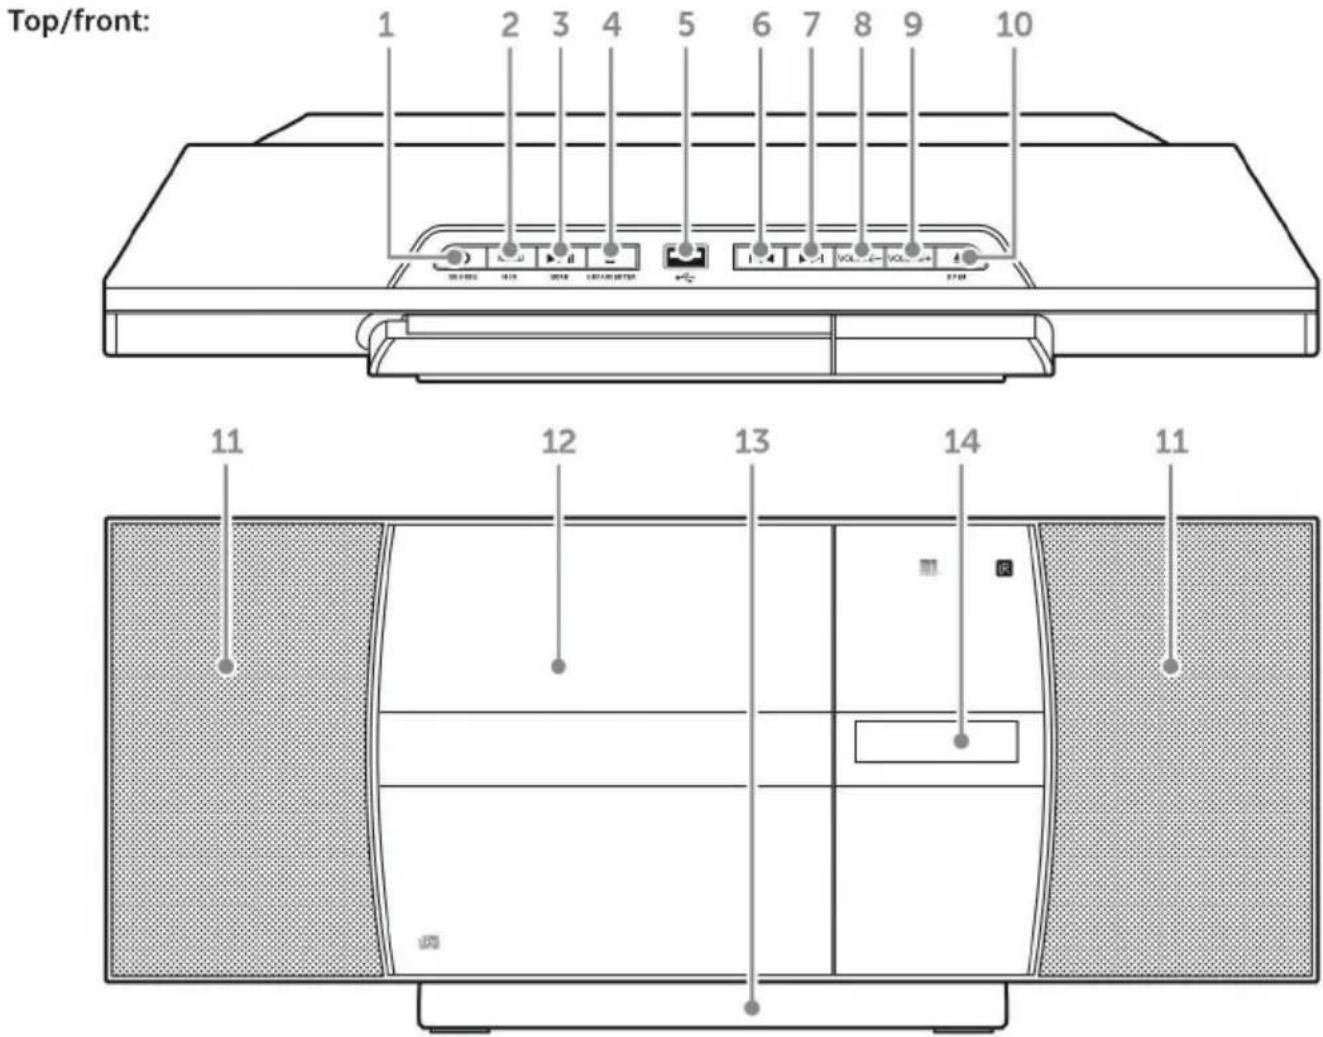
| Standby/SourcePress to switch onPress&hold to switch to standbyRepeatedly press for source selection | 1 | 8 | VOL- |
| Menu/Info | 2 | 9 | VOL+ |
| ▶IIPlay/Pause/Scan | 3 | 10 | OpenOpen cd tray |
| ■Stop/Unpair/Enter | 4 | 11 | Speakers |
| USB PortConnect USB drive here(not suitable for PC connection) | 5 | 12 | CD tray |
| ◀◀Previous (track/station/preset) | 6 | 13 | Stand (detachable) |
| ▶▶Next (track/station/preset) | 7 | 14 | Display |
Rear:
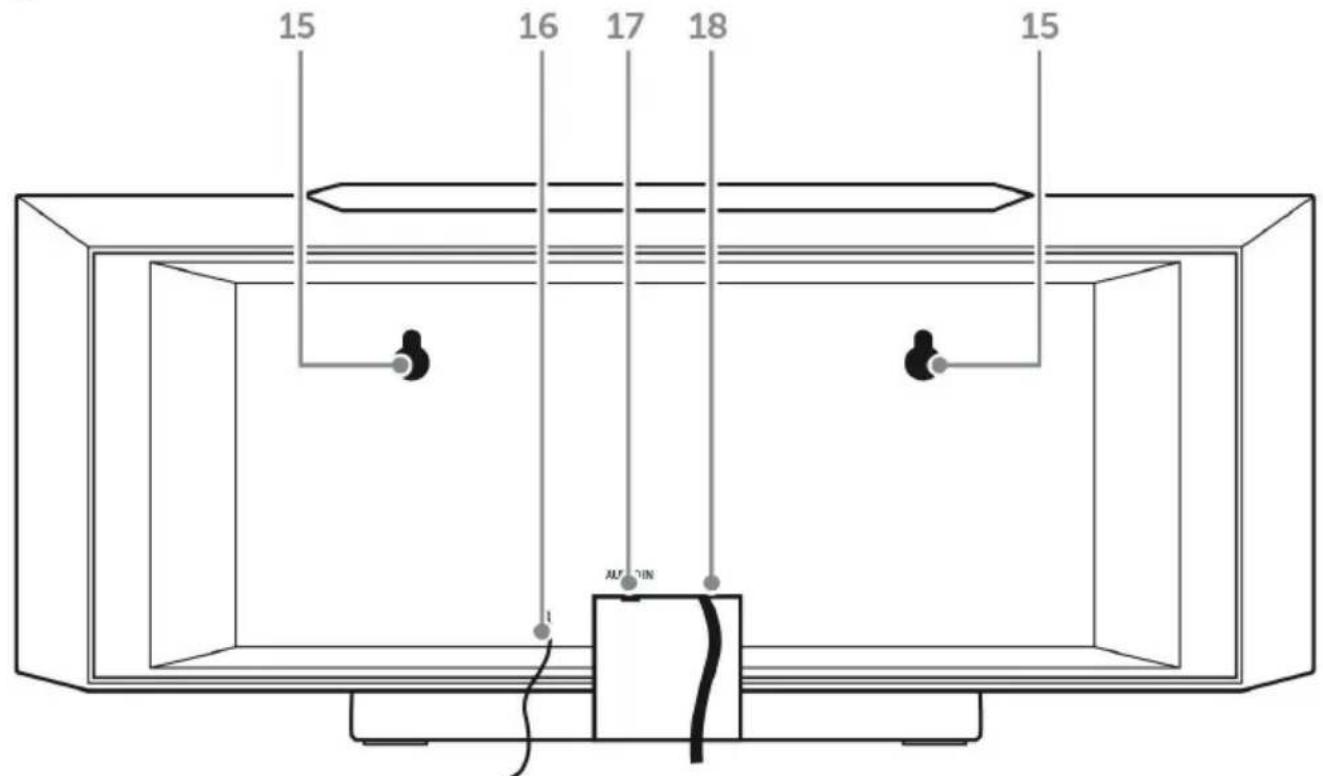
| Hooks for wall mount | 15 | 17 | AUX-IN (3.5mm) |
| Antenna | 16 | 18 | Mains cable |
Standby: Standby mode ON/OFF button
FM/DAB: Press to switch between FM & DAB radio
USB: Press to enable USB mode
CD: Press to enable CD mode
MENU: Press enable the DAB/FM menu options
▲ PRESET: Tune up and menu navigation button
<TUNE: Tune down and menu navigation button
LIGHT: Light on/off
◀◀/▶◀: Skip to the previous or next track in CD mode.
FOLDER +/-: Skip folders on a disc or USB flash drive
X-BASS: Press to enhance the bass output
MONO/ST: Press to switch between FM radio stereo & mono modes
NUMERIC BUTTONS: Press to enter digits directly
MEMORY/PROGRAM: Press and hold to store a radio station preset/Press in CD STOP mode to program a playlist
SLEEP: Press to activate the sleep timer settings
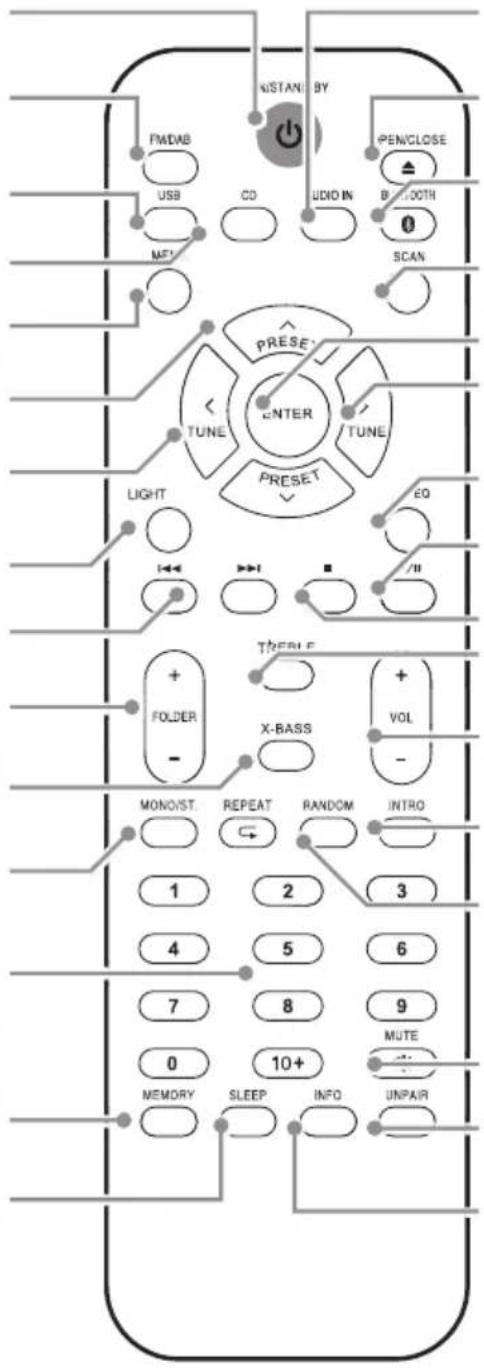
AUDIO IN: Press to enable the audio in mode
OPEN/CLOSE: Press to eject or close the disc compartment
BLUETOOTH: Press to enable Bluetooth mode
SCAN: Press to perform a station scan FM/DAB
ENTER: Press select menu options
TUNE: Tune up and menu navigation button
EQ: Press to cycle EQ sound modes
▶II PLAY/PAUSE: Press for play, pause functions
■ STOP: Press to stop playback
TREBLE: Press enable BASS & TREBLE adjustments
VOLUME +/-: Press + to increase and - to decrease the volume level
INTRO: Press to playback the first 10 seconds off all tracks on a CD
RANDOM: Press to playback CD tracks in a random order
MUTE: Press to mute audio playback.
UNPAIR: Press and hold to unpair a connected Bluetooth device
INFO: Press in DAB mode to display information
Stand:
To detach the stand, carefully turn the unit upside down and push the stand towards the rear (see fig 1). Then lift it up (see fig 2). Do the opposite to re-attach the stand again.
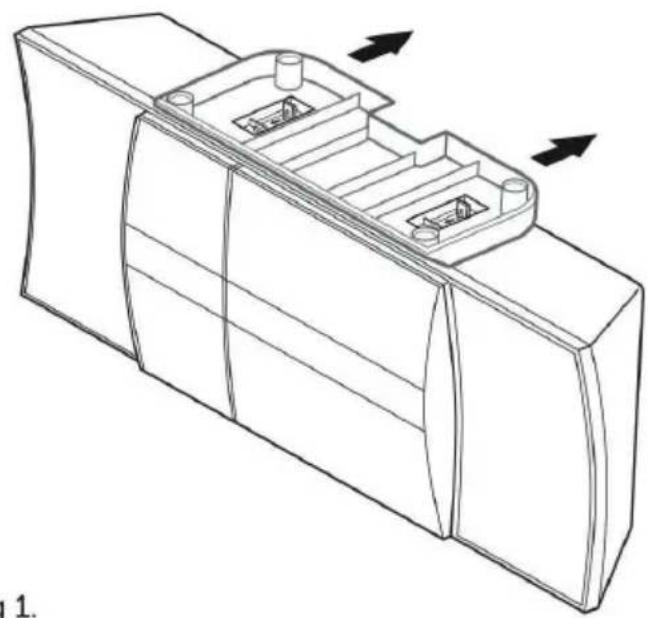
natural_image
Technical line drawing of a mechanical component with internal cavities and mounting holes (no text or symbols)Fig 1.
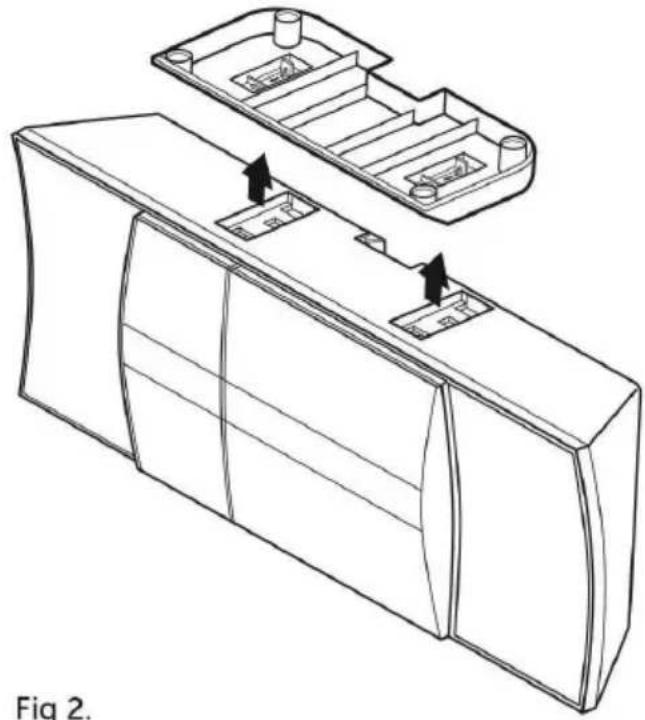
natural_image
Technical line drawing of a battery pack assembly with internal compartments and mounting holes (no text or symbols)Fig 2.
Initial Use
- Connect the mains plug to a household mains socket (230V \~50Hz).
• Press POWER/STANDBY.
• Insert two batteries (type AAA) in the RC battery compartment. Mind the correct polarity as indicated:
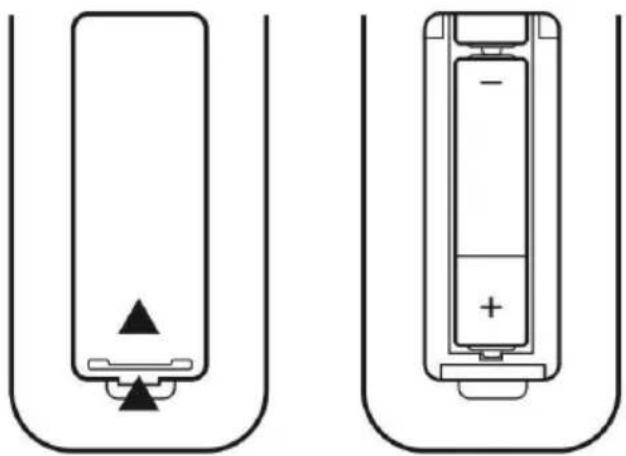
natural_image
Two battery diagrams showing different charging configurations (no text or symbols)Operation
Global Functions
• MODE: Switch the unit on with STANDBY/SOURCE, then press repeatedly to select CD - DAB - FM - AUX - USB - BT.
• VOL+/-: Press VOL+/- to adjust the output volume.
• MUTE: Press MUTE to toggle mute on/off.
• X-BASS: Toggle to switch the bass enhancement on/off.
- EQ: Press repeatedly to cycle through pre-set EQ settings (Classic - Pop - Vocal - Jazz - Flat - Rock - EQ off).
- Sleep: While the device is playing, press SLEEP repeatedly to switch on and set the sleep timer in steps of 10 minutes (90mins - 80mins - 70mins - ... - 10mins - off).
• Num pad operation: Track 02 : Press 2; Track 12 : Press 2 then 10+; Track 22 : Press 2 then 10+ twice
CD / USB
• Press SOURCE to switch to CD/USB mode.
- Press OPEN/CLOSE to open the CD tray. Insert an audio/MP3 disc with the printed side facing towards you. The CD will be read automatically. Insert a USB thumb drice into the USB socket on the device top.
• Use ◀◀, ▶▶, ▶▶ and ■ to conveniently navigate through your music library.
- Playing MP3 CDs or USB drives containing folder stuctures, use FOLDER+/- to toggle folders.
- Play modes: Press REPEAT (repeat current track / repeat all tracks / repeat folder/ repeat mode off), INTRO (scan whole CD/USB drive and play first 10s of each song) or RANDOM (paly songs in randomized order) on the RC.
- Program: You can compile a playlist consisting of up to 20 songs. Stop playback and press MEMORY. Use ◀◀/▶▶ to select the desired track, then press MEMORY to add it to your playlist. Repeat this procedure (max 20x) and start playback (▶II).
USB/ MP3 information
• Do not remove the USB device during playback.
• Max 999 tracks and 99 folders can be recognised
• USB flash drive format: FAT 16, 32 only.
• USB reading speed may be elected by the number of files on the device
Radio: FM/DAB
DAB functions
- On initial selection of DAB mode, a station scan will be performed. All found stations will be saved to presets in alphanumerical order. The first station (according to the list) will be played automatically after the scan has finished successfully. Use the NEXT/PREVIOUS buttons to cycle through the list of
saved station, then press ENTER to tune in the currently highlighted station.
• For a new scan, press and hold MENU/INFO for 3 seconds. Confirm with ENTER.
- Prune: Press the MENU button on the remote or press and hold the MENU/INFO button on the micro system. When the 'FULL SCAN' option appears press either TUNE or TUNE buttons on the remote or / buttons on the micro system and locate 'PRUNE', press the ENTER button on the remote or UNPAIR/ENTER on the micro system. 3. Use the TUNE or TUNE buttons on the remote or / buttons on the micro system to select 'YES' and press the ENTER button on the remote or UNPAIR/ENTER on the micro system.
- DRC: Press the MENU button on the remote or press and hold the MENU/INFO button on the micro system. When the 'FULL SCAN' option appears press either TUNE or TUNE buttons on the remote or / buttons on the micro system and locate 'DRC', press the ENTER button on the remote or UNPAIR/ENTER on the micro system. Use the TUNE or TUNE buttons on the remote or / buttons on the micro system to select between DRC OFF, DRC LOW and DRC HIGH. Press the ENTER button on the remote or UNPAIR/ENTER on the micro system to save the setting.
DAB / FM
- Use ◀◀ / ▶▶ to manually search the band for stations (hold for automatic scan in the respective direction). Press STOP to interrupt the scan.
- Save stations: Press and hold MEMORY and use ◀◀ / ▶▶ to select the desired preset number. Confirm pressing ENTER. Alternatively press and hold the number button you want to save the station to.
- Press MEMORY briefly to enter the station preset list. Use the arrow buttons to cycle through the list. Tune in the desired station with ENTER. Alternatively, use the number buttons to directly tune in the desired station.
• Press MONO/ST to toggle stereo/mono reception.
• Press INFO repeatedly to toggle display modes:
FM: Radio Text (if available)- Program Type - Program Name - Audio Mode (mono/stereo) - Time&Date
DAB: DLS (Dynamic label segment is a scrolling message that the broadcaster may include with their transmissions. This message usually includes information, such as program detail etc.) - Signal strength - Program Type - Ensemble/Multiplex (A multiplex/ensemble is a collection of radio stations that are bundled and transmitted on one frequency. There are national and local multiplexes. Local ones contain stations that are specific to that area e.g. MXR West.) - Channel (current frequency) - Mode (current mode) - Time&Date .
BT
This device supports BT 2.1 + EDR and the A2DP profile. The BT function can be used to stream music from any BT device such as smartphones or tablets, but does not support hands free telephone operation.
- Switch the MC-5230DAB+ on and press SOURCE to switch to BT mode.
• Activate BT on your BT device and pair with the MC-5230DAB+. - Use your BT device to operate audio/media playback or use the MC-5230DAB+ buttons / ▶/ ▶/ ▶.
• Type in "0000", if prompted to enter a password.
- NFC: When enabled on the transmitting audio device; all that is required is for you to touch the NFC logo on the front of the micro system with the NFC hotspot on your compatible audio device. Enable NFC on your audio device (such as a mobile phone). Touch the NFC hot spot on your audio device to the NFC logo on the front of the micro system. You may need to move the device around slightly to hit the exact contact point. When the connection is made, a melody is played and the 'BT-LINK' text on the display will stop flashing and the device will be automatically connected.
• To remove a paired device using the micro system, press and hold the UNPAIR/ENTER button on the micro system or press the UNPAIR button on the remote The 'BT LINK' text will begin flashing again.
AUX
- Aux-In: Use a 3.5mm audio cable to connect external media/audio players to the AUDIO IN socket on the rear. Press SOURCE repeatedly to switch to AUX mode. Operate the playback on your external device. If using the headphone out, set it to about 70% volume, to avoid hum. Adjust the output volume on the MC-5230DAB+, then.
Display Illumination
When the unit is standby mode the backlight will dim after 10 seconds. Press the LIGHT button on the remote control to illuminate the backlight for 10 seconds.
System Settings
The system settings (TIME/DATE, AUTO UPDATE, FACTORY RESET) are accessible through the MENU button: Press MENU (RC: hold), then scroll through the list, using the arrow buttons. Press ENTER to enter sub menus or confirm any change. Use the arrow buttons to adjust values.
Factory Reset
To reset the device to factory presets, press MENU and use the arrow buttons to select the SYSTEM sub menu. Scroll through to SYSTEM RESET with the arrow buttons, then press ENTER. Please note: All station presets and changes will be deleted.

Marke : DENVER
Modell : MC-5230DAB+
Kategorie : Hi-Fi-System