
A010 - Objektiv TAMRON - Kostenlose Bedienungsanleitung
Finden Sie kostenlos die Bedienungsanleitung des Geräts A010 TAMRON als PDF.


| Produkttyp | Telezoomobjektiv |
| Marke / Modell | Tamron A010 |
| Kompatible Kameras | Nikon, Canon, Sony (Modelle ohne VC) |
| Brennweite | 28–300 mm |
| Maximale Blende | f/3,5–6,3 |
| Bildwinkel | 75°23' – 8°15' |
| Linsensystem | 15 Elemente in 19 Gruppen |
| Naheinstellgrenze | 0,49 m (19,3 Zoll) |
| Maximaler Vergrößerungsfaktor | 1:3,5 (bei 300 mm) |
| Filtergröße | 67 mm |
| Länge (ohne Gegenlichtblende) | 96 mm (3,8 Zoll) |
| Gesamtlänge (inkl. Bajonett) | 104,4 mm (4,1 Zoll) |
| Gewicht (Nikon-Modell) | 540 g (19,6 Unzen) |
| Bildstabilisator | VC (Vibration Compensation) bei Nikon/Canon-Modellen |
| Fokus | Autofokus (AF/MF) mit Full-Time-Manual-Funktion |
| Zoom-Arretierung | Ja (Zoom-Lock-Schalter bei 28 mm) |
| Gegenlichtblende | HA10 (separat erhältlich) |
| Entfernungsskala | Ja (auf dem Objektivtubus) |
| Zubehör im Lieferumfang | Objektivdeckel, Bajonettdeckel, Gegenlichtblende HA10 |
| Reinigung und Pflege | Linsenoberfläche mit Blasebalg oder weichem Tuch reinigen; Fingerabdrücke mit Reinigungslösung entfernen |
| Wichtige Sicherheitshinweise | Kontakte zwischen Objektiv und Kamera nicht berühren; Objektiv trocken und kühl lagern |
Häufig gestellte Fragen - A010 TAMRON
Benutzerfragen zu A010 TAMRON
0 Frage zu diesem Gerät. Beantworten Sie die, die Sie kennen, oder stellen Sie Ihre eigene.
Eine neue Frage zu diesem Gerät stellen
Laden Sie die Anleitung für Ihr Objektiv kostenlos im PDF-Format! Finden Sie Ihr Handbuch A010 - TAMRON und nehmen Sie Ihr elektronisches Gerät wieder in die Hand. Auf dieser Seite sind alle Dokumente veröffentlicht, die für die Verwendung Ihres Geräts notwendig sind. A010 von der Marke TAMRON.
BEDIENUNGSANLEITUNG A010 TAMRON
TAMRON
28-300mm F/3.5-6.3 Di VC PZD (for Nikon, Canon)
28-300mm F/3.5-6.3 Di PZD (for Sony *Models without the VC)
Model: A010




ENGLISH
Thank you for purchasing the Tamron lens as the latest addition to your photographic equipment. Before using your new lens, please read the contents of this Owner's Manual thoroughly to familiarize yourself with your lens and the proper techniques for creating the highest quality images possible. With proper handling and care, your Tamron lens will give you many years of photographing beautiful and exciting pictures.
• Explains precautions that help to prevent problems.
• Explains things you should know in addition to basic operations
Explains the pts just offers a 100% offer in the case of operation.
NOMENCLATURE (Refer to Fig. 1, if not specified)
| 1 Lens hood | 2 Hood attaching alignment mark |
| 3 Hood attaching indicator | 4 Filter ring |
| 5 Hood attaching baynet ring | 6 Zooming ring |
| 7 Zoom lock switch (Figs. 33 & 34) | 8 Focal length scale |
| 9 Zoom index mark | 10 Distance scale |
| 11 Distance index | 12 Focusing ring |
| 13 VC (Wibration Compensation) switch | 14 AF/MF switch (Figs. 33 & 34) |
| 16 Lens attachment mark | 16 Lens mount/Less mount contacts |
SPECIFICATION
| A:0 1:0 | |
| Focal Length 28-300 mm | |
| Maximum Aperature 413.5-6.3 | |
| Angle of View 75°23' - 8°15 | |
| Lens Construction 15°19 | |
| Minimum Focusing Distance 0.49 m (19.3") (throughout the entire zoom range) | |
| Maximum Magnification Ratio 1:3.5 (at 300 mm) | |
| Filter Size 67 mm | |
| Length/Overall Length 96 mm (3.8")/104.4 mm (4.1")* | |
| Diameter 14.4 mm (2.9") | |
| Weight 540 (19.6-c2)* | |
| Lens hood HA10 |
* values are specifications of Nikon products. Length: Distance from the lens front extremity to the mount surface.
Overall length: Distance from the lens front extremity to the rear projection extremity.
Features and appearance of lenses listed in this owner's manual are subject to change without notice.
ATTACHING AND REMOVING THE LENS
How to mount the lens
Removing the rear cap of the lens. Align the Lens attachment mark ⑮ on the lens barrel with its counterpart on the camera mount and
insert the lens. Delete the lens displaying until it click insulin. For N209 models, align the lens attachment mark with the dot on the camera and rotate the
Rotate the lens clockwise until it click-locks. For Nikon models, align the lens attachment mark with the out on the camera and rotate the lens counter-clockwise until it click-locks.
■ How to detach the lens
Pressing the lens release button on the camera down, turn the lens counter-clockwise (in case of Nikon lens, clockwise), and lift the lens
off the camera's lens mount.
• For further details, please read the instruction manual of your camera.
B
FOCUSING (Autofocus) and using the full-time manual function
In case of a Nikon or Canon camera, switch the AF/MF switch ① on the lens to AF (Fig. 3). In case of a Nikon camera with the focus mode selector dial, set the focus mode to S or C, and then set the AF/MF switch ② on the lens to AF. Press the shutter button halfway down while viewing through the camera's viewfinder, the lens focuses automatically. An in-focus mark will light when lens focuses on the main subject sharply. Press the shutter button further to photograph.
In case of a Sony camera, switch the AF/MF switch ⑮ on the lens to AF (Fig.3), and set the focus mode on the camera to Auto focus (AF). Press the shutter button halfway down while viewing through the camera's viewfinder, the lens focuses automatically. An in-focus mark will light when lens focuses on the main subject sharply. Press the shutter button further to photograph.
- Using the full-time manual function
| A010 is equipped with the full-time manual function. The full-time manual function is a function that the focus can be fine-tuned by the manual focus without switching the AF/MF changing switch when taking a picture of auto focus. • How to use the full-time manual function First, set the focus mode to "AF". You can adjust focus manually while turning the focus ring in the shutter button is pressed lightly. |
• The distance scale ⑩ is marked for guidance purposes. The actual focal point may slightly differ from the distance marked on the
focal length index
• For further details, please read the instruction manual of your camera.
FOCUSING (Manual Focus) (Ref. Fiso 1, 2, 8, 4)
In case of a Nikon or Canon camera, switch the AF/MF switch (1) on the lens to MF (Fig. 4). In case of a Nikon camera with the focus mode selector dial, set the focus mode to M, and then set the AF/MF switch (5) on the lens to MF. Focus manually rotating the focusing ring (2) while viewing through the camera's viewfinder (Fig. 2). The main subject in the viewfinder will be sharp when the lens is focused correctly. In case of a Sony camera, switch the AF/MF switch (6) on the lens to MF (Fig. 4), and set the focus mode on the camera to Manual focus (MF). Focus manually rotating the focusing ring (2) while viewing through the camera's viewfinder (Fig. 2). The main subject in the viewfinder will be sharp when the lens is focused correctly.
Even in the MF mode, when turning focusing ring ⑫ while pressing the shutter button halfway, the focus aid function lamp lights up when the
picture is in focus.
- At infinity, make sure the image in the victimfuel appears sharp. The infinity position is made with certain allowances to ensure proper focus under a variety of conditions.
• For further details, please rea
VC MECHANISM (Ref. Figs 1, 5 & 6) (Mounted for Nikon and Canon models)
VC (Vibration Compensation) is a mechanism which reduces the image blur caused by hand-held shooting.
■ How to use VC mechanism
1) Set the VC switch ☑ on.
*When VC is not used, set the switch off.
2) Press the shutter button halfway to verify the effect of the VC.
When the shutter button is pressed down halfway, it takes about 1 second for the VC to provide a stable image.
■ The VC can be effective for hand-held shots under the following conditions.
• Dimly lit locations
• Scenes where flash photography is forbidden
• Situations where your footing is uncertain
• Taking parking shots of a moving subject The V9 may not be able to mix
■ The VC may not be able to give full effect in the following cases:
- When a photograph is taken from a fast moving vehicle
• Shooting during the excessive movement
• When taking photographs using a tripod
• Turn the VC switch OFF when taking pictures with the bulb setting or during long exposures. If the VC switch is ON, the VC mechanism
may introduce errors.
* With the VC mechanism, there are occasions that the image in the viewfinder blurs right after the shutter button is pressed down
halfway, but this is not a malfunction.
- When the VC is ON, the number of images recordable is reduced due to the power used from the camera.
- When the VC is ON, immediately after the shutter button is pushed halfway down and approximately 2 seconds after a finger releases
the shutter button, the camera will "click". This sound is the VC's locking mechanism activating, not a malfunction.
• Turn the VC switch OFF when using tripod.
• 2013: a. 2014: a. 2015: a. 2016: a. 2017: a. 2018: a. 2019: a. 2020: a. 2021: a. 2022: a. 2023: a. 2024: a. 2025: a. 2026: a. 2027: a. 2028: a. 2029: a. 2030: a. 2031: a. 2032: a. 2033: a. 2034: a. 2035: a. 2036: a. 2037: a. 2038: a. 2039: a. 2040: a. 2041: a. 2042: a. 2043: a. 2044: a. 2045: a. 2046: a. 2047: a. 2048: a. 2049: a. 2050: a. 2051: a. 2052: a. 2053: a. 2054: a. 2055: a. 2056: a. 2057: a. 2058: a. 2059: a. 2060: a. 2061: a. 2062: a. 2063: a. 2064: a. 2065: a. 2066: a. 2067: a. 2068: a. 2069: a. 2070: a. 2071: a. 2072: a. 2073: a. 2074: a. 2075: a. 2076: a. 2077: a. 2078: a. 2079: a. 2080: a. 2081: a. 2082: a. 2083: a. 2084: a. 2085: a. 2086: a. 2087: a. 2088: a. 2089: a. 2090: a. 2091: a. 2092: a. 2093: a. 2094: a. 2095: a. 2096: a. 2097: a. 2098: a. 2099: a. 2100:
[Non-Text]
[Non-Text]
[Non-Text]
[Non-Text]
[Non-Text]
[Non-Text]
[Non-Text]
[Non-Text]
[Non-Text]
[Non-Text]
[Non-Text]
[Non-Text]
[Non-Text]
[Non-Text]
[Non-Text]
■
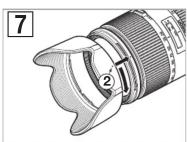
- Pay particular attention to align the hood attaching indexes when using zoom lenses including wide-angle (e.i. 35mm or wider)
settings.
Improper attachment of a hood on a wide-angle zoom lens may cause large shadowed areas in your pictures.
■ Stowing lens hood on the lens (Ref. Fig. 9)
1) Reverse the lens hood. Point the lens toward the opening, then align the hood attaching index ⑤ on the lens with the (TAMRON □)
alignment on the hood attaching indicator ③
2) Turn the hood clockwise until the alignment mark (•) is at the top to set it. (Fig.9)
700M LOCK SWITCH (Ref. Figs 1)
- We look with manufacturing equipment, how we find our work done in the work of the company and the company from
zoom lock switch mechanism prevents lens barrels from extending toward long focal length by their shoulders. Activate the switch at 90mm setting to rise the lens hardware from outlining and extending
■ How to activate the room lock switch mechanism
■ How to activate the zoom lock switch mechanism
1) Locking: Set the lens to the 25mm position. Move the switch ↻ toward the camera, until the index lines align with each other. The lens barrel is now looked in positive and does not rotate or rotate by its own weight.
Barrel is now locked in position and does not rotate or extend by its own weight. 2) Releving: Rush the switch away from your camera. The lens harm is now free
2) Heleasing. I don't switch away from your camera. The fold danger is how fires to rotate the extens for zooming.
- The zoom lock switch ② cannot be activated unless the lens is set to the 25mm position. Do not force the lock switch or try to
rotate the lens barrel while locked. The room lock mechanism is made
- The zoom lock mechanism is made to prevent the lens barrel from extending while carried around oil should. The lens may change its final length during a long vacuum if the lock is used in a low as high power position.
change its local length during a long exposure in the lens is used in a low or high angle postbit.
- The lens can be used at 28mm setting for picture-taking even when locked by the switch.
PRECAUTIONS IN SHOOTING
- The optical design for Di takes into consideration the various features of digital single reflex cameras. However, due to the configuration of the digital single reflex cameras, even when the autofocus accuracy is within specifications, the focal point may be a little forward or behind the optimum point when shooting with autofocus under some conditions.
• The Tamron lenses described here employ an internal focusing (IF) system. Because of the characteristics of this optical design, the angles
of view at distances other than infinity are wider than that of the lenses applying an ordinary focusing system.
- When the built-in flash on the camera is used, adverse photographic phenomena such as corner illumination fall-off or vignetting at the
bottom part of the image may be observed, especially in wide angle ranges. This is due to the inherent limitation of the coverage of the
built-in flash, and/or the relative position of the flash to the edge of the lens barrel which causes shadows on the image. It is strongly
recommended to use a suitable separate flash unit provided by the camera manufacturer for all flash photography.
For further details, please read the "built-in flash" article on the instruction manual of your camera.
- Certain camera models may indicate the maximum and minimum aperture values of the lens in appropriate numbers. This is inherent to
the design of the camera and not an indication of an error.
- Please be aware that there is no infrared index line on any models listed in this owner's manual, and therefore, practically, no black-and-
white infrared film can be used with these lenses
- When using a special filter such as a P1 filter, use low profile filters. The thick rim of a normal filter may cause vignetting.
TO ENQUIRE LONG TERM SATISFACTION
TO ENSURE LONG-TERM SATISFACTION
- Avoid touching the glass element surface. Use a photographic lens cloth or blower to remove dust from the lens element surface. When not
using the lens, always place a lens cap on it for protection.
- Use a lens cleaning tissue or lint cloth with a drop of cleaning solution to remove fingerprints or dirt on the glass lens surface with a rotary
motion from the center to the edge.
• Use a silicon cloth to clean your lens barrel only.
• Mildew is an enemy of your lens. Clean the lens after shooting near water or in any humid place. Store your lens in a clean, cool and dry
place. When storing the lens in an lens case, store it with commercially available driving agent such as silicagel, and change the agent
occasionally. If you find mildew on your lens, consult an authorized repair shop or nearby photographic store.
- Do not touch the lens-camera interface contacts since dust, dirt and/or stains may cause a contact failure between the lens and camera.
- When using your equipment
make sure to put your equi


- TAMRON
- ENGLISH
- ATTACHING AND REMOVING THE LENS
- HOW TO MOUNT THE LENS
- HOW TO DETACH THE LENS
- B
- FOCUSING (AUTOFOCUS) AND USING THE FULL-TIME MANUAL FUNCTION
- USING THE FULL-TIME MANUAL FUNCTION
- FOCUSING (MANUAL FOCUS) (REF. FISO 1, 2, 8, 4)
- VC MECHANISM (REF. FIGS 1, 5 & 6) (MOUNTED FOR NIKON AND CANON MODELS)
- HOW TO USE VC MECHANISM
- THE VC CAN BE EFFECTIVE FOR HAND-HELD SHOTS UNDER THE FOLLOWING CONDITIONS
- TAKING PARKING SHOTS OF A MOVING SUBJECT THE V9 MAY NOT BE ABLE TO MIX
- STOWING LENS HOOD ON THE LENS (REF. FIG. 9)
- 700M LOCK SWITCH (REF. FIGS 1)
- HOW TO ACTIVATE THE ZOOM LOCK SWITCH MECHANISM
- PRECAUTIONS IN SHOOTING
- TO ENQUIRE LONG TERM SATISFACTION
Marke : TAMRON
Modell : A010
Kategorie : Objektiv