SL30P - Chauffe-eau instantané et chaudière Joven - Kostenlose Bedienungsanleitung
Finden Sie kostenlos die Bedienungsanleitung des Geräts SL30P Joven als PDF.


Benutzerfragen zu SL30P Joven
0 Frage zu diesem Gerät. Beantworten Sie die, die Sie kennen, oder stellen Sie Ihre eigene.
Eine neue Frage zu diesem Gerät stellen
Laden Sie die Anleitung für Ihr Chauffe-eau instantané et chaudière kostenlos im PDF-Format! Finden Sie Ihr Handbuch SL30P - Joven und nehmen Sie Ihr elektronisches Gerät wieder in die Hand. Auf dieser Seite sind alle Dokumente veröffentlicht, die für die Verwendung Ihres Geräts notwendig sind. SL30P von der Marke Joven.
BEDIENUNGSANLEITUNG SL30P Joven

Thank you for selecting JOVEN Instant Water Heater. Please read this manual before installation and be sure to keep it handy for your future reference.

SAFETY PRECAUTION
This sign warns of serious injury, damage to property and potential death. Before operating, please read the following "Safety Precautions" carefully.
1 PARTS IDENTIFICATION
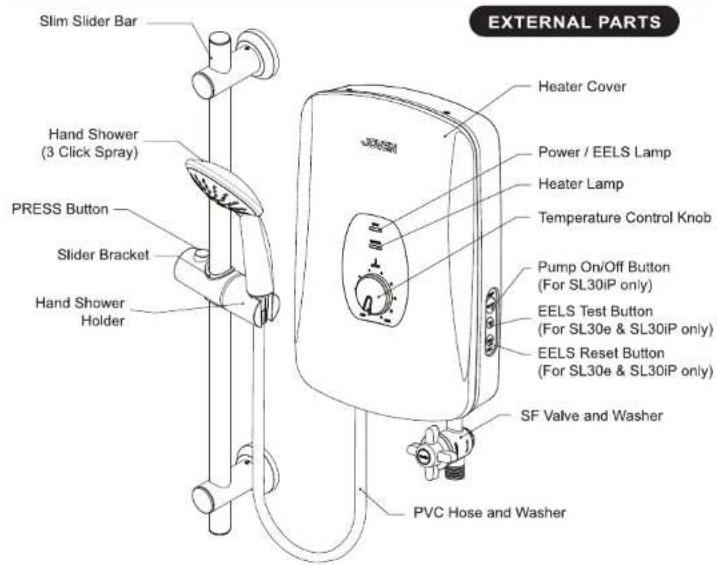
text_image
EXTERNAL PARTS Slim Slider Bar Hand Shower (3 Click Spray) PRESS Button Slider Bracket Hand Shower Holder Heater Cover Power / EELS Lamp Heater Lamp Temperature Control Knob Pump On/Off Button (For SL30iP only) EELS Test Button (For SL30e & SL30iP only) EELS Reset Button (For SL30e & SL30iP only) SF Valve and Washer PVC Hose and Washer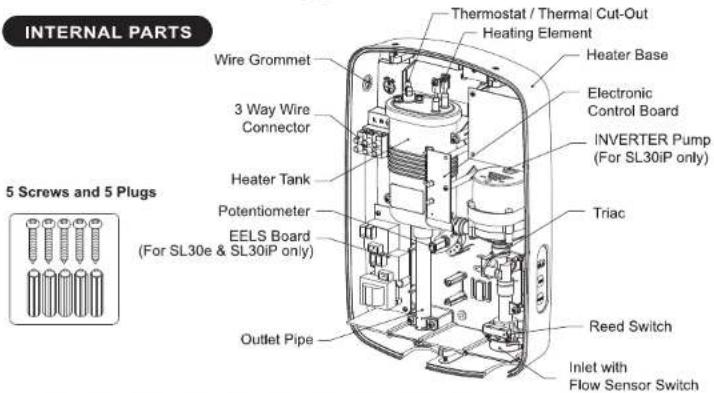
text_image
INTERNAL PARTS 5 Screws and 5 Plugs Thermostat / Thermal Cut-Out Heating Element Wire Grommet 3 Way Wire Connector Heater Tank Potentiometer EELS Board (For SL30e & SL30iP only) Outlet Pipe Triac Electronic Control Board INVERTER Pump (For SL30iP only) Reed Switch Inlet with Flow Sensor Switch2 SPECIFICATION
| Electrical Loading | 2.2 kW | 10.0 A | 220 Va.c. | 50 / 60Hz |
| 3.0 kW | 13.0 A | 230 Va.c. | 50Hz | |
| 3.3 kW | 15.0 A | 220 Va.c. | 50 / 60Hz | |
| 3.3 kW | 15.0 A | 230 Va.c. | 50Hz | |
| 3.3 kW | 13.8 A | 240 Va.c. | 50 / 60Hz | |
| 3.5 kW | 16.0 A | 220 Va.c. | 50 / 60Hz | |
| 3.6 kW | 16.0 A | 230 Va.c. | 50 / 60Hz | |
| 3.6 kW | 15.0 A | 240 Va.c. | 50 / 60Hz | |
| 4.4 kW | 20.0 A | 220 Va.c. | 50 / 60Hz | |
| 4.5 kW | 21.0 A | 220 Va.c. | 50 / 60Hz | |
| 4.8 kW | 21.0 A | 230 Va.c. | 50 / 60Hz | |
| 5.2 kW | 24.0 A | 220 Va.c. | 50 / 60Hz | |
| Min. Water Pressure | 10 kPa / 1.45 psi / 0.1 bar | |||
| Max. Water Pressure | 380 kPa / 55 psi / 3.8 bar | |||
| Min. Water Flow | 2 Litres per Minute | |||
| Max. Water Flow | 8 Litres per Minute | |||
| Water Temp. Control | Stepless Electronic Power Control | |||
| Inlet/Outlet Connection | ø15 mm (1/2"BSP) - Single Point System | |||
| ABS Casing | Splash Proof Casing |P25 | |||
| Built-in EELS system (10mA Sensitivity) | Models: SL30e & SL30iP | |||
| Built-in INVERTER Pump | Model: SL30iP only | |||
| Dimensions | 240 x 360 x 70 mm | |||
| Weight | SL30 - 2.8kg ; SL30e - 3.0kg ; SL30iP - 3.6kg | |||
FEATURES
Electronic Power Control
This continuous variable electronic power control with temperature control knob selection from "OFF" to "MAX" enables you to select to your ideal shower temperature. Thus saves your electric power consumption.
Safety Thermostat / Thermal Cut-Out
It prevents the heater from overheating and thus eliminates the dangers of scalding to the user.
Auto Flow Sensor Switch
It operates the heater only when there is sufficient water flow and turn off the heater when the shower off, thus no power wastage. In case if the water outlet gets blocked, it automatically cuts power to the heater, thus avoids the danger of scalding.
• Built-in EELS System with Surge Protector (For SL30e & SL30iP only)
This extra safety feature with 10mA sensitivity will cut off the electrical supply to the heater in the event of current leakage from the heater, thus prevents the user from fatal electric shock. It also incorporates a surge protector to prevent damage to the electronic circuit in case of sudden power surge.
• Built-in INVERTER Pump (For SL30iP only)
This is specially design to overcome the low water pressure problem for those direct connections to the gravity water tank. It boosts the outlet water flow to provide you an optimum invigorating shower.
- Stop & Filter Valve (SF Valve)
This innovative Valve helps to control and filter the inlet water.
- Slim Slider Bar Set
It is designed as a 'hand's free' shower concept for the convenience of the user. The height and direction of Slider Bracket and Hand Shower Holder can be easily adjusted to your desired position.
• 3 Spray Pattern Hand Shower
3 ideal shower mode spray pattern can be selected just by turning the spray selector, so easy!
3 INSTALLATION INSTRUCTION
3.1 HEATER INSTALLATION

IMPORTANT
- Installation should be carried out by qualified personnel with close reference to the instruction manual and compliance to the local authority. - This appliance must be installed indoor only.
text_image
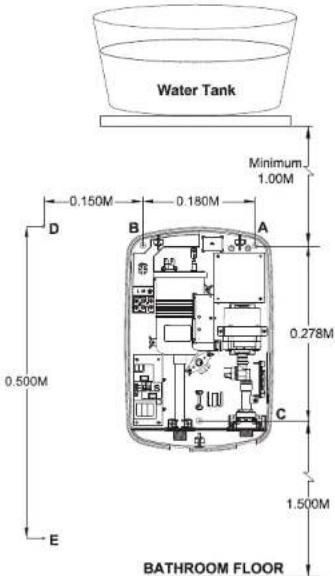
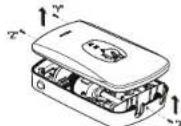
Water Tank 0.150M 0.180M Minimum 1.00M D B A 0.278M 0.500M C 1.500M E BATHROOM FLOOR- Remove the screws X, Y & Z. Gently lift up the cover.
- Select a suitable position in the bathroom, mark the screw points A, B & C on the wall with the heater base and screw points D & E for slider bar. Note:
• The Heater position should be at minimum 1.5m from the bathroom floor and must be in a vertical position.
- For direct connection to the water tank, the heater must have a minimum of 1.0m (3.3ft) below the water tank.
- Use 5mm drill and make the wall plug holes to 25mm depth. Insert the wall plugs.
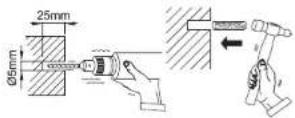
- Mount the heater firmly into position with the screws.
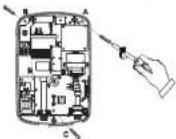
3.2 SLIM SLIDER BAR SET INSTALLATION
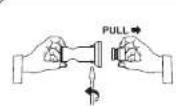
- Loosen both bar bracket screws (Top & Bottom) and remove bracket bush from the bar bracket.
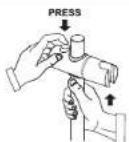
- Insert the hand shower holder into the slider bar by pressing the shower holder adjustment button.
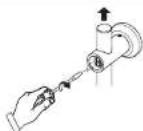
- Insert slider bar into the bar bracket and tighten both plastic screws to hold slider bar at required position.
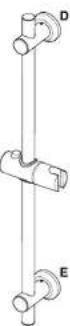
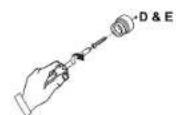
- Screw the bracket bush to the position 'D & E'
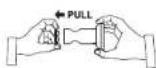
- Remove the bracket cap from bar bracket.
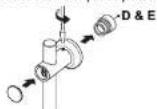
- Insert bar bracket to bracket bush at 'D & E' position and tighten both bar bracket screws (Top & Bottom) to lock Replace the bracket cap.
3.3 PLUMBING CONNECTION
text_image
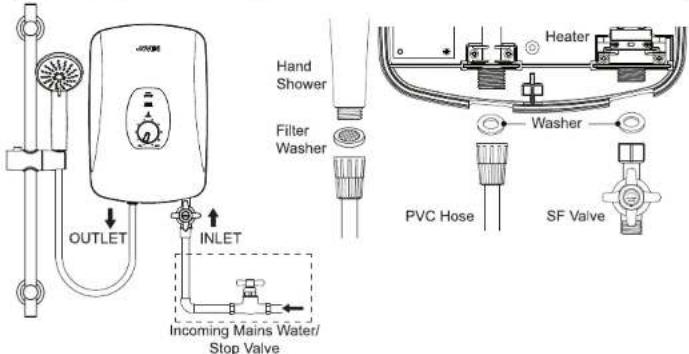
OUTLET INLET Incoming Mains Water/ Stop Valve Hand Shower Filter Washer Heater Washer PVC Hose SF Valve
IMPORTANT
- This heater is a single point system and heater outlet can only be fitted to the PVC Hose and Hand Shower Set Provided. No control valve or fittings can be fitted to the water outlet
- Metallic/chromed hose and conductive control valve shall not be used.

- Connect SF Valve to the water inlet by tightening the plastic nut & washer. Make sure the arrow facing upwards.
- Connect the incoming water plumbing end to SF Valve (1/2" BSP).
- Turn on the water supply and SF Valve to maximum volume to allow water flow into heater tank and drain out any plumbing particles through the outlet. Turn off the SF Valve.
- Connect the PVC Hose to the water heater outlet and the hand shower. Be sure to insert the washers to the outlet connection and the hand shower, otherwise water will leak at the connector ends.
- Hook the hand shower to the hand shower holder and adjust to your ideal position.
- Turn on the SF Valve & check for any water leakage.
3.4 ELECTRICAL CONNECTION

IMPORTANT
- All plumbing works must be completed and heater tank filled with water before proceeding to electrical connections. This will prevent any damage to the appliance.
- Ensure that the electrical supply is single-phase at 220 to 240 Va.c.
- This appliance must be permanently earthed. The use of Plug & Socket is not recommended
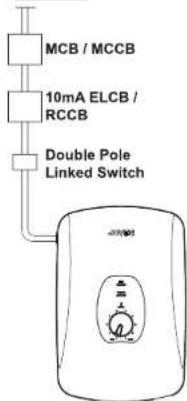
- It is recommended to use an approved current operated type Earth Leakage Circuit Breaker (ELCB) / Residual Current Circuit Breaker (RCCB) of 10mA Sensitivity and higher than rated current. (Refer to Table)
- It is recommended to use an approved type Miniature Circuit Breaker (MCB) or Molded Case Circuit Breaker (MCCB) of higher than rated current. (Refer to Table)
- This appliances must be permanently connected to the electrical supply through a Double Pole Linked Switch above rated current (Refer to Table) and having contact separation of at least 3mm in all poles incorporated in the fixed wiring. The switch must be out of reach from user in the bathroom.
- Do not share the electrical supply with other appliances.
Table: Electrical Loading Table
| HEATER ELECTRICAL LOADING | MINIMUM CONDUCTOR SIZE | RATED CURRENT FOR CIRCUIT BREAKER / DOUBLE POLE LINKED SWITCH (A) | ||||
| Voltage(Va.c.) | Power(kW) | Current(A) | Conductor Size( mm^2 ) | Conduit Cable(No. /ømm) | Flexible Cable(No. /ømm) | |
| 22050/60 Hz | 2,2 | 10 | 2,5 | 7/0.67 | 50/0.25 | 16 |
| 3,3 | 15 | 2,5 | 7/0.67 | 50/0.25 | 20 | |
| 3,5 | 16 | 4,0 | 7/0.85 | 56/0.30 | 20 | |
| 4,4 | 20 | 4,0 | 7/0.85 | 56/0.30 | 25 | |
| 4,5 | 21 | 4,0 | 7/0.85 | 56/0.30 | 25 | |
| 5,2 | 24 | 6,0 | 7/1.04 | - | 32 | |
| 23050/60 Hz | 3,0 | 13 | 2,5 | 7/0.67 | 50/0.25 | 20 |
| 3,3 | 15 | 2,5 | 7/0.67 | 50/0.25 | 20 | |
| 3,6 | 16 | 4,0 | 7/0.85 | 56/0.30 | 20 | |
| 24050/60 Hz | 4,8 | 21 | 6,0 | 7/1.04 | - | 25 |
| 3,3 | 13,8 | 2,5 | 7/0.67 | 50/0.25 | 20 | |
| 3,6 | 15 | 2,5 | 7/0.67 | 50/0.25 | 20 | |
Recommended Electrical Connection
text_image
MCB / MCCB 10mA ELCB / RCCB Double Pole Linked Switch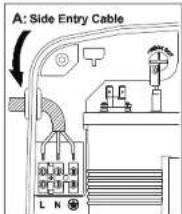
text_image
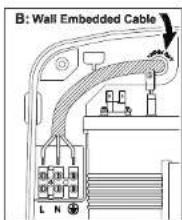
B: Wall Embedded Cable L N- Switch off the electrical mains.
- Refer to Table for correct cable size.
- Insert the cable through 'A' for side entry or 'B' for wall embedded cable by cutting a hole through the wire grommet or breaking the 'Knock Out' point at heater base.
- Connect electrical wire as follow:
Brown or Red to L (LIVE)
Blue or Black to N (NEUTRAL)
Green or Green/Yellow to (EARTH)
Recommended Stripping Length
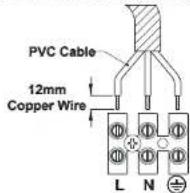
- Check that the wiring connection is correct and properly tightened.
- Replace the cover.
4 OPERATING PROCEDURE

IMPORTANT
- Make sure the heater tank is filled with water before switching on the electrical supply. Failure to do so will damage the appliance and void the warranty.
- This appliance is not intended for use by young children or infirm persons without supervision.
- Do not switch ON if there is a possibility that the water in the heater is frozen.
• This appliance must be switched off after use
text_image
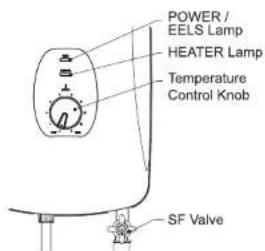
POWER / EELS Lamp HEATER Lamp Temperature Control Knob SF Valve- Switch on the electrical supply. Green Power / EELS light will turn on.
- Turn on the SF Valve in counter clockwise direction and water will flow through the hand shower.
- For hot shower, turn on the temperature control knob. Red 'HEATER' light will turn on. Adjust the temperature knob for comfortable shower temperature.
- For model SL30iP, the INVERTER Pump start automatically when the SF Valve is turned on. The pump boosts the outlet water flow to provide an optimum invigorating hot shower.
This additional pump on/off button located on the right hand side of heater casing is to enable the pump to be switch off wherever the shower pressure is sufficient.
- After shower, turn off the SF Valve & switch off the electrical power supply.
5 3 SPRAY PATTERN HAND SHOWER
How to Select
Turn the spray selector clockwise or anti-clockwise until you get the desired flow.
Spray Selector
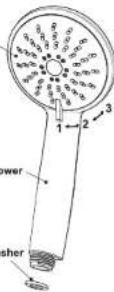
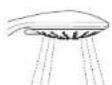
1. Wide Spray
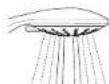
2. Maxi Spray
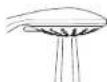
3. Jet Spray
6 EELS MAINTENANCE (For SL30e & SL30iP only)
text_image
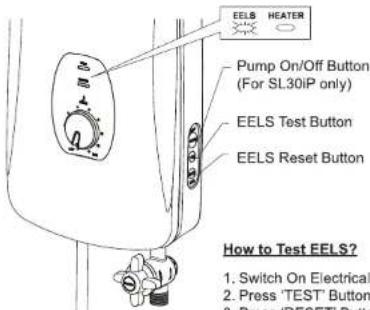
EELS HEATER Pump On/Off Button (For SL30IP only) EELS Test Button EELS Reset Button How to Test EELS? 1. Switch On Electrical 2. Press 'TEST' Button 3. Press 'RESET' Button
WARNING
- It is recommended to test the built-in EELS once a month.
-
If the 'EELS' light does not go off each time the test button is pressed or does not come on when the reset button is pressed, contact our service centre nearest to you or your sales agent for repair. DO NOT TRY TO REPAIR IT YOURSELF.
-
Switch On Electrical supply, Green Light 'EELS' will turned on.
- Press 'TEST' Button, Green Light will turn off.
- Press 'RESET' Button, Green Light will turned on again.
7 CLEANING SF VALVE FILTER
text_image
CLOSE OPEN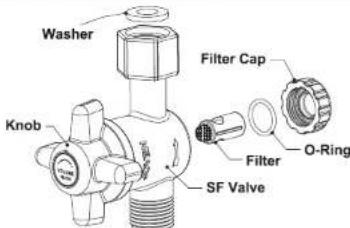
text_image
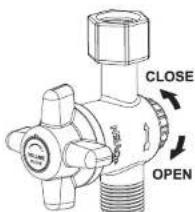
Washer Knob Filter Cap O-Ring Filter SF ValveThis innovative and compact Stop & Filter Valve (SF Valve) helps to control and filter the inlet water. Turning the knob counter clockwise will turn on the flow while turning the knob clockwise will shut off the water. The filter inside the SF valve should be cleaned whenever there is a sign of inlet water blockage. This can be done by loosening the filter cap and pulling out the filter and clean it with soft brush.
Note: i) Make sure to turn off the incoming water supply before the operation.
ii) This has to be done more regularly in areas where the inlet water supply is dirty.
8 TROUBLESHOOTING
- Check the following points for better performance:
| SYMPTOMS | POINT TO CHECK FOR REMEDY |
| A. No water coming out of the heater | Check whether all stop valves are openedCheck whether the water supply is thereCheck and clean the filter cup and spray selector of hand shower if it is clogged by dirtCheck and clean the SF Valve and filter if it is clogged by dirt |
| B. Heater is not working | Check whether power supply is ONCheck whether water supply is very low pressure (Heater requires minimum pressure of 145psi or water flow rate of 2 litres per minute) |
| C. Shower not hot enough | Adjust the temperature control to higher settingCheck whether water flow is too strong. Reduce the water flow to get hotter shower. (Less water, more hot)Shower could be at Maxi spray, turn to Wide spray. |
- If any of the following abnormalities are present during usage, contact our service centres nearest to you or your sales agent immediately:
A. Water leakage
B. Insufficient water running
C. Water temperature cannot be controlled
D. POWER / EELS and HEATER lamp does not light up
E. EELS continuously tripping
(For SL30e & SL30iP only)

IMPORTANT
NEVER TRY TO REPAIR THE UNIT YOURSELF
9 PRODUCT WARRANTY
WARRANTY VOID
- This warranty does not cover lightning, natural disaster, pest attacks, fire, negligence, misuses, accidents, floods, pollution, abuse or neglect, improper installation or improper maintenance and abnormal voltage or the usage of generator.
- Failure to follow the installation manual.
- Repair or attempted repair of this product by anyone not authorised by JOVEN.
- Any unit which has been modified or on which the serial number has been defaced, altered or removed.
* Note: Refer to your local distributor for warranty terms & conditions
Manufactured by JOVEN ELECTRIC CO.



ISO 9001 CERTIFIED MFR