
Helicopter - Spielzeugdrohne i-onik - Kostenlose Bedienungsanleitung
Finden Sie kostenlos die Bedienungsanleitung des Geräts Helicopter i-onik als PDF.


| Produkttyp | Fernsteuerung Helikopter |
| Marke | i-onik |
| Modell | Helicopter |
| Kompatible Betriebssysteme | iOS (iPhone, iPod touch, iPad) und Android (ausgewählte Modelle) |
| Erforderliche App | GB-EMITTER (kostenlos im App Store und Google Play Store) |
| Steuerungsentfernung | Bis zu 10 Meter |
| Flugzeit | Ca. 5–10 Minuten (vollgeladener Akku, windstille Bedingungen) |
| Ladezeit | Ca. 1 Stunde |
| Akku Helikopter | Eingebauter Li-Ion-Akku, Aufladung über USB |
| Akku Sender | Eingebauter Akku, Aufladung über USB |
| Kanalauswahl | ID-Band A/B/C |
| Steuerungsfunktionen | Vorwärts, Rückwärts, Links, Rechts, Steigen, Sinken, Trimmung |
| Sender-LED | Orange: Ein; Aus: Aus; Blinkt rot: niedriger Akku |
| Helikopter-Ladestatus | Lade-LED an: lädt; aus: vollständig geladen |
| Gewicht (ca.) | 150 g (Schätzung) |
| Abmessungen (ca.) | 20 × 10 × 10 cm (L×B×H, Schätzung) |
| Material | Kunststoff und Metallkomponenten |
| Empfohlener Einsatzort | Innenräume, windgeschützt, Abstand zu Ventilatoren/Klimaanlagen |
| Sicherheitshinweise | Nicht mutwillig abstürzen lassen; bei Schäden vor erneuter Nutzung prüfen |
Häufig gestellte Fragen - Helicopter i-onik
Benutzerfragen zu Helicopter i-onik
0 Frage zu diesem Gerät. Beantworten Sie die, die Sie kennen, oder stellen Sie Ihre eigene.
Eine neue Frage zu diesem Gerät stellen
Laden Sie die Anleitung für Ihr Spielzeugdrohne kostenlos im PDF-Format! Finden Sie Ihr Handbuch Helicopter - i-onik und nehmen Sie Ihr elektronisches Gerät wieder in die Hand. Auf dieser Seite sind alle Dokumente veröffentlicht, die für die Verwendung Ihres Geräts notwendig sind. Helicopter von der Marke i-onik.
BEDIENUNGSANLEITUNG Helicopter i-onik
i.onik®
fun
Helicopter
Instruction manual


flowchart
graph TD
    A["Visit the App Store"] --> B["Find the "GB-EMITTER" and install it on your mobile device"]
    B --> C["Switch the helicopter on (1)"]
    C --> D["Start the App"]
    D --> E["Connect the Sender to your mobile device (2)"]
    E --> F["Press ON"]
    F --> G["Check that the volume on your mobile device is on maximum"]
    G --> H["Move the throttle lever"]
    H --> I["Adjust the trimming as required"]
    I --> J["Use the control lever to steer"]
i.onik
Helicopter
Operation steps for ANDROID system
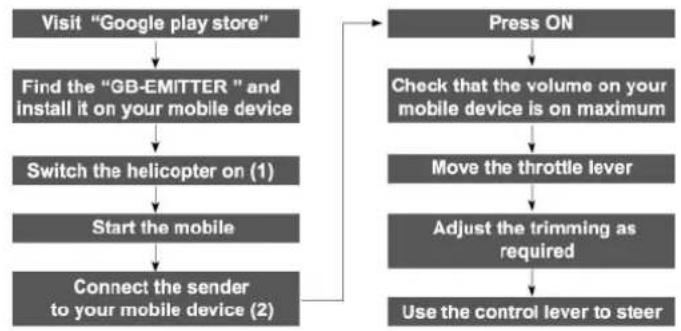
flowchart
graph TD
    A["Visit "Google play store""] --> B["Find the "GB-EMITTER" and install it on your mobile device"]
    B --> C["Switch the helicopter on (1)"]
    C --> D["Start the mobile"]
    D --> E["Connect the sender to your mobile device (2)"]
    E --> F["Press ON"]
    F --> G["Check that the volume on your mobile device is on maximum"]
    G --> H["Move the throttle lever"]
    H --> I["Adjust the trimming as required"]
    I --> J["Use the control lever to steer"]
i.onik
Helicopter
Operations steps for interface choose
- Enter main interface, choose "OPTION"


Helicopter
- Enter "OPTION", select ID - Band A/B/C, then turn back to main interface, and choose "PLAY".
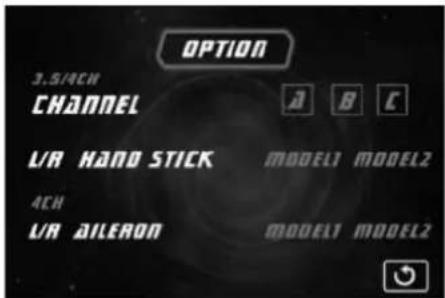

Helicopter
fun
- Enter "PLAY", choose "3.5CH" (4CH is for other models).


Helicopter
Description of the GB-EMITTER control panel
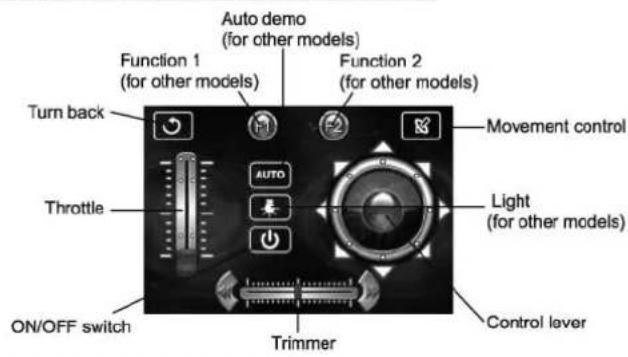

Helicopter
Functions
- Power switch

Press the power switch, orange means ON, while means OFF.
- Movement control

Press the button to fulfill forward/backward/left/right action controlled by movement of mobile.
- Direction control

- Control settings
Press the left button to set the helicopter so that it does not move to the right

Press the right button to set the helicopter so that it does not move to the left.
B

Helicopter
Charging
- Connect the USB cable (3) to a powered USB connection on your computer.
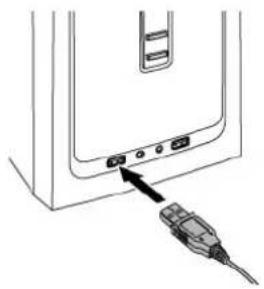
natural_image
Diagram of a device rear panel with two connectors and a cable inserted (no text or symbols)9

Helicopter
- Connect the USB cable to the power jack of the sender. During charging, a red light will flash. As soon as the charging process is complete, the light will turn off.

natural_image
Close-up of a small electronic device with wires attached to its side, no visible text or symbols
Cautions:
If the sender light is flashing red, power is low and the sender must be charged.
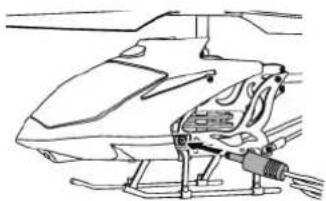
- To charge the helicopter, turn it off and connect it to the charging cable (3). The light will turn on to indicate charging. As soon as the helicopter is fully charged, the light will turn off.
natural_image
Line drawing of a helicopter with attached mechanical components (no text or symbols)-10

Helicopter
Installation of the sender
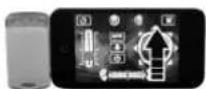
Before starting, carefully connect the sender to your mobile device (see figure).


Caution
If the sender is not properly connected, unexpected disturbances may occur or the helicopter may receive incorrect signals.
Control instructions
Control range: We recommend that you keep the helicopter within 10 m of the sender, anything beyond
that radius will give you limited control of the helicopter. Caution: Do not use the helicopter in the vicinity of air conditioning systems, fans, electric fans or ventilation pipes, or in windy conditions. You may lose control of the helicopter, causing damage to objects or the helicopter itself.
Flying time: With a fully charged battery and little wind, a flying time of at least 5 minutes is possible. For flying times of less than a minute, turn the helicopter off and charge.

Helicopter
1. Take-off
Move the throttle up. The speed of the main rotor is increased and the helicopter takes off.
2. Landing
Move the throttle down. The speed of the main rotor is decreased and the helicopter lands.
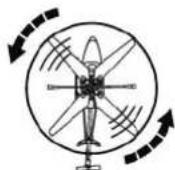
3. Turning left
Move the control lever towards the left. The nose of the helicopter will also turn towards the left.



Helicopter
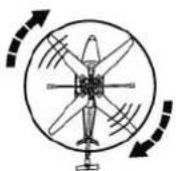
4. Turning right
Move the control lever to the right. The nose of the helicopter will also turn towards the right.

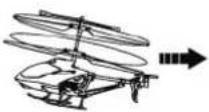
5. Moving forward
Move the control lever up. The nose of the helicopter will move down and the helicopter will move forward.


6. Moving back
Move the control lever down. The nose of the helicopter will move up and the helicopter will move back.

-13

Helicopter
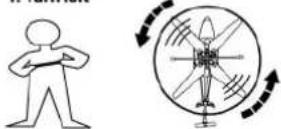
Steering
Turn the steering control on to set the direction of the helicopter. With the throttle lifted, move your hand as shown in the figure below to steer the helicopter in flight.
-
Turn left
-
Fly forwards


-
Turn right

-
Fly backwards


-14

fun
Helicopter
Other instructions
If the helicopter does not respond, proceed as follows:
- Check that the sender is firmly connected to the iPod Touch/iPhone/iPad/Android device and that the volume is on maximum.
- Check that the light on the sender is flashing. This indicates the power supply to the sender.
- If the incorrect channel has been selected, try to find the correct one (A/B/C) by a process of elimination.
- Turn the sender off when you receive or make calls, as this can interfere with the control of the helicopter.
- Before using the helicopter, ensure that it is fully charged. A charging time of about 1 hour will ensure continuous use of about 10 minutes.

Helicopter
Description of remote control functions


1. Take-off/Landing
Lift the throttle to increase the speed of the main rotor for helicopter take-off.
Lower the throttle to decrease the speed of the main rotor for landing the helicopter.

natural_image
Diagram of a helicopter with directional arrows indicating motion or force, alongside an inset showing internal components (no text or symbols)2. Turning right/left
Move the control lever towards the left to turn the nose of the helicopter to the left.
Move the control lever towards the right to turn the nose of the helicopter to the right.


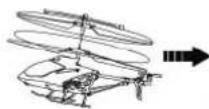
3. Moving forwards/ backwards
Lift the control lever to direct the nose of the helicopter downwards and to allow it to move forward. Lower the control lever to direct the nose of the helicopter upwards and allow it to move back.


Supported by
1. IOS system:
Apple iPhone, iPod touch, iPad
- Andorid system:
HTC: G7, G10, G14, G18
SAMSUNG: S5830, II9100, I9220, 9103, SGH-T959, GALAXY S3
MOTOROLA: ME525, XT883
More models to be continue...
3. Remote control included
Safety instructions
- The remote control range is affected by low battery charge of the sender or helicopter.
- We recommend that you use the helicopter within a radius of 10 m of the sender. You may not be able to control the helicopter from greater distances.
- If the helicopter is unable to take off or the flying time is noticeably reduced, check that the battery is charged. If the helicopter has not been used for some time, the battery may no longer operate at full charge.

Helicopter
- If the helicopter is damaged during flight, inspect it before using it again and replace any damaged parts if required.
- Do not make the helicopter crash deliberately since this can lead to permanent damage and you may injure yourself or other people.
Trouble shooting
| Symptom | Cause |
| Rotor blades don't turn. | Check whether the ON/OFF switch is ON.Check whether the battery is sufficiently charged. |
| The helicopter cannot fly very high or has come to a complete stop. | Charge the battery fully and try again. |
| The helicopter does not respond at all. | Check whether you have selected the right channel. |
| Loss of control of the helicopter. | Check for disturbances from other IR devices.Strong light sources can affect the helicopter controls.Try to use the helicopter in a different place. |



- Charging
- Cautions:
- Installation of the sender
- Caution
- Control instructions
- Take-off
- Landing
- Turning left
- Turning right
- Moving forward
- Moving back
- Steering
- Other instructions
- Take-off/Landing
- Turning right/left
- Moving forwards/ backwards
- Supported by
- IOS system:
- Remote control included
- Safety instructions
Marke : i-onik
Modell : Helicopter
Kategorie : Spielzeugdrohne