
AS313 - Nicht kategorisiert OREGON SCIENTIFIC - Kostenlose Bedienungsanleitung
Finden Sie kostenlos die Bedienungsanleitung des Geräts AS313 OREGON SCIENTIFIC als PDF.


| Produkttyp | Reisewecker mit Hintergrundbeleuchtung |
| Marke | Oregon Scientific |
| Modell | AS313 |
| Anzeige | LCD, 12-Stunden-AM/PM oder 24-Stunden-Format |
| Genauigkeit | +1 bis -0,5 Sekunden pro Tag |
| Alarm | Crescendo-Weckton, automatische Abschaltung nach 1 Minute |
| Schlummerfunktion | 6 Minuten, wiederholbar bis zu 1 Stunde |
| Hintergrundbeleuchtung | LED, beleuchtet das Display für 3 Sekunden |
| Stromversorgung | 1 x UM-4/AAA 1,5V Batterie |
| Batterielebensdauer | Ca. 1 Jahr (Uhrenfunktion) |
| Abmessungen (H x B x T) | 55 mm x 90 mm x 16 mm |
| Gewicht (ohne Batterie) | 60 g |
| Betriebstemperatur | 0 °C bis 50 °C |
| Schutzhülle / Ständer | Klappdeckel, dient als Tischständer |
| Reset-Funktion | Rücksetzknopf für Werkseinstellungen |
| Pflegehinweise | Nicht in Wasser tauchen; weiches Tuch zur Reinigung; keine scheuernden Mittel |
| Sicherheit | Nur neue Batterien verwenden; alte und neue nicht mischen |
| Reparierbarkeit | Keine vom Benutzer zu wartenden Teile; bei Störung zurücksetzen |
Häufig gestellte Fragen - AS313 OREGON SCIENTIFIC
Benutzerfragen zu AS313 OREGON SCIENTIFIC
0 Frage zu diesem Gerät. Beantworten Sie die, die Sie kennen, oder stellen Sie Ihre eigene.
Eine neue Frage zu diesem Gerät stellen
Laden Sie die Anleitung für Ihr Nicht kategorisiert kostenlos im PDF-Format! Finden Sie Ihr Handbuch AS313 - OREGON SCIENTIFIC und nehmen Sie Ihr elektronisches Gerät wieder in die Hand. Auf dieser Seite sind alle Dokumente veröffentlicht, die für die Verwendung Ihres Geräts notwendig sind. AS313 von der Marke OREGON SCIENTIFIC.
BEDIENUNGSANLEITUNG AS313 OREGON SCIENTIFIC
Travel Alarm Clock
With Back Light
Model AS313
INSTRUCTION MANUAL
flowchart
graph TD
    K --> A
    A --> B
    B --> C
    C --> D
    D --> E
    E --> F
    F --> G
    G --> H
    H --> I
    I --> J
[FIG.A]

[FIG.B]
natural_image
Diagram of a device interior with arrows indicating movement or force, no text or symbols present[FIG.C]
[FIG.D]
[FIG.E]
ENGLISH
INTRODUCTION
Thank you for your purchase of the Travel Alarm Clock With Back Light (AS313). Small and portable, the AS313 has several beneficial features that are designed specifically for individuals who frequently travel.
A Quartz clock, this unit maintains good time accuracy. The large Liquid Crystal Display (LCD) is segmented so that the current time and the alarm time can be viewed simultaneously. For night-time viewing, a back light illuminates the display.
The crescendo type daily alarm initially will activate quietly. The alarm gradually increases in volume so that the user is woken in a gentle manner. The daily alarm features a six-minute snooze function that prevents the user from falling back to sleep after the alarm has been deactivated.
Small and light weight, the unit has a protective hinge cover that becomes a table stand when the user is not in transit.
This unit is easy to use. Taking a few minutes to become familiar with the various features should optimize this product's usefulness.
DESCRIPTION OF PARTS
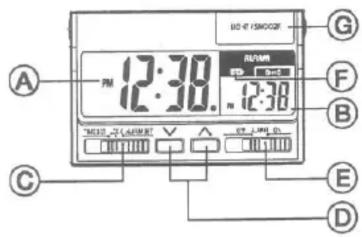
[FIG. A]
Current-Time Clock
12-hour AM/PM format
B Alarm Time
12-hour AM/PM format
© [TIME SET/LOCK/ALARM SET] switch
Sets current time and alarm time
(D) [A] Up and [V] Down button
Changes current time or alarm time increments when setting the alarm or clock.
⑤ [ALARM ON/OFF] switch
Activates and deactivates the alarm
(F) [Alarm ON/OFF] indicator
LCD indicator that shows the on / off status of the alarm
[G] [LIGHT/SNOOZE] button
Activates the LED back light and snooze function
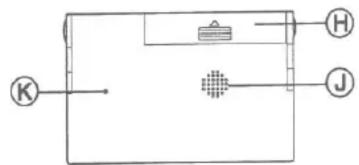
① Battery Compartment
Houses one (1) UM-4 or "AAA" size 1.5 battery
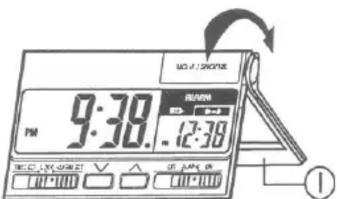
① Protective Cover and Table Stand [FIG.D]
When open, the cover becomes a table stand. Otherwise it functions as a protective cover.
J Alarm
Small openings for the alarm sound
K Reset
When pressed, all the functions will reset to original settings.
MANUFACTURER'S NOTE
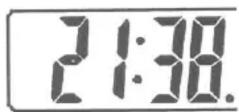
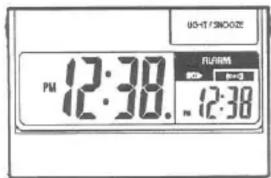
The unit is manufactured in both 12-hour AM/PM format and 24-hour format. The respective format will be indicated on the product's packaging. The 12-hour clock format is illustrated in figure A [FIG. A] and Figure B [FIG. B] illustrates the 24-hour clock format. With exception to the display, the functions of both models are identical.
INSTALLING OR REPLACING BATTERIES
This unit uses one (1) UM-4 or "AAA" size 1.5V battery.
To install/replace batteries:
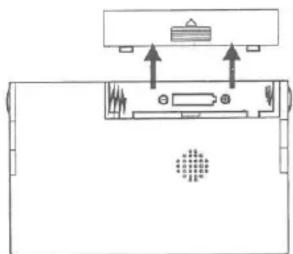
- Remove battery cover by gently pressing and pulling in figure C [FIG C].
- Insert one (1) new UM-4 or "AAA" size 1.5V battery. Be sure to follow the polarity symbols as marked.
- Replace the battery cover.

Note: If not disposed of properly, batteries can be harmful. Protect the environment by taking exhausted batteries to authorized disposal stations.
SETTING THE CLOCK
The current time can be easily set to reflect changes in time-zones, daylight savings, or other factors that may have occurred while traveling.
To change the current-time clock:
-
Slide the [TIME SET / LOCK / ALARM SET] switch from the locked [LOCK] position to the time setting [TIME SET] position.
-
Press the [A] Up or [V] Down buttons until the desired time is reached. Press and hold for accelerated changes.
- Once the desired time is displayed return the [TIME SET/LOCK/ALARM SET] switch to the locked [LOCK] position.
The current time is now set.
SETTING THE ALARM
The alarm can be easily set to activate at a specified time.
To set the alarm:
- Slide the [TIME SET / LOCK / ALARM SET] switch from the locked [LOCK] position to the alarm setting [ALARM SET] position.
- Press the [A] Up or [V] Down buttons until the desired time is reached. Press and hold for accelerated changes.
- Once the desired alarm time is displayed return the [TIME SET / LOCK / ALARM SET] switch to the locked [LOCK] position.
- Slide the [ALARM ON/OFF] switch to the on [ON] position.
The alarm time is now set. The alarm [Alarm ON/OFF] indicator will be shown on the display to indicate that the alarm is active. The alarm will activate at the indicated time.
ABOUT THE ALARM
The alarm is a crescendo type and will progressively increase in loudness. The alarm will automatically deactivate after one minute if it is not deactivated sooner.
To turn off the alarm:
- Slide the [ALARM ON/OFF] switch to the off [OFF] position.
The alarm also has a snooze function. When pressed, the alarm will stop for six minutes and then activate again.
To activate the Snooze Function:
- Press [LIGHT/SNOOZE].
The alarm will stop for six minutes before activating again. The snooze function can be repeatedly used for up to one (1) hour after which the alarm will automatically deactivate until the same time the following day.
THE BACK LIGHT
At night time or in a dark place the display can be easily seen by using the LED back light.
To use the back light:
- Press LIGHT/SNOOZE.
The LED back light will illuminate the LCD for 3 seconds.
THE TABLE STAND
When not in transit the protective cover can flip open and be used as a table stand as shown in figure D [FIG D].
THE PROTECTIVE COVER
When in transit the protective cover can be kept closed to protect the unit from getting damaged. Flip the table stand closed as shown in figure E [FIG E].
RESETING THE UNIT
Resetting the unit will return all settings to the factory values.
The button is required only when the unit is not operating in a favorable way, such as in the rare case of a malfunction.
To reset the unit:
- Gently insert a blunt styles such as a paper clip into the reset hole located at the back of the unit.
MAINTENANCE
When handled properly, this unit is engineered to give you years of satisfactory service.
Here is a few product care instructions:
- Do not immerse the unit in water. If the unit comes in contact with water, dry it immediately with a soft lint-free cloth.
- Abrasive cleaning agents may scratch the plastic parts and corrode the electronic circuit. Do not subject the unit to exces sive: force, shock, dust, temperature, or humidity.
- Such treatment may result in malfunction, a shorter electronic life span, damaged batteries, or distorted parts.
-
Do not tamper with the unit's internal components. Doing so will terminate the unit's warranty and may cause damage. The unit contains no user-serviceable parts.
-
Only use new batteries as specified in this instruction manual. Do not mix new and old batteries as the old batteries may leak.
SPECIFICATION
| Operation | : 0°C to 50°C(32°F to 122°F) |
| Accuracy | : + / - 0.5 seconds per day |
| Power Source | : One (1) UM-4 or “AAA” size 1.5V batter |
| Battery Life | : Approximately one year for the clock function |
| Dimensions | : 55mm (H) x 90mm (W)16mm (D) |
| Weight | : 60g (without battery) |
CAUTION
— The content of this manual is subject to change without further notice.
— Due to printing limitation, the displays shown in this manual may differ from the actual display.
— The manufacturer and its suppliers held no responsibility to you or any other person for any damage expenses, lost profits, or any other claim arise by using this product.
— The contents of this manual may not be reproduced without the permission of the manufacturer.
Marke : OREGON SCIENTIFIC
Modell : AS313
Kategorie : Nicht kategorisiert