EOS 05 LED - Nicht kategorisiert Synergy 21 - Kostenlose Bedienungsanleitung
Finden Sie kostenlos die Bedienungsanleitung des Geräts EOS 05 LED Synergy 21 als PDF.


Benutzerfragen zu EOS 05 LED Synergy 21
0 Frage zu diesem Gerät. Beantworten Sie die, die Sie kennen, oder stellen Sie Ihre eigene.
Eine neue Frage zu diesem Gerät stellen
Laden Sie die Anleitung für Ihr Nicht kategorisiert kostenlos im PDF-Format! Finden Sie Ihr Handbuch EOS 05 LED - Synergy 21 und nehmen Sie Ihr elektronisches Gerät wieder in die Hand. Auf dieser Seite sind alle Dokumente veröffentlicht, die für die Verwendung Ihres Geräts notwendig sind. EOS 05 LED von der Marke Synergy 21.
BEDIENUNGSANLEITUNG EOS 05 LED Synergy 21
Receiver for RGBW Remote & W if it transmitter
Model: 103504
text_image
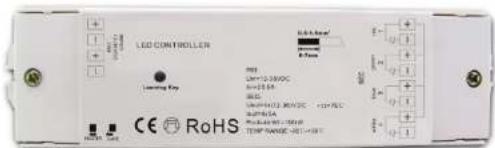
LED CONTROLLER Lacing Key CE RoHS 100kΩ 10Ω 10Ω 200kΩ 200kΩ 300kΩ 300kΩ 400kΩ 400kΩ 500kΩ 500kΩ 600kΩ 600kΩ 700kΩ 700kΩ 800kΩ 800kΩ 900kΩ 900kΩ 1000kΩ 1000kΩ 1100kΩ 1100kΩ 1200kΩ 1200kΩ 1300kΩ 1300kΩ 1400kΩ 1400kΩ 1500kΩ 1500kΩ 1600kΩ 1600kΩ 1700kΩ 1700kΩ 1800kΩ 1800kΩ 1900kΩ 1900kΩ 2000kΩ 2000kΩ 2100kΩ 2100kΩ 2200kΩ 2200kΩ 2300kΩ 2300kΩ 2400kΩ 2400kΩ 2500kΩ 2500kΩ 2600kΩ 2600kΩ 2700kΩ 2700kΩ 2800kΩ 2800kΩ 2900kΩ 2900kΩ 3000kΩ 3000kΩ 3100kΩ 3100kΩ 3200kΩ 3200kΩ 3300kΩ 3300kΩ 3400kΩ 3400kΩ 3500kΩ 3500kΩ 3600kΩ 3600kΩ 3700kΩ 3700kΩ 3800kΩ 3800kΩ 3900kΩ 3900kΩ 4000kΩ 4000kΩ 4100kΩ 4100kΩ 4200kΩ 4200kΩ 4300kΩ 4300kΩ 4400kΩ 4400kΩ 4500kΩ 4500kΩ 4600kΩ 4600kΩ 4700kΩ 4700kΩ 4800kΩ 4800kΩ 4900kΩ 4900kΩ 5000kΩ 5000kΩ


Feature
• Work with different sender
• Work with WIFI transmitter
• Control RGBW, RGB, CC-CW. Single color LED lighting.
Parameter
| Part No. | Input Voltage | Current | Output | Remarks |
| 103504 | 12-36VDC | 4x5A | 4x(60-180)W | Constant voltage |
| 112694 | 12-36VDC | 4x(96-288)W4x8A | Constant voltage | |
| 116291 | 12-36VDC | 4x350mA | 4x(4.2-12.6)W | Constant current |
| 111315 | 12-36VDC | 4x(8.4-25.2)W4x700mA | Constant current |
Suitable sender
| RGB+W remote | EOS 05 Handsender RGBW |
| CCT remote | EOS 05 Handsender DUAL |
| Dimmer remote | EOS 05 Handsender MONO |
| RGB+W wall mounted panel | EOS 05 Wanddimmer und Wandtaster RGBW |
Product Size
text_image
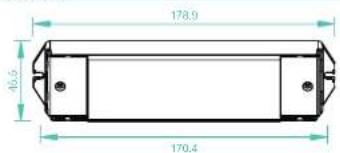
178.9 46.5 170.4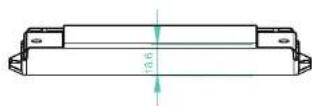
Brief introduction of buttons
text_image
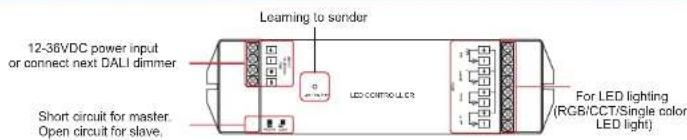
12-36VDC power input or connect next DALI dimmer Short circuit for master. Open circuit for slave. Learning to sender LED CONTROLS For LED lighting (RGB/CCT/Single color LED light)Wiring diagram
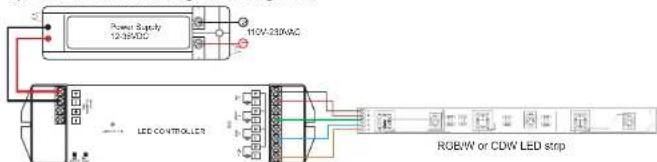
1) Receiver Connection Diagram for Single Unit
text_image
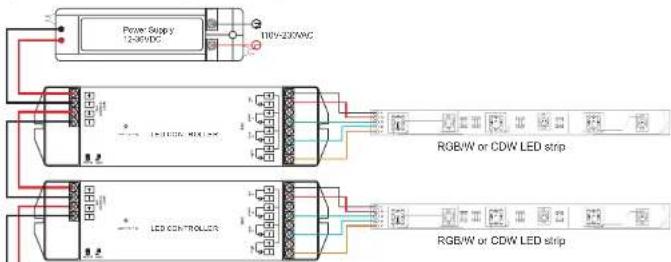
Power Supply 12.38MΩC 110V-238kΩC LED CONTROLLER RGB/W or CDW LED strip2) Receiver Connection Diagram for Multiple Units
text_image
Power Supply 12-06VDC 110V-230VDC LED CONTROLLER RGB/W or CDW LED strip RGB/W or CDW LED strip
text_image
LED CONTROLS RGB/W or CDW LED stripOperation
Learning (matching)
a. Do wiring according to connection diagram
b. Wake up the remote control by touching ON/OFF button.
c. Press learning button on receiver.
d. Touch any zone button on remote control.
e. Then touch color wheel.
1. Connected LED light will blink to confirm zone designation.
g. Press at learning button on receiver over 5 seconds until LED light flash, then delete the learned ID.
Note 1: To choose a master from slaves by jumper for each zone.
Short circuit for master.
Open circuit for slave.
Each zone only can set one master controller. After a period of time, the master will do synchronization operation to keep the same power or mode of all drivers in one zone.
operation to keep the same color or mode of all slaves in one zone.
Note 2: Each remote control 8 zones (areas) receivers, each area can be learned as many receivers as
we can.
Each receiver maximally can be controlled by 8 different remote controllers.
Safety & Warnings
1) The product shall be installed and serviced by a qualified person.
2) IP20. Please avoid the sun and rain. When installed outdoors, please ensure it is mounted in a water proof enclosure.
3) Always be sure to mount this unit in an area with proper ventilation to avoid overheating.
4) Please check if the output voltage of any LED power supplies used comply with the working voltage of the product.
5) Never connect any cables while power is on and always assure correct connections to avoid short circuits before switching on.
6) Please ensure that the cable is secured tightly in the connector
7) For update information please consult your supplier.
Warranty Agreement
1) We provide lifelong technical assistance with this product:
- 3-year warranty. We print date on every products, for example :1125 means year 2011,week 25.The
warranty is for free repair or replacement and covers manufacturing faults only.
- For faults beyond the 3-year warranty we reserve the right to charge for time and parts.
2) Limited Warranty
● Any defects caused by wrong operation.
- Any damages caused by unauthorized removal, maintenance, modifying, incorrect connection and replacement of chips.
- Any damages due to transportation, vibration etc. after purchase.
- Any damages caused by earthquake, fire, lightning, pollution and abnormal voltage.
- Any damages caused by negligence, inappropriate storing at high temperatures and humidity or near harmful chemicals.
● Product has been updated
3) Repair or replacement as provided under this warranty is the exclusive remedy to the customer.