
XA201 - Sicherheitskamera XENA - Kostenlose Bedienungsanleitung
Finden Sie kostenlos die Bedienungsanleitung des Geräts XA201 XENA als PDF.


| Produkttyp | Sicherheitsalarmanlage (Einbruchmelder) |
| Marke | XENA |
| Modell | XA201 |
| Stromversorgung | 4 AA-Batterien (nicht im Lieferumfang) oder 4,5V AC-Adapter (nicht im Lieferumfang) |
| Batterietyp Fernbedienung | 3 LR44-Knopfzellen (im Lieferumfang) |
| Erfassungsmethode | Passiver Infrarot-Bewegungsmelder |
| Reichweite Bewegungssensor | 6 m (20 Fuß) |
| Erfassungswinkel vertikal | 30° |
| Erfassungswinkel horizontal | 60° (110° laut Diagramm) |
| Alarmlautstärke | Sehr laut ( Piepton bei Batterieeinbau) |
| Anzahl Fernbedienungen | 1 (im Lieferumfang) |
| Programmierbarer Sicherheitscode | Ja (über DIP-Schalter und Anlernvorgang) |
| Externer Sirenenanschluss | Ja (für XA301, nicht im Lieferumfang) |
| Verzögerung beim Scharfschalten | 30 Sekunden |
| Verzögerung beim Auslösen | 4 Sekunden (nach Bewegungserkennung) |
| Batteriestandsanzeige | Rote LED an der Basis |
| Befestigung | Wandmontage oder freistehend |
| Gehäusematerial | Kunststoff |
| Reinigung | Mit leicht feuchtem Tuch, keine chemischen Reiniger |
| Batteriehinweise | Nur passende Größe, Polarität beachten, nicht mischen, bei Nichtgebrauch entfernen |
| Garantie / Support | www.xenasecurity.com |
Häufig gestellte Fragen - XA201 XENA
Benutzerfragen zu XA201 XENA
0 Frage zu diesem Gerät. Beantworten Sie die, die Sie kennen, oder stellen Sie Ihre eigene.
Eine neue Frage zu diesem Gerät stellen
Laden Sie die Anleitung für Ihr Sicherheitskamera kostenlos im PDF-Format! Finden Sie Ihr Handbuch XA201 - XENA und nehmen Sie Ihr elektronisches Gerät wieder in die Hand. Auf dieser Seite sind alle Dokumente veröffentlicht, die für die Verwendung Ihres Geräts notwendig sind. XA201 von der Marke XENA.
BEDIENUNGSANLEITUNG XA201 XENA
INSTRUCTIONS MANUAL
XA201
INTRUDER ALARM with
remote keyfob
XENA
INTELLIGENT SECURITY

Controls
- Motion Sensor
- Alarm Speaker
- Remote Receiver
- Battery Low LED
- External Siren Socket
- 4.5V AC Adaptor Socket (AC adaptor not included)
- Battery Compartment
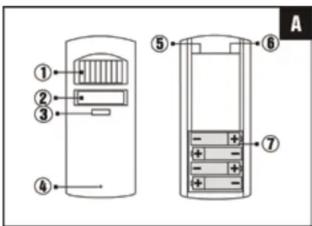
- Arm Button
- LED
- Disarm Button
- Battery Compartment
- Programmable Switch
- Battery Cover
Battery installation
Alarm unit
- The battery compartment is accessed from the rear of the alarm unit by removing the screw from the base and lifting the back cover as shown C.
- Insert four (4) 'AA' size batteries (not included) following the polarity D.
- When the last battery is inserted the alarm will beep very loudly to indicate that the batteries are installed properly.
- Replace the back cover and fix with screw.
The Battery Low LED will light when the batteries need replacing.
Remote control
The remote control uses 3 LR44 batteries (included). If the red light on the remote control does not come on when either the 'ARM' or 'DISARM' buttons are pressed, then the batteries need to be replaced. Diagram B shows where the batteries are located. Simply remove and replace with fresh batteries.

natural_image
Line drawing of a mechanical part or bracket (no text or symbols)
Programming the alarm
- To set or change the security code of the remote control, simply set the programmable switches 12 to the desired code and remove the batteries from the alarm unit. Then wait at least 30 seconds for the alarm to reset.
- Immediately after inserting the batteries point the Remote Control at the alarm and press the 'ARM' button, the Alarm LED will flash once to indicate that it has learnt the code of the remote control.
NOTE: The alarm must be re-programmed with the remote control each time the batteries are removed or replaced.
Installation
- Place the alarm in the desired location, preferably near the front or back door.
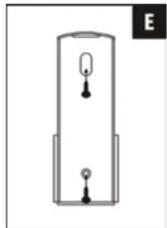
- Remove the back cover and fix it to the wall using the screws and rawplugs supplied, as shown E.
- The alarm body can then be snapped into place on to the back cover and secured using the screw at the base.
* Please note that this alarm can also be used free standing.
Operation
When exiting from the protected area
Point the remote control at the alarm unit and press the 'ARM' button. A confirmation tone will indicate that the alarm is armed and you have 30 seconds in which to vacate the area. After this time, if motion is detected then the alarm will sound.
When entering the protected area
Simply point the remote control at the alarm unit and press the 'DISARM' button. Please note that on entering the area, there is a short beep to indicate that motion has been detected and a 4 second delay before the alarm will sound to allow it to be disarmed.
Detection range
The motion detector of the alarm unit has a 6m (20ft) with approximate angles of 30^ vertical and 60^ horizontal.
Detection Area

External siren socket
This socket can be used to connect the XA301 Remote Siren to the alarm (not included).
Care and maintenance
To clean the case, simply use a soft slightly damp cloth with water and wipe dry immediately.
CAUTION: Never use chemicals to clean the case, as they may cause damage to the plastic and cause the alarm not to function.
Troubleshooting
The unit does not sound when the batteries are installed
Ensure that the batteries are connected correctly according to the diagram in the battery compartment
The alarm does not arm
Ensure that the back plate of the alarm unit is secure to hold the batteries in place and that the red light comes on when the 'ARM' or 'DISARM' buttons are pressed
The red light on the base of the alarm is on
This is the 'Battery Low Indicator'. The batteries need replacing
The red light on the remote control does not light up when the buttons are pressed
Remove the battery cover of the remote control and replace the batteries
Battery precautions
When using this product follow these precautions at all times.
- Use only the appropriate size batteries
- Be sure to follow the correct polarity when installing the batteries as indicated in the battery compartment. Incorrect polarity may cause damage to the alarm.
- Do not mix different types of battery such as Alkaline and Carbon-zinc or old batteries with new.
- If the alarm is not used for long periods of time, remove the batteries to prevent damage or injury from possible battery leakage.
- Do not recharge batteries not intended to be recharged as they can overheat and rupture. (Always follow the manufacturer's directions.)
www.xenasecurity.com
- INSTRUCTIONS MANUAL
- XA201
- INTRUDER ALARM with
- remote keyfob
- XENA
- INTELLIGENT SECURITY
- Controls
- Battery installation
- Alarm unit
- Remote control
- Programming the alarm
- Installation
- Operation
- When exiting from the protected area
- When entering the protected area
- Detection range
- External siren socket
- Care and maintenance
- Troubleshooting
- The unit does not sound when the batteries are installed
- The alarm does not arm
- The red light on the base of the alarm is on
- The red light on the remote control does not light up when the buttons are pressed
- Battery precautions
Marke : XENA
Modell : XA201
Kategorie : Sicherheitskamera