BC-9031 - Heimtrainer Body Sculpture - Kostenlose Bedienungsanleitung
Finden Sie kostenlos die Bedienungsanleitung des Geräts BC-9031 Body Sculpture als PDF.


Benutzerfragen zu BC-9031 Body Sculpture
0 Frage zu diesem Gerät. Beantworten Sie die, die Sie kennen, oder stellen Sie Ihre eigene.
Eine neue Frage zu diesem Gerät stellen
Laden Sie die Anleitung für Ihr Heimtrainer kostenlos im PDF-Format! Finden Sie Ihr Handbuch BC-9031 - Body Sculpture und nehmen Sie Ihr elektronisches Gerät wieder in die Hand. Auf dieser Seite sind alle Dokumente veröffentlicht, die für die Verwendung Ihres Geräts notwendig sind. BC-9031 von der Marke Body Sculpture.
BEDIENUNGSANLEITUNG BC-9031 Body Sculpture
text_image
BODY SCULPTURE SINCE 1965 IN SHAPE IN CONTROLBC-9031
TRIM BIKE

SINCE 1965
natural_image
Black-and-white photo of a toy robot with black handles and a camera lens (no text or symbols visible)
Important Safety Information
Please keep this manual in a safe place for reference.
-
It is important to read this entire manual before assembling and using the equipment. Safe and efficient use can only be achieved if the equipment is assembled, maintained and used properly. It is your responsibility to ensure that all users of the equipment are informed of all warnings and precautions.
-
Before starting any exercise program you should consult your doctor to determine if you have any physical or health conditions that could create a risk to your health and safety, or prevent you from using the equipment properly. Your doctor's advice is essential if you are taking medication that affects your heart rate, blood pressure or cholesterol level.
-
Be aware of your body's signals. Incorrect or excessive exercise can damage your health. Stop exercising if you experience any of the following symptoms: Pain, tightness in your chest, irregular heartbeat, extreme shortness of breath, feeling light headed, dizzy or nauseous. If you do experience any of these conditions you should consult your doctor before continuing with your exercise program.
-
Keep children and pets away from the equipment. The equipment is designed for adult use only.
-
Use the equipment on a solid, flat level surface with a protective cover for your floor or carpet. For safety, the equipment should have at least 0.5 meter of free space all around it.
-
Before using the equipment, check the nuts and bolts are securely tightened.
-
The safety level of the equipment can only be maintained if it is regularly examined for damage and/or wear and tear.
-
Always use the equipment as indicated. If you find any defective components whilst assembling or checking the equipment, or if you hear any unusual noise coming from the equipment during use, stop. Do not use the equipment until the problem has been rectified.
-
Wear suitable clothing whilst using the equipment. Avoid wearing loose clothing which may get caught in the equipment or that may restrict or prevent movement.
-
The equipment has been tested and certified to EN957 under class H.C. Suitable for domestic, home use only. Maximum weight of user: 100kg. Braking is speed independent.
-
The equipment is not suitable for therapeutic use.
-
This article can't be used by standing on it.
-
Care must be taken when lifting or moving the equipment so as not to injure your back. Always use proper lifting techniques and/or use assistance.
Please contact our customer services on 01274-693888
Monday-Thursday 08:00\~16:30
Friday 08:00\~15:30
or by mail support@hi-markgroup.co.uk
* This service is available for UK residents only
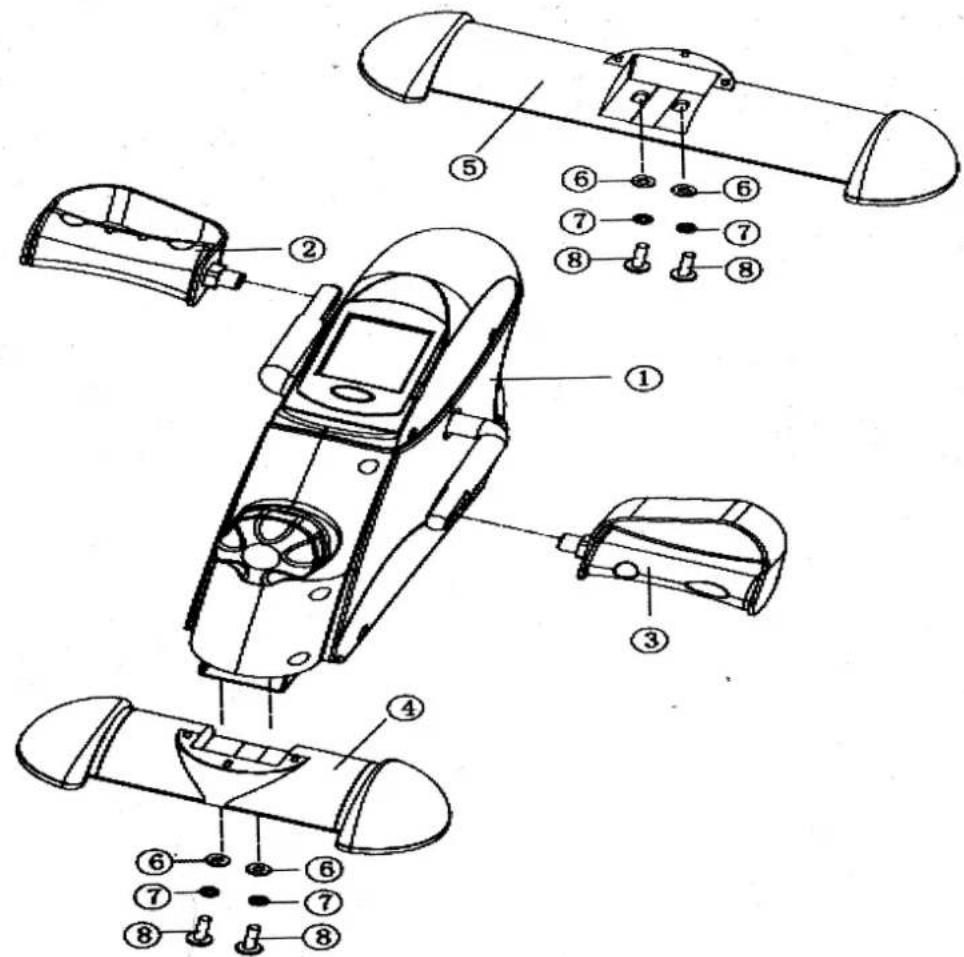
EXPLODED-VIEW ASSEMBLY DRAWING
text_image
Technical diagram of a mechanical device with numbered parts for identification and assembly reference.| No. | Description | Quantity |
| 1 | Mini Bike(basic unit) | 1 |
| 2 | Left foot pedal | 1 |
| 3 | Right foot pedal | 1 |
| 4 | Front foot | 1 |
| 5 | Rear foot | 1 |
| 6 | Plain washer | 4 |
| 7 | Spring washer | 4 |
| 8 | Screws | 4 |
ASSEMBLY INSTRUCTION
text_image
Diagram illustrating the assembly of a small mechanical device with numbered parts, showing before and after states.STEP 1
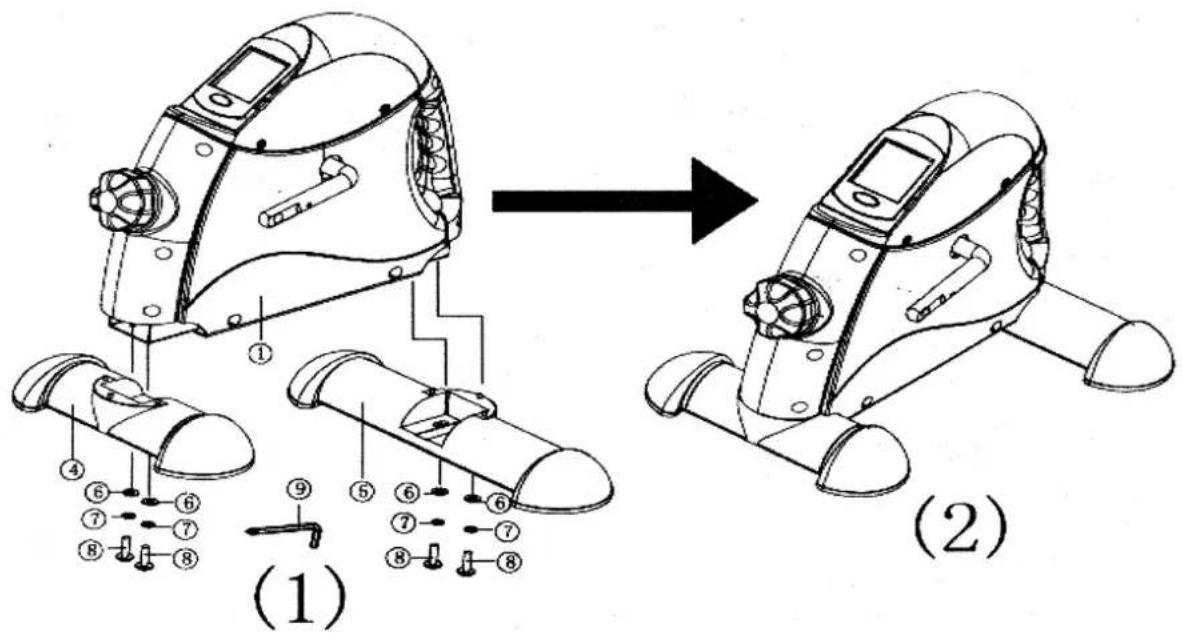
Attach the front foot④ and rear foot⑤ to the basic unit① with the screws⑧, spring washer⑦ and plain washer⑥. Use the supplied screwdriver⑨ for this. See picture (1).
Note: Ensure that the front foot④ and rear foot⑤ are correctly positioned. Picture (2) shows the image after step 1.

text_image
(3) (4)STEP 2
Attach the left foot pedal② and right foot pedal③ to the corresponding crank arms. Use the supplied open-ended spanner⑩ to fasten the pedals. See picture (3).
Note: The foot pedals and crank arms are marked with "L" for left and "R" for right. During assembling make sure that these markings match. Picture (4) shows the image after step 2. Note that the left pedal should be threaded on anti-clockwise. Note that the right pedal should be threaded on clockwise.
EXERCISE INSTRUCTIONS
Using your Toning Bike will provide you with several benefits, it will improve your physical fitness, tone muscle and in conjunction with calorie controlled diet help you lose weight.
1. The Warm Up Phase
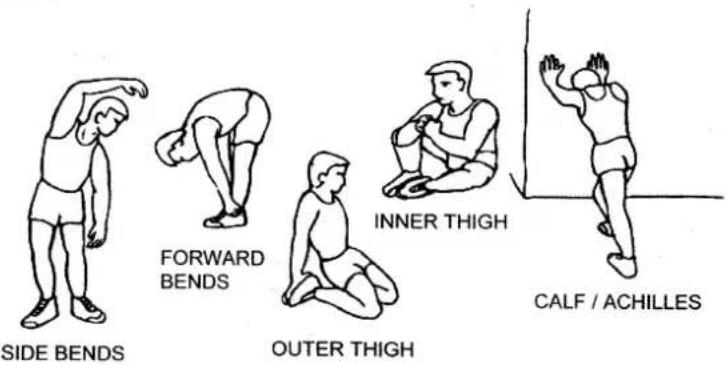
This stage helps get the blood flowing around the body and the muscles working properly. It will also reduce the risk of cramp and muscle injury. It is advisable to do a few stretching exercises as shown below. Each stretch should be held for approximately 30 seconds, do not force or jerk your muscles into a stretch - if it hurts, STOP.
text_image
SIDE BENDS FORWARD BENDS OUTER THIGH INNER THIGH CALF / ACHILLES2. The Exercise Phase
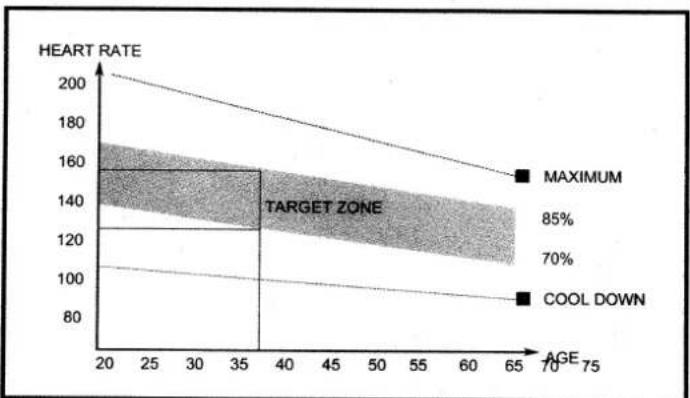
This is the stage where you put the effort in. After regular use, the muscles in your legs will become more flexible. Work to your but it is very important to maintain a steady tempo throughout. The rate of work should be sufficient to raise your heartbeat into the target zone shown on the graph below.
line
| AGE | HEART RATE | | --- | ---------- | | 20 | 160 | | 35 | 140 | | 70 | 120 | | 75 | 100 |This stage should last for a minimum of 12 minutes though most people start at about 15-20 minutes.
3. The Cool Down Phase
This stage is to let your Cardio-vascular System and muscles wind down. This is a repeat of the warm up exercise e.g. reduce your tempo, continue for approximately 5 minutes. The stretching exercises should now be repeated, again remembering not to force or jerk your muscles into the stretch. As you get fitter you may need to train longer and harder. It is advisable to train at least three times a week, and if possible space your workouts evenly throughout the week.
MUSCLE TONING
To tone muscle while on your Toning Bike you will need to have the resistance set quite high. This will put more strain on our leg muscles and may mean you cannot train for as long as you would like. If you are also trying to improve your fitness you need to alter your training program. You should train as normal during the warm up and cool down phases.
WEIGHT LOSS
The important factor here is the amount of effort you put in. The harder and longer you work the more calories you will burn. Effectively this is the same as if you were training to improve your fitness, the difference is the goal.
EXERCISE COMPUTER
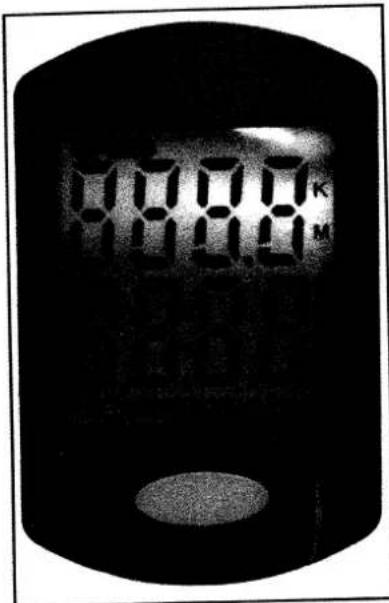
The computer has a two line display on which the different functions can be displayed. The speed is displayed in the upper line. There are different displays avail to you in the lower line. Press the oval key below the display to switch between the following display values:
text_image
107.7 K 108.8 MSCAN: Each display is shown for a few seconds.
TIME: Previous training time in minutes: seconds (0:00 - 99:59).
ODO: Total distance covered since the last insertion of the battery (0 - 9999 km)
(note: This value is reset to 0 as soon as the exhausted battery is removed and replaced by a new battery).
RPM: Shows the speed of rotation per minute.(0 - 999)
DIST: Shows the distance covered. (0.00 - 99.99 km)
CAL: Shows the number of calories burned (0.00 - 999.9)
(this display states an approximate value. The actual calorie
consumption depends on the condition of the person training)
SPEED: Speed in km / h (0.0 - 999.9 km)
Keep the oval key pressed down for approximately three seconds to delete all of the values(except for the ODO).
Turning the computer on and off
The computer automatically turns on and starts taking measurements as soon as you start exercising on the Mini Bike. The computer turns off automatically when the equipment is not used for longer than approximately 4 minutes.
Replacing the battery
· Take the training computer carefully out of the holder.
- Remove the exhausted battery.
- Insert a new battery (1.5 V, AAA) into the battery compartment on the underside of the training computer.
Note: Make sure you fit the battery the right way round (polarity). The correct polarity is shown inside the battery compartment.
Check that the plug-in connector is correctly inserted. Insert it again if necessary.
Place the training computer back into the holder and lightly press it into position.
▲Caution!
Ensure that the cable does not become kinked or trapped.