Rapid 3 TL-LD630-F - Fahrradlampe Cateye - Kostenlose Bedienungsanleitung
Finden Sie kostenlos die Bedienungsanleitung des Geräts Rapid 3 TL-LD630-F Cateye als PDF.


| Produkttyp | Fahrradrücklicht |
| Modell | Rapid 3 TL-LD630-F |
| Marke | Cateye |
| Abmessungen (L x B x H) | 66 x 23 x 43 mm |
| Gewicht (inkl. Batterie) | 44 g |
| Batterietyp | 1 x AA (LR6) |
| Leuchtmodi | Rapid, Blitz, Dauerlicht |
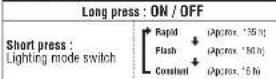
| Betriebsdauer (Alkaline) | Rapid: ca. 35 h, Blitz: ca. 80 h, Dauer: ca. 6 h |
| Temperaturbereich | -10 °C bis 40 °C |
| Befestigungssystem | FlexTight™-Halterung (SP-12-F) |
| Lieferumfang | Lichteinheit, FlexTight™-Halterung, 1x AA-Batterie, Abschattungsaufkleber |
| Garantie | 2 Jahre auf die Lichteinheit |
| Reinigung | Mit feuchtem Tuch und milder Seife; keine Lösungsmittel |
| Wasserdichtigkeit | Nicht vollständig wasserdicht; nach Regen trocknen |
Häufig gestellte Fragen - Rapid 3 TL-LD630-F Cateye
Benutzerfragen zu Rapid 3 TL-LD630-F Cateye
0 Frage zu diesem Gerät. Beantworten Sie die, die Sie kennen, oder stellen Sie Ihre eigene.
Eine neue Frage zu diesem Gerät stellen
Laden Sie die Anleitung für Ihr Fahrradlampe kostenlos im PDF-Format! Finden Sie Ihr Handbuch Rapid 3 TL-LD630-F - Cateye und nehmen Sie Ihr elektronisches Gerät wieder in die Hand. Auf dieser Seite sind alle Dokumente veröffentlicht, die für die Verwendung Ihres Geräts notwendig sind. Rapid 3 TL-LD630-F von der Marke Cateye.
BEDIENUNGSANLEITUNG Rapid 3 TL-LD630-F Cateye

RAPID 3
TL-LD630F
Manual
ENG
Design Paranthed
Copyright©2012 CAI EYE Co., Ltd
[Unreadable]
Before using the product, please thoroughly read this manual and keep it for future reference.


Light unit

FlexTight™ bracket (SP-12-F)

AA dry-call battery
×1

Shade sticker
CAUTION!
- Before your trip, please make sure the light is firmly mounted to the bracket, if lights up, and the light is not blocked by baggage, etc. Stop your bicycle to operate the switch.
- This unit is not totally waterproof. Please wipe and dry it completely after using in rain. Otherwise, it may cause failure.
- If the light unit or parts become dirty with mud, etc., clean with a soft cloth which is moistened with mild soap. Never apply paint thinner, benzine or alcohol; damage will result.
LIMITED WARRANTY
2-year Warranty: Light unit only
CatEye products are warranted to be free of defects from materials and workmanship for a period of 2 years from original purchase. If the product fails to work during normal use, CatEye will repair or replace the defect at no charge. Service must be performed by CatEye or an authorized retailer. To return the product, pack it carefully and enclose the warranty certificate (proof of purchase) with instruction for repair. Please write or type your name and address clearly on the warranty certificate. Insurance, handling and transportation charges to CatEye shall be borne by person desiring service. For UK and REPUBLIC OF IRELAND consumers, please return to the place of purchase. This does not affect your statutory rights.
SPARE PARTS
5342400
FlexTight™ bracket (SP-12-F)

OPTION PARTS
5342280
FlexTight™ bracket (SP-11)

5440900N
Clip (C-1K)

Preparing the Light
1 HOW TO INSTALL BATTERY
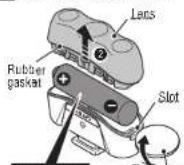
AA (LR6) x 1
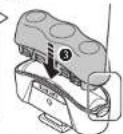
Close the lens with the slot facing to the body slot.
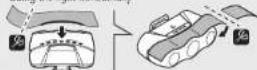
Shade sticker
Using the light horizontally
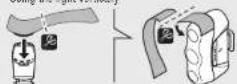
Using the light vertically
2 HOW TO USE
Switch operation
* Standard operating time
1 HOW TO INSTALL BATTERY
- Using a coin to remove the lens from the light as shown in the drawing. (① - ②) - Close the lens with the slot facing to the body slot. (③)
CAUTION!
- Do not press the switch when removing or installing the lens or batteries.
- Be sure to install batteries in the correct direction.
• Install the rubber gasket correctly to maintain waterproof features.
- Remove and store batteries when you will not use the light for a long period of time. Otherwise, batteries may leak liquid, which may result in failure.
How to use the shade sticker
Shade the light with the sticker if you are dazzled.
2 HOW TO USE
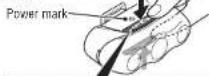
Use the switch to turn the power ON or OFF and to change the lighting mode.
* The light will turn on in the lighting mode previously selected. (Mode memory function)
Attach to the bicycle
1 HOW TO MOUNT THE BRACKET

2 HOW TO MOUNT THE LIGHT
text_image
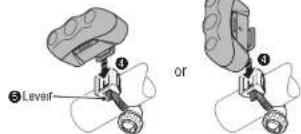
Level orAttach the bracket to the handlebar as shown in the drawing. (1 - 3)
Slide the light onto the bracket until it "clicks" into place. (4)
To remove the light, press the lever and slide it off. (5)
CAUTION!
- Be sure to lighten the dial by hand. When you lighten it too hard with a tool, the screw thread may be stripped.
- Check the bracket frequently to be sure it is properly tightened at all times.
Round off the cut edge of the bracket strap to prevent injury.
SPECIFICATIONS
Battery ....AA dry-cell battery x 1
Operating time ....Rapid : Approx. 35 hours, Flash : Approx. 80 hours, Constant : Approx. 6 hours (When using alkaline batteries)
Temperature range .....14°F - 104°F (-10°C - 40°C)
Dimensions/weight .....2-19/32" x 29/32" x 1-11/16" (66 x 23 x 43 mm) / 1.6 oz (44 g) (Including batteries)
The specifications and design are subject to change without notice.