Lady Bug 2300 - Dampfreiniger Vapor - Kostenlose Bedienungsanleitung
Finden Sie kostenlos die Bedienungsanleitung des Geräts Lady Bug 2300 Vapor als PDF.


Benutzerfragen zu Lady Bug 2300 Vapor
0 Frage zu diesem Gerät. Beantworten Sie die, die Sie kennen, oder stellen Sie Ihre eigene.
Eine neue Frage zu diesem Gerät stellen
Laden Sie die Anleitung für Ihr Dampfreiniger kostenlos im PDF-Format! Finden Sie Ihr Handbuch Lady Bug 2300 - Vapor und nehmen Sie Ihr elektronisches Gerät wieder in die Hand. Auf dieser Seite sind alle Dokumente veröffentlicht, die für die Verwendung Ihres Geräts notwendig sind. Lady Bug 2300 von der Marke Vapor.
BEDIENUNGSANLEITUNG Lady Bug 2300 Vapor
Advanced Vapor Technologies
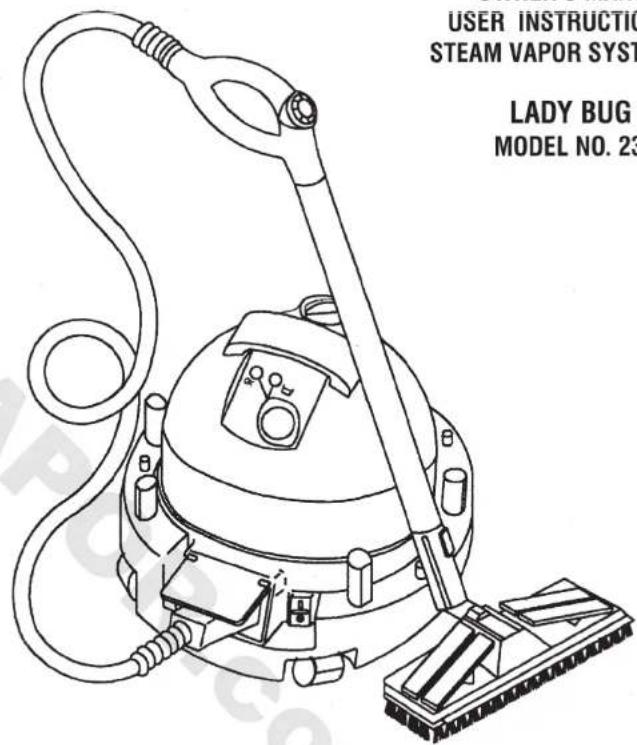
OWNER'S MANUAL
USER INSTRUCTIONS
STEAM VAPOR SYSTEM
LADY BUG
MODEL NO. 2300
text_image
USER INSTRUCTION STEAM VAPOR SYST LADY BUG MODEL NO. 232300 (USA)
COD. 5908004.0 12/00 PRINTED IN ITALY BY SIEL
STEAM VAPOR SYSTEM
USER INSTRUCTIONS
1 DESCRIPTION & NOMENCLATURE
1.1 STEAM CLEANER DESCRIPTION
1.2 ACCESSORIES
2 SAFETY PRECAUTIONS & RULES FOR OPERATION OF SYSTEM
3 BEFORE OPERATING THE SYSTEM
3.1 FILLING WITH WATER
3.2 ATTACH THE FLEXIBLE STEAM HOSE
3.3 USING THE ACCESSORIES
4 OPERATING THE SYSTEM
4.1 ELECTRICAL CONNECTION
4.2 USEFUL ADVICE
4.3 END OF STEAM OPERATION
5 CARE & MAINTENANCE
5.1 CARE INSTRUCTION
5.2 DRAINING & DESCALING
5.3 CALLING FOR SERVICE
6 STEAM IRON OPTION
7 WARRANTY
8 TECHNICAL DATA
This symbol that appears on products or packages indicates that the product must not be disposed of together with domestic waste. The users must provide for the disposal of the equipment to be scrapped by bringing it to the indicated collection centre for the successive recycling of the electric and electronic equipment. Separated collection and recycling of equipment to be scrapped helps to conserve natural resources and guarantees that the equipment is scrapped while respecting the environment and safeguarding health. For further information about collection points for equipment to be scrapped, contact your local city hall, the local waste disposal service or the shop where the product was purchased.

TECHNICAL DATA
Voltage:
Power Use:
Solenoid Valve:
Hose Switch Voltage:
Boiler Material:
Boiler Capacity:
Reservoir Tank Capacity:
Functional Pressure Regulation:
Safety Thermostat Cutout:
Over Pressure Safety Release Valve:
Low Water Indicator:
Boiler Insulation:
Injection Pump:
Weight:
Special Classification:
120Vac, 60Hz
1500 Watts
One, 22VA
120 V. 60Hz
Normally closed
5 Volt
Steel AISI 304
2.1 liters (Nominal)
1.3 liters
4.0 bars
2; 1 manual reset
1 auto reset
Yes, independent
hydraulic
Yes, light and buzzer
Yes, form fitting
41W, 120V/60Hz
Electric Impulse
16.5 pounds
IPX4 splash proof

DESCRIPTION

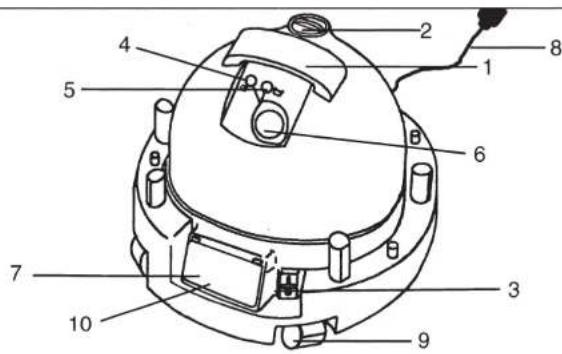
Steam Vapor System Description
text_image
Technical diagram of a mechanical device with numbered components for identificationCOMPONENTS
- Carry handle
- Water tank cap
- ON/OFF switch
- Steam ready indicator light
-
No water indicator light
-
Pressure gauge
- Steam hose socket
- Power cord and plug
- Casters
- Hinged cover on hose socket
This household appliance for generating steam permits cleaning without the need to use any chemicals. It is hygienic and environmentally friendly. High temperature steam removes dirt and kills bacteria as well as dust mites. It can be used on all kinds of surfaces: ceramic floor tiles, stone floors, parquet flooring, vinyl floors, carpets, rugs, wooden ceilings, wall paper, windows, mirrors, sanitary ware, taps, cooking surfaces, ovens, grills, radiators, window and door frames, furniture, fireplaces, cars, seats etc. Steam can be generated continuously by refilling the water tank. This appliance is designed and intended to be used as a domestic steam vapor system suitable for house cleaning. Using the unit for any other purpose must be considered improper and, therefore, dangerous. Under no circumstances can the manufacturer be held liable for damages arising from the improper, erroneous or unreasonable use of the appliance.
HOT STEAM CAN CAUSE DAMAGE. Please read these instructions carefully and understand the safety instructions before use.
1.2 Accessories
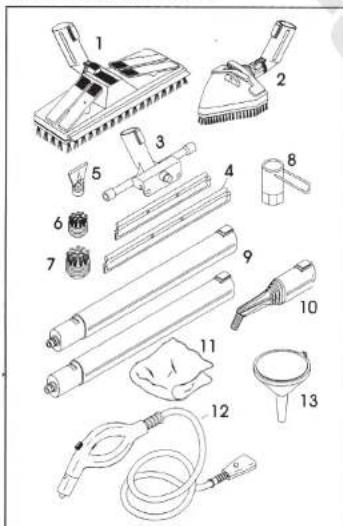
STANDARD ACCESSORIES
OPTIONAL ACCESSORIES
text_image
Exploded view diagram of a hair clip assembly with numbered parts for identification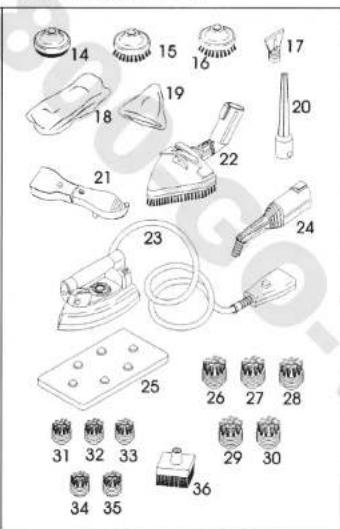
text_image
Exploded view diagram of various household appliances with numbered parts and corresponding icons below- Rectangular brush
- Triangular brush
- Window cleaner with 25 cm wiper
- Window cleaner with 35 cm wiper
- Black wallpaper remover
- Small black round brush ∅ 30 mm with black polyester bristles
- Medium black round brush ∅ 38 mm with black polyester bristles
- Drainage tool
- Extension tube (2 pieces)
- Black jet-nozzle
- Towel
- Steamhose mm 2050 with handgrip
- Funnel
OPTIONAL ACCESSORIES: - Plumber's helper
- Black round brush ∅ 60 mm with black polyester bristles
- Black round brush ∅ 60 mm with red polyester bristles
-
Grey wallpaper remover
B. Rectangular pad -
Triangular pad
- Jet-nozzle extension
- Aromatherapy tool
- Triangular brush with red polyester bristles
- Iron
- Grey jet-nozzle
- Iron rest
- Medium black round brush ∅ 38 mm with black brass bristles
- Medium black round brush ∅ 38 mm with steel bristles
- Medium grey round brush ∅ 38 mm with brass bristles
- Medium grey round brush ∅ 38 mm with steel bristles
- Medium grey round brush ∅ 38 mm with polyester bristles
- Small black round brush ∅ 30 mm with brass bristles
- Small black round brush ∅ 30 mm with steel bristles
- Small grey round brush ∅ 30 mm with brass bristles
- Small grey round brush ∅ 30 mm with steel bristles
- Small grey round brush ∅ 30 mm with black polyester bristles
- Clothes brush
-7 TERMS OF WARRANTY
SPARE PARTS
There are no user serviceable components inside the steam generator. To avoid a safety hazard all repairs must be carried out authorised by technicians.
TERMS OF WARRANTY
- The steam generator is warranty for a period of one year from the date of purchase if validated by a dated sales receipt issued by the authorized dealer. Please take a moment to complete the enclosed Warranty registration card and mail it to the address shown. The receipt and warranty certificate must both be produced if technical assistance is required.
- By warranty we mean the free replacement or repair of any components with a proven manufacturing defect. Certain items are not covered by the warranty by nature of their use. Please review your warranty form so that you are able to make use of it should the need arise.
- In the event of irreparable or repeated defects, the appliance may be replaced on the express and final judgement of the manufacturer. The warranty of the new appliance will continue until the expiration of the original contract.
- This warranty does not cover all parts that are found to be defective as the result of negligence or incorrect use (non-observance of the instructions for use), incorrect installation or maintenance, maintenance carried out by unauthorized persons, damage during transport or during circumstances that cannot be proved to be fault of the manufacturer. This warranty does not cover installation or connection to an incorrect power supply or user maintenance described in the instruction leaflet.
- Incorrect use and non-domestic use of the steam generator may render this warranty void.
- The manufacturer may not be held liable for any damage arising directly or indirectly from the use of this appliance to persons, property or pets in the event of non-observance of the instructions described in the instruction leaflet and relative papers, with particular regard to the installation, use and maintenance of the appliance.
This product is manufactured to comply with the UL Standard 499 and CAN/CSA C 22.2 No.64-M91.
The professional steam iron accessory can be used with this steam generator when connected via the iron steam hose and plug.
Setting the ironing temperature
The iron is thermostatically controlled and the indicator light will go off when the selected ironing temperature has been reached, continue ironing even when this light comes back on. The element is continuously switched on and off by the thermostat to maintain the selected temperature.
First check that the fabric is suitable to be ironed. A label can usually be found on the fabric (see table). Always follow the instructions on the label.
If there are no instructions on the fabric, but you know the type of fabric, follow the instructions in the table. If the type of fabric is not known, start at the coolest setting and gradually increase to find the most suitable ironing temperature. Test a small piece of the fabric that will not be visible when it is worn or in use.
| Setting | Temperature °C (Approximate) | Steam Examples of Fabrics | |
| MIN | OFF | No | |
| • | COOL 55/60 | No | Acrylics, Triacetates, Polyester |
| •• | WARM 90/100 | Yes | Nylon, Silk, Wool, Wool/Nylon mixture |
| ••• | HOT 130/140 | Yes | Cotton, Linen, Viscose, Polyester/Cotton mixture |
| MAX | VERY HOT 175/185 | Yes | Cotton, Linen |
Textile care labels
The following symbols will be found on the care labels that refer to washing, ironing, drying and dry cleaning of most garments. The dot settings on the control dial of your iron correspond with these symbols.

text_image
Cool Warm Hot Do not iron-2 SAFETY PRECAUTIONS & RULES FOR OPERATION OF SYSTEM
CAREFULLY READ ALL THE SAFETY WARNINGS AND CAUTIONS IN THESE INSTRUCTIONS AS THEY PROVIDE IMPORTANT INFORMATION FOR THE SAFE ASSEMBLY, USE AND MAINTENANCE OF THIS STEAM GENERATOR.
-
Keep these instructions in a safe place for future reference.
-
After removing the packaging, check that the steam generator is undamaged. If in any doubt, do not use the appliance but contact a service agent. The packaging material must be kept out of the reach of children, as it could be a health safety risk to them.
-
Before connecting the steam generator to the electricity supply check that the voltage on the rating label is the same as the electric power supply. The rating label is located on the underside of the steam generator body (See fig. 1). CAUTION: To avoid circuit overload, do not operate another high wattage appliance on the same circuit.
-
This appliance must only be used in accordance with these instructions as a steam generator with cleaning accessories for domestic use to clean household carpets, flooring, walls, upholstery, tiles, windows, fabrics. The optional iron accessory is only intended for ironing household garments and fabrics. The manufacturer cannot be liable for any damage arising from improper, incorrect or unreasonable use of this steam generator or the optional iron. CAUTION: The user is solely responsible for ensuring that the item to be cleaned will not be damaged/discolored by subjecting it to steam at temperatures of 230°F; that prudent use of the iron as it relates to temperatures and fabric type, is solely the responsibility of the user. Please see Section 6, Steam Iron Option.
5. WARNING!
There are no user serviceable components inside this appliance, all maintenance MUST be carried out only by authorised service personnel.
When using your steam generator, basic safety precautions should always be practiced, including the following:
- This steam generator MUST be grounded.
- never use extension cords without a ground or safety listings (UL, ETL, etc), rated at 15 amperes.
- never use the appliance barefooted;
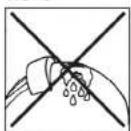
- never aim the steam at people or animals (See fig. 2);
- never aim the steam at electrical switches, socket outlets or any electrical appliances;
- never "unplug" or "plug in" the appliance with the power switch in the 'on' position;
- never pull the power cord or the appliance itself to unplug the power cord from the electrical supply;
- never allow the power cord to rub against sharp edges; do not trap the cord between doors, window or drawers;
- always check that the power cord and plug are in good condition before use (See fig. 3);
- protect the power cord from heat, steam and oil;
- never allow children to operate this appliance (See fig. 4);
- never allow inexperienced users to operate this appliance without supervision;
- never leave the steam generator unattended when switched on or when plugged into electrical supply(See fig. 5);
- never leave the appliance unprotected from the weather (sun, ice, rain, frost, etc) (See fig. 6);
- never store the appliance in an area that is likely to freeze;
- never immerse in water (See fig. 7);
- never overfill the water tank (See fig. 8);
- never direct the steam at the steam generator body or steam hose.
- never use any accessory that is damaged - danger of scalding;
- never put the steam generator away while it is still hot, wait until it has completely cooled down;
- never steam leather or synthetic velvet;
- only fill or top off the tank with clean clear, potable tap water;
- always check, in an inconspicuous area, that the item to be cleaned will not be damaged/discolored
by using steam at 230°F
- always turn the system off and remove the plug from the electricity supply before filling the tank
with water;
- always keep the steam generator away from heat sources such as fires, radiators, direct sunlight, etc.
-
During use the steam generator produces very high temperatures; take care not to touch any of the steam jets from the accessories or hoses.
-
Always unplug the power cord from the electrical supply:
- before topping off the water tank;
- before draining the boiler;
- before cleaning the appliance;
- when interrupting its use, even for short periods.
-
A hydraulically operated pressure relief safety valve is fitted inside the appliance, and MUST be replaced by only authorised service personnel with an identical valve to prevent a safety hazard.
-
The steam generator is fitted with a high temperature safety cut-out that MUST only be reset or replaced with an identical component by only authorised service personnel to prevent a safety hazard.
-
In the event of a breakdown and/or malfunction unplug the power cord from the electrical socket and do not tamper with the steam generator. Contact the authorised service personnel for advice or repair. Any tampering with this appliance voids the warrantee and could create a serious safety hazard.
-
If the power cord on this appliance is damaged, it must be replaced by authorised service personnel to prevent a safety hazard.
-
Each time the steam generator heats up from a cold condition, the air inside the appliance prevents steam being delivered immediately. When the steam ready light (comp.#4) turns green, set the steam regulation knob to maximum (open) position and press push-button under pistol grip, for a few seconds to purge this air from the boiler. Allow the steam ready light to turn green for most effective use.
-
Electrical or electronic appliances (computers-TV-radio-lights-telephones-etc) must never be cleaned with steam as this could cause damage or create a safety hazard, even if these are not plugged into the electrical supply (See fig. 9).
-
NEVER put detergents, perfumes or any other chemical substances in the water tank (See fig. 10), with exception of products indicated in Section 5.
-
Fill the tank with only clean, clear, potable water. Use the funnel and take care not to overfill. Refit tank cap.
a) Drain clean water tank
b) Drain boiler by removing the 20 mm hexagon drain nut replace drain nut.
c) Mix approx. 1 & 1/2 ounces of tartaric acid in 1 quart of water.
c) Pour this solution into clean water tank - replace cap.
e) Connect the power cord to the electrical outlet and switch on the steam generator.
f) Allow the water to heat for 2 hours and then use the product for a few minutes.
g) Switch off the product and unplug from the electrical outlet and allow 4 hours to cool down.
h) Drain the clean water tank and rinse. Drain the boiler, replace the drain nut being careful not to overtighten.
i) After filling the water tank, the product is ready for use.
NOTE: With the boiler empty of water, the pump will run longer and the water tank should be refilled before using. See 4.1 for proper operation after draining the boiler.

Calling for service
Before calling a Service Engineer run through the following check list.
- Is there a working electricity supply to the steam generator? Check with another electrical appliance.
- Is the steam generator ON/OFF switch ON and the light ON?
- Is the steam ready light ON and/or is the beeper sounding?
- Is the no water light blinking on when the tank runs out of water?
- Is the pressure gauge in the orange zone when the "ready light" is on?
- Is the flexible hose correctly connected?
- Are the extension tubes/accessories correctly connected?
If there is any doubt call the authorised service personnel for advice, they may be able to assist over the phone.

STEAM IRON OPTION
The professional steam iron accessory can be used with this steam generator when connected via the iron steam hose and plug.
Setting the ironing temperature
The iron is thermostatically controlled and the indicator light will go off when the selected ironing temperature has been reached, continue ironing even when this light comes back on. The element is continuously switched on and off by the thermostat to maintain the selected temperature.
First check that the fabric is suitable to be ironed. A label can usually be found on the fabric (see table). Always follow the instructions on the label.
If there are no instructions on the fabric, but you know the type of fabric, follow the instructions in the table. If the type of fabric is not known, start at the coolest setting and gradually increase to find the most suitable ironing temperature. Test a small piece of the fabric that will not be visible when it is worn or in use.
Wrap a cloth around the brush when cleaning fabrics. Both of these brushes can be used directly connected to the hand grip, or in conjunction with either one or both extension tubes.
To clean inaccessible areas, use a small round brush fitted to a nozzle (accessory.#10).
Car hub caps can be cleaned with direct contact, but keep to a distance of 5-10 inches away from car tyres. Always use a soft cloth to remove oil or tar stains from car paint after softening the tar with steam, do not use a brush.
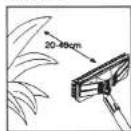
If cleaning delicate items (e.g. plants) keep the nozzle at a distance of 15-20 inches away from the leaves. Avoid direct contact between the steam and the leaves (See fig. 20).

End of steam operation
Push the lower half of the ON/OFF switch on the steam generator, the upper half of the switch will 'pop' out and the light will go out, the appliance is now OFF. Unplug from the socket outlet. Allow to cool for approximately 30 minutes. Remove the flexible hose/extension tubes if this assists storage. Any water remaining in the steam generator can be left for 1 - 3 months. However, if the storage area can go below freezing the product MUST be drained when the water is completely cold, as serious damage to the product and/or a safety hazard could result.

CARE & MAINTENANCE

Care instruction
Always switch off and unplug the steam generator before carrying out any maintenance. Never use any abrasive or chemical substances on the appliance or in the water (apart from the possible occasional descalent).

Draining and descaling
1) Empty all water from the steam generator when COMPLETELY COLD every 1 - 3 months. Empty the water from the water tank by removing the tank cap and
pouring water into sink. Turn the generator on it's side to reveal the 20 mm hexagonal drain nut located in the center of the underside.
Remove the drain nut with drainage tool (See fig. 21). After draining, replace the drain nut. Do not overtighten. NOTE: Please see 4.1 for using your steam generator after draining the boiler.
2) The steam generator does not require frequent descaling. However, if the product is used frequently, particularly in hard water areas, we recommend that descaling be carried out more often. This can be done by either using a proprietary descaler providing the manufacturers instructions for the chemical descalent are carefully followed or as follows:
No. 21
No. 1
No. 5
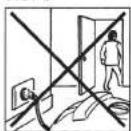
No. 9
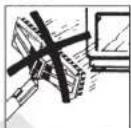
No. 2
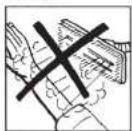
No. 6
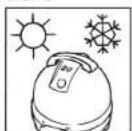
No. 10
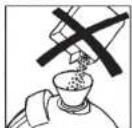
No. 3
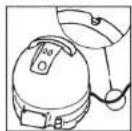
No. 7
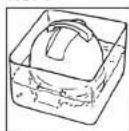
No. 4
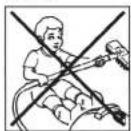
No. 8
Picture A
BEFORE OPERATING THE SYSTEM

Filling with water
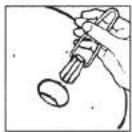
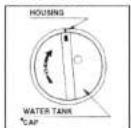
Before connecting to the electricity supply socket outlet, untwist the cap and fill the tank via the funnel with clean clear, potable water (take care not to overfill). Most ordinary household tap water may be used. If you have extremely hard water, (over 180 ppm) consider using de-mineralized water to achieve better result and extend the useful life of the steam generator. DO NOT use water processed through a home "softening" system as it contains minerals harmful to your steam generator. Replace the cap (see pict. A). An acoustic alarm (beeper) and a low water light (comp.#5) will operate to indicate when the water tank requires re-filling.

Attach the flexible steam hose
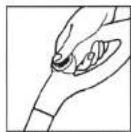
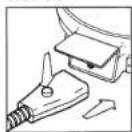
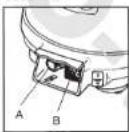
Lift the hinged cover on the lower front of the steam generator (comp.#10) and fit the hose connector into the hose socket (comp.#7) by depressing the red button and pushing firmly home until a 'click' is heard indicating that the hose plug is correctly connected (See fig. 11). The hose MUST be properly connected, otherwise the solenoid valve will not operate and thus steam cannot be delivered through the hose or attachments. To work safely and correctly the steam hose MUST be fully connected to both the steam outlet 'A' and the 5 volt electric control 'B' (See fig. 12). A control switch is incorporated in the steam hose hand grip a push button on the underside of the handle grip that
MUST be held ON to electrically open the solenoid steam delivery valve and, on the top of the handle grip, a knob that can be rotated to adjust the volume of steam (See fig. 13).
3.3 Using the accessories
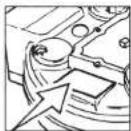
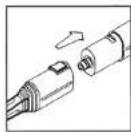
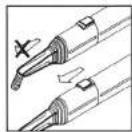
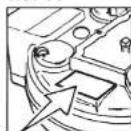
The hand grip incorporates a connector suitable for fitting a variety of accessories and extension tubes to suit the cleaning application. To connect tubes or nozzles to the hand grip slide the accessory towards the hand grip (See fig. 14). In order to easily remove an accessory, slide only the red button in the direction of the embossed arrow, without forcing accessory itself. (See fig. 15).
CAUTION: Ensure that all tubes and/or accessories are firmly attached to each other. Poor connections can result in scalding! All accessory brushes have holes to allow steam flow at 230°F - do not let the steam contact skin - danger of scalding!
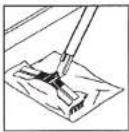
Both the rectangular and the triangular floor cleaning brushes incorporate molded clamps with "teeth" to hold the floor cloth - be careful when opening or closing these clamps (See fig. 16). The rectangular and the triangular brushes (Accessory 1 & 2) can either freely rotate or be locked in one position by sliding the red locking tab into the recess-located on the neck of the accessory. The window cleaning nozzle incorporates a squeegee and is only suitable for use on windows or large mirrors. The round brushes are for cleaning very dirty small spots. No. 11 No. 12
CAUTION: Before using any of the round brushes, ensure that the bristles are suitable for the surface of concern and will not cause any damage to the surface to be cleaned. CAUTION: Make sure all the attachments required for your first cleaning job are completely and correctly connected.
No. 13
No. 14
No. 11
No. 12
No. 15
No. 16
-4 OPERATING THE SYSTEM
4.1 Electrical connection
WARNING!
ELECTRICITY CAN BE EXTREMELY DANGEROUS. THIS APPLIANCE MUST BE PROPERLY GROUNDED.
The wires in the power cord are colored in accordance with the following code:
White = NEUTRAL
Black = LOAD OR LIVE
Green = GROUND
Check that the voltage shown on the rating label, located on the underside of the steam generator, is the same as the supply voltage (See fig.17).
Check that the ON/OFF switch (comp.#3), located next to the flexible hose socket on the steam generator, is in the OFF position (upper half of switch projecting).
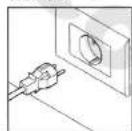
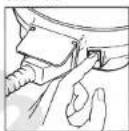
Connect the power cord plug to the electrical socket outlet (See fig. 18). Push in the upper half of the ON/OFF switch: the light in the switch will illuminate to indicate that the appliance is switched ON (See fig. 19). The steam boiler is automatically supplied with water via an electronically controlled pump. It is quite normal to hear noises during operation of the steam generator.
Note: Every time the steam generator heats up from cold conditions, the air inside the appliance prevents steam being delivered immediately. When the steam ready light (comp.#4) turns green set the pistol grip steam rotary control knob to the maximum (open) position and press and hold the push-button steam delivery switch located on the hose hand grip for a few seconds.
This will expel this air through the attached accessories.
Wait until the STEAM READY indicator light turns green, before starting to use the appliance to achieve maximum benefit.
Before changing any accessories, brushes, nozzles, hoses or tubes the steam supply push button, on the underside of the flexible hose hand grip, MUST be OFF. Make sure that the 'new' accessory is correctly attached before pressing and holding the steam supply push button in the ON position.
4.2 Useful advice
Before cleaning any fabric ensure that the steam will not cause damage, shrinkage or discoloration by testing on an inconspicuous part of the fabric. Always adjust the steam regulator to suit the surface/fabric to be cleaned.
Use the rectangular brush without a cloth for stubborn dirt on ceramic floor tiles. Loosen the dirt directly with the bristles and then only use the cloth to remove the residue.
Clean windows and large mirrors with the window tool that is fitted with a rubber squeegee attachment for drying the surface. If the panes are frozen, hold the window tool approximately 20 inches from the glass with the regulator set to the minimum steam setting, and move quickly across the glass. DO NOT use on cracked or pitted glass panes. Use the extension tubes to clean areas that cannot be easily reached. Use the rectangular brush complete with a cloth fitted to clean carpets, rugs, parquet and hard floor surfaces. If the rectangular brush is too large, use the triangular brush particularly on chairs, sofas, mattresses, corners, etc. Wrap
No. 17
No. 18
No. 19
No. 20