180 - Tragbarer DVD-Player INGO - Kostenlose Bedienungsanleitung
Finden Sie kostenlos die Bedienungsanleitung des Geräts 180 INGO als PDF.


Benutzerfragen zu 180 INGO
0 Frage zu diesem Gerät. Beantworten Sie die, die Sie kennen, oder stellen Sie Ihre eigene.
Eine neue Frage zu diesem Gerät stellen
Laden Sie die Anleitung für Ihr Tragbarer DVD-Player kostenlos im PDF-Format! Finden Sie Ihr Handbuch 180 - INGO und nehmen Sie Ihr elektronisches Gerät wieder in die Hand. Auf dieser Seite sind alle Dokumente veröffentlicht, die für die Verwendung Ihres Geräts notwendig sind. 180 von der Marke INGO.
BEDIENUNGSANLEITUNG 180 INGO
TECHNICAL SPECIFICATIONS
| Sensor | 1.3 MegaPixels CMOS, |
| Display | 1.44" TFT Color LCD |
| Focus range | 150cm ~ infinity |
| Aperture | F3.0, Fixed Focus |
| Shutter | Electronic Shutter: 1/2000 ~ 1/2sec. |
| Resolution | StillImage: 2592X1944(5M by interpolation)、2048X1536(3M by interpolation)、1280X960(1.3M) 800X600(SVGA) 640X480(VGA)Video: 1280X 720,720X480, 640x480,320 x 240 |
| Sensitivity | Auto |
| White balance | Auto / Daylight / Cloudy / Fluorescent / Bulb |
| Exposure control | -2EV to +2EV in 0.3 step |
| Burst | 3 consecutive shots captured |
| Photo effect | Normal/ B&W/ Sepia / Negative/ Red/ Green/ Blue |
| Self-timer | 2 or 10 second time delay options |
| Storage | External memory card slot Accepts up to 8GB SD / SDHC card |
| TV system | NTSC / PAL |
| Power Supply | 2 * AA (alkaline/ 1.5V) batteries |
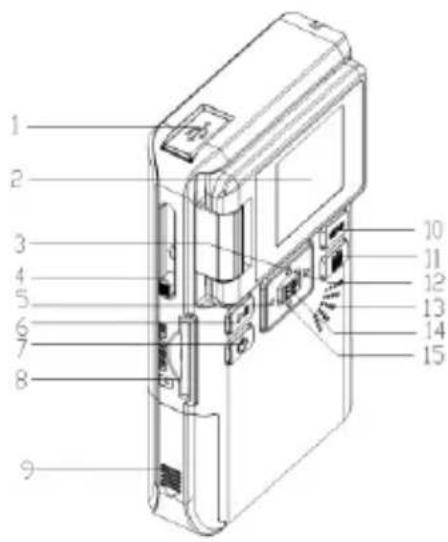
PARTS OF THE VIDEO CAMERA
1: USB jack
2: LCD screen
3: Up button
4: USB switch
5: Left/Self-timer button
6: MODE button
7: Power button
8: SD card slot
9: Battery cover
10: Menu button
11: Delete button
12: Right button
13: Speaker
14: Shutter/OK button
15: Down button
16: Microphone
17: Power LED
18: Lens
19: AV out jack
text_image
Technical diagram of a device with numbered parts labeled for identification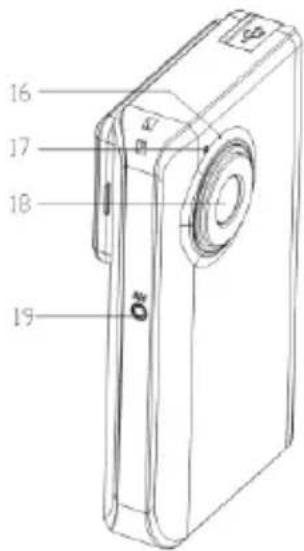
text_image
16 17 18 19©
©
©
©
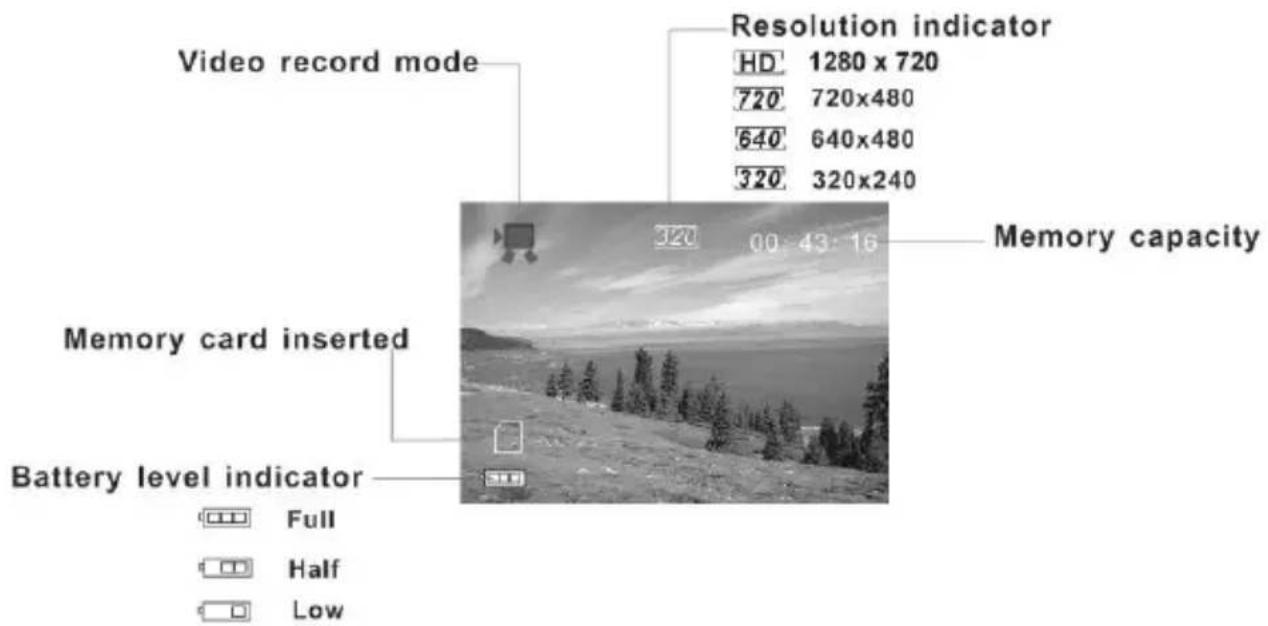
Video record mode
text_image
Video record mode Resolution indicator HD 1280 x 720 720 720x480 640 640x480 320 320x240 Memory capacity 320 00:43:16 Memory card inserted Battery level indicator Full Half LowPlayback mode
text_image
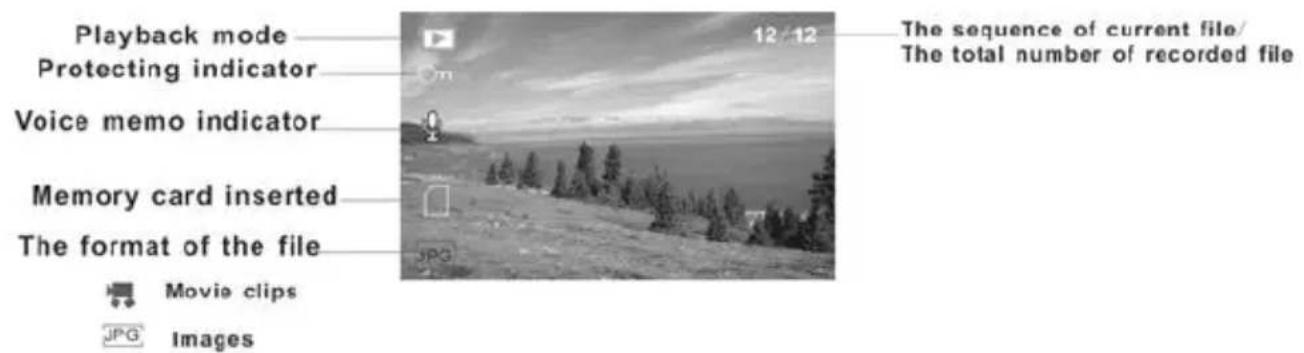
Playback mode Protecting indicator Voice memo indicator Memory card inserted The format of the file Movie clips Images 12/12 The sequence of current file/ The total number of recorded fileUSING THIS VIDEO CAMERA
Turning the Camera On and Off
- Press the POWER button to turn on the video camera.
- Press the POWER button again will turn the camera off.
To save battery power, the video camera automatically turns off a period of time after the last control accessed. Press the power button to power the camera back on. You can change the power-off time by setting the function [Power Save] in the Setup menu.
Change the record mode
There are three record modes in this video camera.
1: Press the POWER button to turn on the camera, and the camera get into the default video mode.
2: Press the MODE button to change the mode. Each time the MODE button is pressed the mode icon is changed.
| Display | Title | Description |
 | Capture mode | For taking still photos. |
 | Video mode | For recording movie clips. |
 | Playback mode | Preview the record files. |
Taking still images
-
Turn on the video camera.
-
Press the Mode button to set the video camera to capture mode, the icon appears on the LCD screen.

-
Use the LCD screen to frame your subject.
-
Hold the video camera steady and then press the SHUTTER/OK button completely down to take a picture.
• Automatically the number displayed on the screen is decreased by one. For example, if the screen displays 018 when the camera is powered on, after one photo has been captured, 017 will appear. If the memory is full, "Memory Full" will appear on screen.
- Make sure that your fingers do not cover the lens.
- Do not take the memory card or battery out when the video camera is saving the image, otherwise the image will not be saved completely.
©
©
©
| Metering | Setting metering. |
| White Balance | Setting white balance |
Setup menu
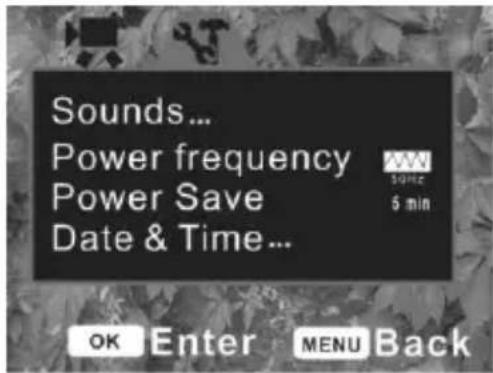
You can set the system items in setup menu.
1: Turn the power on and press the MENU button to display the menu.
2: Press the RIGHT button to select [Setup].
3: Use the UP or DOWN button to select an item.
4: Press the SHUTTER/OK button to enter the submenu.
5: Use the UP or DOWN button to select the desired item.
6: Press the SHUTTER/OK button to confirm the setting.
7: Press the MENU button to close the menu.
| Menu item | Function |
| Sounds | There are four items for option:[Shutter]: Set the shutter sound on or off by pressing theRIGHTbutton.[Start-up]: Set the start-up sound. Press theRIGHTbutton to |
text_image
Sounds... Power frequency Power Save Date & Time... OK Enter MENU Back©
©
©
Delete files
1: Press the MENU button in playback mode.
2: Press the UP or DOWN button to select the item [Delete...].
3: Press the SHUTTER/OK button to enter the submenu.[One]: Delete current file. [All]: Delete all files except locked files.
4: Use the UP or DOWN button to select the item.
5: Press the SHUTTER/OK button to confirm the setting. A dialog box will appear. Using UP or DOWN button to select the item [Yes].
6: Press the SHUTTER/OK button to delete the current file or all files.
Play a slide show
1: Press the MENU button in playback mode.
2: Press the UP or DOWN button to select the item [Slide Show...].
3: Press the SHUTTER/OK button to enter the submenu.
[Start]: Select this item to prepare for slide showing after setting the slide show mode.
[Interval]: Set the interval time by pressing the LEFT or RIGHT button.
The range of interval time is 1 second to 10 seconds.
[Repeat]: Press the LEFT or RIGHT button to set the repeat function on or off.
4: Use the UP or DOWN button to select [Start].
5: Press the SHUTTER/OK button start slide show.
6: Press the MENU button to end slide show.
- Only the still image can be show in slide show.
Effect
1: In Playback mode, select and display the photo you want to change color tone. Press the MENU button.
2: Press the UP or DOWN button to select the [Effect].
3: Press the SHUTTER/OK button entering the submenu: [B&W], [Sepia], [Negative], [Red], [Green], [Blue], [Binarize], [Sunset], [Warm], [Cold], [Contrast].
4: Press the UP or DOWN button to select an effect to change the image's color tone.
5: Press the SHUTTER/OK button to confirm the setting.
Rotate the image
1: Select an image you want to rotate in playback mode.
2: Press the MENU button to display the menu.
3: Press the UP or DOWN button to select the item [Rotate...].
4: Press the SHUTTER/OK button to launch the submenu:
Rotate: Each time the SHUTTER/OK button is pressed the image will rotate 90°.
Save: Select this item to save the rotated image.
Back: Select this item to close the submenu.
Resize
1: Select an image you want to resize in playback mode.
2: Press the MENU button to display the menu.
3: Press the UP or DOWN button to select the item [Resize...].
4: Press the SHUTTER/OK button to launch the submenu.
5: Press the UP or DOWN button to select the item.
6: Press the SHUTTER/OK button to save the resized image.
- The image can only be resized to smaller size.
text_image
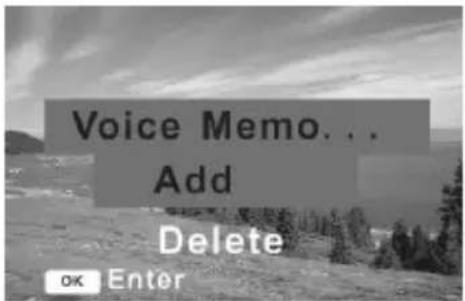
Voice Memo... Add Delete OK Enter©
Using a Card Reader
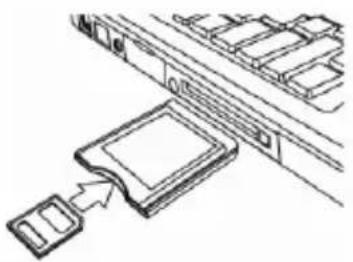
1: Eject the memory card from the video camera and insert it into a card reader that is connected to a computer.
2: Open [My Computer] or [Windows Explorer] and double-click the removable disk icon that represents the memory card.
natural_image
Diagram of a device being inserted into a rack, showing a clip and surrounding compartments (no text or symbols)3: Copy images from the card into a directory of your choice on the computer's hard disk.
Connecting the Camera to a PC with the USB Cable
1: Set the USB mode to [MSDC] mode..
2: Connect the supplied USB cable to the computer's USB port and turn on the camera. A message "MSDC" appears on the screen when connection to the computer has been successfully completed.
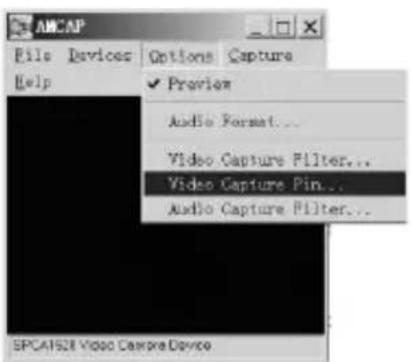
3: Open [My Computer] or [Windows Explorer]. A "Removable Disk" appears in the drive list. Double-click the "Removable Disk" icon to view its contents. Files stored on the camera are located in the folder named "DCIM".
©
text_image
AMCAP File Devices Options Capture Help ✓ Preview Audio Format... Video Capture Filter... Video Capture Pin... Audio Capture Filter... SPCA1528 Video Capture Device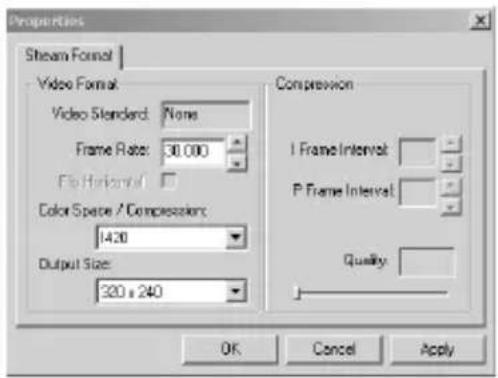
text_image
Proportions Stream Format | Video Format Video Standard: None Frame Rate: 30.000 File Horizontal Color Space / Compression: 1420 Output Size: 320 x 240 Compression I Frame Interval: P Frame Interval: Quality: OK Cancel ApplyTROUBLESHOOTING
| Power does not turn on. | |
| 1. Battery is inserted in the wrong direction. | ★Reload battery in the correct direction. |
| 2. Battery is insufficient to power on. | ★Replace or recharge the battery. |
| The camera does not take pictures. | |
| 1. Memory is full. | ★Insert a new memory card. |
| 2. Memory card is not formatted correctly. | ★Format the memory card again or use a new card. |
| Image is blurry or out of focus. | |
| 1. The video camera was moving whenthe image was captured. | ★Hold the video camera steady whenshooting picture. |
| Image is not displayed on the LCD monitor. | |
| 1. A memory card with non-SUNP**** images (recorded with other camera) is loaded. | ★This video camera cannot display non-SUNP**** images. |
| Recorded images are not saved in memory. | |
| 1. The video camera was turned off before the images are saved in memory. | ★If the battery low indicator appears on the LCD monitor, replace the battery immediately. |
DISPOSAL

Electrical and electronic equipment (EEE) contains materials, parts and substances which can be dangerous to the environment and harmful to human health if waste of electrical and electronic equipment (WEEE) is not
disposed of correctly.

- Different types of batteries or new and used batteries are not to be mixed.
- Batteries are to be inserted with the correct polarity.
- Batteries should be replaced under the supervision of an adult.
- Exhausted batteries are to be removed from the product.
• The supply terminals are not to be short-circuited.
• Used batteries are hazardous waste and NOT to be disposed of the household waste!!! Return the batteries to your dealer or to collection points in your community. - Keep batteries away from children. Children might swallow batteries.
Contact a physician immediately if a battery was swallowed.
- Check your batteries regularly to avoid battery leakage.
- Batteries shall not be exposed to excessive heat such as sunshine, fire or the like.
- CAUTION: Danger of explosion if battery is incorrectly replaced
Replace only with the same or equivalent type.

Ingo Devices assumes no responsibility for any errors that may appear in this manual.