
DM 601 - Lautsprecher BOWERS & WILKINS - Kostenlose Bedienungsanleitung
Finden Sie kostenlos die Bedienungsanleitung des Geräts DM 601 BOWERS & WILKINS als PDF.

| Produkttyp | 2-Wege-Bassreflexsystem 4. Ordnung |
| Tiefton-/Mitteltontreiber | 1x 165 mm (6 1/2 Zoll) Kevlar®-Membran |
| Hochtonkalotte | 1x 26 mm (1 Zoll) Metallkalotte mit Magnetflüssigkeitskühlung |
| Frequenzgang | 70 Hz – 20 kHz ±3 dB auf Referenzachse; -6 dB bei 50 Hz und 30 kHz |
| Empfindlichkeit | 88 dB SPL (2,83 V, 1 m) |
| Nennimpedanz | 8 Ohm (min. 4,2 Ohm) |
| Übergangsfrequenz | 3 kHz |
| Belastbarkeit | 25 W – 100 W Dauerleistung an 8 Ohm |
| Maximaler Kabelwiderstand | 0,2 Ohm |
| Abmessungen (H x B x T) | 356 x 204 x 244 mm |
| Gewicht | 6,1 kg |
| Gehäusematerial | Schwarze Eschen-Vinylfolie |
| Gitterstoff | Schwarzer Stoff |
| Besonderheiten | Abgerundete Gehäusekanten zur Beugungsminderung; Bi-Wiring- und Bi-Amping-fähig; vergoldete Anschlussterminals |
Häufig gestellte Fragen - DM 601 BOWERS & WILKINS
Benutzerfragen zu DM 601 BOWERS & WILKINS
0 Frage zu diesem Gerät. Beantworten Sie die, die Sie kennen, oder stellen Sie Ihre eigene.
Eine neue Frage zu diesem Gerät stellen
Laden Sie die Anleitung für Ihr Lautsprecher kostenlos im PDF-Format! Finden Sie Ihr Handbuch DM 601 - BOWERS & WILKINS und nehmen Sie Ihr elektronisches Gerät wieder in die Hand. Auf dieser Seite sind alle Dokumente veröffentlicht, die für die Verwendung Ihres Geräts notwendig sind. DM 601 von der Marke BOWERS & WILKINS.
BEDIENUNGSANLEITUNG DM 601 BOWERS & WILKINS
OWNER'S MANUAL
DM601
DM602
natural_image
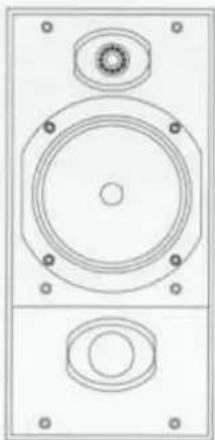
Technical line drawing of a speaker with two circular components and mounting holes (no text or symbols)
LISTEN AND YOU'LL SEE
natural_image
Simple line drawing of three boxes with curved arrows indicating rotation or movement (no text or symbols)FIGURE 1
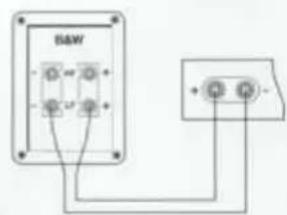
FIGURE 2
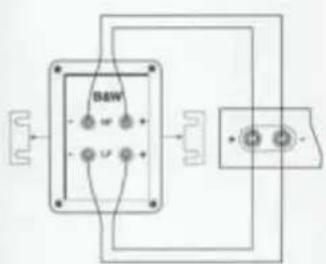
FIGURE 3
INTRODUCTION
Thank you for purchasing B&W DM600 Series speakers.
Since its foundation in 1966, the continuing philosophy of B&W has been the quest for perfect sound reproduction. Inspired by the company's founder, the late John Bowers, this quest has entailed not only high investment in audio technology and innovation but also an abiding appreciation of music to ensure that the technology is put to maximum effect.
It is also our policy to make sure the advanced features pioneered on one product are incorporated into others we manufacture.
DM600 Series systems have cabinets with rounded edges to reduce sound diffraction (the re-radiation of sound waves from sharp edges that interfere with and blur the direct sound from the drive units), incorporating woven Kevlar® cone bass/midrange drive units for lowest coloration and maximum definition. They also have alloy dome tweeters with magnetic fluid cooling to ensure good definition to the limits of audibility and maintain dynamics to high sound levels. All these features were originally developed for the acclaimed B&W 800 Series systems and go towards the realisation of fine transducers.
However, no matter how good the speakers themselves, they must work well into the listening room and time spent on the installation process will reap the reward of many hours listening pleasure. Please read through this manual fully. It will help you optimise the performance of your audio system.
B&W distribute to over 50 countries world-wide and maintain a network of dedicated distributors who will be able to help should you have any problems your dealer cannot resolve.
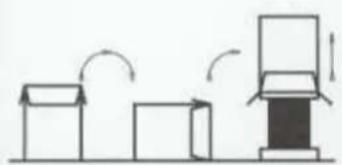
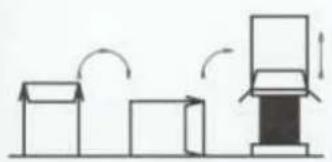
UNPACKING
(figure 1)
Fold the top carton flaps right back and invert the carton and contents. Lift the carton clear of the contents.
Remove the inner packing from the product.
We suggest you retain the packaging for future use.
DM600 Series speakers are supplied in veneer matched pairs. Check that your speakers have consecutive serial numbers.
CONNECTIONS
(figures 2 & 3)
All connections should be made with the equipment turned off.
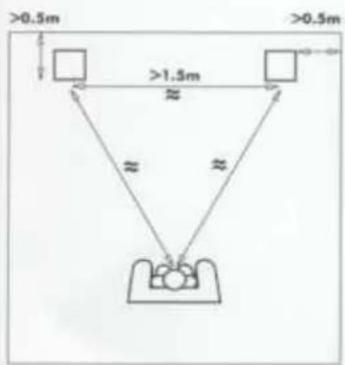
FIGURE 4
natural_image
Simple line diagram showing two squares above a container with three circles at the bottom (no text or symbols)FIGURE 5
GB
natural_image
Simple line drawing of three boxes with curved arrows indicating rotation or movement (no text or symbols)FIGURE 1

FIGURE 2
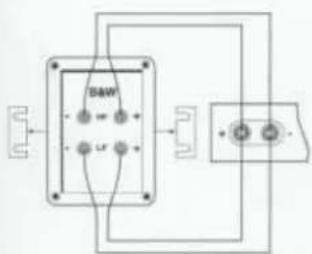
FIGURE 3
There are two pairs of gold plated terminals at the back of each speaker (one pair to the bass/midrange and one pair to the tweeter) which permit bi-wiring or bi-amplification if desired. On delivery, both pairs are connected together by high-quality gold plated copper links for use with a single twin cable.
For single cable connection, connect either of the positive terminals on the speaker (marked + and coloured red) to the positive terminal on the power amplifier and negative (-, black) to negative (figure 2). Failure to observe correct polarity will result in poor sound balance and image focusing.
When bi-wiring the speakers, loosen the terminal caps and remove the links. Use a separate twin cable from the amplifier terminals to each pair of speaker terminals (figure 3). Correct polarity connection is even more critical in this case to maintain the frequency response of each speaker as well as the correct balance between left and right speakers. The use of separate cables can improve the reproduction of low-level detail by reducing interaction in the crossover and allowing optimum choice of cable for each frequency range.
Always make sure all the terminal caps are screwed down tight as otherwise they may rattle.
When choosing cable, keep the total electrical impedance (out and back) below the maximum recommended in the specification. In particular, the cable to the tweeter should have low inductance, otherwise the very high frequencies will be attenuated. Ask your dealer for advice, as the optimum cable will depend on the length required.
POSITIONING
(figure 4)
Some experimentation with the position of the speakers is well worthwhile to optimise the interaction between them and the listening room. However, as an initial guide:
Place the speakers on firm stands or bookshelves that place the tweeters approximately at ear level.
Place the speakers and the centre of the listening area approximately at the corners of an equilateral triangle.
Keep the speakers at least 1.5m (5ft) apart to maintain left-right stereo separation.
Keep the speaker baffles at least 0.5m (20in) clear of walls. Having the speakers too close to walls increases the level of bass relative to the midrange and may give a boomy quality to the sound.
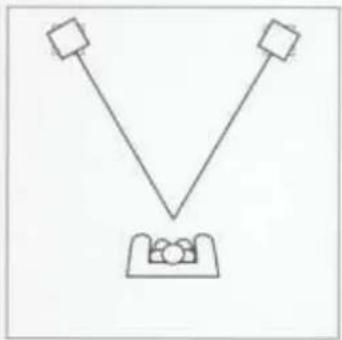
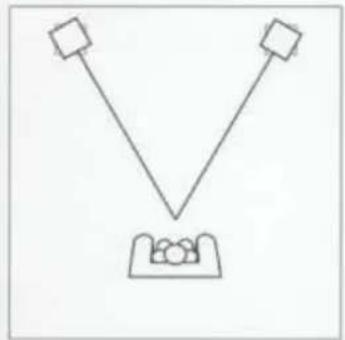
FINE TUNING
Before fine tuning the installation, double check the polarity and security of the connections.
If the level of bass is uneven with frequency, this is usually due to strong excitation of resonance modes in the room.
Even small changes in the position of the speakers within the listening room can have a profound effect on the perceived sound quality by altering the excitation of these modes. Try mounting the speakers along a different wall. Even moving large pieces of furniture about can have an effect.
If the general level of bass is too high, try moving the speakers further away from the walls. Conversely, if you need more bass, move the speakers closer to the walls. Space behind the speakers also improves the impression of perspective on well recorded material.
If the central image is poor, try moving the speakers closer together or toeing them in so they point at or just in front of the listening area (figure 5).
If the sound is too harsh, increase the amount of soft furnishing in the room. For example, use heavier curtains. Conversely reduce the amount of soft furnishing if the sound is dull and lifeless.
Test for flutter echoes by clapping your hands and listening for rapid repetitions. These can smear the sound, but may be reduced by irregular shaped surfaces such as bookshelves and large pieces of furniture.
Ensure the speakers are firmly supported. Speaker stands should be regarded as part of the speaker and chosen with care. Ask your dealer for advice on the best stands for your needs.
AFTERCARE
The vinyl veneers normally only require dusting. If you wish to use an aerosol cleaner, remove the grille first by gently pulling it away from the cabinet. Spray onto the cleaning cloth, not directly onto the cabinet. The grille fabric may be cleaned with a normal clothes brush after removing the grille from the cabinet.
Avoid touching the drive units, especially the tweeter, as damage may result.
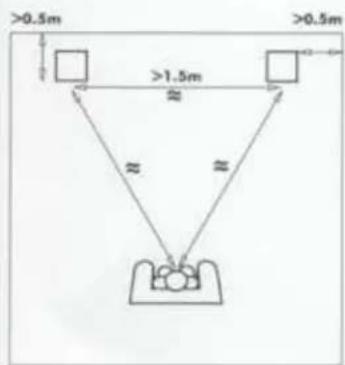
FIGURE 4
natural_image
Simple line drawing of two squares above a container with three circles at the bottom (no text or symbols)FIGURE 5

DM601
DM602
DESCRIPTION:
DRIVE UNITS:
2-way 4th-order vented-box system
1x 165mm (6 ^1 /2 in) Kevlar® bass/mid
1x 26mm (1in) metal dome
high-frequency
-6dB at 50Hz and 30kHz
70Hz - 20kHz ±3dB on reference axis
Within 2dB of response on
reference axis
Horizontal: over 40° arc
Vertical: over 10° arc
88dB spl [2.83V, 1m]
2nd & 3rd harmonics <1%
88Hz - 20kHz (90dB spl, 1m)
8Ω (minimum 4.2Ω)
3kHz
25W-100W continuous into 8Ω
on unclipped programme.
2-way 4th-order vented-box system
1x 180mm (Tin) Kevlar® bass/mid
1x 26mm (lin) metal dome
high-frequency
-6dB at 43Hz and 30kHz
52Hz - 20kHz ±3dB on reference axis
Within 2dB of response on
reference axis
Horizontal: over 40° arc
Vertical: over 10° arc
90dB spl (2.83V, 1m)
2nd & 3rd harmonics <1%
60Hz - 20kHz (90dB spl, 1m)
8Ω (minimum 4.3Ω)
3kHz
25W-120W continuous into 8Ω
on unclipped programme.
SENSITIVITY:
HARMONIC DISTORTION:
NOMINAL IMPEDANCE:
CROSSOVER FREQUENCY:
POWER HANDLING:
MAX. RECOMMENDED
CABLE IMPEDANCE:
DIMENSIONS:
0.2(1)
Height: 356mm (14 in)
Width: 204mm (8 in)
Depth: 244mm (9 1/8 in)
6.1kg (13.4 lb)
Cabinet: Black Ash vinyl
Grille: Black Cloth
0.2Ω
Height: 490mm (19 ^-3 /s in)
Width: 236mm (9 ^1 /sin)
Depth: 306mm (12 in)
9.8kg (21.6 lb)
Cabinet: Black Ash vinyl
Grillo: Black Cloth
B&W
LISTEN AND YOU'LL SEE
Marke : BOWERS & WILKINS
Modell : DM 601
Kategorie : Lautsprecher