R 850 R (2003) - Motorrad BMW - Kostenlose Bedienungsanleitung
Finden Sie kostenlos die Bedienungsanleitung des Geräts R 850 R (2003) BMW als PDF.


| Produkttyp | Motorrad |
| Marke | BMW |
| Modell | R 850 R |
| Modelljahr | 2003 |
| Abmessungen (L x B x H) | 2170 mm x 900 mm x 1145 mm |
| Radstand | 1487 mm |
| Sitzhöhe | 780 mm (optional 800 mm) |
| Trockengewicht | 229 kg |
| Zulässiges Gesamtgewicht | 415 kg |
| Tankinhalt | 22 Liter (Reserve ca. 4 Liter) |
| Antriebsart | Verbrennungsmotor |
| Motor | 2-Zylinder-Boxer, 4-Takt, 848 cm³ |
| Leistung | 70 PS (51 kW) bei 7000 min⁻¹ |
| Drehmoment | 77 Nm bei 5500 min⁻¹ |
| Kraftübertragung | Kardanantrieb |
| Getriebe | 5-Gang-Schaltgetriebe |
| Fahrwerk | Telelever vorne, Paralever hinten |
| Bremse vorne | Doppelscheibenbremse, 305 mm |
| Bremse hinten | Einscheibenbremse, 276 mm |
| Reifengröße vorne | 120/70 ZR17 |
| Reifengröße hinten | 160/60 ZR17 |
| Wartungsintervall | Alle 12.000 km oder jährlich |
| Sicherheitshinweise | Helmpflicht, regelmäßige Bremsenprüfung, Reifendruck kontrollieren |
| Ersatzteile & Reparierbarkeit | Original BMW-Teile, Vertragshändler |
Häufig gestellte Fragen - R 850 R (2003) BMW
Benutzerfragen zu R 850 R (2003) BMW
0 Frage zu diesem Gerät. Beantworten Sie die, die Sie kennen, oder stellen Sie Ihre eigene.
Eine neue Frage zu diesem Gerät stellen
Laden Sie die Anleitung für Ihr Motorrad kostenlos im PDF-Format! Finden Sie Ihr Handbuch R 850 R (2003) - BMW und nehmen Sie Ihr elektronisches Gerät wieder in die Hand. Auf dieser Seite sind alle Dokumente veröffentlicht, die für die Verwendung Ihres Geräts notwendig sind. R 850 R (2003) von der Marke BMW.
BEDIENUNGSANLEITUNG R 850 R (2003) BMW
Rider's Manual
R 850 R Comfort
BMW Motorrad
On-board
documentation
consisting of
Rider's Manual
and Maintenance
Instructions



Warning:
This symbol indicates pre-cautions and measures which are essential in protecting the rider or other persons from severe or fatal injury.

Attention:
Instructions and precautions specifically intended to prevent damage to the motorcycle. Disregarding them may render the warranty invalid.

Note:
Specific instructions on how to operate, control, adjust or look after items of equipment on the motorcycle.
Welcome to BMW
We congratulate you on your choice of a motorcycle from BMW and welcome you to the community of BMW riders.
Familiarise yourself with your new motorcycle, so that you can ride it safely and confidently in all traffic situations.
To make sure of this, please read this Rider's Manual carefully before starting to use your new motorcycle. It contains important information on how to operate the controls and how to make the best possible use of all the motorcycle's technical features.
In addition, it contains useful hints and information on the correct equipment for machine and rider, to ensure maximum reliability and safety, and advice on how to maintain the value of your motorcycle.
If you have any questions concerning your motorcycle, your authorised BMW motorcycle dealer will gladly provide advice and assistance.
We hope you enjoy reading this Rider's Manual and wish you many a pleasant, safe journey on your BMW motorcycle.
Best wishes,
BMW Motorrad
General information and controls
General view, left side .....4
General view, right side......5
Cockpit 6
Telltale and warning lights..... 7
Ignition switch and
steering lock 8-9
Trip meter/clock......10
Hazard warning flashers..... 11
Left handlebar fitting .....12
Right handlebar fitting ..... 13
Seat 14-15
Helmet holder ....16
System cases......17-19
Safety check
Checklist......20-21
Engine oil....22-23
Fuel....24-25
Handlebar levers......26-27
Brake system
- general ......28-29
Brake system - without
BMW Integral ABS .....30-32
Brake system - with
BMW Integral ABS .....33-36
Clutch.... 37
Lights....38-40
Shock-absorber
adjustment.... 41
Spring preload 42
Wheels....43-44
Accessories and loads...45-47
Starting – Riding – Parking
Your first journey ..... 48-49
Important notes .... 50-51
Side stand.... 52-53
Centre stand 54-55
Running in.... 56-57
Before you start...... 58-59
Starting 60-61
Warning lights.... 62-63
Riding, gear shifts...... 64-65
Brake system
- general.... 66-67
Brake system - with
BMW Integral ABS...... 68-74
BMW Integral ABS
- troubleshooting chart .....75
Arrive safely
Arrive safely....76-77
Service worldwide .....78
Environmental protection .... 79
BMW rider's equipment......80
BMW motorcycle
equipment...... 81
Training means
extra safety 82
Concluding thoughts......83
General view, left side
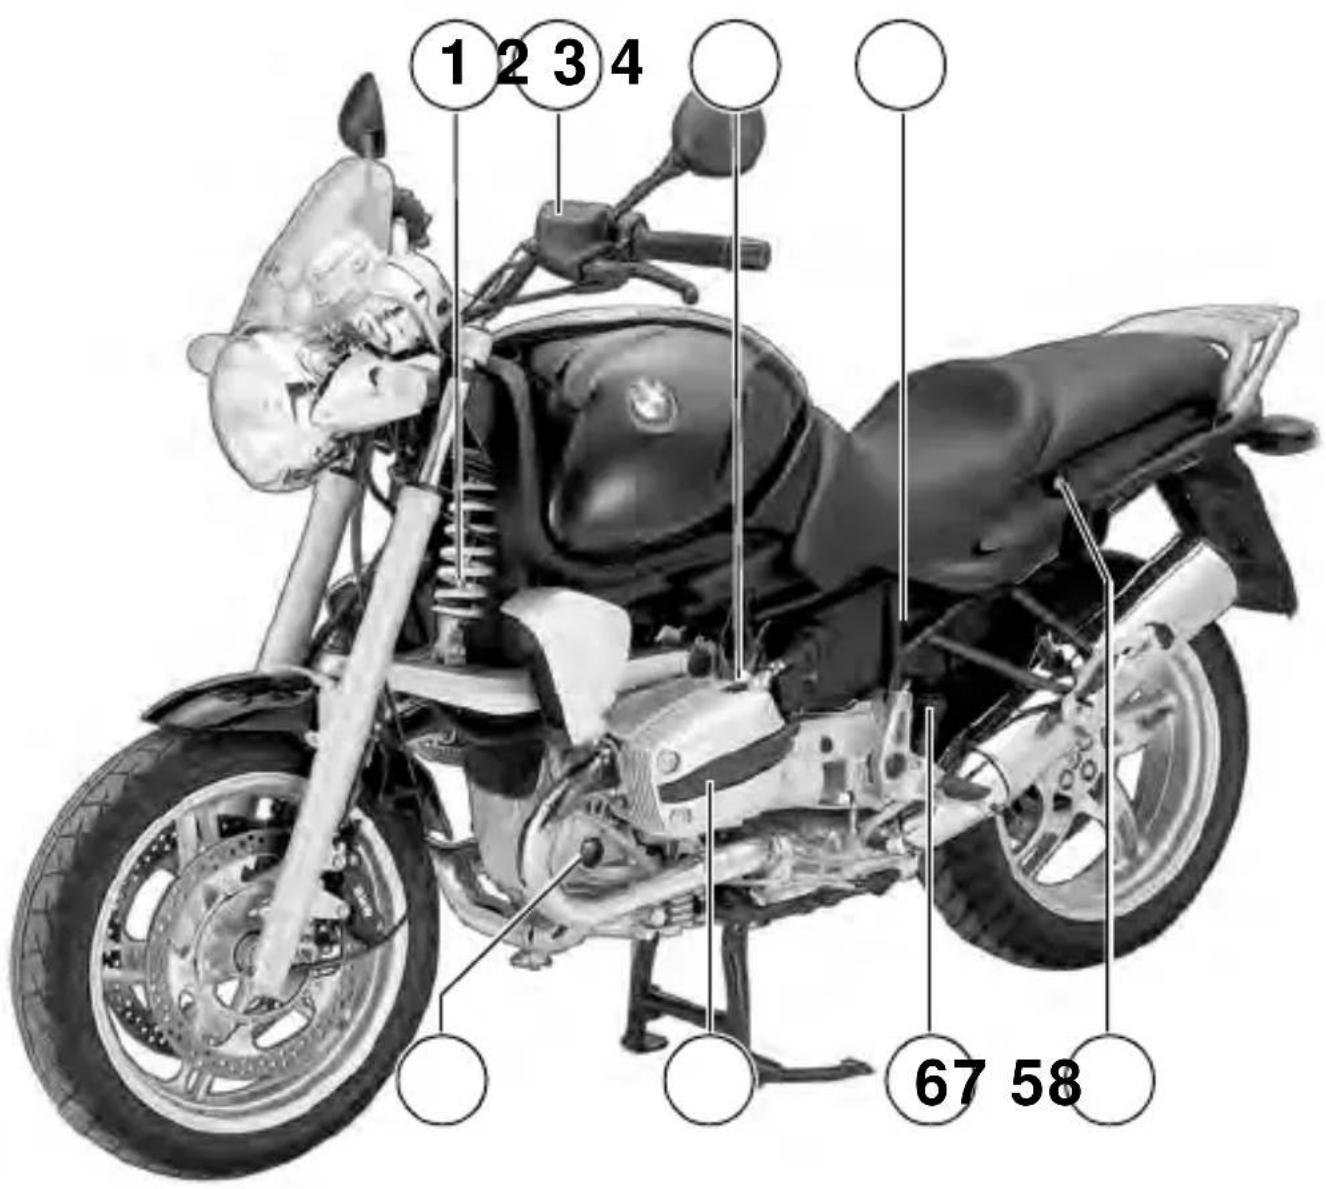
1 Front suspension strut, shock-absorber adjuster (41)
2 Reservoir for clutch hydraulic fluid (→ 37)
3 Engine oil filler neck (→ 23)
4 Rear suspension strut, spring preload (→ 42)
5 Seat lock ( 14) 6 Rear suspension strut, shock-absorber adjuster ( 41)
7 Spark plug, left 8 Oil level sight glass, engine (→ 23)
( ) Figure in brackets

9 Stowage compartment for on-board toolkit
10 Fuse box
11 Air filter (→ Maintenance Instructions, Chapter 2)
12 Fuel filler cap (→ 24)
() Figure in brackets
page number for description
13 Front brake-fluid reservoir (31, 35)
14 Type plate/vehicle identification number
15 Spark plug, right
16 Rear brake-fluid reservoir (32, 36)
17 Helmet-holder lock (→ 16)
Cockpit

1 Reset knob for trip meter (→ 10)
2 Speedometer
3 Odometer
4 Trip meter (10)
5 Clock (→ 10)
6 Revolution counter ( 56)
7 Ignition switch and steering lock (8)
8 Telltale and warning lights (7)
( ) Figure in brackets page number for description

1 Telltale light, left turn indicator green
2 Warning light fuel level/when approx. 5 litres left in tank orange (25, 62)
3 Telltale light,
neutral green N (59)
4 Telltale light, high-beam headlight blue
5 Telltale light, right turn indicator green
6 Warning light, battery charge current red (→ 63)
7 Warning light, ABS red ABS OE (63)
8 Warning light, general red ⚠ (→ 63)
9 Warning light, engine oil pressure red (62)
Ignition switch and steering lock


Keys
You will receive two master keys and one spare key.
The key number is on the plastic tag accompanying the keys.

Warning:
If the motorcycle is fitted with BMW Integral ABS OE , only a RESIDUAL BRAKING FUNCTION is available when the ignition is switched off (71)

Note:
Ignition switch and steering lock, tank filler cap lock, and helmet/seat lock are all operated with the same key. System cases OA with locks for the same key can be ordered on request.
Ignition switch and steering lock
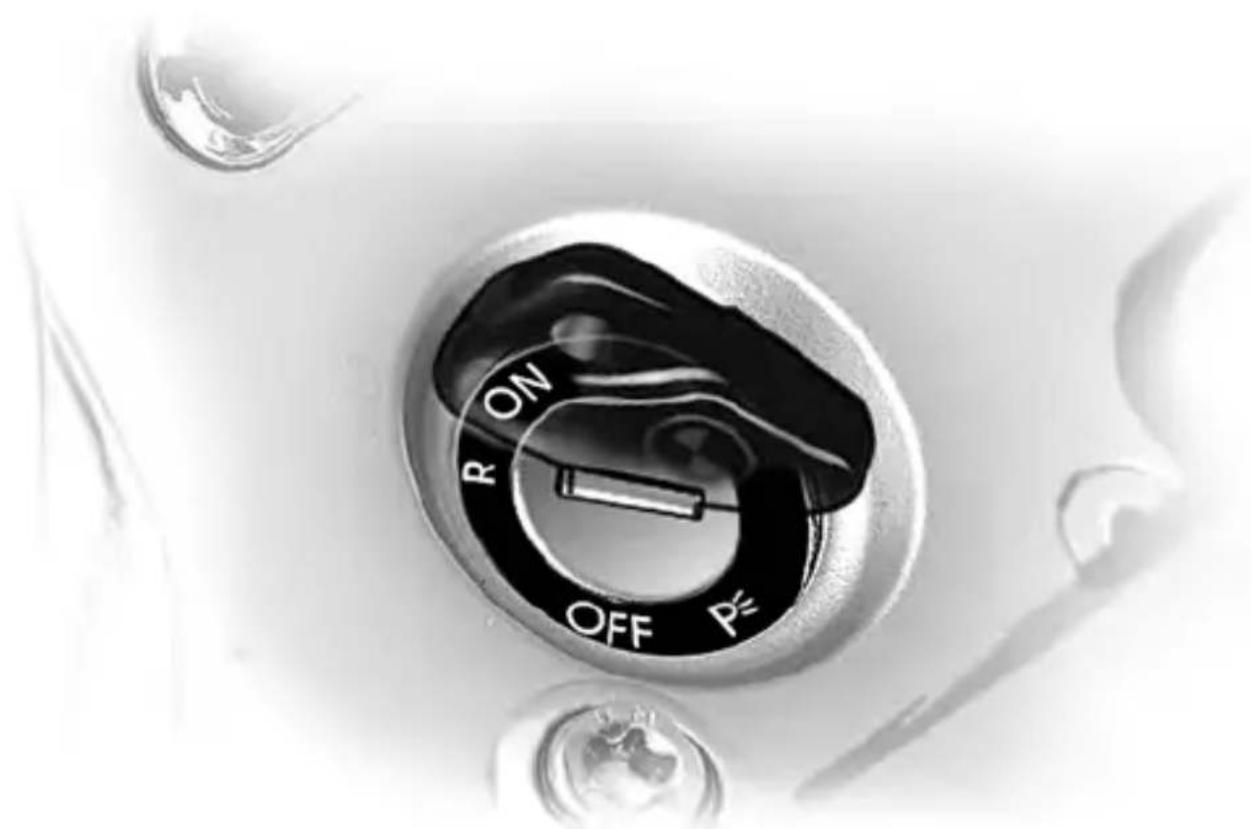
Key positions

Warning:
Never turn the key to OFF or P while riding the motorcycle!
ON Operating position, ignition, lights and all electrical circuits switched on
R * Ignition and lights off, steering not locked (handlebars can be turned freely to left or right)
* The key can be removed in these positions
- Turn the handlebars to full left lock.

Attention:
Engage the steering lock with the handlebars in this position only.
OFF* Ignition and lights off, steering locked
P* Parking light on, steering locked

Note:
Switch the parking light on for limited periods only. Note state of battery charge.

Trip meter
Resetting:
- Turn knob 2 in the direction indicated by the arrow until all the trip-meter readings show "0"
Clock
Setting the time:
- Press and hold down button 1
- Release button 1 as soon as the clock shows the right time

Hazard warning flashers

Note:
You cannot activate the hazard warning flashers if the ignition is switched off.
Do not use the hazard warning flashers for longer than absolutely necessary.
Note battery charge state
Switching on the hazard warning flashers
- Switch on the ignition
- Hazard warning flasher switch 1 lights up
-
Operate hazard warning flasher switch 1
-
Hazard warning flashers in operation
- Left/right flashing turn indicator telltale light in the telltale light panel (7) flashes
- Switch off the ignition
- The hazard warning flashers continue to operate
- The light in the hazard warning flasher switch goes out
Switching off the hazard warning flashers:
- Operate hazard warning flasher switch 1
- Hazard warning flashers cease to operate
- Left/right flashing turn indicator telltale light in the telltale light panel (7) off


Warning:
To prevent air from entering the clutch system:
- Do not turn the fitting on the handlebar.
- Do not turn the handlebars in the clamping blocks.
1 Lever for cold start (fast idle) (61)
2 Hazard warning flasher switch (11)
3 Horn push
4 Left flashing turn indicator switch
- Press
- Turn indicators operate
To switch off turn indicators:
- Press turn indicator cancel switch 9
5 High-beam/low-beam headlight switch
High-beam headlight
Low-beam headlight
DHeadlight flasher


Warning:
To prevent air from entering the brake system:
- Do not turn the fitting on the handlebar.
- Do not turn the handlebars in the clamping blocks.
6 Switch for heated handlebar grips OE
A Heating function off
B 50% (centre position)
C 100%
7 Starter pushbutton
8 Emergency off (kill) switch for ignition (→ 58)
9 Turn indicator cancel switch
- Press
- Left/right turn indicators off
10 Right flashing turn indicator switch
- Press
- Turn indicators operate
To switch off turn indicators:
- Press turn indicator cancel switch 9
OE Optional extra
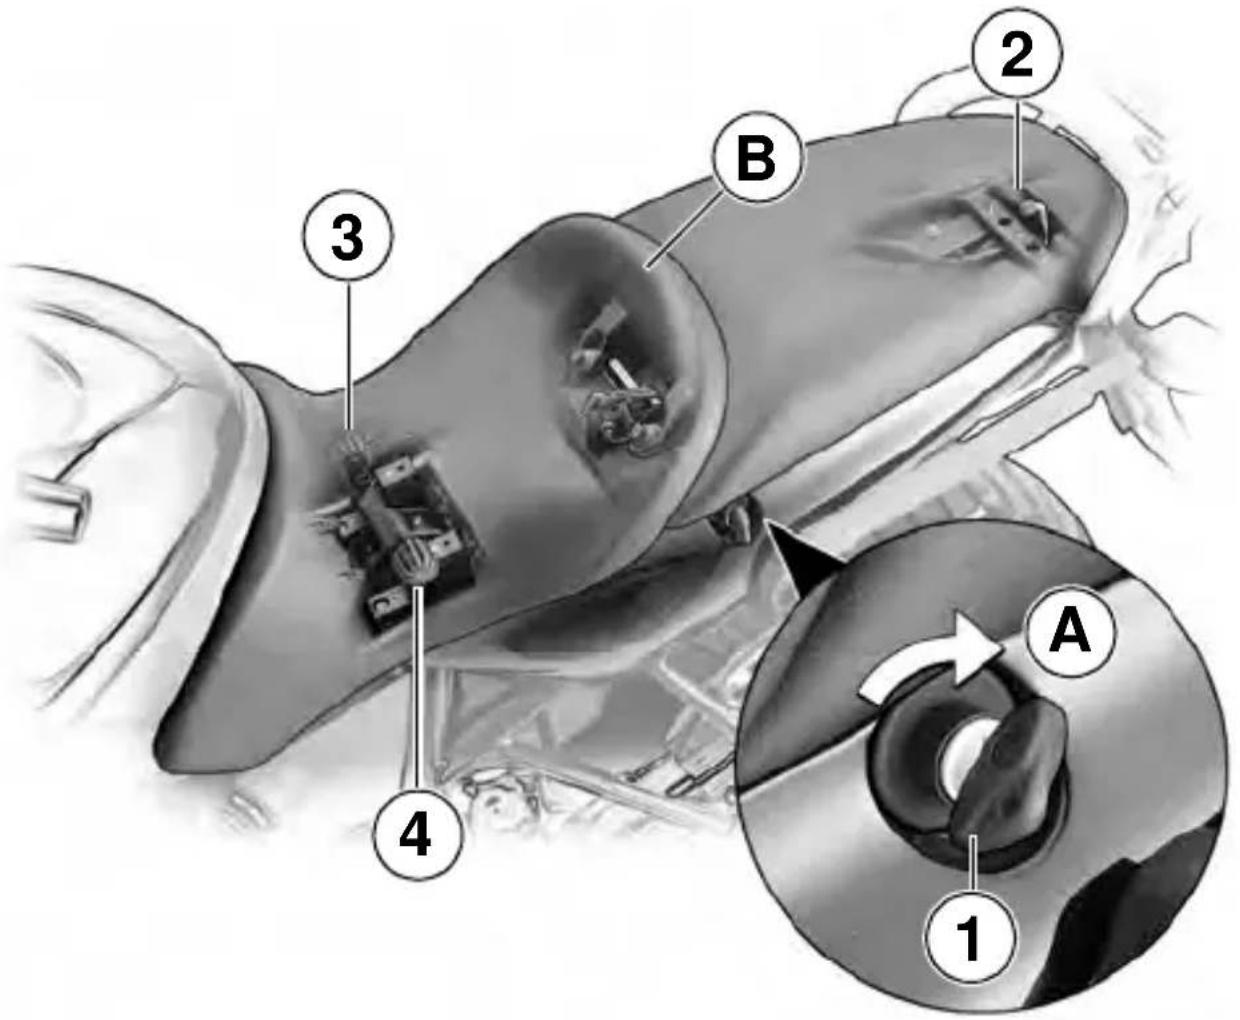
Locking seat:
Removing seat:
- Turn the key in seat lock 1 to position A
- Remove the front seat
- Fuses are accessible (→ Maintenance Instructions, Chapter 2)
- Pull the rear seat forward and up to remove
- Toolkit is accessible

Attention:
When installing, make sure that the seat is correctly secured.
- Push the rear seat back into catch 2 and lower it into position
- Push the front seat into locks 3 and 4 on left and right
- Apply light pressure at position B to engage the seat lock

Adjusting front seat:

Attention:
When installing, make sure that the seat is correctly secured.
- Remove the front seat
- Remove Allen key 2 from the holder in the front seat
-
Remove two socket-head screws 3 from front seat lock 1
-
Adjust seat lock 1 to suit the rider's stature
- Tighten both socket-head screws to secure the seat lock
- Reinstall Allen key 2 in its holder
- Lock the seat
The front seat can be set to any of three positions:
A = high B = middle C = low
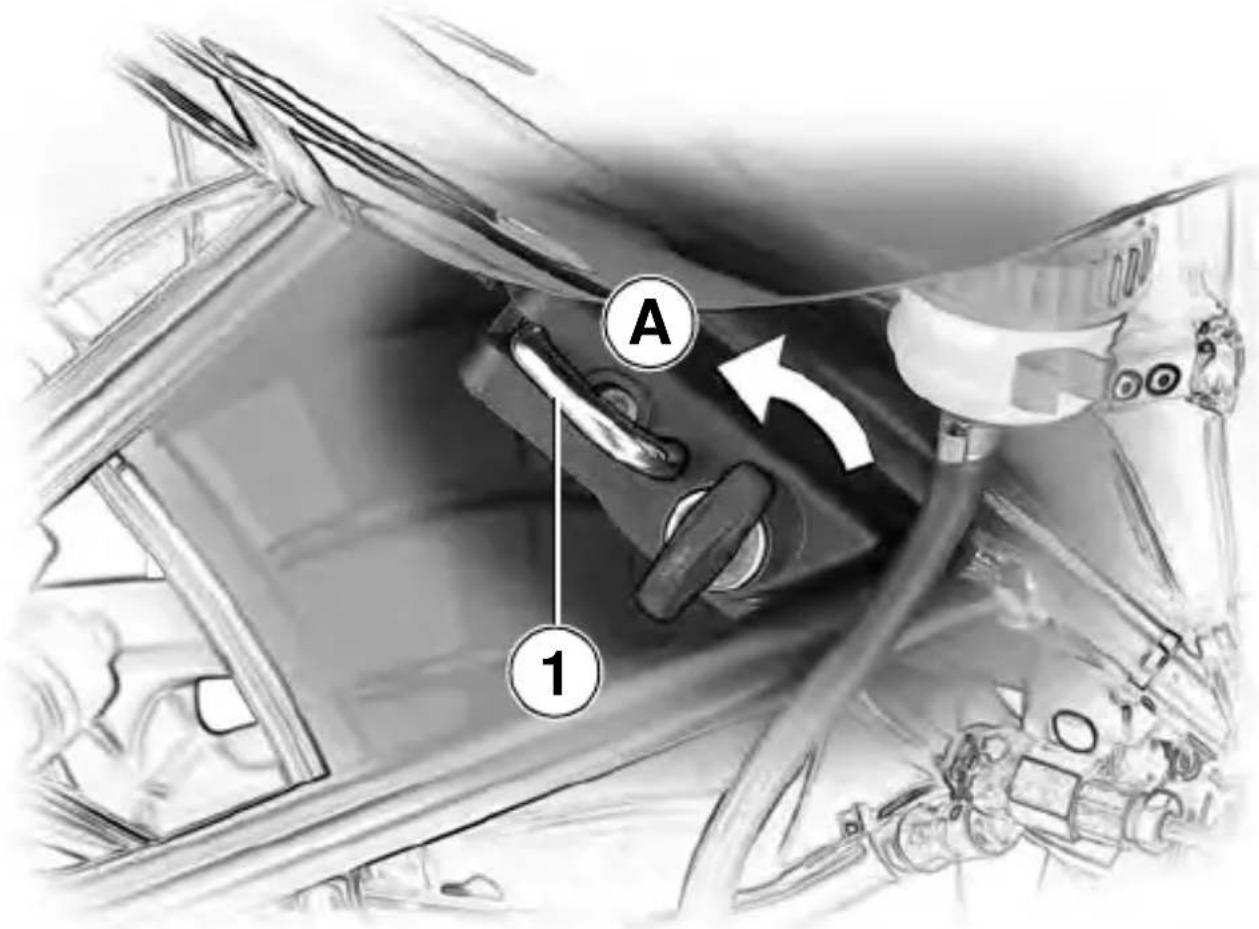
Helmet holder
- Turn the key in the helmet holder to position A
- Helmet holder 1 open
- Close the helmet holder by pressing it lightly into its lock
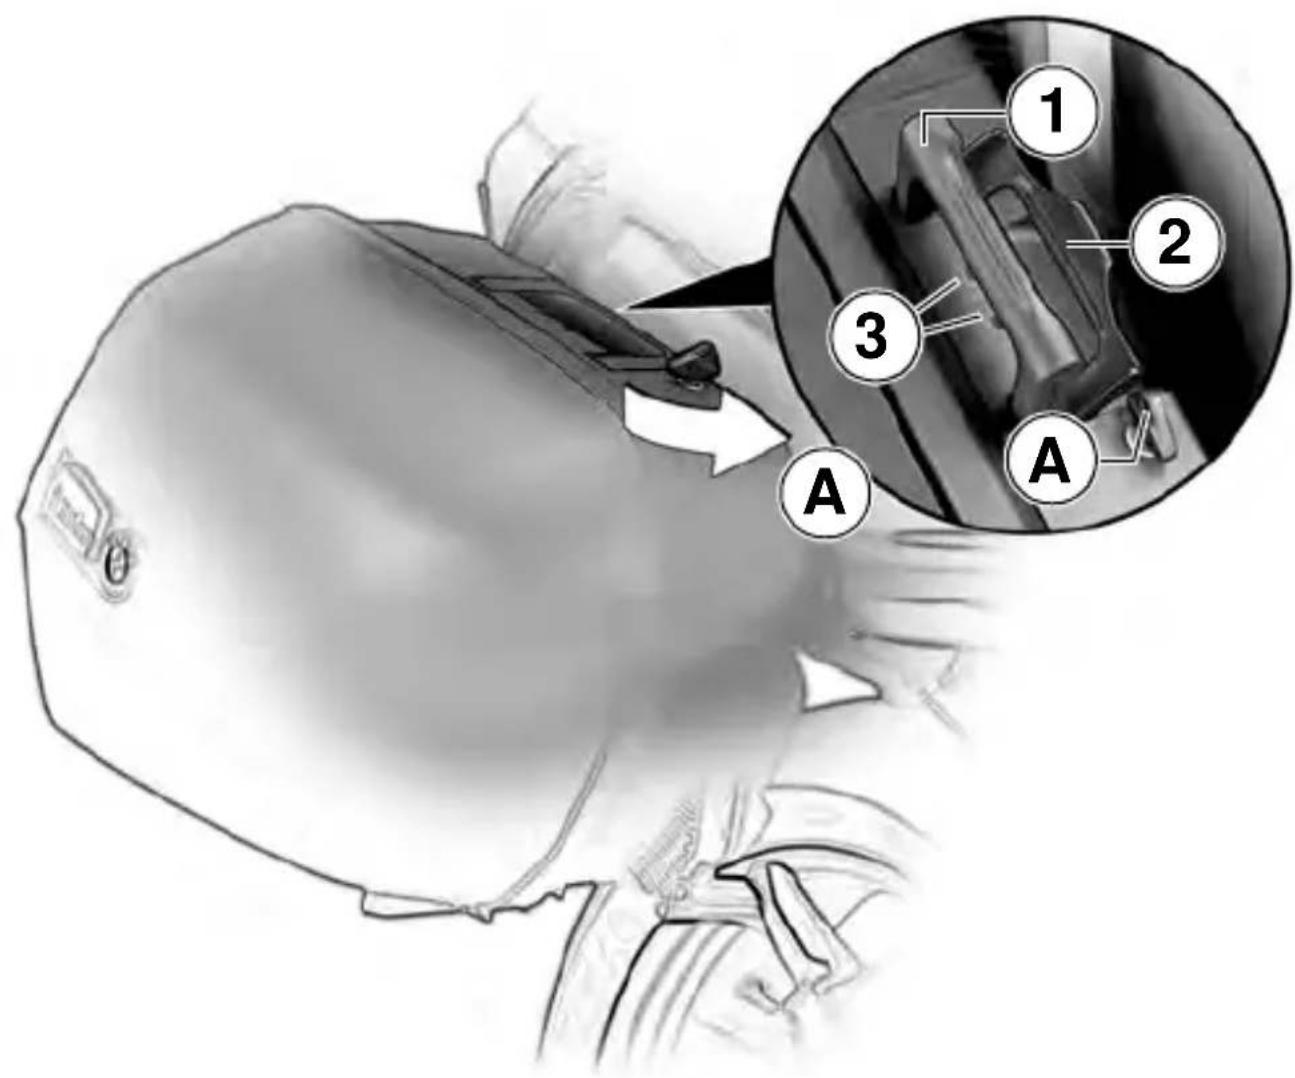

Warning:
After an accident or if the motorcycle has fallen over, check that the system cases are correctly secured Max. load per system case: 10 kg.
With system cases installed, it is advisable not to exceed 130 km/h.
Opening system cases
- Turn the key in the case lock to position A
- Pull up handle 1 and locking device 2
- The two windows 3 turn red
- Open the system case

Closing system cases

Attention:
Risk of breaking the latch.
Before closing handle 1 or locking device 2, turn the key in the case lock to position A.
- Turn the key in the case lock to position A
- Close locking device 2 and handle 1
- The two windows 3 turn black
- Lock the case and remove the key
Removing system cases
- Turn the key in the case lock to position A
- Pull up handle 1
- The two windows 3 turn red
- Remove the key and remove the system case from its holder

Installing system cases

Attention:
Risk of breaking the latch. Before closing handle 1 or locking device 2, turn the key in the case lock to position A.

Warning:
When installing, make sure the case is correctly seated. An incorrectly secured case could be lost and endanger other road users.
- Insert the system case into the holder (arrows), making sure that bottom holder 4 and top hook 5 are correctly seated
- Turn the key in the case lock to position A
- Close handle 1
- The two windows 3 turn black
- Lock the case and remove the key
Use the safety checklist – before every journey
Please perform the safety check accurately. If your motorcycle needs any routine maintenance, you can attend to it before the journey starts (→ Maintenance Instructions), or have it carried out by your authorised BMW motorcycle dealer.
This is to ensure that your motorcycle complies with road-vehicle use and safety laws. A motorcycle in perfect technical condition is essential for your safety and that of other road users.
For this reason, check the details in the following sections before you start the journey:
- Fuel level
- Positions of the handlebar-lever fittings
- Brake fluid level
- Clutch fluid level
- Brakes
- Warning lights and telltale lights
- Lights
- Shock-absorber setting and spring preload
- Wheel rim and tyre condition, tread depth and tyre pressures
-
Load, gross weight
-
Check regularly (every time you stop for fuel), on the basis of the following section:
- Engine-oil level (every 2nd/3rd stop for fuel):
- Brake pads
If you encounter any problems or difficulties, it is always best to contact your authorised BMW motorcycle dealer. He will provide the necessary advice and assistance.
Checking oil level
Check the oil level every time you stop for fuel.
Always check the oil level when the engine is at operating temperature, because the difference between the oil level indicated when the engine is at operating temperature and the oil level indicated when the engine is very cold due to extremely low outdoor temperatures (-10 °C) can be as much as 10 mm.
After switching off the engine at operating temperature, wait at least 5 minutes for the oil to drain back into the sump.
Checking the oil level after the engine has been run only briefly or when it is not properly warm will falsify the reading and could lead to the engine being operated with the wrong quantity of oil, because cold oil is viscous and takes longer to drain back into the sump. At extremely low outdoor temperatures (-10 °C), this can take as long as 12 hours.

Attention:
To avoid damage to the engine:
- Never exceed the maximum oil level mark.
- Always keep the oil level above the minimum mark.
Always check the oil level with the motorcycle upright.
- Check the oil level with the engine at its regular operating temperature
- Check the oil level after the engine has been stopped for at least 5 minutes
- Make sure that the motorcycle is upright
- Make sure the ground is level and firm

- Check the oil level at the sight glass:
MAX Top edge of marking ring
MIN Bottom edge of marking ring
- The difference between the two marks is approx. 0.5 litre
- If necessary, remove oil filler plug 2 and top up the engine oil through oil filler neck 1
- Reinstall oil filler plug 2

Attention:
The red warning light (7) for engine oil pressure indicates no (or very little) oil pressure in the lube-oil system; this light must not be regarded as an oil level check.
Oil pressure builds up after 1-2 seconds and the warning light goes out – the red engine oil pressure warning light should remain off while the engine is running.
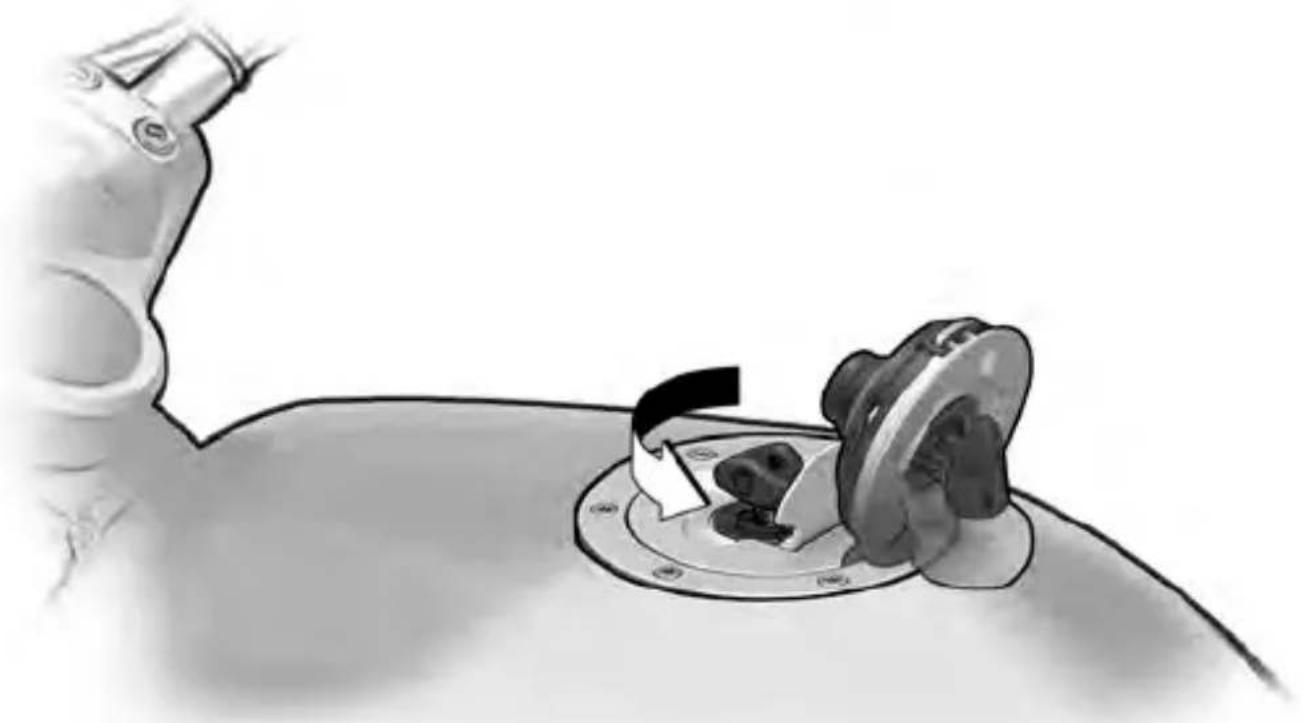
Refuelling

Warning:
Fuel is flammable and explosive. Do not smoke. Never bring a naked flame near the fuel tank.
Fuel expands when hot (for instance if the fuel tank is in the sun). For this reason, only fill as far as the lower edge of the filler neck.

Attention:
Leaded fuel will destroy the catalytic converter.
Do not run the fuel tank dry or you may damage the engine or the catalytic converter.
Wipe off plastic parts immediately if they are wetted with fuel.
- Place the motorcycle on the centre stand
- Make sure the ground is level and firm.
- Open fuel filler cap

Capacity

Note:
The fuel gauge works only when the ignition is on.
- Refuel
- Always use super (premium) unleaded fuel to DIN 51607 or equivalent standard, min. octane number 95 (RON) or 85 (MON)
-
Close the fuel filler cap
-
Usable tank capacity 17.6 litres
- An orange warning light 1 comes on when there are approximately 5 litres of fuel left in the tank

Adjusting clutch lever

Attention:
Sudden changes in the amount of play at the lever or a spongy feeling when it is applied may indicate a fault in the hydraulic system.
If you are doubtful about the reliability of the hydraulic clutch operating system, it is advisable to consult an authorised BMW motorcycle dealer.

Warning:
To prevent air from entering the clutch system:
- Do not turn the fitting on the handlebar.
- Do not turn the handlebars in the clamping blocks.
- Turn knob A to set the most comfortable span:
- Setting 1: minimum span
- Setting 3: maximum span

Adjusting the handbrake lever

Warning:
To prevent air from entering the hydraulic circuit of the brake system:
- Do not turn the fitting on the handlebar.
-
Do not turn the handlebars in the clamping blocks.
-
Turn knob A to set the most comfortable span:
- Setting 1: minimum span
- Setting 4: maximum span
Work on the brake system

Warning:
To ensure reliability have all work on the brake systems carried out by a specialist workshop, preferably an authorised BMW motorcycle dealer.
Checking the brake system

Warning:
Sudden changes in play or spongy action of the brake lever indicate a fault in the brake system.
Before riding off, therefore, always check the resistance of the front and rear brake le-vers and test operation of the brakes.
Do not ride the motorcycle if you have any doubts about the safety of the brake system.
Immediately seek the advice of a specialist workshop, preferably an authorised BMW motorcycle dealer.
Checking brake pads

Warning:
Have the brake pads replaced before they wear to the minimum permissible thickness: have the work performed by a specialist workshop, preferably an authorised BMW motorcycle dealer.
Brake pad wear depends on your personal style of riding. To ensure reliable operation of the brakes: do not allow the pads to wear past the minimum specified thickness (→ Maintenance Instructions Chapter 2).
Checking brake fluid level
Gradual wear of the brake pads causes the brake fluid level in the reservoir to sink.

Warning:
If brake fluid level in the fluid reservoirs for the front or rear brakes has dropped below the MIN mark (31, 32) have the brake system checked without delay by a specialist workshop, preferably an authorised BMW motorcycle dealer.
Changing brake fluid

Warning:
Brake fluid is subject to severe thermal loads and absorbs moisture from the atmosphere.
Consequently, the brake fluid must be changed regularly (→ Maintenance Instructions, Chapter 1) by a specialist workshop, preferably an authorised BMW motorcycle dealer.

Checking front brake fluid level

Warning:
Never permit the brake fluid level to drop below the minimum level (MIN mark)
- Place the motorcycle on the centre stand
- Make sure the ground is level and firm
- Turn the handlebars all the way to the left.
- Check the brake fluid level in the sight glass
MIN minimum level (top edge of marking ring)

Note:
Gradual wear of the brake pads causes the brake fluid level in the reservoir to sink.
Brake system - without BMW Integral ABS

Checking rear brake fluid level

Warning:
Never permit the brake fluid level to drop below the MIN mark on the brake-fluid reservoir
- Place the motorcycle on the centre stand
- Make sure the ground is level and firm
- Check the brake fluid level MAX maximum level MIN minimum level

Note:
Gradual wear of the brake pads causes the brake fluid level in the reservoir to sink.
Checking brake fluid level

Warning:
On a motorcycle equipped with BMW Integral ABS, the brake fluid level in the reservoir does NOT drop as the brake pads wear (35, 36).

Warning:
If the brake fluid level in the reservoir (35, 36) has dropped below the specified MIN mark, have the brake system checked without delay by a specialist workshop, preferably an authorised BMW motorcycle dealer.
Changing brake fluid

Warning:
Brake fluid is subject to severe thermal loads and absorbs moisture from the atmosphere.
Consequently, the brake fluid must be changed regularly (→ Maintenance Instructions, Chapter 1) by a specialist workshop, preferably an authorised BMW motorcycle dealer.
Residual braking function

Warning:
When the ignition is switched off, before and during self-diagnosis (72) or if the BMW Integral ABS develops a fault, only a RESIDUAL BRAKING FUNCTION (71) remains available for slowing the motorcycle.
When the RESIDUAL BRAKING FUNCTION is active, you must apply CONSIDERABLY higher pressure to the brake levers in question in order to apply the brakes, and lever travel is longer.
When the RESIDUAL BRAK-ING FUNCTION is active, the ABS function is unavailable in the brake systems in question.

Warning:
When the RESIDUAL BRAK-ING FUNCTION is active, maintain a defensive riding style and proceed immediately to the nearest specialist workshop, preferably an authorised BMW motorcycle dealer.

Note:
When the RESIDUAL BRAKING FUNCTION is active at the front wheel, it is advisable to set adjuster A of the front-brake lever to position 4 (→27).

Checking front brake fluid level

Warning:
Never permit the brake fluid level to drop below the minimum level (MIN mark)
- Place the motorcycle on the centre stand
- Make sure the ground is level and firm
OE Optional extra
- Turn the handlebars all the way to the left.
- Check the brake fluid level in the sight glass
MIN minimum level (top edge of marking ring)

Note:
The brake fluid level in the brake fluid reservoir remains constant despite wear of the brake pads.
Brake system - with BMW Integral ABS OE

Checking rear brake fluid level

Warning:
Never permit the brake fluid level to drop below the MIN mark on the brake-fluid reservoir
- Place the motorcycle on the centre stand
- Make sure the ground is level and firm
- Check the brake fluid level MIN minimum level

Note:
The brake fluid level in the brake fluid reservoir remains constant despite wear of the brake pads.

2
37
Safety check
Checking fluid level in the clutch lever fitting

Attention:
If the fluid level drops, assume there is a defect in the clutch system.
Have the clutch system checked immediately by a specialist workshop, preferably an authorised BMW motorcycle dealer.

Warning:
Never permit the fluid level to drop below the minimum level (MIN mark)

Note:
The fluid level in the reservoir rises as the clutch wears.
- Place motorcycle on side stand
- Make sure the ground is level and firm
- Turn the handlebars fully to the right
- Check fluid level in sight glass MIN Minimum level (halfway up sight glass)

Checking lights

Attention:
Check that all lights are operational at the start of each journey.

Note:
If the turn indicator telltale light flashes at twice the usual speed: defective flasher bulb.
Motorcycle with BMW Integral ABS OE :
General warning light ON (→ 7): check the brake light and the rear light.
If the rear light is defective the brake light is dimmed and acts as a rear light. When you apply the brakes the brake light shines at full brightness.
To change bulbs in parking lights, headlight (low and high beams), rear/brake lights, turn indicators and the number-plate light:
(→ Maintenance Instructions, Chapter 2)
Masking off headlight
If the motorcycle is ridden in a country where the opposite rule of the road applies, its asymmetric low headlight beam will tend to dazzle oncoming traffic.
To prevent this, mask over part of the headlight glass (apply a piece of adhesive tape cut to the correct size and shape).
Adjusting beam throw

Note:
When the basic setting is correct, headlight beam throw is regulated when spring preload is adjusted to suit load.
Have the headlight basic setting adjusted by a specialist workshop, preferably an authorised BMW motorcycle dealer.

Note:
Adjust beam height so that oncoming traffic is not dazzled. Make sure that the throw of the light cone adequately illuminates the road ahead of you.

Adjusting to suit load:
- Change the spring strut setting to suit the load (42) - Spring preload has an effect on headlight throw Do not pivot the headlight down to adjust beam throw unless the motorcycle is heavily loaded. Procedure
- Remove cover 1 - Unfasten two screws 2
Readjust the headlight to the correct basic setting at the earliest possible opportunity.
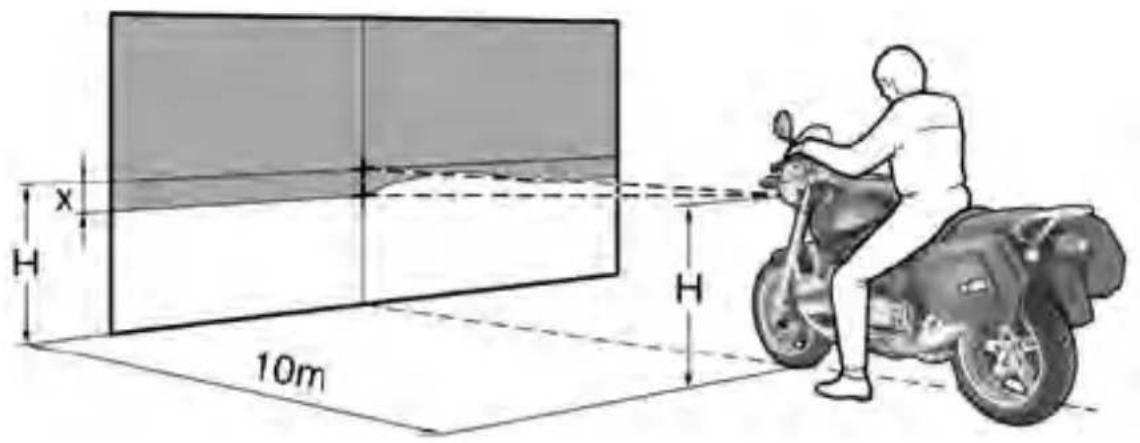
Headlight basic setting

Note:
Do not prop the motorcycle on the centre or side stand.
- Check tyre pressures and correct if necessary.
- Set the spring-strut adjuster to the position for one-up riding
- Position the motorcycle on a level surface 10 metres (headlight) from a light-coloured wall, and with the rider's weight (approx. 85 kg) on the seat
• Measure the distance H from the ground to the centre of the headlight -
Transfer this height H to the wall and draw a cross on the wall at this point
-
Draw a second cross (x = 25 cm) lower
- Switch on the low-beam headlight beam
- Align the headlight in such a way that the light-dark cut-off starts in the middle of the bottom cross and rises to the right to the height of the upper cross, before dropping again.

Note:
Have the headlight basic setting checked by a specialist workshop, preferably an authorised BMW motorcycle dealer.
Shock-absorber adjustment


Warning:
Before riding off, adjust the front shock absorbers to suit the surface and your style of riding. Adjust the rear shock absorber to suit the gross weight of the motorcycle plus load.
- Place the motorcycle on the centre stand
- Use a screwdriver to adjust the front/rear shock absorbers
Basic setting (one-up):
- Turn adjusting screw 1 or 2 all the way clockwise in the direction indicated by arrow H
- Back off adjusting screw 1 or, as applicable, 2 two turns counter-clockwise in the direction indicated by arrow S
Hard setting "H":
- Fully tighten adjusting screw 1 or, as applicable, 2
Soft setting "S":
- Fully back off adjusting screw 1 or, as applicable, 2


Warning:
Before the journey starts, adjust spring preload to suit gross weight.
For safety reasons, never attempt to alter spring preload while the motorcycle is being ridden.
Always bring the motorcycle to a stop before adjusting.
If spring preload is changed the shock absorber setting always has to be adjusted accordingly.
Adjusting spring preload
- Place the motorcycle on the centre stand
- Adjust spring preload at knob 1
Basic setting, one-up:
- Turn knob 1 as far as it will go counter-clockwise in the direction indicated by the "LOW" arrow
- Turn knob 1 one mark clockwise in the direction indicated by the "HIGH" arrow
Setting for two-up and luggage:
- Turn knob 1 as far as it will go clockwise in the direction indicated by the "HIGH" arrow

Warning:
Use only wheels and tyres that BMW Motorrad has approved for your motorcycle. For each size of tyre BMW tests certain makes, and approves those that it certifies as roadworthy.
If BMW Motorrad has not approved the wheels and tyres it cannot assess their suitability or provide any guarantee of road safety. You can obtain detailed information from your authorised BMW motorcycle dealer or by visiting
www.bmw-motorrad.com on the Internet.
Checking wheel rims

Warning:
Have damaged wheel rims checked and, if necessary, replaced by a specialist workshop, preferably an authorised BMW motorcycle dealer.
Checking tyre tread

Warning:
Comply with statutory legal requirements concerning minimum tread depth. Worn tyres can impair handling.
• Measure tread depth at the centre of the tyre tread
BMW's minimum tread depth recommendation:
Front 2 mm
Rear ....3 mm
Checking tyre pressures

Warning:
Incorrect tyre pressures have a considerable influence on handling and on tyre life.
Adjust tyre pressures to suit total weight. Never exceed either the motorcycle's gross weight or the individual wheel load limits (47).
- When tyres are cold:
- Remove valve caps
- Check/correct tyre pressure
Tyre pressures:
Front Rear
One-up 2.2 bar 2.5 bar
Two-up 2.5 bar 2.7 bar
Two-up
with luggage 2.5 bar 2.9 bar
- Fully tighten valve caps
Fully tightening valve caps

Warning:
At high road speeds, tyre valves have a tendency to open as a result of centrifugal force.
Use only metal valve caps with rubber seals.
Valve caps that are screwed on well prevent air from escaping suddenly.

Warning:
BMW cannot examine or test each product of outside origin on the accessories and tyres market to ensure that it can be used on or in connection with BMW motorcycles without constituting a safety hazard. Even approval by an official inspection authority or an official permit (General Operating Permit) cannot always provide this guarantee. Tests conducted by these instances cannot make provision for all operating conditions experienced by BMW motorcycles and consequently, they are not sufficient in some circumstances.

Note:
BMW accessories and other products approved by BMW can be obtained from your authorised BMW motorcycle dealer.

Correct loading

Warning:
Overloading can impair the handling of your motorcycle.
• Make sure that the weight is uniformly distributed between right and left
- Pack heavy items at the bottom and toward the inboard side
- Max. load in each case OA (left and right): 10 kg
- Max. load on luggage rack and in tank-top rucksack OA 5 kg each
- Check that fastenings are correctly positioned and tight

Warning:
With cases installed, it is advisable not to exceed 130 km/h


Attention:
Do not exceed the gross weight limit of 450 kg.
Do not exceed the wheel load limits of 180 kg at the front and 300 kg at the rear.
Set the shock absorbers, spring preload and tyre pressures to suit gross weight (41, 42, 44).
The gross weight consists of:
- Motorcycle with full tank
- Rider
- Passenger
- Luggage
Handling your motorcycle safely
Each motorcycle has a character all its own. It is time now for you to familiarise yourself with the way your own motorcycle behaves:
- Acceleration
- Roadholding
- Cornering
- Braking ...
These are all things you need to become familiar with.
Please remember too that if the motorcycle has not yet covered 1,000 kilometres, the engine is not yet fully run in.

Attention:
BMW Integral ABS OE incorporates a brake booster, so braking efficiency is significantly higher than with conventional brake systems.

Warning:
The tyres need to cover a certain distance before they acquire their full road grip (57).
If you ride at high speed, always bear in mind that various boundary conditions such as the spring preload setting and the shock absorber setting, an unbalanced luggage load, loose clothing, low tyre pressure, poor tyre tread, and so on, can affect the handling of your motorcycle.
Safe motorcycling does not depend on the motorcycle alone.
Your own skill and commonsense are needed too.
The key to genuine safety on the road is a sensible balance between the motorcycle's technical features and the rider's skill, so that together they form a single efficient unit.
Riding safely in traffic calls for a sense of responsibility to your passenger and to other road users.

Warning:
Do not ride the motorcycle after drinking alcoholic beverages. Even small amounts of alcohol or drugs, particularly if taken in conjunction with medicines, will adversely affect your perception and your ability to assess situations and make decisions, and also slow down your reflexes.
Take to the road now by all means, but think carefully about everything you do.
BMW Integral ABS OE
Motorcycle equipped with BMW Integral ABS (68)

Warning:
When the ignition is switched off or if the BMW Integral ABS fails, only a RESIDUAL BRAKING FUNCTION remains available for slowing the motorcycle (71).
Under these circumstances you must apply CONSIDERABLY higher pressure to the brake levers in order to apply the brakes, and lever travel is longer
OE Optional extra
Risk of poisoning
Exhaust fumes contain carbon monoxide, which is colourless and odourless but highly toxic.

Warning:
Inhaling the exhaust fumes therefore represents a health hazard and can even cause loss of consciousness with fatal consequences.
Do not run the engine in an enclosed space.
Risk of fatal accident
Your motorcycle is equipped with a digital engine management system (Motronic) and a high-power ignition system.

Warning:
When the engine is running or the ignition switched on, never touch electrically live parts of the ignition system or the digital engine electronics.
Catalytic converter

Attention:
To avoid damage to the catalytic converter:
- Do not run the fuel tank dry
- Push-start only when the engine is cold
- Do not run the engine with a spark-plug cap disconnected
- Do not exceed the engine-speed limits marked on the revolution counter
- Comply with all specified maintenance intervals
- Stop the engine at once if it misfires
- In the event of misfiring or a severe drop in engine power, consult a specialist workshop, preferably an authorised BMW motorcycle dealer If misfiring or malfunction of the fuel-air mixture preparation system causes unburned fuel to reach the catalytic converter, there is a risk of it overheating and being damaged.
Risk of fire
High temperatures occur at the exhaust system, particularly if a catalytic converter is installed.

Warning:
Make sure that whether riding or standing still or when the motorcycle is parked, no easily flammable material (for example hay, grass, leaves, clothing or luggage etc.) can come into contact with the hot exhaust system.
Do not allow the engine to idle unnecessarily or for prolonged periods of time
- risk of overheating or fire.
Ride away immediately after starting the engine.

Placing motorcycle on side stand

Warning:
For safety reasons, never sit on the motorcycle with the side stand extended.

Attention:
Stop the engine before using the side stand.
Make sure the surface under the stand is firm.
On a gradient, the motorcycle should always face uphill; select 1st gear.
- Switch off the ignition
- Keep both feet on the ground
- Hold the left handlebar grip with your left hand
- Keep your right hand on the right handlebar grip and the handbrake lever
- Hold the motorcycle upright and balanced
- Use your left foot at the extension pin to extend the side stand fully (arrow)
- Slowly lean the motorcycle to the side until its weight is taken by the stand and dismount
- Turn the handlebars to full left lock (→ 9)
- Check that the motorcycle is firmly supported

Removing motorcycle from side stand

Warning:
Note that on a motorcycle fitted with BMW Integral ABS OE only a RESIDUAL BRAKING
FUNCTION (71) is available if the ignition is switched off.
Make sure the side stand is fully retracted before you ride off.
- Allowing the motorcycle to roll with the side stand extended represents a safety risk.
- Turn the ignition key to the "R" or "ON" position (9) - Handlebars unlocked
- Both feet on the ground, no weight on the motorcycle
- Hold the left handlebar grip with your left hand
- Keep your right hand on the right handlebar grip and the handbrake lever
- Slowly raise the motorcycle to the upright position and keep it balanced
- Sit on the motorcycle and use your left foot to retract the side stand
OE Optional extra

Placing motorcycle on centre stand

Warning:
For safety reasons, never sit on the motorcycle with the centre stand extended.

Attention:
Stop the engine before using the centre stand.
Make sure the surface under the stand is firm.
- Switch off the ignition
- Hold the left handlebar grip with your left hand
- Hold the frame with your right hand
- Place your right foot on the extension pin of the centre stand and press it down until the curved shoes of the stand touch the ground
- Place your right foot on the tread surface of the centre stand
- Apply all your body weight to the centre stand
- Pull the motorcycle to the rear and upwards (arrow) until it rests on the centre stand
- Check that the motorcycle is firmly supported

Removing motorcycle from centre stand

Warning:
Note that on a motorcycle fitted with BMW Integral ABS OE only a RESIDUAL BRAKING FUNCTION (71) is available if the ignition is switched off. Make sure the centre stand is fully retracted before you ride off.
- Turn the ignition key to the "R" or "ON" position (9)
- Handlebars unlocked
- Hold the left handlebar grip with your left hand
- Hold the frame with your right hand
- Push the motorcycle forward off the centre stand
- Check that the centre stand has fully retracted
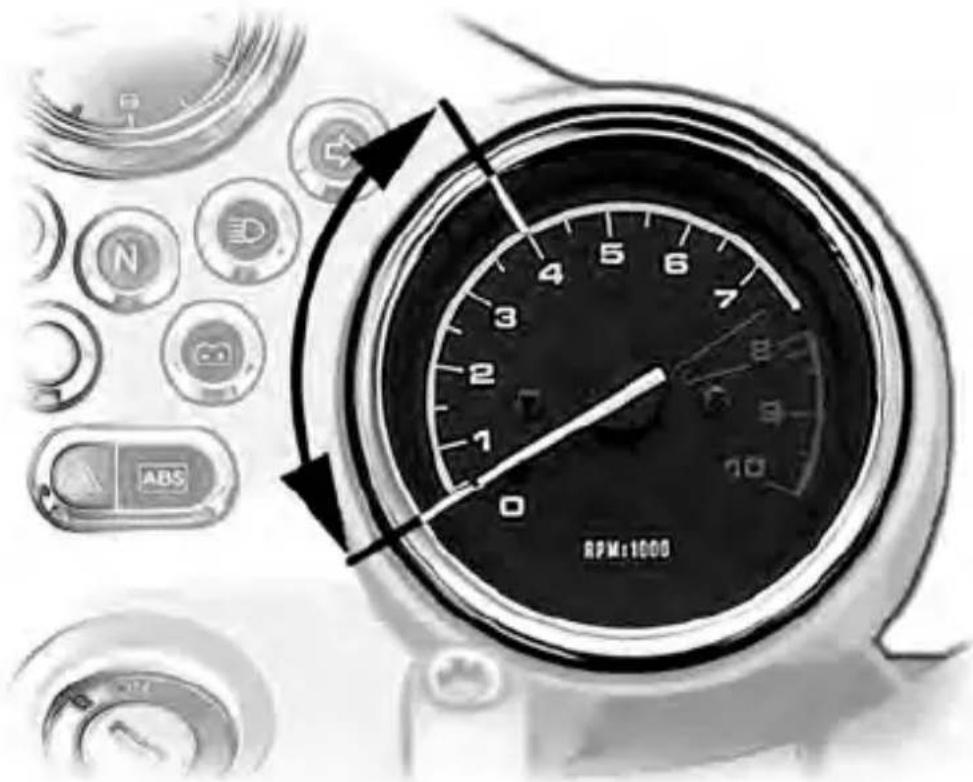

Attention:
Exceeding the specified engine speeds while running in will lead to increased engine wear.

Note:
While running in the motorcycle, vary the throttle opening and engine-speed range frequently.
Try to do most of your riding during this initial period on twisting, fairly hilly roads rather than high-speed main roads and highways.
Running-in engine speeds From 0 to 1,000 km
• Engine speed max. 4,000 rpm and no full-load acceleration
- Do not omit the first inspection after 1,000 km
Make an appointment with your authorised BMW motorcycle dealer in good time, so that the work can be performed punctually.
From 1,000 to 2,000 km
• Engine speeds can be gradually increased after 1,000 km
- Avoid lengthy periods at full load until 2,000 km have been covered
Running in new brake pads

Warning:
New brake pads must "bed down" and therefore do not achieve their optimum friction levels during the first 500 km. This slight initial reduction in braking efficiency can be compensated for by exerting greater pressure on the lever. Try to avoid all unnecessary hard braking during this initial period.

Attention:
Comply with the notes on BMW Integral ABS OE (68-75).
Running in new tyres

Warning:
New tyres have a smooth surface. This must be roughened by riding in a restrained manner at various heel angles until the tyres are run in. This running in procedure is essential if the tyres are to achieve maximum grip.

Switch on the ignition
- Move the kill switch to the run position A
- Ignition switch ON (→ 9)
In an emergency only:
- Move switch 1 to the B position.
- The Motronic, fuel pump and starter motor electrical circuits are de-energised

Note:
If you move the kill switch to the B position while the ignition is on (switch in ON position, the BMW Integral ABS OE remains operational (68-75).

Fully retract the side stand

Note:
If the side stand is extended and a gear engaged, you cannot start the motorcycle.
Select neutral
- Neutral indicator light 1 green N on ( → 7).

Note:
Engine does not start:
- Move the gear lever to the |N| position or disengage the clutch
Engine stops when first gear is engaged:
- Fully retract the side stand; if necessary, consult the troubleshooting chart (→ Maintenance Instructions, Chapter 2)

Starting

Attention:
If you attempt to start the engine when the battery is flat, you will hear the relay chattering. Further attempts will damage the starter relay and starter motor.
Before trying again: recharge the battery.

Warning:
Do not warm up the engine with the motorcycle at a standstill – risk of overheating or fire.
Ride away immediately after starting the engine.
To avoid overheating the air-cooled engine and possible damage as a result, avoid even short warm-up periods at a standstill.
Avoid high engine speeds after a cold start.
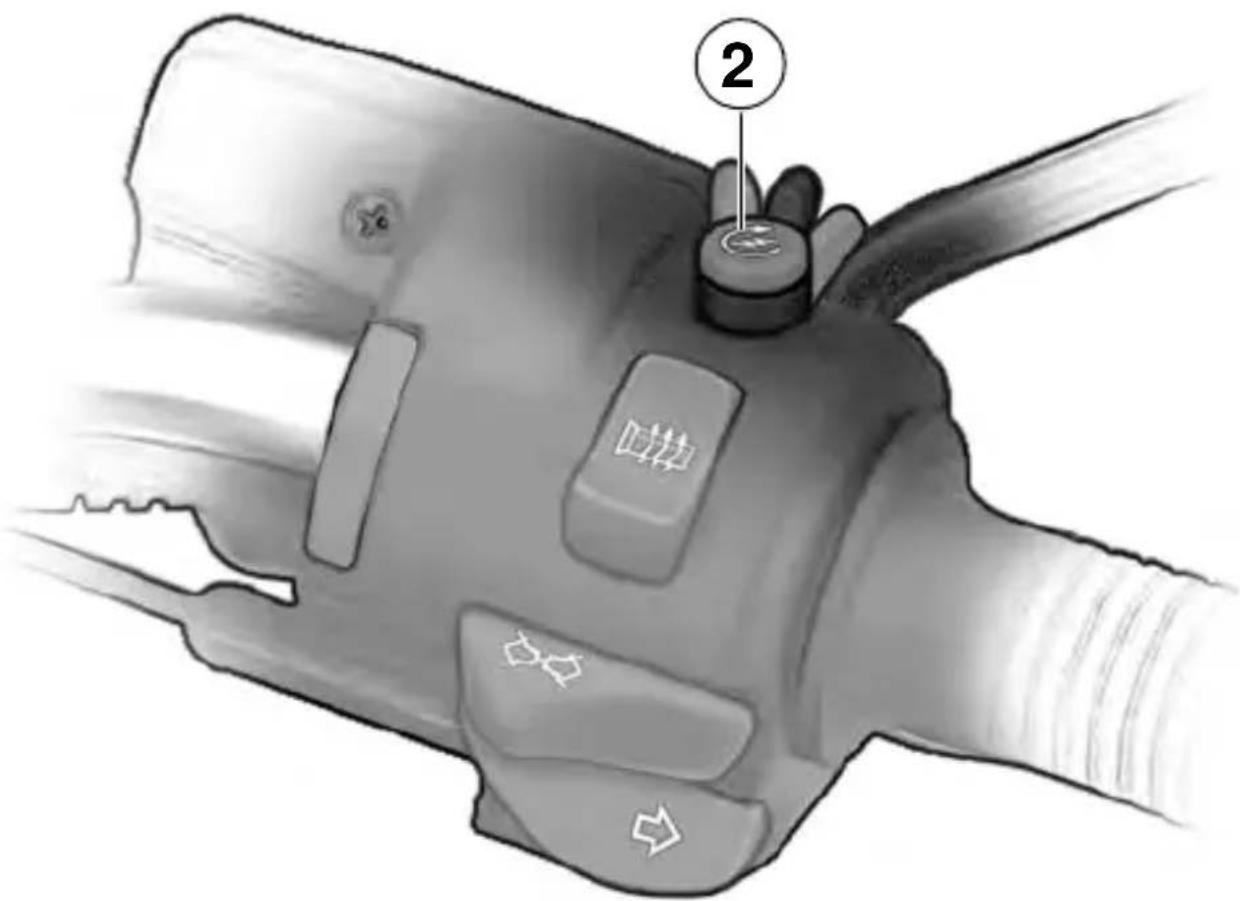

Note:
Do not turn the throttle twistgrip when starting the engine.
Using fast idle
- Set lever 1 for cold starting:
- Lever up in position A: cold starting
- Lever down in position C: engine at operating temperature
- Pull lever 1 up to position A (arrow) and hold it in this position while starting the engine
- Press starter pushbutton 2
- The engine starts
- Turn the throttle twistgrip carefully
- Release lever 1
- Lever 1 in position B
- Return lever 1 for cold starting to position C as soon as possible (when engine is firing regularly)

Low fuel level
When warning light 1 comes on, there are still approximately 5 litres of fuel in the tank.
Engine oil pressure
Warning light 2 goes out above idle speed.

Attention:
If warning light 2 comes on during the journey, take the following action as soon as traffic conditions permit:
- Disengage the clutch
- Operate the kill switch
- Bring the motorcycle safely to a halt
- Check engine oil level (→ 22)
If the warning light comes on but the oil level is correct, always consult a specialist workshop without delay, preferably an authorised BMW motorcycle dealer.

Warning light, general
General warning light 3 lights up if the BMW Integral ABS OE develops a fault (75), or if the tail light or brake light is defective.
ABS warning light OE
ABS warning light 4 lights up if the BMW Integral ABS develops a fault (75)
OE Optional extra
Battery charge light
Warning light 5 goes out above idle speed.

Attention:
If telltale light 5 comes on during the journey:
consult a specialist workshop, preferably an authorised BMW motorcycle dealer.
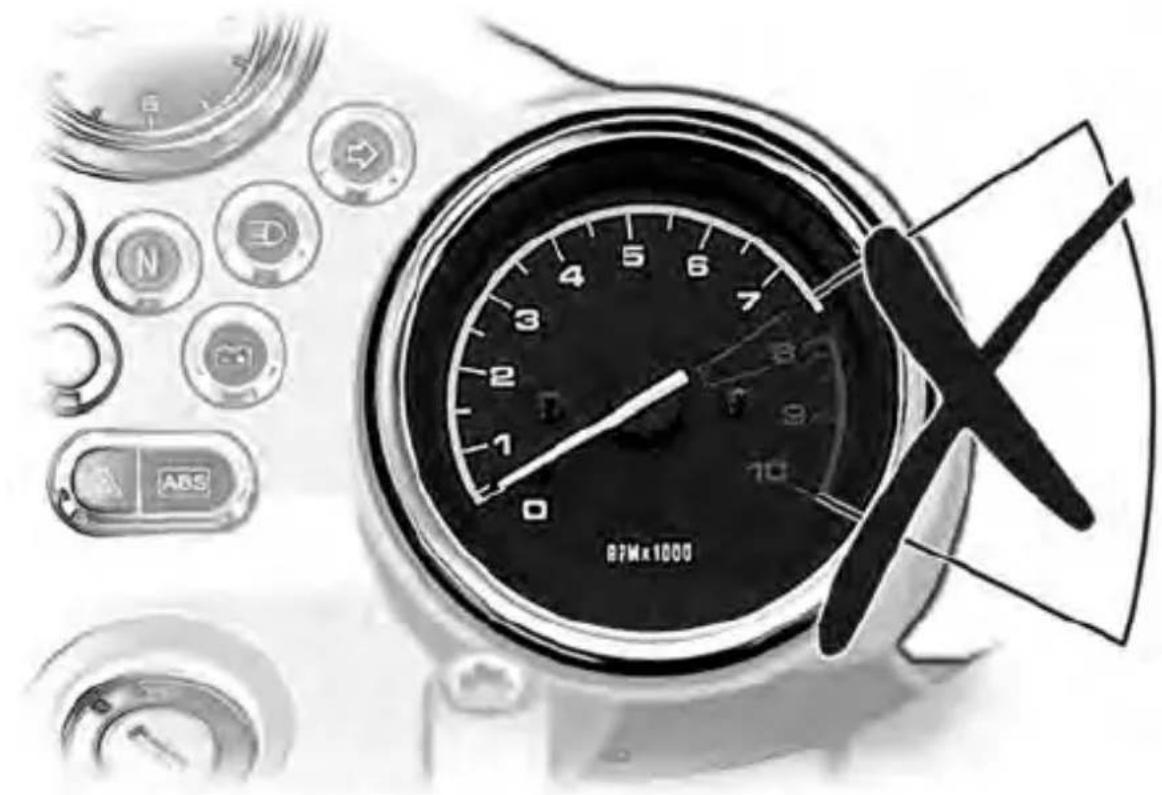
Engine speed
Limit engine speed in accordance with engine temperature, using the highest engine speeds only when the engine has reached its regular operating temperature.
When the revolution counter needle enters the red zone on the dial, the fuel supply is interrupted in order to protect the engine against overspeeding.

Note:
The governor cuts in at 7,900 rpm.
Load changes

Warning:
Try not to open or close the throttle abruptly, particularly on wet or slippery roads.
Gear shifts

Note:
Never slip the clutch excessively when changing gear. Vary your speed only by using the throttle in a suitable gear, not by slipping the clutch.

Moving away/upshifts:
- Pull the clutch lever in
- Press down on the gearshift lever (to select first gear) and take your foot off the lever
- Smoothly re-engage the clutch
- Increase engine speed slightly as necessary
- Accelerate when the clutch is fully engaged
- For upshifts into 2nd, 3rd, 4th, 5th and 6th gears, pull the front of the gear lever up
Downshifts:
- Close the throttle (twistgrip)
- Pull the clutch lever in
- Select the next-lower gear: (opposite direction to arrow)
- Smoothly re-engage the clutch
Wet brakes
After the motorcycle has been washed, ridden through water or ridden in the rain, the brake discs and pads may be wet (or iced-over in winter), and may not take effect immediately.

Warning:
The brakes have to dry before they start to bite.
Salt on brakes
The full braking effect can be delayed if the motorcycle is ridden on salt-covered roads and the brakes are not applied for some time.

Warning:
The layer of salt on the brake discs and pads has to be worn off before the brakes start to bite.
Oil and grease on brakes

Warning:
Brake discs and pads must be free from oil or grease.
Dirt or mud on brakes
When riding on loose surfaces or muddy roads, the brakes may fail to take effect immediately because of dirt or moisture on the discs or brake pads.

Warning:
The brakes must first be applied until the discs and pads are clean.
Dirt on the brakes increases the rate of pad wear.

Warning:
If the brake lever can be moved right to the limit of its travel, this indicates a mechanical or hydraulic fault. The brake system is defective.
Immediately consult a specialist workshop, preferably an authorised BMW motorcycle dealer.
Sensitive electronic control
It takes skill and sensitive control of the brakes to pull up safely on a motorcycle. If the front wheel brake locks and the wheel skids, the necessary longitudinal and lateral stabilising forces are lost, and a fall can result.
For this reason, the rider seldom makes full use of available braking performance in an emergency.
OE Optional extra
BMW Integral ABS is the latest-generation BMW ABS development: by preventing both wheels from locking and optimising braking-force distribution by means of the integral function, it offers much improved braking performance (70). Full use is made of technical braking capacity to minimise braking distances, even when road conditions are poor. When the motorcycle is ridden in a straight line, the BMW Integral ABS is able to handle emergency braking safely.
Extra safety reserves
But remember: the potentially shorter braking distances which BMW Integral ABS permits must not be used as an excuse for careless riding. ABS is primarily a means of ensuring a safety margin in genuine emergencies.
- You have to familiarise yourself with the new, electronically assisted braking. Try the brakes several times when you take your motorcycle out for the first time. Find out for yourself how the brakes feel
- Never ride without due care and attention, or assume that good fortune will protect you from your own foolhardiness
- Keep within the permitted speed limits
- Take care when cornering. When you apply the brakes on a corner, the motorcycle's weight and momentum take over and even BMW Integral ABS is unable to counteract their effects.
OE Optional extra
Partially integral brakes
The integral brake function interlinks the front and rear brakes, so both wheels are braked when you operate the brake lever.
The electronic controller in the BMW Integral ABS computes the braking-force distribution between front and rear wheels, and applies the brakes accordingly.
Braking-force distribution depends on load and is recalculated every time the ABS controller comes into action. In this partially integral brake configuration the integral braking function is activated only when you pull the handbrake lever. The footbrake lever acts only on the rear brake.
Brake servo
The hydraulic pump in the BMW Integral ABS actively boosts the braking force acting on the wheel when the brakes are applied.
By boosting the braking force in this way, BMW Integral ABS achieves higher braking efficiency than conventional brake systems.
ABS - anti-lock brake system
ABS prevents the wheels locking under heavy braking when the motorcycle is travelling in a straight line, thus contributing significantly to road safety.
RESIDUAL BRAKING FUNCTION
If the BMW Integral ABS develops a fault, a RESIDUAL BRAKING FUNCTION only is available in the brake circuits in question. The RESIDUAL BRAKING FUNCTION is the braking efficiency without the hydraulic servo assistance of the BMW Integral ABS.
Under these circumstances, therefore, you must apply CONSIDERABLY higher pressure to the brake levers in question in order to apply the brakes, and lever travel is longer.
When the RESIDUAL BRAKING FUNCTION is active, the ABS function is unavailable in the brake system in question. When the RESIDUAL BRAKING FUNCTION is active, the integral braking function is partially or entirely unavailable.

Warning:
When the RESIDUAL BRAK-ING FUNCTION is active, maintain a defensive riding style and proceed immediately to the nearest specialist workshop, preferably an au-

Note:
When the RESIDUAL BRAKING FUNCTION is active at the front wheel, it is advisable to set adjuster A of the front-brake lever to position 4 (27).
The RESIDUAL BRAKING FUNCTION is active under the following circumstances:
- Ignition off
- Before and during self-diagnosis (72)
- Fault in the BMW Integral ABS (75)

Note:
When the RESIDUAL BRAKING FUNCTION is active for both brake circuits, the noise of the pump is no longer audible when you operate the brake levers.

Optional extra

Self-diagnosis with pull-away test
The BMW Integral ABS performs self-diagnosis and a pull-away test to ensure its operability.
Self-diagnosis is performed automatically when you switch on the ignition.

Warning:
Self-diagnosis is not performed unless both brake levers are in their fully released positions.
Only the RESIDUAL BRAKING FUNCTION is available until self-diagnosis is completed (71).
- Release the brake levers, if necessary
- Switch on the ignition Initially:
- ABS warning light 2: Flashes at 4 Hz
- General warning light 1: ON
Self-diagnosis is in progress
Then:
- ABS warning light 2: Flashes at 1 Hz
- General warning light 1: OFF
Self-diagnosis successfully completed
OE Optional extra

- Start the engine.
- Move off
- ABS warning light 2:
OFF (as of approx. 5 km/h road speed)
Pull-away test successfully completed
BMW Integral ABS is available

Note:
Starting on gradients:
Always switch on the ignition with gear engaged, clutch lever released and both brake levers released.
Self-diagnosis cannot be performed if you do not follow this procedure.
When self-diagnosis completes, apply the brakes, disengage the clutch, and start the engine.

Note:
Flashing at 1 Hz = 1 flash per second (slow flashing) Flashing at 4 Hz = 4 flashes per second (fast flashing)
OE Optional extra


Warning:
If the BMW Integral ABS fails in both brake circuits, a RESIDUAL BRAKING FUNCTION only is available. (71)

Warning:
If the RESIDUAL BRAKING FUNCTION (71) is active, maintain a defensive riding style and proceed immediately to a specialist workshop, preferably an authorised BMW motorcycle dealer.
OE Optional extra

Warning:
If there is a fault in the ABS system, the reserves of safety normally afforded by ABS are not available until the defect has been put right.
There is a risk of dropping the motorcycle if the brakes are applied too hard and the wheels lock or the rear wheel lifts clear of the ground as a result of a high level of tyre adhesion. Have the defect rectified immediately by a specialist workshop, preferably an authorised BMW motorcycle dealer.
BMW Integral ABS OE - Troubleshooting chart
| Warning light, general △ | ABS warning light ABS | Malfunctions |
| OFF ON Only R | RESIDUAL BRAKING FUNCTION available in both circuits (71) | |
| OFF Flashing at | 1 Hz | ABS not available Pull-away test not completed (72) |
| OFF Flashing at | 4 Hz | Only RESIDUAL BRAKING FUNCTION available in both circuits (71) Self-diagnosis not completed (72) |
| ON OFF Rear light/brake light defective (Maintenance Instructions, Chapter 2) | ||
| ON Flashing at | 1 Hz | At least one brake circuit without ABS (70) |
| ON Flashing at | 4 Hz | At least one brake circuit in RESIDUAL BRAKING FUNCTION mode (71) |
| Alternate flashing at 1 Hz | Alternate flashing at 1 Hz | Fluid level in BMW Integral ABS too low. Check the motorcycle as follows: Ignition OFF: is brake pressure OK at the brake levers? Are the brakes acting on both wheels? Is the brake system leaktight, no signs of brake fluid escaping? The brake system is defective if the test outcome is negative. |
| Alternate flashing at 4 Hz | Alternate flashing at 4 Hz | Fluid level in the BMW Integral ABS is too low, perform the checks listed above. Only RESIDUAL BRAKING FUNCTION available in at least one circuit (71)  Warning: Do not ride the motorcycle if you have any doubts about the dependability of the brake system. Warning: Do not ride the motorcycle if you have any doubts about the dependability of the brake system. |
OE Optional extra
Know how...
In recent years, motorcycles' technical design features have become more and more sophisticated.
Motronic, electronic ignition, integral brakes, the catalytic converter or the use of four valves per cylinder are clear signs that far more than basic technical knowledge may be needed to solve certain problems. In addition, high-tech materials are increasingly taking the place of conventional ones, which again calls for thorough and expert knowledge if they are to be handled correctly during repair work.
To be sure of achieving the necessary standard, it is always advisable to consult your authorised BMW motorcycle dealer.
The authorised BMW motorcycle dealer employs staff who attends regular and comprehensive training courses.
Authorised BMW motorcycle dealers also receive all the current technical information and are therefore fully aware of the latest developments.
...technical features...
The authorised BMW motorcycle dealer's staff has the experience and all the necessary facts at its disposal when it comes to solving problems quickly and effectively. Workshops are equipped with the latest technical facilities, for example the special tools developed by BMW, such as the BMW diagnostic system and exhaust emissions tester.

Regular visits to the workshop for routine servicing are strongly recommended even after the warranty period has elapsed. They are the only way to be genuinely certain that your BMW motorcycle is being kept in perfect working order.
For generous treatment of claims submitted after the warranty period has expired, evidence of regular maintenance by an authorised BMW motorcycle dealer is essential.
Certain signs of wear may not otherwise be noticed until it is too late to put them right at moderate cost.
The staff in the authorised BMW motorcycle dealer's workshop know every detail of your motor-cycle and can take remedial action if necessary before minor faults develop into serious problems. By having the necessary repairs done properly and in good time, you save time and money in the long run.
...service
You can obtain accurate advice in all cases, and make appointments with a firm completion deadline which we will comply with punctually. But the most gratifying feeling of all is that your BMW is in genuinely good shape when it leaves the authorised BMW motorcycle dealer's workshop – and above all, safe.
BMW Service Card
A Service Card is available for all new BMW motorcycles.
A wide range of emergency-assistance services are in place to help you in the unlikely event of a problem occurring somewhere far from home.
If you have a breakdown anywhere in Europe, just call our Central Emergency Service number from any telephone.
Our experts are on duty there day and night to arrange assistance for you. They can provide practical advice on what to do next and can make arrangements on your behalf, for example notifying local emergency services anywhere in Europe, arranging recovery and transportation of the motorcycle to the nearest authorised BMW motorcycle dealer, a taxi for you, and even a replacement vehicle and hotel accommodation, if necessary.
BMW Service worldwide
And if your travels take you even further afield, you have no need to worry: we are represented in more than 100 countries of the world.

Note:
Call us if you have any questions about the BMW dealership network. You can contact us from any European country on a telephone hotline. The phone numbers are listed in the "Service Kontakt / Service Contact" booklet (see on-board documentation). Or if you prefer you can use the homepage address to contact us on the Internet.
Development...
Motorcyclists have an intensive relationship with nature. BMW has made sure that they continue to enjoy the best possible prospects for successful riding in the future.
For instance, your new Boxer is available with exhaust emission control by closed-loop, three-way catalytic converter.
...waste disposal...
Behind the scenes, in the repair shop, we do not neglect the pro-environmental aspects of our work either.
Wherever possible, we use environmentally acceptable biodegradable materials. We ensure strict compliance with all environmental legislation, for example the correct disposal of old oil, which is now classified as hazardous waste in many countries.
...recycling
Alongside the correct disposal of environmentally hazardous materials, recycling is another high-priority issue for BMW. For example, plastics that are marked according to type can more easily be returned to the materials cycle. Remember: when it comes to making repairs to your motorcycle, the authorised BMW motorcycle workshop is far better equipped to protect the environment than you are at home.

The essentials
To reach your destination safely every time, there is only one choice:
- Helmet
- Suit
- Gloves
- Boots
It is foolhardy to ride without these items of clothing. This even applies to short journeys, and to every season of the year.
Well-planned riding pleasure
Many motorcyclists have learned the hard way that the proper clothing contributes so much to riding pleasure. You must feel comfortable and relaxed – and your own safety must never be endangered. There is no doubt about it: when buying motorcycling clothing, you simply cannot set your sights too high. It is good to know that the BMW brand can be trusted to supply you with safe, high-quality rider's clothing as well.
Information on the latest products is always available from your authorised BMW motorcycle dealer.

Always an idea ahead
This is our motto – and it is one we live up to. For many years now, BMW has offered the enthusiast everything capable of enhancing the fascination of motorcycling. A unique programme that is regularly updated and offers plenty of scope for choosing items according to individual preferences.
Ask your authorised BMW motorcycle dealer for the latest upgrades and retrofits.
Every accessory product is made to the same exemplary standards of design, function and quality as the motorcycle itself. This calls for a great deal of experience, but our engineers are themselves enthusiastic motorcyclists who know what is needed. Accessories and motorcycle equipment are included when a new motorcycle is being developed, and their practical features optimised in a series of thorough tests. This is your guarantee of the high quality you expect from BMW.
Cornering and braking need to be practiced
Develop a "sixth sense" for potentially dangerous situations. What this means: look ahead, plan how to avoid possibly dangerous situations and study other road users' behaviour with a degree of healthy scepticism.
- Take bends smoothly and rhythmically, avoiding violent braking and acceleration
- Approach bends slower than you feel they can be taken; a neat riding style will get you to your destination more safely than sheer speed
- Ride at the inner edge of the ideal line, look ahead and plan to leave the bend as smoothly as you entered it
Allow for reaction time when judging braking distances.
- at a speed of 50 km/h, for instance, one second's hesitation means that about 14 meters are covered additionally before the brakes are applied
- At 90 km/h, this distance grows to 25 metres
Practice applying the brakes with and without an extra load on the motorcycle, and study its reactions on various kinds of road surface.
Work up to the wheel lock limit gradually.
BMW has a worthwhile safety contribution to make in this area too – BMW Safety Training.
These programmes are a wonderful opportunity: systematic basic and follow-up training enables you to master situations close to the limit and keep your motorcycle under supreme control whatever happens.
Now it's your turn
- Regular care is important, with all functions checked before the journey starts
- Use only genuine BMW accessories. These satisfy all safety requirements and are precisely matched to your BMW motorcycle.
- Your authorised BMW motorcycle dealer is best placed to service your motorcycle
- Do not under any circumstances install unapproved accessories: They may give rise to a safety risk, and invalidate your insurance policy and the motorcycle's general operating permit
- Technical modifications should always be entrusted to the trained specialists employed by your authorised BMW motorcycle dealer.

Note:
Your authorised BMW motorcycle dealer can supply you with useful items to accompany the Maintenance Instructions.
- BMW Repair Manual
- BMW set of circuit diagrams
It is good to know you have thought of everything, isn't it?
Our aim is to make your journey safer
We want you to reach your destination safely – and for riding your BMW Boxer to be the most delightful leisure pastime in the world!
A
ABS - anti-lock brake system, 70
Adjusting beam throw, 38
Adjusting front seat, 14, 15, 16
Anti-lock brake system
Notes, 68, 70, 71, 72, 73, 74, 75
B
BMW Integral ABS
Changing brake fluid, 33
Checking brake fluid level, 33
Troubleshooting chart, 75
Brake fluid level
Check
Front brakes, 31, 35
Rear brakes, 32, 36
Brake servo, 70
Brake system
With BMW Integral ABS, 33, 34, 35, 36
Without BMW Integral ABS, 30, 31, 32
Brake system, general, 28, 29
Brake-fluid level
Check, 30
Braking, precautions, 66
C
Capacity, 25
Catalytic converter, 51
Safety instructions, 51
Centre stand, 54, 55
Changing brake fluid, 30
Checking brake fluid level, 30
Checking brake pads, 29
Checking the brake system, 28
Choke
Cold start, 61
Cold-start lever, 12
Choke (cold-start lever)
Operation, 61
Clock, 10
Closing system cases, 18
Clutch
Fluid level, 37
Clutch lever, 26
Cockpit
Overview, 6
Cold-start lever (choke)
Position, 12
E
Emergency off (kill) switch for ignition, 13
Engine oil, 23
Oil filler neck, 4, 23
Engine oil level sight glass, 4
Engine oil pressure
Telltale light, 62
F
Flashing turn indicator switch
Left, 12
Right, 13
Front brake
Brake fluid level, 35
Brake lever, 27
Brake-fluid reservoir, 5
Front brakes
Brake fluid level, 31
Fuel
Octane number, 25
Refuelling, 24
Fuel filler cap, 5
Fuse box, 5
G
Gear shifts, 64, 65
Gearbox in neutral, 59
General view
Left side, 4
Right side, 5
H
Handlebar fitting
Left, 12
Right, 13
Handlebar lever
Brake lever, 27
Clutch lever, 26
Handlebar levers, 26
Hazard warning flashers, 11
Heated handlebar grips, 11, 13
Hemet holder, 16
High/low (dipped) headlight
switch, 12
Horn push, 12
Hydraulic fluid
Clutch, 37
|
Ignition switch and steering
lock, 6
Function, 8, 9
Installing system cases, 19
Instruments in cockpit, 6
L
Lights
Beam throw, 38
Notes, 38
M
Motorcycle equipment, 81
N
Neutral (transmission), 59
O
Octane number, fuel, 25
Odometer, 6
Oil filler neck, 4, 23
Oil level
Check, 23
Engine oil pressure, 7, 62
Oil level sight glass, 4
Opening system cases, 17
Overheating, 51, 60
P
Partially integral brakes, 70
Power socket, 12 V, 4
R
Rear brake
Brake-fluid reservoir, 5
Refuelling, 24
Removing system cases, 18
Residual braking, 34
Residual braking function, 71
Revolution counter, 6
Rider's equipment, 80
Riding, 64
Rims, 43
Running in, 57
S
Safety check, 20
Safety instructions
Catalytic converter, 51
General, 50, 51
Seat lock, 4
Service worldwide, 78
Shock absorber, 41
Side stand, 52, 53
Speedometer, 6
Spring preload
Front wheel, 42
Spring strut, 4
Starter pushbutton, 13
Starting, 60
Stowage compartment for toolkit, 5
Switching on ignition, 58
System cases, 17, 18, 19
T
Telltale and warning lights
ABS, 7, 63
Battery charge current, 7, 63
Engine oil pressure, 7, 62
Fuel level, 7, 62
High-beam headlight, 7
Neutral, 7
Turn indicator, left, 7
Turn indicator, right, 7
Toolkit, 5
Tools, 5
Tread depth, tyres, 43
Trip meter, 6
Troubleshooting chart, 75
Troubleshooting, ABS, 75
Turn indicator cancel switch, 13
Turn indicators
Telltale lights, 7
Type plate, 5
Tyres
Running in, 57
Tyre pressures, 44
V
Valve caps, 44
W
Warning, 7
Warning lights
ABS, 7, 63
Battery charge current, 7, 63
Engine oil pressure, 7, 62
Fuel level, 7, 62
General, 7, 63
i
87
index

Details described or illustrated in this booklet may differ from the motorcycle's actual specification as purchased, the accessories fitted or the national-market specification. No claims will be entertained as a result of such discrepancies. Dimensions, weights, fuel consumption and performance data are quoted to the customary tolerances. The right to modify designs, equipment and accessories is reserved. Errors and omissions excepted. © 2004 BMW Motorrad Not to be reproduced either wholly or in part without written permission from BMW Motorrad, After Sales. Printed in Germany
BMW Motorrad Printed information
Order No.: 0141 7 685 651 04.2004 1st edition GB / RF

The Ultimate Driving Machine

- RIDER'S MANUAL
- R 850 R COMFORT
- WARNING
- ATTENTION
- NOTE
- WELCOME TO BMW
- GENERAL INFORMATION AND CONTROLS
- SAFETY CHECK
- STARTING – RIDING – PARKING
- ARRIVE SAFELY
- GENERAL VIEW, LEFT SIDE
- COCKPIT
- IGNITION SWITCH AND STEERING LOCK
- KEYS
- KEY POSITIONS
- TRIP METER
- RESETTING
- CLOCK
- SETTING THE TIME
- HAZARD WARNING FLASHERS
- SWITCHING ON THE HAZARD WARNING FLASHERS
- SWITCHING OFF THE HAZARD WARNING FLASHERS
- LOCKING SEAT
- REMOVING SEAT
- ADJUSTING FRONT SEAT
- HELMET HOLDER
- OPENING SYSTEM CASES
- CLOSING SYSTEM CASES
- REMOVING SYSTEM CASES
- INSTALLING SYSTEM CASES
- USE THE SAFETY CHECKLIST – BEFORE EVERY JOURNEY
- CHECKING OIL LEVEL
- REFUELLING
- CAPACITY
- ADJUSTING CLUTCH LEVER
- ADJUSTING THE HANDBRAKE LEVER
- CHECKING BRAKE PADS
- CHECKING BRAKE FLUID LEVEL
- CHANGING BRAKE FLUID
- CHECKING FRONT BRAKE FLUID LEVEL
- BRAKE SYSTEM - WITHOUT BMW INTEGRAL ABS
- CHECKING REAR BRAKE FLUID LEVEL
- RESIDUAL BRAKING FUNCTION
- BRAKE SYSTEM - WITH BMW INTEGRAL ABS OE
- CHECKING FLUID LEVEL IN THE CLUTCH LEVER FITTING
- CHECKING LIGHTS
- MASKING OFF HEADLIGHT
- ADJUSTING BEAM THROW
- ADJUSTING TO SUIT LOAD
- HEADLIGHT BASIC SETTING
- SHOCK-ABSORBER ADJUSTMENT
- BASIC SETTING (ONE-UP)
- HARD SETTING "H
- SOFT SETTING "S
- ADJUSTING SPRING PRELOAD
- BASIC SETTING, ONE-UP
- SETTING FOR TWO-UP AND LUGGAGE
- CHECKING WHEEL RIMS
- CHECKING TYRE TREAD
- CHECKING TYRE PRESSURES
- WHEN TYRES ARE COLD
- TYRE PRESSURES
- FULLY TIGHTENING VALVE CAPS
- CORRECT LOADING
- HANDLING YOUR MOTORCYCLE SAFELY
- BMW INTEGRAL ABS OE
- RISK OF POISONING
- RISK OF FATAL ACCIDENT
- CATALYTIC CONVERTER
- RISK OF FIRE
- PLACING MOTORCYCLE ON SIDE STAND
- REMOVING MOTORCYCLE FROM SIDE STAND
- PLACING MOTORCYCLE ON CENTRE STAND
- REMOVING MOTORCYCLE FROM CENTRE STAND
- RUNNING-IN ENGINE SPEEDS FROM 0 TO 1,000 KM
- FROM 1,000 TO 2,000 KM
- RUNNING IN NEW BRAKE PADS
- RUNNING IN NEW TYRES
- SWITCH ON THE IGNITION
- IN AN EMERGENCY ONLY
- FULLY RETRACT THE SIDE STAND
- SELECT NEUTRAL
- STARTING
- USING FAST IDLE
- LOW FUEL LEVEL
- ENGINE OIL PRESSURE
- WARNING LIGHT, GENERAL
- ABS WARNING LIGHT OE
- BATTERY CHARGE LIGHT
- ENGINE SPEED
- LOAD CHANGES
- GEAR SHIFTS
- MOVING AWAY/UPSHIFTS
- DOWNSHIFTS
- WET BRAKES
- SALT ON BRAKES
- DIRT OR MUD ON BRAKES
- SENSITIVE ELECTRONIC CONTROL
- EXTRA SAFETY RESERVES
- PARTIALLY INTEGRAL BRAKES
- BRAKE SERVO
- ABS - ANTI-LOCK BRAKE SYSTEM
- SELF-DIAGNOSIS WITH PULL-AWAY TEST
- BMW INTEGRAL ABS OE - TROUBLESHOOTING CHART
- KNOW HOW
- TECHNICAL FEATURES
- SERVICE
- BMW SERVICE CARD
- BMW SERVICE WORLDWIDE
- DEVELOPMENT
- WASTE DISPOSAL
- RECYCLING
- THE ESSENTIALS
- WELL-PLANNED RIDING PLEASURE
- ALWAYS AN IDEA AHEAD
- CORNERING AND BRAKING NEED TO BE PRACTICED
- NOW IT'S YOUR TURN
- OUR AIM IS TO MAKE YOUR JOURNEY SAFER
- A
- B
- C
- E
- F
- P
- R
- S
- T
- V
- W
Marke : BMW
Modell : R 850 R (2003)
Kategorie : Motorrad