
LI94MA531B - Dunstabzugshaube SIEMENS - Kostenlose Bedienungsanleitung
Finden Sie kostenlos die Bedienungsanleitung des Geräts LI94MA531B SIEMENS als PDF.


Benutzerfragen zu LI94MA531B SIEMENS
0 Frage zu diesem Gerät. Beantworten Sie die, die Sie kennen, oder stellen Sie Ihre eigene.
Eine neue Frage zu diesem Gerät stellen
Laden Sie die Anleitung für Ihr Dunstabzugshaube kostenlos im PDF-Format! Finden Sie Ihr Handbuch LI94MA531B - SIEMENS und nehmen Sie Ihr elektronisches Gerät wieder in die Hand. Auf dieser Seite sind alle Dokumente veröffentlicht, die für die Verwendung Ihres Geräts notwendig sind. LI94MA531B von der Marke SIEMENS.
BEDIENUNGSANLEITUNG LI94MA531B SIEMENS
SIEMENS
Extractor hood
LI63MA526C, LI63LA526, LI64MB521, LI64MA521C, LI64LA521, LI64MA531, LI64LB531, LI94LB530, LI94MA531B, LI64MA531B
en User manual and installation instructions

Register your product on My Siemens and discover exclusive services and offers. siemens-home.bsh-group.com/welcome
The future moving in.
Table of contents
USER MANUAL
1 Safety.... 2
2 Avoiding material damage.... 4
3 Environmental protection and saving energy 4
4 Operating modes 5
5 Familiarising yourself with your appliance ..... 6
6 Basic operation 6
7 Cleaning and servicing.... 7
8 Troubleshooting.... 8
9 Customer Service.... 9
10 Accessories.... 9
11 Disposal.... 9
12 INSTALLATION INSTRUCTIONS .... 10
12.3 Secure installation 10

1 Safety
Please read the safety information to ensure that you use the appliance safely.
1.1 General information
- Read this instruction manual carefully. Only this will ensure you use the appliance safely and efficiently.
- Keep the instruction manual and the product information safe for future reference or for the next owner.
- Check the appliance after unpacking it. Do not connect the appliance if it has been damaged in transit.
1.2 Intended use
Read the information on intended use to ensure that you use the appliance correctly and safely.
The appliance can only be used safely if it is correctly installed according to the safety instructions. The installer is responsible for ensuring that the appliance works perfectly at its installation location.
Only use this appliance:
■ For extracting cooking vapour.
■ In private households and in enclosed spaces in a domestic environment.
■ Up to an altitude of max. 2000 m above sea level.
Do not use the appliance:
■ With an external timer.
1.3 Restriction on user group
Avoid risks to children and vulnerable persons.
This appliance may be used by children aged 8 or over and by people who have reduced physical, sensory or mental abilities or inadequate experience and/or knowledge, provided that they are supervised or have been instructed on how to use the appliance safely and have understood the resulting dangers.
Children must not play with the appliance. Children must not perform cleaning or user maintenance unless they are at least 15 years old and are being supervised.
Keep children under the age of 8 years away from the appliance and power cable.
1.4 Safe use
⚠ WARNING – Risk of suffocation!
Children may put packaging material over their heads or wrap themselves up in it and suffocate.
- Keep packaging material away from children.
- Do not let children play with packaging material.
⚠ WARNING – Risk of poisoning!
Risk of poisoning from flue gases being drawn back in. Room-air-dependent heat-producing appliances (e.g. gas, oil, wood or coal-operated heaters, continuous flow heaters or water heaters) obtain combustion air from the room in which they are installed and discharge the exhaust gases into the open through an exhaust gas system (e.g. a chimney). With the extractor hood switched on, air is extracted from the kitchen and the adjacent rooms. Without an adequate supply of air, the air pressure falls below atmospheric pressure.
Toxic gases from the flue or the extraction shaft are sucked back into the living space.
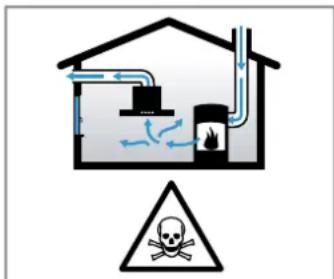
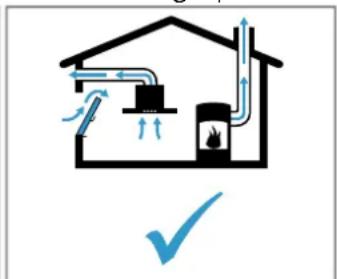
▶ Always ensure adequate fresh air in the room if the appliance is being operated in exhaust air mode at the same time as a room air-dependent heat-producing appliance is being operated.
It is only possible to safely operate the appliance if the pressure in the room in which the heating appliance is installed does not drop more than 4 Pa (0.04 mbar) below atmospheric pressure. This can be achieved whenever the air needed for combustion is able to enter through openings that cannot be sealed, for example in doors, windows, in conjunction with incoming/exhaust air wall boxes or by other technical means. An incoming/exhaust air wall box alone does not ensure compliance with the limit.
In any case, consult your responsible chimney sweep. They are able to assess the house's entire ventilation setup and will suggest the suitable ventilation measures to you.
▶ Unrestricted operation is possible if the appliance is operated exclusively in air recirculation mode.
⚠ WARNING – Risk of fire!
Fatty deposits in the grease filters may catch fire.
▶ Never operate the appliance without a grease filter.
- Clean the grease filters roughly every 2 months.
▶ Never work with naked flames close to the appliance (e.g. flambéing).
- Do not install the appliance near a solid fuel heating appliance (e.g. wood- or coal-burning) unless the heating appliance has a sealed, non-removable cover. There must be no flying sparks.
Hot oil or grease ignites very quickly.
▶ Always supervise hot oil and fat.
▶ Never extinguish burning oil or fat with water. Switch off the cooking zone. Extinguish flames carefully using a lid, fire blanket or something similar.
When gas burners are in operation without any cookware placed on them, they can build up a lot of heat. A ventilation appliance installed above the cooker may become damaged or catch fire.
▶ Only operate the gas burners with cookware on them.
Operating multiple gas hobs at the same time generates a great deal of heat. A ventilation appliance installed above the cooker may become damaged or catch fire.
▶ Only operate the gas hobs with cookware on them.
▶ Select the highest fan setting.
▶ Never operate two gas hobs simultaneously on the highest flame for longer than 15 minutes. Two gas hobs correspond to one large burner.
▶ Never operate large burners of more than 5 kW with the highest flame for longer than 15 minutes, e.g. a wok.
⚠ WARNING – Risk of burns!
The accessible parts of the appliance become hot during operation.
▶ Never touch these hot parts.
- Keep children at a safe distance.
The appliance will become hot during operation.
- Allow the appliance to cool down before cleaning it.
⚠ WARNING – Risk of injury!
Components inside the appliance may have sharp edges.
- Carefully clean the appliance interior.
Items placed on the appliance may fall off. - Do not place any objects on the appliance.
Changes to the electrical or mechanical assembly are dangerous and may lead to malfunctions. - Do not make any changes to the electrical or mechanical assembly.
The light emitted by LED lights is very dazzling, and can damage the eyes (risk group 1).
▶ Do not look directly into the switched-on LED lights for longer than 100 seconds.
⚠ WARNING – Risk of electric shock!
If the appliance or the power cord is damaged, this is dangerous.
▶ Never operate a damaged appliance.
▶ Never pull on the power cord to unplug the appliance. Always unplug the appliance at the mains.
▶ If the appliance or the power cord is damaged, immediately unplug the power cord or switch off the fuse in the fuse box.
▶ Call Customer Service. → Page 9
▶ Repairs to the appliance should only be carried out by trained specialist staff.
Incorrect repairs are dangerous.
▶ Repairs to the appliance should only be carried out by trained specialist staff.
- Only use genuine spare parts when repairing the appliance.
If the power cord of this appliance is damaged, it must be replaced by the manufacturer, the manufacturer's Customer Service or a similarly qualified person in order to prevent any risk.
An ingress of moisture can cause an electric shock.
▶ Before cleaning, pull out the mains plug or switch off the fuse in the fuse box.
- Do not use steam- or high-pressure cleaners to clean the appliance.
⚠ WARNING – Risk of explosion!
Highly caustic alkaline or highly acidic cleaning agents in conjunction with aluminium parts in the interior of the appliance may cause explosions.
▶ Never use highly caustic alkaline or highly acidic cleaning agents. In particular, do not use commercial or industrial cleaning agents in conjunction with aluminium parts, e.g. grease filter on extractor hoods.
2 Avoiding material damage
ATTENTION!
Condensate may cause corrosion damage.
▶ To prevent condensation from building up, switch on the appliance during cooking.
If moisture gets into the controls, this may result in damage.
▶ Never clean controls with a wet cloth.
Incorrect cleaning damages the surfaces.
▶ Follow the cleaning instructions.
- Do not use harsh or abrasive detergents.
- Clean stainless steel surfaces in the direction of the finish only.
▶ Never clean controls with stainless steel cleaners.
Condensation that flows back in may damage the appliance.
The air extraction duct must be installed with a gradient of at least 1° from the appliance.
If you put incorrect stress on the design elements, they may break off.
▶ Do not pull design elements.
- Do not place objects on the design elements or hang objects from them.
3 Environmental protection and saving energy
Help protect the environment by using your appliance in a way that conserves resources and by disposing of reusable materials properly.
3.1 Disposing of packaging
The packaging materials are environmentally compatible and can be recycled.
- Sort the individual components by type and dispose of them separately.
Information about current disposal methods are available from your specialist dealer or local authority.
3.2 Saving energy
If you follow these instructions, your appliance will use less power.
Ensure that there is sufficient ventilation when cooking.
■ The appliance works more efficiently and with fewer operating noises.
Adjust the fan speed to the amount of steam produced during cooking.
■ The lower the fan speed, the less energy is consumed.
Only use intensive mode when required.
If cooking produces large amounts of steam, select a higher fan speed in good time.
■ The odours are distributed around the room less.
Switch the appliance off when you are not using it.
■ The appliance does not consume any energy.
Switch off the lighting if you no longer require it.
■ The lighting does not consume any energy.
Clean or replace the filters at regular intervals.
■ The effectiveness of the appliance is increased.
Put the cooking lid on.
■ The cooking vapours and condensation are reduced.
4 Operating modes
4.1 Air extraction mode
The air which is drawn in is cleaned by the grease filters and conveyed to the exterior by a pipe system.

The air must not be discharged into a flue that is used for exhausting fumes from appliances burning gas or other fuels (not applicable to appliances that only discharge the air back into the room).
■ If the exhaust air is to be conveyed into a non-functioning smoke or exhaust gas flue, you must obtain the consent of the heating engineer responsible.
■ If the exhaust air is conveyed through the external wall, a telescopic duct should be used.
4.2 Air recirculation mode
The air which is drawn in is cleaned by the grease filters and an odour filter, and conveyed back into the room.

To bind odours in circulating-air mode, you must install an odour filter. The different options for operating the appliance in circulating-air mode can be found in our catalogue. Alternatively, ask your dealer. The required accessories are available from specialist retailers, from customer service or from the Online Shop.
5 Familiarising yourself with your appliance
5.1 Controls, variant 1 and 2
The controls are used to configure all functions of your appliance and to obtain information about the operating status.
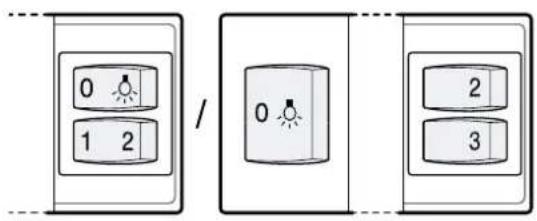
1 Switches on fan setting 1.
2 Switches fan setting 2 on.
3 Switches on fan setting 3.
Switching on the lighting
0 Switching off the lighting
5.2 Controls, variant 3
The controls are used to configure all functions of your appliance and to obtain information about the operating status.
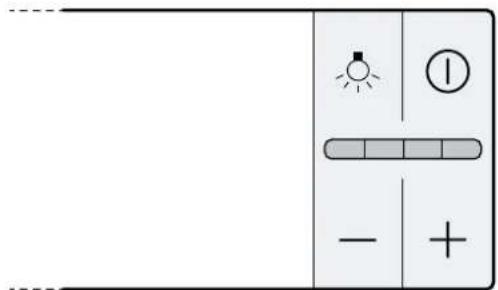
① Switch the appliance on or off
+ Increase the fan setting
— Decrease the fan setting
Switch the lighting on or off
6 Basic operation
6.1 Control panel, variant 1 and 2
Switching on the appliance
▶ Pull out the filter pull-out.
√ The appliance starts at the selected fan setting.
Switching off the appliance
▶ Slide the filter pull-out as far as it will go.
Selecting a fan setting
▶ Press 1, 2 or 3
Switching on the lighting
The lighting can be switched on and off independently of the ventilation system.
▶ Press 🔒
Switching off the lighting
▶ Press Q
6.2 Control panel, variant 3
Switching on the appliance
- Pull out the filter pull-out.
- Press Ⓙ
√ The appliance starts at fan setting 2.
Switching off the appliance
-
Press ①
-
Slide in the filter pull-out.
Selecting a fan setting
▶ Press +or .—
Switching on intensive mode
If particularly strong odours or vapours develop, you can use intensive mode.
- Press +repeatedly until all of the LEDs in the display light up.
√ After approx. six minutes, the appliance automatically switches to a lower fan setting.
Switching off intensive mode
▶ To select a fan setting of your choice, press —
Switching on the fan run-on
During the fan run-on, the appliance continues to run for a short time and then switches off automatically.
Requirement: The appliance is switched on.
▶ Slide in the filter pull-out.
√ The appliance switches off automatically after approx. 10 minutes.
Switching on the lighting
The lighting can be switched on and off independently of the ventilation system.
▶ Press 🔒
7 Cleaning and servicing
To keep your appliance working efficiently for a long time, it is important to clean and maintain it carefully.
7.1 Cleaning products
You can obtain suitable cleaning products from after-sales service or the online shop.

WARNING – Risk of electric shock!
An ingress of moisture can cause an electric shock.
Before cleaning, pull out the mains plug or switch off the fuse in the fuse box.
- Do not use steam- or high-pressure cleaners to clean the appliance.

WARNING – Risk of burns!
The appliance will become hot during operation.
- Allow the appliance to cool down before cleaning it.
ATTENTION!
Unsuitable cleaning products may damage the surfaces of the appliance.
- Do not use harsh or abrasive detergents.
- Do not use cleaning products with a high alcohol content.
- Do not use hard scouring pads or cleaning sponges.
- Do not use any special cleaners for cleaning the appliance while it is hot.
▶ Only use glass cleaners, glass scrapers or stainless steel care products if recommended in the cleaning instructions for the relevant part. - Wash sponge cloths thoroughly before use.
7.2 Cleaning the appliance
Clean the appliance as specified. This will ensure that the different parts and surfaces of the appliance are not damaged by incorrect cleaning or unsuitable cleaning products.

WARNING – Risk of explosion!
Highly caustic alkaline or highly acidic cleaning agents in conjunction with aluminium parts in the interior of the appliance may cause explosions.
▶ Never use highly caustic alkaline or highly acidic cleaning agents. In particular, do not use commercial or industrial cleaning agents in conjunction with aluminium parts, e.g. grease filter on extractor hoods.

WARNING – Risk of electric shock!
An ingress of moisture can cause an electric shock.
Before cleaning, pull out the mains plug or switch off the fuse in the fuse box.
- Do not use steam- or high-pressure cleaners to clean the appliance.

WARNING – Risk of burns!
The appliance will become hot during operation.
- Allow the appliance to cool down before cleaning it.

WARNING – Risk of injury!
Components inside the appliance may have sharp edges.
- Carefully clean the appliance interior.
- Observe the information regarding the cleaning agents.
→ "Cleaning products", Page 7
-
Clean as follows, depending on the surface:
-
Clean stainless steel surfaces in the direction of the finish using a sponge cloth and hot soapy water.
- Clean painted surfaces using a damp sponge cloth and hot soapy water.
- Clean aluminium using a soft cloth and glass cleaner.
- Clean plastic using a soft cloth and glass cleaner.
-
Clean glass using a soft cloth and glass cleaner.
-
Dry with a soft cloth.
-
Apply a thin layer of the stainless steel cleaning product to stainless steel surfaces using a soft cloth.
You can obtain stainless steel cleaning products from the after-sales service or the online shop.
7.3 Removing the grease filter
- Pull out the filter pull-out fully.
2. ATTENTION!
Falling grease filters may damage the hob below.
▶ Grip below the grease filter with one hand.
Note: Remove the grease filter in the filter pull-out first, then remove the grease filters in the appliance. Open the locks on the grease filters.
![graph TD A["Step 1: Device Input"] --> B["Step 2: Arrow to Start"] B --> C["Step 3: Arrow to End"] C --> D["Step 4: Arrow to End"] D --> E["Step 5: Arrow to End"]](/content/2026/06/1365509/images/d80bbb833b7abeef994f3376a672772233515eb77f9da387bcddf56cccb5ce5b.jpg)
- Remove the grease filters from the holders.
To prevent grease from dripping, hold the grease filter horizontally.
7.4 Cleaning grease filters in the dishwasher
The grease filters filter the grease from the cooking vapour. Regularly cleaned grease filters guarantee a high level of grease removal.

WARNING – Risk of fire!
Fatty deposits in the grease filters may catch fire.
- Clean the grease filters roughly every 2 months.
ATTENTION!
The grease filters may become damaged if they are squeezed.
▶ Do not squeeze the grease filters.
Note: When cleaning the grease filter in the dish-washer, light discolouration may occur. This discolouration has no effect on the performance of the metal grease filters.
Requirement: The grease filters have been removed. → "Removing the grease filter", Page 7
- Observe the information regarding the cleaning agents.
→ "Cleaning products", Page 7 - Place the grease filters loosely into the dishwasher. Do not clean heavily soiled grease filters with utensils.
Use special grease solvent for stubborn dirt. You can obtain grease solvents from after-sales service or the online shop. - Start the dishwasher.
Select a temperature of no more than 70 °C. - Allow the grease filters to drain.
7.5 Cleaning grease filters manually
The grease filters filter the grease from the cooking vapour. Regularly cleaned grease filters guarantee a high level of grease removal.
WARNING – Risk of fire!
Fatty deposits in the grease filters may catch fire.
▶ Clean the grease filters roughly every 2 months.
Requirement: The grease filters have been removed. → "Removing the grease filter", Page 7
- Observe the information regarding the cleaning agents.
→ "Cleaning products", Page 7 - Soak the grease filter in hot soapy water.
Use special grease solvent for stubborn dirt. You can obtain grease solvents from after-sales service or the online shop. - Use a brush to clean the grease filters.
- Rinse the grease filters thoroughly.
- Allow the grease filters to drain.
7.6 Fitting grease filters
ATTENTION!
Falling grease filters may damage the hob below.
▶ Grip below the grease filter with one hand.
- Fit the grease filters.
- Fold the grease filters upwards and engage the locks.
- Make sure that the locks engage.
8 Troubleshooting
You can rectify minor faults on your appliance yourself. Read the troubleshooting information before contacting after-sales service. This will avoid unnecessary costs.
⚠ WARNING – Risk of injury!
Improper repairs are dangerous.
▶ Repairs to the appliance should only be carried out by trained specialist staff.
▶ If the appliance is defective, call Customer Service.
WARNING – Risk of electric shock!
Incorrect repairs are dangerous.
▶ Repairs to the appliance should only be carried out by trained specialist staff.
▶ Only use genuine spare parts when repairing the appliance.
If the power cord of this appliance is damaged, it must be replaced by the manufacturer, the manufacturer's Customer Service or a similarly qualified person in order to prevent any risk.
8.1 Malfunctions
Fault Cause and troubleshooting
| The appliance is not working. The mains plug of the power cord is not plugged in. |
| ► Connect the appliance to the power supply. |
| The circuit breaker is faulty. |
| ► Check the circuit breaker in the fuse box. |
| There has been a power cut. |
| ► Check whether the lighting in your kitchen or other appliances are working. |
| The LED lighting does not work. Different causes are possible. |
| ► Defective LED lights may be replaced by the manufacturer, their customer service or a qualified technician (electrician) only. |
| ► Call the after-sales service.→ "Customer Service", Page 9 |
9 Customer Service
If you have any queries on use, are unable to rectify faults on the appliance yourself or if your appliance needs to be repaired, contact Customer Service. You can solve many problems yourself by consulting the information on troubleshooting in these instructions or on our website. If this is not the case, contact our after-sales service.
With any warranty claims, we will make sure that your appliance is repaired by trained after-sales technicians using genuine spare parts, including after the manufacturer's warranty has expired.
Function-relevant genuine spare parts according to the corresponding Ecodesign Order can be obtained from Customer Service for a period of at least 10 years from the date on which your appliance was placed on the market within the European Economic Area.
Note: Under the terms of the manufacturer's warranty the use of Customer Service is free of charge.
Detailed information on the warranty period and terms of warranty in your country is available from our after-sales service, your retailer or on our website.
If you contact Customer Service, you will require the product number (E-Nr.) and the production number (FD) of your appliance.
The contact details for Customer Service can be found in the enclosed Customer Service directory or on our website.
9.1 Product number (E-Nr.) and production number (FD)
You can find the product number (E-Nr.) and the production number (FD) on the appliance's rating plate. Depending on the model, the rating plate can be found:
■ Inside the appliance (remove grease filters for access).
■ On top of the appliance.
Make a note of your appliance's details and the Customer Service telephone number to find them again quickly.
10 Accessories
Only use original accessories. These have been made especially for your appliance. Here you can find an overview of your appliance's accessories and how to use them.
Accessories Order number
| Standard odour filter (re- placement) | LZ45510 |
| Standard recirculation kit LZ45450 | |
| Stainless steel handle strip, 60 cm | LZ46551 |
| Stainless steel handle strip, 90 cm | LZ49551 |
| Black handle strip, 60 cm | LZ46561 |
| Black handle strip, 90 cm | LZ49561 |
| White handle strip, 60 cm | LZ46521 |
| White handle strip, 90 cm | LZ49521 |
Accessories Order number
| Design handle strip, 60 cm | LZ46850 |
| Design handle strip, 90 cm | LZ49850 |
10.1 Other accessories
You can purchase other accessories from our after-sales service, specialist retailers or online.
You will find a comprehensive range of products for your appliance in our brochures and online: www.siemens-home.bsh-group.com
Accessories vary from one appliance to another. When purchasing accessories, always quote the exact product number (E no.) of your appliance.
You can find out which accessories are available for your appliance in our online shop or from our after-sales service.
11 Disposal
Find out here how to dispose of old appliances correctly.
11.1 Disposing of old appliance
Valuable raw materials can be reused by recycling.
- Unplug the appliance from the mains.
- Cut through the power cord.
- Dispose of the appliance in an environmentally friendly manner.
This appliance is labelled in accordance with European Directive 2012/19/EU concerning used electrical and electronic appliances (waste electrical and electronic equipment - WEEE).
The guideline determines the framework for the return and recycling of used appliances as applicable throughout the EU.
12 Installation instructions
Observe this information when installing the appliance.

12.1 Included with the appliance
After unpacking all parts, check for any damage in transit and completeness of the delivery.
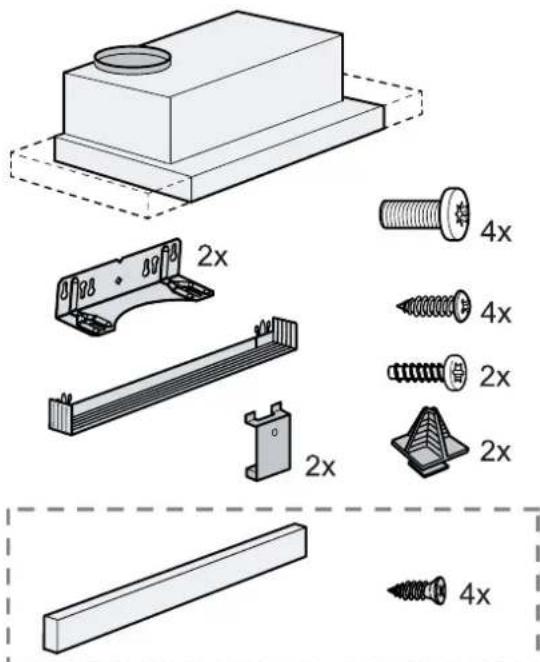
Depending on the appliance specifications
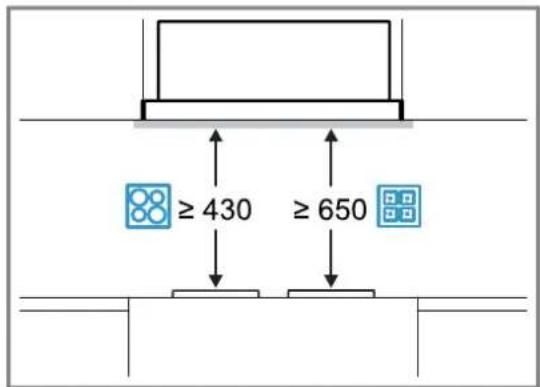
12.2 Safety clearances
Comply with the safety clearances for the appliance.
12.3 Secure installation
Follow these safety instructions when installing the appliance.
⚠ WARNING – Risk of poisoning!
Risk of poisoning from flue gases being drawn back in. Room-air-dependent heat-producing appliances (e.g. gas, oil, wood or coal-operated heaters, continuous flow heaters or water heaters) obtain combustion air from the room in which they are installed and discharge the exhaust gases into the open through an exhaust gas system (e.g. a chimney). With the extractor hood switched on, air is extracted from the kitchen and the adjacent rooms. Without an adequate supply of air, the air pressure falls below atmospheric pressure. Toxic gases from the flue or the extraction shaft are sucked back into the living space.
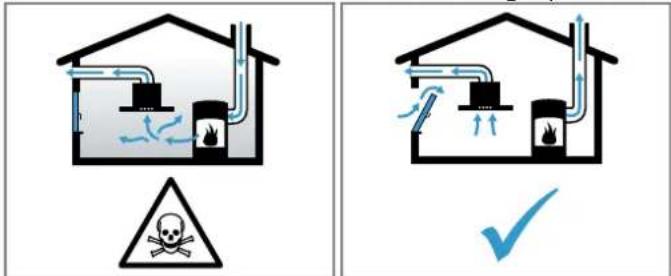
▶ Always ensure adequate fresh air in the room if the appliance is being operated in exhaust air mode at the same time as a room air-dependent heat-producing appliance is being operated.
It is only possible to safely operate the appliance if the pressure in the room in which the heating appliance is installed does not drop more than 4 Pa (0.04 mbar) below atmospheric pressure. This can be achieved whenever the air needed for combustion is able to enter through openings that cannot be sealed, for example in doors, windows, in conjunction with incoming/exhaust air wall boxes or by other technical means. An incoming/exhaust air wall box alone does not ensure compliance with the limit.
In any case, consult your responsible chimney sweep. They are able to assess the house's entire ventilation setup and will suggest the suitable ventilation measures to you.
▶ Unrestricted operation is possible if the appliance is operated exclusively in air recirculation mode.
⚠ WARNING – Risk of suffocation!
Children may put packaging material over their heads or wrap themselves up in it and suffocate.
- Keep packaging material away from children.
- Do not let children play with packaging material.
⚠ WARNING – Risk of fire!
Grease deposits in the grease filter may catch fire.
- The specified safety clearances must be complied with in order to prevent a build-up of heat.
- Observe the specifications for your cooking appliance. If gas and electric hobs are being operated together, the largest specified clearance applies.
The appliance must be installed with no more than one side directly next to a high-sided unit or a wall. The distance between the appliance and wall or high-sided unit must be at least 50 mm.
Grease deposits in the grease filter may catch fire.
▶ Never work with naked flames close to the appliance (e.g. flambéing).
- Do not install the appliance near a heat-producing appliance for solid fuel (e.g. wood or coal) unless a closed, non-removable cover is available. There must be no flying sparks.
⚠ WARNING – Risk of injury!
Components inside the appliance may have sharp edges.
▶ Wear protective gloves.
The appliance may fall down if it has not been properly fastened in place.
- All fastening components must be fixed firmly and securely in place.
The appliance is heavy.
▶ To move the appliance, two people are required.
▶ Use only suitable tools and equipment.
Changes to the electrical or mechanical assembly are dangerous and may lead to malfunctions.
- Do not make any changes to the electrical or mechanical assembly.
⚠ WARNING – Risk of electric shock!
Sharp-edged components inside the appliance may damage the connecting cable.
- Do not kink or trap the connecting cable. If the appliance or the power cord is damaged, this is dangerous.
▶ Never operate a damaged appliance.
▶ Never pull on the power cord to unplug the appliance. Always unplug the appliance at the mains.
▶ If the appliance or the power cord is damaged, immediately unplug the power cord or switch off the fuse in the fuse box.
▶ Call Customer Service. → Page 9
▶ Repairs to the appliance should only be carried out by trained specialist staff.
Incorrect repairs are dangerous.
▶ Repairs to the appliance should only be carried out by trained specialist staff.
▶ Only use genuine spare parts when repairing the appliance.
▶ If the power cord of this appliance is damaged, it must be replaced by the manufacturer, the manufacturer's Customer Service or a similarly qualified person in order to prevent any risk.
Improper installation is dangerous.
- Connect and operate the appliance only in accordance with the specifications on the rating plate.
- Connect the appliance to a power supply with alternating current only via a properly installed socket with earthing.
- The protective conductor system of the domestic electrical installation must be properly installed.
▶ Never equip the appliance with an external switching device, e.g. a timer or remote control. - When the appliance is installed, the mains plug of the power cord must be freely accessible. If free access is not possible, an all-pole isolating switch must be installed in the permanent electrical installation according to the conditions of Overvoltage Category III and according to the installation regulations.
- When installing the appliance, check that the power cable is not trapped or damaged.
12.4 Information on the installation situation
■ Install this appliance in a kitchen cupboard.
12.5 Instructions for the exhaust air pipe
The appliance manufacturer does not provide any warranty for faults attributable to the pipeline.
■ Use a short, straight exhaust air pipe with as large a pipe diameter as possible.
- Long, rough exhaust air pipes, many pipe bends or small pipe diameters reduce the suction power and increase the fan noise.
■ An exhaust air pipe that is made of non-combustible material.
■ To prevent condensate from returning, fit the exhaust air pipe from the appliance with a 1° gradient.
Round pipes
Use round pipes with an inner diameter of 150 mm (recommended) or at least 120 mm.
Flat ducts
Use flat ducts with an inner cross-section that corresponds to the diameter of the round pipes:
■ Diameter of 150 mm corresponds to approx. 177 cm 4 .
■ Diameter of 120 mm corresponds to approx. 113 cm 4 .
■ Use sealing strips for different pipe diameters.
■ Do not use any flat ducts with sharp bends.
12.6 Instructions for the electrical connection
In order to be able to safely connect the appliance to the electrical system, follow these instructions.

WARNING – Risk of electric shock!
It must always be possible to disconnect the appliance from the electricity supply. The appliance must only be connected to a protective contact socket that has been correctly installed.
- The mains plug for the mains power cable must be easily accessible after the appliance is installed.
If this is not possible, an all-pole isolating switch must be integrated into the permanent electrical installation according to the conditions of overvoltage category III and according to the installation regulations.
The permanent electrical installation must only be wired by a professional electrician. We recommend installing a residual-current circuit breaker (RCCB) in the appliance's power supply circuit.
Sharp-edged components inside the appliance may damage the connecting cable.
- Do not kink or trap the connecting cable.
■ The connection data can be found on the rating plate inside the appliance.
■ To see the rating plate, remove the grease filter.
■ The connecting cable is approx. 1.30 m long.
■ This appliance complies with the EC interference suppression regulations.
■ The appliance corresponds to protection class 1. Therefore, only use the appliance with a protective earth connection.
■ Do not connect the appliance to the power supply during installation.
■ Ensure that the protection against contact is guaranteed during installation.
12.7 General information
Follow these general instructions during the installation.
- For the installation, observe the currently valid building regulations and the regulations of the local electricity and gas suppliers.
- When discharging the exhaust air, the official and legal regulations, such as the regional building code., must be observed.
■ The width of the extractor hood must correspond at least with the width of the hob.
■ To optimally detect the cooking vapours, install the appliance in the middle of the hob.
In order to freely access the appliance for servicing, select an easy-to-reach installation site.
■ The surfaces of the appliance are sensitive. Avoid damaging them during installation.
12.8 Installation
Checking the unit
- Check whether the fitted unit is level and has sufficient load-bearing capacity.
The max. weight of the appliance is 18 kg. - Ensure that the fitted unit is heat-resistant up to 90° C.
- Ensure that the fitted unit is still stable after the cut-outs have been made.
- Ensure that the fitted unit complies with the following dimensions:
Width 600 mm
Depth Min. 320 mm
Height Min. 390 mm
Preparing the units
Requirement: The unit is suitable for the
→ "Checking the unit", Page 12 installation.
- Cover the hob to prevent damage.
- Ensure that the stability of the fitted unit is guaranteed after the cut-outs have been made.
- If the cabinet is more than 310 mm deep, remove part of the back panel.
- Create the cut-out for the pipe connection.
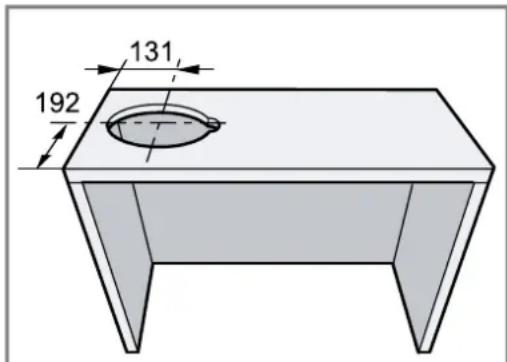
-
If the cabinet base is in place, remove it.
-
Remove any shavings.
-
Use the enclosed template to mark the fastening points on the inside of the cabinet and use a bradawl to make indentations where the holes are to be.
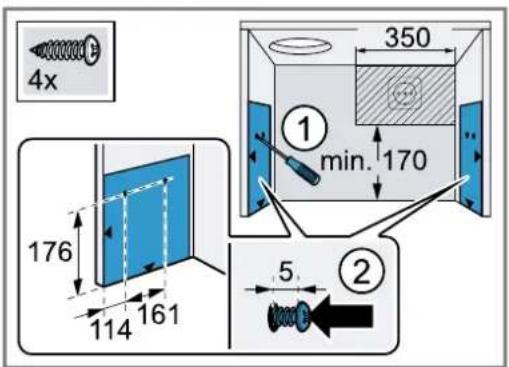
- Screw in the four enclosed screws for the angle bracket up to 5 mm.
Preparing the appliance
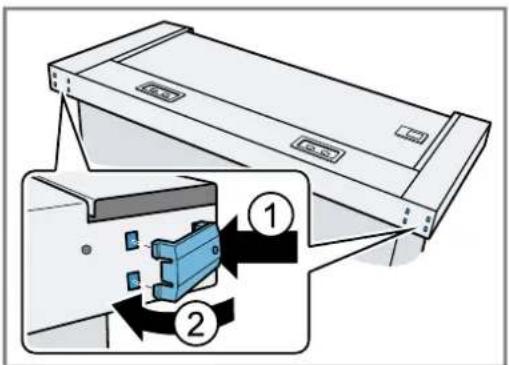
- Insert the holders for the wall edging strip on the outside rear of the appliance into the cut-outs and fold them in to the centre of the unit.
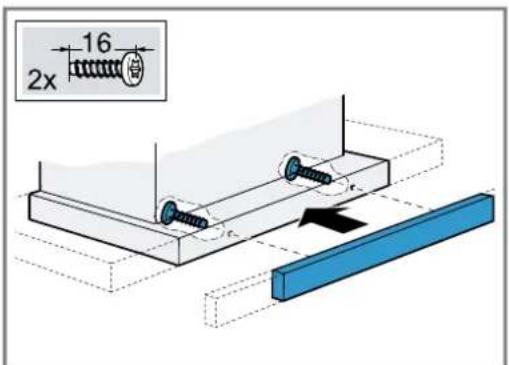
- Use the screws provided to secure the handle strip to the filter pull-out.
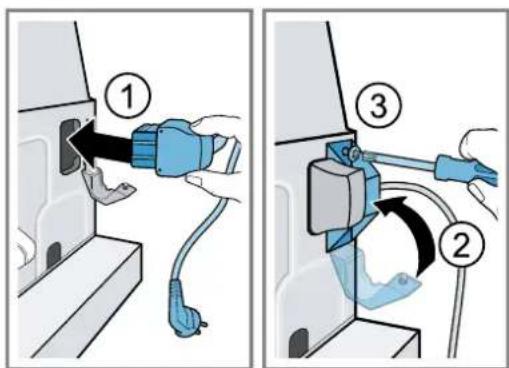
- Connect the enclosed power cord to the appliance and secure the stain relief.
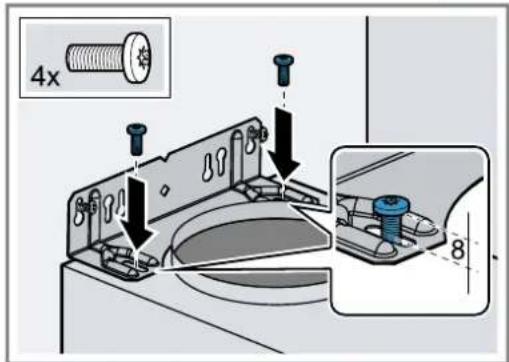
- Screw the two angle brackets to the appliance. Note the position of the screws. Screw in the screws until 8 mm of the threaded section is still protruding.
Installing the appliance
- Use the angle brackets to hang the appliance on the screws, align it and tighten it.
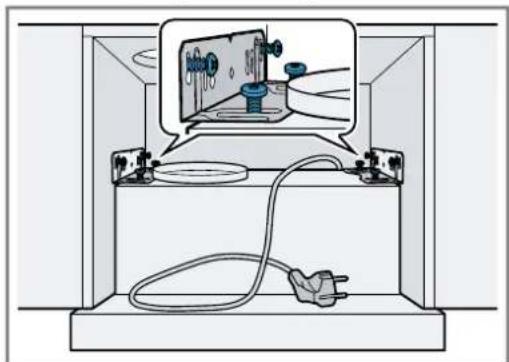
- Appliance width 90 cm: Pull the filter pull-out out completely towards the front. Also use two screws each on the left and right to screw the appliance to the side upper cabinets from below.

- Adjust the wall closing strip to the clearance between the appliance and the wall.
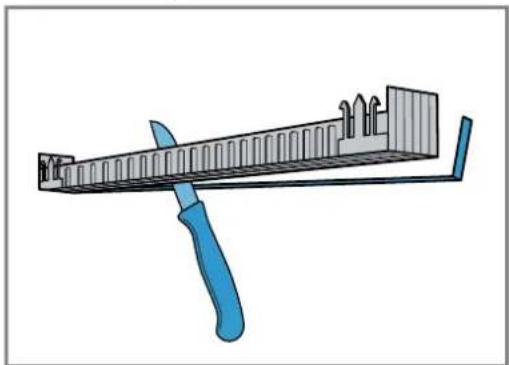
- Snap the wall closing strip into the holders.
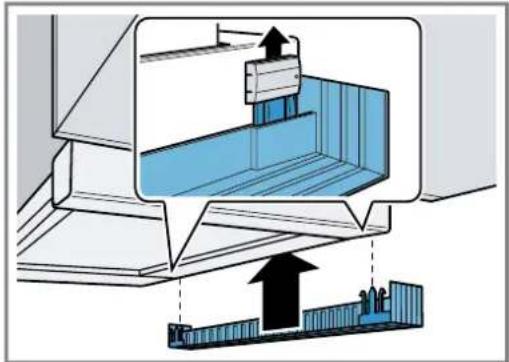
- Fit the grease filters.
- Establish the pipe connection.
- Establish the electrical connection.
Note:
You can conceal the housing of the extractor hood within the upper cabinet. In doing so, observe the following:
■ The intermediate floor must not rest on the housing.
■ The front panel must not be secured to the housing.
■ Access to the housing must remain possible in order to change the filter and for after-sales service.
Changing the filter pull-out's limit stop
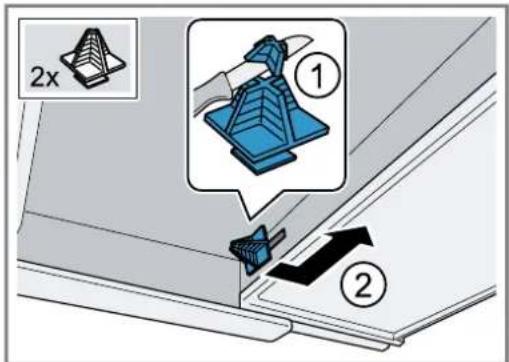
On some versions of the appliance, the limit stop for the filter pull-out can be changed. Spacers are included with these appliances in order to set the appliance's handle strip so that it is flush with the fitted unit.
- Pull the filter pull-out towards the front.
- Shorten the spacers to the required dimension and insert them into the slot specified.
BSH Hausgeräte GmbH
Carl-Wery-Straße 34
81739 München
GERMANY
www.siemens-home.bsh-group.com
Valid within Great Britain:
Imported to Great Britain by
BSH Home Appliances Ltd.
Grand Union House
Old Wolverton Road
Wolverton, Milton Keynes
MK12 5PT
United Kingdom
Manufactured by BSH Hausgeräte GmbH under the trademark licence of Siemens AG
- SIEMENS
- EXTRACTOR HOOD
- TABLE OF CONTENTS
- USER MANUAL
- 1 SAFETY
- 1.1 GENERAL INFORMATION
- 1.2 INTENDED USE
- 1.3 RESTRICTION ON USER GROUP
- 1.4 SAFE USE
- ⚠ WARNING – RISK OF SUFFOCATION
- ⚠ WARNING – RISK OF POISONING
- ⚠ WARNING – RISK OF FIRE
- ⚠ WARNING – RISK OF BURNS
- ⚠ WARNING – RISK OF INJURY
- ⚠ WARNING – RISK OF ELECTRIC SHOCK
- ⚠ WARNING – RISK OF EXPLOSION
- 2 AVOIDING MATERIAL DAMAGE
- ATTENTION
- 3 ENVIRONMENTAL PROTECTION AND SAVING ENERGY
- 3.1 DISPOSING OF PACKAGING
- 3.2 SAVING ENERGY
- 4 OPERATING MODES
- 4.1 AIR EXTRACTION MODE
- 4.2 AIR RECIRCULATION MODE
- 5 FAMILIARISING YOURSELF WITH YOUR APPLIANCE
- 5.1 CONTROLS, VARIANT 1 AND 2
- 5.2 CONTROLS, VARIANT 3
- 6 BASIC OPERATION
- 6.1 CONTROL PANEL, VARIANT 1 AND 2
- SWITCHING ON THE APPLIANCE
- SWITCHING OFF THE APPLIANCE
- SELECTING A FAN SETTING
- SWITCHING ON THE LIGHTING
- SWITCHING OFF THE LIGHTING
- 6.2 CONTROL PANEL, VARIANT 3
- SWITCHING ON INTENSIVE MODE
- SWITCHING OFF INTENSIVE MODE
- SWITCHING ON THE FAN RUN-ON
- 7 CLEANING AND SERVICING
- 7.1 CLEANING PRODUCTS
- WARNING – RISK OF ELECTRIC SHOCK
- WARNING – RISK OF BURNS
- 7.2 CLEANING THE APPLIANCE
- WARNING – RISK OF EXPLOSION
- WARNING – RISK OF INJURY
- 7.3 REMOVING THE GREASE FILTER
- 7.4 CLEANING GREASE FILTERS IN THE DISHWASHER
- WARNING – RISK OF FIRE
- 7.5 CLEANING GREASE FILTERS MANUALLY
- 7.6 FITTING GREASE FILTERS
- 8 TROUBLESHOOTING
- 8.1 MALFUNCTIONS
- 9 CUSTOMER SERVICE
- 9.1 PRODUCT NUMBER (E-NR.) AND PRODUCTION NUMBER (FD)
- 10 ACCESSORIES
- 10.1 OTHER ACCESSORIES
- 11 DISPOSAL
- 11.1 DISPOSING OF OLD APPLIANCE
- 12 INSTALLATION INSTRUCTIONS
- 12.1 INCLUDED WITH THE APPLIANCE
- 12.2 SAFETY CLEARANCES
- 12.3 SECURE INSTALLATION
- 12.4 INFORMATION ON THE INSTALLATION SITUATION
- 12.5 INSTRUCTIONS FOR THE EXHAUST AIR PIPE
- ROUND PIPES
- FLAT DUCTS
- 12.6 INSTRUCTIONS FOR THE ELECTRICAL CONNECTION
- 12.7 GENERAL INFORMATION
- 12.8 INSTALLATION
- CHECKING THE UNIT
- PREPARING THE UNITS
- PREPARING THE APPLIANCE
- INSTALLING THE APPLIANCE
- NOTE
- CHANGING THE FILTER PULL-OUT'S LIMIT STOP
Marke : SIEMENS
Modell : LI94MA531B
Kategorie : Dunstabzugshaube