
VC-M27 - Videorekorder SHARP - Kostenlose Bedienungsanleitung
Finden Sie kostenlos die Bedienungsanleitung des Geräts VC-M27 SHARP als PDF.

| Produkttyp | Videorekorder |
| Marke | Sharp |
| Modell | VC-M27 |
| Abmessungen (B × H × T) | 430 mm × 95 mm × 360 mm |
| Gewicht | ca. 4,5 kg |
| Stromversorgung | 220–240 V, 50 Hz |
| Leistungsaufnahme | 20 W (Betrieb), 3 W (Standby) |
| Anzahl der Videoköpfe | 2 |
| Bandgeschwindigkeit | SP, LP, EP (NTSC) bzw. SP, LP (PAL) |
| Timer-Aufnahme | Ja, bis zu 8 Programme |
| Anschlüsse | HF-Eingang, HF-Ausgang, SCART (RGB), Cinch (Audio/Video) |
| Wiedergabeformate | VHS, VHS-C (mit Adapter) |
| Fernbedienung | Infrarot-Fernbedienung enthalten |
| Besondere Funktionen | Suchlauf, Bildsuchlauf (Jog/Shuttle), Standbild, Zeitlupe |
| Reinigung | Kopf- und Bandpflege mit handelsüblichen Reinigungskassetten |
| Sicherheit | Kindersicherung, automatische Abschaltung |
| Zubehör | Netzkabel, Fernbedienung, Bedienungsanleitung |
| Reparaturhinweis | Reparaturen nur durch qualifiziertes Fachpersonal |
Häufig gestellte Fragen - VC-M27 SHARP
Benutzerfragen zu VC-M27 SHARP
0 Frage zu diesem Gerät. Beantworten Sie die, die Sie kennen, oder stellen Sie Ihre eigene.
Eine neue Frage zu diesem Gerät stellen
Laden Sie die Anleitung für Ihr Videorekorder kostenlos im PDF-Format! Finden Sie Ihr Handbuch VC-M27 - SHARP und nehmen Sie Ihr elektronisches Gerät wieder in die Hand. Auf dieser Seite sind alle Dokumente veröffentlicht, die für die Verwendung Ihres Geräts notwendig sind. VC-M27 von der Marke SHARP.
BEDIENUNGSANLEITUNG VC-M27 SHARP
SHARP
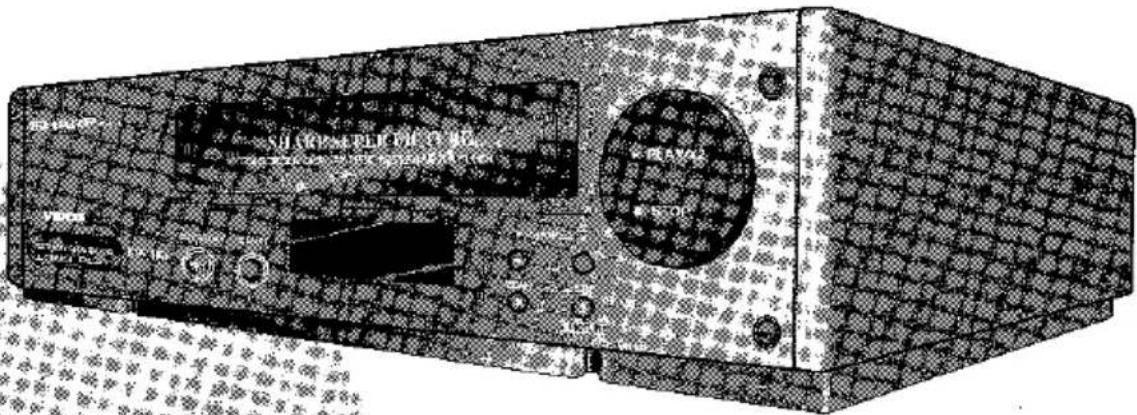
VC-M27HM
VC-M27LM
VIDEO CASSETTE RECORDER OPERATION MANUAL
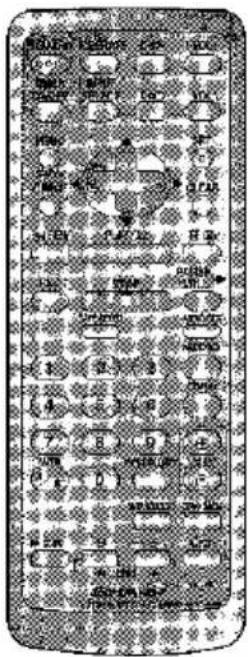
VCR REMOTE CONTROL
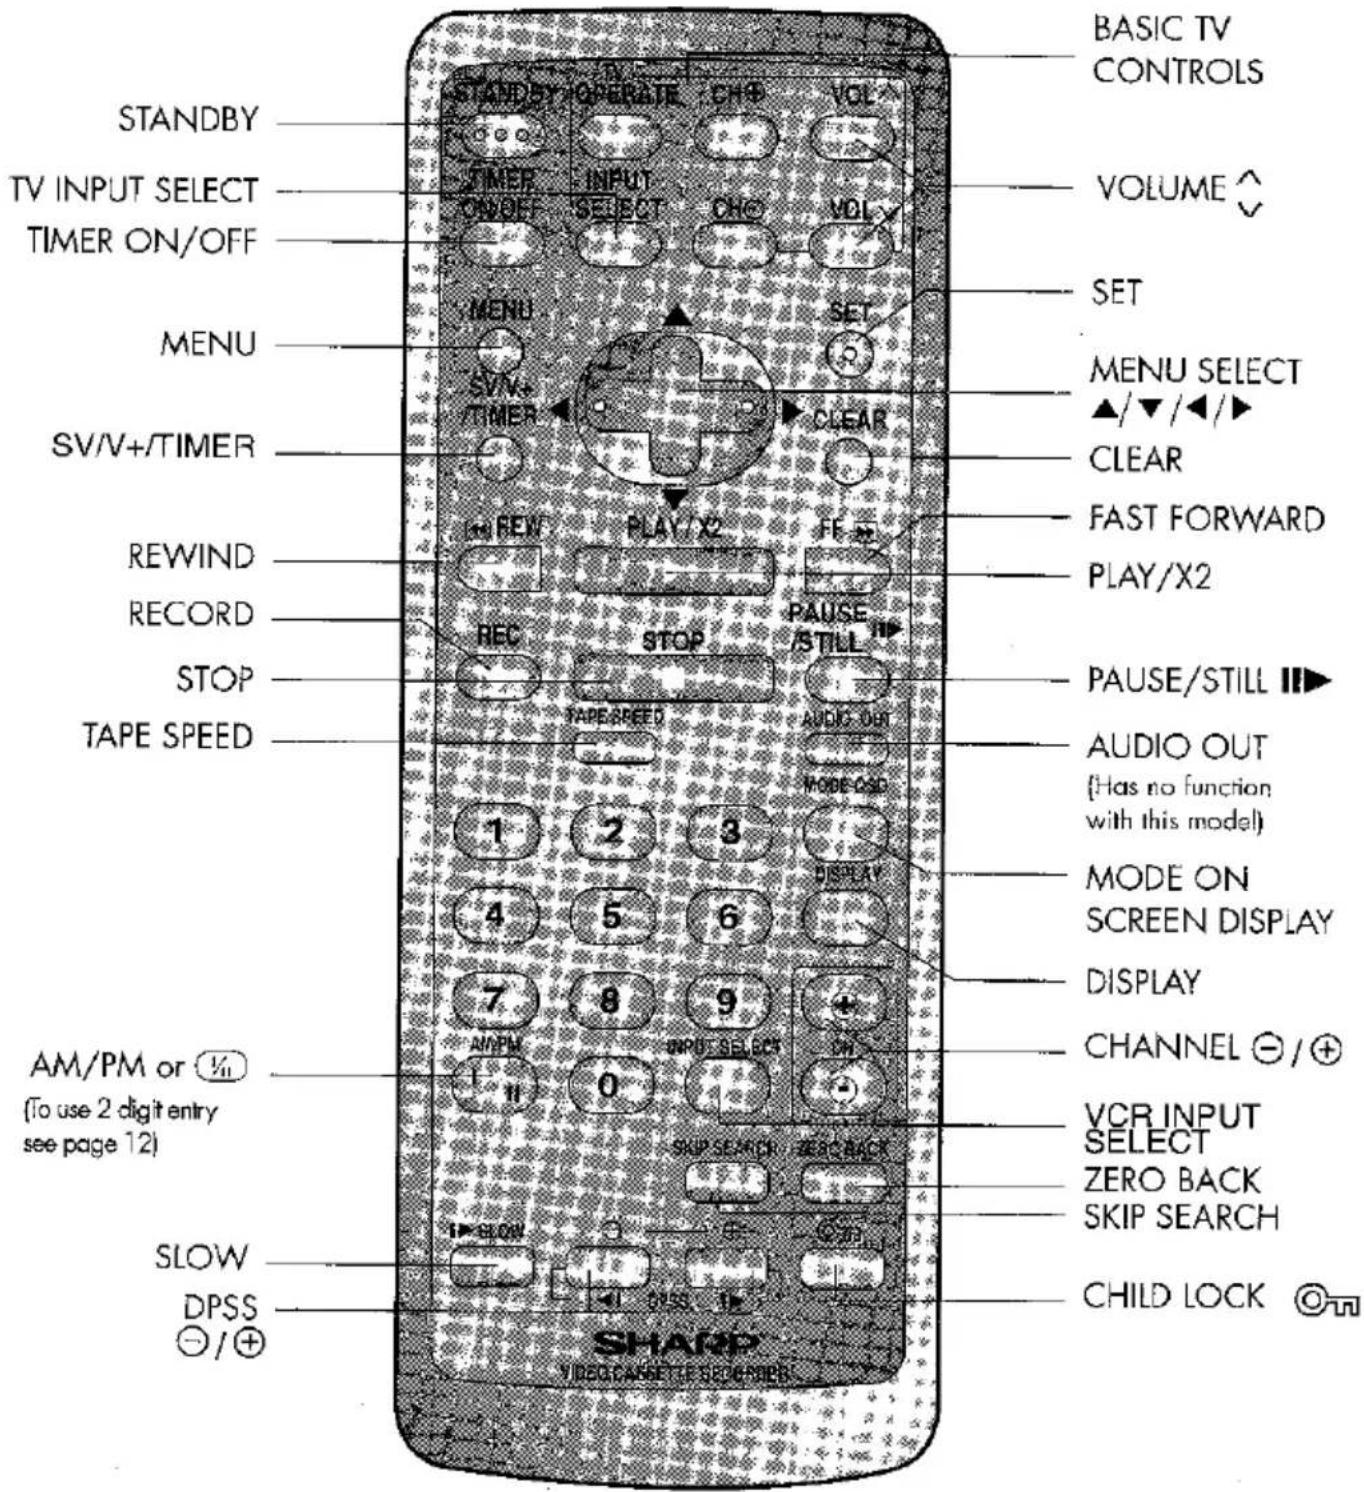
VCR front panel/remote control equivalent functions.
If you prefer, or if remote control batteries fail, you will need to use the VCR front panel controls. The only differences in function are shown below:
| FUNCTIONOSD | OPERATION WITH REMOTECONTROL | OPERATION WITH VCRFRONT PANEL |
| Moving DOWN/UP menuMoving LEFT/RIGHT menu | [▼/▲] buttons[◄/►] buttons | CHANNEL ⊙/⊕ buttons.Turn shuttle ring LEFT/RIGHT |
Dear SHARP Customer
Thank you for buying this SHARP VCR.
SHARP has established a worldwide reputation for unsurpassed quality and precision manufacturing techniques since it was founded in 1915. Your choice of VCR uses the very latest electronic circuitry and engineering advancements to give the best possible performance. Given proper care it will provide years of entertainment for the whole family. Please read this operation manual carefully before attempting to operate the VCR.
Copyright
● Audio-visual material may consist of copyright works which must not be recorded without the authority of the owner of the copyright. Please refer to relevant laws.
- No part of this publication may be reproduced, stored or transmitted in any form without prior permission from SHARP Electronics (U.K.) Ltd.
- VIDEO and PlusCode are trademarks of Gemstar Development Corporation.
- VIDEO® system is manufactured under license from Gemstar Development Corporation.

SAFETY WARNINGS
Observe all warnings for your safety and to ensure trouble free use of your VCR.
INFORMATION Additional information complements instructions.
CONTENTS
BASIC INSTALLATION
On-screen display main menu
VCR Display
Unpacking the accessories
Ideal VCR location
Connecting the VCR to the TV and aerial
Important Note on CH5 Broadcasting 7
Tuning the TV into the RF video channel
Auto Installation
Post Code Security 10
EASY START
Introduction 11
Searching the tape 13
Still frame and slow-motion playback 13
On-screen display 14
Mode selection 15

RECORDING
Immediate recording 16
Simple timed recording 16
Programme Delivery Control (PDC) 17
Delayed recordings using VIDEO 17
Delayed timer recordings 19
Confirming/cancelling delayed recordings 22

ADVANCED OPERATION
Recording from an external source 23
Remote Control Operation of TV 23
Digital display 24
Digital Programme Search System (DPSS) 25
Skip search 25
Repeat 25
Child Lock and Advanced Child Lock 26

CUSTOM INSTALLATION
Manual sorting 27
Manual tuning 30
Manual clock setting 31
Re-tuning your TV into the RF Video Channel 31

OPTIONAL CONNECTIONS
Connecting to a camcorder....32

HELPFUL HINTS
Connecting to the mains 33
Troubleshooting 34
Calling for Service 35
Guarantee 36
Specifications Back cover
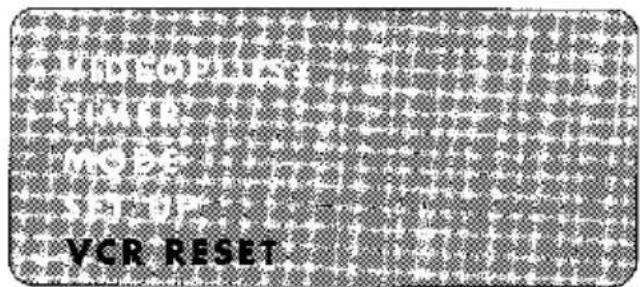
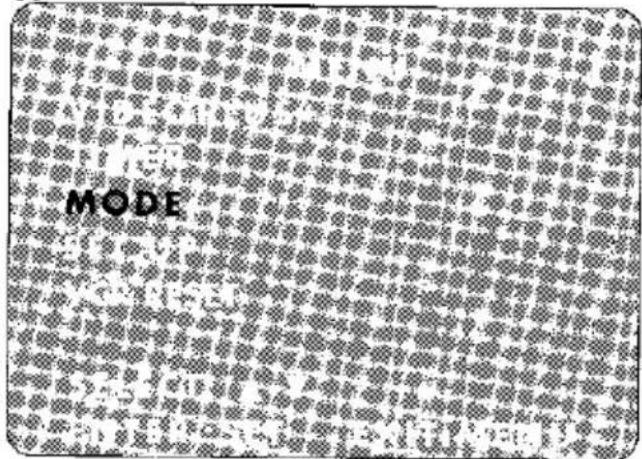
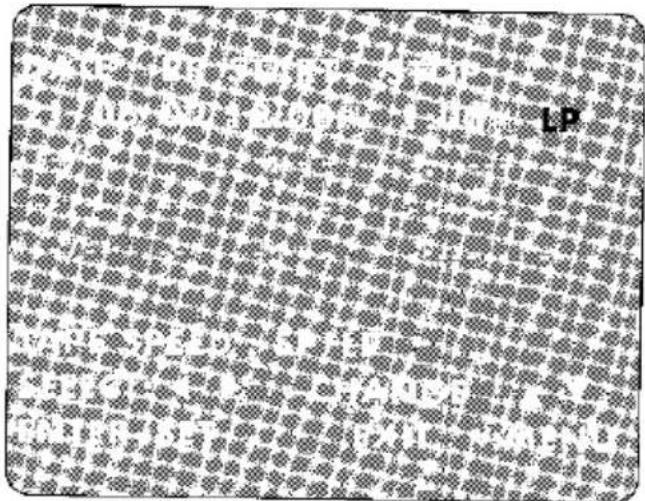
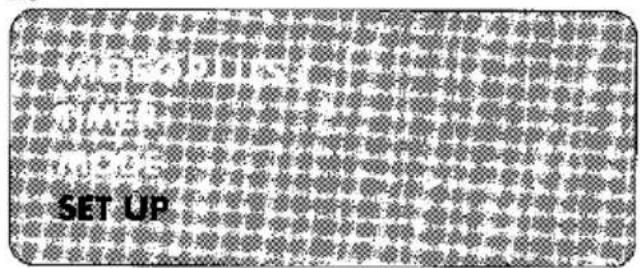
ON-SCREEN DISPLAY MAIN MENU
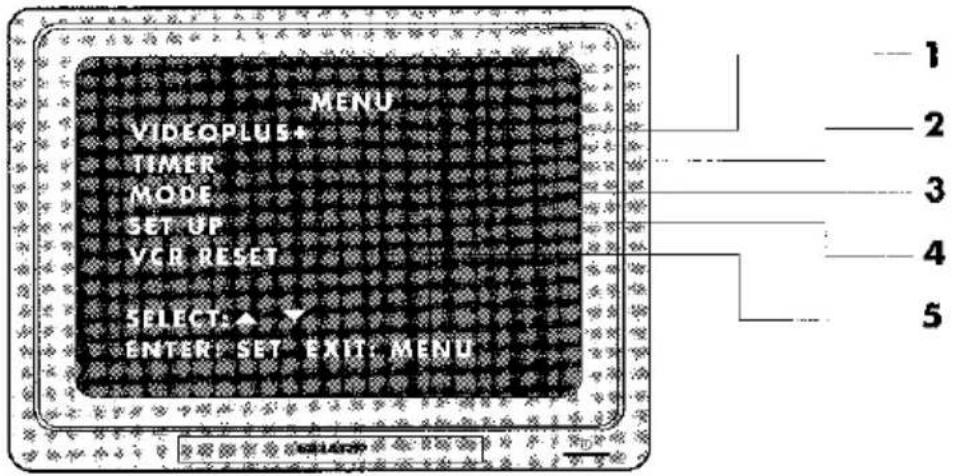
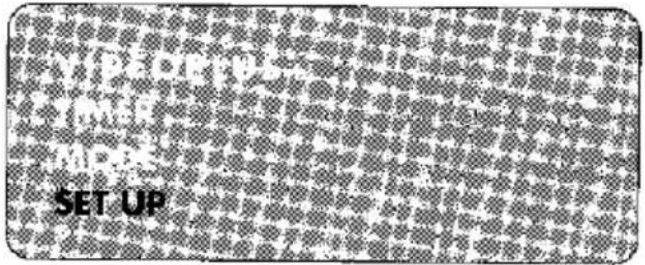
This VCR enables you to set functions by displaying them on the TV screen. The main menu shown here has five sub-menus which list the functions of the VCR and the possible settings for each function (usually ON, OFF or AUTO).
● To access the main menu press MENU on the remote control.
- To select a sub-menu use the [▲/▼] buttons on the remote control. Then press SET.
● To leave the main menu press MENU again.
- If you leave more than 2 minutes between pressing any buttons whilst in any menu the VCR will leave the MENU function.
-
VIDEOPLUS+ Contains the settings required to record using the Plus Code Number published in TV listings. You can also select this function by pressing [SV/V+/TIMER] on the remote control.
-
TIMER Contains the settings required to make, check and cancel delayed recordings.
-
MODE Contains the settings that will improve the playback quality of a video tape (in some cases), change the background colour of the on-screen display, enable auto-speed, and repeat functions.
-
SET UP Contains settings that allow you to manually tune the VCR, sort the channels into your preferred order, set the clock and enter your security/post codes. However, most of these functions will be set automatically when you first install the VCR.
-
VCR RESET Resets the memory of the VCR and returns it to the auto installation procedure.
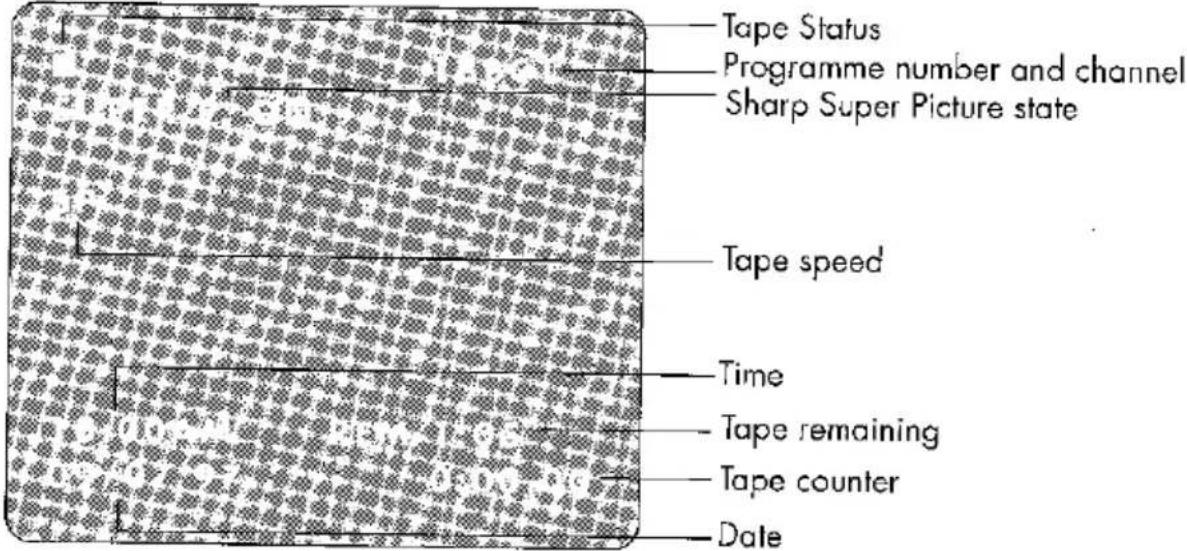
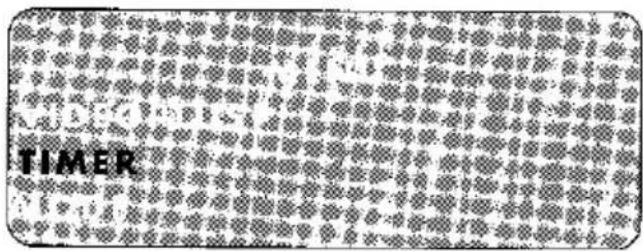
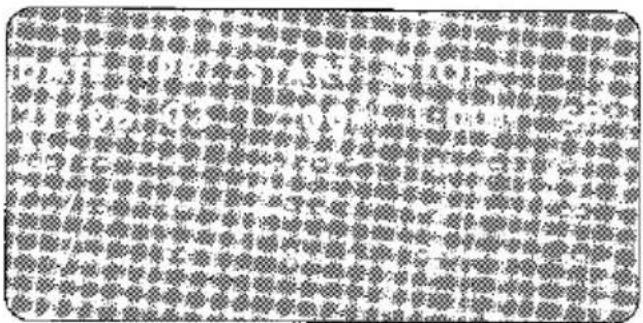
VCR DISPLAY
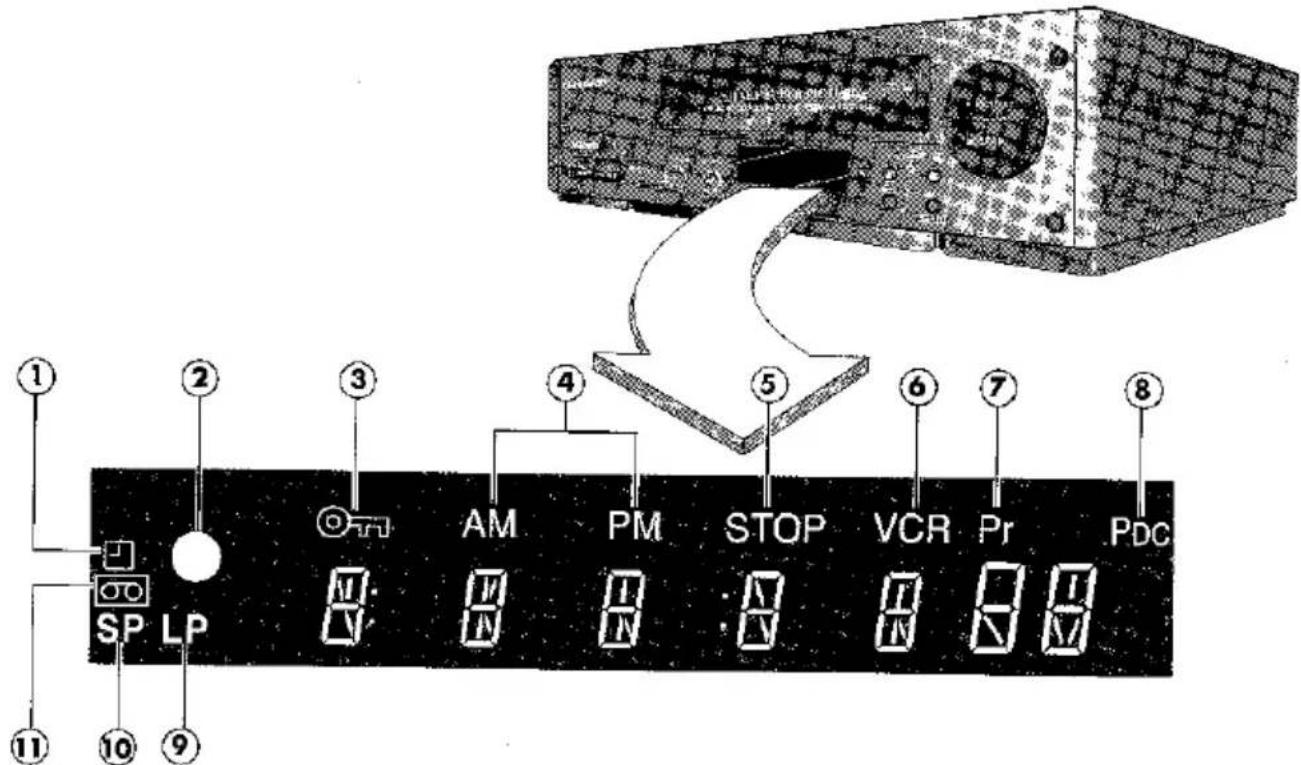
① TIMER indicator. This shows that the VCR is in STANDBY mode, ready to record the delayed recording set in its memory.
② RECORDING indicator. This appears when a recording is being made.
③ CHILD LOCK/ADVANCED CHILD LOCK indicator. This shows that CHILD LOCK /ADVANCED CHILD LOCK is set. When this indicator is lit none of the buttons on the VCR or remote control will operate until CHILD LOCK/ADVANCED CHILD LOCK is disengaged.
④ AM/PM indicators. These will only appear when the 12 hour clock is displayed.
⑤ STOP indicator. This will appear to show the stop time of a Simple Timed Recording. For more information on Simple Timed Recordings see page 16.
⑥ VCR mode indicator. It shows that the VCR is in VCR mode, i.e. the VCR channel not the TV broadcast signal will be displayed on the TV if the VCR is connected to the TV with a SCART lead.
⑦ PRESET CHANNEL indicator. This shows which channel number the VCR is currently displaying.
⑧ PROGRAMME DELIVERY CONTROL indicator. This shows when the current video channel has a PDC signal. See page 17 for more information on PDC.
⑨ LONG PLAY indicator. This shows when a recording is being made in Long Play and when a tape is playing back a Long Play recording.
⑩ STANDARD PLAY indicator. This shows when a standard speed recording is being made and when a tape is playing back a Standard Play recording.
⑪ VIDEO TAPE indicator. This appears when a video tape has been inserted into the VCR.
UNPACKING THE ACCESSORIES
CHECK ALL THESE ACCESSORIES ARE SUPPLIED WITH YOUR VCR. CONTACT YOUR DEALER IF ANY ARE MISSING;
REMOTE CONTROL
operates the VCR.
Battery cover
(TYPE AA)
BATTERIES (X2)
for the remote control unit.

natural_image
Simple line drawing of a twisted cable or wire (no text or symbols)COAXIAL CABLE
connects the VCR to the TV.
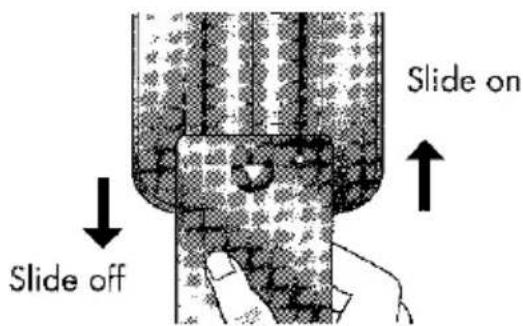
To fit the batteries into the remote control
Press 📍 and slide the battery cover down over the back of the remote control.
Fit the batteries: ⊖ to ⊖ terminal and ⊕ to ⊕. Slide the battery cover back.

Remote Control
● Remote Control must be pointed towards the VCR to operate.
- Do not expose to liquid or shock.
● May not function if the VCR is in direct sunlight or any other strong light.
- Replace both alkaline batteries (type AA) if the remote control fails.
- Remove the batteries and keep in a safe place if you do not plan to use the VCR for several months.
- Remove and dispose of flat batteries promptly.
- Incorrect use of batteries may cause them to leak or burst.
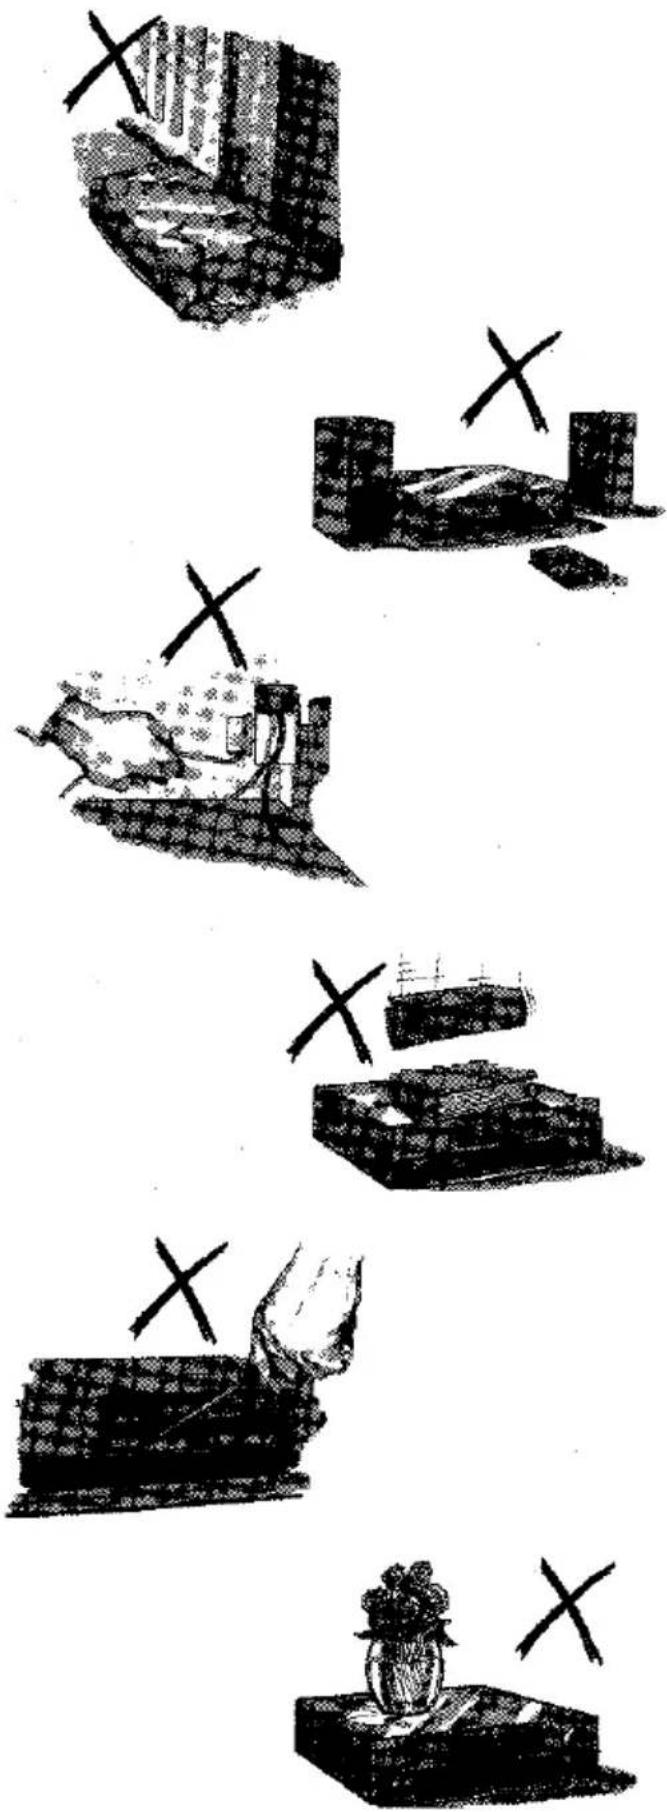
IDEAL VCR LOCATION
- Place the VCR on a flat level surface away from radiators or other heat sources and out of direct sunlight.
- Allow ventilation space around the VCR and position away from curtains, carpets or other materials.
- Do not block the air-vent openings.
- Keep VCR and video tapes away from magnetic sources such as speakers or microwave ovens.
- Place the VCR at least 8" (20cm) away from the TV.
- Do not overload power sockets, this may cause a fire or an electric shock.
● Never pull the power cord to disconnect the plug from the mains.
● To avoid overheating or even fire, insert the plug correctly into the socket and do not bind the power cords together.
- Avoid exposing the VCR to excessive dust, mechanical vibration or shock.
- Do not place any heavy object on top of the VCR.
- Do not insert or drop anything into the cassette compartment or through the air-vents, as this could result in serious damage, fire or even an electric shock.
- Do not place any heavy object or liquid on the VCR. If liquid drops inside the VCR unplug immediately and contact your SHARP dealer. Do not use the VCR.
CONNECTING THE VCR TO THE TV AND AERIAL
1
Connect your existing aerial cable to the VCR using the ANTENNA IN socket.
BACK OF TELEVISION
2
Connect the VCR to the TV with the coaxial cable supplied using the RF OUT (VCR) and AERIAL IN (TV) sockets.

Optional SCART connection (not supplied, refer to page 35). Connect the VCR to the TV with a SCART lead for improved reception.
3
Connect the VCR plug to the mains socket. The VCR is now in STANDBY mode.

√ The VCR is now correctly connected.
To replace mains plug and fuse, see CONNECTING TO THE MAINS, page 33.
IMPORTANT NOTE ON CH5 BROADCASTING
In some areas Channel 5 Broadcasting Limited have been permitted to broadcast on a channel close to that normally used by VCR's. In these areas the VCR signal and the Channel 5 signal may interfere with one another. This will be seen as:
- Disturbance to the VCR playback picture which disappears when the aerial is disconnected from the VCR.
● Disturbance to the Channel 5 picture which disappears when the VCR is switched off
To eliminate this problem we recommend connecting the VCR to the TV using a SCART lead connected to LINE 1/OUT on the VCR as shown on page 6. This has the added benefit of improving the playback picture. Suitable leads can be obtained from your dealer or from the Sharp Parts Distributor (see page 35)
If your television does not have a suitable socket, it may be possible to obtain satisfactory performance by adjusting the RF modulator (see following page item 4), and retuning your television. If the interference persists, the procedure must be repeated as often as necessary to obtain satisfactory results, however in rare circumstances it will not be possible to obtain interference-free performance.
TUNING THE TV INTO THE RF VIDEO CHANNEL
The following procedure describes how to tune the VCR RF channel. It will not be necessary to tune the RF channel if a SCART lead is connected as shown on page 6, simply select 'AV' on your TV.
-
Press STOP on the remote control to switch on the VCR. Your SHARP VCR has been factory set to channel 36.
-
Switch on the TV. Select an unused channel for your VCR (there may be a dedicated video channel - refer to your TV operation manual).
-
Tune the selected channel on your TV (refer to your TV manual) until the auto installation menu appears on the screen. If there is no interference on the screen begin Auto installation (following page).
VC-M27HM Model Only
-
If there is interference on the VCR signal, press STANDBY on the remote control. This will switch the VCR to standby mode.
-
Press and hold MENU for about 2 seconds until the display shows CH36. Then press [▲] once. The display will show CH37. Press SET to confirm. Press STOP on the remote control to switch on the VCR. You will now need to return your VCR channel on the TV. If interference persists return to step 4.
Note that Channel Number will increase each time you carry out this procedure.
VC-M27LM Model Only
-
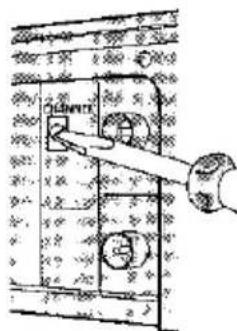
If there is interference on the VCR signal, carefully use a screwdriver to turn CHANNEL adjustment (at the back of the VCR) by up to half a turn either way. You will now need to retune your VCR channel on the TV.
-
Repeat from step 4 until you have an auto installation screen which is free from interference.
If you change your TV set or need to re-tune your TV into the RF video channel on the VCR for any reason, see RE-TUNING YOUR TV TO THE RF VIDEO CHANNEL on page 3.1.
If problems persist contact SHARP Consumer Information Centre LoCall 0345 125387
√ The TV is tuned to the VCR.
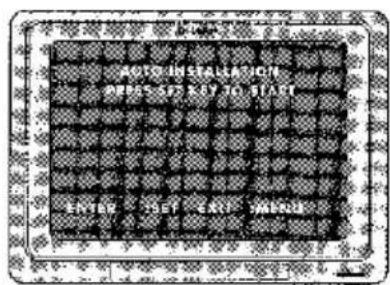
AUTO INSTALLATION
This model automatically tunes the TV channels for your area, then using Teletext information sorts the TV channels into a standard order and sets the clock.
- Turn the TV and VCR on, and select the video channel on the TV.
- Ensure the VCR is connected as shown on page 6 and the instructions on page 8 have been carried out (When no SCART lead is used).
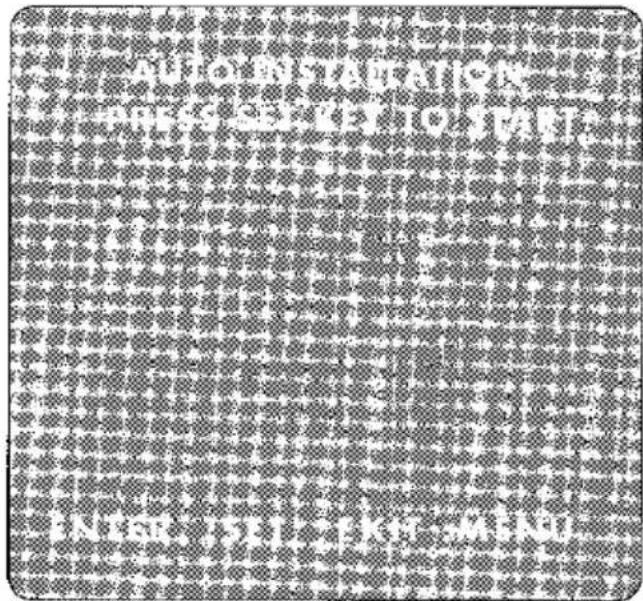
If the VCR has not previously been tuned-in, instructions will be given on screen to guide you through this procedure.
If the screen opposite does not appear when the video is first switched on then follow the procedure below.
- Press MENU.
- Press [▲/▼] to select VCR RESET and press SET twice to confirm.
- Follow the on-screen display.
- Press MENU to exit the menu function at any time.
2.
If you leave more than 2 minutes between pressing any buttons, the VCR will leave the MENU function.
If the VCR does not
- Sort the channels in your preferred order, refer to MANUAL SORTING, (includes MOVE CANCEL, and NAME) pages 27 to 29.
● Auto-tune (due to poor reception), refer to MANUAL TUNING, (including SKIP) page 30. - Set the clock, refer to MANUAL CLOCK SETTING page 31

All the programmes should now be correctly tuned in and the clock set.
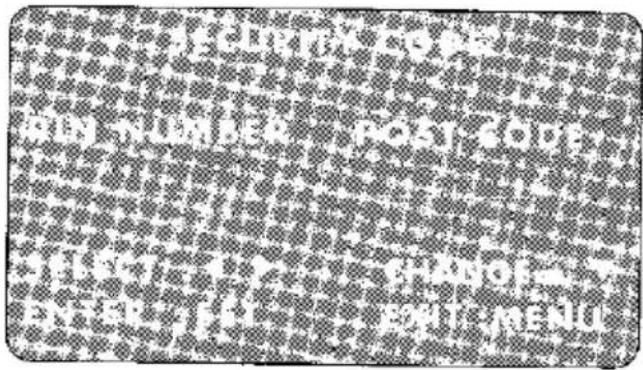
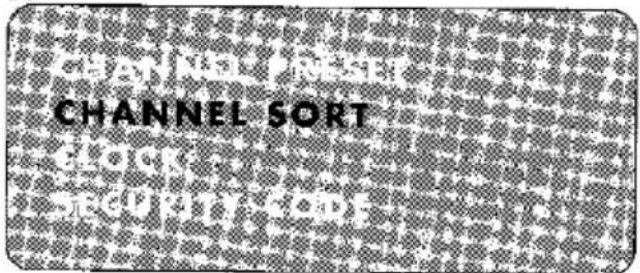
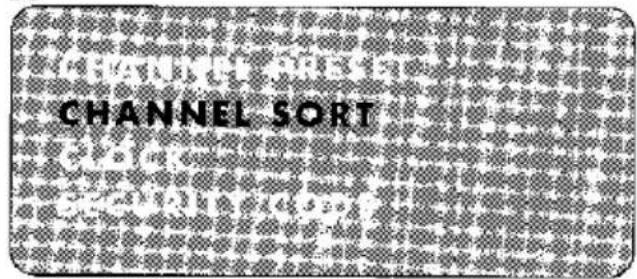
POST CODE SECURITY
This is a new feature which allows the Police to identify you as the owner of the VCR if it is stolen. Each time the VCR is turned on your postcode will be displayed for 5 seconds. Your post code cannot be changed or removed without first entering the correct PIN - number. If you wish to use this function, follow the procedure below.
-
Press MENU
-
Press [▲/▼] to select SET UP. Press SET to confirm.
-
Press [▲/▼] to select SECURITY CODE. Press SET to confirm.
-
Enter your desired PIN number using the NUMBER BUTTONS or the [▲/▼] key. This must be a 4 digit number in the range 0000 - 9999. Press SET to confirm.
- Using the NUMBER BUTTONS or [▲/▼ / ◀/▶] key, enter your Postcode. Press SET to confirm.
- Record your PIN number in the box provided for future reference.
NOTE: Your Post code can be changed at any time, but you must first enter your correct PIN number. If the wrong PIN number is entered an error message will appear. Re-enter the correct numbers. If you wish to change your PIN number at any time follow the procedure below:
- Enter your correct PIN number. Press SET to confirm.
- Press [◀] to re-select your PIN number.
- Enter your PIN number. Press SET to confirm.
natural_image
Simple rectangular frame with four empty cells, no text or symbols presentIMPORTANT:- Please keep your Operation Manual separate from your VCR.
INTRODUCTION

CAUTION! BEFORE LOADING A VIDEO TAPE INTO THE VCR
Condensation forms in the VCR when it is moved out of or into a warm place. If you try to playback or record at this time, the video tape and VCR may be damaged. Turn the VCR on and wait a few hours for the VCR to reach room temperature before operating.
VIDEO TAPES
- Use only video tapes which carry the VHS PAL mark.
REMOTE CONTROL AND VCR
- The VCR shares some function buttons with the remote control. You can use either to operate the VCR. (see page ii)
Record-protection tab
PLAYBACK
-
Switch on your TV and select the video channel.
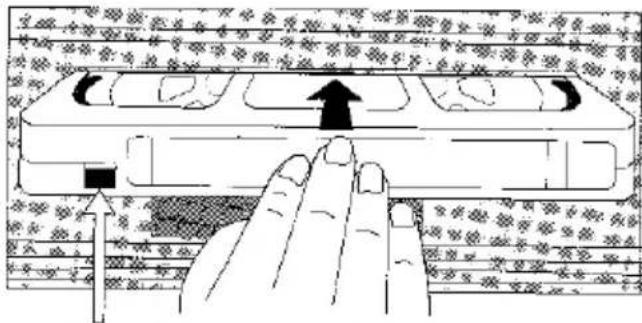
-
Carefully push a pre-recorded video tape into the cassette compartment as shown in the diagram. ☐ appears in the display. This will switch the VCR on.
-
To start playback, press PLAY/X2 once.
If the record protection tab has been removed, the VCP will start playback as soon as the video tape has been loaded.
- For double speed playback (without sound), press PLAY/X2 again.
● To revert to normal playback, press PLAY/X2 again.
- To stop playback, press STOP once. To eject the tape press EJECT on the VCR.
SHARP SUPER PICTURE
In many cases, SHARP SUPER PICTURE will enhance the picture quality during playback of a tape with high-residual interference, making it easier to view. It is preset to ON, and the on screen display (OSD) will indicate that SHARP SUPER PICTURE is in operation. To select or deselect press SUPER P. on the VCR front panel.
INTRODUCTION continued
PICTURE DISTURBANCE DURING PLAYBACK
- The auto-tracking system reduces picture disturbance and is set automatically at the start of playback. Flashing on the OSD indicates auto-tracking.
- To operate auto-tracking manually, press and hold CHANNEL ⊖ and ⭕ buttons together until the OSD flashes
- To adjust disturbance lines, press CHANNEL ⊖/⊕ during playback to position picture interference off the screen.
HEAD CLEANING
- If you only use good quality video tapes, generally it will not be necessary to clean the video heads. Indeed frequent use of some types of cleaner will cause early failure of video heads. If it becomes necessary to clean the video heads, please contact your dealer or a SHARP service facility.
- If poor quality tapes are used, or if a tape is loaded after changing VCR location, oxide from the tape may "clog" the video heads. This will cause the playback picture to be "snowy", or even disappear.
- Run a video tape in VISUAL SEARCH (see page 13) to remove minor contamination. If this fails, you will need to have the heads cleaned by a SHARP Service Facility. Please note, if cleaning is necessary it is not covered by the guarantee.
SELECTION OF PROGRAMME NUMBER
Select the programme number by using the number buttons on the remote control. For example, for Programme 2, press 2.
OR
Select the previous/next programme number by pressing CHANNEL ⊖/⊕.
To change between single digit and 2-digit programme numbers, press (K)
For example, for programme 24, press then press 24.
SEARCHING THE TAPE
You can rewind or fast forward to locate quickly a point on the tape. You can also search with more control using visual search. Both of these can be operated using REW and FF on the remote control or the VCR.
REWIND
In stop mode, press REW on the remote control or the VCR. To stop rewind, press STOP once.
REVERSE VISUAL SEARCH
● During playback, press REW on the remote control.
● To increase the speed, press REW again.
- Press PLAY/X2 to resume playback.
FAST FORWARD
In stop mode, press FF on the remote control or the VCR. To stop fast forward press STOP once.
FORWARD VISUAL SEARCH
● During playback, press FF on the remote control.
● To increase the speed, press FF again.
- Press PLAY/X2 to resume playback.
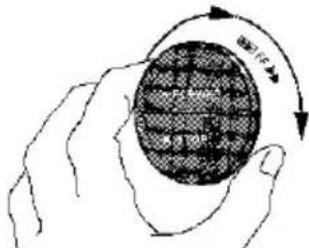
natural_image
Illustration of a hand holding a circular object with internal grid pattern, no text or symbols present● During search, noise bars and black and white picture will appear on the TV.
● The upper part of the picture may be skewed to one side with LongPlay (LP) tapes.
See also SKIP SEARCH; page 25
STILL FRAME AND SLOW MOTION PLAYBACK
- For a still frame during playback, press PAUSE/STILL.
- For slow motion playback, (without sound) press SLOW on the remote control.
- To minimise jitter press CHANNEL ⊖/⊕ whilst in pause mode.
There will be picture interference and passibly a change to black and white picture using these functions
- PAUSE mode will disengage after about 5 minutes.
ON-SCREEN DISPLAY
If you are recording, playing back a tape or watching a broadcast on the video channel you can call up three on-screen displays.
The displays can be selected in the following order by pressing the MODE OSD button 1, 2, 3 or 4 times.
1.
natural_image
Pattern of repeating dark circular shapes on a light background, no text or symbols present-
AUTO The current mode and channel number will be displayed for 3 seconds when an operation or number button is pressed.
-
FULL The first full screen display remains on screen.
2.
3.
natural_image
Pattern of repeating diamond shapes on a white background (no text or symbols)3.COUNTER This shows tape counter and tape remaining.
- DISPLAY OFF This removes the display from the screen.
● Time and date will not be displayed if the clock has not been set.
● The VCR will return to AUTO display each time it is switched on.
- if you are recording from this VCR to another, use DISPLAY OFF to prevent the display from being recorded onto the other VCR.
MODE SELECTION
Press MENU to display the main menu on the screen. The main menu has five options including MODE. For a brief description of these see page 2.
-
To access the mode menu highlight MODE using the [▲/▼] buttons, then press SET.
-
Highlight the option to be changed using the [▲/▼] buttons. Press [◀/▶] to select AUTO, ON or OFF as appropriate, then press SET to return to the normal screen.
-
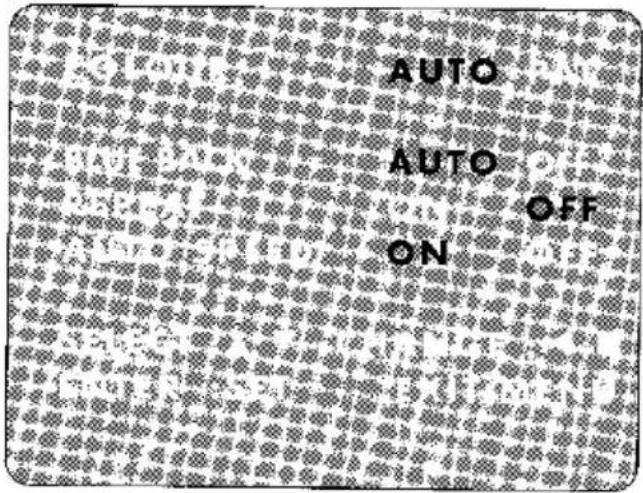
COLOUR. If the VCR is playing a poor quality recording, the picture may turn black and white. Selecting PAL may reduce this (depending on the recording), although coloured speckles will appear on black and white recordings.
BLUE BACK. This alters the background colour of the on-screen display. The TV screen will be blue if a TV channel with no signal is selected, an unrecorded section of tape is played or the quality of the recording on the tape is poor. Select OFF to disable this feature.
REPEAT. If you want to play back repeatedly an entire video tape, this feature will automatically rewind at the end of the tape and replay. This function enables or disables this feature.
AUTO-SPEED. After setting a delayed recording, this feature will, if enabled, check the remaining amount of unused video tape. If this is insufficient to complete the recording at standard speed (SP), it will automatically select long play (LP), even if (SP) has been selected in the TIMER menu. This will allow as much of the recording as possible to be made.
Standard Play (SP) gives the best picture quality; long play (LP) provides the longest recording time.
IMMEDIATE RECORDING
You can record the programme you are watching, or one on a different channel. The recording will continue until you press STOP. If the end of the tape is reached the VCR will stop recording and rewind. Ensure the video tape loaded has a record-protection tab present (see page 11).
- Select the programme you wish to record.
- To change between recording in standard play (SP) and long play mode (LP), press TAPE SPEED.
- To record from an external source such as a camorder select AV. See RECORDING FROM AN EXTERNAL SOURCE, page 23 - When dubbing from one VCR to another turn SHARP SUPER PICTURE off.
- To start recording, press REC. The VCR display will show REC for approximately 3 seconds.
- To pause during recording, press PAUSE. The VCR display will show PAUSE for approximately 3 seconds.
- To continue recording, press REC. To stop recording, press STOP once only.
The clock does not have to be set before you make an immediate recording.
SIMPLE TIMED RECORDING
TIMED SWITCH-OFF
You can start recording immediately and specify a stop time for recordings - useful perhaps when having an unexpected visitor or telephone call.
● The clock must be set for timed switch-off to work.
- If ☐ appears on the VCR display, press TIMER ON/OFF before starting.
- Select the programme you wish to record.
- To change between recording in standard play (SP) and long play mode (LP), press TAPE SPEED.
natural_image
Patterned fabric with repeating dot textures and no visible text or symbols- Press REC once to start recording.
- To specify stop time, press REC again. Each additional press of REC will delay the stop time by 10 minutes. Adjust the number of minutes by pressing CHANNEL ⊖/⊕. The stop time will be shown on the VCR and on-screen display.
To cancel recording and timed switch-off press STOP once.
PDC (PROGRAMME DELIVERY CONTROL)
If you set the timer manually or by using VIDEOPLUS+, PDC will ensure that even if there is a change in actual broadcast time the VCR will still record the whole programme. The PDC signal broadcast by the TV station controls the timer recording.
It is essential that the EXACT start time for the TV programme being recorded is set for this feature to operate as the VCR uses this information to identify the programme.
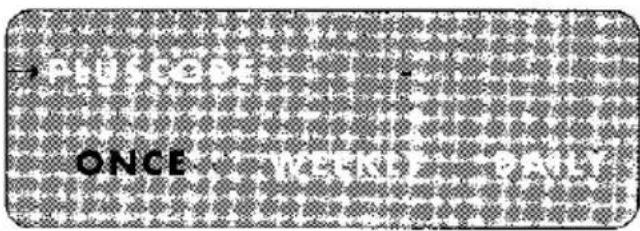
DELAYED RECORDINGS USING VIDEOPlus+
This feature allows you to program the VCR using the Pluscode numbers published in TV listings. The VCR can make up to a total of 8 delayed recordings.
- If ☐ appears on the VCR display, press TIMER ON/OFF before starting.
- Check that the clock is displaying the correct time.
2.
-
Press [SV/V+/TIMER].
-
Enter the PLUSCODE using the NUMBER BUTTONS. If you enter an incorrect number an ERROR message will appear. If this happens, press CLEAR to delete the numbers as required.
-
If you want to make additional recordings at the same time each day or week, use [▲/▼] to select ONCE, WEEKLY, or DAILY option, then use [◀/▶] to select as appropriate. Press SET to confirm.
The menu will show the timer setting corresponding to the PLUSCODE entered. Check that this agrees with the times in the TV listings. If this is incorrect press CLEAR to return to the PLUSCODE menu.
You may also access the VIDEOPLUS+ menu by the following procedure:
i. Press MENU
ii. The VIDEOPLUS+ option will be highlighted. Press SET to confirm
Continue from step 2 above.
DELAYED RECORDINGS USING VIDEO plus cont.
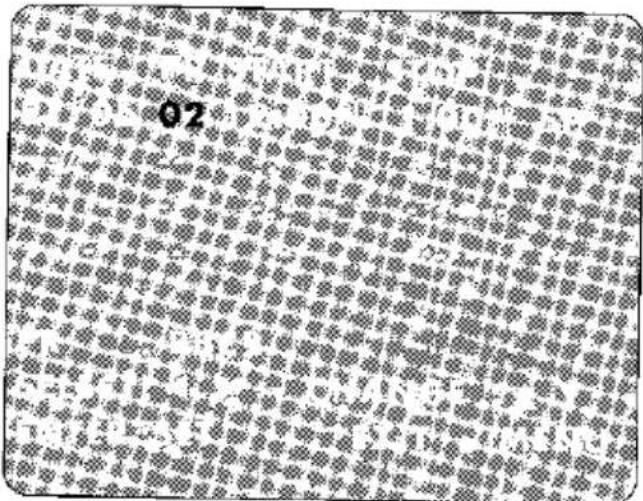
The first time that you use Video Plus+ to make a recording the menu will highlight PR. Enter the programme number using the NUMBER BUTTONS, for example if BBC2 is tuned to programme 2 press 0 2. For satellite receivers connected with a SCART lead, press [▲/▼] until display shows for example AV instead of CHANNEL NUMBER. This is one position before 01. The VCR will remember this for the future.
4.
- To change the recording speed use the [◀/▶] to highlight SP. Press [▲/▼] to select SP or LP as required.
If Auto Speed is ON, LP will automatically be selected if there is not enough tape to record SP.
- To turn PDC off use [◀/▶] to highlight the * symbol. Press [▲/▼] to turn PDC on or off as required. When PDC is off * symbol is replaced by - .
5.
natural_image
Patterned fabric with repeating diamond-like motifs (no text or symbols)-
Press SET to confirm the programme. The pluscode menu will re-appear.
-
If you wish to enter further VideoPlus+ settings, repeat this procedure.
-
When you have completed entering timer settings, press MENU to remove the menu from the TV screen.
DELAYED RECORDINGS USING VIDEOPlus+ cont.
- Press TIMER ON/OFF once to place the VCR in TIMER STANDBY mode. ☐ will appear on the VCR display.
When 📁 appears on the display you must press TIMER ON/OFF to use the YCR, but remember to press it again or your recordings will not be made. If a video tape is not loaded, 📁 will flash. If the record-projection fab is missing, see page 1. The cassette will be ejected.
- During recording, press STOP to cancel the recording. If there are further recordings to be made, the VCR will return to TIMER STANDBY.
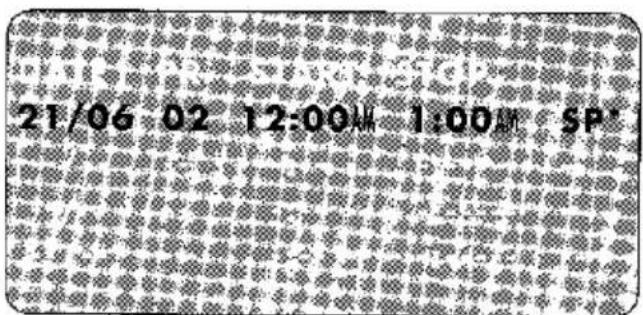
DELAYED TIMER RECORDINGS
This feature allows you to make a maximum of 8 delayed recordings up to a year in advance.
- If ☐ appears on the VCR display, press TIMER ON/OFF before starting.
- Check the clock is displaying the correct time.
For example: Recording programme 3 from 9:05pm to 10:30pm on July 9th.
1.
- Press MENU then press [▲/▼] to select TIMER mode. Press SET to confirm.
Previously selected timer recordings will be listed
The position which is initially highlighted is the next available. Press SET to confirm.
DELAYED TIMER RECORDINGS continued
2.
3.
-
The display will automatically show today's date. If this is the date you wish to make the recording on, press SET to confirm this. Otherwise enter the recording date using the NUMBER BUTTONS. Enter 2 digits for the day, then 2 for the month. For example for July 9th, press 0 9 (9th), then 0 7 (July). Then press SET to confirm.
-
If you want to make additional recordings at the same time each day or week, use [▲/▼] to select D or W. Then press SET to confirm.
-
Enter the programme number using the NUMBER BUTTONS. For example to record programme 3, press 0 3. Then press SET to confirm.
To record programmes from satellite receivers connected using a SCART lead, press [▲/▼] until display shows for example AV instead of channel number. This is one position before channel 01.
5.
6.

-
Enter the start time using the NUMBER BUTTONS - hours first then minutes (when entering less than 10 minutes add a '0' before the number), for example for 9:05pm start, press 905, then [AM/PM] until PM appears. Then press SET to confirm.
-
Enter the stop time, for example for 10:30pm stop, press 1030 then AM/PM.
To change the recording speed use the [◀/▶] to select SP. Press [▲/▼] to select LP. Pressing [▲/▼] again will change back to SP.
DELAYED TIMER RECORDINGS continued
8.
-
To turn PDC off use the [◀/▶] to highlight the * symbol, then press [▲/▼]. When PDC is off the * symbol is replaced by - . Pressing [▲/▼] again will change back to PDC on.
-
Press SET to confirm the programme.
The MENU now shows all the timer settings you have entered. If you wish to make additional timer recordings, repeat this procedure.
- When you have completed entering timer settings, press MENU to remove the menu from the TV screen. Press TIMER ON/OFF once to place the VCR in TIMER STAND-BY mode. □ will appear in the VCR display.
If a video tape is not in the VCR, ☐ will flash. If the record-protection tab is missing, (see page 11) the video tape will be ejected. When ☐ appears on the display, you must press TIMER ON/OFF to use the VCR, but remember to press it again or your recordings will not be made. During recording, press STOP to cancel the recording. If there are any more recordings to be made, the VCR will return to TIMER STAND-BY.
CONFIRMING/CANCELLING DELAYED RECORDINGS
This feature allows you to check what programmes have been entered into the timer memory.
2.
3.
natural_image
Patterned fabric with repeating diamond-like motifs (no text or symbols)4.
-
Press MENU.
-
Press [▲/▼] to select TIMER. Press SET to confirm.
-
Check the timer settings displayed on screen.
-
If you wish to change a timer recording, press [▲/▼] to highlight the setting, then press SET. Press [◀/▶] to highlight the item to be changed and correct the item. When all corrections are complete press SET, then press MENU.
-
If you wish to cancel a timer recording, press [▲/▼] to highlight the recording to be cancelled, then press CLEAR.
-
Press MENU.
If there are some programmes to be recorded, do not forget to press TIMER ON/OFF to return the VCR to TIMER STAND-BY mode.
RECORDING FROM AN EXTERNAL SOURCE
It is possible to record video and audio signals from various external sources. To record from an external source press VCR INPUT SELECT on the remote control until AV appears on the VCR display.
Select AV if you wish to record from a source connected with a SCART lead to LINE 1 IN/OUT at the back of the VCR. (See page 6).
REMOTE CONTROL OPERATION OF TV
In addition to operating the VCR, the remote control will also operate basic functions if you have a SHARP television set.
• TV OPERATE Switches the TV to and from Standby Mode.
- TV INPUT SELECT Determines which input to the TV is to be displayed on the screen.
• TV CH ⊖/⊕ Changes the TV channels.
• TV VOL ∧/∨ Increases or decreases the volume.
DIGITAL DISPLAY
When you press DISPLAY, the display on the VCR changes.
TAPE REMAINING
When a video tape is loaded into the VCR, the amount of tape remaining is calculated approximately in hours and minutes - this may be useful in determining whether there is sufficient tape to make a recording. When a video tape is playing, tape remaining is calculated for you automatically.
To display the amount of tape remaining after loading the tape, press DISPLAY. If the tape has just been loaded, the tape will wind forward and then return to its original position. The tape remaining will be indicated in hours and minutes.
For example, 1 hour 23 minutes:


TAPE COUNTER AND ZERO BACK
Tape counter measures the current position of the video tape in real time. ZERO BACK uses the tape counter to determine a specific point on a tape you may wish to return to.
-
Press DISPLAY until tape counter appears, for example:
-
To identify the current position on a video tape press CLEAR and the tape counter will appear:

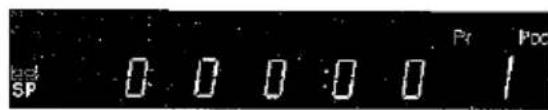
When you wish to return to this position on the video tape, press ZERO BACK. The tape will rewind/advance to this point.
The tape counter will only operate on recorded sections of tape.
TIME OF DAY
Shows current time of day, if the clock is set. Press DISPLAY until the time of day appears. For example, 1:20pm appears:
OPERATION MODE
Shows status of tape. Press DISPLAY until the display appears, for example:


DIGITAL PROGRAMME SEARCH SYSTEM (DPSS)
This VCR records a marker signal on the tape at the start of each recording. These signals can be used later to locate the start point of a recording.
Press DPSS-/+ to locate the previous/next programme.
The DPSS number on the display is relative to current tape position. For example, if you press DPSS+ three times +3 will appear on the on-screen display, and the VCR will locate the third recording after the current one. If you press DPSS- once a -1 will appear on the on-screen display and the VCR will locate the beginning of the current recording.
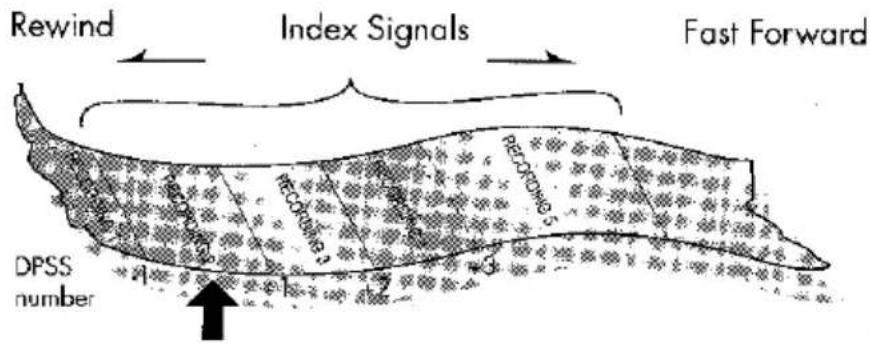
Current tape position
● To cancel DPSS, press STOP or PLAY/X2.
- DPSS functions in normal playback or stop mode provided recordings are longer than 3 minutes.
● The starting point of playback may vary.
- DPSS is for use with video tapes recorded on a VCR with the DPSS function.
SKIP SEARCH
During playback, pressing this button allows you to skip search a section of tape.
Press SKIP SEARCH for forward video search. The number of times you press the button determines the forward search time.
1 press = 30 seconds:
2 presses = 1 minute:
After searching, normal playback will resume automatically.
3 presses = 1 minute 30 seconds.
4 presses = 2 minutes.
REPEAT
This feature plays back the entire video tape repeatedly.
Select REPEAT on the MODE menu. (see page 15). REPEAT will appear on the OSD of the VCR when selected.
CHILD LOCK AND ADVANCED CHILD LOCK
With these features you can lock all VCR modes to prevent accidental change. The functions work even when the VCR is in standby thus preventing children from operating the VCR or viewing select programs.
CHILD LOCK
- Press Ⓞ on the remote control and hold for about 2 seconds. Ⓞ flashes and “----” lights on the VCR display.
- Press @ again. © remains lit on the VCR display confirming that CHILD LOCK has been activated.
Now regardless of what other operating buttons are touched, the VCR will continue to operate in its present mode. If CHILD LOCK is activated during playback, once the tape reaches its end, the VCR will automatically rewind the tape, eject it, and turn the power off.
DISENGAGING CHILD LOCK
Press Ⓞ and hold for about 2 seconds. Ⓞ starts flashing and then disappears. CHILD LOCK is disengaged.
- If power is interrupted for more than 60 seconds (due to power failure etc), CHILD LOCK may disengage
ADVANCED CHILD LOCK
This function works in the same way as CHILD LOCK, the only difference being the use of a personal code number to lock all the VCR modes.
- Press Ⓞ and hold on the remote control for about 2 seconds. Ⓞ flashes and “...” lights on the VCR display.
- Input a personal code number (any 4 digit code) using the numbered buttons. The personal code number you have input is displayed on the VCR display.
- Press ☐ again. ☐ remains lit on the VCR display confirming that ADVANCED CHILD LOCK has been activated.
DISENGAGING ADVANCED CHILD LOCK
- Press Ⓞ and hold for about 2 seconds. Ⓞ flashes and “----” lights on the VCR display.
-
Input the personal code number you used to activate ADVANCED CHILD LOCK using the numbered buttons. The number is displayed on the VCR display. If the code number is wrong "----" is displayed on the VCR display. Re-enter the correct code number, and Press again disappears. Now ADVANCED CHILD LOCK is disengaged.
-
If you attempt to change modes by pressing another button while CHILD LOCK/ADVANCED CHILD LOCK is on, the Ⓞ indicator will flash on the VCR display.
- When you disengage ADVANCED CHILD LOCK the personal code number is erased, so a different number may be used each time you activate ADVANCED CHILD LOCK.
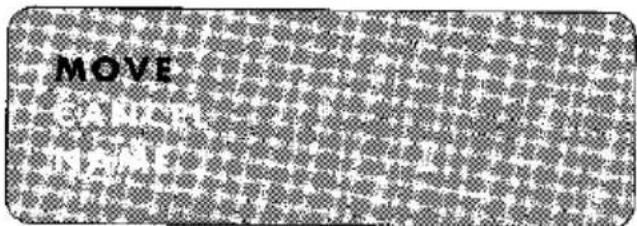
MANUAL SORTING
CHANNEL SORT
Normally the VCR will sort the TV programmes using teletext information. This feature allows you to change the order.
2.
-
Press MENU.
-
Press [▲/▼] to select SET UP. Press SET to confirm.
-
Press [▲/▼] to select CHANNEL SORT mode. Press SET to confirm.
-
The MOVE position will be highlighted. Press SET to confirm.
-
Press [▲/▼] to highlight the channel to be moved. Press SET to confirm.
3.
- Press [▲/▼] to highlight the new position for the channel. Press SET to confirm.
4.
5. Example:
natural_image
Abstract pattern of repeating dark dots on a light background, no text or symbols present-
if any more channels are to be moved, repeat the above procedure.
-
When all the channels are in your preferred order, press MENU to leave the MENU function.
MANUAL SORTING continued
CHANNEL CANCEL
The cancel facility is used to delete unwanted channels.
2.
5. Example:
6. Example:
-
Press MENU.
-
Press [▲/▼] to select SET UP. Press SET to confirm.
-
Press [▲/▼] to select CHANNEL SORT mode. Press SET to confirm.
-
Press [▲/▼] to select CANCEL. Press SET to confirm.
-
Press [▲/▼] to highlight the channel to be cancelled.
-
Press SET twice to cancel the channel.
-
When you have cancelled all the channels you wish, press MENU.
MANUAL SORTING continued
CHANNEL NAME
Normally the VCR will name the TV programmes using teletext information. This feature allows you to change the name of the channel.
2.
-
Press MENU.
-
Press [▲/▼] to select SET UP. Press SET to confirm.
-
Press [▲/▼] to select CHANNEL SORT mode. Press SET to confirm.
3.
-
Press [▲/▼] to highlight NAME. Press SET to confirm.
-
Press [▲/▼] to highlight the channel to be named. Press SET to confirm.
4.
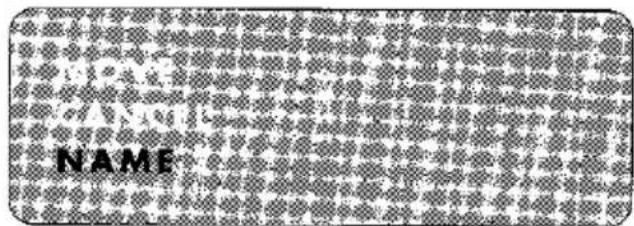
- Press [▲/▼ / ◀/▶] to rename the channel. Press SET to confirm.
Example:
-
If any more channels are to be renamed, repeat the above procedure.
-
When all the channels are named correctly, press MENU to leave the MENU function.
MANUAL TUNING
Normally it will not be necessary to manually tune broadcast programmes except in unusual circumstances such as poor signal.
Ensure that the video channel is selected on the TV.
-
Press MENU. Then press [▲/▼] to select SET UP. Press SET.
-
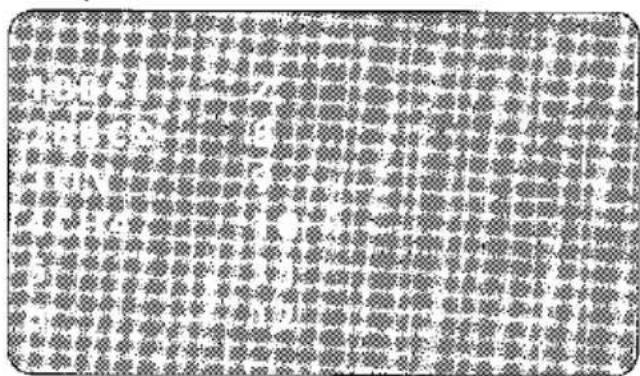
Then press [▲/▼] to select CHANNEL PRESET mode. Press SET to confirm.
1.
CHANNEL PRESET

CABLE RECEPTION FOR VC-M27LM only
| StationSignals VHF | Real ChannelNumbers |
| A | 01 |
| B | 02 |
| C | 03 |
| D | 04 |
| E | 05 |
| F | 06 |
| G | 07 |
| H | 08 |
| J | 09 |
-
Press [▲/▼] to select CHANNEL, then press [◀/▶] to start tuning in either direction. Tuning will stop when a programme is received. If it is not the desired programme, press [◀/▶] to continue tuning.
-
Press [▲/▼] to select FINE TUNING. Press and hold [◀/▶] until the sharpest colour picture is obtained.
-
Press [▲/▼] to select SKIP. The SKIP function determines whether the channel can be selected when using CHANNEL⊖/⊕ instead of the NUMBER BUTTONS.
-
Press [◀/▶] to select ON or OFF for this option.
-
Press SET to confirm.
-
Press MENU to leave this function.
MANUAL CLOCK SETTING
The clock will normally be set automatically using teletext which is present on broadcast television signals. If, for any reason, teletext signals are not present, this procedure will allow you to set the clock manually.
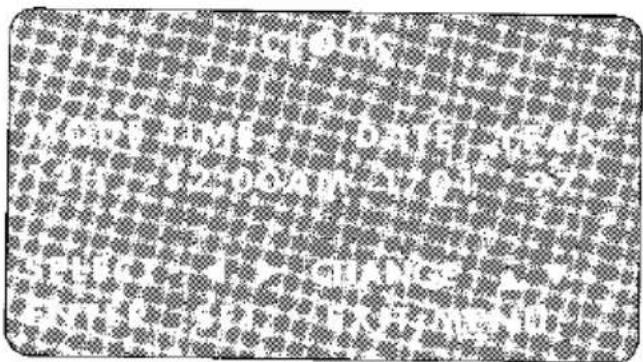
- Press MENU. Press [▲/▼] to select SETUP.
- Press [▲/▼] to select CLOCK. Press SET to confirm.
- Press [▲/▼] to select MANUAL. Press SET to confirm.
-
Press [▲/▼] to select either 12 or 24 hour clock.
-
Press [◀/▶] to select TIME. Enter the time using the NUMBER BUTTONS or [▲/▼]. If the minutes are less than 10, enter the leading 0. If using the 12 hour clock enter AM or PM by pressing [AM/PM] on the remote control.
- Press [◀/▶] to select DATE. Enter the date using the NUMBER BUTTONS. For example, for the 1st of April enter 1 04.
- Press [◀/▶] to select YEAR. Enter the last two digits of the year using the NUMBER BUTTONS. For example, for 1997 enter 9 7. Then press SET to confirm.
If you set the clock manually then it will be necessary for you to update the clock for Greenwich Mean Time or British Summer Time.
RE-TUNING YOUR TV TO THE RF VIDEO CHANNEL
- Switch on the TV. Select an unused channel for your VCR (there may be a dedicated video channel, refer to your TV operation manual).
- Press STANDBY, the VCR will enter standby mode.
- Press MENU for approximately 2 seconds. The channel number will flash on the digital display (VC-M27LM will flash VCR on the digital display).
- Tune the selected channel on your TV until the main menu appears on the screen.
- Press MENU to remove On-Screen Display.

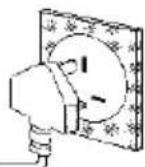
CONNECTING TO A CAMCORDER
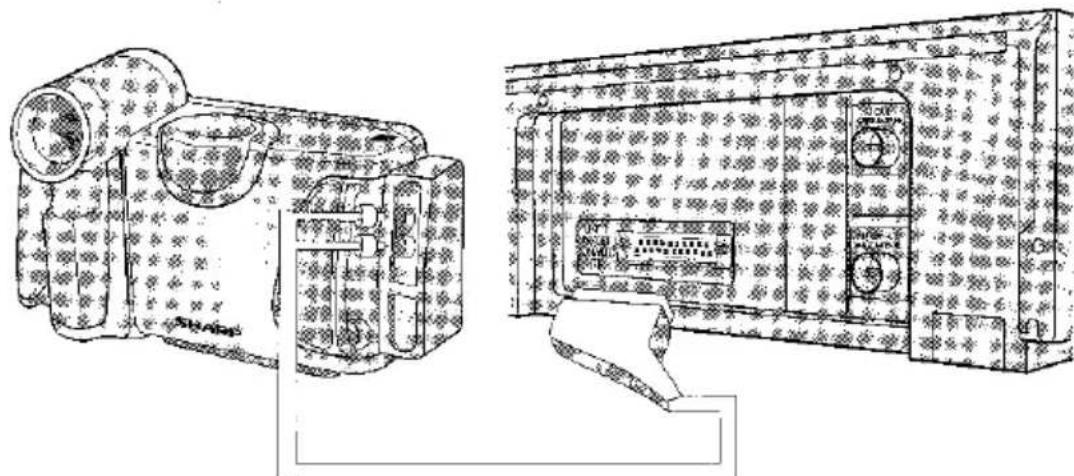
natural_image
Technical line drawings of two vintage camera modules with patterned cover and front panels (no text or symbols)Optional SCART connection (not supplied).
Press VCR INPUT SELECT to select channel AV on the VCR. Display will show AV.
There are numerous different methods of connecting external equipment to the VCR. Please refer to the relevant equipment operation manual for further information.
CONNECTING TO THE MAINS
natural_image
Illustration of a stylized animal holding an object (no text or symbols)This VCR is suitable only for connection to UK mains. The unit is fitted with a moulded 3-pin mains plug with a 3-amp fuse. The VCR does not have a mains power switch. When connected to the mains, the unit will draw current at all times to power the clock. Be sure to unplug the VCR when it is not to be used for several months.
TO REPLACE THE FUSE:
You must use a 3-amp fuse, marked {ASTA} or {BSI} to BS-1362. Remove the fuse cover as shown. Replace the fuse and re-fit the fuse cover securely into the plug.
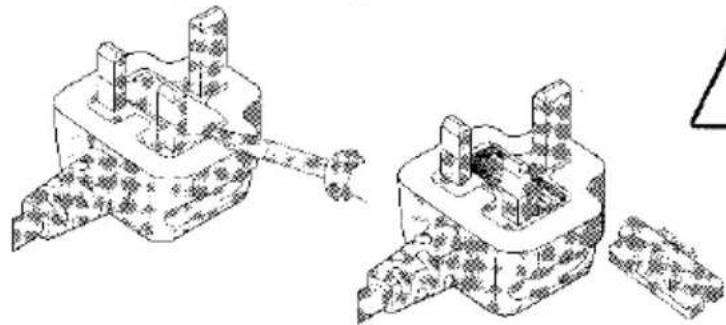
natural_image
Technical line drawing of two mechanical components with no visible text or symbols
Never connect the plug to the mains without the fuse cover fitted.
TO REPLACE THE MAINS PLUG:
If the plug fitted is unsuitable for the mains socket in your home, cut off the plug, remove the fuse and dispose of the cut-off plug safely.

Severe electric shock may occur if you connect the cut-off plug to a mains socket. If a new plug is fitted, observe the wiring code supplied by the plug manufacturer (and given below.) If you have any doubt, consult a qualified electrician.
The wires in the mains cable are colour coded as follows: blue = neutral, brown = live.
As the colours of the wires may not correspond with the terminals in your plug, connect the wires following plug manufacturer's guide:
- blue wire to the terminal marked N or coloured black or blue.
- brown wire to the terminal marked L or coloured red or brown.

Ensure neither the brown nor the blue wire is connected to the earth terminal in your plug.
Do not allow water to come into contact with the power supply cord or plug.
A damaged power supply cord or loose plug may cause electric shock. Contact your SHARP dealer or a qualified electrician. Do not use the VCR.
| PROBLEM | ANSWER | PAGE |
| Display is not working. | Make sure the power cord is plugged in.Check the fuse in the plug.Make sure the wall socket has power [plug another appliance in]. | 33 |
| VCR will not operate - appears in display. | Press the TIMER ON/OFF button to disengage timer. | 16 |
| VCR will not respond to any commands. | Check CHILD LOCK is not engaged.Safety device operating: unplug VCR for 10 minutes. | 26 |
| Cassette cannot be loaded. | Make sure there is no other cassette in the VCR.Make sure you are loading the cassette correctly. | 11 |
| VCR cannot be operated by remote control. | Remote control is too far away from the main unit.Point the remote control at the VCR.Batteries are flat - replace both.Batteries have not been inserted correctly.VCR is positioned in strong light. | 45 |
| No picture appears. | Make sure TV is set to the video channel.Check all connecting cables. | 86 |
| Rewind is not possible. | Make sure tape is not at the start. | 13 |
| Picture does not change even though CHANNEL -/+ buttons are pressed. | Make sure VCR is not in timer or menu mode. | 16 |
| Desired programme position cannot be selected. | The programme position has been set to be skipped.Cancel the skip mode for that channel. | 30 |
| No colour or poor TV picture on normal viewing. | Make sure all the cables are connected properly.Make sure VCR power cord is properly plugged in. | 633 |
| Playback picture is snowy. | Adjust the tracking using CHANNEL -/+ buttons.Try another tape.The video heads may have been contaminated - refer to a SHARP Service Facility. | 1235 |
| Cassette is automatically ejected when pressing REC or TIMER ON/OFF buttons. | The record-protection tab has been removed. | 11 |
| VideoPlus+ does not record desired programme. | Broadcast does not carry PDC signal which alters recording time.Check PDC mode is switched to ON. | 18 |

HELPFUL HINTS
CALLING FOR SERVICE
- If you are unable to resolve a problem using the checks above, do not remove the cabinet or attempt to service this VCR yourself.
- For service please contact your dealer. If this is not possible, please call our Customer Information Centre for details of your nearest Sharp Service Centre.
SHARP Customer Information Centre: Tel Lo-Call 0345 125387
- Please note that for repairs during the guarantee period, you will need to produce proof of purchase.
- SCART leads can be obtained from the SHARP Parts Centre: Tel. 0161 205 7531. Most credit/debit cards accepted.
GUARANTEE
SHARP Electronics (UK) Ltd (hereafter called Sharp) guarantee to provide for the repair, or at its option the replacement, of this product subject to the conditions listed below:
- This guarantee shall only apply to faults which are due to inferior workmanship or materials. It does not cover faults or damage by accident, misuse, fair wear and tear, neglect, tampering with the product, or repair other than by a Service Facility appointed by SHARP.
- As this product is intended for private domestic use only, the guarantee will not apply if the product is used in the course of a business, trade or profession.
- To benefit from this guarantee, any fault which occurs must be notified to SHARP, or its appointed Service Facility within one year from the date this product was purchased. Proof of purchase must be provided.
- The guarantee does not cover carriage costs, batteries or video tapes.
- In the unlikely event of this product requiring repair, please contact the supplier from whom it was purchased. Where this is not possible, please contact the SHARP Customer Information Centre on the telephone number given below.
- This guarantee is offered as an additional benefit to your statutory rights and does not affect these rights in any way.
- No person has any authority to vary the terms or conditions of this guarantee.
If you have any difficulty operating this product, or would like information on other SHARP products, please telephone the SHARP Customer Centre on the number given below.
SHARP Customer Information Centre: Tel Lo-Call 0345 125387
Please note that all calls are charged at local rate.
SPECIFICATIONS
Format: VHS PAL standard
Number of heads: Two heads
Video signal system: PAL colour or monochrome signals: 625 lines
Maximum playing time: 480 min. with E-240 video cassette in Long Play (LP) mode
Tape width: 12.7 mm
Tape speed: 23.39 mm/s Standard Play (SP): 11.70 mm/s. Long Play (LP)
Antenna: 75 Ω unbalanced
Reception channels: UHF channel 21-69 (VHF Channels A-J, VC-MH27LM Models Only)
RF output signal: UHF channel 21-69 (VC-27HM): UHF Channel 30-39 (VC-MH27LM)
Preset to 36: 591.25 MHz
Power requirement: AC 230-240 V, 50 Hz
Power consumption: 17 W (approx)
Operating temperature: 5°C to 40°C
Storage temperature: -20°C to 55°C
Video input: 1.0 Vp-p, 75 Ω
Video output: 1.0 Vp-p, 75 Ω
Audio input: Line: -3.8 dB, 10 kΩ
Audio output: Line: -3.8 dB, 1 kΩ
Dimensions: 360.0(W) × 286.0(D) × 94.0(H) mm
Weight: 3.5 kg (approx)
Supplied accessories: 75 Ω coaxial cable, operation manual, remote control, AA battery (x2)
This equipment complies with the requirements of Directives 89/336/EEC and 73/23/EEC as amended by 93/68/EEC.
CE
- Specifications are subject to change without notice as part of our policy of continuous improvement.
- No liability is accepted for any inaccuracies or omissions in this publication, although every possible care has been taken to make it complete and as accurate as possible.
SHARP ELECTRONICS (U.K.) Ltd.
Customer information Centre..... LoCall 0345 125387
Parts Centre 0161 205 7531
- SHARP
- VIDEO CASSETTE RECORDER OPERATION MANUAL
- VCR front panel/remote control equivalent functions.
- Dear SHARP Customer
- Copyright
- SAFETY WARNINGS
- CONTENTS
- BASIC INSTALLATION
- EASY START
- RECORDING
- ADVANCED OPERATION
- CUSTOM INSTALLATION
- OPTIONAL CONNECTIONS
- HELPFUL HINTS
- ON-SCREEN DISPLAY MAIN MENU
- VCR DISPLAY
- UNPACKING THE ACCESSORIES
- CHECK ALL THESE ACCESSORIES ARE SUPPLIED WITH YOUR VCR. CONTACT YOUR DEALER IF ANY ARE MISSING;
- (TYPE AA)
- BATTERIES (X2)
- COAXIAL CABLE
- To fit the batteries into the remote control
- Remote Control
- IDEAL VCR LOCATION
- CONNECTING THE VCR TO THE TV AND AERIAL
- 1
- 2
- 3
- IMPORTANT NOTE ON CH5 BROADCASTING
- TUNING THE TV INTO THE RF VIDEO CHANNEL
- VC-M27HM Model Only
- VC-M27LM Model Only
- AUTO INSTALLATION
- POST CODE SECURITY
- INTRODUCTION
- CAUTION! BEFORE LOADING A VIDEO TAPE INTO THE VCR
- VIDEO TAPES
- REMOTE CONTROL AND VCR
- PLAYBACK
- SHARP SUPER PICTURE
- INTRODUCTION continued
- PICTURE DISTURBANCE DURING PLAYBACK
- HEAD CLEANING
- SELECTION OF PROGRAMME NUMBER
- SEARCHING THE TAPE
- REWIND
- REVERSE VISUAL SEARCH
- FAST FORWARD
- FORWARD VISUAL SEARCH
- STILL FRAME AND SLOW MOTION PLAYBACK
- ON-SCREEN DISPLAY
- 1.
- 2.
- 3.
- MODE SELECTION
- IMMEDIATE RECORDING
- SIMPLE TIMED RECORDING
- TIMED SWITCH-OFF
- PDC (PROGRAMME DELIVERY CONTROL)
- DELAYED RECORDINGS USING VIDEOPlus+
- DELAYED RECORDINGS USING VIDEO plus cont.
- 4.
- 5.
- DELAYED RECORDINGS USING VIDEOPlus+ cont.
- DELAYED TIMER RECORDINGS
- DELAYED TIMER RECORDINGS continued
- 6.
- CONFIRMING/CANCELLING DELAYED RECORDINGS
- RECORDING FROM AN EXTERNAL SOURCE
- REMOTE CONTROL OPERATION OF TV
- DIGITAL DISPLAY
- TAPE REMAINING
- TAPE COUNTER AND ZERO BACK
- TIME OF DAY
- OPERATION MODE
- DIGITAL PROGRAMME SEARCH SYSTEM (DPSS)
- SKIP SEARCH
- REPEAT
- CHILD LOCK AND ADVANCED CHILD LOCK
- CHILD LOCK
- DISENGAGING CHILD LOCK
- ADVANCED CHILD LOCK
- DISENGAGING ADVANCED CHILD LOCK
- MANUAL SORTING
- CHANNEL SORT
- Example:
- MANUAL SORTING continued
- CHANNEL CANCEL
- Example:
- CHANNEL NAME
- Example:
- MANUAL TUNING
- CHANNEL PRESET
- MANUAL CLOCK SETTING
- RE-TUNING YOUR TV TO THE RF VIDEO CHANNEL
- CONNECTING TO A CAMCORDER
- CONNECTING TO THE MAINS
- TO REPLACE THE FUSE:
- TO REPLACE THE MAINS PLUG:
- CALLING FOR SERVICE
- SHARP Customer Information Centre: Tel Lo-Call 0345 125387
- GUARANTEE
- SPECIFICATIONS
- CE
- SHARP ELECTRONICS (U.K.) Ltd.
Marke : SHARP
Modell : VC-M27
Kategorie : Videorekorder