
AF 5078MS - Digitaler Fotorahmen AGFAPHOTO - Kostenlose Bedienungsanleitung
Finden Sie kostenlos die Bedienungsanleitung des Geräts AF 5078MS AGFAPHOTO als PDF.


| Produkttyp | Digitaler Fotorahmen |
| Modell | AF 5078MS |
| Marke | AgfaPhoto |
| Bildschirmgröße | 7 Zoll (17,8 cm) Diagonale |
| Bildschirmauflösung | 800 x 480 Pixel (WVGA) |
| Seitenverhältnis | 16:9 |
| Abmessungen (B x H x T) | ca. 19 x 13 x 3 cm |
| Gewicht | ca. 350 g |
| Stromversorgung | Netzteil (5 V DC, 1 A) oder USB |
| Stromverbrauch | ca. 5 W (Betrieb), < 1 W (Standby) |
| unterstützte Speichermedien | SD/SDHC-Karte, USB-Stick (FAT32) |
| unterstützte Bildformate | JPEG, BMP, PNG |
| unterstützte Videocodecs | Motion JPEG (AVI) |
| Diashow-Modus | ja, mit verschiedenen Übergangseffekten |
| Uhr und Kalender | ja, integriert |
| Weckerfunktion | ja |
| Bilddrehung | automatisch (EXIF) oder manuell |
| Helligkeitseinstellung | manuell (5 Stufen) |
| Fernbedienung | im Lieferumfang enthalten (IR) |
| Gehäusematerial | Kunststoff, schwarz oder weiß |
| Reinigung | weiches, trockenes Tuch; keine aggressiven Reiniger |
| Sicherheitshinweise | Nicht in feuchter Umgebung betreiben; kein Wasser; Stecker ziehen bei Gewitter |
| Reparatur | Nur vom autorisierten Fachmann; keine verschweißten Teile |
Häufig gestellte Fragen - AF 5078MS AGFAPHOTO
Benutzerfragen zu AF 5078MS AGFAPHOTO
0 Frage zu diesem Gerät. Beantworten Sie die, die Sie kennen, oder stellen Sie Ihre eigene.
Eine neue Frage zu diesem Gerät stellen
Laden Sie die Anleitung für Ihr Digitaler Fotorahmen kostenlos im PDF-Format! Finden Sie Ihr Handbuch AF 5078MS - AGFAPHOTO und nehmen Sie Ihr elektronisches Gerät wieder in die Hand. Auf dieser Seite sind alle Dokumente veröffentlicht, die für die Verwendung Ihres Geräts notwendig sind. AF 5078MS von der Marke AGFAPHOTO.
BEDIENUNGSANLEITUNG AF 5078MS AGFAPHOTO

AGFAPHOTO
AF 5078MS
Quick Start Guide
1

1 Packing Contents
1.1 Digital Photo Frame
1.2 Power Supply
1.3 Quick Guide
1.4 Warranty Card (not depicted)
2

flowchart
graph TD
    A["Device 2.1"] --> B["Device 2.2"]
    B --> C["Device 2.4"]
    C --> D["Device 2.3"]
2 Getting Started
2.1 Insert a memory card (SD, MMC or MS) into the card slot.
Inser the O35 device into the O35 port
The card will only fit in one direction; do not force it. The card should fit snugly when properly inserted.
2.2 Connecting to a PC Using the USB cable (not included), you can connect your frame to a computer to transfer files between the internal memory and computer.
If you connected the frame to a computer, the inserted memory card can not be recognized.
2.3 Plug AC adaptor into the Digital Photo Frame, and plug it into a wall outlet.
2.4 Press the POWER button on the rear of the device to power on.
3
flowchart
graph TD
    A["Device 1"] -->|Hand Interaction| B["Output"]
    C["Device 2"] -->|Hand Interaction| D["Output"]
3 Basic Operations
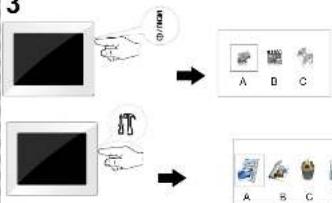
3.1 Press the MENU/Obutton to enter the main menu.
A: PHIO MAYBCEK
C. Music Playback
- 2017年1月1日,公司与关联方累计发生关联交易的总金额为人民币45,000万元。
Press the button to enter the setting menu:
A: Preview Mode
B: Copy Menu C: Delete Menu
D. Selling Made
3.2 Use the direction key to select different item.
-
Direction Key
-
Skips to previous or next image/video/music file.
Enable music playre menu during slide show
-
Direction Key
-
Adjust the volume during audio playback.
OK StartPauseValidation the playback
Press the 7 button during photo playback:
品
Photo Preview Mode( 16 thumbnails per page)

flowchart
graph LR
    A["Image generation"] --> B["Color tracking"]
    B --> C["Bird observation"]
    C --> D["Output"]
- Use ▲ or ▼ button to select a folder/album on the left, then press ▶ button.
- Use ▲,▼,◄ or ► button to select an image and press the OK to start the slideshow.
- Skips to the previous or next image, use the button. To pause or start the slide show press the OK
- Press the ▲ button to enter the background music setting menu. Use or ▲ button to adjust the volume.
4
Photo Copy Menu

flowchart
graph LR
    A["输入数据预处理"] --> B["数据预处理"]
    B --> C["数据验证"]
    C --> D["数据输出"]
    D --> E["结束"]
- Use acr voulton to select a source,
- Select an image and press the OK
- Use ▲or ▼button to select a folder/album and press the OK to start copying.
- If select □ and press the OK, you can rename the album. Use ▲▼, ▶or ▲button to select a letter/digit and press
the OK. After input all the letters/digits, select the *Enter* and press the OK to confirm.
[Unreadable]
noto Delete Menu

flowchart
graph LR
    A["输入图像"] --> B["预处理"]
    B --> C["输出图像"]
    C --> D["结束"]
- Use ▲ or ▼ button to select a source and;
- Select an image and press the OK. Press the OK again to cancel the selections.
- Press ▶ button and then press the OK button.
- Use ▶ or ▶ button to select √ to delete, select □ to cancel
1
The same steps for music/video copy/delete
π
Setting Mode
Icons in the setting mode:
| To set specific fun frame. |
| To choose the specific power start up mode. |
| : Start up with photo slide show orderly. |
| : Start up with photo slide show randomly. |
| : Start up with video playing orderly. |
| : Start up with video playing randomly. |
| : Start up with photo slide show & then video playing orderly. |
| : Start up with photo slide show & then video playing randomly. |
| : Start up with music playing orderly. |
| : Start up with music playing randomly. |
| Eco Setting(Set the automatically power on/off time). |
| Photo Setting(from the left to the right) |
| : Rotation |
| : To change the interval time for slide show. |
| : To choose different transition effect for slide show. |
| : To set different LCD screen display ratio. |
Setting Mode(Cont.)
Icons in the setting mode:
| Adjustment of Brightness, Contrast, Color saturation, LCD backlight of the LCD screen. | |
| ● Brightness | |
| ● Contrast | |
| ● Color Saturation | |
| ● LCD Backlight | |
| Date Setting | |
| ○ Time Setting | |
| ● Alarm Clock Setting | |
| ○ Resort | |
Appendix
Dimensions (L×H×W) 187.7×153.5×12.5 mm
Screen size....7
Resolution....800×600 Pixel
USB Port....USB-Host
Photo formats.....JPEG
Video formats.....MJPEG, Xvid, MPEG4-visual
Weight 0.356Kg
Aspect ratio....4:3
Internal memory..... Up to 1000 photos
Compatible Memory Cards.....SD/SDHC/MMC/MS/XD
Music formats....MP3
File format....*.avi,*.mpg,*.mp3.*.jpg
Power supply
Manufacturer....
Type Model No....
Input 100-240V\~50/60Hz
Output 5V/2A
All data are provided for reference purposes only.AgfaPhoto reserves the right to make any changes without prior notice.
Safety instructions and recommendations
- In order to prevent damage to the card or the unit, please turn off the power before removing or inserting the card.
- Use enclosed DC 5V/2A power adapter, the unit is for indoor use only.
- Always handle the unit with care. Avoid touching the LCD screen.
- Never place heavy or sharp objects on the LCD panel, frame, or power cord.
- Keep the screen clean (please use a dry soft cloth for cleaning). Make sure the power is off before cleaning the unit. Then
gently wipe with a dry soft cloth. - Do not place the unit near any other heat sources.
- Do not splash brill the drill with liquids.
- Do not place the unit to rain, water, moisture of high humidity. Temperature and humidity
Operating temperature: 0°C = +45°C Humidity: 20%-80% - This equipment complies with the voltage type specified on the unit.
The CE marking certifies that the product meets the main requirements of the European Parliament and Council
directive 1999/5/CE on telecommunications terminal equipment, regarding safety and health of users, and regarding
electronmagnetic interference.

The declaration of compliance can be consulted on the site www.agraphoto.com
Preservation of the environment as part of a sustainable development logic is an essential concern of AgfaPhoto.
The desire of AgfaPhoto is to operate systems observing the environment and consequently it has decided to
Integrate environmental performances
In the life cycle of this products, from manufacturing to commissioning use and elimination

Packaging:
The presence of the logo(green dot) means that a contribution is paid to an approved national organisation to improve package recovery and recycling infrastructures to facilitate, please respect the sorting rules set up locally for this kind of waste.

Product:
The crossed-out waste bin stuck on the product means that the product belongs to the family of electrical and electronic equipment. In this respect, the European regulations ask you to dispose of it selectively;
• At sales points in the event of the purchase of similar equipment.
• At the collection points made available to you locally(drop-off centre, selective collection, etc.).
In this way you can participate in the re-use and upgrading of Electrical and Electronic Equipment Waste, which can have an
effect on the environment and human health.
AgfaPhoto Holding GmbH AGFAPHOTO is used under license of Agfa-Gevaert NV & Co. KG. Agfa-Gevaert NV & Co. KG does not
manufacture these products or provide any product warranty or support. Contact www.agaphoto.com
For service, support and warranty information contact the distributor or manufacturer.


Marke : AGFAPHOTO
Modell : AF 5078MS
Kategorie : Digitaler Fotorahmen